WP-configはWordPressサイトで最も強力なファイルの1つで、WordPressが舞台裏でどのように動作するかにおいて重要な権限グループを担っています。
WPBeginnerでは、長年WordPressをいじってきて、初心者が知らないWordPressの便利な設定方法をいくつか発見しました。
メモリの問題、セキュリティの向上、開発者のワークフローのスピードアップなど、適切なwp-configの調整によって、サイトの運用方法を変えることができます。
この記事では、WordPressサイトのトラブルシューティング、最適化、セキュリティ確保に役立つ、最も便利なWordPress設定のトリックをいくつかご紹介します。
WordPressの設定トリックを使うには?
WordPressには、wp-config.phpと呼ばれる強力な設定ファイルが付属しています。このファイルはWordPressサイトのルート・フォルダーにあり、重要な設定が含まれています。
さらに詳しく知りたい方は、WordPressのwp-config.phpファイルの編集方法をご覧ください。
すべての最高のWordPressホスティングサービス会社は、インストール中にwp-config.phpファイルを編集する必要がないことを意味する1クリックWordPressインストールが付属しています。これは、多くのユーザーがこのファイルのパワーをよく知らない主な理由です。
wp-config ファイルを使用して、WordPress サイトのトラブルシューティング、最適化、安全性を確保することができます。
wp-config.phpファイルは強力なツールであり、コードの小さなミスでサイトにアクセスできなくなることがあります。このファイルを編集するのは必要なときだけにし、変更を加える前には必ずWordPressの完全なバックアップを作成してください、
ということで、あなたのWordPressウェブサイトで使える便利なWordPress設定のトリックを見てみましょう。以下のクイックリンクから、興味のあるトリックにジャンプできます:
- The Basic WordPress Configuration Settings
- Adding Security Keys in WordPress
- Change WordPress Table Prefix
- Turn on Debugging in WordPress
- Changing Your Site or WordPress Address
- Override File Permissions
- Changing Post Revision Settings
- Changing WordPress Trash Settings
- Adding FTP/SSH Constants to WordPress Configuration
- Allow Automatic Database Repair
- Increase PHP Memory Limit
- Moving wp-content Directory
- Use Custom User Tables
- Enable Multi-Site Network
- Securing Your WordPress Configuration File
1.WordPressの基本設定
初期設定では、WordPressインストール時にデータベース設定を入力するだけです。wp-config.phpファイルがない場合は、データベース情報を入力して作成するよう求められます。
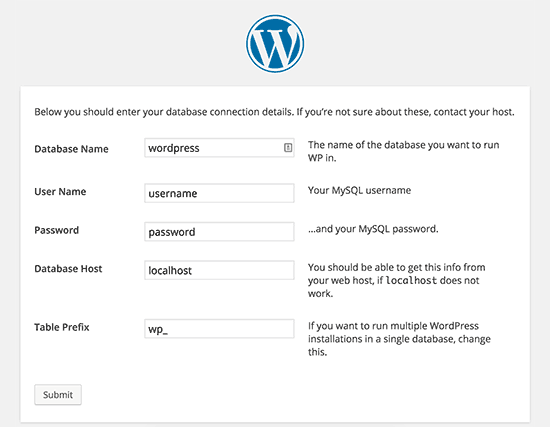
WordPressは、wp-config.phpファイルを生成して、これらの設定を自動的に保存しようとします。しかし、それが失敗した場合は、手動で追加する必要があります。
そのためには、FTPクライアントを使用してサイトに接続する必要があります。接続したら、wp-config-sample.phpファイルをwp-config.phpにリネームする必要があります。
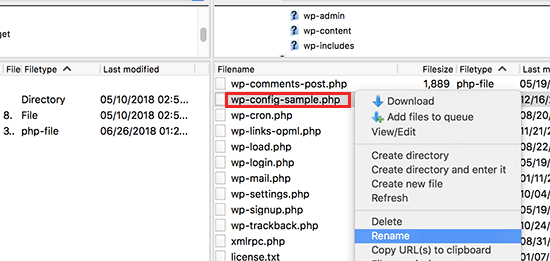
その後、新しく作成したwp-config.phpファイルを編集してください。以下の行を変更して、データベース情報を追加する必要があります:
1 2 3 4 | define('DB_NAME', 'database-name');define('DB_USER', 'database-username');define('DB_PASSWORD', 'database-password');define('DB_HOST', 'localhost'); |
変更を保存し、サーバーにファイルをアップロードすることを忘れないでください。
2.WordPressにセキュリティキーを追加する
初期設定のWordPressインストールでは、設定ファイルにセキュリティキーが自動的に追加されます。これらのセキュリティキーは、WordPressのログインとCookie認証に追加のセキュリティレイヤーを追加するために使用されます。
誰かが適切な認証なしにサイトにアクセスしているかもしれないと感じた場合は、いつでもセキュリティキーを再生成することができます。セキュリティキーを変更すると、ログイン中のユーザーはすべてログアウトします。
1 2 3 4 5 6 7 8 | define( 'AUTH_KEY', 'put your unique phrase here' );define( 'SECURE_AUTH_KEY', 'put your unique phrase here' );define( 'LOGGED_IN_KEY', 'put your unique phrase here' );define( 'NONCE_KEY', 'put your unique phrase here' );define( 'AUTH_SALT', 'put your unique phrase here' );define( 'SECURE_AUTH_SALT', 'put your unique phrase here' );define( 'LOGGED_IN_SALT', 'put your unique phrase here' );define( 'NONCE_SALT', 'put your unique phrase here' ); |
詳しくは、WordPressのセキュリティキーとその使い方に関する投稿をご覧ください。
3.WordPressのテーブル接頭辞を変更する
一般的な初期設定のWordPressインストールでは、WordPressデータベースのテーブル名にすべてwp_プレフィックスが追加されます。WordPressのセキュリティ専門家の中には、テーブル接頭辞を変更することでWordPressデータベースの安全性を高めることができると信じている人もいます。
そのためには、WordPressの設定で以下の行を変更する必要があります。
1 | $table_prefix = 'wp_'; |
既存のサイトでこれを行う場合は、WordPressデータベースのテーブル接頭辞も変更する必要があります。そのためには、WordPressデータベースの接頭辞を変更する方法の投稿をご覧ください。
4.WordPressのデバッグをオンにする
WordPressには、デバッグモード時にWordPressのエラーを表示したり非表示にしたりできる、便利なデバッグ機能があります。これをオンにするには、WordPressの設定ファイルにこのルールを追加する必要があります。
1 | define( 'WP_DEBUG', true ); |
また、デバッグをオンにして、サイト上のエラーを非表示にし、代わりにログファイルに保存することもできます。そのためには、コンフィギュレーション設定に以下の行を追加してください。
1 2 3 | define( 'WP_DEBUG', true );define( 'WP_DEBUG_LOG', true );define( 'WP_DEBUG_DISPLAY', false ); |
これにより、サイトのwp-contentフォルダー内にdebug.logファイルが作成され、すべてのデバッグエラーと通知がログファイルに保存されます。
5.サイトまたはWordPressアドレスの変更
通常、WordPressとサイトのURLは設定 ” 一般ページから設定できます。しかし、WordPressサイトにアクセスできない場合、リダイレクトエラーが表示される場合、サイトを移転したばかりの場合などには、設定できないことがあります。
その場合、wp-config.phpファイルに以下の行を追加することで、サイトとWordPressのURLを変更することができます:
1 2 | define('WP_HOME', 'http://www.example.com');define('WP_SITEURL', 'http://www.example.com'); |
example.comを自分のドメイン名に置き換えることをお忘れなく。
6.ファイル権限の上書き
WordPressでは、ホスティングサービスがすべてのユーザーファイルの権限を制限している場合、ファイルの権限を上書きすることができます。ほとんどのユーザーはこれを必要としませんが、必要なユーザーのために存在します。
1 2 | define('FS_CHMOD_FILE', 0644);define('FS_CHMOD_DIR', 0755); |
ファイル権限についてさらに詳しく知りたい方は、WordPressのファイルとフォルダーの権限エラーを修正する方法の投稿をご覧ください。
7.投稿リビジョン設定の変更
WordPressには非常に便利な投稿リビジョン機能があり、投稿やページの変更を過去のバージョンや自動保存に戻すことで元に戻すことができます。
設定ファイルを通して、投稿リビジョン設定を無効化または変更することができます。以下は、使用できるさまざまな投稿リビジョン設定です。
以下の行を追加することで、WordPressが自動保存をリビジョンとして保存する頻度を変更できます:
1 | define('AUTOSAVE_INTERVAL', 120); // in seconds |
あなたのサイトの記事の中には、執筆にかかった時間に応じて何十回もの投稿リビジョンがあるものもあるでしょう。もしその機能が煩わしいと思うのであれば、投稿ごとのリビジョン数を制限することができます。
1 | define('WP_POST_REVISIONS', 10); |
何らかの理由で投稿のリビジョン機能をすべて無効化したい場合(まったくお勧めしません)、以下のコードを使って投稿のリビジョンを無効化することができます。
1 | define( 'WP_POST_REVISIONS', false ); |
8.WordPress内のゴミ箱設定を変更する
WordPressにはゴミ箱内の機能があります。ユーザーがゴミ箱内の投稿を送信すると、次の30日間はゴミ箱としてサイトに保存されます。その後、WordPressは自動的に投稿を削除します。
ゴミ箱内の保管日数を変更することで、この動作を変更することができます。
1 | define( 'EMPTY_TRASH_DAYS', 15 ); // 15 days |
この機能がお気に召さない場合は、以下の機能を追加して無効化することができます:
1 | define('EMPTY_TRASH_DAYS', 0 ); |
注:ゼロを使用すると、投稿は永久に削除されます。WordPressは、永久削除をクリックする際に確認を求めません。誤ってクリックした場合、あなたの投稿が削除される可能性があります。
さらに詳しく知りたい方は、WordPress内の自動ゴミ箱機能を制限または無効化する方法の投稿をご覧ください。
9.WordPressの設定にFTP/SSH定数を追加する
WordPressの初期設定では、WordPressコア、テーマ、プラグインを管理ダッシュボードからアップグレードすることができます。アップグレードしたり、新しいプラグインをインストールしようとするたびにFTPまたはSSH接続を必須とするホスティングサービスもあります。
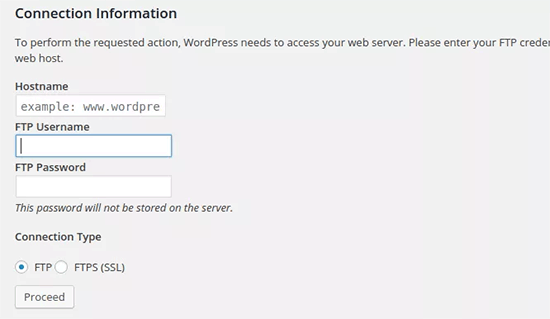
コードを使うことで、FTPやSSHの定数を設定することができ、もう心配する必要はない。
1 2 3 4 5 6 7 8 9 10 11 12 13 14 15 16 17 18 | // forces the filesystem method: "direct", "ssh", "ftpext", or "ftpsockets"define('FS_METHOD', 'ftpext');// absolute path to root installation directorydefine('FTP_BASE', '/path/to/wordpress/');// absolute path to "wp-content" directorydefine('FTP_CONTENT_DIR', '/path/to/wordpress/wp-content/');// absolute path to "wp-plugins" directorydefine('FTP_PLUGIN_DIR ', '/path/to/wordpress/wp-content/plugins/');// absolute path to your SSH public keydefine('FTP_PUBKEY', '/home/username/.ssh/id_rsa.pub');// absolute path to your SSH private keydefine('FTP_PRIVKEY', '/home/username/.ssh/id_rsa');// either your FTP or SSH usernamedefine('FTP_USER', 'username');// password for FTP_USER usernamedefine('FTP_PASS', 'password');// hostname:port combo for your SSH/FTP serverdefine('FTP_HOST', 'ftp.example.org:21'); |
注:WordPressのパスとftp.example.comを、あなた自身のFTPホスティング情報に置き換えることを忘れないでください。
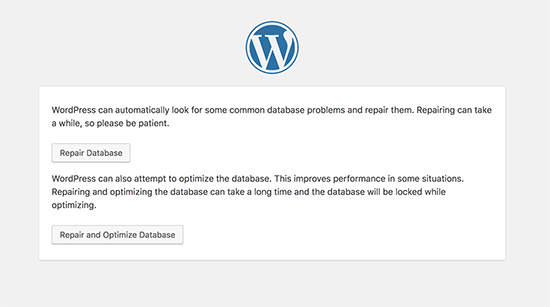
10.データベースの自動修復を許可する
WordPressには、WordPressデータベースを自動的に最適化して修復する機能がビルトインされています。しかし、この機能は初期設定ではオフになっています。
この機能を有効化するには、WordPressの設定ファイルに以下の行を追加する必要があります。
1 | define('WP_ALLOW_REPAIR', true); |
これを追加した後、WordPressデータベースの最適化と修復を行うには、以下のURLにアクセスする必要がある。
http://example.com/wp-admin/maint/repair.php
example.comを自分のドメイン名に置き換えることを忘れないでください。データベースを修復または修復して最適化するオプションのある簡単なページが表示されます。このページにアクセスするためにログインする必要はありません。
11.PHPのメモリ制限を増やす
WordPressでよくあるエラーの中には、PHPのメモリ不足が原因となっているものがあります。wp-config.phpファイルでPHPのメモリ制限を増やすことができます。以下のコードを貼り付けてください:
1 | define('WP_MEMORY_LIMIT', '128M'); |
12.wp-contentディレクトリの移動
WordPressでは、wp-contentディレクトリを移動することができます。WordPressのセキュリティ強化に役立つと考える専門家もいる。
以下のコードをwp-config.phpファイルに追加する必要があります:
1 2 3 4 | define( 'WP_CONTENT_DIR', $_SERVER['DOCUMENT_ROOT'] . '/blog/wp-content' );define( 'WP_CONTENT_URL', 'http://example/blog/wp-content');define( 'WP_PLUGIN_DIR', $_SERVER['DOCUMENT_ROOT'] . '/blog/wp-content/plugins' );define( 'WP_PLUGIN_URL', 'http://example/blog/wp-content/plugins'); |
example.comを自分のドメイン名に置き換えることをお忘れなく。
13.カスタマイザーテーブルの使用
初期設定では、WordPressはすべてのユーザーデータをwp_usersテーブルとwp_usermetaテーブルに保存します。以下の関数を使用することで、ユーザー情報を保存するテーブルを指定することができます。
1 2 | define('CUSTOM_USER_TABLE', $table_prefix.'my_users');define('CUSTOM_USER_META_TABLE', $table_prefix.'my_usermeta'); |
14.マルチサイト・ネットワークの有効化
各 WordPress サイトには、同じインストールーラを使用して複数の WordPress サイトを作成できるマルチサイト機能がビルトインされています。さらに詳しく知りたい方は、WordPressマルチサイトネットワークのインストールとセットアップ方法に関する完全ガイドをご覧ください。
WordPressの設定ファイルに以下の行を追加することで、マルチサイト機能を有効化することができます:
1 | define('WP_ALLOW_MULTISITE', true); |
15.WordPress設定ファイルの保護
ご覧のように、wp-config.phpファイルにはWordPressの本当に重要な設定が含まれています。初期設定ではWordPressのルートフォルダーにありますが、移動することもできます。ユーザーがアクセスできないように、public_htmlディレクトリの外に移動させることができます。WordPressは初期設定で、ファイルがWordPressのルートフォルダに見つからない場合、他のディレクトリを探すことを知っています。
また、.htaccessファイルに以下のコードを追加して、このファイルへのアクセスを制限することもできます。
1 2 3 4 5 | # Protect wp-config.php<Files wp-config.php> order allow,deny deny from all</Files> |
この記事が、あなたが知らなかったWordPressの便利な設定トリックを学ぶのに役立てば幸いです。また、あなたのサイトで使えるWordPressのヒント、トリック、ハックを57以上集めたメガリストや、WordPressのフリーランサー、デザイナー、開発者向けのトップツールのピックアップもご覧ください。
If you liked this article, then please subscribe to our YouTube Channel for WordPress video tutorials. You can also find us on Twitter and Facebook.


Jiří Vaněk
Thank you for the great article. I was particularly interested in point 2, as I constantly struggled to understand the function of these security keys. Thanks for the link in the article to additional content, where I was finally able to learn much more about this function and better understand the whole issue. Regarding point 4, is it good to keep the debug log enabled, or should it only be turned on in case of a problem?
WPBeginner Support
In most cases it is recommended to not have debug mode active unless you are looking for an error on your site.
Admin
tareq khury
hello and thanks for this important post .
my question is where i must add this codes , in the config.php file
but in which line exactly .
regards
WPBeginner Support
There is no specific line but it is normally best to add the code to the bottom so it is easy to find and remove should you want in the future.
Admin
Ali
Thanks alot. But i want to know something more detailed about point 9. Where to place this code and more?
WPBeginner Support
The code would go into your wp-config.php file
Admin
Gurjit Singh
Thanks for this useful post.
i was looking for this 10. Allow Automatic Database Repair.
Thank you very much.
Thanks and Regards,
Gurjit Singh
WPBeginner Support
Glad our article could help
Admin
Sunday
I rely on your tutorials for my website development. The problems here are that you did not state clearly where these codes will be pasted in the various environments. Looking forward to your response.
Sunny Sum
I want to increase my server timeout limit, where I can find that code???
Stu Rader
Wow really awesome. This helped so much.
I’m wresting with one thing setting up my own CDN (which the above took care of 98%:).
I’m trying to exclude a sub-folder on my CDN sub-domain as it’s throwing an access violation.
I’ve tried a half dozen NGINX CORS directives in a server block .conf with no joy.
I want to figure out how to use this file in the main domain rather than how it’s written below:
Access to Font at ‘https://cdn.mydomain.com/wp-content/themes/mytheme/includes/lib/assets/fonts/fontawesome/fontawesome-webfont.woff?v=4.7.0’ from origin ‘https://mydomain.com’ has been blocked by CORS policy: No ‘Access-Control-Allow-Origin’ header is present on the requested resource. Origin ‘https://mydomain.com’ is therefore not allowed access.
Thanks if you can point me to a fix or relevant info you may have !!
Stu
Hypez
They can verufy the information in the wp-config.php if the password or database names correspond and change them if not.
Gopal
My WordPress website adds weird numbers as suffix to every page URL. Why is it happening? I changed the permalinks settings to display post names; it didn’t help.
Could you please guide me?
Here are a few page urls of my site:
WPBeginner Support
Try these WordPress troubleshooting tips step by step and see if it resolves your issue.
Admin
Alex
I have this ‘issue’ – for me its down to backup buddy needing to be run in alternative WP cron mode. The backup buddy FAQ told me to add this:
define(‘ALTERNATE_WP_CRON’, true);
to my wp_config.php file which now adds random numbers etc to URLs.
Its this for me as removing it stops it but also stops backup buddy from working correctly.
David Pascal
I have always enjoyed reading contents on this site. Thanks for sharing this awesome tricks.
ugwu victor
I use useronline plugin…When am in the useronline dashboard I notice that some users want to access my default css, upload images link with their browser! So am scared may be they want to hack my site! Please any help on how to stop them
Exnius
Hey, amazint tricks, thanks a lot. Very useful!
Garratt Campton
WordPress Error Log –
How should I do this in a local environment?
I’m currently using DesktopServer (Xampp lite – Installs sites with .dev extension locally eg. “mysite.dev”) with SourceTree (Git) – However trying to figure out what the path I should be using to my error log file is proving difficult. Could I use a full URL path such as “http://mysite.dev/php_error.log” ? or does it need to be the system file path “C:/Users/Garratt/Documents/mysite.dev/php_error.log” ?
WPBeginner Staff
Yes.
German learning Munich
Hi thanks for the great summary!
I have a question: is any change in the wp-config immediately effective?
Angsuman Chakraborty
Yes, it is immediately effective
Nathan Pinno
Got a question: How do I transfer ownership of a site from one user to another? Like I set it up with my admin account, but I want to have another user be the main admin and do updates and posts. I doubt I can just set them as an admin and myself as a subscriber and be done with it, so what’s the correct route of doing so?
WPBeginner Staff
Yes that’s one way to do it. A WordPress site can also have multiple administrators.
If you also want to transfer them the ownership of domain, web hosting, and database then you will have to create a user account for them in your web hosting control panel. After that you can give them the complete control on domain, hosting, and database as well.
Nathan Pinno
They already have all that, I’m just helping them redevelop their website (cause it’s not a good look right now nor is it easy to update ATM). Found this awesome church theme for them (cause it’s my church’s website I’m working on), and wanted to see how difficult it would be to switch admins. Last time a site of mine had multiple admins, just the first admin (ID #1) could update the plugins, themes, and WP in general.
Anon
Im not too sure but usually u have to do it in your Terminal like : sudo adduser sudo.
john
After I got rid of the database error, now I dont have any errors but now I have just blank page with no source code ? Please help what to do now. Thnaks
Toufiq Hassan Shawon
Thanks, It helps me lot, why dont you add
define(‘WP_CACHE’, true);
roger
useful!
so, what about the Securing Your WP-Config File ? thank you
Oscar
Just a heads up, that the indicated GoDaddy Hostname doesn’t work (maybe at least not for everyone) and the $_ENV option didn’t either.
I found instructions on where to find my specific Hostname here:
http://support.godaddy.com/help/article/39/viewing-your-databases-details?locale=en
Maganizo
I can’t thank you more! You’ve touched on the heart of any online work in a very clear way! You’re great teachers indeed! It can’t be any better than this! Write more!
brad
Hey Guys
Great site, great info just found it. with the secure
Securing Your WP-Config File
where is the code that we need? please
Brad
Bon
is there any configuration in wordpress 3.5 so that the uploaded files will use the defined WP_HOME or WP_SITEURL? thanks
Heather Wood
Awesome. There is so much stuff about wordpress I didn’t even know. Like the repair database define code. this is one great article. I will have to bookmark this for sure.
yadicemil
Thanks for this useful tips.I!m a beginner and I have a wordpress.org web site.
I have followed your instructions and changed the wp-config file by copying the secure keys grabbed from the web site: https://api.wordpress.org/secret-key/1.1/salt/
After putting the new config file into the WP-Admin Folder in the server it gives an error “Parse error: syntax error, unexpected T_VARIABLE….”
That line is: “$table_prefix = ‘wp_’;” and it has never been changed.
How can I correct this error? Thanks.
wpbeginner
@yadicemil You are not supposed to put this in the wp admin folder.
Mark Hedley
Like it
marco
you rock man, thanks for the info
Tony Cosentino
Great information about such an important are as configuration. With all the pharma hacks going on recently the last tip is my favourite. Protecting that damn wp-config file seems to be the key to palace these days.
Thank you for the effort putting all of this information in one place for us all to benefit.
kind regards
Tony
Aidan
Cool, this is informative and always a good flashback if I forgot any of them.
Thanks for sharing!
Aminul Islam Sajib
What exactly does adding those # protect wpconfig.php… to .htaccess file do?
Do I have to do anything else after moving .htacess from public_html to root folder?
Editorial Staff
You will never move the .htaccess file anywhere. That file remains in your public_html folder or the folder where WordPress is installed… The code in that file will disallow all access to wp-config.php file from the web.
You can move the wp-config.php file to the root directory (one above public_html) to add an extra layer of security. One or the other would be fine… doing both is an overkill.
Admin
Andrew Nacin
For reference, 3.0 does not include more security keys, nor were 2.9 installs any less secure when it came to authentication.
The first four are keys. The last four are salts. The salts were missing from wp-config.php before 3.0, but we actually added salts a few versions ago. We added them to wp-config.php in 3.0 so we could easily populate them on install, but they are not necessary.
If salts are not defined (or remain the default, e.g. “Enter unique phrase here”), then WP simply generates random strings to use as salts and stores those in the database.
Also, for an error log, you should instead use these constants:
define( 'WP_DEBUG', true ); // Enables error reporting.

define( 'WP_DEBUG_DISPLAY', false ); // Hides the errors.

define( 'WP_DEBUG_LOG', true ); // Logs errors to wp-content/error.log (or use @ini_set('error_log') )
This has the added benefit of exposing PHP notices, which provide developers warnings about code that could be better or may have errors in it.
Editorial Staff
Thank You Andrew. Didn’t know about the SALT keys. Just saw it in 3.0 and thought it was a new addition.
Admin
Adam W. Warner
Very nice write up, and easy read for beginners. I’ll be sending people here to learn;)
Ozh
$_ENV{DATABASE_SERVER} ??
Syntax doesn’t look correct to me ($_ENV[‘stuff’] maybe but {stuff} I don’t think so) and I’ve just checked, couldn’t find any host I have access to that has this defined. Definitely not something common.
Other than this, nice roundup. Note that WP doesn’t look “in other directories” to find wp-config.php, it just goes one directory up (which is in most case out of the server document root).
gopalb
Thanks…. it’s really good tutorial…Can you write the detail step by step tutorial of “Securing Your WP-Config File” for us…
Editorial Staff
The last two steps are pretty easy to follow, but sure will add that one to the list
Admin
Carlos
Great article as always. I especially like the .htaccess file tip.
DaveK
Wow plenty there to get my teeth into, thanks WPB
Angie Bowen
Thanks so much for all of this great info. This is the side of WordPress I need to learn more about so I’m going to use this post as a springboard to really dive in.