新規WordPressテーマデザイナーになると、長いCSSファイルを整理し、拡張性と可読性を維持しながら管理することの難しさをすぐに知ることになります。
WPBeginnerを含む多くの開発者やフロントエンド開発者は、SassやLESSのようなCSSプリプロセッサ言語を使用することを推奨しています。しかし、これらのプリプロセッサとは何でしょうか?また、どのように使い始めるのでしょうか?
この投稿は、新規WordPressテーマ・デザイナーのためのSass入門です。CSSプリプロセッサとは何か、なぜ必要なのか、そしてどのようにインストールしてすぐに使い始めることができるのかをお伝えします。

Sass(Syntactically Awesome Stylesheet)とは?
私たちが使っているCSSは、使いやすいスタイルシート言語として設計されました。しかし、ウェブは進化しているため、デザイナーはより少ない労力と時間でより多くのことができるスタイルシート言語を持つ必要がある。
SassのようなCSSプリプロセッサ言語では、変数、基本的な数学演算子、入れ子、ミキシンなど、現在のCSSでは使用する権限がありません。
サーバー上でスクリプトを実行し、HTML出力を生成するプリプロセッサ言語であるPHPによく似ています。同様に、Sassは.scssファイルをプリプロセスし、ブラウザーで使用できるCSSファイルを生成します。
バージョン3.8以降、WordPressの管理エリアのスタイルがSassを利用して開発できるように移植されました。すでに多くのWordPressテーマ・ショップや開発者が、開発のスピードアップのためにSassを活用しています。
WordPressテーマ開発のためのSass入門
ほとんどのテーマ開発者は、ステージング環境やライブサーバーにデプロイする前に、ローカルの開発環境でテーマを作成します。Sassはプリプロセッサ言語なので、ローカルの開発環境にインストールする必要があります。
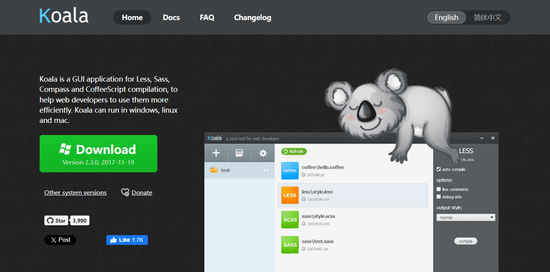
まず最初にSassをインストールする必要があります。Sassはコマンドラインツールとしても使えるが、GUIアプリもいくつか用意されている。Mac、Windows、Linuxで利用可能な無料のオープンソース・アプリであるKoalaを使うことをお勧めします。

この投稿では、空白のテーマを作成する必要があります。wp-content/themes/に新しいフォルダーを作成します。名前は「mytheme」でも何でも構いません。空白のテーマフォルダーの中に別のフォルダーを作成し、stylesheetsと名付けます。
stylesheetsフォルダーに、メモ帳のようなテキストエディターを使って style.scssファイルを作成する必要があります。
Koalaを開き、プラスアイコンをクリックして新規プロジェクトを追加してください。次に、テーマ・ディレクトリを探し、プロジェクトとして追加します。Koalaが自動的にスタイルシート・ディレクトリにあるSassファイルを見つけ、表示することに気づくでしょう。

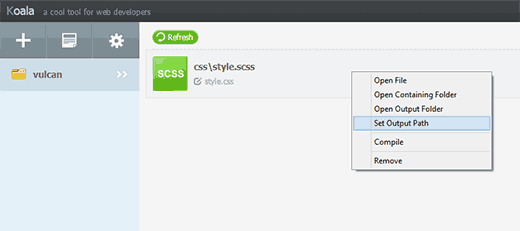
Sassファイルを右クリックし、出力パスの設定オプションを選択します。テーマディレクトリのルート、例えば/wp-content/themes/mytheme/を選択し、エンターキーを押します。KoalaはテーマディレクトリにCSS出力ファイルを生成します。
これをテストするには、Sassファイルのstyle.scssをメモ帳などのテキストエディターで開き、次のコードを追加する必要があります:
1 2 3 4 | $fonts: arial, verdana, sans-serif; body { font-family:$fonts;} |
変更を保存し、Koalaに戻る必要があります。Sassファイルを右クリックすると、サイドバーが右側にスライドします。Sassファイルをコンパイルするには、「コンパイル」ボタンをクリックします。
テーマディレクトリのstyle.cssファイルを開くと、このように処理されたCSSが表示される:
1 2 | body { font-family: arial, verdana, sans-serif; } |
Sassファイルで変数$fontsを定義したことに注目してください。これで、フォント・ファミリーを追加する必要があるときはいつでも、すべてのフォントの名前をもう一度入力する必要がなくなりました。単に$fontsを使えばいいのです。
SassがCSSにもたらす他のスーパーパワーとは?
Sassは信じられないほど強力で、後方互換性があり、学ぶのがとても簡単です。変数、ネスト、ミックスイン、インポート、パーシャル、数学演算子、論理演算子などを作成できることは前述しました。
これからいくつかの例を紹介するので、あなたのWordPressテーマで試してみてほしい。
複数のスタイルシートを管理する
WordPressテーマデザイナーとして直面する一般的な問題の一つは、多くのセクションを持つ大きなスタイルシートです。テーマに取り組んでいる間、修正するために何度も上下にスクロールすることになるでしょう。
Sassを使えば、複数のファイルをメインのスタイルシートにインポートし、テーマ用の個別CSSファイルを出力することができます。
CSSの@importは?
CSSファイルに@importを使用することの問題は、@importを追加するたびに、CSSファイルがサーバーに別のHTTPリクエストを行うことです。これはページのロード時間に影響し、プロジェクトにとって良いことではありません。
一方、Sassで@importを使用すると、Sassファイル内のファイルをインクルードし、ブラウザーに個別CSSファイルとしてすべて提供します。
Sassの@importの使い方を学ぶには、まずテーマのスタイルシート・ディレクトリにreset.scssファイルを作成し、このコードを貼り付ける必要があります。
1 2 3 4 5 6 7 8 9 10 11 12 13 14 15 16 17 18 19 20 21 22 23 24 25 26 27 28 29 30 31 32 33 34 35 36 37 38 39 40 41 42 43 44 45 46 47 48 | /* http://meyerweb.com/eric/tools/css/reset/ v2.0 | 20110126 License: none (public domain)*/ html, body, div, span, applet, object, iframe,h1, h2, h3, h4, h5, h6, p, blockquote, pre,a, abbr, acronym, address, big, cite, code,del, dfn, em, img, ins, kbd, q, s, samp,small, strike, strong, sub, sup, tt, var,b, u, i, center,dl, dt, dd, ol, ul, li,fieldset, form, label, legend,table, caption, tbody, tfoot, thead, tr, th, td,article, aside, canvas, details, embed, figure, figcaption, footer, header, hgroup, menu, nav, output, ruby, section, summary,time, mark, audio, video { margin: 0; padding: 0; border: 0; font-size: 100%; font: inherit; vertical-align: baseline;}/* HTML5 display-role reset for older browsers */article, aside, details, figcaption, figure, footer, header, hgroup, menu, nav, section { display: block;}body { line-height: 1;}ol, ul { list-style: none;}blockquote, q { quotes: none;}blockquote:before, blockquote:after,q:before, q:after { content: ''; content: none;}table { border-collapse: collapse; border-spacing: 0;} |
次に、メインのstyle.scssファイルを開き、リセット・ファイルをインポートしたい場所に次の行を追加する必要があります:
1 | @import 'reset'; |
完全なファイル名を入力する必要はないことに注意してください。これをコンパイルするには、Koalaを開いてコンパイルボタンをもう一度クリックする必要があります。テーマのメインのstyle.cssファイルを開くと、リセットCSSが含まれているのが見えるでしょう。
Sassのネスティン
HTMLとは異なり、CSSはネストされた言語ではありません。Sassでは、ネストされたファイルを簡単に作成することができます。例えば、<article>セクションのすべての要素をarticleセレクタの下に入れ子にすることができます。
WordPressテーマデザイナーとして、これにより、さまざまなセクションで作業し、各要素を簡単にスタイル設定することができます。nestinの動作を見るには、これをstyle.scssファイルに追加してください:
1 2 3 4 5 6 7 8 9 10 11 12 13 | .entry-content { p { font-size:12px;line-height:150%; } ul { line-height:150%; }a:link, a:visited, a:active { text-decoration:none;color: #ff6633;} } |
処理後、以下のCSSが出力される:
1 2 3 4 5 6 7 8 | .entry-content p { font-size: 12px; line-height: 150%; }.entry-content ul { line-height: 150%; }.entry-content a:link, .entry-content a:visited, .entry-content a:active { text-decoration: none; color: #ff6633; } |
テーマ・デザイナーとして、ウィジェット、投稿、ナビゲーション・メニュー、ヘッダーなどの異なるルック・アンド・フィールをデザインすることになります。Sassでnestinを使うことで、うまく構造化され、同じクラス、セレクタ、識別子を何度も書く必要がなくなります。
Sassでミキシンを使う
異なるセレクタやクラスで使用するため、スタイル・ルールは同じであっても、プロジェクト全体でCSSを再利用する必要がある場合があります。そこで便利なのがmixinだ。style.scssファイルにmixinを追加してみましょう:
1 2 3 4 5 | @mixin hide-text{ overflow:hidden; text-indent:-9000px; display:block;} |
このミキシンは基本的にテキストを非表示にします。このミキシンを使ってロゴのテキストを非表示にする例を示します:
1 2 3 4 5 6 | .logo{ background: url("logo.png"); height:100px; width:200px; @include hide-text;} |
mixinを追加するには@includeを使う必要があることに注意。処理後、以下のようなCSSが生成される:
1 2 3 4 5 6 7 | .logo { background: url("logo.png"); height: 100px; width: 200px; overflow: hidden; text-indent: -9000px; display: block; } |
ミキシンはベンダープレフィックスにも非常に役立ちます。不透明度の値や枠線の半径を追加するとき、ミキシンを使うと時間を大幅に節約できます。この例を見てください。枠線の半径を追加するために mixin を追加しています。
1 2 3 4 5 6 7 8 9 10 | @mixin border-radius($radius) { -webkit-border-radius: $radius; -moz-border-radius: $radius; -ms-border-radius: $radius; -o-border-radius: $radius; border-radius: $radius;} .largebutton { @include border-radius(10px); }.smallbutton { @include border-radius(5px); } |
コンパイル後、以下のCSSが生成される:
1 2 3 4 5 6 7 8 9 10 11 12 13 | .largebutton { -webkit-border-radius: 10px; -moz-border-radius: 10px; -ms-border-radius: 10px; -o-border-radius: 10px; border-radius: 10px; } .smallbutton { -webkit-border-radius: 5px; -moz-border-radius: 5px; -ms-border-radius: 5px; -o-border-radius: 5px; border-radius: 5px; } |
その他のリソース
この投稿がWordPressテーマ開発のためのSassについて知っていただく一助となれば幸いです。すでに多くのWordPressテーマデザイナーがSassを使っています。将来的には、すべてのCSSはプリプロセスされるようになり、WordPressテーマ開発者はゲームをアップグレードする必要があると言う人もいます。また、テーマデザイナーのためのWordPressのボディクラスのヒントや、ドラッグ&ドロップでWordPressページビルダーを作成できる専門家のおすすめもご覧ください。
If you liked this article, then please subscribe to our YouTube Channel for WordPress video tutorials. You can also find us on Twitter and Facebook.


Dapo O
Thanks for this.
I’m building a custom Block theme and wondering if I can use SASS same way I do with Classic themes.
WPBeginner Support
There are some differences in how CSS is added with a Block theme compared to Classic themes.
Admin
Mark
Great tutorial. How do you go about creating a WordPress child theme using SASS and Koala? That would be a very useful tutorial…
WPBeginner Support
While we don’t have a guide for that at the moment, we will certainly take a look at it for a possible article.
Admin
Paulo Jesus
Hi, I am working on a WordPress theme using bootstrap and sass. I have a sass folder set up using the smacss aproach and on the root of my sass folder I have a style.sccs file that imports all the scss files for all the sections on my theme(_footer.scss, _header.scss, etc) then it outputs to my style.css file on the root of my theme. The issue I am having is that I am extending some bootstrap classes in some of those .scss files and if I include a _bootstrap.scss on my sass folder and import it on my style.scss file everything works fine, however the whole bootstrap is then also compiled to my style.css and it becomes quite messy. Ideally I would want the bootstrap css separated from my them styles not as part of my style.css, however if I dont import it on my style.scss and instead enqueue it on my functions.php I get an error saying that the bootstrap classes extended cannot be found and the theme breaks.. Any thoughts on how to go around this issue would be appreciated.
Thank you very much
Cinnamon Bernard
Hi,
I know this is sort of an old post, but still quite new, I had a question about incorporating Twitter Bootstrap Sass, Font-Awesome Sass, with Underscores WordPress starter theme template.
I’ve tried to incorporate and placed all Sass files in their own directory, and have a separate output path for Css files, while keeping WordPress style.css in the root with an @import to the style.css within the Css folder.
After setting all of this up, the styles for bootstrap has not been working properly, I’m not certain if it is due to having a reset file. I was sure to place the bootstrap and font-awesome @imports at the top, followed by the others.
If possible, based on what I’ve provided, can you give advice on how to set up my workflow.
Thanks!
Rehan
Awesome tutorial
Thanks
Ricardo Gutierrez
Hello.
Is the “reset” better than normalize ?
Thnks !
WPBeginner Support
Reset would unset browser styles, while normalize uses a consistent style across browser. We think each developer would have their own preference. We would prefer to work with reset.
Admin
Josh McClanahan
Great article!
I was wondering if there is any kind of setup, like in php you have to add PEAR for various extensions, for using SASS especially when going live.
In other words is there anything that is needed to be included after compiling and going live?
Thanks for your help and this article.
WPBeginner Support
No Josh, after compiling it generates the regular CSS output.
Admin