
WPBeginnerの記事を下までスクロールしたことがある方なら、「今WPBeginnerで人気!」ウィジェットにお気づきでしょう。この機能は読者に好評で、私たちの最も価値のあるコンテンツを発見し、私たちのサイトをもっと探検するよう促しています。
WordPressブログの人気記事をハイライトすることで、読者が最高のコンテンツを見つけやすくなるだけでなく、サイトのエンゲージメント指標も高めることができます。訪問者は優れたコンテンツを得ることができ、サイトへの滞在時間も長くなるのです。
この記事では、WordPressで閲覧数に応じて人気の投稿を簡単に表示する方法を紹介します。

なぜWordPressで表示回数別に人気投稿を表示するのか?
ユーザーがWordPressブログの人気投稿を見れば、仲間の読者がどんなコンテンツを一番気に入っているかを知ることができます。そうすれば、それらの投稿をチェックし、会話に参加することができる。
さらに、WordPressで最も人気のあるコンテンツを表示することで、あなたの社会的証明を高めることができます。新規ユーザーに対して、”他のユーザーもこの投稿がとても役に立っているから、あなたもそうなるかもしれませんよ!”と伝えているようなものです。

最後に、トレンドのブログ投稿を表示することで、人々があなたのサイトに長く滞在し、ページビューを増やし、直帰率を減らすことができます。
ユーザー・エンゲージメントが高まれば高まるほど、Googleはあなたのコンテンツを良質で重要なものだと考えるようになります。その結果、WordPressのSEOが向上し、サイトが上位に表示されるようになります。
残念ながら、WordPressにはページビュー別に人気投稿を表示するビルトイン機能やブロックがありません。このガイドでは、プラグインとコードを使ってそれを実現する方法を紹介します。
以下のリンクをクリックすると、ご希望の方法にジャンプします:
方法1:MonsterInsightsでWordPressの人気投稿を閲覧数で表示する(推奨)
WordPressで人気投稿を表示する最も簡単な方法は、プラグインを使うことです。WordPressの人気投稿プラグインは実はたくさんありますが、私たちの意見では、MonsterInsightsがベストチョイスです。

世界中の300万以上のサイトで使用されているMonsterInsightsは、WordPressのための最高のGoogleアナリティクスプラグインです。主な機能はアナリティクスですが、人気の投稿を表示するユーザーフレンドリーな機能もあります。
まず最初に、MonsterInsightsプラグインをインストールし、Googleアナリティクスアカウントに接続する必要があります。詳しくは、初心者のためのWordPressにGoogleアナリティクスをインストールする方法のステップバイステップガイドをご覧ください。
注: MonsterInsightsには無料版もありますが、今回は人気投稿機能を含むPro版を使用します。
人気投稿ウィジェットの テーマを選ぶ
プラグインを有効化し、設定したら、WordPressダッシュボードからInsights ” Popular Postsに行く。そして、「Popular Posts Widget」メニュー項目をクリックします。

下にスクロールすると、人気投稿ウィジェットを表示するテーマを選択する必要があります。様々なオプション設定があります。
投稿にアイキャッチ画像を含むものもあれば、もっとミニマルなものもある。

テーマを選択する前に、そのテーマがどのようなものか確認したい場合は、ページ下の「テーマ・プレビュー」セクションに移動してください。
ワイドまたはナローのフォーマットでテーマをプレビューすることもできます。ワイドフォーマットでは、投稿がページや投稿コンテンツの下に表示され、ナローフォーマットでは、投稿がサイドバーのように右側に表示されます。

次に、「デザインのカスタマイザー」セクションまでスクロールダウンしてみましょう。ここでは、テーマの色、フォントサイズ、レイアウト、表示する投稿数を変更することができます。
カスタマイズのオプションは、使用するテーマによって異なります。本当に〜してもよいですか?

人気投稿ウィジェットの動作を設定する
テーマのデザインを設定したら、ビヘイビアセクションに移動しなければならない。ここで、人気投稿ウィジェットがWordPressサイトにどのように表示されるかをコントロールする。
ウィジェットスタイリング設定では、上記で作成したデザインを使用するか、ウィジェットのスタイルをすべて変更しないかを選択できます。2番目のオプションでは、ウィジェットはWordPressサイトのテーマのCSSに従います。
次に、ウィジェットが人気投稿を選択する方法を選択できます。このチュートリアルでは’Curated’を選択しますが、コメント数に基づいて最も人気のある投稿を表示することもできます。

次の作業は、「Googleアナリティクスから上位5投稿を追加」オプションを有効化することです。しかし、その前にMonsterInsights Dimensions Add-Onと新規カスタムディメンションとして投稿タイプを追加する必要があります。
これにより、MonsterInsightsはGoogleアナリティクスのデータに基づいて最も人気のある投稿を選択することができます。
そのためには、MonsterInsights Dimensionsアドオンをダウンロードし、WordPressにプラグインとしてインストールする必要があります。ステップバイステップの手順については、WordPressプラグインのインストール方法をご覧ください。
次に、Insights “ Settingsに 行き、’Conversions’タブに切り替える。その後、「Add New Custom Dimension」をクリックする。

そうしたら、ドロップダウンメニューから「投稿タイプ」を選択します。
これにより、MonsterInsightsがブログ投稿やその他のカスタム投稿タイプのパフォーマンスを追跡することが有効化されます。

インサイト ” 人気投稿“に戻り、”人気投稿ウィジェット “にアクセスする。
Google アナリティクスから上位5投稿を追加する」トグルボタンを有効化するだけです。その後、’Test Automated Posts’をクリックし、設定が成功したかどうかを確認します。

Yesの場合、成功メッセージがポップアップ表示されます。
人気投稿データが正しく取得されています。ご注意:カスタムディメンションの設定時期によっては、Google アナリティクスから関連する Popular Posts のデータが読み込まれるまで最大 7 日かかる場合があります。

次のステップに進み、ウィジェットの上に表示されるタイトルを追加します。Check Out Our Most Popular Posts’などのようなものでもかまいません。
その下に、ウィジェットをすべての投稿タイプに表示するか、特定の投稿から除外するか、特定の投稿カテゴリーだけに表示するかを選択できます。
これらの設定は、ブログ投稿以外のカスタム投稿タイプを作成していて、人気投稿ウィジェットが無関係に見えると感じる場合に便利です。

最後のステップは、人気投稿ウィジェットを埋め込むことです。自動的に設置する、Gutenbergブロックを使う、サイドバーウィジェットとして追加する、ショートコードを使うなど、いくつかのオプションがあります。
オプションを一つずつ見ていこう。

人気投稿ウィジェットを自動的に埋め込む
過去のBehavior設定に一致する投稿日: すべてにウィジェットを表示したい場合は、Automatic Placementをお勧めします。
そのためには、「自動配置」ボタンを有効化するだけでよい。

このオプションの欠点は、投稿日やページに最適なウィジェットのデザインを調整できないことです。このタイプの機能が必要なら、次の方法を試してください。
人気投稿ブロックをページや投稿に埋め込む
ウィジェットがページや投稿日にどのように見えるかをもっとコントロールしたい場合、この方法が適しています。
まず、ウィジェットを設置したい投稿またはページのブロックエディターに行きます。その後、エディター内の任意の場所で「+」ブロック追加ボタンをクリックし、「Popular Posts」ブロックを探します。

ブロック設定パネルには、ウィジェットのテーマ、フォントサイズ、色、タイトル、レイアウト、投稿数を変更するオプションがあります。
これらの設定は、MonsterInsightsプラグインで見たものと似ている。

唯一の違いは、ウィジェットで選択される投稿を変更できないことです。
とはいえ、「動作設定」では、特定のカテゴリーからの投稿だけを表示することも可能です。こうすることで、人気投稿の選択肢をよりニーズに合わせたものにすることができます。

ブロックの設定に満足したら、投稿エディターとページエディターで「更新」ボタンをクリックするだけです。
テストサイトでの「人気投稿」ブロックはこんな感じです:

人気投稿ウィジェットをサイドバーに埋め込む
ウィジェット対応のサイドバーエリアがある非ブロックWordPressテーマを使用している場合、そこにPopular Postsウィジェットを追加することができる。これは、WordPressサイドバーにおすすめ投稿を追加する方法のカテゴリー:で行ったことである。
すべて外観 ” ウィジェットにアクセスするだけです。そして、サイドバーエリアの「+」ウィジェット追加ボタンをクリックし、「人気投稿 – MonsterInsights」ウィジェットを探してください。

前の方法と同様に、ウィジェットにはテーマの外観をカスタマイズするための同様の設定が含まれています。
何が違うかというと、インターフェースが若干トリッキーになっていることだ。設定を変更しても、ウィジェットが実際にどのように見えるかを見ることはできません。プレビューするには、別のウィジェットまたは別のエリアをクリックする必要があります。
ウィジェットの外観に問題がなければ、右上の「更新」をクリックしてください。

サイドバーが正しく見えるかどうか、あなたのサイトで確認してください。
私たちのはこんな感じだ:

Popular Postsウィジェットを特定のページにのみ表示させたい場合は、WordPressの特定のページでウィジェットを表示または非表示にする方法のガイドをご覧ください。
ショートコードで人気投稿ウィジェットを埋め込む
最後のオプションは、ショートコードを使用することです。この方法は、上記のオプションがあなたの特定のユースケースで機能しない場合に推奨されます。
Popular Posts Widgetタブで、「Embed Options」セクションまですべてスクロールダウンします。次に、「ショートコードを使用して表示」を選択し、「ショートコードをコピー」ボタンをクリックします。

その後、好きな場所にショートコードを配置するだけです。詳しくは、WordPressでショートコードを追加する方法をご覧ください。
方法2:WordPressの人気投稿をコードで表示する(より高度な方法)
MonsterInsightsの方法は、WordPressで最も人気のあるベストコンテンツを表示する最も簡単な方法です。しかし、もしあなたがコーディングに慣れているのであれば、WordPressで最も人気のある投稿を表示するためにコードを使用することもできます。
この方法では、WPCodeのようなコード・スニペット・プラグインを使用することをお勧めします。

WPCodeを使えば、WordPressファイルに直接触れることなくカスタムコードを安全に挿入することができます。さらに、この方法では複数のコードスニペットを使用する必要があるため、プラグインを使用すると、それらのすべての管理とトラッキングがはるかに容易になります。
まず、WordPressにWPCodeをインストールする必要がある。WPCodeには無料版もありますが、ここではPro版を使用します。正しい位置にコードを挿入するために必要な機能が備わっているからです。
ステップバイステップのインストールガイドについては、WordPressプラグインのインストール方法の投稿をお読みください。
WordPress投稿表示カウンター機能の追加
プラグインを有効化したら、ダッシュボードからCode Snippets ” + Add Snippetに 行く必要があります。次に、「カスタムコードの追加(新規スニペット)」にマウスオーバーし、「+ カスタムスニペットの追加」をクリックします。
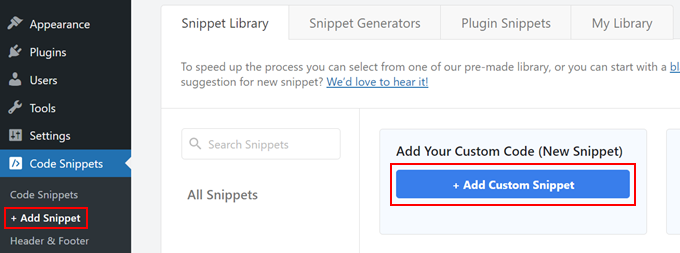
これで、WPCodeコード・スニペット・エディターに入りました。コードを挿入する前に、スニペットのタイトルを追加してください。
この最初のコードには、「WordPress Post Views Counter Function」のような名前を付けることができます。なぜなら、この最初のコードの目的は、WordPressの投稿表示数をカウントする関数を作成することだからです。
次に、コードタイプを「PHPスニペット」に変更する。この投稿から追加しなければならないコード・スニペットはすべてPHPであることに注意してください。

その後、以下のコードをコピー&ペーストしてください:
1 2 3 4 5 6 7 8 9 10 11 12 13 14 | function wpb_set_post_views($postID) { $count_key = 'wpb_post_views_count'; $count = get_post_meta($postID, $count_key, true); if($count==''){ $count = 0; delete_post_meta($postID, $count_key); add_post_meta($postID, $count_key, '0'); }else{ $count++; update_post_meta($postID, $count_key, $count); }}//Get rid of prefetching to keep the count accurateremove_action( 'wp_head', 'adjacent_posts_rel_link_wp_head', 10, 0); |
あとは「インサーター」セクションまでスクロールダウンし、挿入方法に「Auto Insert」、場所に「Run Everywhere」を選択するだけです。これはテーマのfunctions.phpファイルにコードを挿入するのと同じです。
その後、ページの右上に移動し、コードを有効化する。
そして、「スニペットを保存」をクリックする。

この段階で、別の新しいカスタムコードスニペットを追加する必要があります。これは「Track Post Views Function Call」と名付けることができます。
このコードは上記の関数を呼び出し、個別投稿ページで有効化します。
1 | wpb_set_post_views(get_the_ID()); |
このコード・スニペットで異なるのは、個別投稿ページで実行することを想定しているため、「Insert After Post」の場所を選択することです。

完了したら、コードを有効化して保存する。
WordPress投稿表示トラッキングフックの挿入
ここで、現在のページが個別投稿かどうかをチェックする新しいコード・スニペットを追加する必要があります。もしそうなら、投稿の表示回数を追跡して更新するためにWordPressの投稿表示カウンター関数を呼び出します。
こうすることで、ユーザーが投稿にアクセスするたびに表示回数が更新される。
このスニペットを「WordPress Post Views Tracking Hook」と名付けよう。そして、以下のコード行を挿入する:
1 2 3 4 5 6 7 8 9 | function wpb_track_post_views ($post_id) { if ( !is_single() ) return; if ( empty ( $post_id) ) { global $post; $post_id = $post->ID; } wpb_set_post_views($post_id);}add_action( 'wp_head', 'wpb_track_post_views'); |
インサート方法は「自動インサート」、場所は「フロントエンドのみ」を選択できる。
前のステップと同じように、コードを有効化してスニペットを保存するだけです。

注: キャッシュプラグインを使用している場合、このテクニックは初期設定では動作しない可能性があります。W3 Total Cacheのようなキャッシュ・プラグインが提供するフラグメント・キャッシング機能を使えばうまくいくかもしれません。
投稿の表示回数を取得し、最も人気のある投稿を表示する関数を追加。
このガイドの最終段階に入った。WordPressの投稿の表示回数を取得してフォーマットするコード・スニペットを追加する必要があります。これは後で最も閲覧された投稿のリストを表示するときに便利です。
このコードを「投稿表示回数取得関数」と名付け、場所を「どこでも実行」に設定します。
以下はそのコード・スニペットである:
1 2 3 4 5 6 7 8 9 10 | function wpb_get_post_views($postID){ $count_key = 'wpb_post_views_count'; $count = get_post_meta($postID, $count_key, true); if($count==''){ delete_post_meta($postID, $count_key); add_post_meta($postID, $count_key, '0'); return "0 View"; } return $count.' Views';} |
この場合も、WPCodeでコードを有効化してから保存してください。
それができたら、また新しいコード・スニペットを作成し、名前を「Display Most Popular Posts with View Counts」とします。これは、ブログ投稿の一番下に人気投稿を表示するコードです。
コード・プレビュー・ボックスに、以下のスニペットを挿入する:
1 2 3 4 5 6 7 8 9 10 11 12 13 14 15 16 17 18 19 20 21 22 23 24 | // Customize the query parameters as needed$popularpost = new WP_Query( array( 'posts_per_page' => 3, // Feel free to adjust the number of posts to display 'meta_key' => 'wpb_post_views_count', 'orderby' => 'meta_value_num', 'order' => 'DESC'));?><div class="popular-posts"> <h2>See Our Most Popular Posts</h2> <!-- Feel free to customize the title --> <ul> <?php while ( $popularpost->have_posts() ) : $popularpost->the_post(); ?> <li> <a href="<?php the_permalink(); ?>"><?php the_title(); ?></a> - <?php echo wpb_get_post_views(get_the_ID()); ?> </li> <?php endwhile; ?> </ul></div><?php wp_reset_postdata(); |
コードにあるように、表示する投稿数を自由に調整し、このセクションのタイトルをカスタマイズしてください。
WPCode Insertionセクションで、Locationに’Insert After Post’を選択してください。そして、コードを有効化してスニペットを保存します。
あとはすべて、あなたのブログの投稿を訪問し、コードが機能するかどうかを確認するだけです。以下は、私たちのテストWordPressブログで、表示セクション別に最も人気のある投稿がどのように見えるかです:

専門家のアドバイス:コードをさらにカスタマイズしたいが、コーディングの経験がない場合は、WPCodeのAIコードジェネレータをご利用ください。この機能は、あなたの正確なニーズに合わせて既存のコードを編集することができます。
詳しくは、WPCodeのレビューをご覧ください。
動画チュートリアル
視覚的な説明がお好きな方は、以下のビデオ版チュートリアルをご覧ください:
このWordPressチュートリアルで、人気記事を閲覧数別に表示する方法を学んでいただけたでしょうか。また、WordPressの専門家が選ぶ最高の関連記事プラグインや、コンバージョン率の高いランディングページとは何かについての記事もご覧ください。
If you liked this article, then please subscribe to our YouTube Channel for WordPress video tutorials. You can also find us on Twitter and Facebook.


 in 2024")
Mrteesurez
I think it would be easier to use a plugin maybe Monsterinsights or another as it straight forward than using custom code, but the issue is, I don’t think using Monsterinsights will shows view counts ??
WPBeginner Support
MonsterInsights would mot show the view count by default if that is what you want to include with your popular posts.
Admin