Jetpack購読者を他のメールプロバイダーに切り替えたいですか?
ブログを始めるとき、ほとんどの初心者はJetpackのメール購読機能を使います。しかし、ブログが成長するにつれて、メールリストを管理し、購読者に自動メールキャンペーンを送信するために、より 強力なメールマーケティングプラットフォームが必要になります。
この投稿では、Jetpackの購読をConstant Contact、AWeber、Drip、Mailchimpなどの他のメールサービスに簡単に切り替える方法を紹介します。
なぜJetpackから他のメールサービスに乗り換えるのか?
メールマーケティングは最も費用対効果の高いマーケティング戦略の一つであり、カスタマイザーと直接コンタクトを取ることができます。
購読者を着実に増やし、結果的にビジネスを成長させるためには、初日からメールリストを作り始めることが重要です。
Jetpackを使えば、WordPressサイトに簡単に購読を追加できます。これにより、サイトに新しいコンテンツを公開したときに購読者に通知することができます。
しかし、ニュースレター限定のコンテンツを送信したり、自動応答機能を追加したり、ターゲットを絞ったメールキャンペーンを行ったりしたい場合は、より強力なものが必要になります。
WordPressブログでメールリストを作成するには、本物のメールマーケティングサービスプロバイダーが必要です。
Constant Contact、AWeber、Dripなど、人気の高いメールマーケティングプラットフォームに切り替えることをお勧めします。
これらのメールマーケティングプラットフォームは、マーケティングの自動化、セールスファネルの作成、パーソナライゼーションの活用など、幅広いツールを提供する最も強力なメールマーケティングプラットフォームです。
とはいえ、Jetpackから他のメールサービスに簡単に切り替える方法を見てみましょう。
Jetpack購読者を他のメールサービスに移動する方法
まず始めに、Jetpack購読から他のメールマーケティングプラットフォームに切り替えるために、メール購読者のリストが必要です。
まず、WordPressの管理ダッシュボードからJetpack ” 設定ページに移動します。
ここから、上部の「ディスカッション」タブに切り替える。
その後、「購読者」セクションまでスクロールダウンし、「メール購読者の表示」リンクをクリックします。
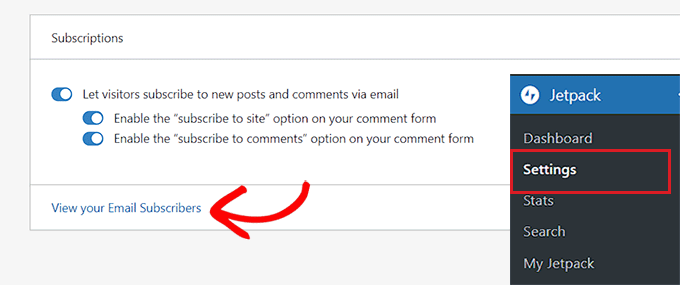
ユーザー」ページに移動しますので、「購読者」タブに切り替えてください。
購読者リストが開いたら、右隅にある3点鎖線のメニューをクリックし、ドロップダウンメニューから「購読者メールをCSVでダウンロード」を選択します。
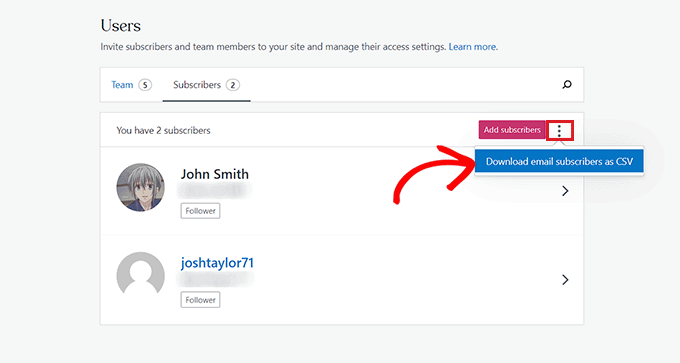
Jetpackが購読者リストを作成し、ブラウザーがCSVファイルとしてダウンロードします。
購読者を獲得した後は、お好きなメールマーケティングサービスにインポートすることができます。
方法1:JetpackからConstant Contactに切り替える(推奨)
コンスタントコンタクトのメールサービスに切り替えたい場合は、この方法がお勧めです。
コンスタントコンタクトをお勧めする理由は、初心者に優しく、カスタマイザーへの大量メール送信、メールリストの管理、効果的なメールマーケティングキャンペーンの実施に特化しているからです。
Constant Contactは、プレミアムサービスで、月額$9.99からご利用いただけます。しかし、WPBeginnerユーザーは、Constant Contactのクーポンコードを使用することで、さらに20%割引を得ることができます!
まず、Constant Contactのサイトにアクセスし、アカウントにサインアップする必要があります。
詳しくは、WordPressにConstant Contactを接続する方法をご覧ください。
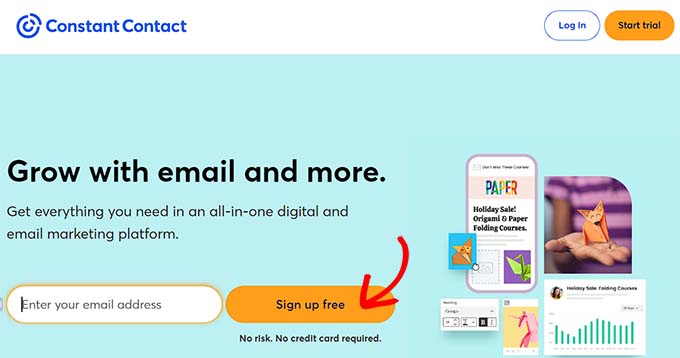
アカウントを作成すると、アカウントのダッシュボードに移動します。
ここから、上部の「連絡先」タブに切り替え、「連絡先を追加」ボタンをクリックします。
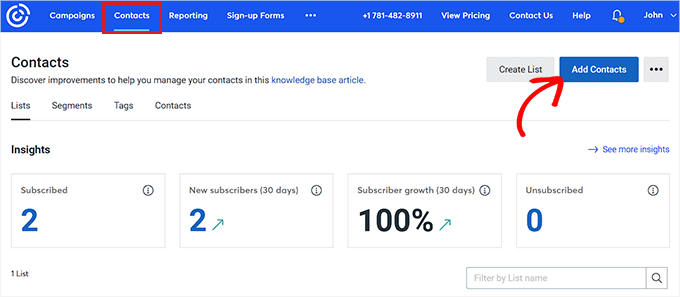
画面上にポップアップが表示され、コンタクトリストのインポートに使用できるメソッドのリストが表示されます。
ファイルからアップロード」オプションをクリックするだけです。
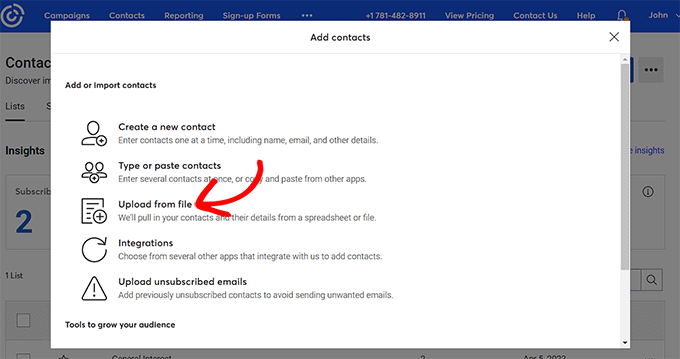
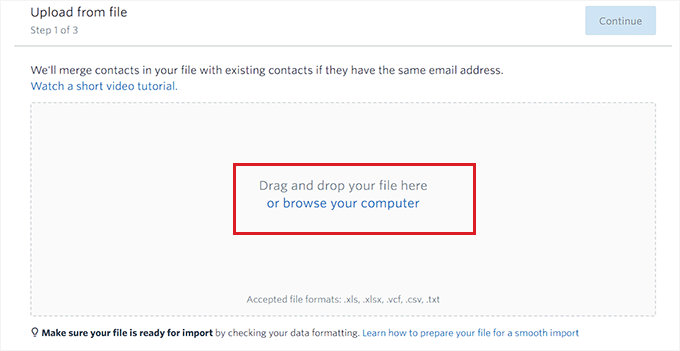
次に、コンピューターからファイルをアップロードするよう求められます。先ほどダウンロードしたJetpackメール購読者CSVファイルを選択してください。
その後、’Continue’ボタンをクリックしてプロセスを進める。
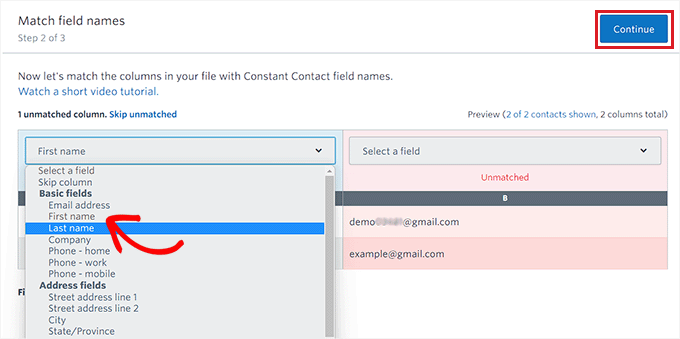
次のステップでは、CSVファイルのカラムの見出しを選択する必要があります。
例えば、メール購読者の名前を含むカラムがCSVファイルにある場合、ドロップダウンメニューから「名前」フィールドを選択する必要があります。
完了したら、上部にある「Continue」ボタンをクリックします。
最後のステップに進みますので、「メールの同意」設定にチェックを入れてください。
最後に、「アップロード」ボタンをクリックして、メール購読者のCSVファイルをインポートします。
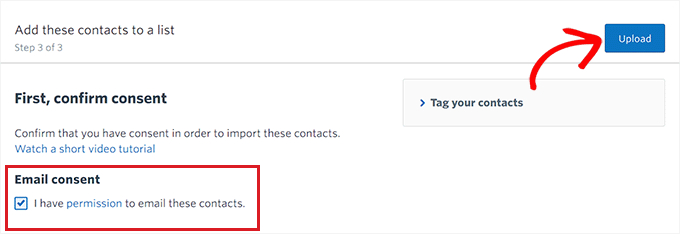
JetpackからConstant Contactメールマーケティングプラットフォームへの切り替えに成功しました。
このプラットフォームを使ってメールを送る方法についてさらに詳しく知りたい方は、メールマガジンの始め方についての投稿をご覧ください。
方法2:JetpackからAWeberに切り替える
この方法は、JetpackからAWeberに乗り換えたい場合に適しています。
AWeberは最も古く、最も人気のあるメールマーケティングサービスプロバイダーの一つです。AMPメール、ブロガー向けの自動RSSメール、タグベースの購読者セグメンテーションなど、幅広い配列を提供しています。
AWeberはまた、500購読者までの限定無料プランを提供しています。それ以降は、月額12.50ドルからとなります。詳しくはAWeberのレビューをご覧ください。
まず、AWeberのサイトにアクセスし、アカウントを登録する必要があります。詳しくは、AWeberとWordPressの接続方法をご覧ください。
アカウントを有効化すると、AWeberダッシュボードに移動します。
左のカラムから購読者 ” 購読者の追加ページにアクセスしてください。その後、「複数インポート」ボタンをクリックしてください。
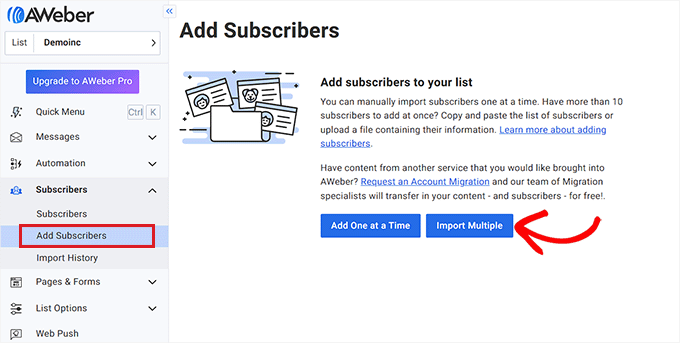
購読者のインポート」画面が表示されます。
ここから、「クリックして参照」ボタンをクリックして、コンピューターからファイルをアップロードする必要があります。先ほどダウンロードしたJetpack CSVファイルをアップロードしてください。
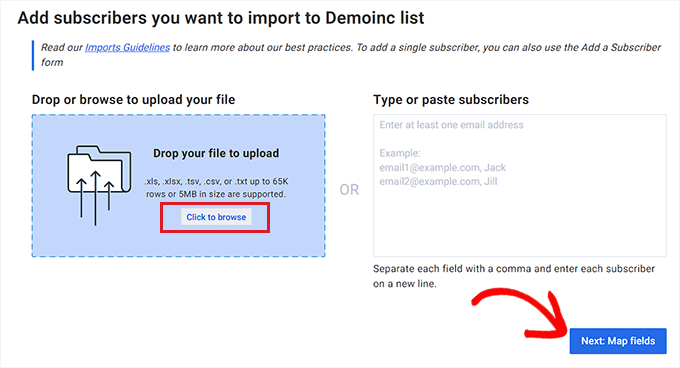
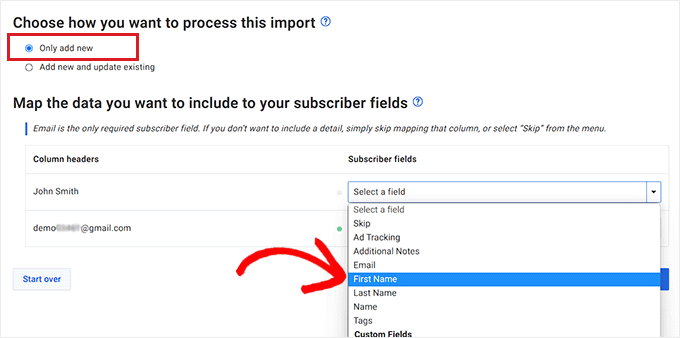
その後、インポートの処理方法を尋ねられます。新規追加のみ」の設定にチェックを入れてください。
そうしたら、カラムヘッダーの購読者フィールドを選択する必要があります。
例えば、CSVファイルに購読者名のカラムがあった場合、そのカラムのヘッダーとして「ファーストネーム」オプションを選択する必要があります。
完了したら、「次へ」をクリックします:フィールドをマップする’ボタンをクリックして続けます。
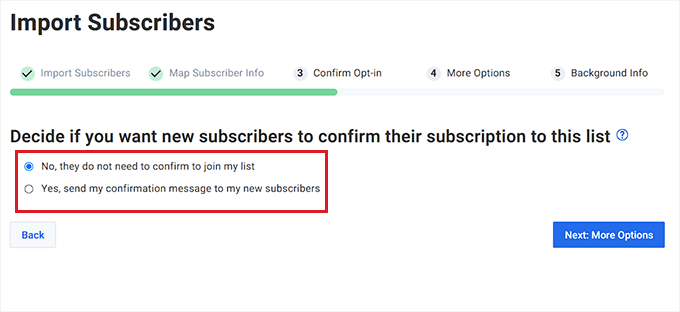
次のステップでは、ユーザーにリストへの登録を確認させるかどうかを決めなければなりません。
例えば、「はい」オプションを設定すると、インポート完了時にCSVファイル内のすべての購読者にメールが送信されます。ユーザーはメールに記載された確認リンクをクリックし、有効化した購読者となります。
ただし、「いいえ」にチェックを入れると、ユーザーに確認メールは届きません。
選択したら、「次へ」をクリックします:その他のオプション設定」ボタンをクリックします。
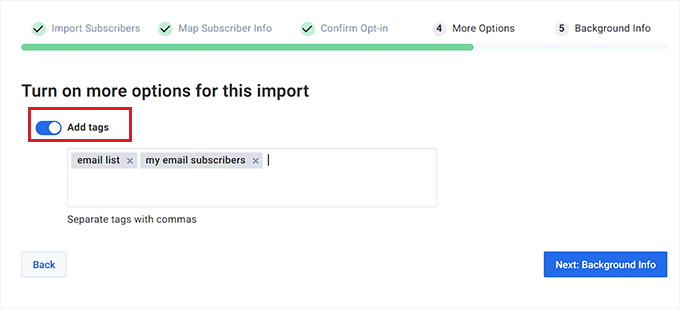
その後、ステップ3に進みます。 ここから、「タグを追加」スイッチを切り替えて、メールリストに区切りタグを追加することができます。
タグを追加したくない場合は、次のステップにスキップすることもできます。次へ」をクリックしてください:背景情報」ボタンをクリックして次に進みます。
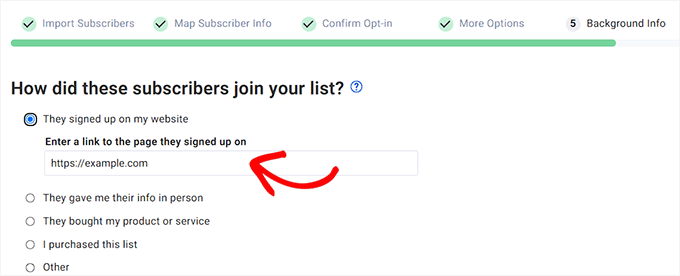
次のページでは、購読者の登録方法を尋ねられます。オプションのいずれかを選択し、必要に応じて詳細を入力してください。
例えば、「They signed up on my website」オプションを設定した場合、あなたのサイトのURLも入力する必要があります。
次に、他のプロバイダーから購読者をインポートするかどうか尋ねられます。Yes, they are coming from another provider “オプションにチェックを入れ、メールサービスとしてJetpackと入力してください。
最後に「インポート送信」ボタンをクリックしてCSVファイルをアップロードします。
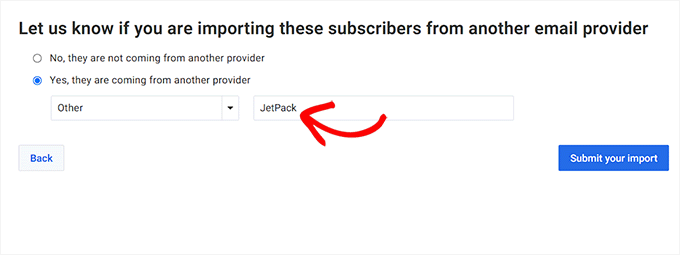
これでJetpackからAWeberへのメール購読者のインポートは完了です。
方法3:ジェットパックからDripに切り替える
Dripはeコマース、ブロガー、デジタルマーケティング担当者向けの強力なメールマーケティングプラットフォームです。オンラインストアをお持ちの方は、最高のeコマースメールマーケティング機能を提供するDripへの乗り換えをお勧めします。
まず、Dripのサイトにアクセスし、「サインイン」ボタンをクリックしてアカウントを作成します。
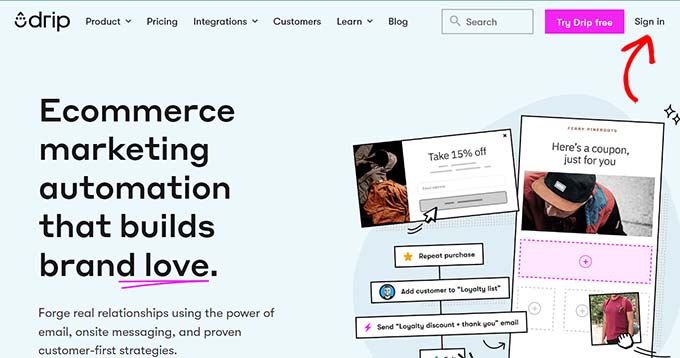
アカウント登録の手順に従ってください。アカウントが有効化されると、ダッシュボードが表示されます。
そこで、左サイドバーから「人々 ” 有効化した」ページに向かう。
次に、ページ右上の「+ Add People」ボタンをクリックします。
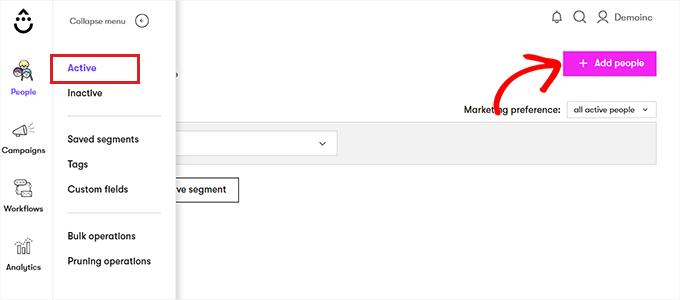
画面に新しいプロンプトが表示されます。
リストをアップロード」設定の下にある「開始」ボタンをクリックします。
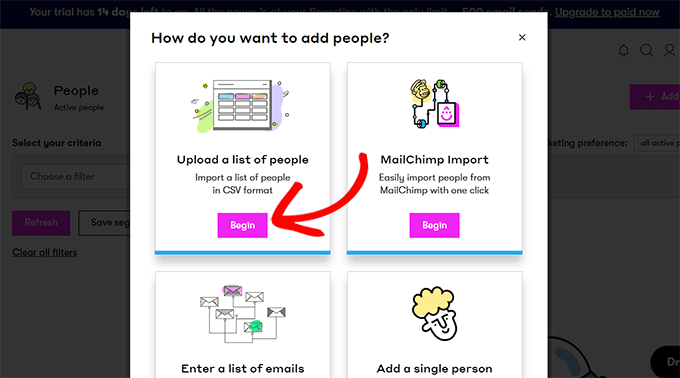
CSVファイルをドラッグまたはアップロードできる新しいページが表示されます。
アップロードまたはcsvをここにドラッグ」ボタンをクリックし、Jetpack CSVファイルをインポートします。
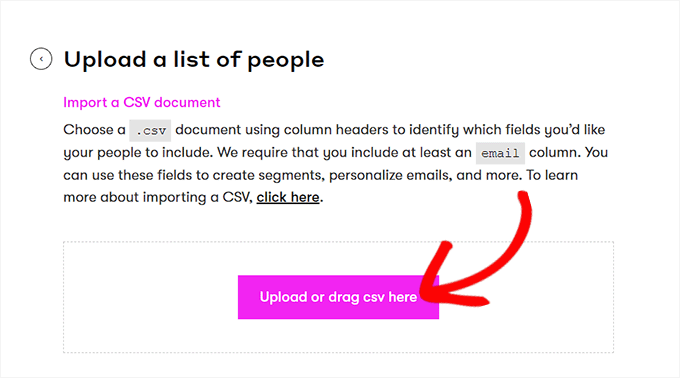
これで自動的に次のステップに進みます。
ここで、ドロップダウンメニューからCSVファイルのカラム名を選択する必要があります。そして、’Next’ボタンをクリックして次に進みます。
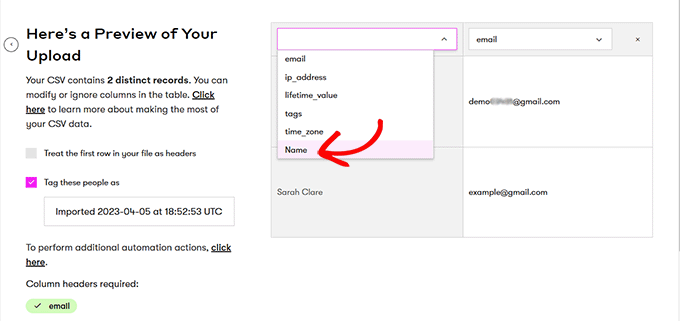
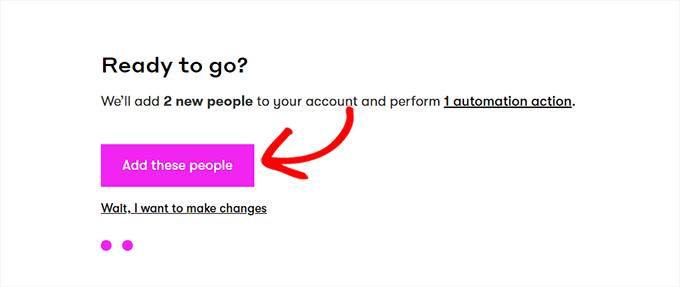
これで「準備できましたか」のページが表示されるので、そこで「この人たちを追加する」ボタンをクリックする。
購読者がJetpackからDripにインポートされます。
方法4:JetpackからMailchimpに切り替える
この方法は、JetpackからMailchimpに乗り換えたい場合の方法です。
注: Mailchimpは年々品質が低下し、価格も高くなっているため、他の3つのプロバイダーの利用をお勧めします。詳しくは、Mailchimpの代用品をご紹介しています。
まず、Mailchimpのサイトにアクセスし、アカウントを作成してください。
詳しくは、WordPressでMailchimpを使う究極のガイドをご覧ください。
アカウントを有効化すると、Mailchimpのダッシュボードに移動します。
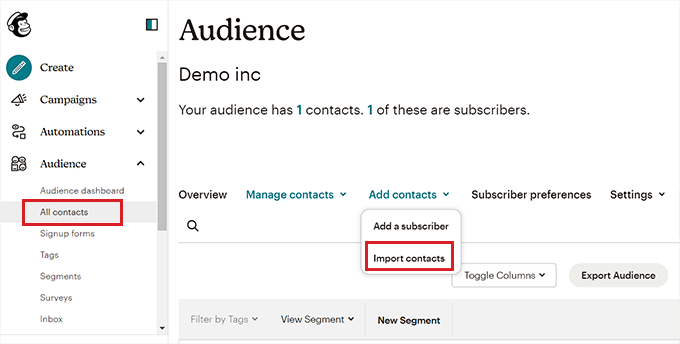
そこで、左の列からAudience ” All Contactsページに進みます。
次に、’Add Contacts’ドロップダウンメニューから’Import Contacts’オプションを選択します。
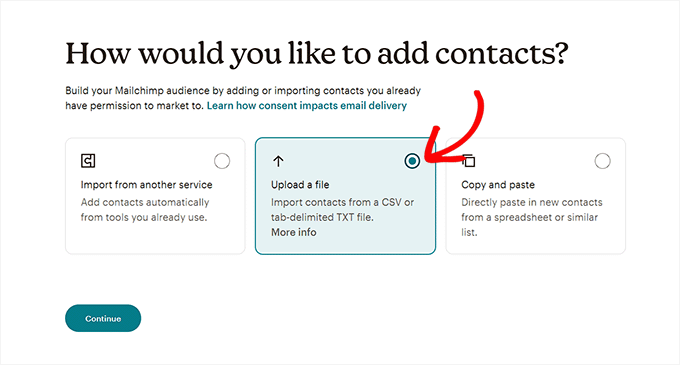
インポート方法のリストが表示されます。
ファイルをアップロード」オプションを選択し、「続行」ボタンをクリックするだけです。
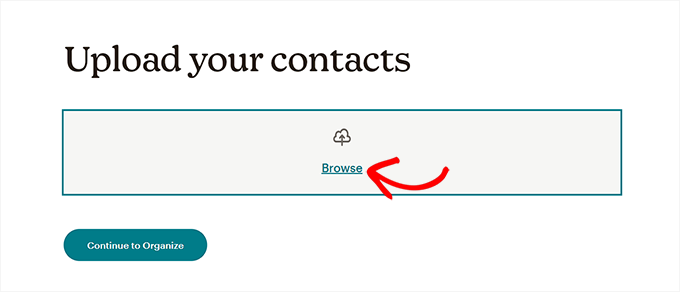
連絡先のアップロード」ページが表示されます。参照」ボタンをクリックして、Jetpack CSVファイルをアップロードしてください。
次に、「整理を続ける」ボタンをクリックする。
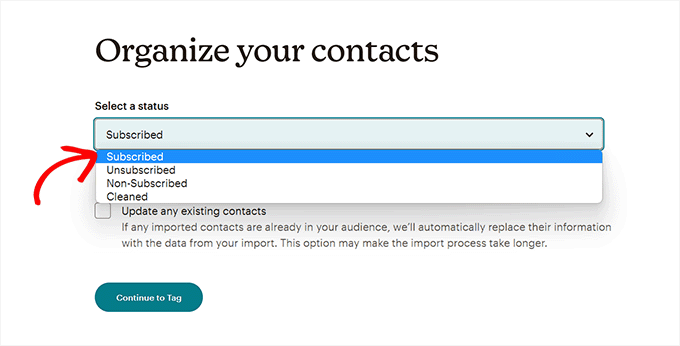
インポートする連絡先の状態を選択するよう求められます。メール購読者のリストをインポートするので、ドロップダウンメニューから「購読中」オプションを選択する必要があります。
完了したら、「Continue to Tag」ボタンをクリックします。
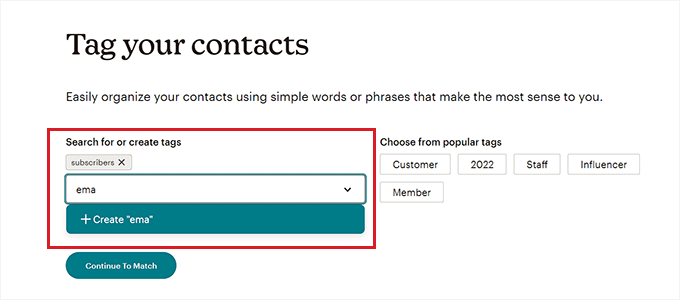
連絡先にタグを付ける」ページでは、一般的なタグから選択するか、独自のタグを作成することができます。
その後、’Continue to Match’ボタンをクリックして先に進む。
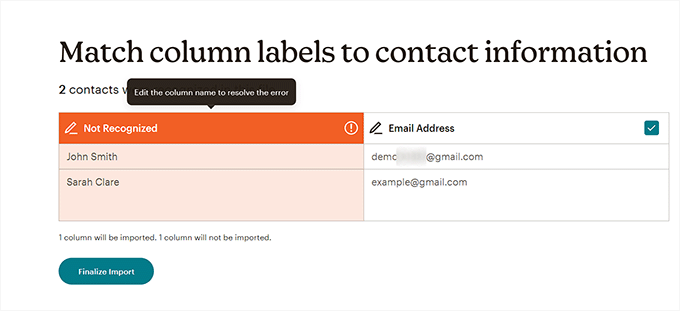
次のステップでは、カラムラベルをCSVファイルの連絡先情報と一致させる必要があります。
例えば、インポートしたCSVにすべての購読者のメールアドレスを含むカラムがある場合、カラムラベルとして「メールアドレス」を選択する必要があります。
異なるカラムに適切なラベルをプロバイダーしたら、’Finalize Import’ボタンをクリックします。
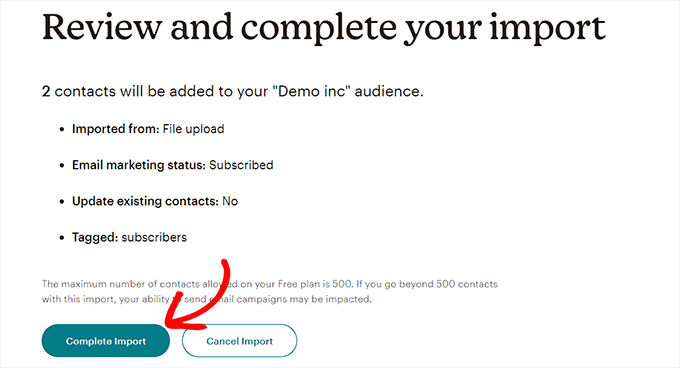
これで「Review and complete your import(インポートの確認と完了)」のページに移動します。
最後に「インポートを完了する」ボタンをクリックすると、JetpackからMailchimpに購読者がインポートされます。
この投稿が、Jetpackの購読をMailchimpや他のメールサービスに切り替える方法を学ぶのにお役に立てば幸いです。WordPressでメールリストを作成する方法のチュートリアルや、トラフィックを増やすのに最適なWebプッシュ通知ソフトウェアの比較もご覧ください。
If you liked this article, then please subscribe to our YouTube Channel for WordPress video tutorials. You can also find us on Twitter and Facebook.


Diane
This is exactly what I was looking for. Thank you for a clear and informative tutorial!
anon
If you disable Jetpack, how do you get Mailchimp or any other service to send emails when you post a new blog entry?
Also, Jetpack is using WordPress.com’s servers, not your own PHP email function on your site, so wouldn’t it be a trusted sender as well? Is there any data comparison to show send rates?
Thanks
joelle
This was very helpful and very easy to follow. Thank you!
Michelle
Thank you for this info. I recently enabled Jetpack’s subscribe to comments and subscribe to blog feature. I wanted to keep all my subscribers in one place. I was able to export them as you said to MailChimp and then delete them from WordPress to prevent duplicate notifications of blog posts. Thanks again.
Keri
Question, how in the world did you delete the subscribers from Jetpack? We just switched over from Jetpack to MailChimp but can’t find how to delete them from Jetpack. Now, they are getting all our posts twice!
Kieran Thomas
Good question. I’ve just had a look and it appears you can turn it off as follows:
1) login to your blog admin
2) go to jetpack > settings
3) click on the “discussions” tab
4) scroll down to the “subscriptions” setting and turn off “Allow users to subscribe to your posts and comments and receive notifications via email”
Caveat: I haven’t tested this, but that seems to be the setting you will want to disable
Mathukutty P. V
My blog is one year old. Only less than 10 subscribers in Jetpack. Yesterday created MailChimp account. Found that footer of their e-mails showing physical address because that is compulsory. Is it necessary to show the physical address for personal small blogs which do not have much revenue or not selling any product, but sharing only posts? I had also tried SumoMe free which has free and easy forms, welcome mat, hello bar and other features. They also do not ask or show the physical address, mobile numbers on e-mails. As a small beginner personal blog which one you select?
Carol
Jetpack subscriber list is NOT on Site Stats.
P,ease updat .
Jose Cervantes
It’s kind of hard to find now and this post does need updating, but to find it now go to WP.com jetpack, then go to stats > insights > followers (at the bottom) then there will be a button to download the data in CSV format.
AZ
What are you suppose to do with the blog only followers who cannot be converted over to mailchimp?
WPBeginner Support
You can write a post asking your blog subscribers to signup with MailChimp. It may work and you may get a few blog only subscribers into your email list.
Admin
Sudipta Kumar Maiti
After switch from jetpack to mail chimp what will happen the blog follwers as only the email follwers are import from jetpack, are the blog follwers continue to get my new post as they get earlier during jetpack. Or I have to keep jetpack and mail chimp both
Rodwell Smith
Thank you for answering my contemplation. I do have one other concern with the difference between JetPack and MailChimp.
JetPack notifies subscribers of new blogs and posts. MailChimp sends email promotions. Would I substitute JetPack subscription forms with MailChimp signup forms and achieve the two functions?
WPBeginner Support
If you just want to send posts to readers JetPack does that. But if you want to use your mailing list as your own, then MailChimp is the way to go.
Admin
Jerome Short
Will I have to post my blog in WordPress and then redo it all in MailChimp to send out to people? Is there a MailChimp plugin that would take care of that?
Thanks,
Jerome
ashley
How do you deactivate email subscribers for jetpack after?
Keri
I just moved my subscriptions over to Mail Chimp but will subscribers get two emails-one automatic when my post goes up and another when I send out the email from Mail Chimp alerting subscribers to a new post? How do I get the automatic email turned off. I don’t want to uninstall Jetpack but I do want to use Mail Chimp to deliver emails.
WPBeginner Support
You can turn off subscriptions module in JetPack. MailChimp will not send automatic emails unless you set it to do so.
Admin
Ria
I’m quite new in blogging and almost all questions that I have, mostly I get in this site. It’s very helpful and easy explained:) thank you!
did you have experience in adding MailChimp for wordpress plugin’s sign-up checkbox to jetpack comments form?:)
WPBeginner Support
Thanks, we are glad you find WPBeginner helpful. No we have not tried adding MailChimp for WordPress plugin’s signup checkbox into JetPack comments.
Admin
Lehel Matyus
your sidebar has a subcscription field and just below it you have the categories people can subscribe to. thats awesome! how did you do that? are you using jetpack for that?
WPBeginner Support
No, we use MailChimp. We have described how we do it in our tutorial how to allow users to subscribe to categories in WordPress.
Admin
Jayne
The problem is that the link to download the file takes you to a WP account that is different than the wp account I use for my website. It’s another Dashboard that has nothing there. It says you have to logged into your WP account which looks like a WP hosted site. My site is self-hosted.
Lore
The same thing happens to me. Any solutions?
Regrds,
Daniel
Hi
If I deactivate the Jetpack subscribe module would’ve this also impact post comments. Also does Mailchimp allow sigh up to posts of a selected category.
Daniel
H
If I deactivate the Jetpack subscribe module would’ve this also impact post comments. Also does Mailchimp allow sigh up to posts of a selected category.
Kristine
Does our subscriber from jetpack need to confirm their email again?
If yes, that’s really a disadvantage
ESist
This is a nice post. However, I don’t have the “site stats” sub-item for Jetpack. Maybe you could tell us which settings are required for it ?
Mark Szymanski
Hey great post. I’m looking for away to kind of have both. One place for visitors to subscribe that will sync to WP and Mailchimp. The thought is WP is great to easily shoot new posts to subscribers, while keeping MC for very specific one-offs. Any ideas?
Ron Killian
Thanks for the post. I do have to say though, one of the reason I like jetpack is that wordpress does all the mailing. My thoughts are that they should have good deliverable because they are such a trusted source. No? Also seems like emails would have a better chance of making it into the inbox and not end up in the trash folder, or promotions tab.
One other thing, I am pretty sure Aweber won’t let you import subscribers. Correct me if I am wrong.
WPBeginner Staff
You can deactivate JetPack subscriptions module. Before doing that you would want to inform your users that they should optin to join your new mailing list.
Wade Smith
How do I then deactivate jet packs emailing of the now exported group ?