WordPressでカスタマイザーコミュニケーションの自動化を始めた当初は、ターゲットクーポンを手動で送信することに何時間も費やしていました。
数多くのソリューションをテストした後、FunnelKit AutomationsとUncanny Automatorがクーポンキャンペーンを自動化するための画期的なソリューションであることを発見しました。
自動操縦で機能する洗練されたクーポンキャンペーンを、専門知識を必要とせずに作成することができます。
このガイドでは、これらの強力なツールを使用して自動クーポンキャンペーンを設定する方法を具体的に紹介します。
顧客を呼び戻すために自動クーポンを送る理由とは?
新規顧客を獲得するには、古い顧客を維持するよりも5倍のコストがかかるということわざを聞いたことがあるかもしれない。
リードジェネレータはビジネスの成長に役立ちますが、既存のカスタマーを満足させることも必要です。時間が経つにつれて、顧客はあなたのサイトに興味を失い、商品のことを忘れ、競合他社で買い物をするようになるかもしれません。
そこで自動クーポンの出番だ。
最高のWordPress自動化ツールやプラグインは、顧客の離反の兆候を監視することができます。例えば、あるカスタマが2ヶ月間注文をしなかったり、メールを開かなくなったりすることがあります。
そのようなカスタマイザーを呼び戻す方法のひとつが、メールでクーポンコードを自動的に送信することです。WordPressでこの自動化されたワークフローを作成することで、あなたはすべてのハードワークを自分で行うことなく、カスタマイザーを維持することができます。
プロからのアドバイス: クーポンをEメールで送信する場合、そのメッセージが迷惑メールフォルダではなく、顧客の受信トレイに届くようにする必要があります。良いSMTPサービスプロバイダーは、メールの到達性を向上させるために不可欠です。WP Mail SMTPを使用すると、どのSMTPサービスプロバイダーでも簡単にWordPressのメールを送信することができます。
それでは、WordPressで自動クーポンを送信し、顧客を呼び戻す方法を見てみましょう。以下のクイックリンクから、使いたい方法にジャンプしてください。
方法1.FunnelKitを使う(WooCommerceユーザーに最適)
WordPressで自動クーポンを送信する一つの方法は、FunnelKit Automationsを使用することです。
FunnelKitは、強力なカスタマイバックキャンペーンを作成できるWordPressセールスファネルビルダーと最適化プラグインです。また、ユニークでパーソナライズされたクーポンを作成することができ、買い物客の注目を集めることができます。
私たちはこのプラグインを徹底的にテストし、初心者に優しいプラグインであることを確認しました。詳しくは、Funnelkit Automationsのレビューをご覧ください。
FunnelKitはWooCommerceと統合し、オンラインストアを成長させるための機能をたくさん持っています。FunnelKitは、すでにWooCommerceを使用して製品やサービスをオンライン販売している方に最適です。
FunnelKit WordPressプラグインの設定方法
まず、FunnelKit Automationsの無料版をインストーラし、有効化してください。詳しくは、WordPressプラグインのインストール方法をご覧ください。
その後、FunnelKit Automations Proプラグインをインストールし、有効化する必要があります。
両方のプラグインを有効化した後、FunnelKit Automation ” Settingsにアクセスしてください。ライセンスキーを’License’フィールドに追加してください。
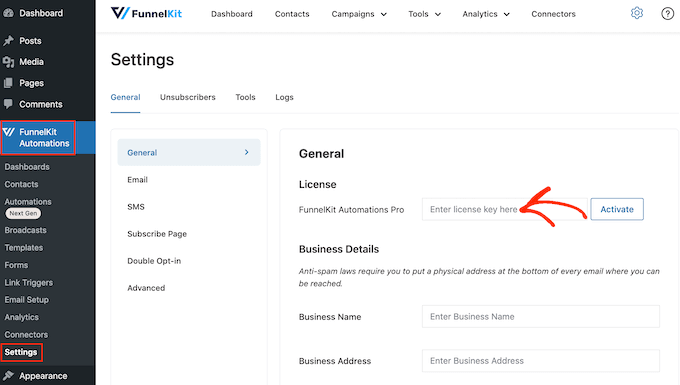
この情報は、FunnelKitサイトのアカウントにあります。この情報を追加したら、’有効化’ボタンをクリックしてください。
WordPressで自動クーポン・ワークフローを作成する方法
では、パーソナライズされたクーポンを生成し、カスタマにメールするワークフローを作成します。このワークフローは、カスタマーの最後の注文から30日が経過した時点で実行されます。
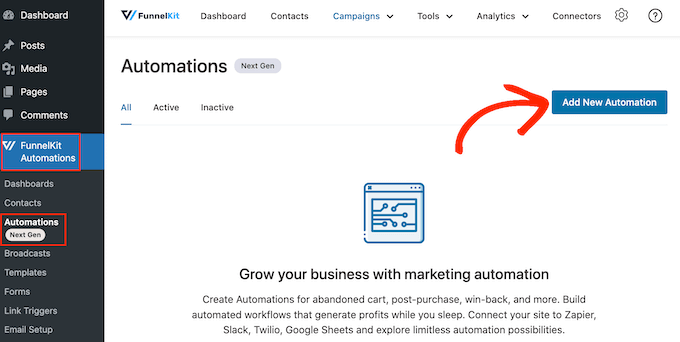
ワークフローを作成するには、WordPressダッシュボードのFunnelKit Automations ” Automations (Next Gen)にアクセスしてください。そして、’Add New Automation’ボタンをクリックしてください。
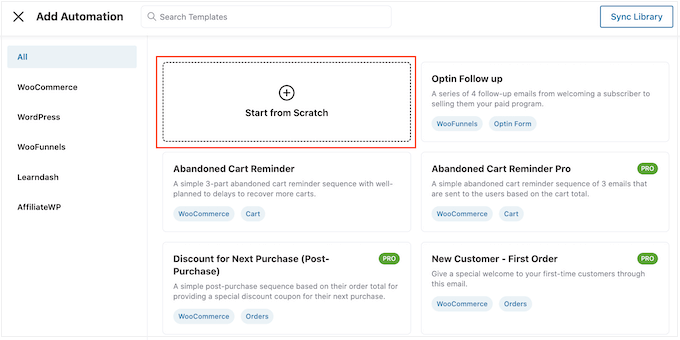
使用できるすべてのオートメーション・テンプレートが表示されます。
独自のワークフローを作りたいので、「ゼロから始める」を選択する。
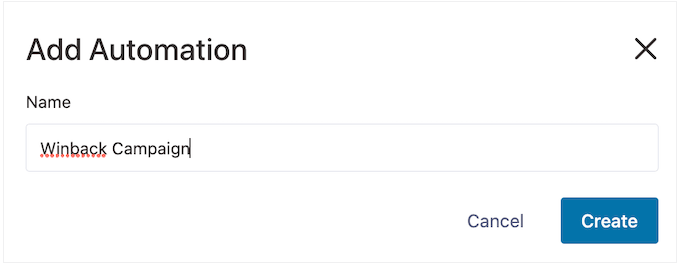
現れたポップアップで、オートメーションの名前を入力する。これは参考用なので、好きなものを使ってよい。
それが終わったら、『作成』をクリックする。
次に、ワークフローを開始するアクションを選択する必要があるので、「Select Trigger」をクリックする。
左側のメニューで「WooCommerce」を選択し、「カスタマイザー」をクリックして選択します。
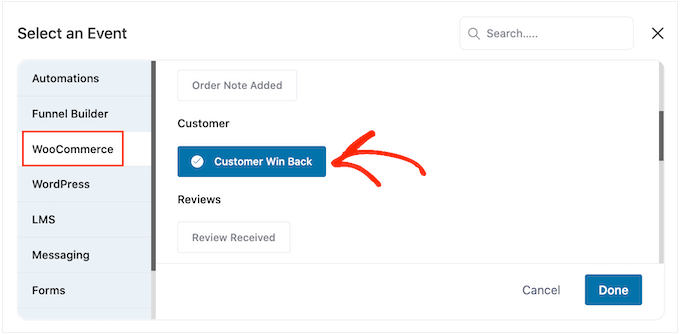
完了したら、’Done’をクリックして、自動化ワークフローにトリガーを追加する。
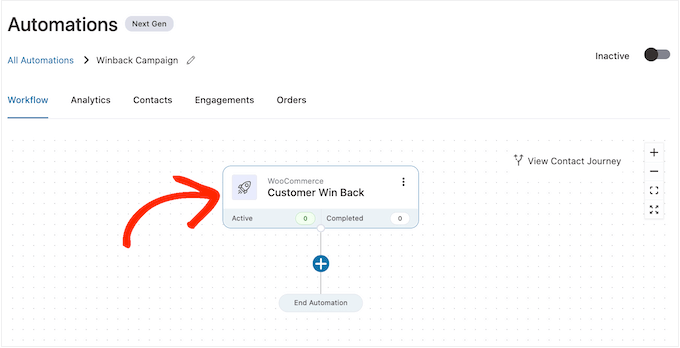
メインエディターに戻り、’Customer Win Back’トリガーをクリックする。
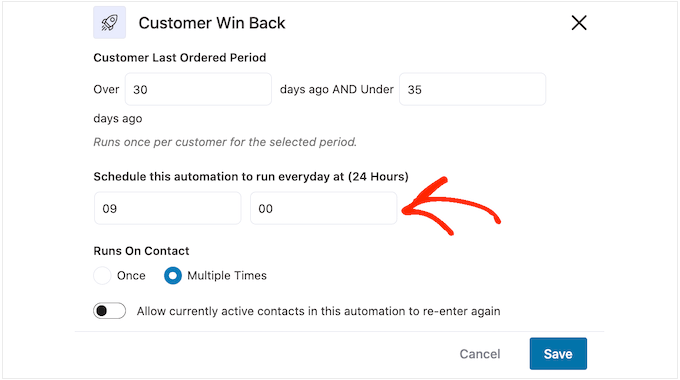
Customer Last Ordered Period’セクションで、ワークフローを実行する前にFunnelKitが待機する時間を入力できます。
例えば、以下の画像では、カスタマイザーからの最終注文から30日が経過した時点でワークフローが実行されます。
FunnelKitはこの自動化を24時間に1回繰り返しますので、短期間だけ実行することが重要です。このため、カスタマイザーの最終注文から35日経過した時点でワークフローを停止するように設定しました。
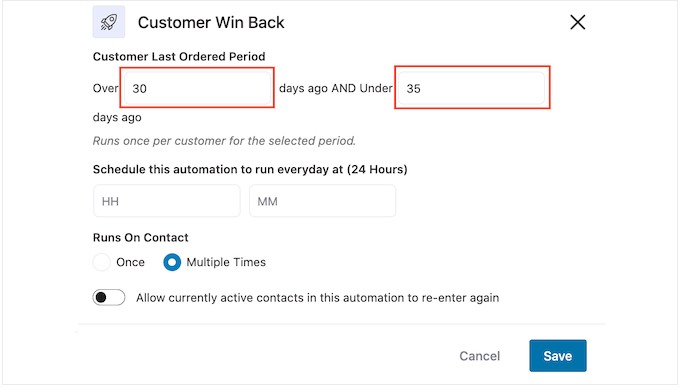
こうすれば、何十通ものメールを送ってカスタマイザーを困らせることもない。
次に、’Schedule this…’フィールドを使って自動化を実行する時間を設定します。FunnelKitはストアのタイムゾーンを使用しますので、別のタイムゾーンを使用したい場合はオンラインストアの設定を変更してください。
それが終わったら、『保存』をクリックする。
メインのワークフローエディターに戻り、「+」をクリックし、「アクション」を選択する。
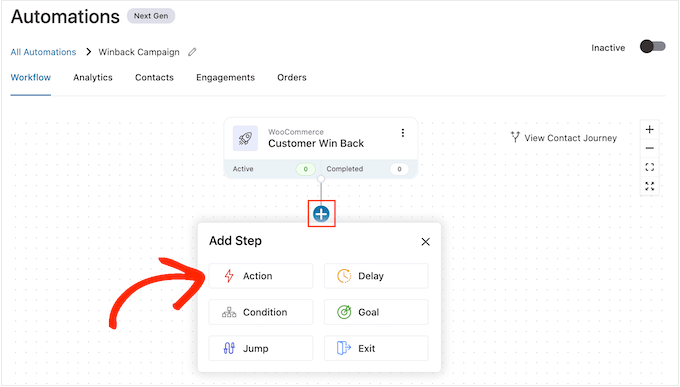
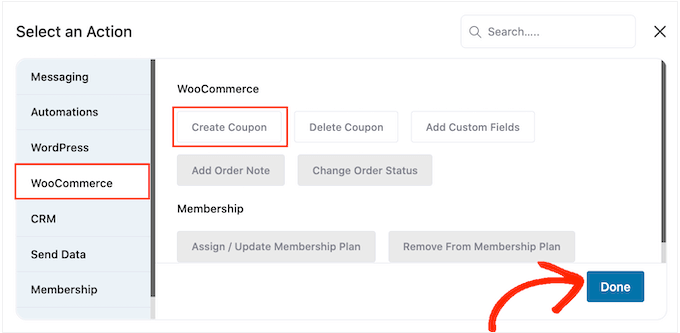
表示されるポップアップで「WooCommerce」を選択し、「クーポンを作成」をクリックします。
完了」をクリックするだけで、このアクションがワークフローに追加されます。
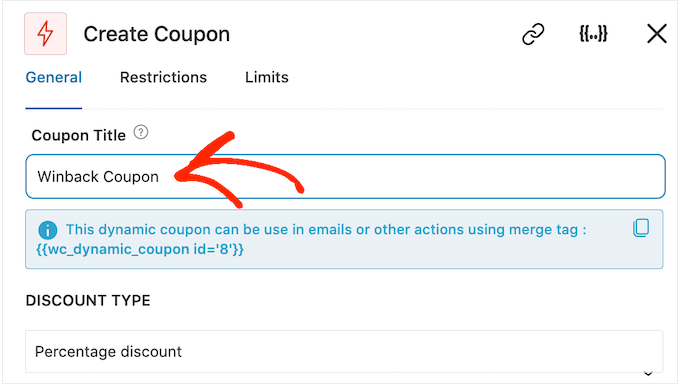
メインFunnelKitエディターに戻り、追加したアクションをクリックします。Create Coupon’アクションをカスタマイズするポップアップが開きます。
まず、「クーポンタイトル」フィールドにクーポン名を入力してください。これは参考用ですので、お好きなものをお使いください。
その後、「割引タイプ」ドロップダウンメニューを使用して、作成したいクーポンのタイプを選択します。
FunnelKitはパーセンテージ割引、固定お買い物カゴ割引、固定商品割引をサポートします。
ほとんどの場合、「パーセント割引」を選択し、すべてのカスタマイザーが同じような特典を受けられるようにします。
その後、「金額」フィールドに金額を入力します。例えば、カスタマイザーに20%オフや、すべての購入に5ドルの割引を提供することができます。
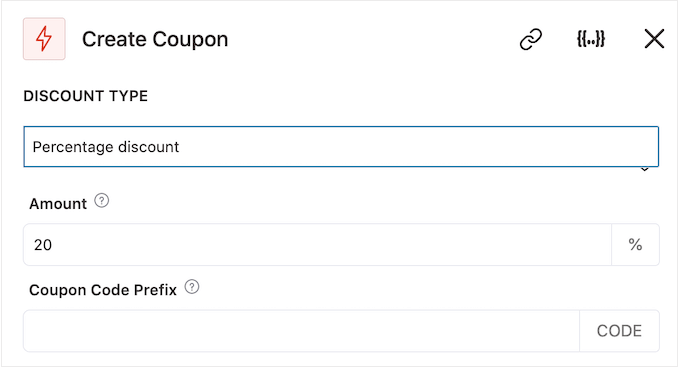
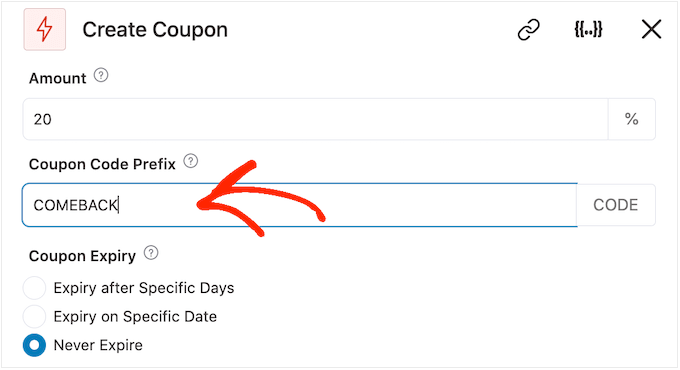
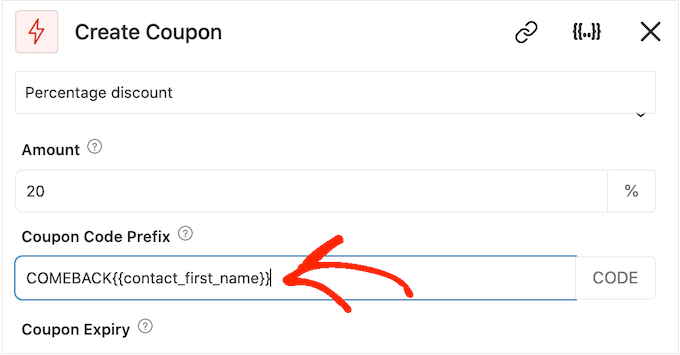
FunnelKitは自動的に各コンタクトにユニークなクーポンコードを作成します。しかし、クーポンの最初にプレフィックスを追加することができます。プレフィックスはプレーンテキストかダイナミックタグのどちらかになります。FunnelKitはコードを作成する度にタグを実際のテキストに置き換えます。
買い物客を再度来店させたいので、クーポンにカスタマイザーの名前を入れることもできます。そうすることで、お客様の目を引くことができ、またコードを覚えやすくなります。
プレフィックスとしてプレーンテキストを追加するには、「クーポンコードのプレフィックス」フィールドにタイプするだけです。
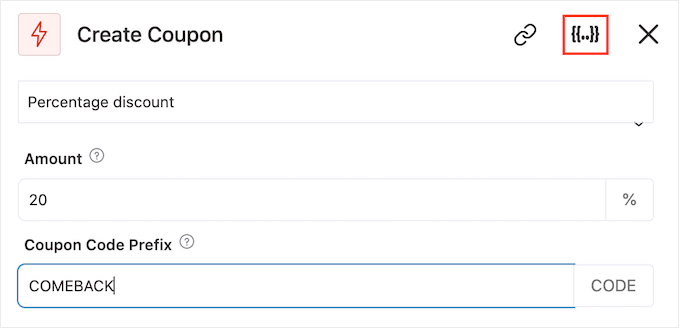
1つ以上のタグを追加するには、「タグの統合」アイコンをクリックします。
これは中括弧のついたボタンである。
自動クーポンで使用できるすべてのタグが表示されます。
ここでは{{contact_first_name}}タグを使いますが、どのタグを使ってもかまいません。
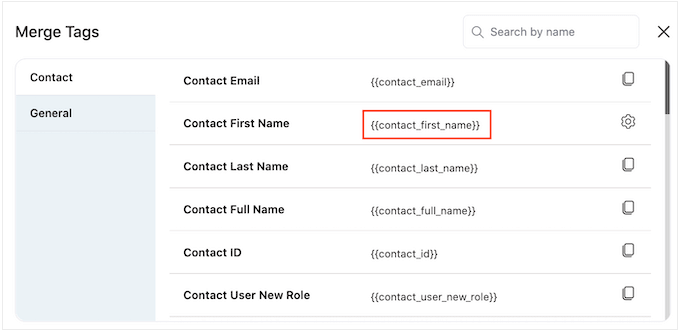
各タグをコピー&ペーストして、「クーポンコードのプレフィックス」フィールドに入力するだけです。
以下の画像にあるように、プレーンテキストとタグを混在させることができる。
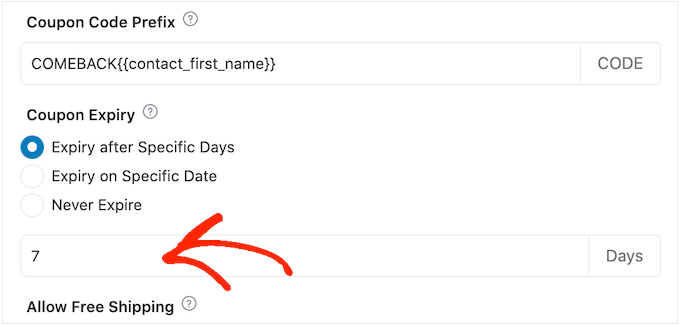
初期設定では、クーポンの有効期限はありません。緊急感やFOMOはカスタマイザーにクーポンを使用させることができます。
その後、コントロールを使ってクーポンの有効期限を指定することができます。
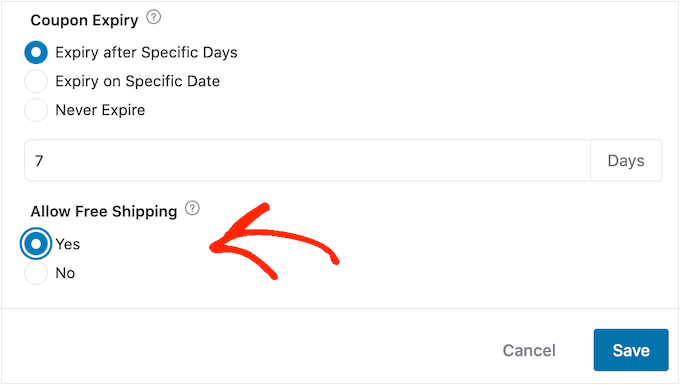
最後に、カスタマイザーが送料を無料にするかどうかを選択することができます。
買い物客は送料無料が大好きなので、「Allow Free Shipping(送料無料を許可する)」の下にある「Yes(はい)」のラジオボタンを選択して、クーポンにこれを追加することを検討するとよいだろう。
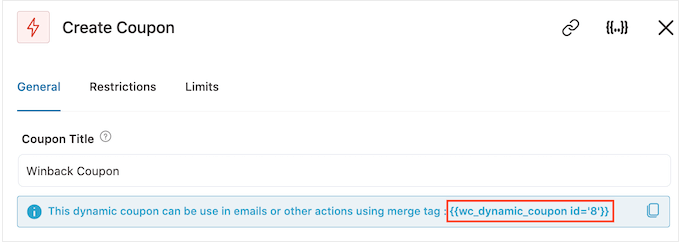
クーポンの設定に満足したら、「クーポンタイトル」の下にある小さなコードをコピーしてください。
このクーポンコードは、次のステップで作成するメールに必要ですので、安全な場所に保管してください。
完了したら、「保存」をクリックして変更を保存します。
クーポンが出来たら、次はFunnelKitがカスタマイザーに送信するメールを作成しましょう。メールアクションを追加するには、’+’ボタンをクリックし、’Action’を選択します。
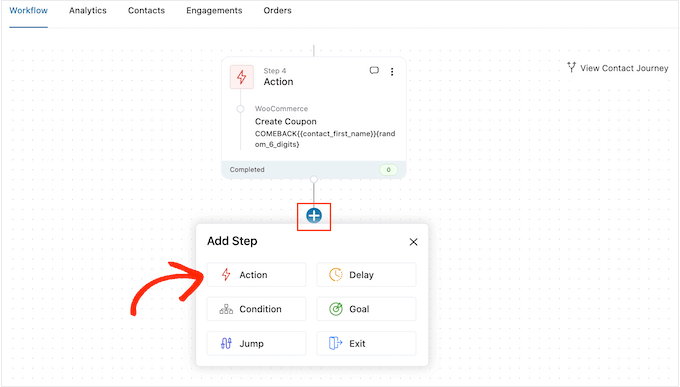
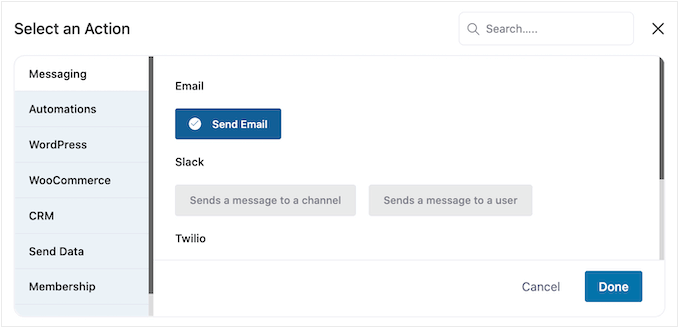
すでに選択されていない場合は、左側のメニューから「メッセージング」をクリックします。
次に、「メールを送信」を選択し、「完了」をクリックします。
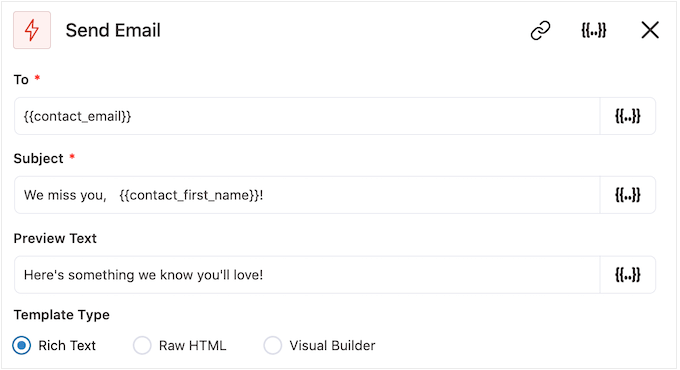
件名を入力し、本文をプレビューして追加することで、メールを作成できるようになりました。
クーポンの作成と同様に、プレーンテキストとタグを組み合わせて使用するのが最適です。ダイナミックタグを追加するには、To、Subject、Preview Textフィールドの横に表示される’Merge Tags’アイコンをクリックしてください。
タグをメール本文に追加したい場合は、「タグを統合」ボタンをクリックします。
クーポンコードを追加するには、前のステップでコピーした{{wc_dynamic_coupon id=8}}コードをペーストまたはタイプするだけです。
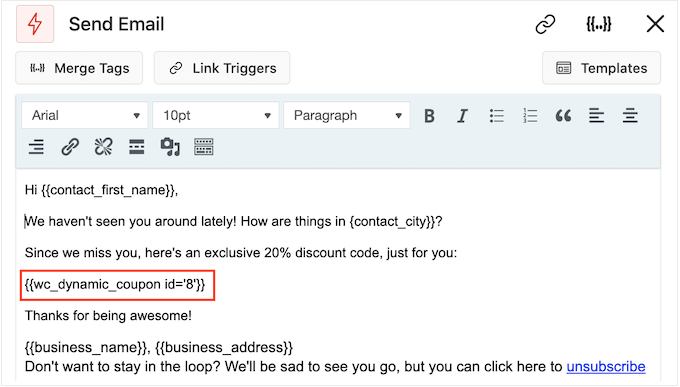
メールの見た目に満足したら、「保存して閉じる」をクリックします。
これだけだ。自動化を有効化する準備ができたら、’Inactive’スライダーをクリックして’Active’にする。
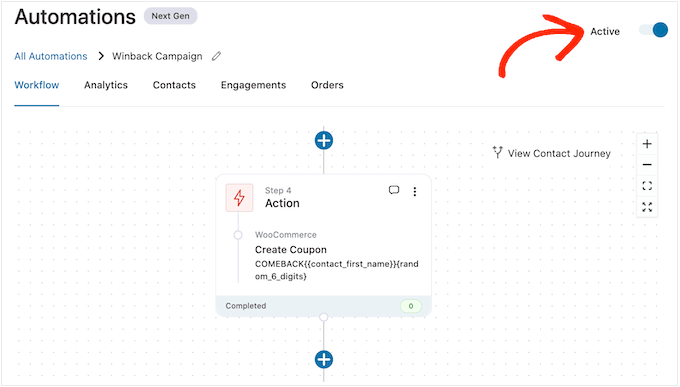
これで、FunnelKitは過去30日以内に購入したことのないカスタマイザーに自動的にクーポンを送信します。
方法2.Uncanny Automatorを使う (150以上の統合)
WordPressで自動クーポンを送信するもう一つの方法は、Uncanny Automatorを使用することです。これは、市場で最高のWordPress自動化プラグインの1つであり、時間を節約し、より迅速に顧客に対応するための強力なワークフローを作成することができます。
テストしてみると、WooCommerceとシームレスに連動し、さらにWordPressの必須プラグインやサードパーティツールすべてと連動することがわかりました。
すでにオンラインストアでさまざまなソフトウェアを使用している場合は、良い選択かもしれません。さらに詳しく知りたい方は、Uncanny Automatorのレビューをご覧ください。
まずは、Uncanny Automator Proと、プレミアムバージョンのベースとなる無料プラグインをインストールしてください。ヘルプが必要な場合は、WordPressプラグインのインストール方法のガイドを参照してください。
注: 多くの一般的なタスクを自動化できる無料のUncanny Automatorプラグインがあります。しかし、ここではWooCommerceで動作するUncanny Automator Proを使用します。
有効化したら、Automator ” Settingsに進み、ライセンスキーを「Uncanny Automator Pro ライセンスキー」フィールドに入力します。
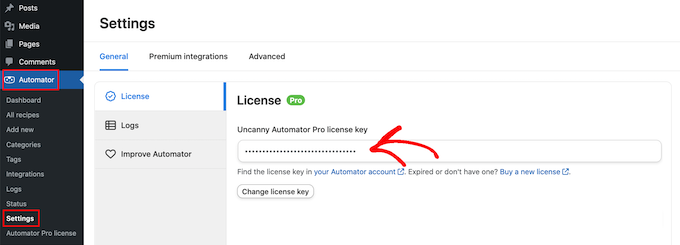
この情報は、Uncanny Automatorサイトのアカウントにあります。
Uncanny Automatorはパワフルでフレキシブルなプラグインです。いくつかのオプションを見てみましょう。
ログアウト中の顧客にクーポンを自動送信
カスタマイザーにオンラインストアのアカウントを作成させることは、ブランドロイヤリティを高め、将来的な購買を容易にする。
ユーザー登録はリードジェネレータにも役立つ。買い物客のEメールアドレスを取得すれば、Eメールマーケティング、パーソナライズされた広告、Eメールニュースレターなどでターゲットを絞ることができる。
WooCommerceを使用している場合、このプラグインはカスタマイザーがアカウントを作成・管理するために必要なすべてのページを自動的に作成します。WooCommerceはまた新しいカスタマイザーロールを追加し、あなたのストアに登録した買い物客に自動的に割り当てます。
カスタマイザー登録をサポートしていない別のeコマースソリューションを使用していますか?WordPress サイトでユーザー登録を許可する方法については、こちらのガイドをご覧ください。
その後、カスタマイザー用に新しい権限グループを作成するだけです。詳細な手順については、WordPressユーザー権限グループの初心者ガイドをご覧ください。
ユーザー登録を許可している場合、買い物客がいつアカウントからログアウトしたかをトラッキングすることができます。そして、クーポンを送って再ログインを促すことができる。
このレシピを作成するには、WordPressダッシュボードのAutomator ” Add newにアクセスするだけです。
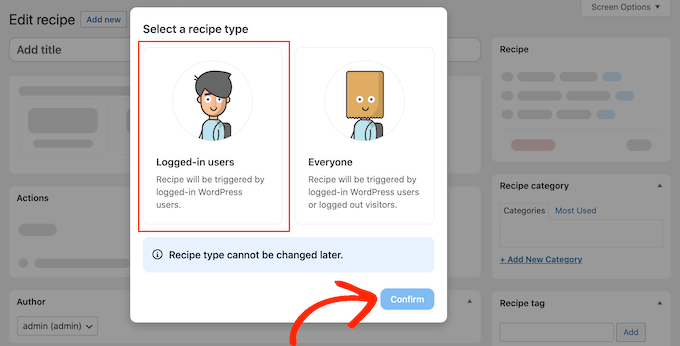
Uncanny Automatorは、ログインユーザー用レシピを作成するか、全員用レシピを作成するかを尋ねます。ログインユーザー」を選択し、「確認」ボタンをクリックしてください。
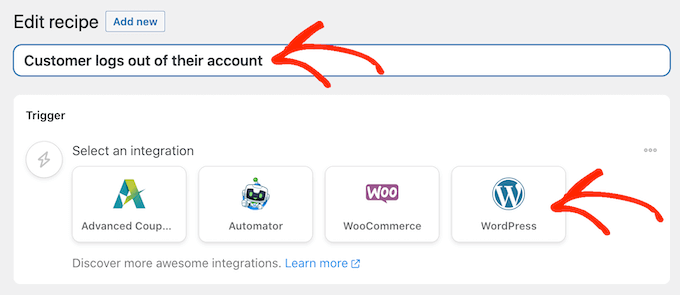
次に、「タイトル」フィールドに入力して、レシピに名前をつけることができます。これは参考用なので、好きなものを使ってください。
それが済んだら、「Select an integration」エリアの「WordPress」をクリックする。
トリガーを選ぶことができる。
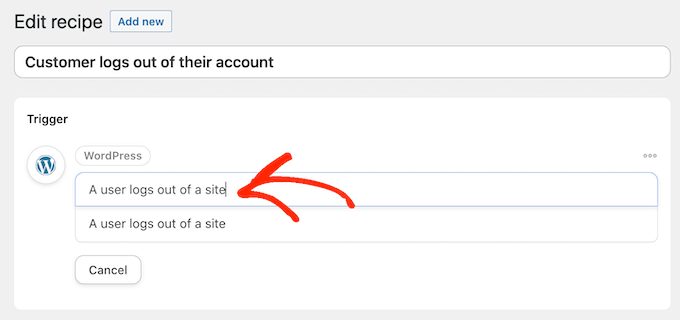
ドロップダウンメニューで、次のように「A user logs out of a site」と入力し、適切なオプションが表示されたら選択する。
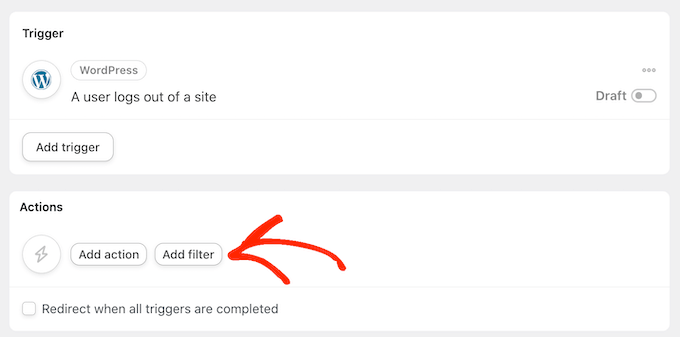
ユーザー権限’カスタマイザー’を持つ人がアカウントからログアウトした時のみワークフローを実行したい。
それを念頭に置いて、『フィルターを追加』ボタンをクリックする。
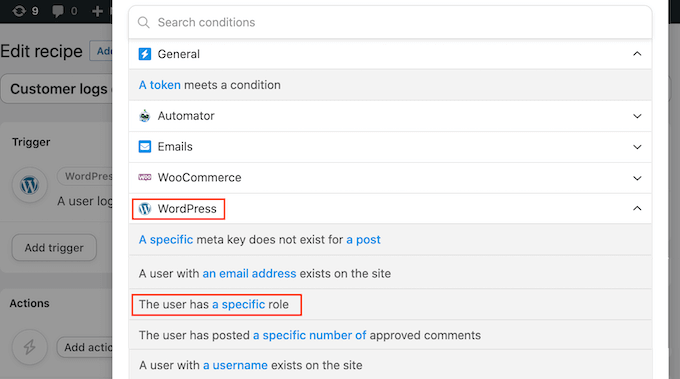
表示されたポップアップで、「WordPress」をクリックする。
次に、ドロップダウンメニューで「ユーザーには特定の権限があります」を見つけます。
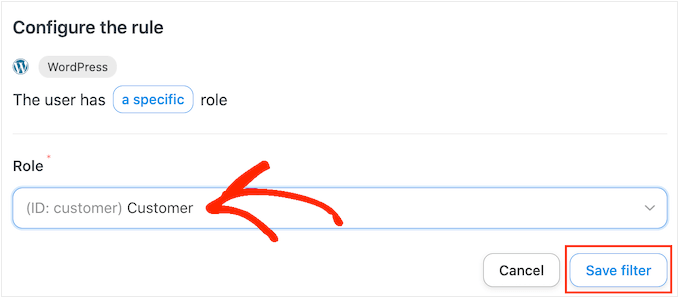
役割」ドロップダウンを開き、カスタマイザーに使用する権限グループを選択します。
その後、先に進み、『フィルターを保存』をクリックする。
次に、このワークフローが実行されるたびに、Uncanny Automatorが実行するアクションを指定します。
カスタマイザーにクーポンを含むメールを送りますので、先に進み、’アクションを追加’をクリックしてください。
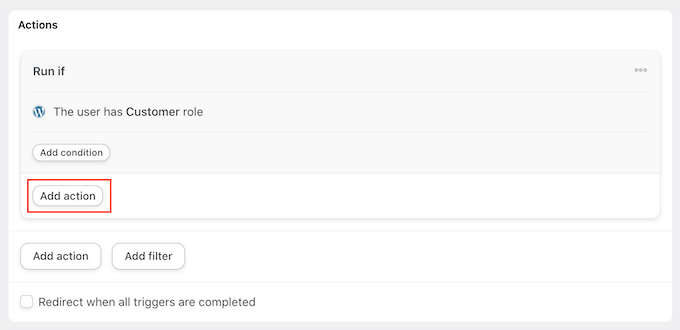
メールを送信したいので、統合として「メール」を選択する。
表示されるドロップダウンで、『メールを送信する』をクリックする。
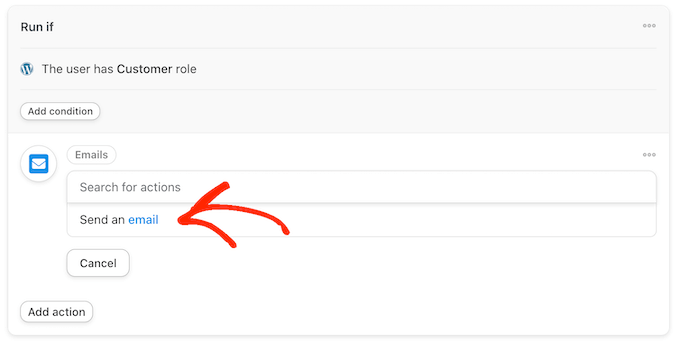
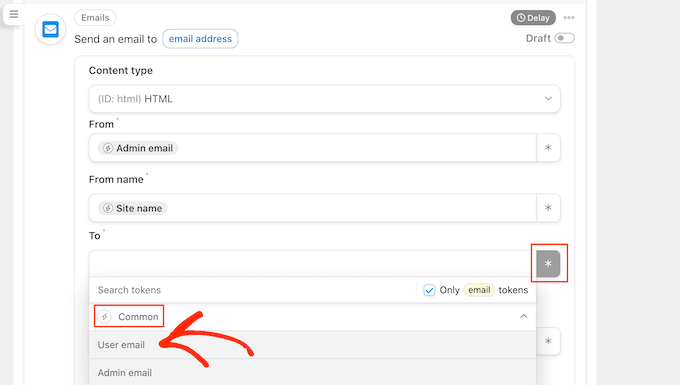
これで、メール作成に使用できるフィールドがすべて追加されます。
まず始めに、’To’フィールドの隣にあるアスタリスクをクリックして、メッセージが正しいユーザーに送られることを確認する必要がある。次に、『共通』と『ユーザーのEメール』を選択する。
件名と本文を追加してメールを作成します。
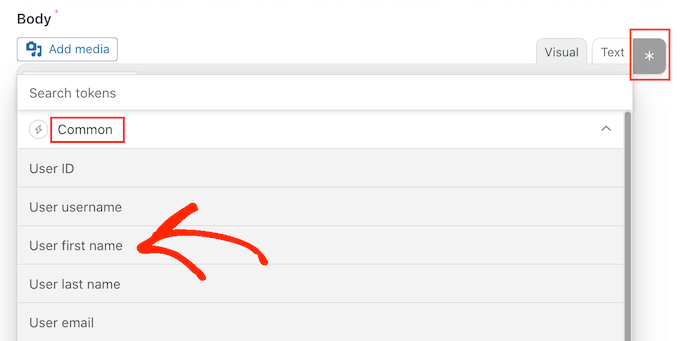
ここでは、プレーンテキストとトークン(Uncanny Automatorが自動的に実際の値に置き換えるプレースホルダー)を混ぜて使用できます。たとえば、カスタマイザーの名前を使用したい場合は、アスタリスクをクリックして「共通」を選択します。
ユーザー名」トークンを選択するだけで、パーソナライズされた挨拶文が作成されます。
また、クーポンを作成し、メールに追加する必要があります。
最も簡単な方法は、Advanced Couponsプラグインを使用することです。Advanced Couponsプラグインは、市場で最高のWordPressクーポンコードプラグインです。このプラグインを使用すると、より多くの売上を獲得し、ビジネスを成長させるために、さまざまな高度なクーポンを作成することができます。
ステップバイステップのガイドについては、スマートクーポンの作成方法に関する投稿日をご覧ください。
クーポンを作成したら、メールに追加するだけです。
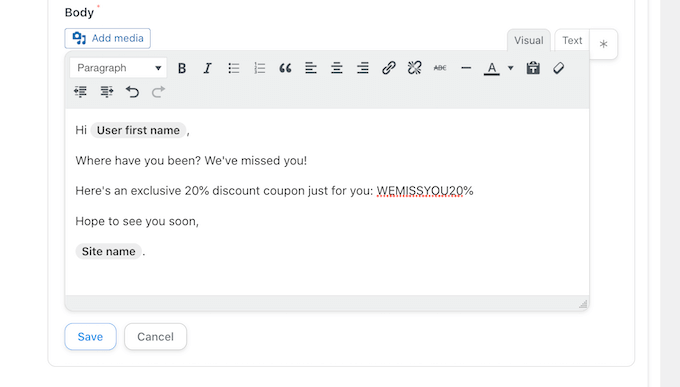
メールの見た目に満足したら、「保存」をクリックします。
その後、遅延時間を設定します。これは、カスタマがログ記録してからクーポンを送信するまでの時間です。
遅延を追加するには、「メール」アクションにマウスオーバーします。外観が表示されたら、’Delay’をクリックします。
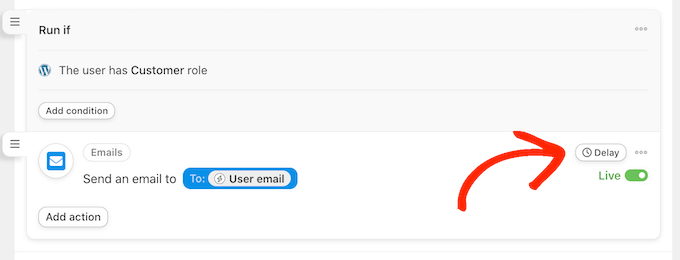
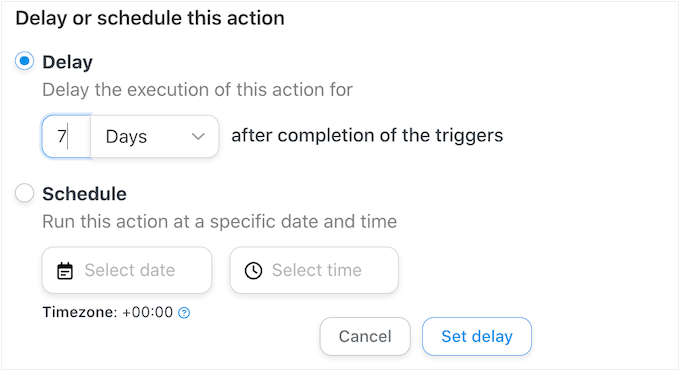
その後、表示されるポップアップでディレイを追加することができます。
そうしたら、『遅延を設定する』を選択する。
レシピの設定に満足したら、いよいよ有効化だ。
レシピ」ボックスで「下書き」スイッチをクリックし、代わりに「ライブ」と表示されるようにする。
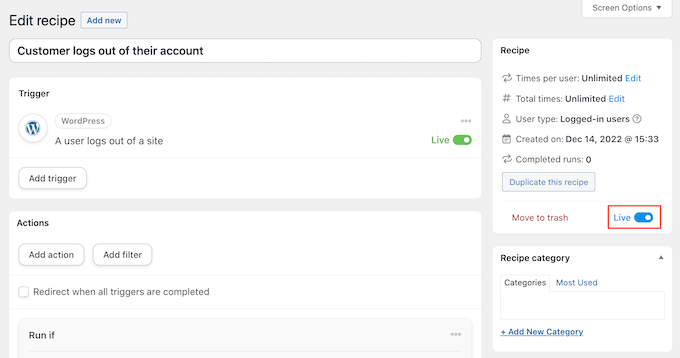
これだけです。これで、カスタマイザーがアカウントからログアウトすると、クーポンコードを送信する前に指定された時間待つようになります。
特定の商品のクーポンを自動的に送信する
買い物客が何度も商品を見ることがあるが、これはその商品に興味があるが購入に至らないことを示唆している。
このような場合、クーポンを送るとよい。
始めるには、上記と同じ手順に従ってログイン中ユーザー用の新規レシピを作成します。その後、’Select an integration’エリアで’WooCommerce’をクリックします。
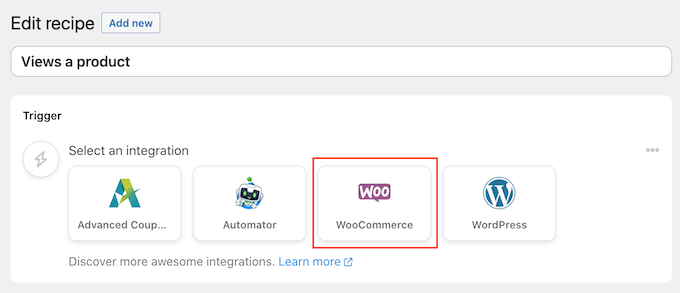
次に、次のように入力してトリガーを選択する ‘A user views a product’.
適切なトリガーが外観に現れたら、それをクリックする。

初期設定では、このトリガーは「Any product」に設定されています。
レシピを特定の商品にリンクさせたい場合は、’商品’ドロップダウンメニューを開き、リストからその商品を選択します。
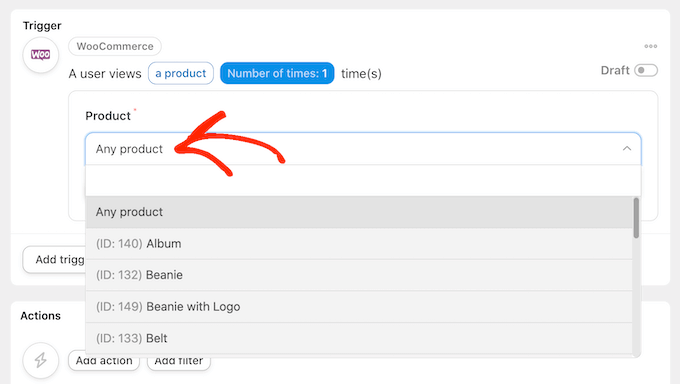
それが済んだら、『回数』ボタンをクリックする。
デフォルトでは、顧客が商品を見るたびにレシピが実行されます。レシピをトリガーする前にカスタマが商品を複数回見るように変更する必要があります。これを行うには、’回数’フィールドに異なる数値を入力してください。
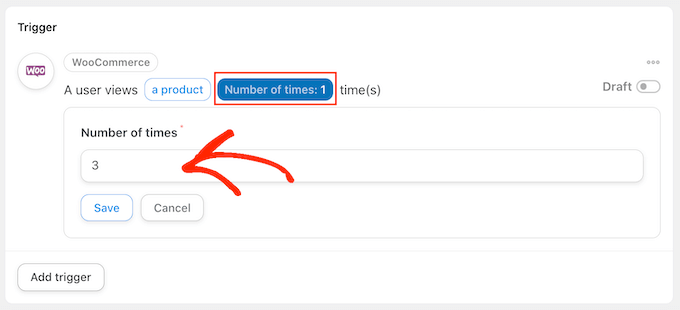
設定が完了したら、「保存」をクリックして設定を保存します。
このレシピはカスタマイザーが商品を表示した時にのみ実行されるべきなので、’Add Filter’をクリックします。表示されるポップアップで’WordPress’をクリックし、’The user has a specific role’を選択します。
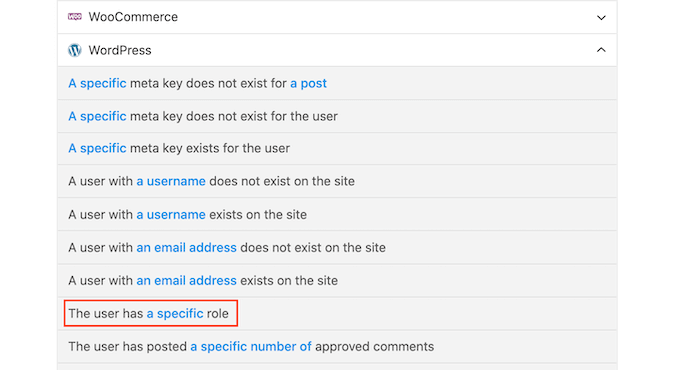
その後、「Role」ドロップダウンを開き、カスタマイザーに使用する権限グループを選択します。
準備ができたら、『フィルターを保存』をクリックします。
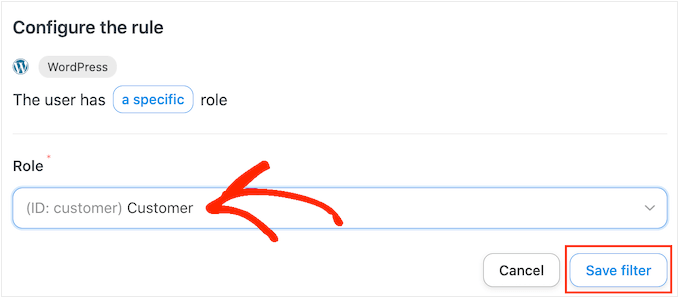
さて、いよいよアクションを追加しましょう。WordPressウェブサイトから自動クーポンを送信するには、いくつかの方法があります。
Uncanny AutomatorとAdvanced Couponsを使用してカスタマイザーにコードをメールするには、上記と同じ手順に従ってください。
もう一つのオプションは、WooCommerceを使用してコードを生成することです。これを行うには、’Add Action’をクリックし、インテグレーションとして’WooCommerce’を選択します。
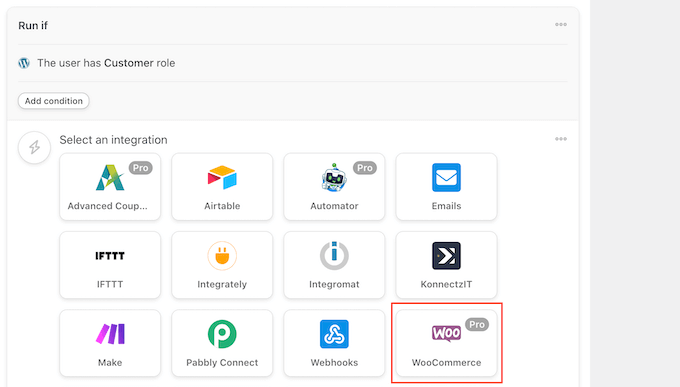
検索バーで、『クーポンコードをジェネレータし、ユーザーにメールする』とタイプし始める。
適切なオプションが設定されたら、それをクリックする。

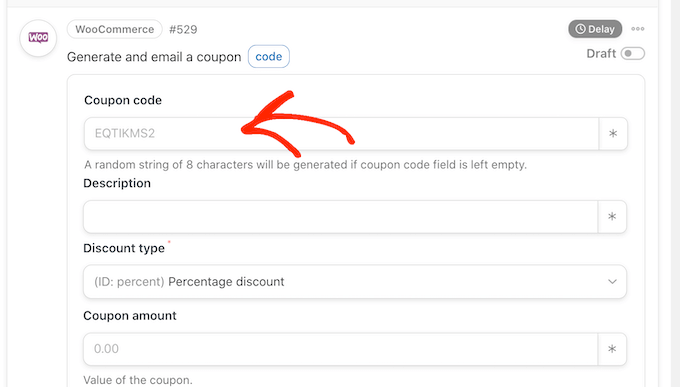
クーポンコードを作成するための新しい設定が追加されます。
コードを自動的に生成するには、「クーポンコード」フィールドを空白のままにします。
割引タイプ」フィールドで、固定カート割引やパーセンテージ割引など、作成したいクーポンの種類を選択します。
このガイドでは、「割引率」を選択します。
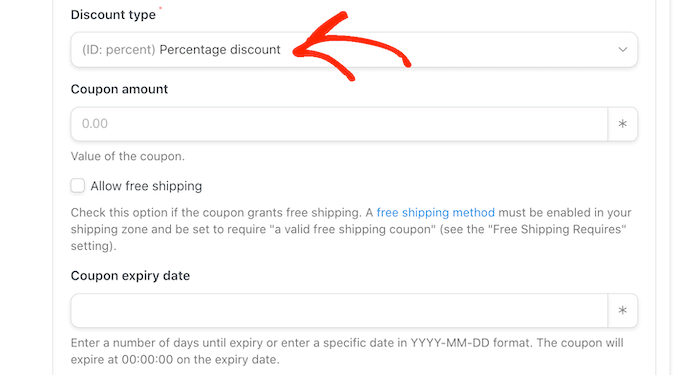
その後、「クーポン金額」フィールドに割引率を入力する。
以下の画像では、カスタマイザーに30%の割引を提供している。
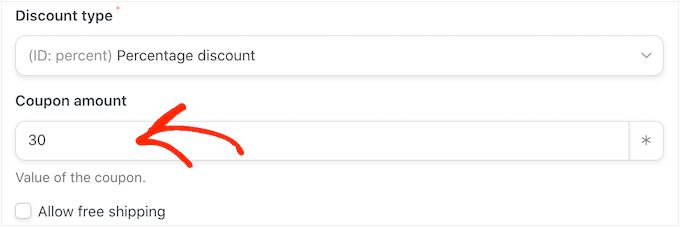
次のフィールドでは、YYYY-MM-DDフォーマットを使用するか、クーポンの有効期限までの日数を入力して、クーポンの有効期限を設定することができます。
例えば、以下の画像の場合、クーポンの有効期限は7日間です。
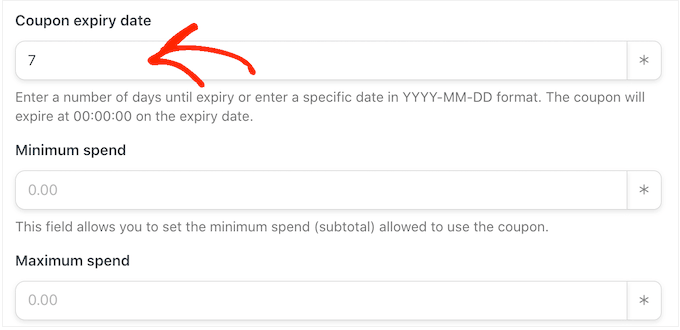
また、クーポンの最低金額と最高金額を設定することもできます。カスタマイザーがどのような購入でもコードを使用できるように、これらのフィールドは空白のままにしておきます。
また、カスタマイザーがこのコードを他のクーポンと併用できないように、「個人使用のみ」にチェックを入れておくとよいでしょう。
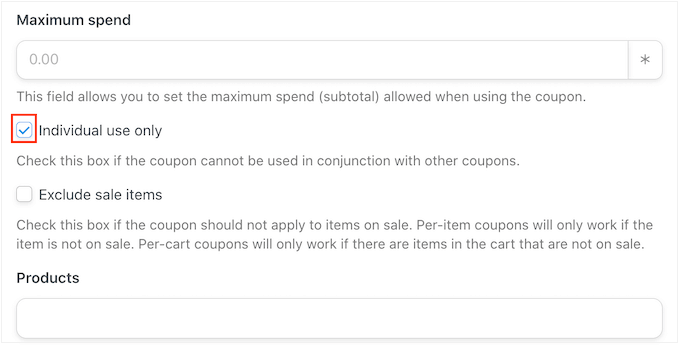
次に、’Usage limit per coupon’ セクションまでスクロールする。買い物客はクーポンを一度しか使えないはずなので、「1」と入力してください。
クーポンのために変更できる設定は他にもたくさんあります。これらの設定に目を通し、さらに変更を加えるかどうかを確認することをお勧めします。
クーポンの設定に満足したら、「メール」セクションまでスクロールします。まず、’To’フィールドを見つけ、その横にあるアスタリスクをクリックします。次に、’Common’をクリックし、’User email’を選択します。
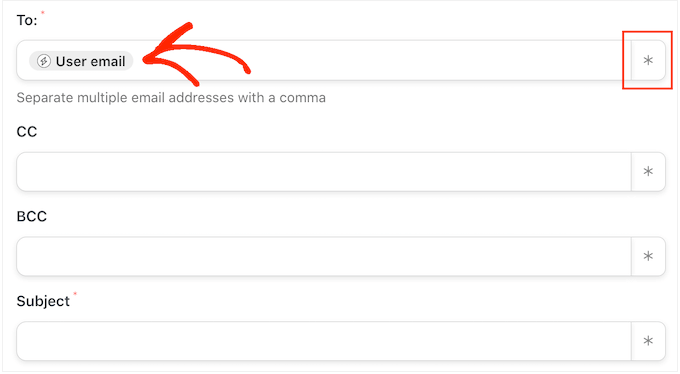
これで、件名を追加し、メール本文の引数を変更することができます。
よりパーソナライズされたメールを作成するには、上記と同じプロセスを踏んで、プレーンテキストとトークンをミックスして使用するのがよいでしょう。
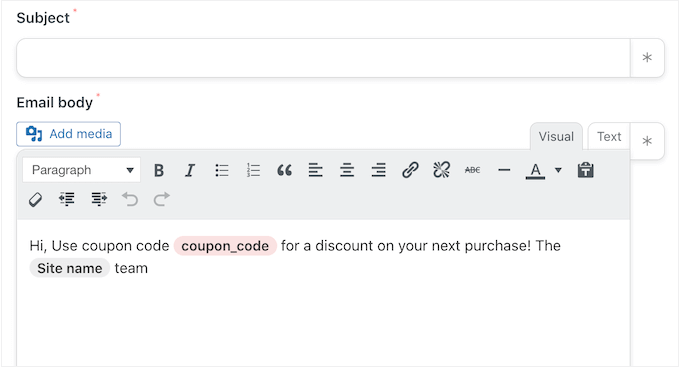
メールに問題がなければ、「保存」ボタンをクリックしてレシピを保存します。
その後、「下書き」スイッチをクリックして「ライブ」と表示させれば、レシピをライブにすることができる。
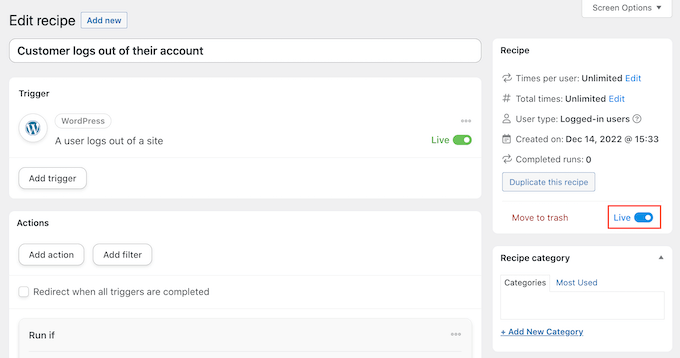
これで、誰かが商品を複数回表示するたびに、レシピワークフローが起動する。
この記事が、WordPressで自動クーポンを送信して顧客を呼び戻す方法を学ぶのにお役に立てば幸いです。また、WooCommerceのポップアップを作成して売上を増やす方法や、あなたのストアに最適なWooCommerceプラグインのガイドもご覧ください。
If you liked this article, then please subscribe to our YouTube Channel for WordPress video tutorials. You can also find us on Twitter and Facebook.


Jiří Vaněk
Sending out coupons is a very good method to attract people back to the store. The funnel kit method seems great and relatively simple. Moreover, it’s a great option to choose the range of days. Thank you very much for the instructions. It looks really promising.