誕生日や購入記念日は、カスタムとつながる絶好の機会です。
パーソナライズされた誕生日や記念日のメールを送ることは、ロイヤルティへの感謝を示す素晴らしい方法です。また、パーソナライズされたクーポンコードや割引などのインセンティブを提供することで、顧客に価値を感じてもらい、エンゲージメントを高め、売上を向上させることができます。
私たちのリサーチでは、割引コード付きのアニバーサリーメールやバースデーメールを自動送信している店舗は、多くの場合、顧客がサイトに戻り、再度購入する動機付けとなり、コンバージョンの向上に役立っていることが分かっています。
この投稿では、WooCommerceで誕生日リマインダーや購入記念メールを簡単に送信する方法をご紹介します。
誕生日・記念日メールを自動送信する理由
eコマースストアを運営しているのであれば、メールリストがあれば、すでにあなたのビジネスに興味を示している人たちに商品やサービスを宣伝することができます。
プロのヒントWordPressはメッセージを送信することができますが、WordPressを使ってメールを送信するべきではありません。より良い代替手段を見つけるには、専門家が選んだ中小企業に最適なメールマーケティングサービスをご覧ください。
メールリストを作成した後は、購読者の興味を引き続けることが重要です。誕生日や記念日のメールを自動配信するのも一つの設定です。
即座に、カスタマイザーはより評価され、感謝されていると感じ、ブランド・ロイヤルティを高めることができます。しかし、割引、クーポンコード、無料プレゼントなどの特典を提供することで、さらに多くのエンゲージメントと売上を獲得できることも多い。
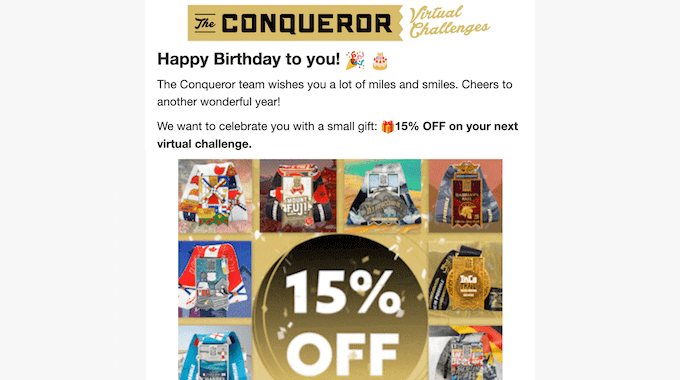
このようなメールマーケティングキャンペーンは、カスタマイザーにとても人気があります。実際、Omnisendによると、誕生日メールの開封率は45%、クリックスルー率は12%、コンバージョン率は3%で、これは全国平均をはるかに上回っている。
それでは、WooCommerceで誕生日や記念日のメールを自動送信する方法を見てみましょう。
誕生日・記念日メールを自動送信する方法
WooCommerceで誕生日や記念日の自動メールを送信する最も簡単な方法は、FunnelKit Automations Proを使用することです。WooCommerceサイトに最適な自動化ツールで、ドラッグアンドドロップビルダーを使ってWooCommerceメールをカスタマイズし、自動メールやSMSキャンペーンを作成することができます。
まず、FunnelKit Automations Proプラグインをインストールし、有効化してください。詳しくはWordPressプラグインのインストール方法をご覧ください。
また、プレミアムプラグインはより高度な機能のベースとして使用するため、無料のFunnelKit Automationsプラグインが必要です。
有効化したら、FunnelKit Automations ” Settingsへ行き、’FunnelKit Automations Pro’フィールドにライセンスを追加してください。
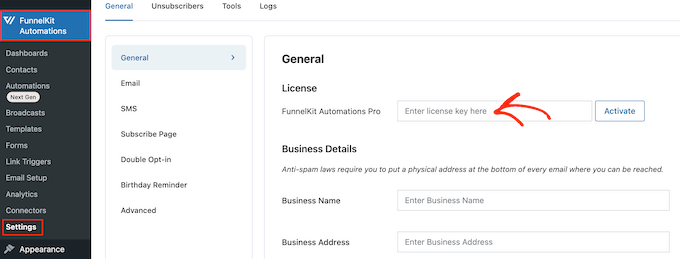
この情報は、FunnelKitサイトのお客様のアカウントにあります。キーを入力後、’有効化’ボタンをクリックしてください。
これで、誕生日や記念日のリマインダーメールを自動作成する準備が整いました。下記のクイックリンクからお好きなメールキャンペーンにお進みください。
WooCommerceで誕生日メールを自動送信する方法
パーソナライズされた誕生日メッセージは、カスタマイザーとカスタマーの関係を強化し、ブランドロイヤリティを高めるのに役立ちます。
さらに良いのは、誕生日メッセージに、パーソナライズされたクーポンコードや無料アップグレード、電子書籍などの無料デジタルダウンロードなどのプレゼントを添えることです。このようなプレゼントは、エンゲージメントを高め、カスタマーのウェブサイトへの訪問を促し、さらに売上を伸ばすことができます。
それでは、FunnelKit Automationsプラグインを使って誕生日メールを自動送信する方法を見てみましょう。
ステップ1.カスタマイザーの生年月日を取得する。
自動バースデーメールを送信する前に、カスタマーの生年月日を知る必要があります。この情報はWooCommerceの購入手続きページ、マイアカウントページ、またはサンキューページで収集することができます。
始めるには、WordPressダッシュボードのFunnelKit Automations ” Settingsにアクセスしてください。
左側のメニューで『誕生日リマインダー』を選択する。
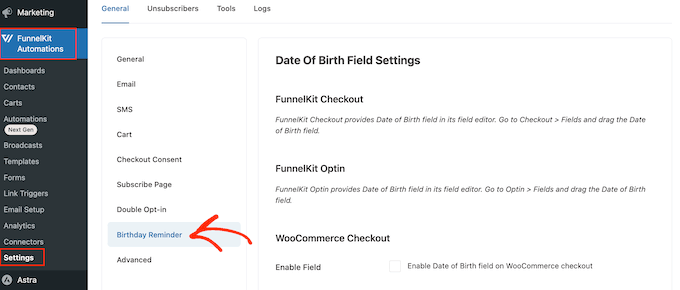
生年月日フィールドを追加する場所を選択できるようになりました。
最初の設定は、購入手続きページでこの情報を収集することです。
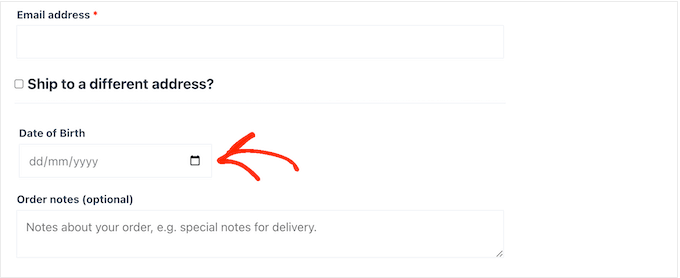
このフィールドを購入手続きの一部にすることで、確実に情報を得ることができます。しかし、これは購入プロセスに余分なステップを追加し、お買い物カゴの放棄率を増加させる可能性があります。
WooCommerceの購入手続きページにフィールドを追加するには、隣のボックスにチェックを入れるだけです:WooCommerceの購入手続きで生年月日フィールドを有効化する。
初期設定では、FunnelKitは’Date of Birth’ラベルを使用しますが、’Field Label’に入力することで’Birthday’のようなカスタマイザーに置き換えることができます。

フィールド位置」ドロップダウンを開くことで、WooCommerce購入手続きページ上のフィールドの外観を変更することもできます。
次に、請求詳細後、注文メモ前、注文メモ後のいずれかを選択します。

もう一つのオプションは、WooCommerceのマイアカウントページの「アカウント詳細」セクションにフィールドを追加することです。
これにより、購入手続きに手間をかけることなく、生年月日を収集することができます。ただし、すべてのカスタマイザーがマイページにアクセスして生年月日を入力するという保証はありません。
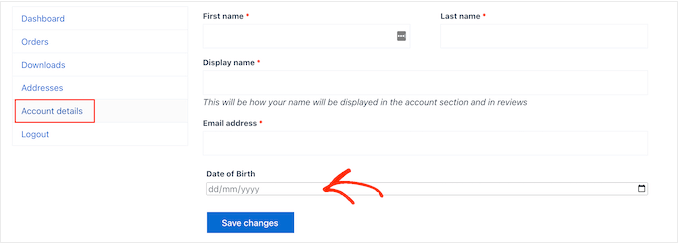
このフィールドをマイアカウントページに追加するには、「マイアカウントの生年月日フィールドを有効化」オプションの横にあるチェックボックスをオンにするだけです。
ラベルを変更するには、「フィールドラベル」にカスタマイザーメッセージを入力するだけです。

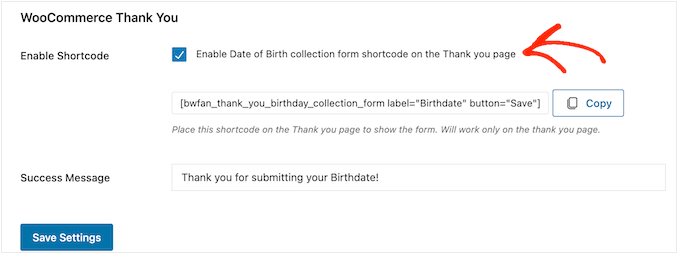
最後に、ショートコードを使用してサンキューページに誕生日フィールドを追加することができます。
こうすることで、購入手続きのステップを増やすことなく、生年月日を収集することができます。また、カスタマイザーは購入するたびにサンキューページを見るので、生年月日を入力する機会を何度も得ることができます。
ショートコードを作成するには、「サンキューページで生年月日収集フォームのショートコードを有効化する」というラベルの付いたボックスをチェックします。
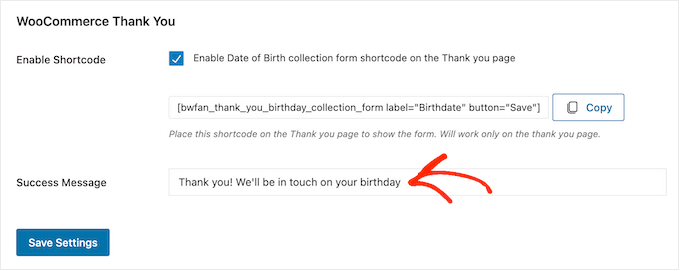
初期設定では、カスタマイザーが生年月日を入力すると、FunnelKitは以下のメッセージを表示します:生年月日を送信していただきありがとうございます!
これを独自のメッセージに置き換えるには、「サクセス・メッセージ」フィールドに入力するだけです。
その後、FunnelKitがショートコードを作成します。
コピー」ボタンをクリックして、コードをコンピューターのクリップボードにコピーしてください。
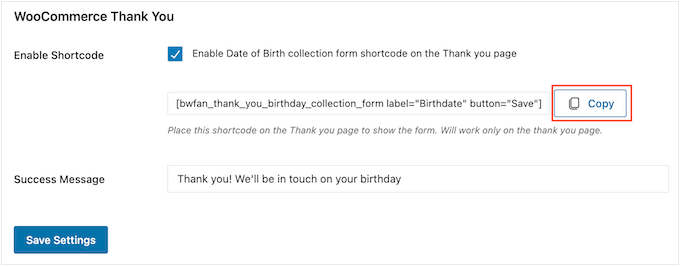
これでWooCommerceのサンキューページにショートコードを追加することができます。すでにカスタムページをお持ちでない場合は、WooCommerceのカスタムサンキューページを簡単に作成する方法のガイドをご覧ください。
サンキューページにショートコードを設置する方法については、WordPressでショートコードを追加する方法をご覧ください。
フィールドの設定に満足したら、「Save Settings(設定を保存)」をクリックして、フィールドを本番状態にします。
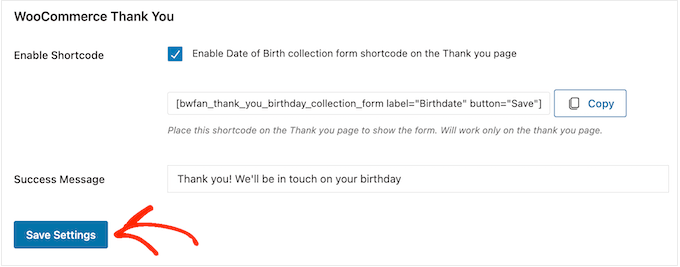
ステップ2.WooCommerceの誕生日メール自動送信を作成する。
カスタマイザーの生年月日を記録したら、次は自動ハッピーバースデー・ワークフローを作成しましょう。
開始するには、FunnelKit Automations ” Automations (Next-Gen)に行き、’Add New Automation’ ボタンをクリックしてください。
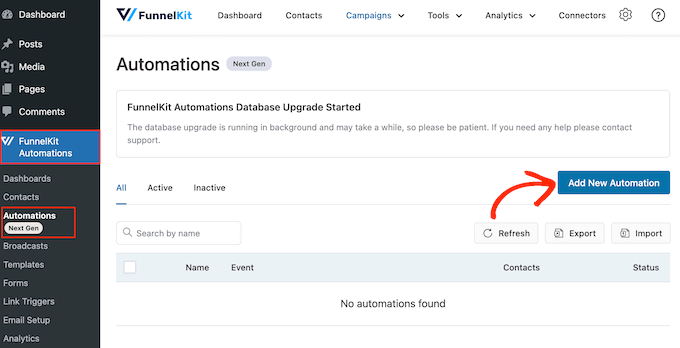
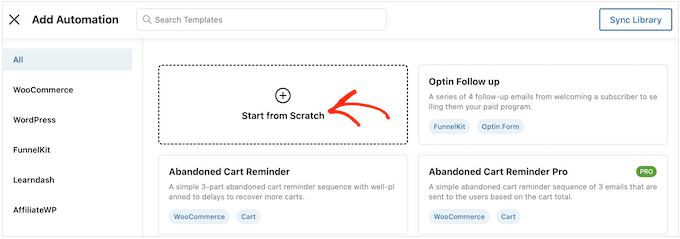
ここでは、お買い物カゴの回収やオンラインコースの販売など、すぐに使えるメールキャンペーンをすべてご覧いただけます。
誕生日メールを自動送信するには、「ゼロから始める」をクリックしてください。
オートメーションの名前を入力することができる。これは参考のためなので、好きなものを使っていい。
それが終わったら、『作成』をクリックする。
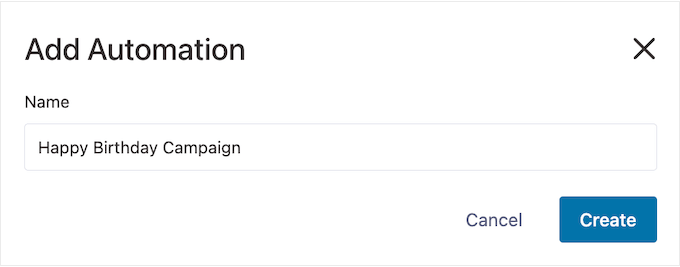
これでFunnelKitのユーザーフレンドリーなメール自動化ビルダーが起動し、WooCommerceワークフローを作成する準備が整います。
開始するには、「トリガーを選択」をクリックします。
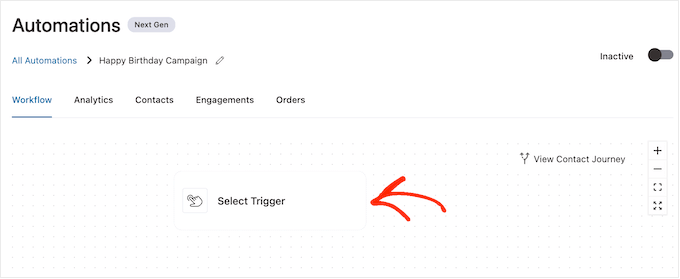
WordPressの自動ワークフローをトリガーするアクションを選択できます。
表示されるポップアップで、『誕生日リマインダー』をクリックする。
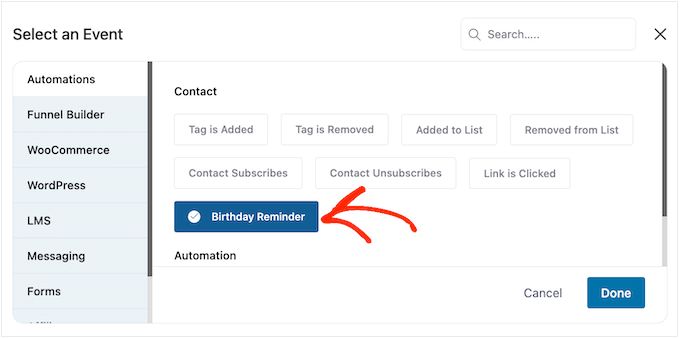
そして、「完了」を選択して、ワークフローにトリガーを追加します。
次のステップはトリガーの設定です。
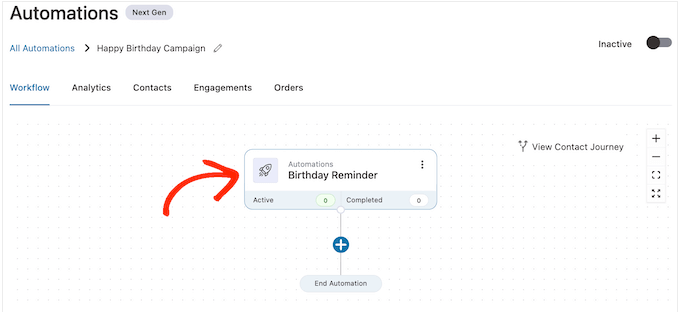
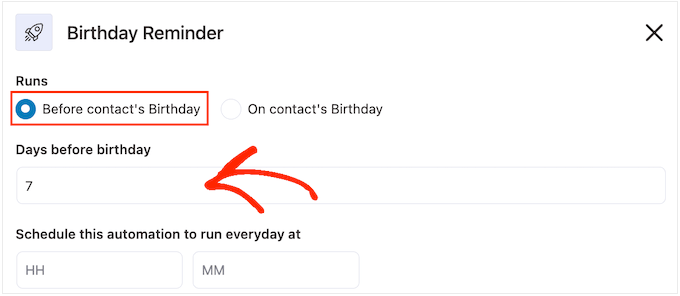
表示されるポップアップで、コンタクトの誕生日に自動化を実行するか、コンタクトの誕生日前に自動化を実行するかを選択できます。
このガイドでは、フォローアップメールの作成方法をご紹介します。例えば、カスタマイザーの誕生日の7日前に、パーソナライズされたクーポンコードを送信し、その後、クーポンの有効期限が迫っていることを警告するフォローアップメールを送信するとします。
それを念頭に置いて、「コンタクトの誕生日前」を選択し、日数を入力するとよいでしょう。
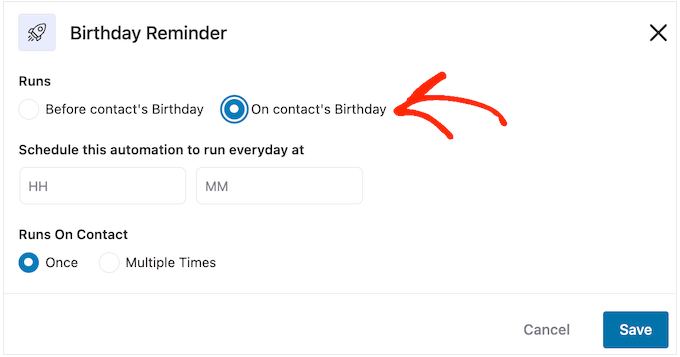
もう一つのオプションは、『コンタクトの誕生日に』を選択することです。
カスタマイザーに誕生日のお祝いをする場合や、有効期限のない無料ギフトクーポンを送る場合に適しています。
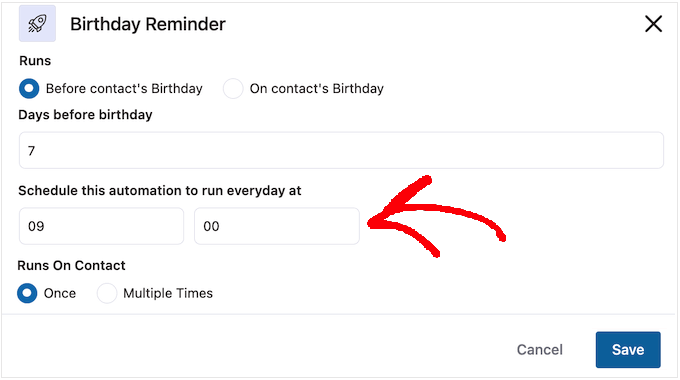
誕生日メールを送信する時間をFunnelKitに指示します。通常、カスタマイザーがオンラインにいる可能性の高い時間を使用します。
とはいえ、カスタマイザーについてできるだけ多くのことを知ることは役立ちます。もしまだなら、WordPressにGoogleアナリティクスをインストールすることをお勧めします。これにより、場所やタイムゾーンなど、カスタマイザーについてさらに詳しく知ることができます。
WooCommerceのカスタムメールをすべて継続的にモニタリングし、微調整することで、開封率やコンバージョン率を向上させることができるはずです。
特定の時間に自動バースデーメールを送信するには、初期設定で’HH'(時間)と’MM'(分)が表示されているフィールドに入力するだけです。
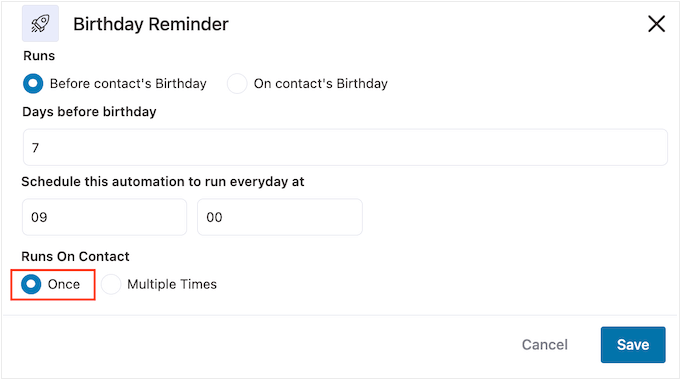
カスタマイザーは、同じワークフローに同時に複数回参加することが可能です。
これは、アップセルやクロスセリングの自動化など、複数のキャンペーンが同時に実行される可能性のある自動化ワークフローには良いアイデアかもしれません。ただし、誕生日キャンペーンの自動化には意味がありませんので、本当に〜してもよいですか?
トリガーの設定に満足したら、「保存」ボタンをクリックします。
ステップ3.パーソナライズされたバースデークーポンを作成する(オプション)
多くの企業が顧客の誕生日にクーポンコードを送っている。こうすることで、カスタマイザーは大切にされていると感じると同時に、より多くのエンゲージメントと売上を得ることができる。
このことを念頭に置いて、誕生日メールに追加するパーソナライズされたクーポンを作成するとよいでしょう。これを行うには、「+」をクリックし、「アクション」を選択します。
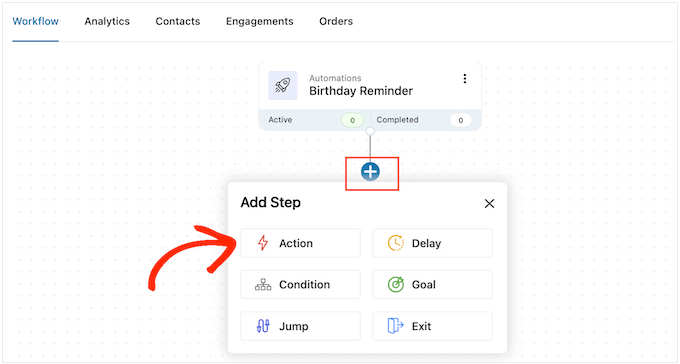
表示されたポップアップで「WooCommerce」タブをクリックします。
次に、「クーポンを作成」を選択する。
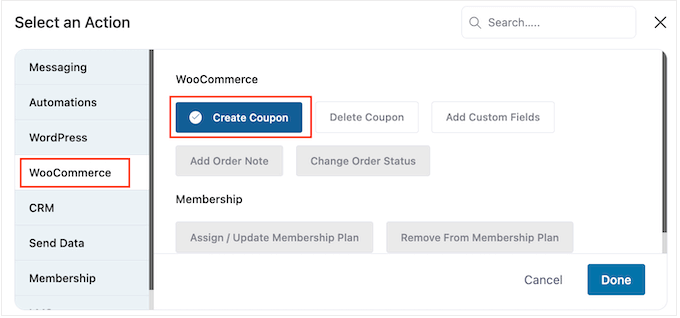
最後に「完了」をクリックして、ワークフローにアクションを追加します。
メインFunnelKitエディターに戻り、追加したアクションをクリックします。Create Coupon’アクションをカスタマイズするポップアップが開きます。
まず、「クーポンタイトル」フィールドにクーポンの名前を入力します。これは参考用ですので、お好きなものをお使いください。
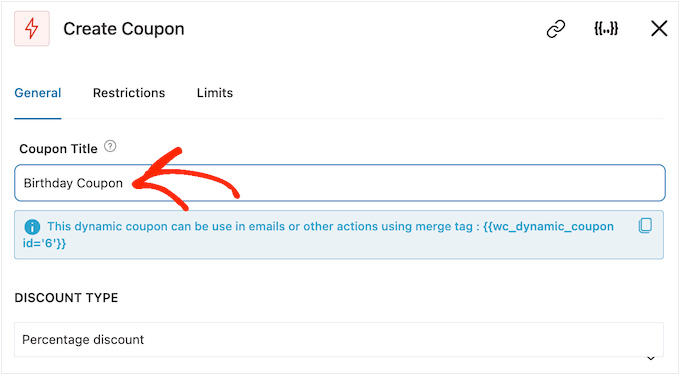
その後、「割引タイプ」ドロップダウンメニューを使用して、作成したいクーポンのタイプを選択します。
FunnelKitはパーセンテージ割引、固定お買い物カゴ割引、固定商品割引をサポートします。
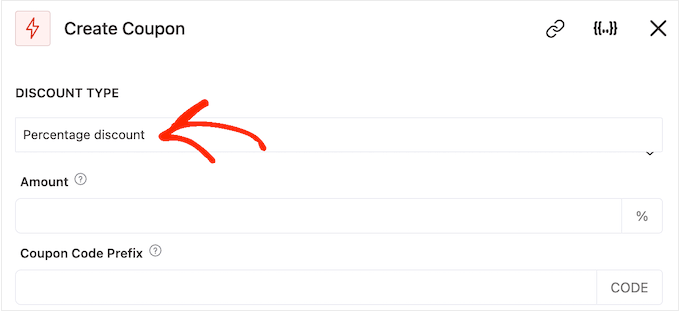
決定後、割引額を「金額」フィールドに入力する必要があります。
FunnelKitは自動的に各コンタクトにユニークなクーポンコードを作成します。プレインテキストまたはダイナミックマージタグをクーポンの先頭に追加することができます。
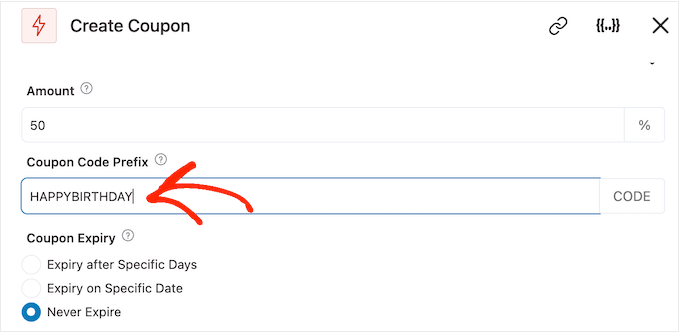
FunnelKitはコードを作成するたびにマージタグを実際のテキストに置き換えます。
誕生日メールを作成するのですから、クーポンにカスタマイザーの名前を入れるのは良いアイデアです。そうすることで、お客様の目を引くことができ、またコードを覚えやすくなります。
マージタグを使ってカスタマイザーの名前を追加できますので、「{{.}}」アイコンをクリックしてください。
注: 製品によってはマージタグに別の名前を使用しています。例えばWPFormsは スマートタグと呼んでいます。
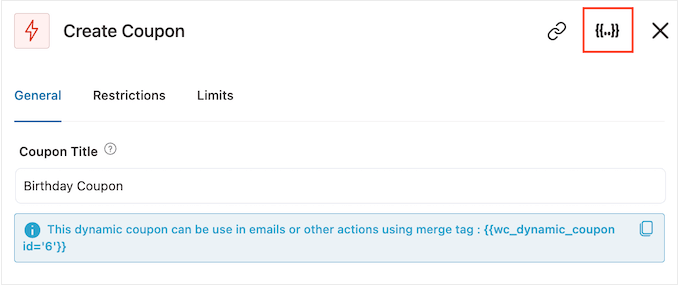
利用可能なマージタグをすべて見ることができるポップアップが開きます。
使いたいタグが見つかったら、「コピー」または「設定」アイコンが表示されます。コピー」のマークが表示されている場合は、クリックするだけでマージタグがコピーされます。
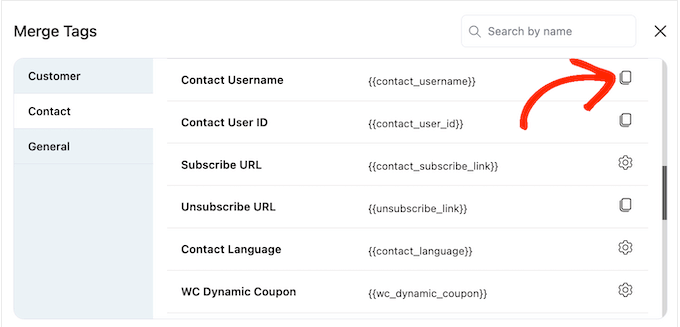
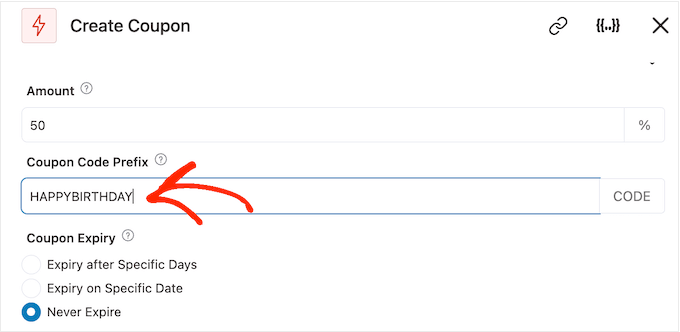
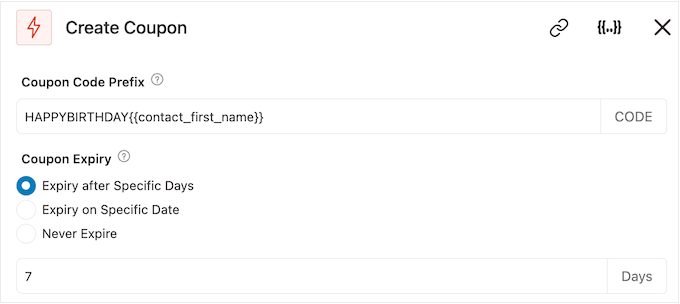
これで、タグを「クーポンコードのプレフィックス」フィールドに貼り付けることができます。
以下の画像にあるように、プレーンテキストとタグを混在させることができる。
タグを見ていると、「コピー」アイコンの代わりに「設定」アイコンが表示されることがあります。
例えば、以下の画像では、「コンタクト名」マージタグの横に「設定」アイコンが表示されています。
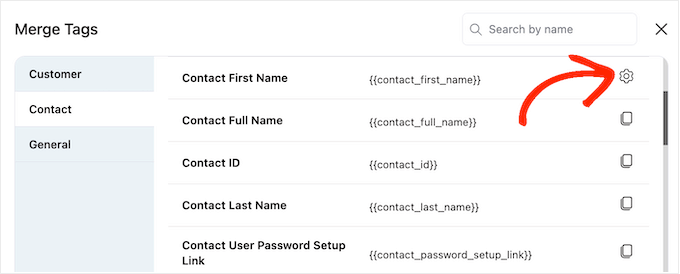
このアイコンは、FunnelKitが実際の値にアクセスできない場合に使用するフォールバックを設定することができます。
設定」アイコンが表示されたら、それをクリックし、「フォールバック」フィールドにテキストを入力する。
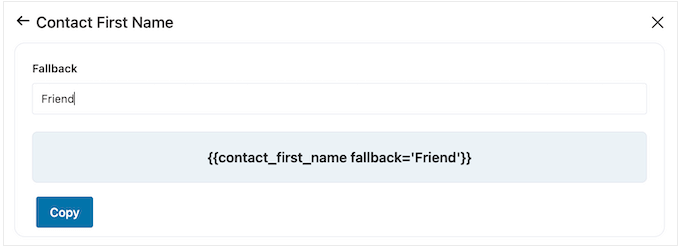
フォールバックを作成したら、「コピー」をクリックします。これで、マージタグを’Coupon Code Prefix’フィールドに貼り付けるだけです。
初期設定では、クーポンの有効期限はありません。緊急感とFOMOはカスタマイザーにクーポンの使用を促すことができます。
その後、WooCommerceでクーポンをスケジュールするためにコントロールを使用することができます。
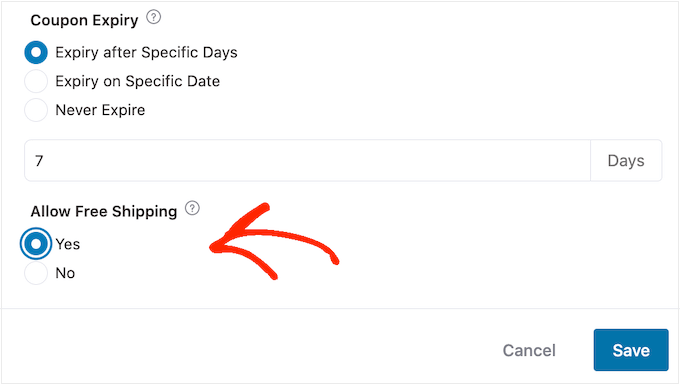
最後に、そのクーポンが買い物客に送料無料割引を与えるかどうかを選択できる。
カスタマイザーは送料無料が大好きなので、「Allow Free Shipping(送料無料を許可する)」の下にある「Yes(はい)」のラジオボタンを選択することをお勧めします。
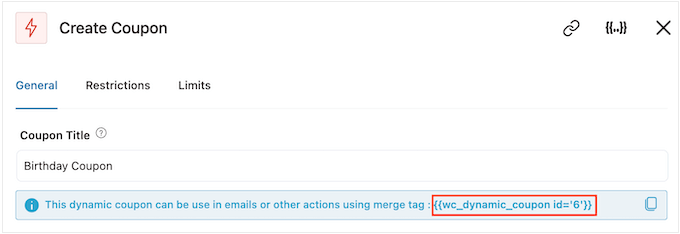
クーポンの設定に満足したら、「クーポンタイトル」の下にあるコードをコピーしてください。
このコードを誕生日メールに追加する必要があるので、安全な場所に保管してください。
完了したら、「保存」をクリックして変更を保存します。
ステップ4: WooCommerce自動誕生日メールのデザイン
いよいよカスタマイザーに送信するWooCommerceメールを作成します。
開始するには、「+」ボタンをクリックし、「アクション」を選択する。
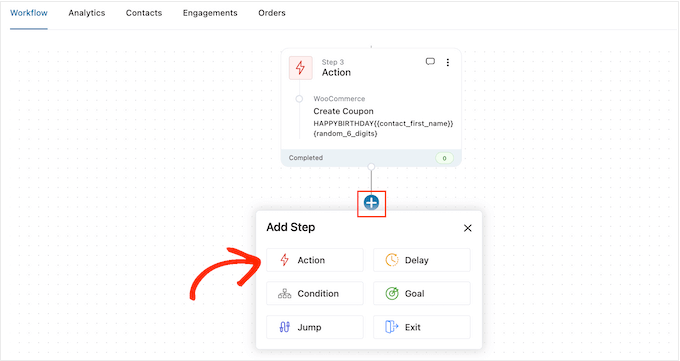
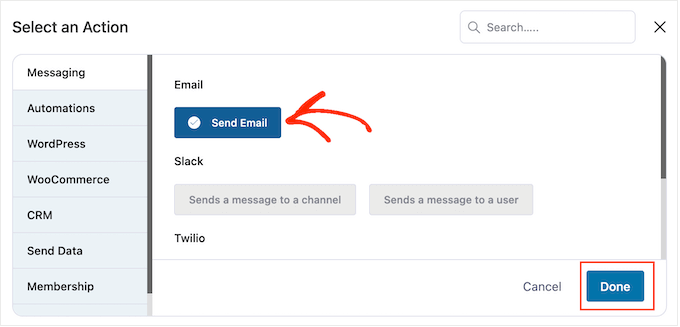
表示されるポップアップで「メールを送信」を選択する。
そして、『完了』をクリックする。
件名を入力してメールを作成し、プレビューできるようになりました。
プレーンテキストとマージタグを混ぜて使用することができます。マージタグを追加するには、タグを使用したいフィールドの横にある「{{.}}」アイコンをクリックしてください。
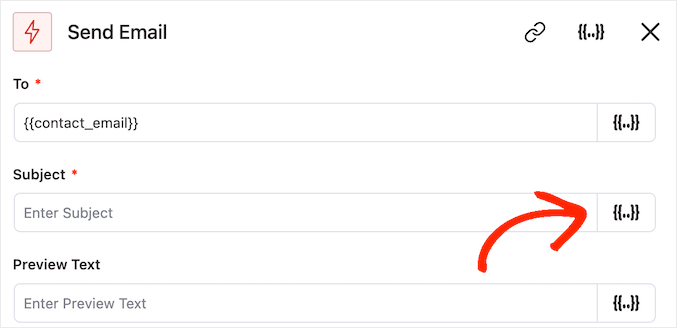
その後、上記と同じ手順でマージタグを追加することができる。
被写体とプレビューに満足したら、小さなテキストエディターまでスクロールする。
ここでは、エディターに入力してメール本文を作成することができます。また、「Merge Tags」を選択し、上記の手順でダイナミックタグを追加することもできます。
クーポンコードを追加するには、前のステップでコピーした{{wc_dynamic_coupon id='6'}}コードをペーストまたはコードタイプするだけです。ユーザーに送信する割引のID番号を再確認してください。
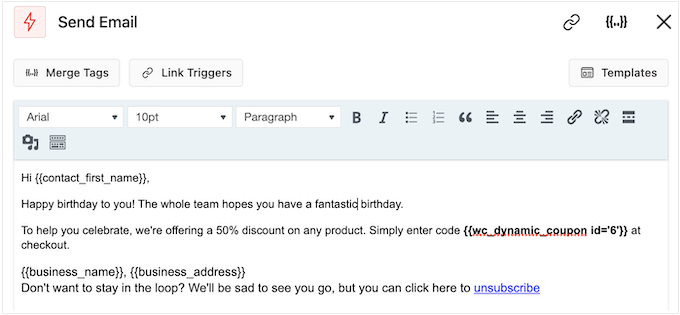
テキストエディターには、標準的なテキスト設定オプションがすべて用意されているので、リンクの追加、テキストサイズの変更、フォントの変更などが可能です。
メールがカスタマイザーにどのように表示されるかを確認するには、「プレビューを表示」ボタンをクリックしてください。
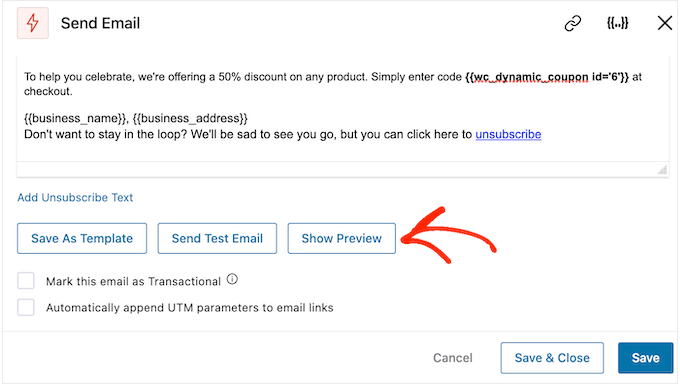
誕生日メールの設定が完了したら、「保存して閉じる」ボタンを忘れずにクリックしてください。
ステップ5:誕生日キャンペーンにフォローアップメールを追加する
この時点で、キャンペーンに1つ以上のフォローアップメールを追加するとよいでしょう。例えば、事前にカスタマイザーの誕生日クーポンを送り、誕生日に簡単な挨拶を送るなどです。
フォローアップメールを作成する際には、カスタマイザーがすべてのメッセージを同時に受け取らないように、遅延を加えることが重要です。
これを行うには、「+」アイコンをクリックし、「ディレイ」を選択する。
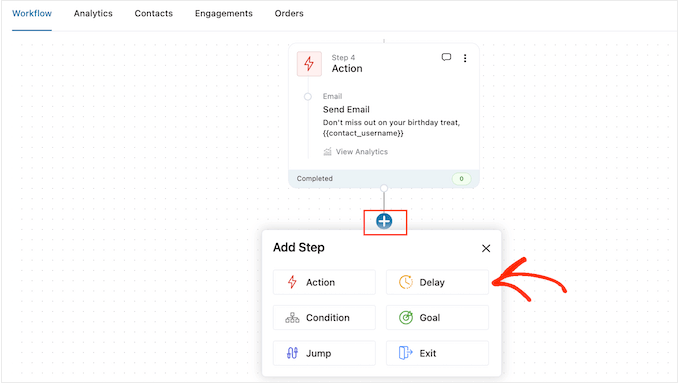
この画面で、初期設定では「分」と表示されているドロップダウンを開き、リストから値を選択します。バースデーメールシーケンスを作成する場合、通常は「日」または「週」のいずれかを選択します。
その後、「1週間」や「3日間」など、使用したい値を入力する。
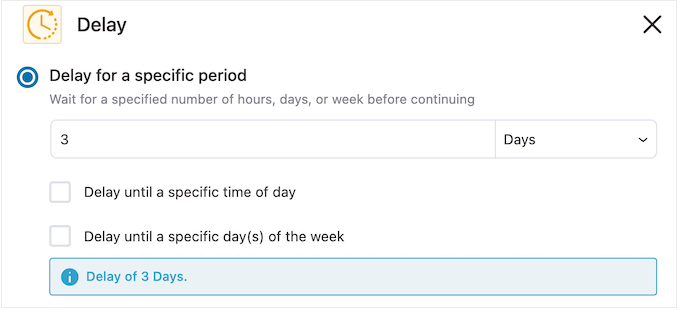
これで、FunnelKitがフォローアップメールを送信する時間を設定できます。
通常、カスタマイザーがオンラインにいる可能性の高い時間帯や、開封率が最も高くなる時間帯にメールを送るのがよいでしょう。
これを行うには、以下のボックスにチェックを入れるだけです:特定の時間帯まで遅延させる。
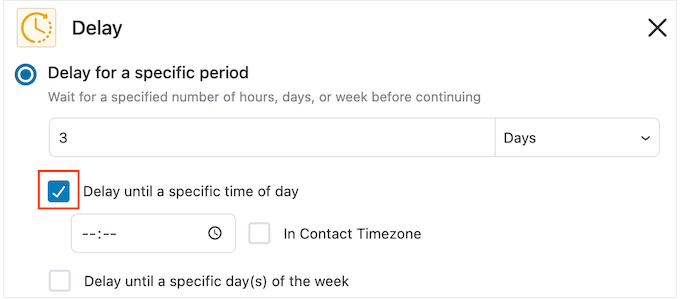
表示される新しい設定を使って時間を設定することができます。
初期設定では、FunnelKitはWordPress設定のタイムゾーンを使用します。しかし、’In Contact Timezone’ボックスをチェックすることで、カスタマイザーのタイムゾーンに基づいてメッセージをスケジュールすることができます。
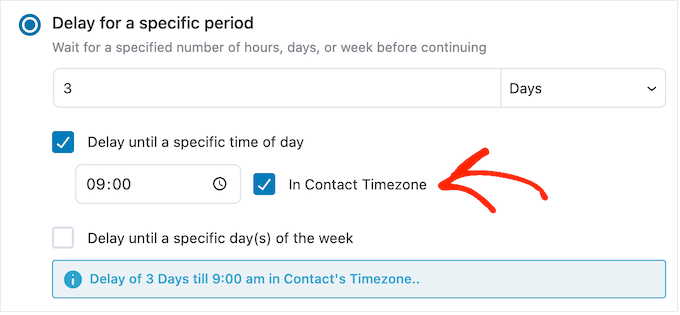
ディレイの設定に満足したら、『保存』をクリックする。
これでフォローアップメールの作成は完了です。先に進み、「+」アイコンをクリックし、「アクション」を選択します。
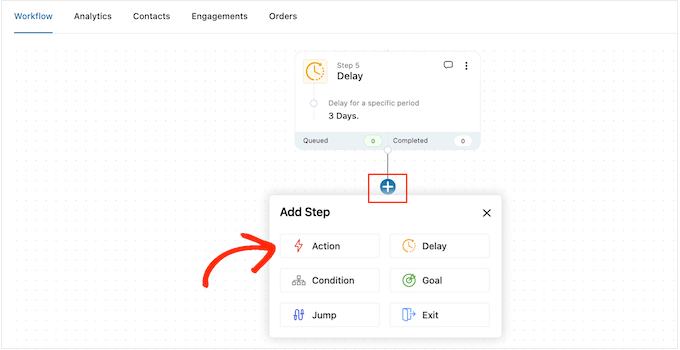
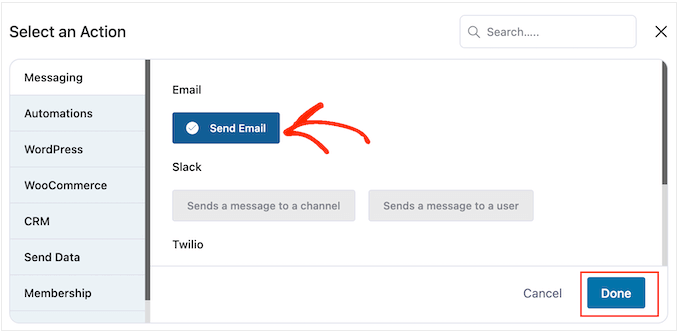
表示されるポップアップで、「メールを送信」を選択します。
その後、『完了』をクリックする。
件名とプレビューを作成するポップアップが開きますので、上記と同じ手順で本文を入力してください。
フォローアップメールに満足したら、忘れずに「保存して閉じる」をクリックしてください。
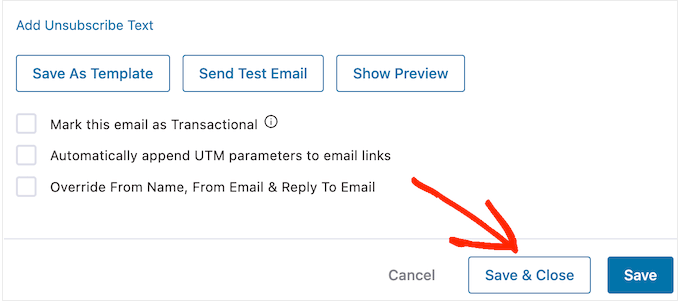
さらに遅延やフォローアップを追加するには、この手順を繰り返すだけでよい。
WordPressウェブサイト上で自動化を実行する準備ができたら、’Inactive’スライダーをクリックして’Active’にする。
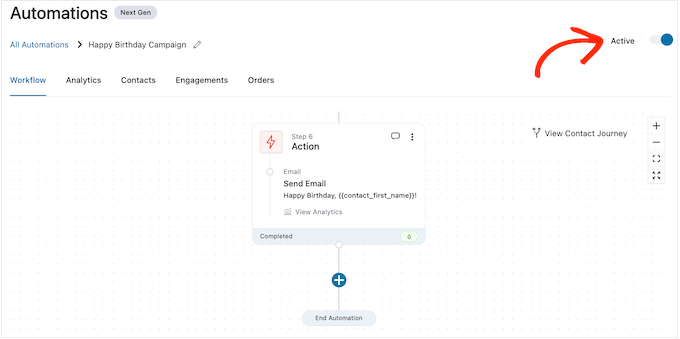
これで完了です。FunnelKitはあなたのカスタマイザーに自動バースデーメールを送信します。
WooCommerceで記念日メールを自動送信する方法
購入記念日は、カスタムと連絡を取り合い、オンラインストアを思い出してもらうチャンスです。
また、より多くのコンバージョンを獲得するためにアニバーサリーメールを利用することもできます。例えば、物理的な商品を販売している場合、1つ購入すると1つ無料になるクーポンや送料無料クーポンを提供することで、カスタマイザーに再注文を促すことができます。
WooCommerce Subscriptionsのようなプラグインを使用してサブスクリプションを販売している場合、無料アップグレードを提供することで、カスタマイザーに年間サブスクリプションの更新を促すことができます。
さらに良い方法は、これらのクーポンや特別オファーを、ロイヤルカスタマーであることに対する特別な報酬として提示することです。こうすることで、カスタマイザーは大切にされていると感じ、特典を利用するようになる。
ステップ1.WooCommerceのアニバーサリーメールオートメーションを作成する。
まずは、FunnelKit Automations ” Automations (Next Gen)で新規WooCommerceオートメーションを作成します。
ここで、Add New Automationを選択する。
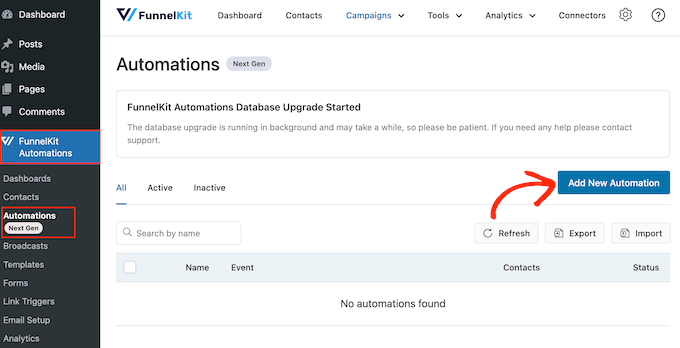
これで、使用できるすべての既製の自動化テンプレートが表示されます。
記念日メールを作成するには、「ゼロから始める」をクリックしてください。
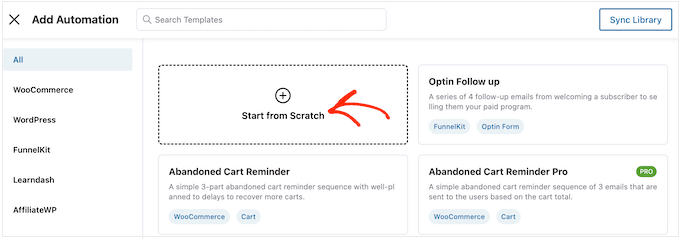
オートメーションの名前を入力することができる。これは参考のためなので、好きなものを使っていい。
それが終わったら、『作成』をクリックする。
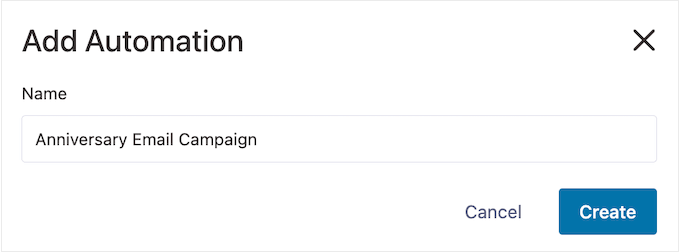
ステップ2.注文作成トリガーを追加する
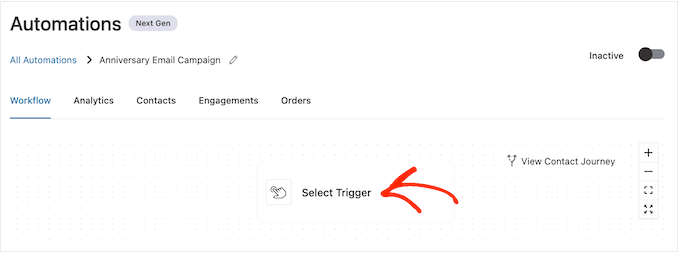
最初のステップはワークフロー・トリガーを追加することなので、「Select Trigger」をクリックする。
表示されるポップアップで、「WooCommerce」タブを選択します。
そして、『オーダー作成』をクリックする。
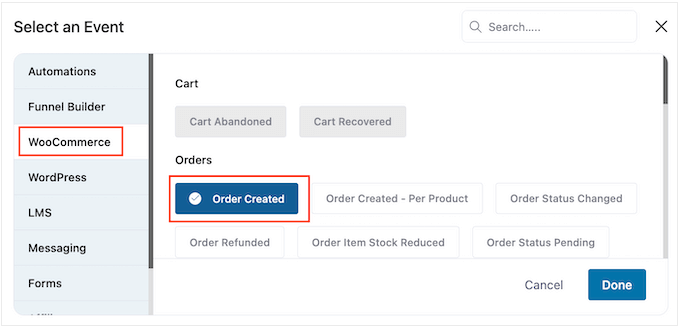
次に、「完了」をクリックして、ワークフローにトリガーを追加します。
次のステップはトリガーの設定です。
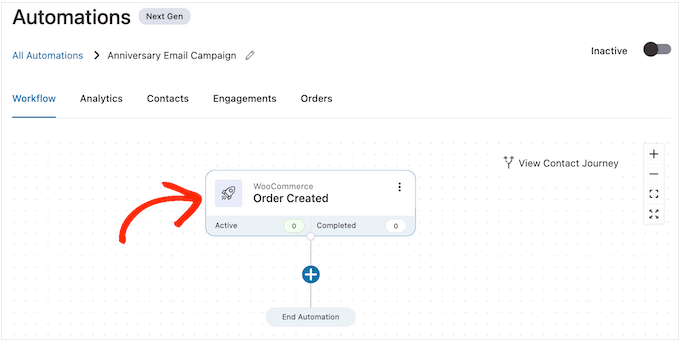
トリガーで使用する注文状態を選択することができます。
購入記念メールを送信するのですから、通常は「Completed」の隣にあるボックスにチェックを入れます。
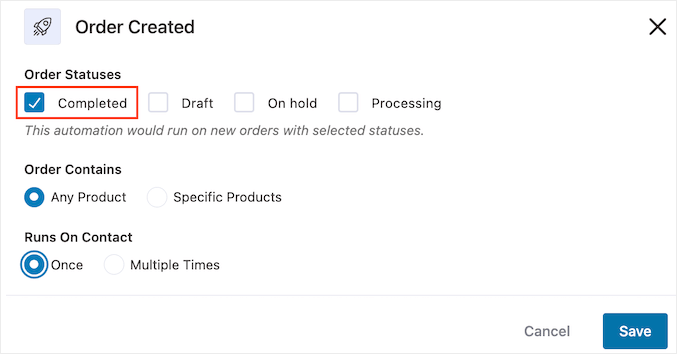
ただし、注文の完了に時間がかかる場合は、「下書き」または「処理中」を選択するとよいでしょう。例えば、注文を手動で承認する場合、完了日ではなく、注文が作成された日付を使用することは理にかなっているかもしれません。
初期設定では、FunnelKitはカスタマイザーが購入する商品毎にこの自動化ワークフローを実行します。これは、あなたのオンラインマーケットプレイスが少数の商品しか持っていない場合や、より高価で豪華な項目を販売している場合に良い選択です。
しかし、カスタマイザーが小さな商品をたくさん購入することが多い場合、個別購入ごとにこのワークフローを実行すると、記念日メールがたくさん作成される可能性があります。これでは、顧客はすぐにイライラしてしまいます。
とはいえ、特定の商品のみを対象とした自動アニバーサリーワークフローを実行したい場合もあるでしょう。これを行うには、「特定の商品」ラジオボタンを選択し、「商品名で検索」フィールドに各商品を入力します。
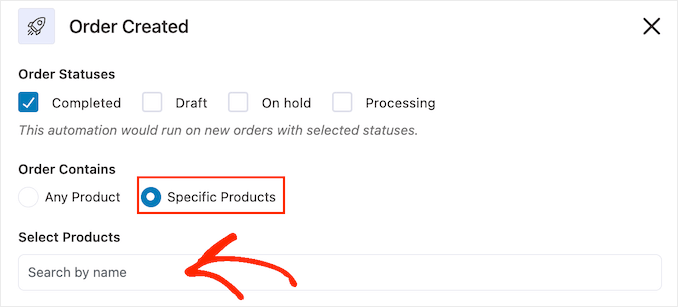
次に、カスタマイザーがこのワークフローに複数回、同時に参加できるかどうかを選択できます。初期設定は「1回」ですので、WordPressサイトでどのように機能するか見てみましょう。
カスタマイザーが項目1を購入した場合、FunnelKitはそのカスタマイザーを項目1のアニバーサリーオートメーションに追加します。しかし、その買い物客が項目2を購入した場合、すでにワークフロー内にいるため、項目2のアニバーサリーワークフローには追加されません。
これにより、FunnelKitが短時間に同じ顧客にたくさんのアニバーサリーメールを送信するのを止めることができます。
もう一つのオプションは、カスタマイザーが項目を購入するたびにワークフローに追加する方法です。これは、高価な項目や高級な項目を販売する場合に良い選択です。例えば、オンライン・ブティック・ショップを経営しているのであれば、個別購入記念日を祝うことは理にかなっているかもしれません。
この変更を行うには、「複数回」の隣にあるボタンを選択します。次に、以下のトグルをクリックします:このオートメーションで現在有効化したコンタクトに再入力を許可する。

トリガーの設定に満足したら、「保存」をクリックします。
ステップ3.ディレイを追加する
ここで、遅延を設定する必要があります。これは、カスタマイザーにアニバーサリーメールを送信するまでの時間です。
開始するには、『+』をクリックし、『ディレイ』を選択する。
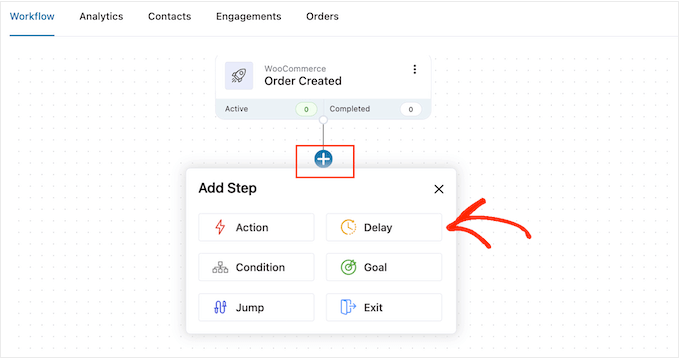
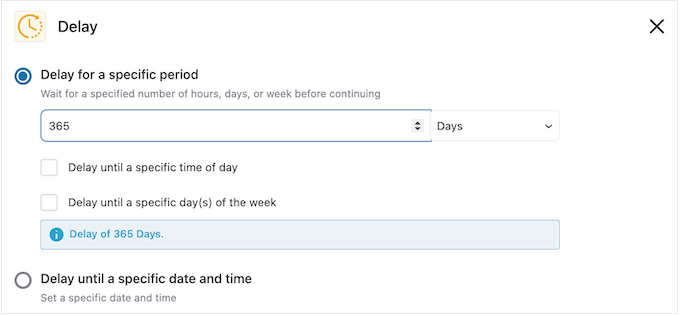
ポップアップで、初期設定では「分」と表示されているドロップダウンを開き、リストから値を選択します。記念日メールを作成する場合は、通常「月」または「日」を選択します。
その後、使用したい値を入力します。例えば、カスタマイザーの購入記念日を1年にしたい場合、12ヶ月または365日に設定する必要があります。
アニバーサリーメールは、カスタマイザーがオンラインにいるときに送るのが一般的です。
それを念頭に置いて、『特定の時間帯まで遅らせる』に時間を入力するといいだろう。
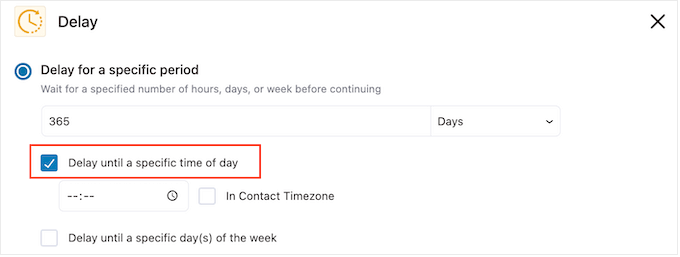
初期設定では、FunnelKitはWordPress設定のタイムゾーンを使用します。
ただし、「In Contact Timezone」にチェックを入れて、カスタマイザーのタイムゾーンを使用することもできます。
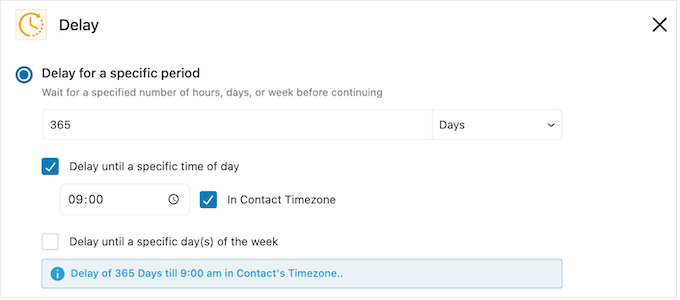
設定が完了したら、「保存」をクリックして設定を保存します。
ステップ4.パーソナライズされたクーポンコードを作成する(オプション)
パーソナライズされたクーポンコードを送信することで、顧客のロイヤリティを高めることができます。
これは、カスタマイザーのサブスクリプションが期限切れになる場合に特に有効な設定です。単に有効期限について顧客にリマインドする代わりに、WooCommerceで購読を更新した場合、忠実な購読者であることを祝福し、割引を提供することができます。
パーソナライズクーポンコードを作成するには、FunnelKitエディターで’+’アイコンをクリックしてください。次に、’Action’を選択します。
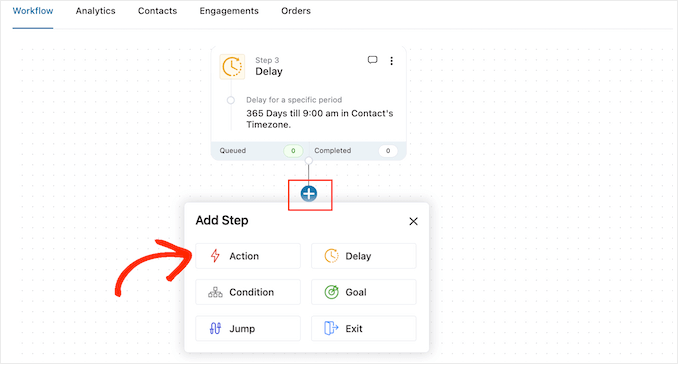
表示されるポップアップで、「WooCommerce」タブを選択します。
次に、「クーポンを作成」をクリックする。
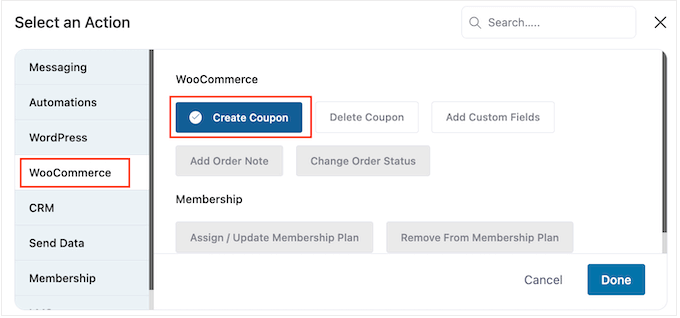
最後に「完了」をクリックして、アクションをワークフローに追加します。
クーポンの作成」をクリックします。
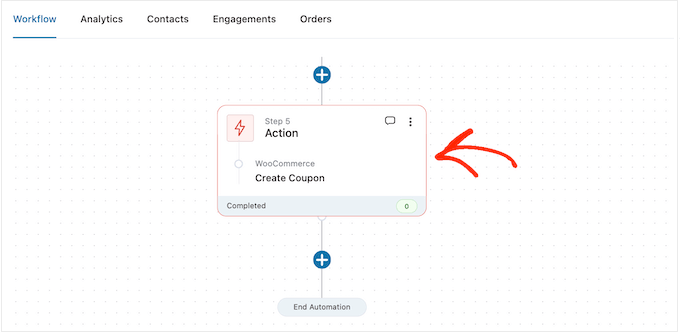
クーポンを作成し、FunnelKitマージタグを追加してパーソナライズするポップアップが開きます。
ステップ・バイ・ステップの手順については、上記と同じ手順に従ってください。
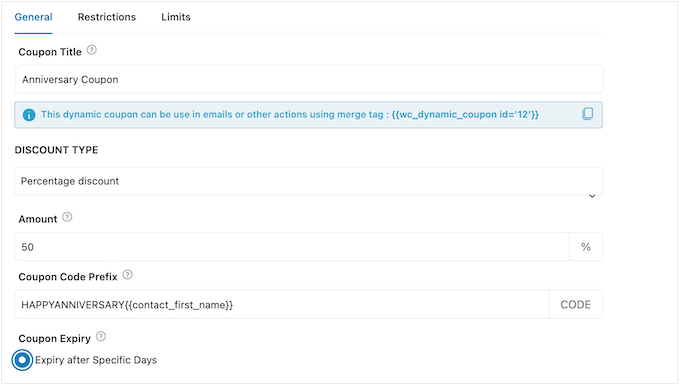
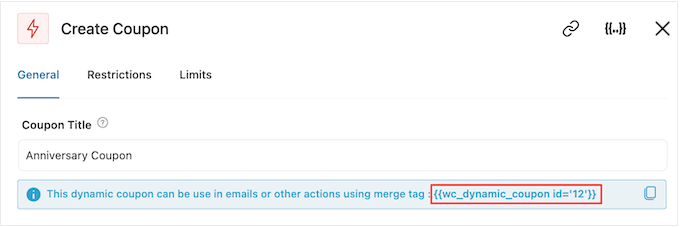
クーポンの設定に満足したら、「クーポンタイトル」の下にある小さなコードをコピーします。
次のステップでは、このコードを記念メールに追加しますので、安全な場所に保管してください。
完了したら、「保存」をクリックして、クーポンコードをワークフローに追加します。
ステップ5.WooCommerceアニバーサリーメールのデザイン
ボタンをクリックして、FunnelKitが記念日にカスタマイザーに送信するメールを作成します。
そして、『アクション』を選択する。
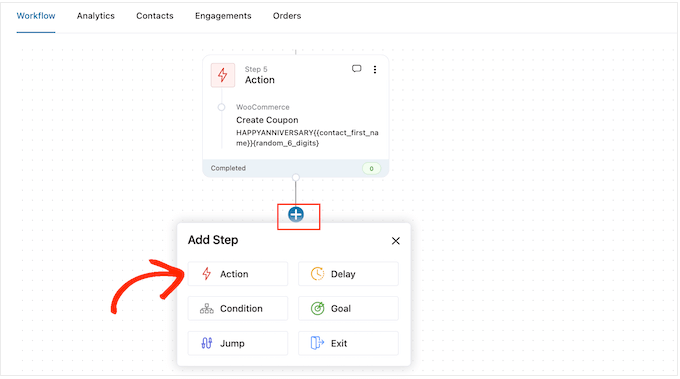
表示されるポップアップで「メールを送信」を選択する。
そして、『完了』をクリックする。
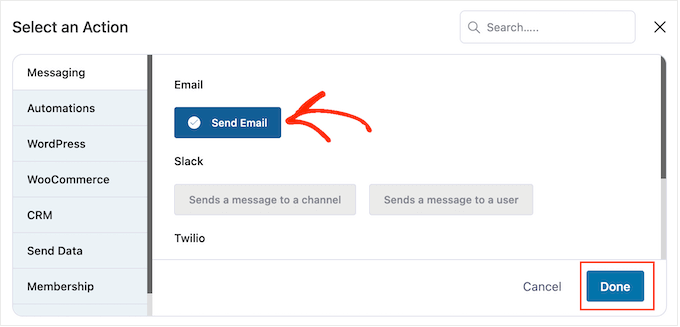
件名、プレビュー、本文を入力してメールを作成できるようになりました。
マージタグを追加することで、メールをパーソナライズすることもできます。例えば、カスタマイザー名、店舗名、その他重要な情報を記載することができます。
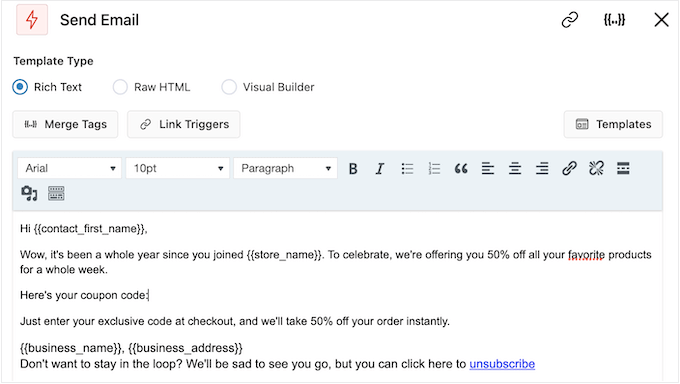
マージタグの使い方をステップ・バイ・ステップで説明するには、上記と同じ手順に従ってください。
アニバーサリークーポンを作成した場合は、前のステップでコピーしたコードを使って追加することができます。
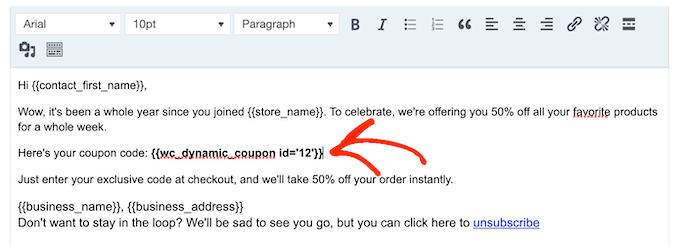
記念日のメールに満足したら、「保存して閉じる」をクリックするだけです。
ステップ6.記念日メールワークフローにフォローアップメールを追加する
この時点で、キャンペーンに1つ以上のフォローアップメールを追加したくなるかもしれません。例えば、アニバーサリークーポンの有効期限をカスタマイザーにリマインドするなどです。
フォローアップメールを作成する際は、カスタマイザーがすべて同時にメッセージを受け取らないように、遅延を加えることが重要です。
スケジュールを作成するには、’+’アイコンをクリックし、’Delay’を選択します。
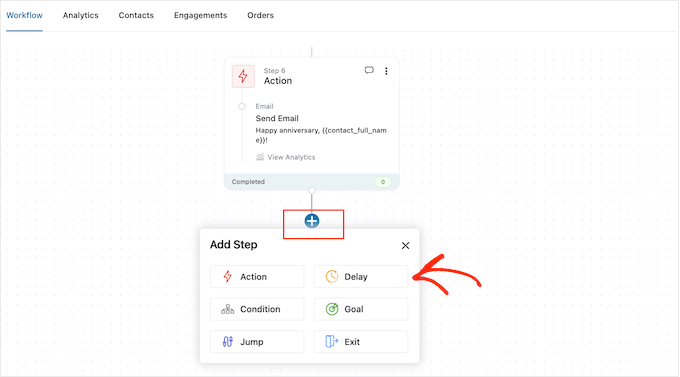
表示されたポップアップで、上記と同じ手順で遅延を設定します。遅延時間に満足したら、「保存」をクリックします。
これでフォローアップメールの作成は完了です。ワークフローに’メール送信’アクションを追加してください。
件名、プレビュー、本文を入力できるようになりました。
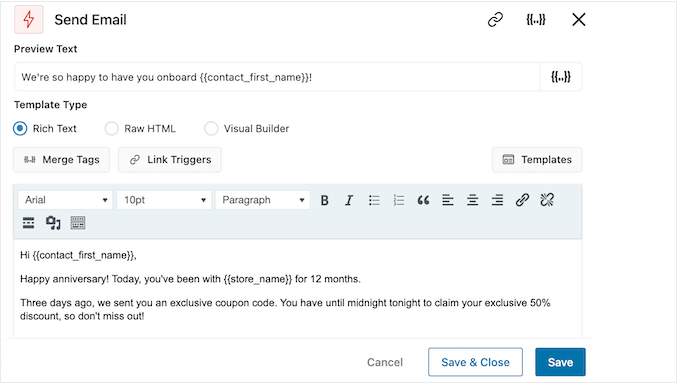
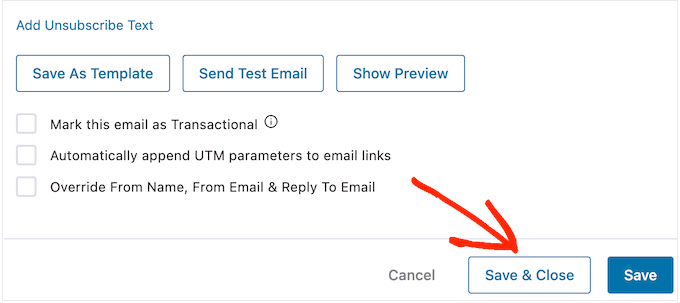
フォローアップメールにご満足いただけましたら、「保存して閉じる」ボタンをクリックしてください。
まったく同じ手順を繰り返すだけで、さらに遅延やフォローアップメールを追加することができます。
ステップ7.WooCommerceで記念日メールを公開する。
最終的にWordPressウェブサイト上で自動化を実行する準備ができたら、’Inactive’スライダーをクリックし、代わりに’Active’を表示させる。
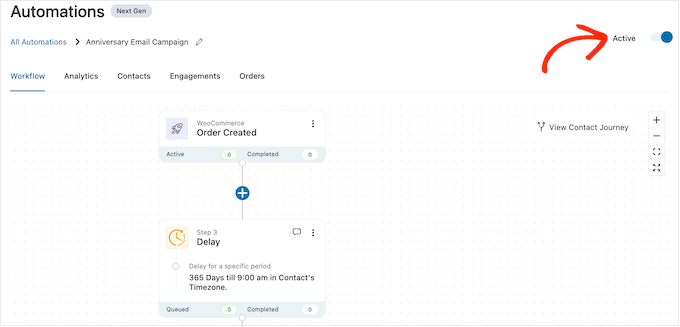
FunnelKitはすべてのカスタマイザーと購読者にアニバーサリーメールを送信します。
ボーナス:成功するメールリストの作り方
自動化された誕生日や記念日のワークフローを作ることは素晴らしいスタートですが、最良の結果を得るためには、メールリストの構築にも取り組むことが重要です。
そこでOptinMonsterの出番です。
OptinMonsterは、120万以上のサイトで使用されているWordPressのための最高のメールキャプチャープラグインの一つです。訪問者をメール購読者に変えるために必要なものが全て揃っています。
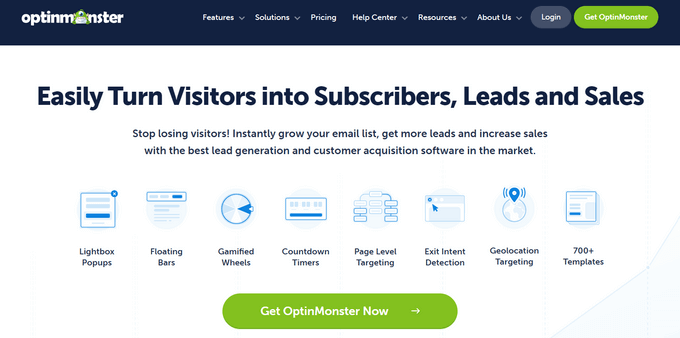
OptinMonsterでは、ポップアップ、フローティングバー、フルスクリーンウェルカムマット、スライドインスクロールボックス、インラインパーソナライズリードフォーム、ゲーム化されたスピントゥウィンオプティンなど、目を引くメールサインアップフォームを作成することができます。
OptinMonaterには、400以上のプロがデザインしたテンプレートが付属しており、ドラッグアンドドロップビルダーを使用してカスタマイズすることができます。
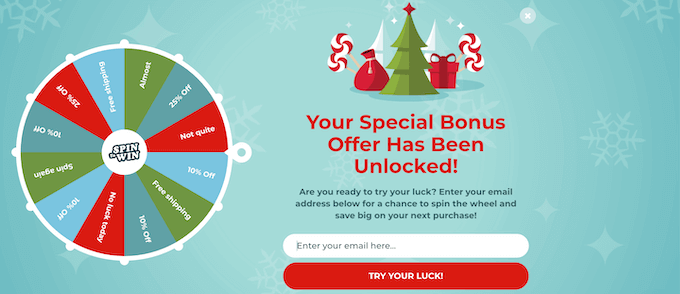
詳しくは、WordPressでOptinMonsterを使ってメールリストを作成する方法をご覧ください。
WooCommerceで誕生日やリマインダーのメールを自動送信する方法について、この記事がお役に立てれば幸いです。また、WooCommerceのポップアップを作成して売上を増やす方法や、あなたのストアに最適なWooCommerceプラグインのガイドもご覧ください。
If you liked this article, then please subscribe to our YouTube Channel for WordPress video tutorials. You can also find us on Twitter and Facebook.


Jiří Vaněk
This is a long and very detailed article. Personalization towards the customer is always great. Even though I know it’s automated, such gestures always bring joy, especially if it’s linked with a coupon or discount. Not only does it show better customer service, but it also potentially boosts sales. Awesome.
Ralph
I think sending customers extra discount coupon on their birthday is really great idea. I works only for 24 hours (or make it 48h for their convenience) but is huge and can give us nice profit.