
本番サイトで何かを壊してしまう心配をせずに、WordPressウェブサイトを試す安全なスペースが欲しいですか?
WordPressサイトをコンピュータ上のローカルサーバーに移動することは、特に開発者、デザイナー、WordPress初心者にとって完璧なソリューションだと私たちは考えています。
WordPressをパソコン(ローカルサーバー)にインストールすることで、WordPressの学習やテストを簡単に行うことができます。WordPressのライブサイトをローカルサーバーに移動すると、ライブサイトと同じデータを使って実験することができます。
この記事では、ライブのWordPressサイトをローカルサーバーに簡単に移動する方法を紹介します。

なぜ、そして誰がWordPressサイトをローカルサーバーに移行したいのか?
WordPressでウェブサイトを運営していると、新しいテーマやプラグインを試したくなることがあります。しかし、ライブのウェブサイトでこれを行うと、ユーザーのユーザーエクスペリエンスが低下する可能性があります。
これを避けるために、多くのユーザーは新しいテーマやプラグインをテストしたり、開発テストを行ったりするために、WordPressウェブサイトのコピーをローカルサーバーに作成します。
これにより、サイトを壊す心配をすることなく、すべてのコンテンツでテーマを設定し、すべての機能をテストすることができます。多くのユーザーは、実際のサイトデータを使ってWordPressやコーディングのスキルを練習するために、サイトをローカルサーバーにコピーします。
WordPressのダミーコンテンツですべてのテストを行うことができても、実際のサイトデータは、これらの変更が実際のサイトでどのように表示されるかをより視覚的に表現してくれます。
ローカル・サイトをローカル・サーバーに移動する準備
まず、WordPressのウェブサイトを常にバックアップしておく必要があります。WordPressのバックアップ・プラグインにはいくつか優れたものがあります。
次に、ローカルサーバー環境をコンピュータにインストールする必要がある。WindowsならWAMP、MacならMAMPを使うことができる。環境をセットアップしたら、phpMyAdminを使って新しいデータベースを作成する必要があります。
ブラウザで以下のURLにアクセスするだけで、phpMyAdminが起動します。
http://localhost/phpmyadmin/
http://localhost:8080/phpmyadmin/
ここから「データベース」タブをクリックし、新規データベースを作成する必要があります。このデータベースは、後でライブサイトのデータを解凍するために必要になります。

これで、ライブのWordPressサイトをローカルサーバーに移動する準備が整いました。
方法1.プラグインを使用してライブWordPressサイトをローカルサーバーに移動する
この方法は簡単で、すべてのユーザーにお勧めできる。
まず最初に行う必要があるのは、Duplicatorプラグインをインストールして有効化することです。詳しくは、WordPressプラグインのインストール方法のステップバイステップガイドをご覧ください。
Duplicatorを使えば、ウェブサイト全体の複製パッケージを簡単に作成できます。WordPressサイトを新しい場所に移動したり、バックアッププラグインとしても使用できます。
注意: Duplicatorには無料版もあり、すぐに使い始めることができる。しかし、Duplicator Proは無制限のバックアップとより高度な機能を備えています。
有効化したら、WordPress管理サイドバーからDuplicator Pro ” Backupsにアクセスしてください。新規パッケージを作成するには、「新規追加」ボタンをクリックします。

Duplicatorはバックアップウィザードを開始します。
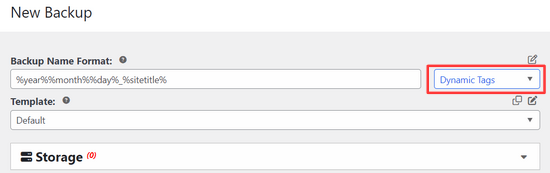
まず、バックアップパッケージの名前を入力する必要があります。ダイナミックタグを使用して、日付やサイトタイトルのような名前のフォーマットを自動的に作成することもできます。
次に、「ストレージ」セクションを展開し、ストレージの場所を選択する。
このチュートリアルでは、デフォルトの場所を使用します。必要であれば、’ストレージを追加’リンクをクリックして、Dropboxや Googleドライブのような新しい場所を追加することができます。
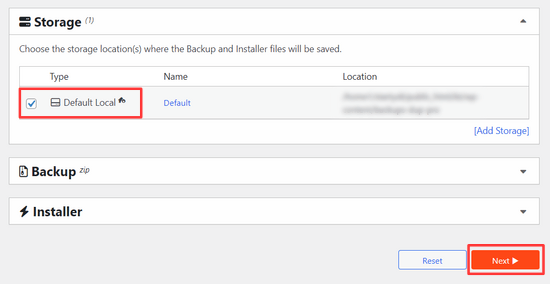
Next(次へ)」ボタンをクリックして進みます。
プラグインはあなたのウェブサイトをスキャンし、いくつかのバックグラウンドチェックを実行します。そして、これらのチェックの概要を表示します。
問題がなければ、「Create Backup」ボタンをクリックして続行します。

Duplicatorはあなたのウェブサイトパッケージを作成します。
完了すると、ウェブサイトの全データを含むアーカイブZIPファイルとインストーラファイルが表示されます。両方のファイルをコンピュータにダウンロードする必要があります。

これでこれらのファイルを解凍し、ローカルサーバーにインストールする準備が整いました。
まず、ローカルサーバーのルートフォルダーに新しいフォルダーを作成する必要があります。これは、ローカルサーバーがすべてのウェブサイトを保存するフォルダです。
例えば、MAMPを使用している場合、/Applications/MAMP/htdocs/フォルダになります。また、WAMPを使用している場合は、C:³³³フォルダになります。
このフォルダの中に、インポートまたはローカルサーバーに作成する新しいウェブサイトごとに新しいフォルダを作成することができます。

その後、ローカルのウェブサイト用に作成したフォルダを開き、アーカイブZIPファイルと先ほどダウンロードしたインストーラースクリプトの両方をコピー&ペーストする必要があります。

インストールを実行するには、ウェブブラウザーでinstaller.phpスクリプトを開く必要があります。
例えば、両方のファイルを/mylocalsite/フォルダに貼り付けた場合、ブラウザでhttp://localhost/mylocalsite/installer.php。
このようにDuplicatorのインストールスクリプトが表示されます:

Next(次へ)」ボタンをクリックして進みます。
Duplicatorはアーカイブのzipファイルを解凍し、ローカルサイトのデータベース情報を入力するように指示します。これは先ほど作成したデータベースです。

サーバー名はほとんどの場合localhostで、ユーザー名はrootです。ほとんどの場合、ローカルサーバーのインストールではrootにパスワードが設定されていないので、空白のままにしておくことができます。
ページの一番下に’Test Database’(データベースのテスト)ボタンがあります。

問題がなければ、「Next」ボタンをクリックして次に進む。
DuplicatorはWordPressデータベースをインポートします。その後、自動的に検出された新しいウェブサイト情報を再確認するよう求められます。

Next(次へ)」ボタンをクリックして進みます。
Duplicatorはセットアップを完了し、ローカルサイトにログインするためのボタンを表示します。本番サイトで使用しているのと同じWordPressのユーザー名とパスワードを使用します。

以上で、ライブサイトのローカルサーバーへの移動は完了です。
方法2.手動でWordPressサイトをローカルサーバーに移動する
プラグインが動作しない場合は、いつでも手動でライブサイトをローカルサーバーに移動することができます.まず必要なのは、WordPressホスティングアカウントから手動でウェブサイトをバックアップすることです。
ステップ1.ライブサイトのWordPressデータベースをエクスポートする。
ライブサイトのWordPressデータベースをエクスポートするには、cPanelダッシュボードにログインし、phpMyAdminをクリックする必要があります。
注:我々はBluehostのダッシュボードからのスクリーンショットを示しています。

phpMyAdminの中で、エクスポートしたいデータベースを選択し、上部のエクスポートタブをクリックします。

phpMyAdminは、クイックまたはカスタムのエクスポート方法を選択するように尋ねます。カスタム方法を使用し、圧縮方法としてzipを選択することをお勧めします。
WordPressプラグインがWordPressデータベース内に独自のテーブルを作成することがあります。そのプラグインをもう使っていないのであれば、カスタム・メソッドでそれらのテーブルを除外することができます。
その他のオプションはそのままにして、「Go」ボタンをクリックすると、データベースのバックアップがZIP形式でダウンロードされます。

phpMyAdminがデータベースファイルをダウンロードします。詳しくは、WordPressデータベースを手動でバックアップする方法のチュートリアルをご覧ください。
ステップ2.すべてのWordPressファイルをダウンロードする
次のステップは、WordPressファイルをダウンロードすることです。そのためには、FTPクライアントを使用してWordPressサイトに接続する必要があります。
接続が完了したら、WordPressのファイルをすべて選択し、コンピューターにダウンロードします。

ステップ3.WordPressファイルとデータベースをローカルサーバーにインポートする
WordPressファイルをダウンロードしたら、ローカルサーバーにローカルサイトをインポートするフォルダを作成する必要があります。
WAMPを使用している場合、ローカルサイト用にC:³³³フォルダ内にフォルダを作成します。MAMPユーザーは、/Applications/MAMP/htdocs/フォルダーにフォルダーを作成する必要があります。
その後、新しいフォルダにWordPressファイルをコピー&ペーストするだけです。
次に、WordPressデータベースをインポートする必要があります。以下のURLにアクセスして、ローカルサーバーのphpMyAdminを開きます:
http://localhost/phpmyadmin/
先にデータベースを作成しているので、それを選択し、上部にある「インポート」タブをクリックする必要があります。

Choose File(ファイルを選択)」ボタンをクリックして、最初のステップでダウンロードしたデータベース・エクスポート・ファイルを選択し、アップロードします。その後、ページ下部の「Go」ボタンをクリックします。
phpMyAdminがWordPressデータベースを解凍してインポートします。
データベースがすべてセットアップされたので、WordPressデータベース内のURLを更新し、ライブサイトを参照する必要があります。
phpMyAdminでSQLクエリを実行します。ローカルサイトのデータベースを選択したことを確認し、SQLをクリックします。

phpMyAdminのSQL画面で、このコードをコピー&ペーストしてください。example.comをあなたのライブサイトのURLに、http://localhost/mylocalsite をあなたのサイトのローカルサーバーのURLに置き換えてください。
UPDATE wp_options SET option_value = replace(option_value,'https://www.example.com','http://localhost/mylocalsite') WHERE option_name ='home'OR option_name ='siteurl';UPDATE wp_posts SET post_content = replace(post_content,'https://www.example.com','http://localhost/mylocalsite');UPDATE wp_postmeta SET meta_value = replace(meta_value,'https://www.example.com','http://localhost/mylocalsite');
このクエリは、データベースからあなたのライブサイトのURLへの参照を置き換えて、ローカルホストのURLに置き換えます。
ステップ4.wp-config.phpファイルを更新する
最後のステップは、ローカルサイトのwp-config.phpファイルを更新することです。このファイルには、WordPressデータベースへの接続方法など、WordPressの設定が含まれています。
ローカルサーバーのWordPressをインストールしたフォルダに移動し、メモ帳などのテキストエディタでwp-config.phpファイルを開きます。
データベース名は、ローカルホストのphpMyAdminで作成したものに置き換えてください。
その後、データベースユーザー名をローカルのMySQLユーザー名(通常はroot)に置き換える。ローカルホストのMySQLユーザーrootにパスワードを設定している場合は、そのパスワードを入力する。そうでなければ、空のままにして変更を保存します。
/** The name of the database for WordPress */define('DB_NAME','database_name_here');/** MySQL database username */define('DB_USER','username_here');/** MySQL database password */define('DB_PASSWORD','password_here');
このようにURLを入力すれば、ブラウザ・ウィンドウでローカル・サイトにアクセスできる:
http://localhost/mylocalsite/
mylocalsite」をWordPressファイルをコピーしたフォルダ名に置き換えてください。
以上で、WordPressのライブ・サイトはローカル・サーバーにコピーされた。
この記事で、WordPress のライブサイトをローカルサーバーに簡単に移動する方法をご理解いただけたでしょうか。また、WordPress をテストするためのステージングサイトを簡単に作成する方法や、WordPress サイトをローカルサーバーからライブサイトに移動する方法についても、こちらのガイドをご覧ください。
If you liked this article, then please subscribe to our YouTube Channel for WordPress video tutorials. You can also find us on Twitter and Facebook.
")
 in 2024")


Joseph
Hi, just came across this tutorial today, I found out about some of the steps from other tutorials, but my problem is with the SQL Query. I get the error # MySQL returned an empty result set (i.e. zero rows). I followed all your steps about changing site names etc but cant work this one out and so obviously i cant then connect to the local site. I used the Duplicator before on another site but it wont work so good on this one because of all the images on my photo site, ie timeout issues. Kinda going around in circles here, so help would be good.
Thanks,
Joseph
Yarina
Joseph, check that the table prefix on the SQL tables you are working with are the same. I had this issue before when I didn’t realize that the theme I was copying from had a non typical prefix (wp_extra-text instead of just wp_). When you create the new db on phpMyAdmin, make sure that the prefix matches that of the old db. Hope this helps!
Alan OldStudent
I tried using Duplicator, and that worked with one minor glitch. So then I dropped the database and tried the manual method. All steps proceeded well until it came time to import. I recreated the database and went to import. Afterwards, I got this error message: “#1064 – You have an error in your SQL syntax; check the manual that corresponds to your MySQL server version for the right syntax to use near ‘default’, ‘This is the default profile, used when no profile is specified.’, ‘a:’ at line 7”
To me that looks like gobbledygook. Do you have any idea what went wrong and how I can do the import manually?
Regards,
Alan
WPBeginner Support
This could be a syntax error or conflict caused by using different versions of MySQL. To solve this, when exporting your database choose the same MySQL version as your local install. Also make sure that you are using the same character set for both database tables.
Admin
Em Cloney
Just a quick thing I noticed: the Duplicator file is called “installer.php” rather than “install.php”.
Ben
I noticed the same thing. Great article, though. So glad I heard about this plugin from you guys.
wpva
Hi I decided to do it manually
I created a database for my WordPress site on my local server and tried to import the database that I downloaded before to my computer but im getting this error message:
SQL query:
—
— Database: `aguilar_jmln1`
—
— ——————————————————–
—
— Table structure for table `gm_AnythingPopup`
—
CREATE TABLE IF NOT EXISTS `gm_AnythingPopup` (
`pop_id` int(11) NOT NULL,
`pop_width` int(11) NOT NULL DEFAULT ‘380’,
`pop_height` int(11) NOT NULL DEFAULT ‘260’,
`pop_headercolor` varchar(10) NOT NULL DEFAULT ‘#4D4D4D’,
`pop_bordercolor` varchar(10) NOT NULL DEFAULT ‘#4D4D4D’,
`pop_header_fontcolor` varchar(10) NOT NULL DEFAULT ‘#FFFFFF’,
`pop_title` varchar(1024) NOT NULL DEFAULT ‘Anything Popup’,
`pop_content` text CHARACTER SET utf8 COLLATE utf8_bin NOT NULL,
`pop_caption` varchar(2024) NOT NULL DEFAULT ‘Click to open popup’
) ENGINE=MyISAM AUTO_INCREMENT=2 DEFAULT CHARSET=utf8;
MySQL said:
#1046 – Aucune base n’a été sélectionnée
Kin
It is saying that no database was selected.
Yeah I got that as well.
You need to make sure that you clicked on a database before hitting the ‘import”, if not the admin tool will try to import the .sql file on nothing!!
TMo
Wonderful tutorial on how to manually go through this process. Thank you for the clear directions and photos!
Shane Levine
Hi, is Duplicator an acceptable method for keeping a backup website? I have been using BackWPup but it looks like Duplicator also allows you to create a backup…
Dennis Crayon
Hi I am not sure if I just got lucky but I was able to download and setup the local version quickly. The only problem I am having is that I have to set permalinks to default which is fine locally will I be able to set them back to post name later when I push the whole thing live? Thanks just getting this far is great
WPBeginner Staff
Yes, you can change permalinks after putting your site live.
Felix
Dennis, I am new to wordpress but I have so far learnt key configuration issues. Could you lease hel on changing permalinks from default to post name?
Iftikhar Raja
Just an observation to share.
If you choose custom structure as permalink, it might not work. The work around is to chose default permalink and save the changes. It worked for me after several hours of head scratching
Hope it helps
Mario
If you’re using WAMP you need to turn on mod_rewrite to enable custom permalinks.
Click Wamp -> Apache -> Apache Modules -> rewrite_module
WPBeginner Staff
It is usually enabled by default.
isboleas
Perfect! I did it manually just in wp-config.php must change and the line
/** MySQL hostname */
define(‘DB_HOST’, ‘127.0.0.1 ‘);
With ip appear in phpmyadmin in left up corner.
Anindyo Yudhistiro
I’ve followed all the steps, but I still can’t see my database in my local wp. I still only have Hello World post.
I’ve imported it, change all the url’s, and many row has already affected.
Keith Davis
I used the manual method but the SQL query wouldn’t work for me.
I had to go into the wp-options and change url in siteurl and home table and then all was fine.
Keith Davis
Hi guys
The Duplicator method looks good.
Do you know how much free disc space you need to create the packages?
Nana
Any ideas why it gives me a “Welcome to the famous five-minute install” screen?
WPBeginner Staff
It is possible that your WordPress URL and Site URL are set to localhost/xammp. If you can access the admin area go to settings and set it to your WordPress install directory.
Je
I checked and it’s definitely not set to that. It is so strange!
Je
I figured it out. It was the W3 cache in the htaccess file causing problems. Thanks for you help and for this awesome tutorial!
Jen
Great tutorial, I did everything exactly like you said….I thought it was working until I tried to change the theme and it wouldn’t change. Then I started trying to navigate to other pages and it took me to localhost/xammp. Everytime. Any ideas?
dion
Hi. I did all of this(using the manual option, but when I click on any option, ie login or one of the menu options, I get “the requested URL … was not found on this server”
wagster
If you copy the SQL query straight off the screen above, you will get the line numbers as well, which will throw an error like the above. Click ‘View source’ and copy the clean code from there.
MrDev
Thanks for this article. I tried the manual route of moving a WordPress site to localhost, however my stylesheets are not loading. For some reason the ‘href’ is not being set on all my stylesheets. Any idea what might be going on?
WPBeginner Staff
We would feel more confident recommending BackupBuddy for backups.
NikkiC4lyf
Would you recommend using the Duplicator plugin for doing backups as well as moving sites?
Kin Tatsu
Great tutorial! The problem I’m having is when I login to to wp-admin with the same login and password I used for my live site I get “ERROR: Invalid username. Lost your password?” The username and password are correct for the live site but incorrect for the localhost site. I tried to retrieve password with my email address but it says that my email address is not registered. Any ideas?
pbr
I have only one word about this steps…AAWWEESSOOMMEE!!!!
StefsterNYC
Did you check your Prefixes?
pels
got same error
StefsterNYC
You may have missed a table or something. Do a search for the old prefix. Also make sure you’re using a fresh new WP-CONFIG. I find that sometimes that messes things up.
StefsterNYC
Sorry for the delay Mark. Not sure I understand your question. Hopefully I can answer something here.
If you started with a config file and it originally started with the wp_ and you didn’t use a custom one you’ll be fine. Just remember the config has to match the DB. If you worked locally and are migrating everything to a live site and you use the same DB and same Config that you worked locally with everything should be fine. Just remember to change Username, Password and Hostname.
The key here to remember here is Prefixes. So many people teach you how to do this and that but they miss the one thing that can mess it all up for you. And that is the Prefix.
And User Roles, if missed can cause a major headache when adding Admins manually. So be careful when changing and working with prefixes. They are absolutely a great way to tighten up WP sites. I highly recommend using a custom prefix always. dbh_234_ something like that is a great way to protect your site(s).
WPBeginner Staff
If your live site’s mysql host is not localhost, then you need to change it to localhost. You may also need to change the database name to the database on your local computer. Same goes for DB username which is usually root on local servers, and db password which is usually blank.
Mark
Hi just to be clear the password in the config.php file should be the same as the one you use for myphpadmin? because that seems to work for me?
StefsterNYC
Great tutorial. I believe one thing was missed. Prefix. For those of you that use a prefix in the config, make sure when you query the db you change the wp for the query to your prefix. Otherwise your query won’t reset the urls correctly.
Mark
If I have a local install and I move the database live, the prefix will remain the same correct? Do I need to do anything?
Cypherinfo
Error 404: Object not found: The requested URL was not found on this server. The link on the referring page seems to be wrong or outdated. Please inform the author of that page about the error.
If you think this is a server error, please contact the webmaster.
” I followed all of the steps you wrote.
Sophie
These instructions are exactly what I needed. Thank you!!!
However, I seem to have encountered a problem…
When updating the URLs in my database for those of the local server, it returns a #1064 – error in your SQL syntax near line 3. Could you possibly suggest a solution?
Would I need to include the port number when updating the http://localhost/ part of the code?
Please Help!!
Vtin
One more newbie trouble here! Sorry for the inconvenience.
Of course, I think I’ve done everything correctly (probably not). When I try to access the site via localhost, in the screen appears the index.php file line by line, instead of loading it.
Any ideas?
W
This was fantastic. Super quick and worked exactly as intended.
Paul Sahota
Can you please show how to move a live wordpress site to local using backup buddy on mac using MAMP. I have tried multiple times but it does not work for me. I can easily do the opposite.
thanks
Jeremy
After transferring the live site to my local server (wamp), I navigate to the destination in browser and get a “Not Found” wordpress error. The site’s navigation loads though and when clicked it takes me to the live site. Am I missing something rudimentary?
Kin
I am getting the same thing. I followed all the steps. Then came back to check again, but the error remains. I am seeing that a couple of people above had the same problem as well. Any idea guys of why this is happening?
Sinuhe
Thank you!!! I just finished moving my site and a subdomain to a new hosting service and it worked like a charm. I am no techie, actually I am philosopher I really appreciate you taking the time to explain this info in detail.
Sam
Hey, I did everything the same way you said in manual method.
after setup,
I can see homepage of my website on local server.
But when I try to navigate to other page, I get following error:
“Not Found: the requested URL /test/logistics was not found on this server.”
Please help
Bill
I just ran into the same issue. I went into site/wp-admin. Then went to Setting > Permalinks and just clicked Save Changes. It updated something and all of my links work.
Look at that! My first contribution to the community.
Isabela Santos
thank you! But I had to disable it for it to work…
Mark
Brilliant!
John
Awesome. Worked great! Thanks for posting this.
Natalia
Hi,
I followed your tutorial on doing it manually to the T, but I still get an error message. I am pulling my hair, here…
I’m pretty new to WP and I still have to figure out how to actually enter the new content and modify the files… but I can’t even get it to work locally
This is the message I get:
“Error establishing a database connection”
Which I don’t understand, because I did everything as you said in your tutorial.
Help, please!!
Natalia
Tried it all over again a second time and still same error message… I’m going crazy
Natalia
I even tried in a remote server and I got the same error message. I don’t know what I’m doing wrong… there must be a path somewhere that I’m forgetting about and it’s just not reading the right db…
Someone, please, help!!
WPBeginner Support
Natalia, the most common cause for this error is incorrect database information. On your live site, you need to edit your wp-config.php file. Make sure that the database information in this file matches the database you have created for your live site.
Admin
Kathi Kostiuk
Thank you, your site is super helpful. New to WP, inherited a site, got it localhost so I can learn/test. When trying to ‘upload’ a pic, get this: C:/wamp/www/testsite/wp-content/uploads. Is its parent directory writable by the server? No errors shown in phpMyAdmin, permissions on folders, users look right. Could you possibly direct me to a solution? Have looked everywhere I can think of. Thanks.
WPBeginner Support
When you moved the site to localhost, did you change the siteurl and homeurl options? If you didn’t then you need to add these two lines to your
wp-config.phpfiledefine('WP_HOME','http://localhost/yoursite');define('WP_SITEURL','http://localhost/yoursite');1-click Use in WordPress
Admin
Kathi Kostiuk
Thank you, will do that.
Julie Rondeau
Hi,
Great tutorials! Thank you, however i keep getting an “Unknown” Error code 0 from the Duplicator Plugin when trying to create the packages. Is there any other way you could recommend? Any help would be really appreciated.
Thank you so much,
Best from Paris.
J.
WPBeginner Support
You can also manually backup your localhost site and restore it on live server.
Admin
Rehan
Best tutorial ever!!
Ashley
Hi! Thank you so much for your great tutorials! Everything worked out great, but I when I was supposed to “resave permalinks” it wouldn’t let me login. I got that fixed and I am logged in now, but where do I go to resave them now that I don’t have that pop up? I’m assuming this is why when I try to click on posts it gives me a “not found page” ? Thanks in advance!
WPBeginner Support
You can save permalinks from Settings » Permalinks.
Admin
Jesse
Can I ask how you fixed the login problem? I’m getting the same issue.
Yarina
Hi! This all worked great until I had to login to the wp dashboard, my login didn’t work and even after changing it manually in the users table, I couldn’t log in, any ideas…?
Angela
Thank You! I’ve been trying to do this for some time now. I’ve watch several YouTube videos but could not get it to work correctly. This was so easy….the best thing ever. Again thanks!
Ivan
Hi,
I followed your instructions to the letter (and sing lol), but was not successful. I think it has something to do with WP installation. I have not installed it, just copied it.
Brett Golding
Didn’t work for me just ended up with a blank white home page after I ran the program. Re tried 3 times.
WPBeginner Support
Checkout how to resolve white screen of death issue.
Admin
Jason Moore
Thank you! This is was too easy!
ron
Hi, I’m trying to do exactly this, but I get a 500 Internal Server Error right after I put the database details and hit the Run Deployment button, I get the progress animation and after about 10 or 15 seconds I get the error.
I was looking at the error logs located at C:\wamp\logs and I could only find this line that seemed somewhat relevant: “Invalid command ‘RewriteOptions’, perhaps misspelled or defined by a module not included in the server configuration”.
I’ve successfully used duplicator in the past, but going from webserver to another webserver.
Any ideas?
WPBeginner Support
Please take a look at our guide on how to fix 500 internal server error in WordPress.
Admin
Usama Noman
Thanks, seems like this is a tutorial posted upon my request Thanks guys you are doing good.
WPBeginner Support
Yes it is Usama. Thank you for suggesting it to us.
Admin
Jamie Mannion
Good guide, but I think you missed the part where you update wp-config.php with the new database details – name is the new name, username is ‘root’ and password is empty.
I tried it manually and it all looks good but the links take me to the WAMP server configuration page, even though the URLs are updated – can’t figure it out. I can get the home page and admin, but that’s it. Cheers!
WPBeginner Support
Thanks for pointing out updating wp-config.php thing. We have updated the article.
As for your redirection issue. Try deleting .htaccess file from wordpress installation on your localserver.
Admin
Jamie Mannion
Awesome, thanks! I removed the .htaccess, then visited the permalinks option page and saved and now we’re good! I should admit, the only reason I knew about the wp-config.php settings is because I’ve read your previous articles. Keep up the great work!
Kin
I put a question earlier today, but this worked out for me great.
Thank you.
Shahraar Khan
I do this manually. Just zip the files from the server and download it… export the database and replace all the links in my text editor. just a 5 min work.. But anyhow your tutorial is also a very good alternative.