WordPressのwp-login.phpファイルへのIPアドレスによるアクセスを制限したいですか?
WordPressのログインページは、DDoS攻撃やハッカーによるサイトへのアクセス攻撃をよく受けます。特定のIPアドレスへのアクセスを制限することで、このような試みを効果的にブロックすることができます。
この投稿では、WordPressのwp-login.phpファイルへのIPによるアクセスを簡単に制限する方法を紹介します。
なぜIPアドレスでwp-login.phpへのアクセスを制限するのですか?
WordPressサイトのログインページ(通常はwp-login.php)は、ユーザーがサイトにログインするための場所です。
サイトオーナーとして、 WordPressの管理エリアにアクセスし、ウェブサイトのメンテナンス、コンテンツの作成、ウェブサイトの管理を行うことができます。
しかし、インターネット上の一般的な総当たり攻撃は、サイトにアクセスするためにwp-login.phpページを標的にすることが知られています。たとえ侵入に失敗したとしても、サイトの速度を低下させたり、クラッシュさせたりする可能性があります。
この状況に対処する1つの方法は、攻撃元のIPアドレスをブロックすることだ(これについては投稿の後半で説明する)。
IPアドレスは、インターネット上の特定のコンピューターを識別する電話番号のようなものです。ハッカーはソフトウェアを使ってIPアドレスを変更することができます。
しかし、より巧妙な攻撃はより多くのIPアドレスを使用するため、すべてをブロックすることは不可能かもしれない。
その場合、あなた自身やあなたのサイトの他のユーザーが使用する特定のIPアドレスへのアクセスを制限することができます。
そこで、クラウド・セキュリティ・ファイアウォールを含む3つの方法を使って、特定のIPアドレスによるwp-login.phpファイルへのアクセスを簡単に制限する方法を見てみよう。
1.IPアドレスでWordPressログインページへのアクセスを制限する
この方法では、.htaccessファイルにコードを追加する必要がある。
.htaccessファイルは、サイトのルートフォルダにある特別なサーバー設定ファイルで、FTPまたはWordPressホスティングコントロールパネルのファイルマネージャーアプリを使用してアクセスできます。
FTPクライアントを使用してWordPressサイトに接続し、.htaccessファイルの先頭に以下のコードを追加して編集するだけです。
1 2 3 4 5 6 7 8 9 10 11 | <Files wp-login.php> order deny,allow Deny from all # whitelist Your own IP addressallow from xx.xxx.xx.xx #whitelist some other user's IP Addressallow from xx.xxx.xx.xx </Files> |
XXをご自身のIPアドレスに置き換えることをお忘れなく。ご自分のIPアドレスはSupportAllyのページで簡単に確認できます。
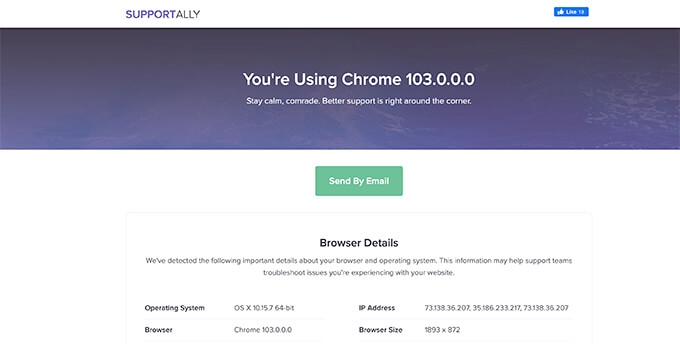
あなたのサイトにログインする必要のある他のユーザーがいる場合、そのユーザーにもIPアドレスを提供してもらうことができます。そして、そのIPアドレスを.htaccessファイルに追加します。
上記のコードの別の例を挙げよう。
1 2 3 4 5 6 7 8 9 10 11 12 13 14 | <Files wp-login.php> order deny,allow Deny from all # Whitelist John as website administratorallow from 35.199.128.0 #Whitelist Tina as Editor allow from 108.59.80.0# Whitelist Ali as moderatorallow from 216.239.32.0 </Files> |
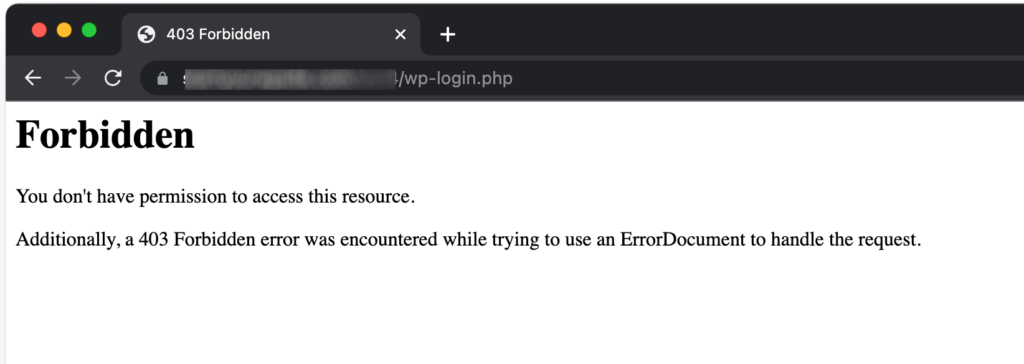
これで、これらのIPアドレスを持つユーザーはwp-login.phpファイルを表示し、サイトにログインできるようになります。その他のユーザーには、以下のエラーメッセージが表示されます:
2.特定のIPアドレスからのサイトへのアクセスをブロックする
この方法は、最初の方法とはまったく逆である。
WordPressのログインページへのアクセスを特定のIPアドレスに制限する代わりに、サイトへの攻撃に使用されるIPアドレスをブロックできるようになります。
この方法は、WordPressの会員制サイトやeコマースストアなど、複数のユーザーがアカウントにアクセスするためにログインが必要な場合に特に便利です。
この方法の欠点は、ハッカーがIPアドレスを変えてサイトを攻撃し続けることができることだ。
幸いなことに、一般的なWordPressハッキングの試みの多くは、固定されたIPアドレスのセットを使用しているため、ほとんどの場合、この方法は効果的です。
ステップ1:ブロックしたい違反IPアドレスを見つける
まず、あなたのサイトを攻撃するために使用されているIPアドレスを見つける必要があります。
問題のIPアドレスを見つける最も簡単な方法は、サーバーのログ記録を見ることです。ホスティングサービスのコントロールパネルを開き、「Raw Access」のログ記録をクリックしてください。
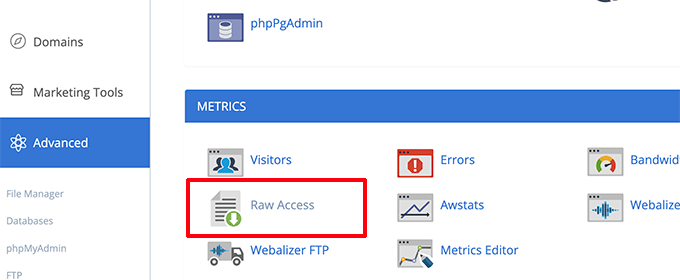
次のページで、アクセスログをダウンロードするドメイン名をクリックします。拡張子がgzのファイルがダウンロードされます。
ファイルを解凍し、メモ帳やテキストエディットなどのテキストエディターで開く必要があります。
ここから、wp-login.phpページに繰り返しアクセスしているIPアドレスがわかります。

IPアドレスをコピー&ペーストして、コンピューター上の別のテキストファイルに保存します。
ステップ2.疑わしいIPアドレスをブロックする
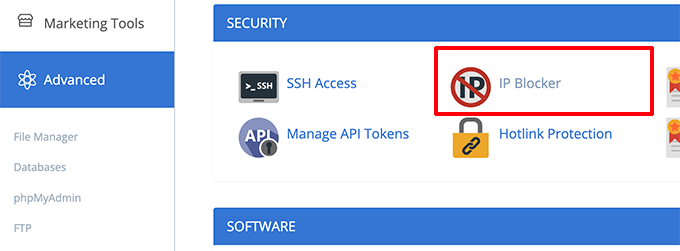
次に、WordPressホスティングサービスのコントロールパネルにログインし、「IP Blocker」アイコンをクリックします。
次の画面で、ブロックしたいIPアドレスをコピー&ペーストし、「追加」ボタンをクリックするだけです。
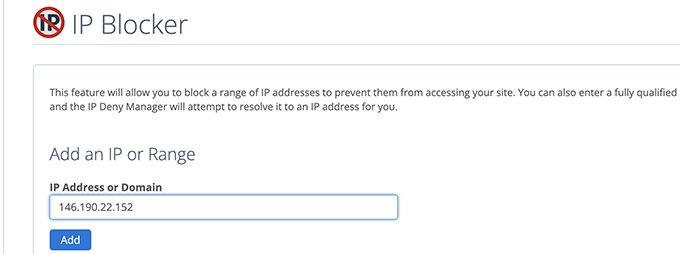
このプロセスを繰り返して、他の疑わしいIPアドレスをブロックします。
これですべてです!これで不審なIPアドレスによるサイトへのアクセスを完全にブロックすることができました。
その後、これらのIPアドレスの1つをブロック解除する必要がある場合は、IPブロックアプリから簡単に行うことができます。

3.サイトファイアウォールによるWordPressログインの保護
サイト管理者としては、WordPressのログインページにアクセスできるIPアドレスの管理にあまり時間をかけたくないかもしれません。
WordPressのログインページを保護する最も簡単な方法は、Sucuriを使用することです。これは、包括的なWordPressセキュリティプラグインに付随する最高のWordPressファイアウォールです。
Sucuriのサイトファイアウォールは、不審なIPアドレスがWordPressの重要なコアファイルにアクセスしないように自動的にフィルターをかけます。
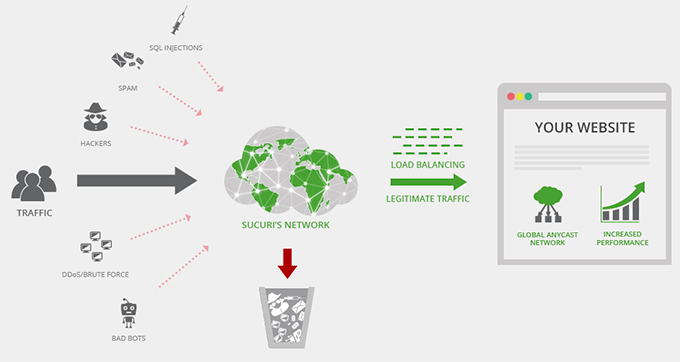
この方法は、サーバーの速度を低下させる不審な活動をブロックするため、WordPressのパフォーマンスと速度も向上します。
その上、SucuriにはCDNネットワークもビルトインされている。これは、画像、スタイルシート、JavaScriptなどの静的ファイルを、ユーザーに近いサーバーから自動的に提供する。
WordPressのログインページにアクセスできないユーザーのIPアドレスを簡単にホワイトリストに登録できます。

代替 MalCareまたはCloudflare Free CDN
この投稿が、wp-login.php ファイルへの IP アドレスによるアクセスを制限する方法について知っていただく一助となれば幸いです。また、WordPress のセキュリティに関する完全ガイドや、WordPress の管理エリアを保護するためのその他のヒントもご覧ください。
If you liked this article, then please subscribe to our YouTube Channel for WordPress video tutorials. You can also find us on Twitter and Facebook.


Jiří Vaněk
I copied the directives to the website, adjusted the IP addresses, and placed them in the .htaccess file. It works perfectly for both IP addresses that are now set in the .htaccess.
Av
in regards to a woocommerce site, is this function useful?
login can be done from my-account page.
WPBeginner Support
If you have multiple users logging in to your site for something like WooCommerce then this would not be something you would use. This would normally be for a site with a limited number of users.
Admin
Michael Pepper
Thanks for the article, helpful!
WPBeginner Support
Glad our article was helpful
Admin
Mick
For some reason when I use this the whitelisted ip is blocked too.
any idea why?
WPBeginner Support
You may want to ensure you set the correct IP and if you are using a VPN or something similar that may be the root of the issue
Admin
Bahar Ali
I used the above code and it somehow apply’s to every page of the site for example my home even shows prohibited.
WPBeginner Support
You may first want to check with your hosting provider to ensure there isn’t a conflicting setup on their end.
Admin
Unni Krishnan
Good One guys,
As you stated in the last section, I do have dynamic IPs for my mobile connection. Though I have white listed my Broadband IP, getting stuck while accessing on the go.
Do you know if any plugins help to solve this ?
Unni Krishnan
Also, such requests to wp-login.php are getting redirected to the homepage. Is this normal ?
FrancescoElzy
Hmm it seems like your blog ate my first comment (it was super long) so I guess I’ll just sum it up what I wrote and say, I’m thoroughly enjoying your blog. I too am an aspiring blog blogger but I’m still new to the whole thing. Do you have any helpful hints for newbie blog writers? I’d genuinely appreciate it.
Stéfano Willig
We have made our ftp accessable only by certain IP.
Now I can’t install or update wordpress directly via wordpress…
What can I do?
Jobbatam
Great tips and works for me.
But, Can i redirect wp-login to error 404?
If can, what code i add into code above?
thanks
MargaretMacnamar
It’s very simple to find out any matter on net as compared to textbooks, as I found this post at this website.
EQHRaymond
Thank you for the function. Post aided me a whole lot
Rex Wickham
If you want to add more than one IP you can do this:
1. you can use a partial IP:
Allow from 145.50.39
This will allow IP from 145.50.39.0 to 145.50.39.255
2. you can use a netmask or a CIDR:
Allow from 145.50.39.0/255.255.255.224
or
Allow from 145.50.39.0/27
This will allow IP from 145.50.39.0 to 145.50.39.31.
Julius Musembi
This is a great workaround.
David Swanson
I added the code to my .htaccess but when my users logout they receive Error 403.
When they click logout the link is /wp-login.php?action=logout
Anyway to fix this?
Brijesh
Great Tip! But i got a problem. It locks admin login from others ips, but if a registered user sign out from site, code also restricts that. I mean when user click sign out, it gives forbidden message. How to solve it?
Rafaqat
Thanks for your quick guideline to protect from excessive and illegal log in attempts. Actually there is a free plugin “better wp security” that can manage nearly all security issues regarding,login attempts,wp.config file,.htaccess file and many more. I think one should give it a try.
Kris
To get around the dynamic IP issue you can reference an htpasswd.
Baptiste Legrand
Thanks for this great tip ! But i’m a but confused : should I paste this snippet in my root .htacess file, or into my wordpress/.htaccess file ?
Cheers (and btw, I just LOVE wpbegginer.com, keep up the good work !)
Editorial Staff
Paste it in your wordpress/.htaccess
Admin
Editorial Staff
With dynamic IPs this can be a pain. You can set Apache Protect on it, but that is a bit more complex. #whitelist line is just to let me know which IP is which.
Admin
Steve Pringle
You should mention that plugins (like JetPack) may have issues when you limit access.