長年WordPressでウェブサイトを構築してきた経験から、ローカルのWordPressをコンピュータにセットアップすることがいかに重要かを学びました。
WordPress を個人のマシンに置くことで、本番サイトを危険にさらすことなく新機能を試したり、WordPress 開発に深く入り込んだり、本番前にウェブサイト全体を構築したりすることができます。WordPressプロジェクト専用のサンドボックスを持つようなものです。
Windowsユーザーなら、WordPressをローカルにセットアップする方法は数多くある。しかし、私たちは最も簡単な2つの方法に絞りました。このガイドでは、どのバージョンを使っていても、WindowsコンピューターにWordPressを簡単にインストールする方法をご紹介します。
なぜWindowsにWordPressをインストールすべきなのか?
Windowsユーザーであれば、WordPressをローカルにインストールすることでいくつかのメリットがある。
ローカルのWordPressインストールは、本番のウェブサイトに影響を与えないテスト環境を作成します。ローカルサーバーまたはローカルホストと呼ばれるこのセットアップは、WordPressの個人的な遊び場です。
WordPressの開発者は、定期的にローカルインストールを仕事に使っている。例えば、新しいプラグインやテーマの実験に使ったり、Gutenbergブロックエディタにアップデートする前にサイトをテストしたりするためです。
しかし、それはプロだけのものではありません。WordPressを初めて使うのであれば、ローカルのセットアップは学習に最適です。機能を調べたり、テーマやプラグインをテストしたり、ライブサイトを壊す心配をせずに自由に実験することができます。
WindowsでWordPressをローカルにインストールした場合、自分だけがサイトを見ることができることに注意することが重要だ。公開用のウェブサイトを作成したい場合は、ドメイン名と ウェブホスティングが必要です。
技術的には、XAMPPを使ってWindowsにWordPressをインストールすることは可能で、以前チュートリアルを書きました。
とはいえ、XAMPPよりもさらに簡単なWordPressのローカル環境を構築する方法を2つ見つけました。以下のリンクをクリックして、興味のある方法に進んでください:
方法1:Studioを使用してWindowsにWordPressをインストールする(迅速かつ簡単)
最初の方法では、Studioを使う。これは、WordPress.comを管理・運営しているAutomattic社製のローカルWordPressソフトウェアで、WordPressソフトウェアをベースにしたウェブサイト・ビルダーである。
この方法を最初に説明しよう。なぜなら、この方法の方がはるかに早く、シンプルであるため、全くの初心者に最適だからだ。
まず、Studio by WordPress.comのウェブサイトを開きます。そして、「Download for Windows」ボタンをクリックします。
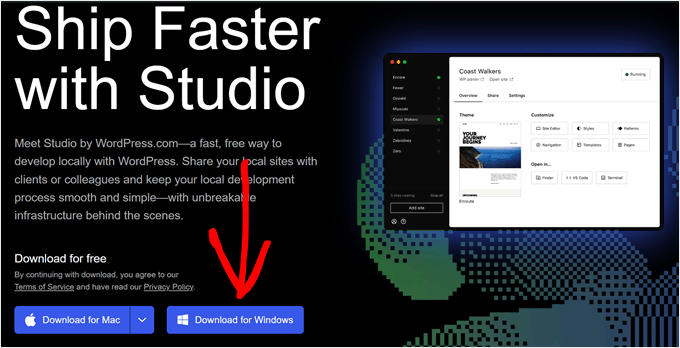
それが済んだら、ダウンロードしたファイルを開いてインストールを開始する。
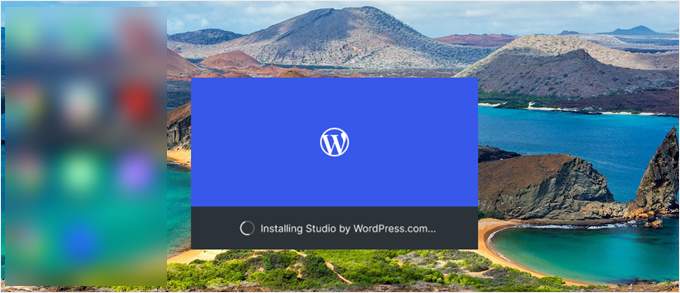
アプリケーションがインストールされていることを示すポップアップウィンドウが表示されます。
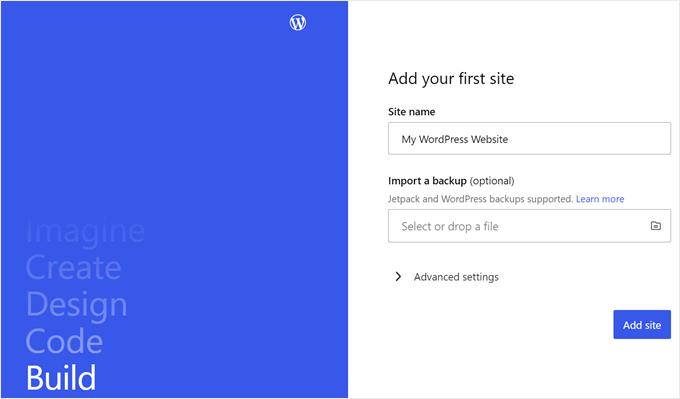
これで、最初のサイトを追加できる。
これを行うには、新規ローカル・ワードプレス・サイト名を入力し、「サイトを追加」をクリックするだけです。サイト名は、そのサイトを簡単に識別できるものであれば、どのような名前でもかまいません。
ローカルのWordPressサイトのダッシュボードが表示されるはずです。
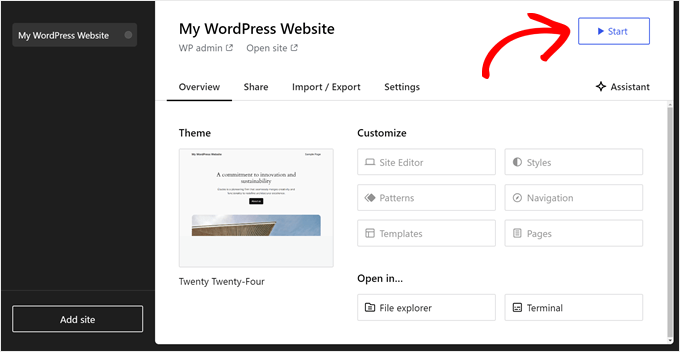
WordPressのダッシュボードにアクセスしてウェブサイトを編集するには、右上の「Start」ボタンをクリックするだけです。これで、ローカルウェブサイトにパソコンからアクセスできるようになります。
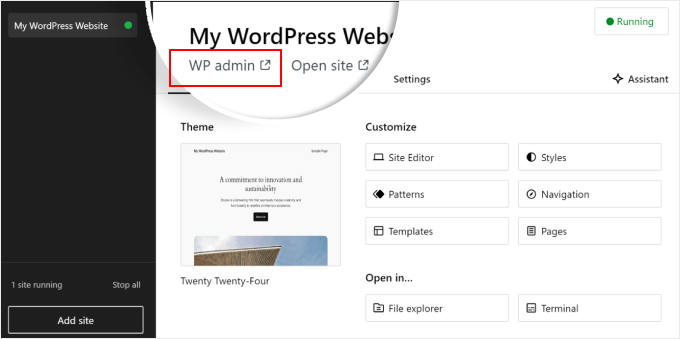
Start」ボタンが「Running」に変わったら、ページ左上の「WP Admin」リンクをクリックする。
これでローカルのWordPress管理ページに移動します。
これで設定はほぼ完了だ。ローカルのウェブサイトを構築する際に必要と思われるその他の設定を探ってみよう。
概要」タブにあるように、StudioダッシュボードからすぐにWordPressフルサイトエディタメニューにアクセスできます。また、’File explorer’をクリックしてWordPressウェブサイトのフォルダやファイルを開いたり、’Terminal’をクリックしてWP-CLIを使用してウェブサイトを管理することもできます。
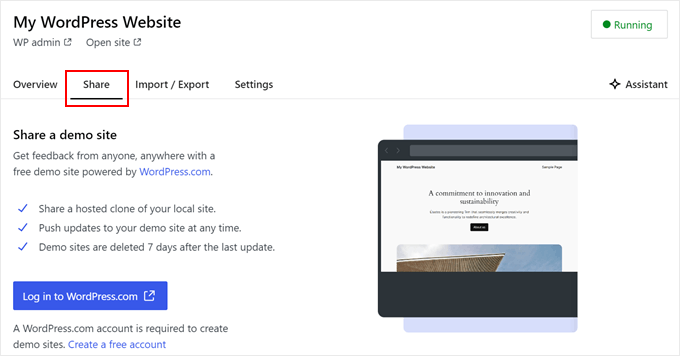
共有」タブに切り替えると、WordPress.comアカウントにログインし、ローカルのウェブサイトをクローンしてWordPress.comのサーバーにアップロードすることができます。これにより、クローンサイトは一時的にオンラインになり、クライアントやチームメンバーとデモサイトを共有するのに便利です。
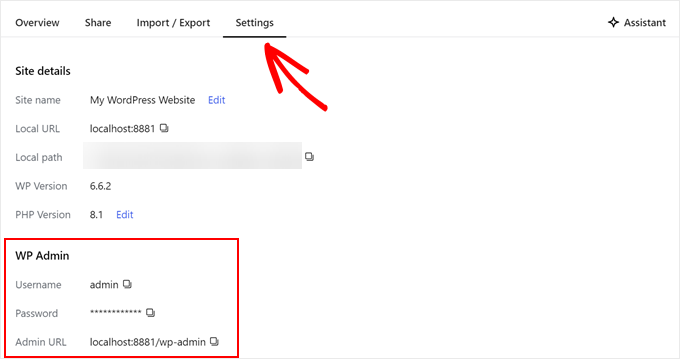
Studio を使用する代わりに、ブラウザからローカル Web サイトに直接ログインしたい場合があります。その場合、wp-adminの認証情報を知っておく必要があります。
これらを見つけるには、「設定」タブに切り替えて、ワードプレスの管理者ユーザー名、パスワード、ログインURLをそこで見つけることができる。
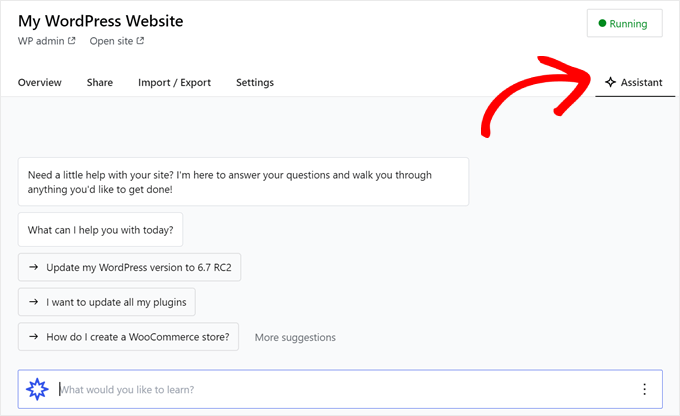
アシスタント」ボタンをクリックすれば、ビルトインAIチャットボットとコミュニケーションをとることができる。
ここでは、すべてのプラグインを一度に更新したり、WordPressのコアバージョンを更新したり、カスタムブロックのコードを作成したりといった作業をStudioに依頼することができます。
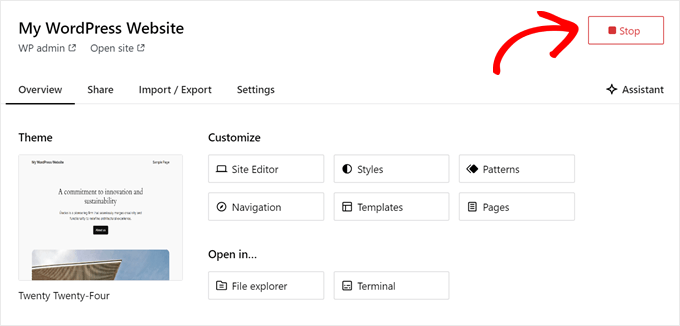
ローカルサイトでの作業が終わったら、右上の「実行中」ボタンにマウスオーバーし、「停止」と表示されるまで待つ。
そして、ウェブサイトを停止するボタンをクリックする。
Studioの欠点は、WordPressの環境を自分好みに設定できないことです。つまり、あらかじめ選択されているPHPバージョン、ウェブサーバー、データベースを使用する必要があります。
これは、特定のサーバー構成でウェブサイトやプラグインをテストする必要がある場合、欠点になる可能性があります。
ローカルのWordPress環境をよりコントロールする必要がある場合、またはローカルのセットアップを特定のライブサーバーの設定に合わせる必要がある場合は、ローカルWPを使用する次の方法をチェックアウトすることができます。
方法2:ローカルWPを使ってWindowsにWordPressをインストールする(よりカスタマイズ可能)
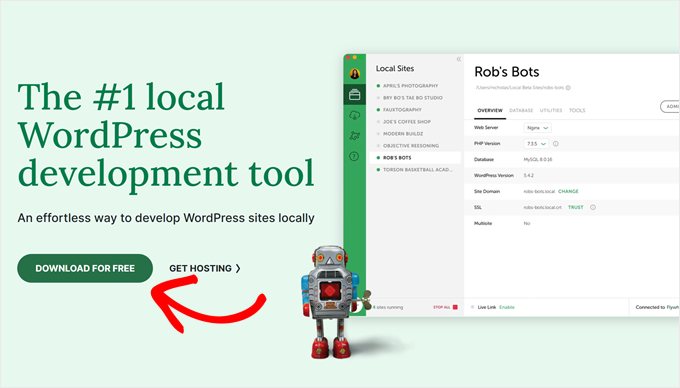
まず、Local WPソフトウェアをダウンロードし、Windowsコンピューターにインストールする必要があります。ローカルWPのサイトに行き、「無料でダウンロード」ボタンをクリックするだけです。
その後、プラットフォームを選択するポップアップウィンドウが表示されます。ドロップダウンメニューから「Windows」を選択してください。
次に、姓名、勤務先のEメールアドレス、電話番号などの詳細情報を入力してソフトウェアをダウンロードします。
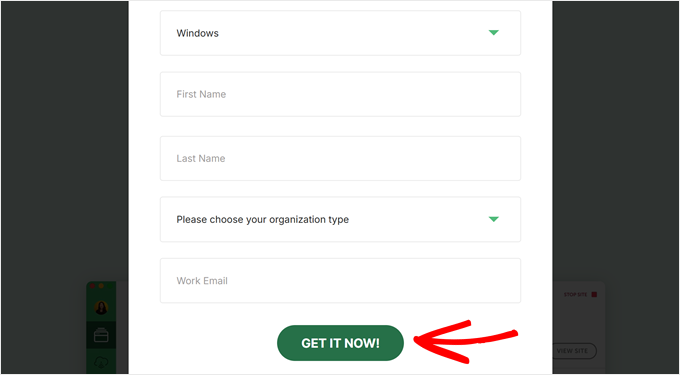
詳細を入力したら、’Get it Now’ボタンをクリックするだけです。
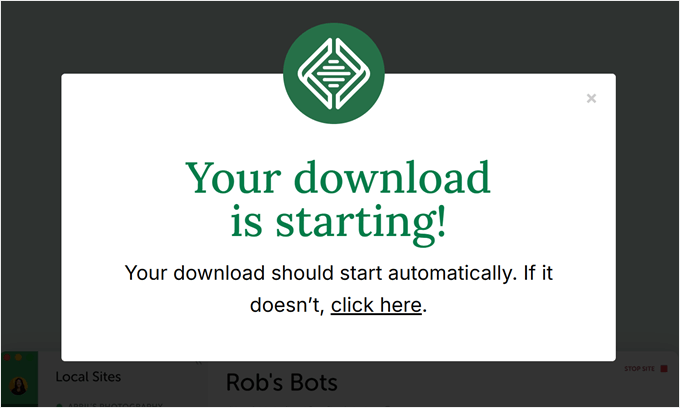
その後、ソフトウェアは自動的にコンピュータにダウンロードされます。それ以外の場合は、「ここをクリック」リンクをクリックしてダウンロードを開始することができます。
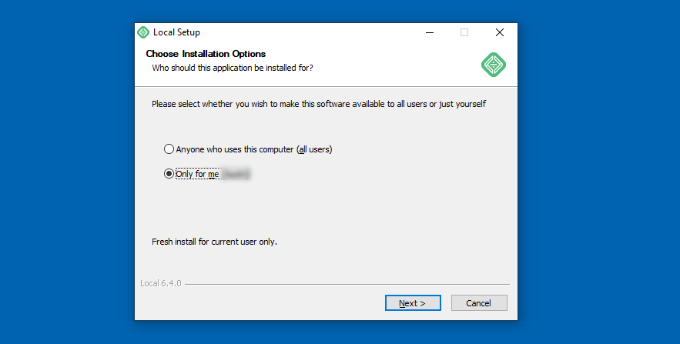
ファイルをダウンロードしたら、セットアップウィザードを起動します。
ここで、ソフトウェアを全ユーザーにインストールするか、あなただけにインストールするかを選択する必要があります。
オプションを選択したら、「次へ」ボタンをクリックします。
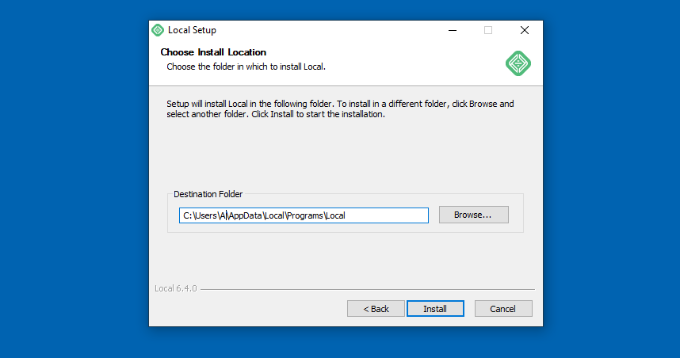
次のステップでは、ソフトウェアをインストールする「インストール先フォルダー」を選択できます。
参照」ボタンをクリックしてパスを設定し、「インストール」ボタンをクリックするだけです。
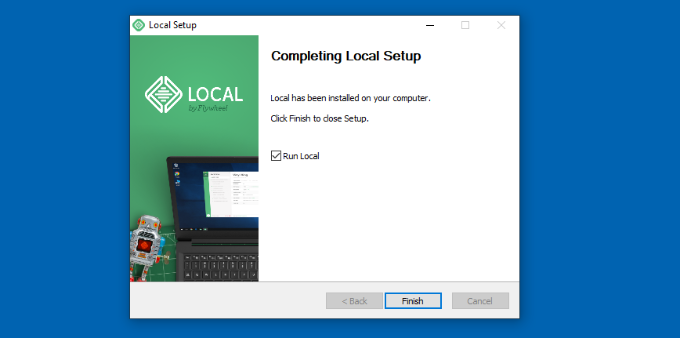
ローカルWPソフトウェアがWindowsコンピューターにインストールされます。
完了したら、セットアップ・ウィザードで「ローカルで実行」チェックボックスをチェックし、「完了」ボタンをクリックします。
ソフトウェアがWindows端末上で起動します。
次のステップは、新しいローカルウェブサイトを追加することです。そのためには、一番下にあるプラス「+」ボタンをクリックするだけです。
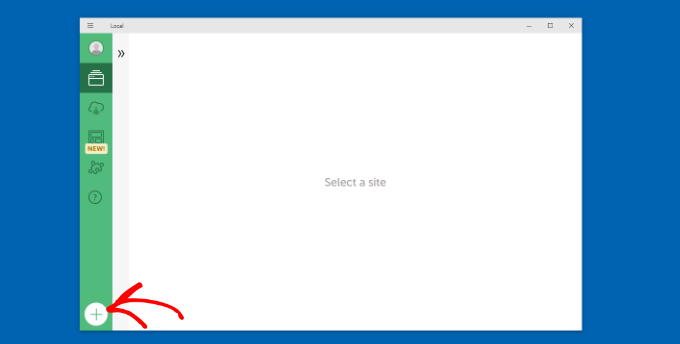
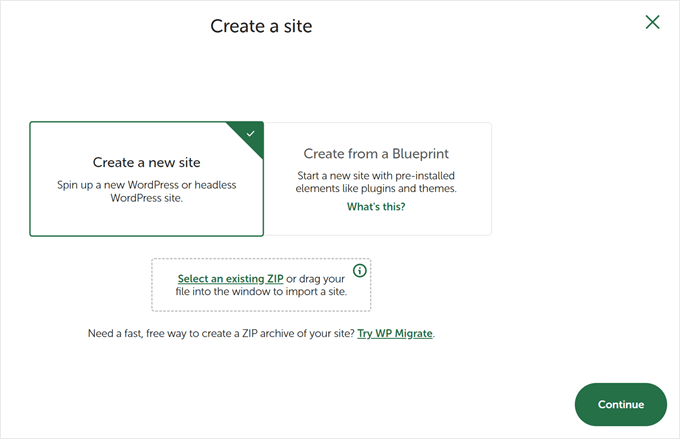
その後、ローカル・ソフトウェアでサイトを作成することができる。
新規サイトを作成する」オプションを選択し、「続ける」ボタンをクリックします。ブループリントまたは既存のウェブサイトファイルからサイトを作成するオプションもありますが、デモンストレーションのために最初のオプションを使用します。
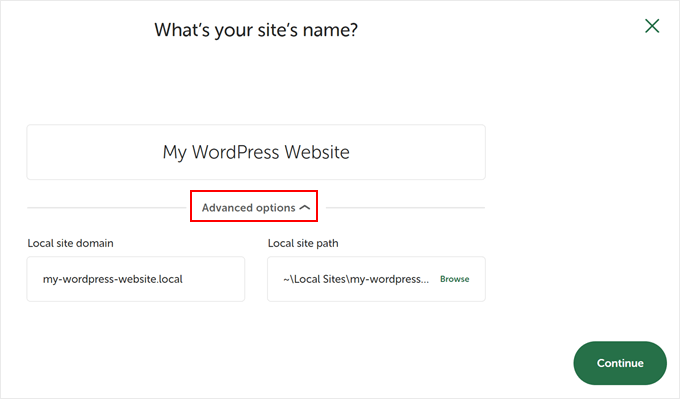
次に、「My WordPress Website」のように、ローカルウェブサイトの名前を入力します。
また、ローカルサイトのドメインとローカルサイトのパスを入力できる詳細オプションもあります。デフォルトでは、ドメインはウェブサイトのタイトルを使用しますが、ダッシュで区切られます。
完了したら、’Continue’ボタンをクリックするだけです。
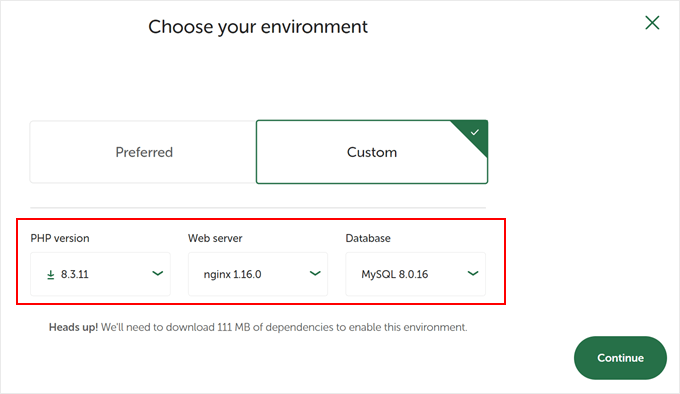
その後、ローカルサイトの環境を選択する必要がある。
Preferred’環境を使用すると、ソフトウェアが自動的にPHPバージョン、Webサーバー、MySQLバージョンを選択します。一方、’カスタム’を選択し、環境の詳細を入力することもできます。
Local WPは最新のPHPバージョンを提供します。ウェブサーバーは、NginxまたはApacheから選択できます。また、データベースはMySQLまたはMariaDBから選択できます。
PHP、ウェブサーバー、データベースのバージョンによっては、正しく動作させるためにいくつかの依存関係をダウンロードする必要があることに注意してください。
次に、ローカルウェブサイト用のWordPressユーザー名とパスワードを入力します。さらに、すべてのメール通知を受け取るWordPressのメールアドレスを選択するオプションもあります。
その他に、WordPressのマルチサイト・ネットワークを持っているかどうかを尋ねる詳細オプションがある。そうでない場合は、「いいえ」をクリックしてください。
これらの詳細を入力したら、「サイトを追加」ボタンをクリックするだけです。
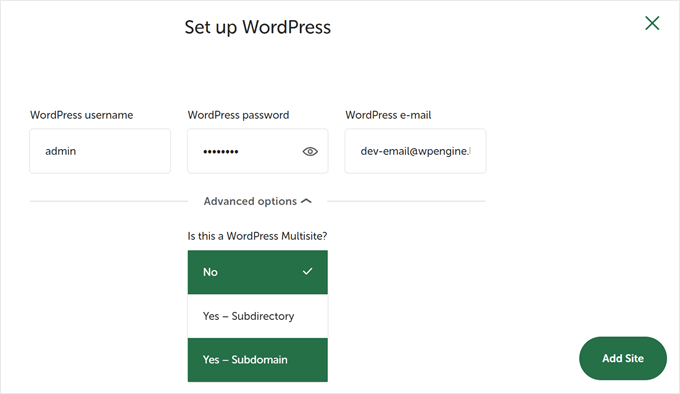
ソフトウェアがWordPressをインストールし、サイトを立ち上げます。
ローカルのウェブサイトを立ち上げるには、右上にある「Start site」ボタンをクリックする。
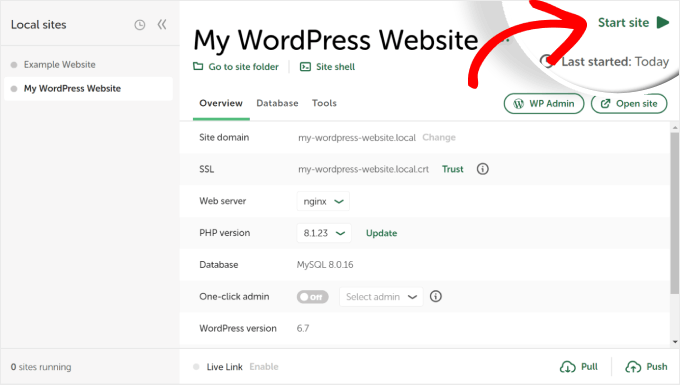
次に、「WP Admin」ボタンをクリックすると、WordPressの管理者ログイン・ページが表示されます。
ローカルのウェブサイトを設定する際に入力したユーザー名とパスワードを入力し、「ログイン」ボタンをクリックするだけです。
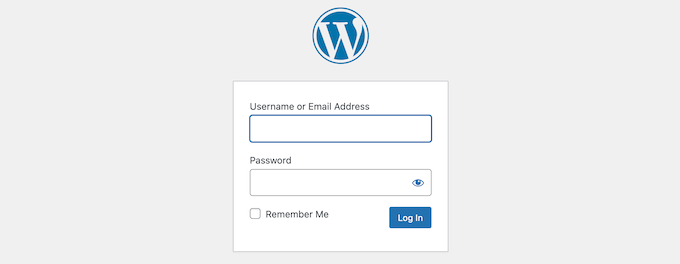
これで、Windowsコンピューターでローカルサイトを編集できるようになりました。
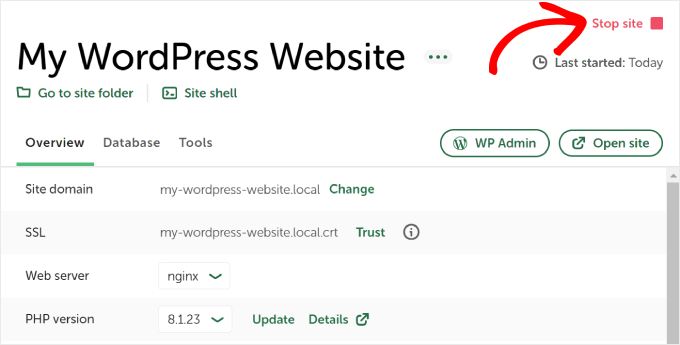
完了したら、「サイトを停止」ボタンをクリックして、Local WPソフトウェアからサイトを停止することを忘れないでください。
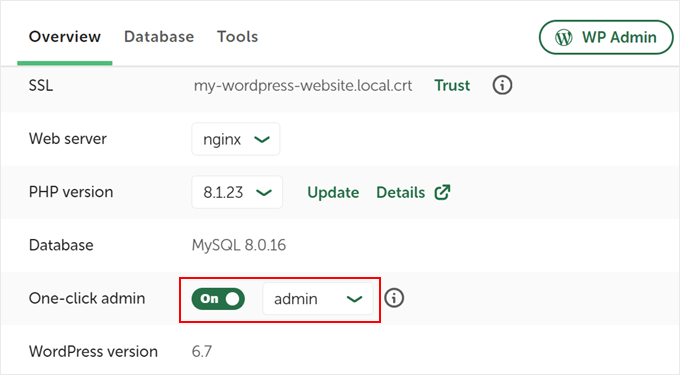
プロからのアドバイス: ログインプロセスをスキップしたい場合は、Local WPでワンクリック管理者ログインを有効にすることができます。
これを行うには、ローカルWPダッシュボードに戻り、’One-click admin’ボタンを’On’と表示されるまで切り替えます。次に、ドロップダウンメニューで、このワンクリック・ログイン機能を使用できる管理ユーザーを選択します。
代替案WordPress Playgroundを使ってテーマやプラグインなどをテストする
WordPress Playgroundは、ウェブブラウザ上で直接WordPressを試すことができる革新的なツールです。実際のウェブサイトに影響を与えることなく、新しいWordPressテーマ、プラグイン、機能を試すことができる仮想のサンドボックスです。
WordPress Playgroundは、いくつかの重要な点で、ローカルのWordPress環境とは異なります。
まず、永久的なローカル・セットアップとは異なり、コンピューターにインストールする必要がなく、使用するたびにリセットされる。ローカル・インストールが1台のコンピューターに縛られるのに対し、ブラウザーがあればどのデバイスからでもアクセスできる。
WordPress Playgroundは迅速なテストや学習に理想的ですが、Windowsコンピュータ上のローカルWordPress環境は、長期的な開発プロジェクトにより柔軟性を提供します。
詳しくは、ブラウザでWordPress Playgroundを使う方法をご覧ください。
WindowsコンピュータにWordPressをインストールしました。
あなたのコンピューターにWordPressを入れたら、できることがいくつかあります:
- WordPressの基本的なTipsやトリックを学び、サイトをより良く使いこなしましょう。
- さまざまなWordPressテーマを試して、あなたのサイトがどのように見えるかを見てみましょう。
- WordPressに必須のプラグインをインストールしてテストし、サイトに新しい機能を追加します。
- WordPressのよくあるエラーを自分で修正する方法を学びましょう。
- ドラッグ&ドロップで作成できるページビルダーをいろいろ試して、サイトを見栄えよく仕上げましょう。
- ローカルホストのWordPress管理者パスワードをリセットして、サイトへのアクセスを回復する方法をご紹介します。
- 自動化されたワークフローを設定することで、サイトの管理が容易になります。
- ハッカーからサイトを守るために、WordPressのセキュリティについて学びましょう。
- みんなと共有する準備ができたら、ローカルのWordPressサイトをライブサーバーに移動しましょう。
この記事で、WindowsコンピュータにWordPressをローカルにインストールする方法をご理解いただけたでしょうか。MacコンピュータにWordPressをローカルインストールする方法や、WordPressステージングサイトを作成するための究極のガイドもご覧ください。
If you liked this article, then please subscribe to our YouTube Channel for WordPress video tutorials. You can also find us on Twitter and Facebook.


mike
installed wamp Apache/2.4.9 (Win32) PHP/5.5.12, downloaded wordpress, configured wp-config nothing, absolutely nothing happens.
Any thoughts?
Villi
Hey. So everything worked great and i have been playing around practicing. Now i am going to make another website but keep the practice website also, but i need them to be completely independent from each other since i dont want my “messing around” to affect the new one Should i install wordpress again and follow the same instructions (extract the wordpress folder to C:\wamp\www etc.) and make another database ?
In short, should i follow exactly the same process as before, except i would not need to download wamp again obviously.
Thank you
WPBeginner Support
Yes, you need to follow the same instructions.
Admin
Wayne
Great article. I have managed to get everything up and running. But have not got stuck when I try to upload a Theme I have purchased. I have a personal live site using WordPress. But wanted to build one offline for my workplace, hence I am using phpAdmin. Any ideas please how I can work on purchased themes on a localhost?
WPBeginner Support
Installing a purchased theme is no different on a localhost site than on a live site. Simply go to Appearance > Themes on your localhost site. Click on the Add New button and then click on the Upload button. Click on the choose file button to locate the Theme Zip file from your computer and then upload it.
Admin
Manoj
Hi
I had installed everything as per the guide here and my site was working fine. Today, however, i tried to loginto localhost and it gives an error. It says this webpage is not available. ERR_CONNECTION_REFUSED
Kindly help
naveenraj
hi sir,
The icon says in orange colour and i getting blank pages when i go for localhost/phpmyadmin/ page, Please help t resolve this.
WPBeginner Support
Please see WAMP documentation and support forums.
Admin
bella
“Go to C:\wamp\www and paste wordpress folder there.”
I can’t seem to find anywhere that accepts my wordpress folder. Does anybody have more detailed description to do this step for me? Thank you very much for all you sharing people
Ayesha
Hi,
Once you go to wordpress.org and install wp, you will have a wordpress zip folder, extract its contents and it would create a wordpress folder, open this folder and copy the folder named wordpress. Now goto your wampserver folder and then open www folder that lies insides wampserver folder, paste the folder wordpress over there i.e. inside www folder.
You just have to copy your wordpress folder and paste it in the www folder of wampserver.
Hope that helps!
Kush Singh
Really it’s very helpful site for installing wordpress.
Nice work guys keep it up…
Satish Shihani
Superb….. I really like this
On my first attempt only, i done all installation without any error
Thank you so much for this tutorial
Amir
Smooth and fun, worked like a charm. I had only one problem which was resolved by shutting down a certain Microsoft product…
Thank you.
Paul
Great tutorial glad I found it as I am just learning how to use wamp and my local server to build wordpress sites. I would also like to copy a live wordpress site to my local server so I could modify a theme, then reload it to the remote server and was wondering if there was a tutorial on how to do that? I have found and read the tutorial on uploading a site from my local server to the remote one but nothing on copying a live site to the local server and getting it to work. Is this possible and if so, do you have a tutorial on how to achieve it successfully? Thanks in advance.
Kvaibahv01
Hey there,
I had created a WordPress blog earlier this month and my WAMP server was uninstalled due to some reasons….I reinstalled it>did all the same steps> named the ‘wordpress’ folder to ‘site’> opened localhost/site/wp-admin which says :
Welcome to WordPress. Before getting started,………………………….before proceeding.
Database name
Database username
Database password
Database host
Table prefix (if you want to run more than one WordPress in a single database)
We’re going…………We got it.
In all …………… all ready…
I clicked ‘Let’s go’ button which opened ‘Setup config.File’ entered my DB name ‘site’> ‘username’ and ‘password’ I edited on ‘wp-config-sample.php’ and changed username to blank and same with password too> Click next and now it shows me an error “Can’t select database”:
We ………………. database.
Are you sure it exists?
Does the user have permission to use the site database?
On some systems the name of your database is prefixed with your username, so it would be like username_site. Could that be the problem?
If you don’t know how to set up a database you should contact your host. If all else fails you may find help at the WordPress Support Forums.
Please help!
WPBeginner Support
Visit localhost/phpmyadmin to confirm that the database name you entered is correct.
Admin
Geraldine
Hello. I hope you can help me with this. After I created the test site, how can I share this to my friend via online?
Rhian Williams
thank you so much for this I have been battling with localhost software all day and this worked first time for me
moneytechnicals
Ive installed WAMP in windows 7 32 bit. And want to use wordpress. But its not showing to create configuration file. Its showing an error like this-
Warning:
require(C:wampwwwwordpress-trunk/wp-blog-header.php): failed to open
stream: No such file or directory in
C:wampwwwwordpress-trunkindex.php on line 18
Please help me to get out of this. Thank you in advance.
Campbell Sinclair
Hello and to anyone who googles this error and is stuck like I was on this,
You likely downloaded the zip installer and extracted them, maybe cancelled it some point because the extraction / transfer of the folder inside was slow. I’m not sure what happened, not the point either.
This error occurs when not all the files are present. Try and hunt down wp-blog-header in your WordPress folder directory with a simple search. The index page (one that is first loaded by a browser when it opens a directory) is only asking for this file but it simply won’t be there with it in the directory. Index.php is asking for wp-blog-header and everyone else said I’m not the file you’re looking for.
I downloaded the version prior and it was complete because I had the installation page as expected. This is the quickest and certain fix. If you do this, you will should be able to upgrade to the latest once you have installed as well.
WPBeginner Staff
Yes you can.
ArtaGene
Since I didn’t see any specs listed, not sure my old computer will have enough memory…can I install on a portable drive (connects with USB) and use that way ?
WPBeginner Staff
Seems like WAMP didn’t install correctly on your computer. Try installing again or try XAMP.
jerry
I get this error right at the end of the installation.
httpd.exe – system error
The program can’t start because MSVCR110.dll is missing from your computer. Try reinstalling the program to fix this
problem
nikhil
i have install wamp server but when i am going to phpMyAdmin it is showing error like this:-
Forbidden
You don’t have permission to access /phpmyadmin/ on this server.
Roshan Bagdiya
error
#1045 – Access denied for user ‘root’@’localhost’ (using password: NO)
while accesing phpmyadmin
how to resolve it
WPBeginner Staff
Please make sure that the Wamp server icon in your taskbar turns Green before you click on phpMyAdmin. You can also try manually accessing phpMyAdmin by typing this URL in your browser’s address bar http://localhost/phpmyadmin/
Diviya
Followed your procedure step wise. Now when I try to setup database for WordPress, when I click on phpMyadmin I get error ‘HTTP Error 404. The requested resource is not found’
Syed Balkhi
Done – thanks for the suggestion.
Carrie
FYI, the “Skype” error also happens with a similar program called Team Viewer. A similar simple fix, going in to the program and changing the checkbox regarding ports 80 and 443. I agree with others, if nothing else you should put a link to the troubleshooting info in the article right after the WAMP installation. I got frustrated that I kept getting an error, and decided to look through the comments until I found a solution.
Anand Upadhyay
Suggested edit. Please replace
C:wampwww
with
C:wampwww
Aditya Pranav
Done all thing , but when I click on phpMyadmin the an error page will open in browser and that is :-
HTTP Error 404.0 – Not Found
The resource you are looking for has been removed, had its name changed, or is temporarily unavailable.
Derick
Howe about adding a tutorial that continues from this one on how to add multiple websites to be worked on offline like the above one.
Vijay
Thanks so much for this. It worked for me.
My only complaint is that the skype error should have been right after the WAMP installation part. I spent a lot of time figuring out how to get the WAMP icon to go green instead of orange. Ultimately found out that IIS 8.5 was using port 80 and that I had to stop WWW publishing services from Services.msc and restart the Apache on WAMP to get it to work.
M♥ηyαηє Ramołło™
Great tutorial
Jim
Great tutorial. Big thanks. Only you should post the info on Skype port before in the beginning, as I did everything by myself and changed the port number in wamp folder. Then here I found out that there was easier way doing it on Skype
lobsterhands
Great tutorials. Thank you for being so clear and concise.
Lis
Fab article! I’m all installed and working. However, any additional pages I am creating over and above the home page don’t work. I am creating the page in WordPress, but when following the ‘View’ link, I get a 404. Any idea?
pramod
Downloaded everything. when i write on web http://localhost/mysite/ but display error
The requested URL /mysite/ was not found on this server.
Monica
Very helpful thanks.
St. Buzo of C.O.B. ®
Bingo..!! this was so helpful.!! Phase one done i have installed..!!
anbu
dear sir,
this blog is very usefull to me..as per your instruction i create a website locally. but when i try to open the same site from different machine in tha same lan i can’t.please guide me.
i tried via this following method in another computer
1.http://192.168.1.88/(sitename).
2.http://localhost/(sitename)
the site is not opening
anbu
dear sir,
this blog is very usefull to me..as per your instruction i create a website locally. but when i try to open the same site from different machine in tha same lan i can’t.please guide me.
i tried via this following method in another computer
1.http://192.168.1.88/(sitename).
2.http://localhost/(sitename)
Lyle Denman
http://forum.wampserver.com/read.php?2,121118
This should answer many of your questions. Know that you will also have to update your database’s options (from localhost/phpmyadmin/). wp_options > siteurl and wp_options > home should be changed from http://localhost/database_name to http://your_local_ip_address/database_name (for example http://192.168.0.11/coolsite/).
Make sure you open c:/wamp/bin/apache/apache2.4.9/conf/httpd.conf
In that file, after the line reading: # onlineoffline tag – don’t remove, add the following 2 lines:
Require all granted
Require ip 192.168.0 (or whatever the first 3 groupings of your local ipv4 address is)
Then, in the same file, find the line reading: #Include conf/extra/httpd-vhosts.conf and remove the # from the beginning of that line.
Then, open the file c:/wamp/bin/apache/apache2.4.9/conf/extra/httpd-vhosts.conf and comment out the code that is there (just to keep defaults around) and past the following:
ServerName localhost
DocumentRoot c:/wamp/www
AllowOverride All
Save those files, restart all WAMP services and enjoy your LAN development.
Lina
This post was VERY helpful!! Thank you very much!
WPBeginner Staff
First you need to uninstall wampserver completely from your computer. Then download a fresh copy and try to reinstall. If this does not work out, then we will recommend you to use XAMPP which is an alternate software with nearly the same software (Apache, php, mysql).
Jokerman
I tried EasyPhP too but that didn’t work either. Have just installed Xampp and that appears to be working. Thanks very much for the advice.
Jokerman
I have downloaded and attempted an install. It didn’t work as I was missing a dll file. Have downloaded the necessary software from MS and this time the install appeared to have gone well…no error messages and the Wampserver icon has appeared on my desktop as requested. However when I click on the Wampserver icon it asks: Do you want to the following program from an unknown publisher to make changes to your computer? (Program name: wampmanager.exe) Clicking on Yes causes that window to close then nothing happens. Do you have any clues as to what to try next please? Thank you
cmills
The latest version of wamp uses PHP 5.5.12 which isn’t compatible with WordPress!
WPBeginner Staff
That’r probably because your site is served at 127.0.01 which is a local loop address while the other ip address is your lan address. They are two different things.
To enable sharing you need to add this line to your httpd.conf file Listen 192.168.1.4:80 make sure your computer is using static ip and it is set to use the ip address you enter in apache configuration file.
You will also need to make sure that WordPress saves your IP address as your sites URL not localhost. To achieve this you would need to install wordpress from 192.168.1.4/mysite instead of localhost/mysite
Naresh
Thank you very much.
archetypechris
Hello, and thank you for the amazing guide! I have a small
problem. Everything worked find when I followed the guide and my site loads up
fine, but when I try to connect to it from another computer in my house with
address: 192.168.1.4/mysite, it says I don’t have permission to view the page.
Does anyone know how to fix this? Thank
you!
WPBeginner Staff
You can use the Duplicator plugin or BackupBuddy for site transfers.
Anji
It is my first time creating a website in WP and his post was easy and it worked like a charm! Thank you so much!
WPBeginner Staff
George,
The WordPress you install on your local computer is only available on that computer.
There are specialized software that allow you to install Wampserver on a USB stick which you can then carry with you to work.
George
Thanks for the speedy reply,
Today I installed Wamp on my work laptop and using phpadmin exported my sql database from my home computer and imported it to my work laptop.
I tried mirroring the process above on my work laptop and named the database the same thing. I was able to get into my site on my work laptop but is seems my plugins and theme haven’t transferred. Am I missing a step? Must I transfer another folder?
I was planning on working on a local server doing this transfer sequence between work and home and was wondering if it can even be done (I heard about url linking problems) A short check list or play by play of what I must do would be very helpful.
Thank you,
-George
rustomQ
excellent guide!!!!!! got everything up and running the first time!!! thank you oh so much!!!!
George
This Work wonderfully! I’ve been word pressing for a couple of days and have made some progress over the weekend.
One Problem:
How can I take what I have on my home computer and work on it on my work computer in the office? Can I upload this to wordpress and work on it from anywhere? (I am fine with having a http://www.website.wordpress.com url while I am developing) What are my options to working and showing my development work after following the process above.
I am a complete newbie but willing to learn, a quick tutorial on that process and options would be greatly appreciated. Great work so far and thank you for all the resources you guys provide.
Thomas
*facepalm* There is a link just above to resolve the problem. Sorry about that! Thanks again for this great tutorial!