最近、読者の一人から、Amazon Web Services(AWS)にWordPressをインストールする方法を取り上げてほしいという依頼があった。
Amazon Web Servicesは強力なクラウド・コンピューティング・プラットフォームであり、誰でもAmazonの優れたインフラを従量課金制で利用することができる。
この投稿では、Amazon Web ServicesにWordPressをインストールする方法を紹介します。
注:サイトを立ち上げたばかりの場合は、WordPressのインストール方法ガイドにある簡単なソリューションのいずれかを使用することをお勧めします。
この投稿は2つの方法に分けています。1つ目の方法は、非常に技術的で複雑な手動プロセスである。2つ目の方法は、マネージドWordPressホスティングサービスを利用することで、AWSインフラストラクチャを利用することができるため、初心者にとってより簡単なソリューションです。
方法1.AWS上にカスタマイザーWordPressインストールを作成する。
まず最初にアマゾン・ウェブ・サービスのサイトにアクセスする。無料のアカウントを作成できますが、クレジットカード情報を入力する必要があります。アマゾンはあなたのカードに1ドル請求することで本人確認を行います。
アカウントが認証されたら、AWSコンソールにログインし、「サービス」メニューをクリックする必要がある。コンピュートセクションで、EC2を選択して続行する必要がある。
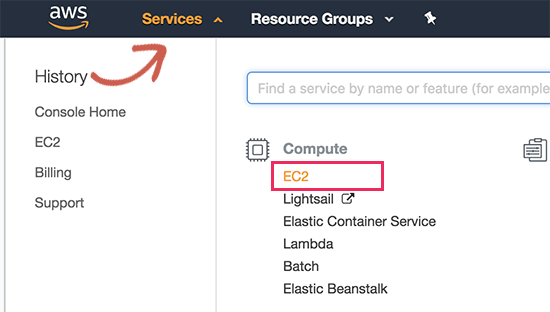
EC2はAWSのクラウドコンピューティングプラットフォームで、仮想マシンを作成し、WordPressのようなウェブアプリケーションを実行することができます。仮想マシンの詳細については、VPSとは何か、VPSは必要かについてのガイドをお読みください。
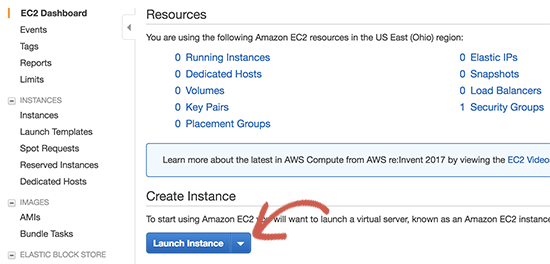
次に、「Launch Instance」ボタンをクリックしてインスタンスを起動し、インスタンス設定を構成します。
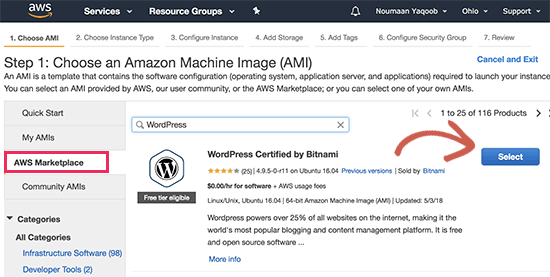
Amazon Machine Imageを選択する必要があります。これらは設定済みのソフトウェア・スタックで、個別クリックでインストールできます。
AWS Marketplace」でWordPressを検索し、「WordPress by Bitnami」を選択する。
価格設定のポップアップが表示されますので、「続ける」ボタンをクリックしてください。
次の画面では、インスタンスタイプを選択するよう求められます。先に進み、t2.micro free tierを選択し、’Configure Instance Details’ボタンをクリックします。
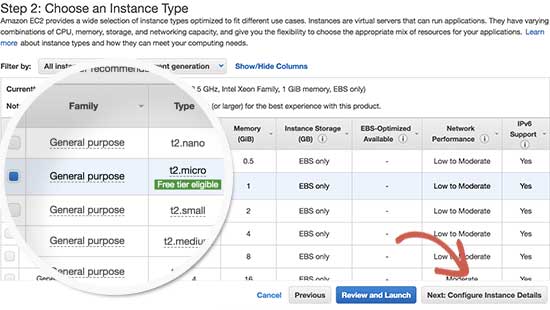
次の画面では、何も変更する必要はありません。次へ」をクリックするだけです:ストレージの追加」をクリックし、次に「次へ」をクリックします:タグの追加’ボタンをクリックします。
次に、このインスタンスの名前をタグとして入力します。タグの追加」ボタンをクリックし、キーとして「名前」、値として「MyWordPress」を入力します。
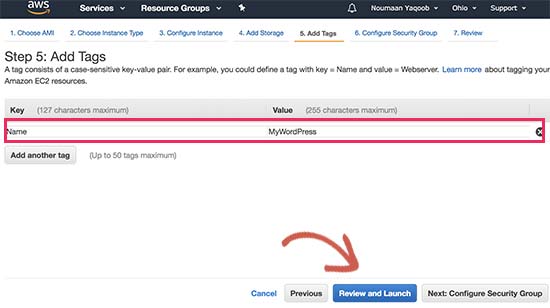
Review and Launch “ボタンをクリックして続行する。
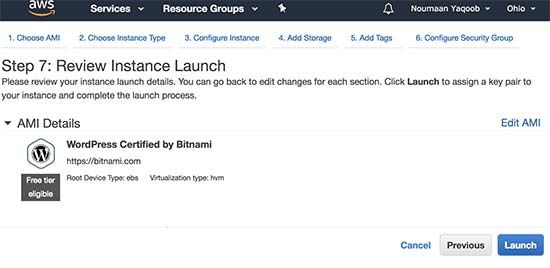
EC2インスタンス構成の概要が表示されます。Launch」ボタンをクリックしてインスタンスを起動します。
次に、ペア・キーの選択を求められます。キー・ペアなしで進む」を選択し、その下のボックスにチェックを入れる必要がある。
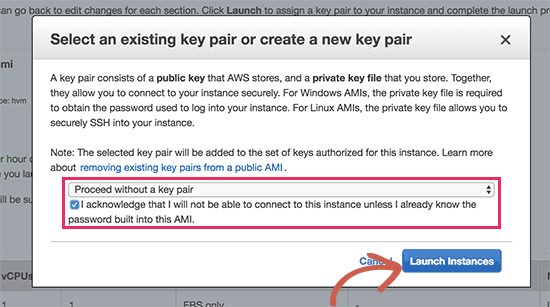
その後、「Launch Instances」ボタンをクリックして設定を保存し、EC2インスタンスを起動する。
AWSに成功のメッセージが表示されます。画面右下の’View Instances’ボタンをクリックします。
WordPressインスタンスが起動していることが確認できます。
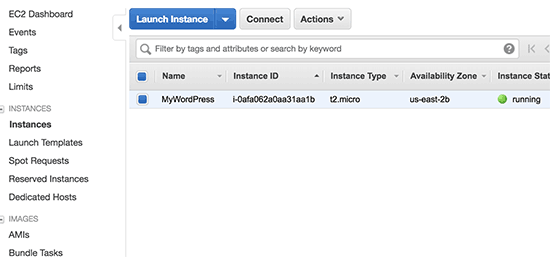
WordPressサイトをテストするには、そのパブリックIPアドレスを見つける必要があります。インスタンスの隣にあるIPV4 Public IPカラムで見つけることができます。
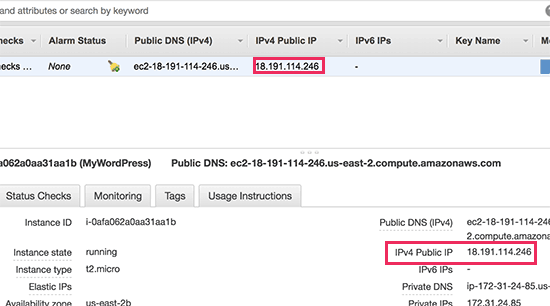
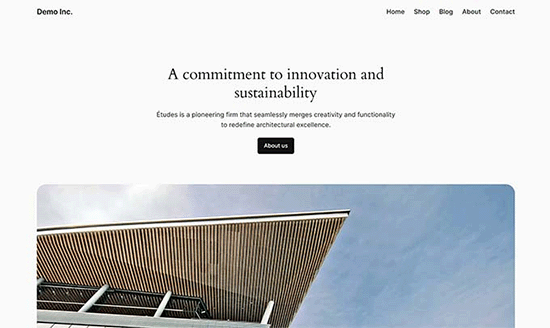
このIPアドレスをコピーして、新しいブラウザータブのアドレスバーに入力すると、サイトを表示できるようになります。デフォルトテーマのWordPressサイトが表示されます。
WordPressの管理エリアにアクセスするには、次のようにサイトの公開IPアドレスの横に/wp-admin/を追加するだけです:
http://18.191.114.246/wp-admin
初期設定のWordPressログインページが表示されます。
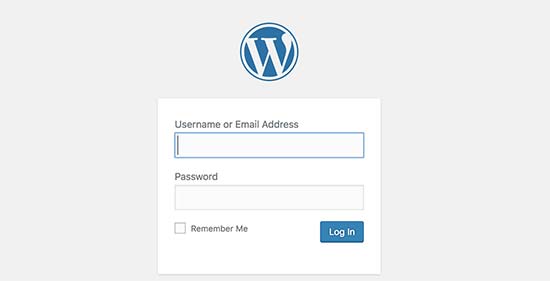
ただし、管理エリアにアクセスするにはユーザー名とパスワードが必要です。
EC2コンソールに戻って「Actions」ボタンをクリックし、「Instance Settings」 ” 「Get System Log」を選択することで取得できる。
すると、たくさんのテキストが書かれたポップアップウィンドウにログファイルが表示されます。一番下までスクロールすると、##記号で囲まれた「Setting Bitnami user password to」という行があります。アプリが設定した初期ユーザー名も表示されます。
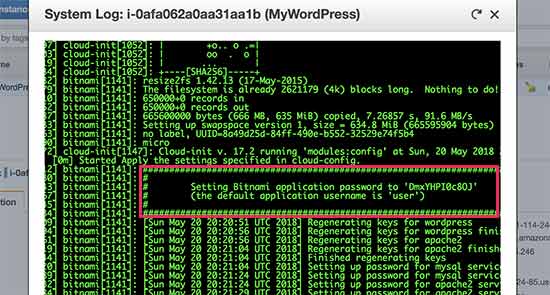
ユーザー名とパスワードをコピーして、WordPressサイトのログイン画面に入力します。
おめでとうございます、あなたはAmazon Web ServicesにWordPressをインストールすることに成功しました。しかし、あなたのサイトはまだIPアドレスでしかアクセスできません。
AWS WordPressインストールにドメイン名を指定したい場合は、ドメイン名をAWSのDNSサーバーに接続する必要があります。
ドメイン名の登録方法については、ステップバイステップのガイドをご覧ください。
ドメイン名を登録したら、AWSインスタンスに追加する準備ができました。
Amazon Web ServicesでWordPressサイトにドメイン名を追加する
まず、EC2インスタンスのダッシュボードにアクセスし、左カラムの「ネットワークとセキュリティ」セクションから「Elastic IPS」をクリックする。
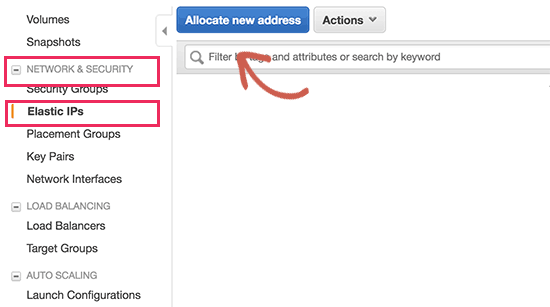
次に、’Allocate New Address’ボタンをクリックして続けます。
IPアドレスをどのように使用するか尋ねられます。Allocateボタンをクリックしてください。
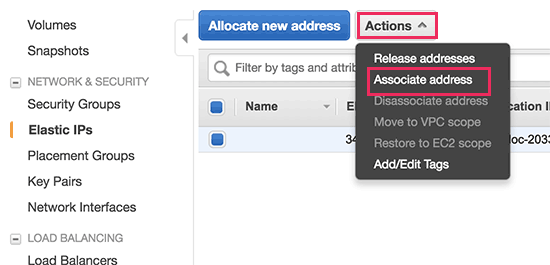
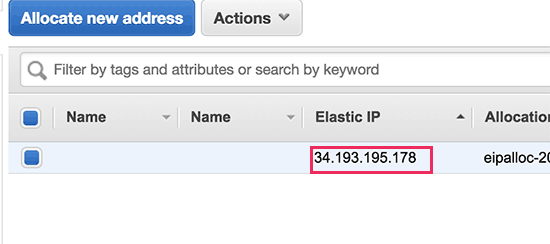
AWSはWordPress EC2インスタンス用に新しいエラスティックIPを作成します。IPアドレスが表に表示されます。IPアドレスの行を選択し、’Actions’ボタンの下にある’Associate Address’を選択します。
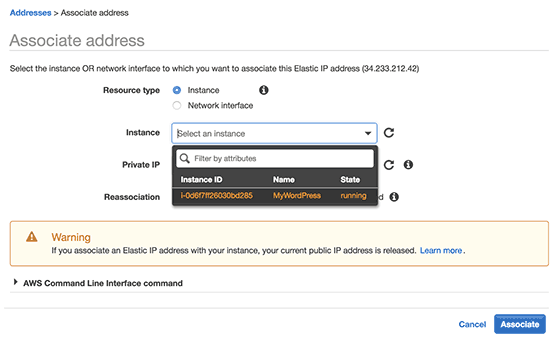
次の画面で、ドロップダウン・メニューからWordPressインスタンスを選択し、「Associate」ボタンをクリックします。
あなたのElastic IPが表に表示されます。IPアドレスをコピー&ペーストして、メモ帳などのテキストエディターに貼り付けてください。次のステップで必要になります。
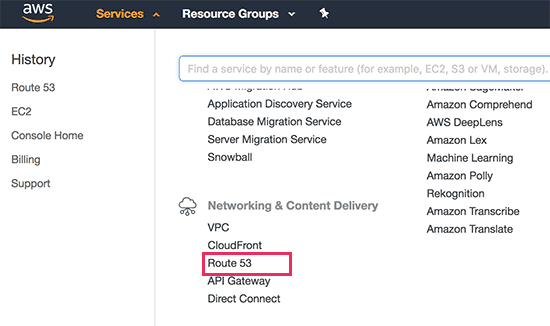
次に、上部にある「Services」メニューをクリックし、「Route53」を検索する必要がある。これはAmazon web servicesのDNS管理サービスで、EC2インスタンスにトラフィックをルーティングすることができる。
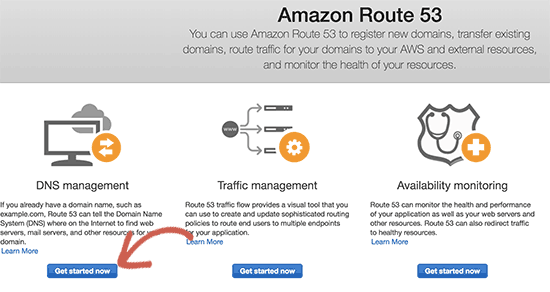
次のページで、DNS管理セクションの下にある「今すぐ始める」ボタンをクリックします。
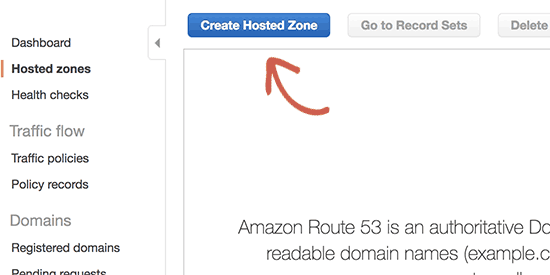
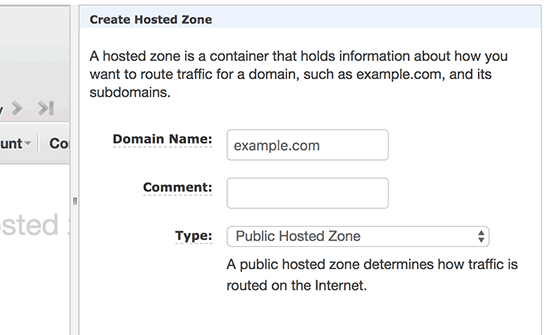
これでホスティングサービスゾーンのセクションが表示されます。ホスティングサービスゾーンを作成」ボタンをクリックしてください。
次に、ドメイン名を追加し、作成ボタンをクリックしてホスティングサービスゾーンに追加する必要があります。
ドメインをホスティングサービスゾーンに追加したら、「レコードセットを作成」ボタンをクリックします。ここで、「Name」フィールドの横に「www」と入力する必要があります。Value」フィールドに先ほどコピーしたエラスティックIPを入力し、「create」ボタンをクリックします。
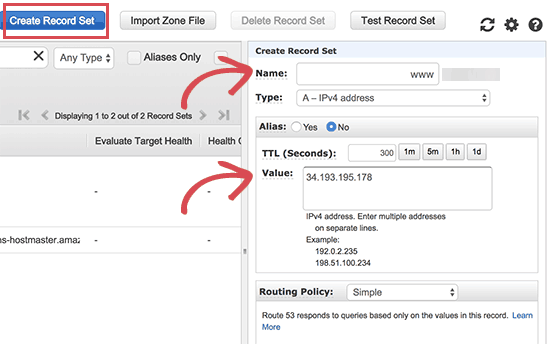
これで、Aレコードがドメイン名とともにホスティングサービスゾーンに追加されます。左のカラムから、NSフィールドの下の行をコピーする必要があります。これらは次のステップで必要となるネームサーバーのアドレスです。
ドメイン登録業者のサイトに行き、ドメイン名の設定を編集する必要があります。以下のスクリーンショットはプロバイダーによって異なる場合がありますが、基本的な手順は各プロバイダーで同様です。
ドメインのDNSネームサーバー設定で、先ほどコピーしたネームサーバーのアドレスを入力します。
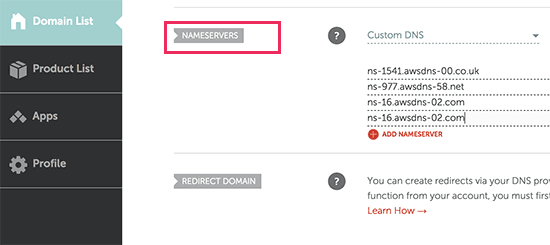
変更を保存するのを忘れないでください。追加したドメイン名にアクセスすると、Amazon Web Services上のWordPressサイトに移動します。
注意:DNSの変更が反映されるまでには時間がかかる場合があります。
方法2.マネージドWordPressホスティングサービス経由でAmazon Web Servicesを利用する。
お気づきかもしれませんが、AmazonウェブサービスへのカスタマイザーWordPressインストールは、非常に技術的で複雑なプロセスです。
アマゾン・ウェブ・サービスが提供するクラウド・コンピューティング・インフラストラクチャは、従量課金制です。つまり、トラフィックが急増すると、ホスティングサービスの請求額が大幅に増加します。言うまでもないことですが、あなた自身のサービスを管理するレスポンシブが発生するため、余計な作業が増えるだけです。
Amazon Web ServicesでWordPressを手間なく利用する簡単な方法は、マネージドWordPressホスティングサービスプロバイダーを利用することです。
WP Engineの利用をお勧めします。彼らはホスティングサービスの一部をAWSインフラストラクチャ上で運営しており、トラフィックの急増、サーバー管理、WordPressのメンテナンスについて心配する必要はありません。
さらに、WPBeginnerユーザーは、WP Engineクーポンで年間プランが4ヶ月無料になります。
もう一つの素晴らしい選択肢は、プレミアムマネージドWordPressホスティングサービスプロバイダーであるSiteGroundです。超高速サーバー、一流のWordPressセキュリティ、24時間365日のWordPressエキスパートサポート、素晴らしい開発者ツールなどを提供しています。
この投稿が、Amazon Web ServicesにWordPressをインストールする方法を学ぶのにお役に立てば幸いです。また、WordPress のスピードとパフォーマンスを向上させるためのステップバイステップの究極のガイド、または専門家が選ぶビジネスサイトに最適な WordPress プラグインもご覧ください。
If you liked this article, then please subscribe to our YouTube Channel for WordPress video tutorials. You can also find us on Twitter and Facebook.


sanskruti
Is it possible to link a pre-existing website(created on wordpress) with AWS?
WPBeginner Support
You would use this method to install WordPress and transfer your content over. You can see our guide on how to transfer your content below:
https://www.wpbeginner.com/wp-tutorials/how-to-move-wordpress-to-a-new-host-or-server-with-no-downtime/
Admin
Nancy Melucci
Just a head’s up – the new interface for EC2 makes it a lot harder to find the system log to recover the password. Fortunately, there’s a toggle button. So I toggled to the old interface.
WPBeginner Support
Thank you for sharing that information for those looking for that
Admin
Gordon Taylor
Thank you so much for this excellent guide. I now have my first WordPress site up on AWS.
WPBeginner Support
Glad our guide was helpful
Admin
Rahul Veerwal
This was amazing. Thank you so much for the detailed guidance. I was able to setup in under 10 mins.
WPBeginner Support
You’re welcome, glad our guide could help
Admin
AJ
Hello thank you for the article. I currently have AWS subscription and services. I also have a website that is already being hosted and it is not WP.
I now want to install a WP website to replace the current site.
Do I just use the same installation instructions above? Or is there a different process.
Another question: if I want the designer to install for me, should I create a different AWS log in for them to use? Or
WPBeginner Support
You would need to remove the old site and then you can follow this guide. It may be a good idea to give your designer their own login information should access need to be removed at a later date.
Admin
kenny
WOW!! What an excellent article. Very thorough, painless and easy to follow.
I also wanted to let you know that your Pagely link in (Method 2. Using Amazon Web Services via Managed WordPress Hosting) goes to the Pagely website but it pops up with a 404. Just wanted to let you guys know that so you can possibly fix that if you’d like.
WPBeginner Support
Thanks for letting us know, we’ll be sure to look into that
Admin
Majed Ahmed
Thank you so much but i have one important question
When i installed my wordpress site
I already have theme ok ? from where can i upload the theme please ?
Sorry for my bad english
WPBeginner Support
For installing a theme, if that is what you’re looking to do, you would want to take a look at our guide here: https://www.wpbeginner.com/beginners-guide/how-to-install-a-wordpress-theme/
Admin
Yaya JATTA
What a well documented step by step process laid out simply for any lay man to follow and get the same result as an expert will.
Thank you!, I landed on the right page will be sure to join your youtube channel.
WPBeginner Support
Glad our article was helpful
Admin
Nigel
Incredibly useful page. Thanks for posting this. Took me 15 minutes to set up 2 WordPress sites. Brilliant.
WPBeginner Support
Glad our guide could help
Admin
Vikas Goyal
I installed wordpress as guided in the step by step process in this article.
Everything is working fine except for the backend login page.
The password that is given in instance log is not working.
Kindly help
WPBeginner Support
Don’t forget to exclude the quotes in the password when entering it and it is case sensitive. Otherwise, you would need to use the command line and reset your password using the Bitnami documentation method.
Admin
Kevin
One of the best walkt hroughs of this complex setup i have seen. Thanks!
WPBeginner Support
Hey Kevin,
We are glad you found it helpful. Don’t forget to join us on Twitter for more WordPress tips and tutorials.
Admin
Jay
Great article and instructions. I did this about a year ago and have been very happy with the service. I have a small personal website that was free for the first year and now $10 per month.
“As you may have noticed that setting up a custom WordPress install on Amazon web services is a very technical and complicated process.”
You should at least state that ‘very technical’ is subjective. You should also at least mention the advantages of having a VPS versus a managed hosting service.
Mahesh
Really Thanks a lot
Ahmed
Thanks for the explanation. Well explained
Andy
Great article. Thanks a lot for detail explination.