WordPressサイトにファイルをアップロードしようとして、行き詰まったことはありませんか?必要な画像、プラグイン、またはテーマをアップロードできないのは非常にイライラします。ファイルアップロードの問題はワークフローを遅くする可能性があるため、読者からよく助けを求められます。
これらのファイルアップロード制限により、メディアライブラリにコンテンツを追加したり、必要なより大きなプラグインやテーマをインストールしたりできなくなる場合があります。それはまるで身動きが取れないようなものです。そして、それをどう修正すればよいかわからない場合は、さらにイライラします!
しかし、心配しないでください。私たちがサポートします。WordPressが非常に設定可能なプラットフォームであることを気に入っており、同じ問題を解決する方法は複数あることがよくあります。
このガイドでは、WordPress で最大ファイルアップロードサイズを増やす最も簡単な方法を紹介します。これらの制限を乗り越えて、あなたが愛するウェブサイトの運営に戻れるようにします!
WordPressで最大ファイルアップロードサイズを増やす理由
あなたの WordPressホスティング プロバイダーは、サインアップ時および WordPressのインストール 時にデフォルトの最大ファイルアップロードサイズを設定します。この制限はホスティングプロバイダーによって定義され、通常は2MBから500MBの範囲です。
ほとんどのWordPressウェブサイトの所有者にとって、この制限で十分すぎるほどです。
ただし、アップロードエラーが発生しないように、この制限を引き上げる必要がある場合があります。
例えば:
- あなたは写真サイトを運営しており、大きな画像をアップロードする必要があります。
- あなたのデザインまたは写真のポートフォリオには大きな画像が含まれています。
- より大きなWordPressテーマまたはプラグインをインストールしたい場合。
- eBook、写真、ビデオなどのデジタル製品を販売したいと考えています。
- コンテンツを定期的に更新し、現在の制限を超えたオーディオ、写真などを追加しています。
とはいえ、WordPressサイトで最大ファイルアップロードサイズを増やす方法をご紹介します。
注: ウェブサイトに多数の大きなファイルを表示すると、速度とパフォーマンスが著しく低下する可能性があることに注意してください。そのため、通常はWordPressに動画をアップロードしないことをお勧めします。
ほとんどのユーザーは異なるWordPressホスティング設定を使用しているため、以下をカバーします。
- WordPressで最大ファイルアップロードサイズ制限を確認する方法
- 方法1:WordPressホスティングプロバイダーに連絡する
- 方法2:既存のphp.iniファイルを作成または編集する
- 方法3:WordPressテーマのfunctions.phpファイルにコードを追加する
- 方法4:.htaccessファイルにコードを追加する
- Method 5: Use a WordPress Plugin to Increase File Upload Size
WordPressで最大ファイルアップロードサイズ制限を確認する方法
WordPressは、画像やその他のメディアをアップロードする際に、最大ファイルアップロードサイズ制限を自動的に表示します。
これを確認するには、WordPress管理画面のメディア » 新規追加にアクセスするだけで、WordPressサイトの最大ファイルアップロードサイズ制限が表示されます。
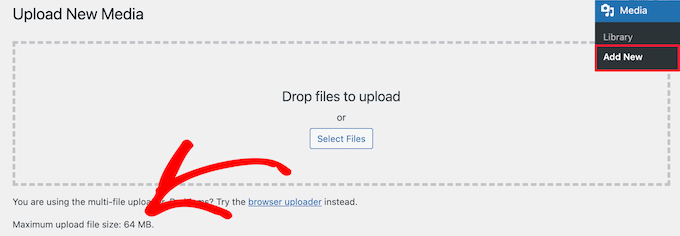
アップロードサイズの上限を見つけ方がわかったので、WordPressで最大アップロードサイズを増やす方法をご紹介します。
方法1:WordPressホスティングプロバイダーに連絡する
WordPressで最大ファイルアップロードサイズを増やす最も簡単な方法の1つは、WordPressホスティングプロバイダーに連絡することです。
これは、彼らのカスタマーサービスチームにとっては比較的簡単なタスクであり、数分で完了できます。
初心者にとっては、WordPressにコードを追加したりサーバーファイルを編集したりするよりもはるかに簡単です。
単純に、Bluehostのようなホスティングプロバイダーのウェブサイトにアクセスしてログインしてください。
次に、画面下部にある「チャット」アイコンをクリックします。その後、サポートスタッフにWordPressサイトのファイルアップロードサイズを増やすように依頼できます。
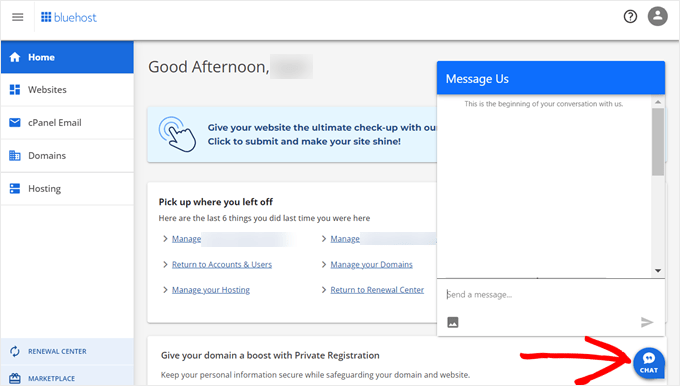
ホスティングアカウントダッシュボード内からサポートに連絡することもできます。
方法2:既存のphp.iniファイルを作成または編集する
最大ファイルアップロードサイズを増やすもう一つの方法は、php.iniという名前のファイルを作成または編集することです。このファイルは、WordPressホスティング環境の多くの設定を制御します。
BluehostのようなほとんどのWordPressホスティングプロバイダーは、ウェブサイトを管理するのに役立つ初心者向けのcPanelを提供しています。
ウェブホストに cPanel ダッシュボードがある場合、組み込みツールを通じてファイルアップロードサイズを増やすことができます。
注: 以下はBluehostのcPanelからのものです。ただし、ほとんどの共有ホスティングプロバイダーも同様の手順になります。
Bluehostのホスティングタブの下部にあるcPanelボタンを見つけることができます。
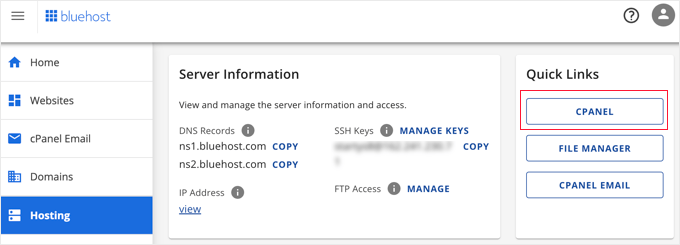
このボタンをクリックすると、cPanelダッシュボードが開きます。
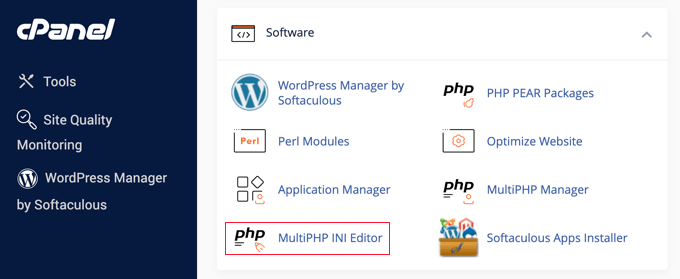
次に、下にスクロールして「ソフトウェア」セクションを見つけ、「MultiPHP INI Editor」をクリックします。
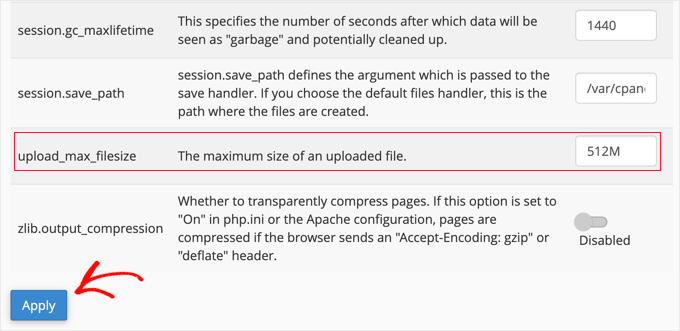
次に、「upload_max_filesize」というラベルのセクションまでスクロールダウンし、ボックスに新しい最大ファイルサイズを入力します。
次に、「適用」ボタンをクリックします。
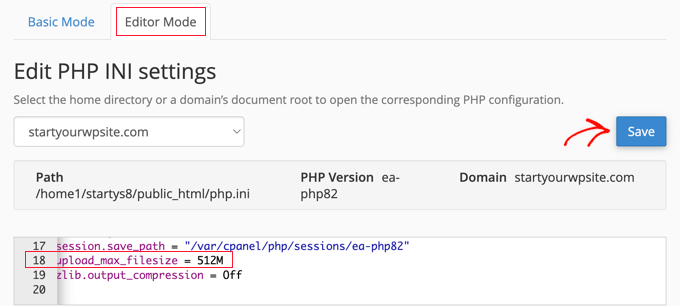
または、「エディターモード」メニュータブをクリックして、エディターで直接最大ファイルアップロードサイズを変更することもできます。
ファイルのアップロードサイズを増やすには、「upload_max_filesize」セクションを編集する必要があります。
完了したら、「保存」ボタンをクリックしてください。
コードを追加してphp.iniを編集する
現在のホスティングプロバイダーがcPanelオプションを提供していない場合は、このファイルを直接編集する必要があります。
これを行うには、FTPクライアントを使用するか、WordPressホスティングコントロールパネルのファイルマネージャーオプションを使用できます。
共有ホスティングを使用している場合、ホスティングディレクトリにphp.iniファイルが表示されない場合があります。表示されない場合は、php.iniという名前のファイルを作成し、ルートフォルダにアップロードしてください。
次に、以下のコードスニペットをファイルに追加します。
upload_max_filesize = 256M
post_max_size = 256M
max_execution_time = 300
「256M」の制限を、WordPressブログに必要なファイルサイズに変更できます。
方法3:WordPressテーマのfunctions.phpファイルにコードを追加する
この方法では、functions.phpファイルにコードを追加します。これは、WordPressテーマにあります。
ファイルを直接編集する代わりに、WPCodeの使用をお勧めします。これは、ウェブサイトを壊すことなくコードを追加できる最高のコードスニペットプラグインです。
これが初めての場合は、WordPressにカスタムコードを追加する方法に関する初心者向けガイドをご覧ください。
まず、無料のWPCodeプラグインをインストールする必要があります。詳細については、WordPressプラグインのインストール方法のステップバイステップガイドをご覧ください。
アクティベート後、Code Snippets » + Add Snippet に移動してください。
「カスタムコードを追加 (新規スニペット)」オプションにマウスカーソルを合わせ、「+ カスタムスニペットを追加」ボタンをクリックする必要があります。

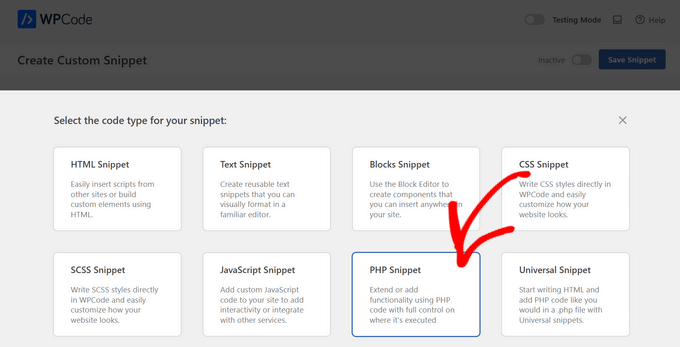
次に、表示されるオプションのリストからコードタイプとして「PHPスニペット」を選択する必要があります。
次の画面で、新しいスニペットの名前を入力します。これは、コードが何であるかを思い出すのに役立つものであれば何でも構いません。
次に、「コードプレビュー」の下に次のコードスニペットをコピーして貼り付けることができます。「256M」を必要な最大ファイルサイズに変更してください。
@ini_set( 'upload_max_size' , '256M' );
@ini_set( 'post_max_size', '256M');
@ini_set( 'max_execution_time', '300' );
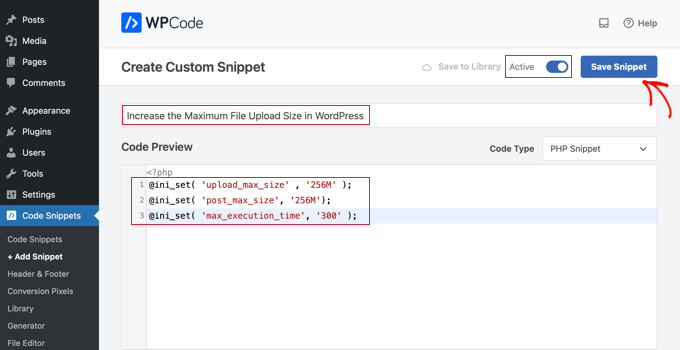
最後に、上部のトグルを「アクティブ」に切り替え、次に「スニペットを保存」ボタンをクリックします。これで、コードがウェブサイトで実行されるようになります。
方法4:.htaccessファイルにコードを追加する
最大ファイルサイズを増やすもう一つの方法は、.htaccessファイルを変更することです。このファイルは、ウェブサイトの高レベルな設定を制御します。
これを行うには、FTP経由でウェブサイトサーバーにログインする必要があります。以前にこれを行ったことがない場合は、初心者向けWordPressへのファイルのアップロードにFTPを使用する方法に関するガイドを参照してください。
次に、ウェブサイトのルートフォルダにある.htaccessファイルを特定する必要があります。

.htaccess ファイルが見つからない場合、ファイルマネージャーまたはFTPクライアントによって非表示になっている可能性があります。詳細については、WordPressサイトで.htaccessファイルが見つからない理由に関するガイドをご覧ください。
次に、以下のコードスニペットを.htaccessファイルに追加する必要があります。
php_value upload_max_filesize 256M
php_value post_max_size 256M
php_value max_execution_time 300
php_value max_input_time 300
最大ファイルアップロードサイズをさらに増やすには、単に「64M」を必要なサイズに変更してください。
方法5:WordPressプラグインを使用してファイルアップロードサイズを増やす
最大ファイルアップロード制限を引き上げるもう1つの方法は、WP Increase Upload Filesizeプラグインを使用することです。WordPressにコードを追加することに慣れていない場合は、これが良い選択肢となるでしょう。
まず最初に行うべきことは、プラグインのインストールと有効化です。詳細については、WordPressプラグインのインストール方法に関するガイドをご覧ください。
有効化したら、WordPress管理画面の メディア » アップロード制限の引き上げ に移動してください。
これにより、「最大アップロードファイルサイズを選択」ドロップダウンで新しいファイルアップロードサイズを選択できる画面が表示されます。
次に、「変更を保存」ボタンをクリックします。

注意: 最大ファイルアップロードサイズは、ホスティングプロバイダーによって設定されます。ドロップダウンに表示されている制限よりも大きいファイルサイズ制限が必要な場合は、ホスティングプロバイダーに連絡して制限の引き上げを依頼する必要があります。
動画チュートリアル
文章での指示に従うのが好きでない場合は、代わりにビデオチュートリアルをご覧ください。
この記事がWordPressの最大ファイルアップロードサイズを増やすのに役立ったことを願っています。また、WordPressでアップロードできる追加ファイルタイプを追加する方法に関するガイドや、WordPress管理エリアを改善するためのプラグインとヒントの専門家によるおすすめもご覧ください。
この記事が気に入ったら、WordPressのビデオチュートリアルについては、YouTubeチャンネルを購読してください。 TwitterやFacebookでもフォローできます。


Abduaziz
本当にありがとうございます!方法3がうまくいきました
WPBeginnerサポート
Glad our recommendation could help
管理者
Alexander Gartley
ありがとうございます。これにより、アップロード制限のトラブルシューティングができました。私はWordpressマルチサイトネットワークインストールを使用しているため、最終的にはネットワーク管理設定の設定でした。
最初は混乱しました。PHP設定ではより大きなアップロードが許可されていましたが、ネットワーク設定で制限されていました。
WPBeginnerサポート
Thanks for sharing what solved the problem for you
管理者
Ernesto
.user.iniメソッドを含めていただければ幸いです。
.user.ini を編集したphp.iniと同じ値/テキストでルートフォルダにアップロード
ほとんどの場合、共有ホスティングではこの方法のみが機能します。
ErnestPH
WPBeginnerサポート
The php.ini file should work the same as the user.ini file unless your specific host ignores the php.ini but thank you for sharing your recommendation
管理者
Mark
これは私の共有ホスティングサーバーで機能する唯一のソリューションです。Ernestoありがとう!
Tamir Davidoff
私には機能していません。
このガイドに従い、php.iniファイルを再確認して、変更が実際に保存されていることを確認しました。制限を増やすために.htaccessファイルを変更しました。また、phpMyAdminのhttpd-app.confおよびphp-settings.confファイルを変更しようとしました。これらのすべてのファイルは、40mを超える最大アップロードを反映していますが、私のWPサイトはこれらの変更をまったく反映していません。本当にイライラしています。
お手伝いいただけますでしょうか、ありがとうございます!
WPBeginnerサポート
If you haven’t already, you would want to reach out to your hosting provider to ensure there is not a setting on their end that is overriding what you are setting
管理者
rajesh
3つの方法をすべて試しましたが、どれもうまくいきませんでした。WordPressサイトにnewspaperテーマをアップロードしようとしていますが、毎回php.iniファイルのアップロード最大ファイルサイズが表示されます。
助けてください。
WPBeginnerサポート
あなたが行った変更を上書きする設定がないことを確認するために、ホスティングプロバイダーに連絡することをお勧めします。
管理者
アダム・ウォルズワース
非表示のphp.iniファイルに注意してください。私のセットアップでは、2つ見つかりました。実際に問題を解決したのは、次の場所で見つかったファイルでした。
./etc/php/7.0/apache2/php.ini
このファイルを変更したら、私の問題は解決しました。
WPBeginnerサポート
ソリューションを共有していただきありがとうございます。そのファイルがどこにあるかによりますが、そのような場所を探す前に、ほとんどのユーザーにはホスティングプロバイダーに連絡することをお勧めします。
管理者
Rafiq khan
ありがとう、友達。php.iniファイルを編集して、方法2を採用することで問題を解決しました。
本当にありがとう、素晴らしい働きです。
WPBeginnerサポート
Glad our article could help
管理者
Carla
上記のいずれも私には機能しませんでした。事実、htaccessファイルを編集すると、上記のコードを削除した後でもサイトが壊れました。新しいファイルで上書きすることで問題が解決しました。
私はBluehostの専用サーバーを持っています。私にとってうまくいったのは、cpanelやFTPアクセスではなく、WHMのルートに入ることでした。MultiPHP INI Editorを検索してください。タイトルとアイコンしか表示されない場合は、読み込みに少なくとも5分かかります。そこでアップロード時間、投稿サイズなどを設定できます。Cloudflareを使用しているサイトでも、開発モードにしたりキャッシュをクリアしたりすることなく、即座に機能します。誰かの役に立つことを願っています。
WPBeginnerサポート
Thank you for sharing what worked for you, should other users be on a dedicated server, if they reach out and let BlueHost know the need to increase the upload size then BlueHost can normally edit that for them
管理者
Pezza
素晴らしい!.htaccessが私にはうまくいきました!
WPBeginnerサポート
Thank you, glad our guide could help
管理者
ReineR
htaccessの方法がうまくいきました、ありがとう!
WPBeginnerサポート
Glad our article could help
管理者
Ahmed
私にはうまくいきました
3. htaccessメソッド
ファイルを表示および編集するには、(隠しファイルを表示)をクリックする必要があります。
WPBeginnerサポート
Glad our article could help
管理者
rahul
これを試したとき
致命的なエラーを確認するためにサイトと通信できませんでした。そのため、PHPの変更は元に戻されました。SFTPなどの別の手段でPHPファイルの変更をアップロードする必要があります。
これが私に起こりました
この解決策は何ですか
WPBeginnerサポート
コードを追加するには、WordPress自体ではなくFTPを使用する必要があります: https://www.wpbeginner.com/beginners-guide/how-to-use-ftp-to-upload-files-to-wordpress-for-beginners/
管理者
Ephraim
php.iniメソッドを試していましたが、うまくいきませんでした。どうすれば設定できますか?
または、function.phpのどこに貼り付ければよいか教えていただけますか?
WPBeginnerサポート
通常、php.ini ファイルの内容を設定するにはテキストエディタを使用します。functions.php の場合は、後で必要に応じて削除できるように、通常は末尾に追加します。これらの方法で問題が発生している場合は、ホスティングプロバイダーにファイルサイズの増加について支援を依頼できるかどうかも確認するとよいでしょう。
管理者
Ivos G.
どれも私にはうまくいきませんでした。しかし、これはうまくいきました – .htaccess にこの行を追加してください:
LimitRequestBody 104857600
WPBeginnerサポート
Thanks for sharing your solution for this issue
管理者
アキレウス
Nginxを使用しており、php.iniでphpの値をすでに適切に設定していましたが、サーバーブロックに同じ値を client_max_body_size xxxM; として設定したことで解決しました。
誰かの役に立つことを願ってこれを書いています。
編集スタッフ
Thank you for sharing this with us
管理者
RAHUL
それでうまくいきました、ありがとう
WPBeginnerサポート
Glad our tutorial could help
管理者
Adriana Sabo
どのオプションもうまくいきませんでした。最初の2つを試しても何も起こらず、最後の1つはエラー500が発生しました。何かお手伝いできますか?
カール
とても参考になりました、ありがとうございます!
Md. Rana
The third option is worked for me.
WPBeginnerサポート
Ranaさん、こんにちは
うまくいってよかったです。WordPress のヒントやチュートリアルについては、Facebook でフォローしてください。
管理者
トム・アレン
上記の説明はホストされているサイトには適していますが、ローカルホストを使っている私たちのような人間はどうでしょうか? WPプラグインから、またはダウンロードzipファイルからUpdfaftplusをダウンロードする際に、「upload_max_filesize」エラーをまだ解決できません。私は初心者なので、このプロセスを丁寧に教えていただく必要があります。助けていただけると幸いです。
crystal
htaアクセスは機能しました。
コードは#END Wordpressの前に挿入する必要があります。
#end wordpressの後に挿入すると、私のGoDaddyホスティングでの経験ではサイトが500内部サーバーエラーになります。
ルイス・フェリペ・リノ
ありがとう。
ハイメ・ロペス
セットアップした共有cPanelサイトのほとんどで:
- .htaccess の変更はサイト全体をダウンさせます(500 内部エラー)
- php.ini または php5.ini ファイルの追加は何も効果がありません
- cPanel の「サイトソフトウェア」を選択するオプションがありません…
ジョセフ
本当にありがとうございます。.htaccessファイルでうまくいきました
John S
本当にありがとうございます。.htaccessファイルでうまくいきました!
Karina
Thanks you so much!!! The .htaccess version worked for me
Megan
ありがとうございます!大変助かりました!プラグインをアップロードすることさえできませんでした。制限が2MBにプリセットされていたからです…今では64MBに引き上げ、作業できるようになりました。
感謝します!
Okimi Solomon
本当にありがとうございます。2番目のオプションがうまくいきました。神のご加護がありますように
Benj
.htaccessファイルを変更したところ、うまくいきました。本当にありがとうございます。
マーティン・クローカー
vidahost (現TSOhost)にて。
次のphp.iniを追加したところ、うまくいきました…しかし(まだ少し混乱していますが)、httpルートに置いただけではうまくいきませんでした。WordPress内のwp-adminおよびwp-includeディレクトリ内にphp.iniファイルを複製する必要がありました。
Kabelo
とても参考になりました。どうもありがとうございます。
Dwayne S
HostGatorを利用しており、現在max execution timeの問題を抱えています。数週間前に発生し、HostGatorのサポートが問題を解決してくれましたが、再び発生し、共有サーバーのため解決できないと言われました。担当者は手動で.htaccessファイルを編集して私のサイトをクラッシュさせましたが、それが機能するかどうか確認しませんでした。しかし、制限を増やすためのコードで.htaccessファイルを編集するプラグインを推奨しましたが、それは機能しません。HostGatorがそれをブロックしているようです。
ジェサニー
コードを.php関数フォルダーに追加したところ、WordPressがロードされなくなりました。この問題をどうすれば解決できますか??
WPBeginnerサポート
Jessanyさん、こんにちは
FTPまたはcPanelのファイルマネージャー経由でウェブサイトにアクセスすることで、追加したコードを削除できます。
管理者
bala
上記のコードを.htaccessファイルにアップロードしてください。動作します。
ケイレブ
GoDaddyホスティングを利用しており、ファイルアップロードサイズを増やす手助けを求めたところ、とても簡単でした。ファイルを作成したり、テーマにコードを追加したりする必要は全くありませんでした。したがって、GoDaddyやcPanelタイプのコントロールを使用している方は、ハッキングを忘れて管理設定を使用してください。
サポートから指示されたのは以下の通りです。
1. cPanel Adminにアクセスする(同様のホスティングパネルでも多少同じように機能する可能性があります)
2. 下にスクロールして「ソフトウェア」を見つけ、「PHPバージョンを選択」をクリックする
3. 右上にある「PHPオプションに切り替える」をクリックすると、TADA!すべてのPHPオプションが表示されます!
4. 下に移動して、「post_max_filesize」と「upload_max_filesize」を希望の値に変更し、適用して変更を保存すれば、安全で幸せなコーディング不要のウェブサイトオーナーになれます。
幸運を祈ります!
ZafB
ありがとうございます、完璧に機能しました
Alissa
これを投稿してくれてありがとう!素晴らしい効果がありました!
Alejandra
本当にありがとうございます!確かにうまくいきました!!
ポール・パーマー
素晴らしい解決策です – 完璧かつ簡単に機能しました!どうもありがとうございます。
リッチ・ペロジック
これは私にはうまくいきましたが、これらのファイルを見つけるために、GoDaddyに電話する必要がありました。そこで、これらの手順を案内してもらえなければ、彼らの助けなしではcpanel Adminにたどり着くことはできませんでした。
1. GoDaddyにサインオンする
2. 左上の「マイプロダクト」をクリックする
3. 「ウェブホスティング」の下にある「すべて管理」をクリックする
4. 「Cパネル付きウェブホスティング」をクリックする
5. CパネルAdminアイコンをクリックする
6. 下にスクロールして「ソフトウェア」を見つけ、「PHPバージョンを選択」をクリックする
7. 「PHPオプションに切り替える」をクリックする
8. ページ下部にある「upload_max_filesize」の数字をクリックし、最大ファイルサイズとして希望する数字を選択する
9. 「適用」をクリックする。うまくいきました。これで、選択した最大ファイルサイズまでファイルをアップロードできるようになりました。
Chris Sandford
マルチサイトユーザー:
私のように愚かな場合は、何も効果がないのにすべてを試したかもしれません。
WordPressマルチサイトを使用している場合は、個々のサイトのアップロード設定を変更することを忘れないでください。
ネットワーク管理 > 設定 > 最大アップロードファイルサイズ
この記事のヒントを引き続き使用する必要があるかもしれませんが、マルチサイトのアップロード設定を変更せずに使用すると、機能しているかどうかはわかりません。
Stef Thoen
あなたは私のヒーローです。この問題について長すぎる間調べていましたが、ついにあなたの投稿を見ました。本当にありがとうございます。
Ron
これをありがとうございます!この記事の本文に記載されるべきです!
Hitesh L.
うまくいきました!ありがとうございます!!!!!!!
エマヌエル・ピエトリ
方法3 – .htaccess を使用 – テーマでうまく機能します
Stefanos Kargas
ありがとうございます!! .htaccessファイルを変更したら機能しました。
haadi
こんにちは。どうもありがとうございます。3番目の方法がうまくいきました。
ジム・R
オプション2はうまくいきました。情報ありがとうございます。
Tor Helge
.htaccessで最後のものを実行したらうまくいきました。
mara
ゴーダディでこれを機能させた人はいますか?彼らは非常に役に立ちません。php.iniファイルを作成する必要があることはわかっています(そして作成しました)が、あなたが投稿した解決策はどれも機能しませんでした。どんな助けでも感謝します。
WangTuanJie
3つの方法を試しましたが、成功しませんでした。
Mahadi
ありがとう、男!! .htaccesでうまくいきました!
リン
Wish you wouldn’t assume everyone looking for this solution knows what you mean by our “Theme Functions File” – do you mean functions.php? I’m not an expert, and I’m really good at following precise directions, and don’t want to even put a toe in the water of editing files if I don’t know EXACTLY what file you’re talking about! No clues were provided, like what other code I might look for in the file to know I’m in the right place, etc. So…this didn’t help me at all
WPBeginnerサポート
Lynnさん、こんにちは。
はい、テーマのfunctions.phpファイルに追加する必要があります。
管理者
Justin
はい、しかしそれは functions.php のどこに追加すればよいですか?一番上、一番下、真ん中?引用符の中
WPBeginnerサポート
こんにちは、ジャスティン。
一番最後に。
ジャック
ありがとう、すべてのステップが役に立ちました
Alex
ありがとうございます、方法3は本当に私に効果がありました
php_value upload_max_filesize 64M
php_value post_max_size 64M
php_value max_execution_time 300
php_value max_input_time 300
vikram
こんにちは
共有ホスティングを使用していますか?
shahrin
素晴らしい!htaccessの方法がうまくいきました。とても安心しました、皆さん!事前に感謝します。
サンバ・シヴァ
.htaccess method worked for me
nelson
htaccessが私にはうまくいきました、ありがとう
サガール
php.ini が私には効きました。
乾杯。
ありがとう、男!!
Mituka
これは私にはうまくいきました。
.htaccessファイルをメモ帳で開いてください。
見えるものをすべてスキップして、一番下まで行ってください。
次のものを貼り付けて保存します。
php_value upload_max_filesize 64M
php_value post_max_size 64M
php_value max_execution_time 300
php_value max_input_time 300
Thomas
具体的にどこに貼り付けましたか?
# BEGIN WordPress
RewriteEngine On
RewriteBase /
RewriteRule ^index\.php$ – [L]
RewriteCond %{REQUEST_FILENAME} !-f
RewriteCond %{REQUEST_FILENAME} !-d
RewriteRule . /index.php [L]
# END WordPress
php_value upload_max_filesize 64M
php_value post_max_size 64M
php_value max_execution_time 300
php_value max_input_time 300
#END WordPress ステートメントの前ですか?(そうするとエラーが出ます)
それとも #END WordPress ステートメントの後ですか?
WPBeginnerサポート
トーマスさん、こんにちは。
#END WordPress の行の後、.htaccess ファイルの末尾に貼り付ける必要があります。
管理者