WordPressサイトにファイルをアップロードしようとして、壁にぶつかったことはありませんか?必要な画像やプラグイン、テーマがアップロードできないと、とてもイライラしますよね。ファイルアップロードの問題はワークフローを停滞させるので、読者からよくヘルプを求められます。
このようなファイルアップロードの制限によって、メディアライブラリにコンテンツを追加したり、必要な大きなプラグインやテーマをインストールしたりすることが、思いがけずできなくなってしまうことがあります。それはまるで、手を縛られたまま、先頭に固定表示されているようなものです。しかも、それを解決する方法がわからないとなると、さらに厄介だ!
でもご安心ください。WordPressは設定可能なプラットフォームであり、同じ問題を解決する方法が複数あることがよくあります。
このガイドでは、WordPressの最大ファイルアップロードサイズを増やす最も簡単な方法をご紹介します。このガイドでは、WordPressの最大アップロードサイズを増やす最も簡単な方法をご紹介します!
なぜWordPressの最大ファイルアップロードサイズを大きくするのか?
WordPressホスティングサービスプロバイダは、サインアップしてWordPressをインストールするときに、初期設定の最大ファイルアップロードサイズを設定します。ホスティングサービスはこの制限を定義し、通常2MBから500MBの範囲です。
ほとんどのWordPressサイトオーナーにとって、この制限は十分すぎるほどでしょう。
しかし、アップロードエラーを起こさないために、この制限を引き上げる必要がある場合もあります。
例えば、こうだ:
- 写真サイトを運営していて、大きな画像をアップロードする必要がある。
- あなたのデザインや写真のポートフォリオには大きな画像があります。
- より大きなWordPressテーマやプラグインをインストールしたい。
- eBook、写真、動画などのデジタル製品を販売したい。
- あなたは定期的にコンテンツを更新し、音声や写真など、現在の制限を超えるものを追加する。
それでは、WordPressサイトの最大ファイルアップロードサイズを増やす方法をご紹介しましょう。
注:サイトに大きなファイルをたくさん表示すると、サイトのスピードやパフォーマンスが著しく低下する可能性があることに留意してください。WordPressに動画をアップロードしないことをお勧めするのはそのためです。
ほとんどのユーザーは異なるWordPressホスティングサービスを設定しているため、ここでは以下を取り上げます:
- How to Check Your Maximum File Upload Size Limit in WordPress
- Method 1: Contact Your WordPress Hosting Provider
- Method 2: Create or Edit an Existing php.ini file
- Method 3: Add Code to Your WordPress Theme functions.php File
- Method 4: Add Code to Your .htaccess File
- Method 5: Use a WordPress Plugin to Increase File Upload Size
WordPressの最大アップロードサイズを確認する方法
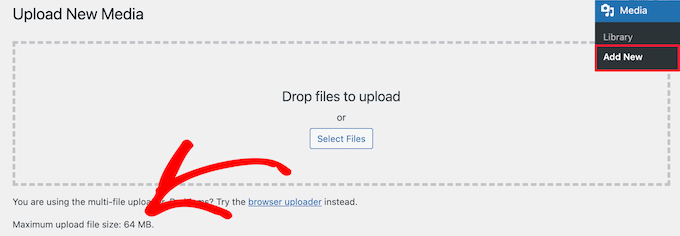
WordPressは、画像やその他のメディアをアップロードする際に、ファイルアップロードサイズの上限を自動的に表示します。
これを確認するには、WordPress管理画面のメディア ” 新規追加にアクセスするだけで、WordPressサイトの最大ファイルアップロードサイズ制限が表示されます。
サイズ制限の見つけ方がわかったところで、WordPressの最大アップロードサイズを増やす方法を紹介しよう。
方法1:WordPressホスティングサービスプロバイダーに問い合わせる
WordPressの最大ファイルアップロードサイズを増やす最も簡単な方法の1つは、WordPressホスティングサービスプロバイダーに連絡することです。
これはカスタマー・サービス・チームにとっては比較的簡単な作業で、数分で完了する。
初心者にとっては、WordPressにコードを追加したり、サーバーファイルを編集したりするよりもはるかに簡単です。
Bluehostのようなホスティングサービスのサイトにアクセスしてログインするだけです。
次に、画面下部の「チャット」アイコンをクリックします。その後、WordPressサイトのファイルアップロードサイズを増やすようサポートスタッフに依頼することができます。
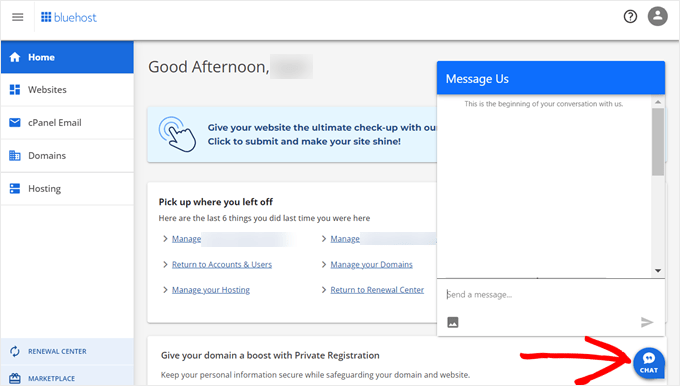
また、ホスティングアカウントのダッシュボードからサポートに連絡することもできます。
方法2:既存のphp.iniファイルを作成または編集する
最大ファイルアップロードサイズを増やすもう一つの方法は、php.iniと呼ばれるファイルを作成または編集することです。このファイルは、WordPressホスティングサービス環境の多くの設定をコントロールします。
BluehostのようなほとんどのWordPressホスティングサービスは、あなたのウェブサイトを管理するのに役立つ初心者に優しいcPanelを持っています。
ホスティングサービスにcPanelダッシュボードがある場合は、ビルトインツールを使用してファイルアップロードサイズを増やすことができます。
注:以下はBluehostのcPanelからです。しかし、ほとんどの共有ホスティングサービスプロバイダーは、同様の手順があります。
Bluehostのホスティングサービスタブの下部にcPanelボタンがあります。
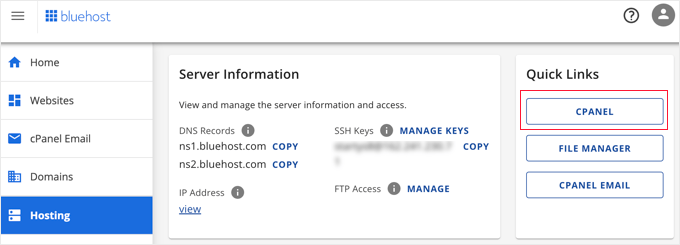
このボタンをクリックすると、cPanelのダッシュボードが開きます。
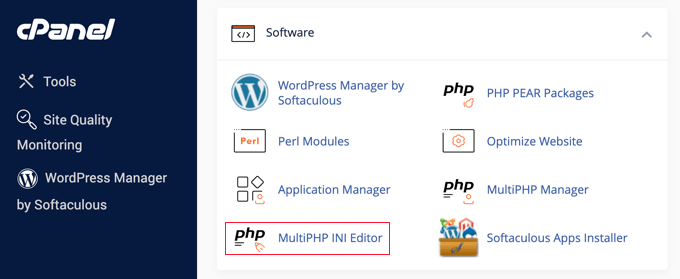
ソフトウェア」セクションまでスクロールし、「MultiPHP INIエディター」をクリックしてください。
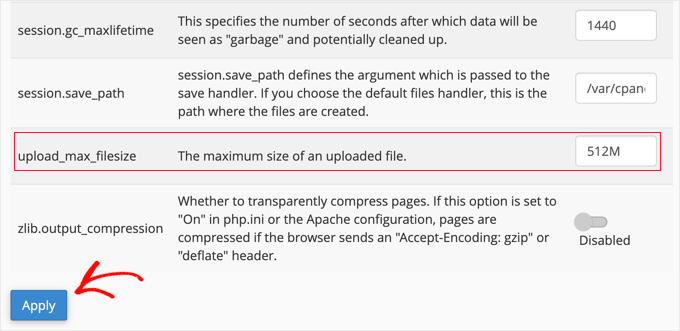
次に、「upload_max_filesize」と書かれたセクションまでスクロールダウンし、新しい最大ファイルサイズをボックスに入力する。
そして「Apply」ボタンをクリックする。
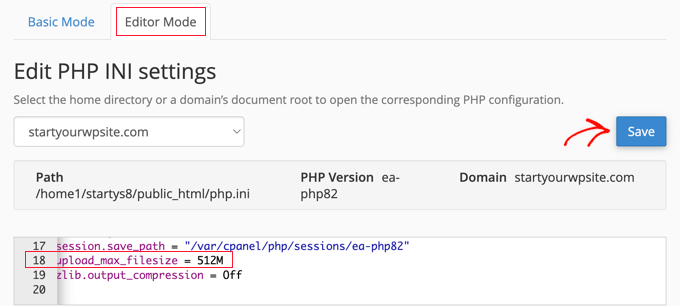
または、「エディターモード」メニュータブをクリックし、エディター内で直接最大アップロードサイズを変更することもできます。
アップロードサイズを増やすには、’upload_max_filesize’セクションを編集する必要があります。
完了したら、「保存」ボタンをクリックします。
コードを追加してphp.iniを編集する
現在のホスティングサービスがcPanelオプションを提供していない場合は、手動でこのファイルを編集する必要があります。
これを行うには、FTPクライアントまたはWordPressホスティングコントロールパネルのファイルマネージャーオプションを使用することができます。
共有ホスティングサービスを使用している場合、ホスティングディレクトリにphp.iniファイルが表示されないことがあります。php.iniが表示されない場合は、php.iniという名前のファイルを作成し、ルートフォルダーにアップロードしてください。
次に、以下のコード・スニペットをファイルに追加する:
1 2 3 | upload_max_filesize = 256Mpost_max_size = 256Mmax_execution_time = 300 |
256M」の制限は、WordPressブログに必要なファイルサイズに変更することができます。
方法3:WordPressテーマのfunctions.phpファイルにコードを追加する
この方法では、WordPressテーマのfunctions.phpファイルにコードを追加します。
ファイルを直接編集する代わりに、WPCodeの使用をお勧めします。サイトを壊すことなくコードを追加できる、最高のコードスニペットプラグインです。
WordPressでカスタムコードを追加する方法については、初心者向けガイドをご覧ください。
まず、無料のWPCodeプラグインをインストールする必要があります。詳しくは、WordPressプラグインのインストール方法のステップバイステップガイドをご覧ください。
有効化したら、Code Snippets ” + Add Snippetに移動してください。
カスタムコードの追加(新規スニペット)」設定にマウスオーバーし、「+カスタム・スニペットの追加」ボタンをクリックします。

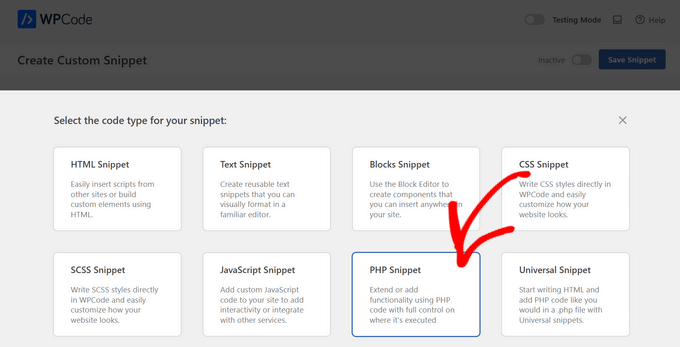
次に、表示されるオプションのリストから、コードタイプとして「PHP Snippet」を選択する必要がある。
次の画面で、新規スニペットの名前を入力します。これは、そのコードが何のためのものかを覚えておくのに役立つものであれば何でもかまいません。
次に、以下のコード・スニペットをコピー&ペーストして、「コード・プレビュー」の下に貼り付けてください。256M」を必要な最大ファイルサイズに変更してください:
1 2 3 | @ini_set( 'upload_max_size' , '256M' );@ini_set( 'post_max_size', '256M');@ini_set( 'max_execution_time', '300' ); |
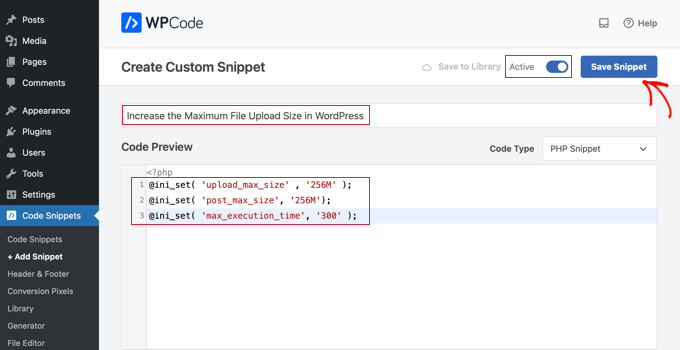
最後に、上部のトグルを「有効化」に切り替え、「スニペットを保存」ボタンをクリックします。これでサイト上でコードが実行されます。
方法4:.htaccessファイルにコードを追加する
最大ファイルサイズを増やすもう一つの方法は、.htaccessファイルを変更することです。このファイルは、サイトのハイレベルなコンフィギュレーション設定をコントロールします。
これを行うには、FTPでサイトサーバーにログインする必要があります。FTPを使用したことがない場合は、初心者向けのFTPを使用してWordPressにファイルをアップロードする方法のガイドを参照してください。
その後、.htaccessファイルをサイトのルート・フォルダーに置く必要があります。

.htaccessファイルが見つからない場合、ファイルマネージャーやFTPクライアントによって非表示になっている可能性があります。さらに詳しく知りたい方は、WordPressサイトの.htaccessファイルが見つからない理由についてのガイドをご覧ください。
次に、以下のコード・スニペットを.htaccessファイルに追加する必要がある:
1 2 3 4 | php_value upload_max_filesize 256Mphp_value post_max_size 256Mphp_value max_execution_time 300php_value max_input_time 300 |
最大アップロードサイズをさらに大きくするには、「64M」を必須サイズに変更するだけです。
方法5:WordPressのプラグインを使ってファイルのアップロードサイズを大きくする
ファイルアップロードの上限を増やすもう一つの方法は、WP Increase Upload Filesizeプラグインを使うことです。WordPressにコードを追加することに抵抗がある場合は、このプラグインを使用するのも良い設定です。
最初に行う必要があるのは、プラグインのインストールと有効化です。詳しくは、WordPressプラグインのインストール方法をご覧ください。
有効化したら、WordPress管理画面のメディア ” アップロードリミットを増やすに移動します。
これにより、「最大アップロードファイルサイズの選択」ドロップダウンで新しいファイルアップロードサイズを選択できる画面が表示されます。
その後、「変更を保存」ボタンをクリックします。

注:ファイルの最大アップロードサイズは、ホスティングサービスプロバイダによって設定されます。ドロップダウンに表示されているサイズよりも大きなファイルサイズの制限が必要な場合は、ホスティングサービスに連絡して、制限を増やすように依頼する必要があります。
動画チュートリアル
チュートリアルの動画もご覧ください:
この投稿が WordPress の最大ファイルアップロードサイズを増やすのにお役に立てば幸いです。WordPress でアップロードできるファイルの種類を追加する方法や、WordPress 管理エリアを改善するプラグインとヒントをピックアップしたガイドもご覧ください。
If you liked this article, then please subscribe to our YouTube Channel for WordPress video tutorials. You can also find us on Twitter and Facebook.


Sushil Kumar
Thank you Yasir Imran it works for me via .htaccess
Pedro Viana
.htaccess rules! thanks.
Amit Kumar Gupta
Very useful Article for me . Thanks wpbeginner
Steve S
I figured out a work-around that does not involve messing with php.ini, .htaccess, functions.php, or any other systtem files. All I did was the following:
* FTP the file up to /wp-content/uploads/year/month/filename.mp4
* New Post –> Add Media –> Insert from URL
* Cut and paste the appropriate URL based on where you uploaded the file.
* Hit Insert Into Post. Done.
kenny
Perfect! ps if you are inserting an image for a slide background in slider Revolution, use option ‘External URL’
vic
the .htaccess worked fine for me. thanks alot
Anchal Singh
my website have got the same issue but thanks to this post its now work perfect
Matt
Thanks. I want to also know how to make a website portal using wordpress. Any information from you will be highly appreciated.
marta
Thanks. For me htaccess Method did his job
Rifqi Arief
Thanks Bro, Its Work On My Free Hosting via .htacess
RT
Please try below steps as well after creating the php.ini
(1) Go to My Sites -> Network Admin -> Settings from WordPress admin dashboard.
(2) Uncheck the checkbox for “Site upload space: Limit total size of files uploaded to 10 MB” and Save changes.
(3) Done.
Regards,
-RT
Suika
Thanks, I forgot there was a setting there for that.
Abhishek
I’m on goddady hosting, none of the 3 solutions worked for me.
But some users reported .user.ini file worked for them in goddady.
can anybody tell me where to put this file?
I have tried root folder and wp-admin folder nothing worked.
Raman Gutyan
htaccess Method is working great in my localhost.
Thanks for sharing.
DVR
If you are hitting a wall. Go to your host. Advance setting for PHP. Scan the code looking for max upload & file size. Change it to your required setting.
Done.
See NICOLAS’ reply above.
martin kendall
Hi DVR I had tried everything and nothing worked, with what had been posted here. I tried multi times in every why to get it to work. Nothing, but your post put me on the correct answer. Thanks very much for that.
Ok this is what i did, Signed into my host server, where my website is. the host server runs on cPanel and the theme is paper_lantern. It should not matter what your sever is or the theme. If you do not have access to this area you will have to get your host to make the changes y cotacting your technical help.
In the panel you will have categories like = files, database, domains, email etc and what you are looking for is software, under software / apps look for multiPHP INI Editor or something like that. Its going to be different on other platforms but should be in that area. What you are looking for is configure PHP INI basic settings or editor mode. I got offered home directory or my domain name. I picked the domain name but maybe need to change both but I did not need to. Scrolled down to upload_max_filesize and changed to 64M but this did not work as you have to also change the momory_limit to 64M also. They have to be the same figure. and then it will work.
Has I understand, when you make the changes in wordpress code. the instruction talk to your data base through the PHP files and instruct the server software to change the database settings. For some reason It would not work for me. So this route, bypass that and making the changes on the server software and not on the wordpress software. In future I will go this way as it was really quick. I hope this helps as a last resort. Martin p.s. this was WordPress 4.8.1 and I found that it did not have, after loading it any PHP.INI or .htaccess files. I did install them but made no difference and or where I put them.
Jeet Patel
THank you so much it’s working really
Silentnight
Thank u so much… I increased my uploading size.
Gopi krishnan
For me, this is not working, but i did this in htaccess file in this way,
php_value post_max_size 10M
php_value upload_max_filesize 40M
php_value memory_limit 500M
This works !
agnieszka00
Thank you!!!!!
Michael Serovey
I have my websites hosted with GoDaddy and so far, NONE of the above suggestions have worked! I have paid for this plugin and now I that I wasted my money!
Paul
Hi,
To avoid the plugin upload limit you can just upload the plugin with filezilla to your plugin directory. After uploading you can extract the zip file in the file manager and after you have done this the plugin is visible and ready to activate in your admin –> plugin panel
Hope this helped.
Cheers
Pooya
WOW! THANK YOU PAUL!!
This worked perfectly for me!
and it is MUCH easier and more reliable than any of those methods.
just go to File Directory under the cPanel -> Public-html -> [ you site folder] -> wp-content ->themes or plugins
Then upload the zip file here and extract it.
login to your wp-admin dashboard. and bam, you got yourself the theme or plugin.
Tom
Thank the Lord (paul) this took way too long.
Nicolas
Just go to your hosting control pannel -> Advanced -> PHP Settings -> upload_max_filesize ( it usually is on 2M you can change it up to 8M in my case… the point is that it shouldn’t be higher than your post_max_size)
You are welcome!
Jake
Best answer yet.
Steven Gliebe
functions.php is not the best place to put the code because raising the PHP max upload size limit is unrelated to a specific theme. Users shouldn’t be changing theme files directly anyway. wp-config.php is probably a better place. The .htaccess or php.ini method is even better (or just ask the host).
Stephanie
php.ini needs to be in wp-admin folder. This article states it needs to be in the root, which I tried but it made no difference. FYI
Thank you for the information!
Aaron
Thanks so much for your reply Stephanie. Your information was exactly what I needed.
Mike Serovey
So far, NONE of the above suggestions have worked. My control panel does NOT allow me to change the PHP Settings, modifying the .htaccess created an internal server error and modifying the theme failed to work as well. Have any other suggestions?
Mike Serovey
With GoDaddy hosting, I discovered that I needed to use the lines of code that someone posted for the .user.ini file and then refresh my browser and recheck the plugin about three times each before the thing FINALLY worked!
Robert
Thank you! ini file need to be uploaded in wp-admin folder.
Emmanuel Parbey
Thank you.
It worked perfectly.
Somnath
@Stephnie Thanks a Lot .It Workz
Sorin
In wp-admin put php.ini and work
Angel Rodriguez
This worked for me as well.
shemmy
thanks ..this works fine
Prabhat
yes this is helpfull
Matt
Worked Immediately! Thanks! By the way if anyone else wants to know, my host is BlueHost and I am using a Genesis Theme.
Panagiotis Sakalakis
Using the .htaccess I got an Internal Error, and then I just removed the code and it fixed. After that, I created a php.ini file in /public_html/wp-admin, pasted the code and saved it. Everything’s work like a charm now and I can upload my files just fine without any problem.
Umesh Shejole
Yes, Useful……
Subin Babukuttan
htaccess worked fine .thanks 4 d post
hol
Hi
Does anyone know why if the PHP.INI file is changed as mentioned why when the file has completed to 100% nothing happens and it displays http error.
I can upload small files and small videos.
I cant upload anything bigger than say 200mb
I had this working and accepting larger files then I had a restore done on website.
I have changed the PHP.INI…
Is there any reason why just large files don’t work ?
do I need to edit the hta.access file ?
thanks
Ian
.htaccess method worked for Media Temple grid hosting, others didnt affect it, just in case anyones wondering…
Jay
IF YOUR STILL FINDING NOTHING IS WORKING..
(In my case the problem was with WP MULTISITES)..,
FIRST CHECK THE FOLLOWING:
1. check your hosting limits (although this was not my problem) make sure your hosting allows the limit you are trying to set ie if on a shared hosting you might find the maximum is 64M.
NOTE: The following solution may also apply If in WordPress, Maximum upload file size will not change even when changed in the php.ini file etc.
The 1M max upload problem lies with WP MULTISITES default settings!!
To change this, do the following to change the Maximum upload file size within WP admin:
LOG INTO YOUR ADMIN DASHBOARD:
1. At the top, hover over My Sites and then click Network Admin.
2. At the left, hover over Settings and then click Network Settings.
3. Scroll to the bottom of the page and change the Max upload file size to whatever you would like in KB.
4. Click Save Changes.
Hope this helps
Gregg
YESSSS. Thank yo sir.
Milton
Thanks Jay you were right on point for WP multisites
Denis
Worked for me. The site used to work and I couldn’t understand why it didn’t anymore. It was my conversion to multisite which caused the ptoblem.
Sam
Amazing!!! This works!
Adam
Thanks!!!! Jeez there’s not much help on the changes mutli-site makes!
Bhanu uday
It worked like a charm. Thank you very much.
AmanDeep Singh
Working !.I use Create or Edit an existing PHP.INI file method and after applying the settings as mentioned in the article now i am able to upload themes and plugins which are large in size.Thanks for sharing solution.
Judy
I am new to WordPress, I usually use Joomla but I have a new client that wants a WordPress site. When trying to upload images the WordPress message was that the file limit was 3Mb. I spent hours searching websites for an answer. I am using WAMP and localhost to create the site. Through localhost phpinfo() I could verify which php.ini was active, the one in Apache. I had a file limit of 64Mb but still WordPress had a 3Mb limit. This site gave the instructions under #3 to edit the .htaccess file in the WordPress folder. I copied and pasted the text into this file and IT WORKED! Thank you wpbeginner.
KenSanDiego
forgot to mention, my WP site is in a subdirectory with a domain pointer. Powweb’s php applies to everything in all subdirectories. So if you have any installations in subdirectories the change applies to all installations.
Ugyen Zangmo
Create php.ini in wp-admin folder
In the file put the following 3 lines:
upload_max_filesize = 2048M
post_max_size = 2048M
max_execution_time = 3000
Goto to your website as admin and check the upload new media page, it should now display Maximum upload file size: 2 GB.
Thanks to Yasir Imran for sharing your tip!
This worked for me. Thank you James for sharing the Yasir Imran tip. Cheers
sadiq
it is not working i have done same
in godaddy server
Raton Miah
working!
Brendan
That was a great tip… it worked for me.. thanks!
Ben
Holy crap! Thanks so much man, after the last wordpress update to 4.3.1 my upload size reverted back to the default of 50 MB even though my php.ini, .htaccess, and wp-config.php files hadn’t changed and were still reflecting a max upload size of 512 MB! You’re a hero!
Alain
Thank you very much!
I tried ALL of the three methods with no results.
I asked the webhost and the raised the limit to 40 MB.
Then, finally, I tried yours and it worked fantastically!
dominio público
post_max_size should be larger than upload_max_filesize to allow room for other information. The defaults are 2MB max file size and 8MB max post size.
From PHP’s documentation:
post_max_size integer
Sets max size of post data allowed. This setting also affects file upload. To upload large files, this value must be larger than upload_max_filesize.
Nori
Thanks for this! Tried the php.ini and I am quite surprised it worked and was so easy
Dan
php.ini file worked perfectly for me. I simply changed the existing values to 100M. All good. Thanks for the advice.
James
Create php.ini in wp-admin folder
In the file put the following 3 lines:
upload_max_filesize = 2048M
post_max_size = 2048M
max_execution_time = 3000
Goto to your website as admin and check the upload new media page, it should now display Maximum upload file size: 2 GB.
Thanks to Yasir Imran for sharing your tip!
Zain
Hy,
Please tell me the names of best themes for softwares/download sites?
i am waiting.
Thanks,
Zain.
Markus Aurelius
Nothing of the above worked for me on GoDaddy so I had to use .user.ini instead of php.ini and that worked fine. Thanks for pointing me in the right direction!
Keith
Thank you so much. I am on GoDaddy and this worked whereas several other methods did not.
Raj Kothari
Hi Keith, can you tell me under which folder you have put this file? .user.ini
Need help
Oliver
Thanks .user.ini worked for me on Godaddy
sam
1:- open “C:wampbinapacheapache2.4.9bin” folder and find “php” which is a configuration file and open it in ur notepad and again find “upload_max_filesize” and “post_max_size” and change both and save.
2:- open “C:wampbinphpphp5.5.12” folder and find “php” and “phpforapache” which are configuration file and open both in ur notepad and again find “upload_max_filesize” and “post_max_size” and change both and save.
3:- finally restart all services of wamp and enjoy…lov u all
Decb
Hi Guys, I’m REALLY new to this but can you look at what I see when I click to edit the .htaccess file – where do i add the code? at the start? at the end? Do I put my cursor at the begining and click return (then put it in) ??? Please help
Gerard ONeill
Deb, it wouldn’t matter where you added it; but make sure its outside of a block. To be safe, just add it at the end.
However, the better way (as of php5.5) is to modify the .user.ini file in a per directory basis. If you did the top level directory, it would apply to all sub directories (unless overridden).
http://php.net/manual/en/configuration.file.per-user.php
And obviously the system wide php.ini works too.
BenPDX
+1 for Alex’s solution. Upload php.ini folder to wp-admin folder worked for me on Lithium Hosting. 30 second Google search and 1 min to create text file and upload to server!
Dede Erik
I choice the third method and this is worked to me, thanks so much
Hasan Tareq
.htaccess works for my wpenigne site
Vineesh
Hi alex, you are right. php.ini file should be added to wp-admin folder. It will work perfectly…. thanks alex
Rafael
Just adding the php.ini file into wp admin folder worked perfectly!!! thanks!
chandan
thnx alot Alex this worked for me to..
Tony_atf
I keep getting http error even with your suggestion. im on godaddy I have filesize 300m but anything over 150Mb chokes. it uploads, sits for a few seconds and then the http error displays. wordpress never shows the error.
SunnyK
same with me. did you found any solution yet?
WPBeginner Staff
You can connect to your website using an FTP client and undo the changes you made.
Nitesh Magan
Hey I added the 1st code to my theme function file, but now everything on my site went blank. I cant even access my wp-admin of my site !!
Please Help …
Chris
If you’re just trying to upload files yourself in the admin panel (media), make a new plain text document, save it as whatever name (including extension) of the large file you’re trying to upload. So if you’re trying to upload “files.zip,” save a blank text document as files.zip. Upload this blank text file you just created in WordPress. Then, go to FTP or file manager, go to wp-content/uploads/(whatever year it is)/(whatever month it is). You should fine files.zip there. Delete that file (which is just a plain text file) then upload the real files.zip, making sure the names match up. Then when you go back to media it will be the right file.
Yasir Imran
I tried htaccess method and found 500 internal server error, then placed php.ini with 3 given lines in root directory, again didn’t work. Then I placed it in wp-admin folder and it worked. I think the author should mention it.
Alexandre
This worked for me while everything else had failed. Thanks for sharing.
Mel
I had the exact same experience and this worked for me. Thanks Yasir!
Les B
Thank you Yasir Imran…your method works where all others, including .htaccess fails!
(The php.ini must be in the wp-admin folder.)
Les