WordPressサイトにファイルをアップロードしようとして、行き詰まったことはありませんか?必要な画像、プラグイン、またはテーマをアップロードできないのは非常にイライラします。ファイルアップロードの問題はワークフローを遅くする可能性があるため、読者からよく助けを求められます。
これらのファイルアップロード制限により、メディアライブラリにコンテンツを追加したり、必要なより大きなプラグインやテーマをインストールしたりできなくなる場合があります。それはまるで身動きが取れないようなものです。そして、それをどう修正すればよいかわからない場合は、さらにイライラします!
しかし、心配しないでください。私たちがサポートします。WordPressが非常に設定可能なプラットフォームであることを気に入っており、同じ問題を解決する方法は複数あることがよくあります。
このガイドでは、WordPress で最大ファイルアップロードサイズを増やす最も簡単な方法を紹介します。これらの制限を乗り越えて、あなたが愛するウェブサイトの運営に戻れるようにします!
WordPressで最大ファイルアップロードサイズを増やす理由
あなたの WordPressホスティング プロバイダーは、サインアップ時および WordPressのインストール 時にデフォルトの最大ファイルアップロードサイズを設定します。この制限はホスティングプロバイダーによって定義され、通常は2MBから500MBの範囲です。
ほとんどのWordPressウェブサイトの所有者にとって、この制限で十分すぎるほどです。
ただし、アップロードエラーが発生しないように、この制限を引き上げる必要がある場合があります。
例えば:
- あなたは写真サイトを運営しており、大きな画像をアップロードする必要があります。
- あなたのデザインまたは写真のポートフォリオには大きな画像が含まれています。
- より大きなWordPressテーマまたはプラグインをインストールしたい場合。
- eBook、写真、ビデオなどのデジタル製品を販売したいと考えています。
- コンテンツを定期的に更新し、現在の制限を超えたオーディオ、写真などを追加しています。
とはいえ、WordPressサイトで最大ファイルアップロードサイズを増やす方法をご紹介します。
注: ウェブサイトに多数の大きなファイルを表示すると、速度とパフォーマンスが著しく低下する可能性があることに注意してください。そのため、通常はWordPressに動画をアップロードしないことをお勧めします。
ほとんどのユーザーは異なるWordPressホスティング設定を使用しているため、以下をカバーします。
- WordPressで最大ファイルアップロードサイズ制限を確認する方法
- 方法1:WordPressホスティングプロバイダーに連絡する
- 方法2:既存のphp.iniファイルを作成または編集する
- 方法3:WordPressテーマのfunctions.phpファイルにコードを追加する
- 方法4:.htaccessファイルにコードを追加する
- Method 5: Use a WordPress Plugin to Increase File Upload Size
WordPressで最大ファイルアップロードサイズ制限を確認する方法
WordPressは、画像やその他のメディアをアップロードする際に、最大ファイルアップロードサイズ制限を自動的に表示します。
これを確認するには、WordPress管理画面のメディア » 新規追加にアクセスするだけで、WordPressサイトの最大ファイルアップロードサイズ制限が表示されます。
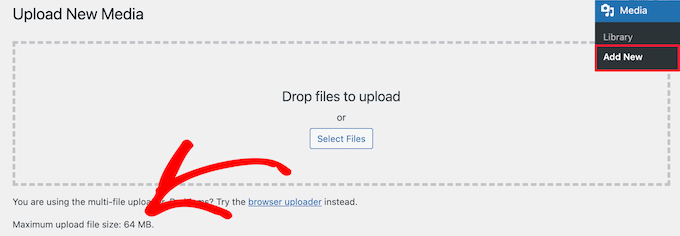
アップロードサイズの上限を見つけ方がわかったので、WordPressで最大アップロードサイズを増やす方法をご紹介します。
方法1:WordPressホスティングプロバイダーに連絡する
WordPressで最大ファイルアップロードサイズを増やす最も簡単な方法の1つは、WordPressホスティングプロバイダーに連絡することです。
これは、彼らのカスタマーサービスチームにとっては比較的簡単なタスクであり、数分で完了できます。
初心者にとっては、WordPressにコードを追加したりサーバーファイルを編集したりするよりもはるかに簡単です。
単純に、Bluehostのようなホスティングプロバイダーのウェブサイトにアクセスしてログインしてください。
次に、画面下部にある「チャット」アイコンをクリックします。その後、サポートスタッフにWordPressサイトのファイルアップロードサイズを増やすように依頼できます。
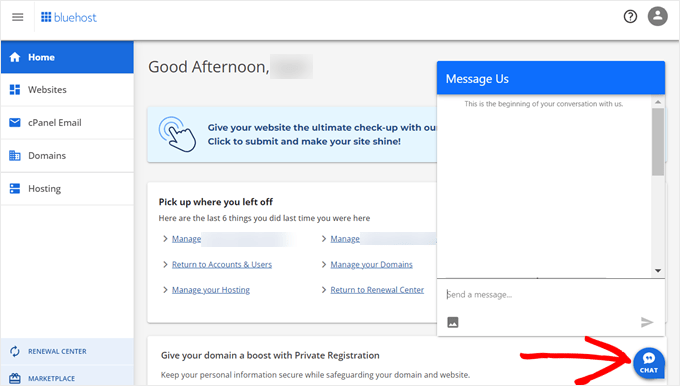
ホスティングアカウントダッシュボード内からサポートに連絡することもできます。
方法2:既存のphp.iniファイルを作成または編集する
最大ファイルアップロードサイズを増やすもう一つの方法は、php.iniという名前のファイルを作成または編集することです。このファイルは、WordPressホスティング環境の多くの設定を制御します。
BluehostのようなほとんどのWordPressホスティングプロバイダーは、ウェブサイトを管理するのに役立つ初心者向けのcPanelを提供しています。
ウェブホストに cPanel ダッシュボードがある場合、組み込みツールを通じてファイルアップロードサイズを増やすことができます。
注: 以下はBluehostのcPanelからのものです。ただし、ほとんどの共有ホスティングプロバイダーも同様の手順になります。
Bluehostのホスティングタブの下部にあるcPanelボタンを見つけることができます。
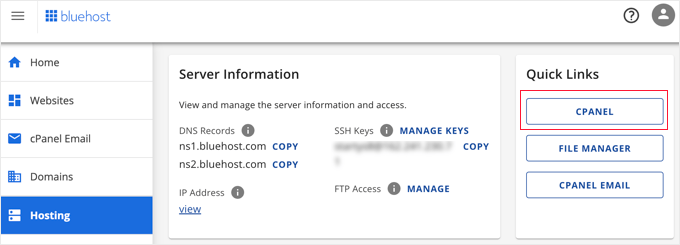
このボタンをクリックすると、cPanelダッシュボードが開きます。
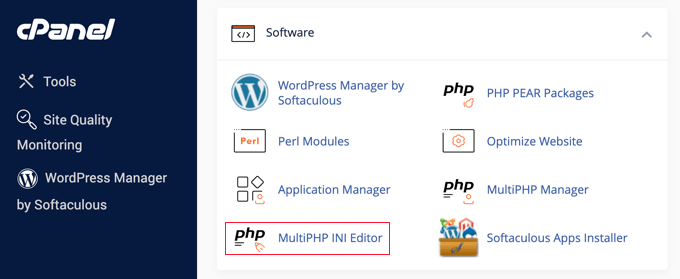
次に、下にスクロールして「ソフトウェア」セクションを見つけ、「MultiPHP INI Editor」をクリックします。
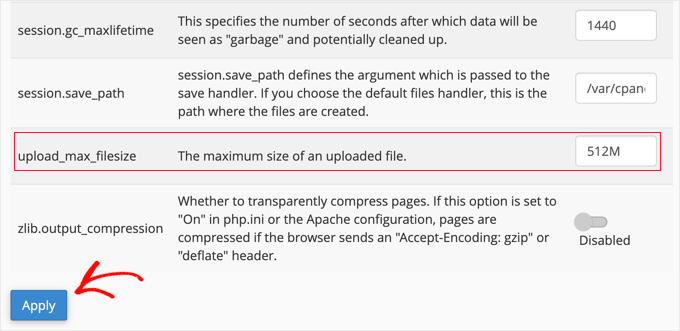
次に、「upload_max_filesize」というラベルのセクションまでスクロールダウンし、ボックスに新しい最大ファイルサイズを入力します。
次に、「適用」ボタンをクリックします。
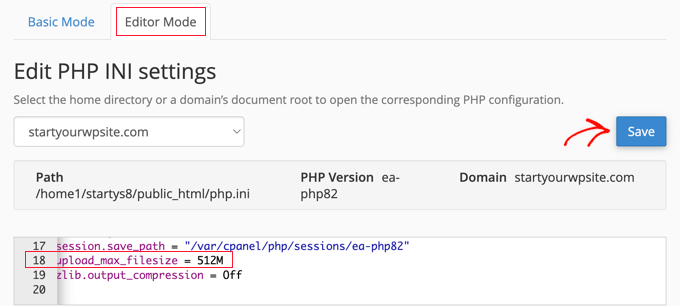
または、「エディターモード」メニュータブをクリックして、エディターで直接最大ファイルアップロードサイズを変更することもできます。
ファイルのアップロードサイズを増やすには、「upload_max_filesize」セクションを編集する必要があります。
完了したら、「保存」ボタンをクリックしてください。
コードを追加してphp.iniを編集する
現在のホスティングプロバイダーがcPanelオプションを提供していない場合は、このファイルを直接編集する必要があります。
これを行うには、FTPクライアントを使用するか、WordPressホスティングコントロールパネルのファイルマネージャーオプションを使用できます。
共有ホスティングを使用している場合、ホスティングディレクトリにphp.iniファイルが表示されない場合があります。表示されない場合は、php.iniという名前のファイルを作成し、ルートフォルダにアップロードしてください。
次に、以下のコードスニペットをファイルに追加します。
upload_max_filesize = 256M
post_max_size = 256M
max_execution_time = 300
「256M」の制限を、WordPressブログに必要なファイルサイズに変更できます。
方法3:WordPressテーマのfunctions.phpファイルにコードを追加する
この方法では、functions.phpファイルにコードを追加します。これは、WordPressテーマにあります。
ファイルを直接編集する代わりに、WPCodeの使用をお勧めします。これは、ウェブサイトを壊すことなくコードを追加できる最高のコードスニペットプラグインです。
これが初めての場合は、WordPressにカスタムコードを追加する方法に関する初心者向けガイドをご覧ください。
まず、無料のWPCodeプラグインをインストールする必要があります。詳細については、WordPressプラグインのインストール方法のステップバイステップガイドをご覧ください。
アクティベート後、Code Snippets » + Add Snippet に移動してください。
「カスタムコードを追加 (新規スニペット)」オプションにマウスカーソルを合わせ、「+ カスタムスニペットを追加」ボタンをクリックする必要があります。

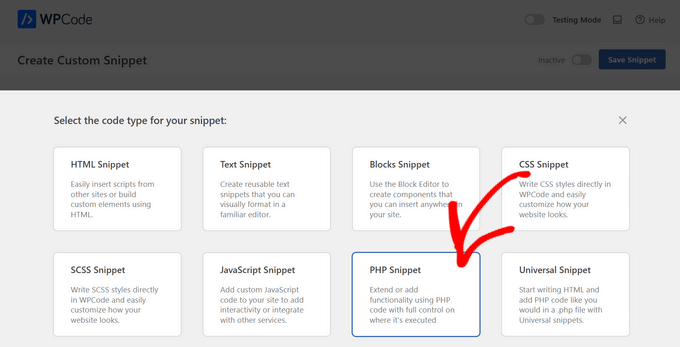
次に、表示されるオプションのリストからコードタイプとして「PHPスニペット」を選択する必要があります。
次の画面で、新しいスニペットの名前を入力します。これは、コードが何であるかを思い出すのに役立つものであれば何でも構いません。
次に、「コードプレビュー」の下に次のコードスニペットをコピーして貼り付けることができます。「256M」を必要な最大ファイルサイズに変更してください。
@ini_set( 'upload_max_size' , '256M' );
@ini_set( 'post_max_size', '256M');
@ini_set( 'max_execution_time', '300' );
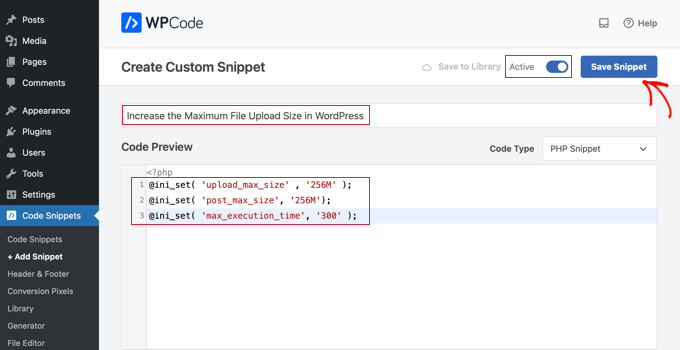
最後に、上部のトグルを「アクティブ」に切り替え、次に「スニペットを保存」ボタンをクリックします。これで、コードがウェブサイトで実行されるようになります。
方法4:.htaccessファイルにコードを追加する
最大ファイルサイズを増やすもう一つの方法は、.htaccessファイルを変更することです。このファイルは、ウェブサイトの高レベルな設定を制御します。
これを行うには、FTP経由でウェブサイトサーバーにログインする必要があります。以前にこれを行ったことがない場合は、初心者向けWordPressへのファイルのアップロードにFTPを使用する方法に関するガイドを参照してください。
次に、ウェブサイトのルートフォルダにある.htaccessファイルを特定する必要があります。

.htaccess ファイルが見つからない場合、ファイルマネージャーまたはFTPクライアントによって非表示になっている可能性があります。詳細については、WordPressサイトで.htaccessファイルが見つからない理由に関するガイドをご覧ください。
次に、以下のコードスニペットを.htaccessファイルに追加する必要があります。
php_value upload_max_filesize 256M
php_value post_max_size 256M
php_value max_execution_time 300
php_value max_input_time 300
最大ファイルアップロードサイズをさらに増やすには、単に「64M」を必要なサイズに変更してください。
方法5:WordPressプラグインを使用してファイルアップロードサイズを増やす
最大ファイルアップロード制限を引き上げるもう1つの方法は、WP Increase Upload Filesizeプラグインを使用することです。WordPressにコードを追加することに慣れていない場合は、これが良い選択肢となるでしょう。
まず最初に行うべきことは、プラグインのインストールと有効化です。詳細については、WordPressプラグインのインストール方法に関するガイドをご覧ください。
有効化したら、WordPress管理画面の メディア » アップロード制限の引き上げ に移動してください。
これにより、「最大アップロードファイルサイズを選択」ドロップダウンで新しいファイルアップロードサイズを選択できる画面が表示されます。
次に、「変更を保存」ボタンをクリックします。

注意: 最大ファイルアップロードサイズは、ホスティングプロバイダーによって設定されます。ドロップダウンに表示されている制限よりも大きいファイルサイズ制限が必要な場合は、ホスティングプロバイダーに連絡して制限の引き上げを依頼する必要があります。
動画チュートリアル
文章での指示に従うのが好きでない場合は、代わりにビデオチュートリアルをご覧ください。
この記事がWordPressの最大ファイルアップロードサイズを増やすのに役立ったことを願っています。また、WordPressでアップロードできる追加ファイルタイプを追加する方法に関するガイドや、WordPress管理エリアを改善するためのプラグインとヒントの専門家によるおすすめもご覧ください。
この記事が気に入ったら、WordPressのビデオチュートリアルについては、YouTubeチャンネルを購読してください。 TwitterやFacebookでもフォローできます。


ステルスであること
wp-adminフォルダにphp.iniファイルを追加したところ、うまくいきました。やったー、ありがとう。
Mouad Chafai
php.iniメソッドは完璧に機能しました。ありがとうございます。
i’ve created the php.ini
wp-adminphp.ini
add lines:
upload_max_filesize = 64M
post_max_size = 64M
max_execution_time = 300
記事をありがとう。
サレ・シャウカット
ありがとう .htaccess が完璧に機能しました!!
Dan Rosenberg
PHP.INIの方法は完璧に機能しました。ありがとうございます!
Ben Peacock
すみません、こちらを確認してください。ルートマシンにログインして、次のコマンドを入力してください。nano /usr/lib/php.ini
検索 ; PHP が受け付ける POST データの最大サイズ。
post_max_size = 2M を 64 に変更
Save and exit and then you should be able to upload what you need hope this helps
QuangPham
修正方法の説明をありがとう。
Voicu Ioan Virgil
ありがとうございます、素晴らしいチュートリアルです!
マリア・マッカーシー
php.iniファイルを私のwp-adminフォルダーに追加したところ、SPECIFICALLYうまくいきました!皆さんありがとう!私にとってうまくいく情報を見つけるのに約4時間かかりました – 命の恩人です!
pete
wp-adminネットワークのphp.iniでphp.iniが見つかりました
タブッサム・ジャヴィード
htaccessメソッドは私にはうまく機能します。ありがとう
マイク
一部のホスト(例:GoDaddy)では、追加の手順が必要になる場合があります。
そして、実行しているPHPはどれですか。GoDaddyでPHP5を使用している場合、php.iniをphp5.iniにリネームしてください。また、実行中の精度がある場合は、ファイルが適用される前に一時停止する必要があるか、しばらく待つ必要があることを覚えておいてください。
システムプロセス / 全て終了
jaymz
記事をありがとうございます。セルフホストの場合、別の方法があります。メソッド2と3は私には機能しませんでした。なぜなら、.htaccessの変更は効果がなく、/wp-adminにphp.iniファイルを追加しても効果がなかったからです。単にApacheの既存のphp.iniファイルを見つけるだけでした。Ubuntuでは、次のように実行しました。
sudo find / -name php.ini
これは /etc/php5/apache2/ にある ini ファイルを見つけました。
必要なのは、パラメータを見つけて次の値を更新することでした。
upload_max_filesize
post_max_size
max_execution_time
そこまでたどり着かせてくれてありがとう!
D Winzell
これを書いてくれてありがとう。php.iniは正しく機能するためにwp-adminディレクトリにある必要があります。ホスト(Vaurent)を確認したところ、最大105Mのファイルアップロードが許可されているので、そのサイズの何かを見つけて、それが私のブログにうまくアップロードされるか確認します。
Matt
GoDaddyを使用している場合、htaccessメソッドは使用できません。500内部サーバーエラーが発生します。
php.iniメソッドを使用する必要があります。唯一の違いは、php.iniとphp5.iniの両方があり、両方にこれらの行を追加する必要があるということです。ファイルは、WordPressのインストール場所のルートディレクトリに配置する必要があり、wp-adminフォルダ内ではなく、その外に配置する必要があります。
また、複数のWordPressをインストールしている場合、各WordPressのインストールがある各ディレクトリにこれを実行して配置する必要があります。
GSJha
非常に良い投稿です。
sandeep
php_value upload_max_filesize 64M
php_value post_max_size 64M
php_value max_execution_time 1500
php_value max_input_time 1500
これらの値を.htaccessで使用すると機能します!
ありがとう
Thyme
全て行い、/etcフォルダのphp.iniを変更しました(私のサイトはmediatempleのgrid-service上にあります)が、何も機能しませんでした。しかし、マルチサイトのインストールの場合、ネットワーク設定で変更する必要があるものがあったことをかすかに覚えていました。ありました。うーん。
WordPressネットワークをお持ちの場合は、ネットワーク設定に移動し、ページの下部近くにある最大ファイルアップロードサイズを変更してください。
Alex
これが唯一私に効いた方法です。すべてのオプションを試しましたが、私は 1&1 を使用しています
memory_limit = 32M
upload_max_filesize = 32M
post_max_size = 32M
file_uploads = On
** サイズは任意です
キーは「file_uploads」行でした
これは /wp-admin/ フォルダに配置してください。
Kristina
私にはうまくいきました!Bluehostを利用しています。
Thanks for your post
ブランダン
他のすべてがうまくいかなかった後、これは私にとってうまくいきました。とても安心しました!
私も1&1を利用しています。「file_uploads = On」という行をphp.iniファイルに追加したところ、見事に機能しました!!
ありがとう!
Hafeez Ansari
Thank you Alex, This works for me in /wp-admin/ folder. Problem solved.
Jordan Miller
本当にありがとうございます
マイク
すごい!ありがとう、Alex。2MBに制限されていました…本当に役立ちます。
サム
Alex、あなたは素晴らしいです!あなたの解決策は私にもうまくいきました!本当にありがとう!
Johnny T
Genius! This worked for me! Just to clarify. Create a php.ini file in the wp-admin folder and only add the lines of code in Alex’s post. FTP this to your server and you’re good to go. Thanks Alex. You are a genius!
Luan
ジョニーとアレックス、ありがとう! とても参考になりました。
vanniee
ファイル名は何ですか?
Togi Tan
しかし、無料ホスティングでは機能しません。試したすべての方法で。サーバーによるかもしれませんが、そう思います。
ダンカン
すごい、すごい、すごい! 明確なコメントをありがとう。おかげでうまくいきました。あなたはスターです。
ノモ
Alex – あなたの投稿は引き続き役立ちます。大変感謝しています!
ヌール
.htaccessメソッドで機能しました。敬礼。
Bogdan
素晴らしいアドバイスです。私のアップロード制限は8MBでしたが、htaccessトリックを試しただけで64MBに増加しました。テストしたところ、見事に機能しています!素晴らしいアドバイスを本当にありがとうございます!
VoidnessMD
注意すべき重要な点:php.iniメソッドを使用するには、ファイルがWPインストールのルートではなく、wp-adminフォルダに配置されている必要があります。
DJ
THANKS!! This sorted it out for me on my end
David Connolly
素晴らしい…明確で、最終的な解決策がうまくいきました。
本当にありがとうございました
ボンゴ
このウェブサイトは WP を学ぶのに最高です! 皆さん、良い仕事を続けてください…もっとください…もっと! lol
編集スタッフ
Thanks for the kind words
管理者
Ido Schacham
ついに、WPでメモリ制限を変更する方法を明確に説明した投稿です。ありがとう!
mostafa
こんにちは。
3番目の方法でうまくいきました。アップロードサイズは8MBでしたが、現在は64MBです。私にはこれで十分です。
本当にありがとうございます。
ちなみに、私はイラン出身です。
Rowan Evenstar
php.iniファイルを作成してルートに配置したところ、すぐに解決しました!
ありがとう、とても助かりました!
assassinateur
ありがとう、でも私は共有ホスティングなので何も機能しません。php.iniをwp-admin、ブログフォルダ、ホームフォルダに入れましたが、機能しませんでした。htaccessも機能しませんでした。テーマを変更しましたが、機能しませんでした。
Arvind Kukreti
.htaccessファイルにコードを追加すると500 Internal Errorが発生する可能性があります…最善の方法はphp.iniファイルを作成してwp-adminフォルダにアップロードすることです
Stephen Afije
すごい、それは素晴らしいものでした。私がやったことは、php.ini を作成して wp-admin フォルダにアップロードしただけで、他の何よりも効果がありました。ありがとう
leo
htaccessメソッドは私にはうまく機能します。ありがとう
アンドリュー・リリー
こんにちは、
上記すべてを行いましたが、それでも11MBのXMLファイルをインポートできません。1500個の商品が含まれているため、インポートする必要があります。
仮想サーバープロバイダーの 1and1 に問い合わせたところ、.htaccess ファイルにコードを追加するだけでよいと言われましたが、うまくいかないようです。
誰か助けてください
編集スタッフ
上記のいずれも機能しない場合は、あなたを助けることができるのはホストのみです。
管理者
Ali Amer
MIME タイプに関連している可能性があります。その場合は、cpanel で解決してください
Dominique
これらはどれもうまくいきませんでした。すべて試しました。ホスティングにはWPEngineを使用しています。
何か提案はありますか?
編集スタッフ
WPEngineにあなたのために制限を増やしてもらうように依頼してください。
管理者
Thad
htaccessの方法は私にとってうまくいきました。投稿ありがとう。良い情報、よく提示されています。
Richard
php.iniオプションは私には機能しましたが、/wp-adminディレクトリにあるphp.iniファイルで機能しました
マイク
完璧 – うまくいきました – 200MBに設定したら問題なく動作しました。
マテウス・M。
ローカルホストでは.htaccessが機能します。しかし、ホストではphp.iniのみです。助けてくれてありがとう。
ダン
はい、php.in は /wp-admin で動作します。ありがとう
marin
ありがとう、htaccess が効きました。感謝します。
Makarand Mane
MediaTempleでホスティングしています。最初の2つの方法は私には機能しませんでした。htaccessメソッドのみが私には機能しました。
ありがとう。
Gavin
php.iniが、一部の共有サーバーがルートディレクトリに持つcgi-binフォルダ内に隠されていることがわかりました。上記のようにこれを修正し(念のためphp5.iniも追加しました)ましたが、これを修正するまで何も機能しませんでした。非常に役立つスレッドをありがとう!
Cath
ありがとうGavin、他のどの方法もうまくいきませんでしたが、あなたのコメントを見ました。cgi-binフォルダーにphp.iniとphp4.iniファイルがありました。両方のファイルで関連するコードを見つけました – post_max_size = と upload_max_filesize = を変更し、これで問題なく動作します。
Jarod Billingslea
この記事をありがとうございます!
Void lon iXaarii
本当にありがとうございます!たくさんの解決策を試しましたが、あなたの.htaccessが最終的に機能しました
Anthony
私にとって唯一うまくいったのは、php.ini ファイルを作成/編集し、以下を追加することでした。
memory_limit = 100M upload_max_filesize = 100M post_max_size = 100M file_uploads = On
そしてそれを wp-admin フォルダにアップロードすることです。
Alan
オプション2は問題なく機能しましたが、php.iniファイルをルートディレクトリではなくwp-adminフォルダーに配置する必要がありました。
phpinfoはルートにあるphp.iniファイルを検出していましたが、WordPressは検出していませんでした。
現在、WP 3.2をインストールしています…
RPaterson
追加のヒントをありがとうございます。これが私のために最終的に機能したものです。
arun
アンソニー、ありがとう、あなたの方法で多くの時間を節約できました。
Quest The Wordsmith
これはまさに私もうまくいった方法です。
RamiAlloush
Thx
Snowboard
この投稿ありがとうございます。デフォルトの制限は何ですか?
almb1111
64 MB
kat1111
8MBでしたが、192MBにすることができました @almb1111
kat1111
返信ありがとう、ついに助けを得ました。PHP を PHP-5 に変更する必要がありました。
kat1111
私はおそらく皆さんのほとんどより新参者です。「ルート」ディレクトリがどれなのか理解できません。Appearanceタブの下にあるEditorのことですか?また、hcaccessにどうやってアクセスするのか理解できません。どなたか助けていただけると幸いです。
jameserie
htaccessメソッドは私には機能します。 - ありがとう!
nycxs
PHP5を使用している場合、ファイル名はphp5.iniである必要があり、共有フォルダのルートに配置する必要があります。
MyDreamDinZ
アップロードの最大制限はいくつですか?
1024Mに設定できますか?
alexlee.cs
.htaccessの方法は私にとってうまくいきました。ありがとう。
rajkanuri
コードをありがとう..本当に助かります..
pranjalgupta2009
はい!wp-adminにもphp.iniを置くとうまくいきました。ありがとう
Snipsley
ありがとう、でもどちらの方法も私にはうまくいきませんでした。
でも、解決策を見つけました!
php.ini を /public_html と /public_html/wp-admin の両方に配置する必要がありました。これで動作します!
Biju Subhash
うん..私も同じ方法でうまくいきました..
Snisleyさん、ありがとう
Trond
Great! This worked for me as well I run Wordpress on an MS Server 2008 with IIS 7.5 from my host provider, btw
kenseneff
私にもうまくいきました。ありがとう!
Kiran
ありがとう、ダディ。うまくいきました。
Rollie Osayan
はい。ここでも機能しています。ありがとう
Kaushik Biswas
投稿の最後に、その投稿の下に特定のカテゴリの最新投稿を表示したいのですが、どうすればよいですか?