WordPressでファイルをアップロードする際、「Upload: failed to write file to disk(アップロード:ディスクへのファイルの書き込みに失敗しました)」というエラーが出ていませんか?
この一般的なエラーは、WordPressサイトにファイルをアップロードできないため、初心者ユーザーにとっては非常にイライラするものです。
この投稿では、WordPressの「アップロード:ディスクへのファイルの書き込みに失敗しました」を修正する方法を紹介します。

専門家のアドバイス WordPressのエラーや継続的なメンテナンス作業にうんざりしていませんか?WPBeginnerのメンテナンスサービスなら、更新から稼働状況の監視まで、すべてをお任せいただけます。さらに、24時間365日のサポートチームへのアクセスも可能です!
WordPressのFailed to Write File to Diskエラーの原因は?
このWordPressエラーは、さまざまな原因で発生する可能性があります。しかし、最も一般的なものは、フォルダーの権限が正しくないことです。
サイトの各ファイルとフォルダーには権限があります。Webサーバーはこれらの権限に基づいてファイルへのアクセスをコントロールします。
フォルダーの権限が正しくないと、サーバーにファイルを書き込む機能が失われます。これは、Web サーバーがその特定のフォルダーに新しいファイルを作成または追加できないことを意味します。
WordPressの管理エリアから画像やその他のファイルをアップロードしようとすると、次のようなエラーメッセージが表示されます:
- WordPressがディスクへの書き込みに失敗した。
- WordPress は、ディスクへのファイルの書き込みに失敗しましたというエラーにより、アップロードに失敗しました。
- ディレクトリ wp-content/uploads/2016/03 を作成できません。親ディレクトリはサーバーから書き込み可能ですか?
ということで、WordPressの「アップロード:ディスクへの書き込みに失敗しました」エラーのトラブルシューティング方法を見ていきましょう。
WordPressでディスクへの書き込みに失敗したアップロードエラーを修正する方法
まず、FTPクライアントを使用してWordPressサイトに接続する必要があります。
このチュートリアルでは、無料のFileZilla FTPクライアントを使用します。他のFTPクライアントを使用している場合は、インターフェースが少し違って見えるかもしれません。
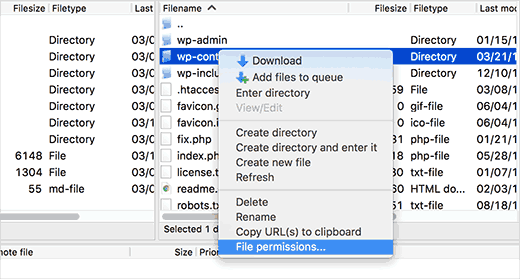
接続が完了したら、wp-contentフォルダーを右クリックし、「ファイル権限」を選択する必要があります。

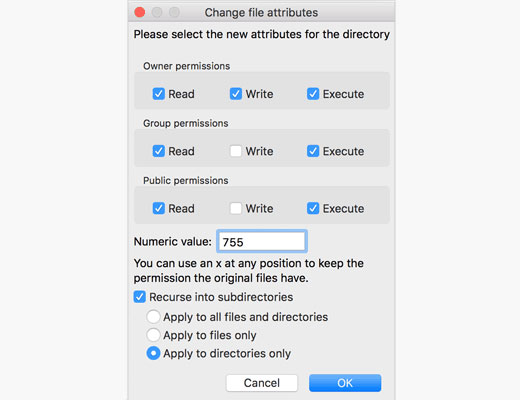
これでFTPクライアントのファイル権限ダイアログボックスが表示されます。
所有者、グループ、パブリックのファイル権限が表示されます。

数値フィールドに755を入力する必要がある。
その後、‘Recurse into subdirectories’(サブディレクトリに再帰する)の隣にあるボックスをチェックする必要がある。
次に、「ディレクトリのみに適用」オプションをクリックし、「OK」ボタンをクリックして続行します。
FTPクライアントはフォルダーの権限を755に設定し、wp-content内のすべてのサブフォルダーに適用します。これには、すべての画像が保存されているアップロード・フォルダーも含まれます。
また、wp-contentフォルダー内の個々のファイルのファイル権限が正しいことも確認したいですか?
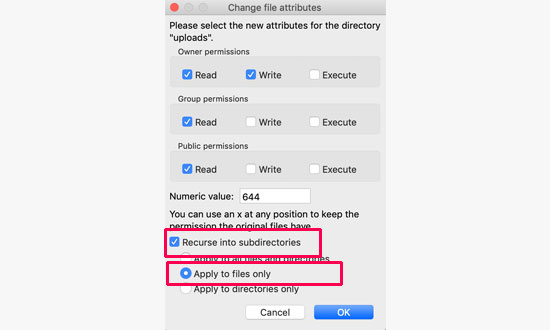
もう一度、wp-contentフォルダーを右クリックし、「ファイルの権限」を選択します。今回は、ファイルの権限を変更します。
数値フィールドに「644」と入力し、「サブディレクトリに再帰する」にチェックを入れる。
ここで、「ファイルのみに適用」オプションをクリックします。

OK」ボタンをクリックして続行します。FTPクライアントは、wp-contentフォルダー内のすべてのファイルの権限を644に設定します。
WordPressのサイトにアクセスして、ファイルをアップロードしてみてください。
それでもエラーが表示される場合は、WordPressホスティングサービスに連絡し、一時ファイルディレクトリを空にするよう依頼する必要があります。
WordPressはPHPを使って画像をアップロードします。PHPはまず、アップロードした画像をWebサーバー上の一時ディレクトリに保存します。その後、WordPressのアップロードフォルダーに移動します。
このテンポラリディレクトリがいっぱいだったり、設定が不十分だったりすると、WordPressはファイルをディスクに書き込むことができません。
この一時フォルダーはサーバー上にあり、ほとんどの場合、FTPでアクセスすることはできません。ホスティングサービスに連絡して、このフォルダを空にしてもらう必要があります。
この投稿がWordPressの「アップロード:ディスクへのファイルの書き込みに失敗しました」エラーを解決するのにお役に立てば幸いです。WordPressでよくある画像の問題を解決する方法や、WordPressのエキスパートが選んだサイトを成長させる最高のプラグインもご覧ください。
If you liked this article, then please subscribe to our YouTube Channel for WordPress video tutorials. You can also find us on Twitter and Facebook.


kehinde
i have try this process and still cant upload files
Farukh
Hello,
I am extremely confused. You repeated same process two times. First you changed file permissions of wp-content folder 755. Second you change the file permissions of wp-content folder to 644. You could change to 644 first time. Why twice. Confused please tell exactly what you did.
WPBeginner Support
Hey Farukh,
These are not the same process. First you would set folder permissions recursively to 755 for wp-content and all folders inside it, and then you set file permissions to 644 for all the files inside wp-content folder.
Admin
Felipe
Just give more space to your web hosting account
Kristin Larsen
I wanted to also let anyone who may be Googling this issue there is another cause specific to BlueHost users. Every once in a great while, if you’re on a shared hosting / cloud hosting environment, BlueHost’s temporary folder that holds browser uploads will fill up and prevent anyone from adding new images/uploads. If that happens, just call their tech support and ask them to empty their temporary folder. That will solve the issue. There’s nothing on our end that we can do as a user to clear it or prevent it.
Ivy
Thank you SO much for this comment. This just saved me so much time. My client uses BlueHost and I am building them a new website. I have never worked with BlueHost or run into this problem before until now.
Ashlee
Are there any other things to check after this process. All permissions are correct I uploaded one day and then the next day I couldn’t upload (no HTML changed) the temporary files have been cleared.
Thank you.