
広告の配置を慎重に選ぶことは、収益を最大化し、WordPressサイトのユーザー体験を向上させる鍵となります。戦略的な広告配置、特に特定の投稿日: がいかに大きな違いを生み出すかを、私たちは身をもって体験してきました。
特定の投稿に広告を表示することで、パフォーマンスの高いコンテンツをターゲットとし、クリーンなサイトデザインを維持し、オーディエンスに邪魔にならない閲覧体験を提供することができます。さらに、広告の視認性を高め、より多くのクリックを獲得することができます。
この投稿では、WordPressの特定の投稿に広告ブロックを簡単に表示する方法を紹介する。

なぜWordPressの特定の投稿に広告を表示するのか?
WordPressのウェブサイトを訪問すると、サイドバーやヘッダーの下にバナー広告が表示されることがよくあります。これらは非常に一般的な広告スポットであるため、ユーザーが広告に気づかないバナーブラインドネスにつながる可能性があります。ひいては、クリック率にも影響します。
WordPressの特定の投稿に広告ブロックを表示することで、広告の視認性を高め、コンテンツに最もエンゲージメントの高いユーザーをターゲットにすることができます。
WordPressブログの複数のページに広告を分散させることで、広告疲れを防ぐだけでなく、オーディエンスのセグメントも可能になります。広告に興味を持つ可能性の高いユーザーにターゲットを絞った広告を表示することで、エンゲージメントとクリックのチャンスを向上させることができます。
例えば、旅行ブログの投稿を読んでいるユーザーは、旅行用品や航空券の広告に興味を持つ可能性が高く、価格をチェックするためにクリックするかもしれません。
それでは、WordPressの特定の投稿に簡単に広告を表示する方法を見ていきましょう。以下のクイックリンクから、使いたい方法にジャンプできる:
方法1:WPCodeを使って特定のWordPress投稿に広告ブロックを表示する(推奨)
WordPressの特定の投稿に広告ブロックを表示する最も簡単な方法は、WPCodeプラグインを使用することです。
WordPressサイト上のあらゆるページ、投稿、ウィジェットエリア内に広告を超簡単に配置することができる、市場で最高のWordPressコードスニペットプラグインです。
WPCodeを使用すると、Google Adsenseや独自のホスティングサービスのようなサードパーティのプラットフォームからの広告を表示することができます。
まず、WPCodeプラグインをインストールし、有効化する必要があります。より詳細な手順については、WordPressプラグインのインストール方法についての初心者ガイドをご覧ください。
注:このチュートリアルには、無料のWPCodeプラグインを使用することもできます。しかし、Proバージョンにアップグレードすると、コードスニペット、スマート条件ロジックなどのクラウドライブラリにアクセスできるようになります。
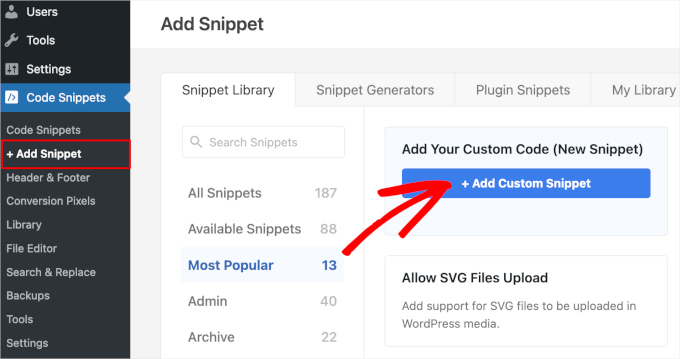
有効化したら、WordPressダッシュボードのCode Snippets ” + Add Snippetページにアクセスしてください。
ここから、「カスタムコードを追加(新規スニペット)」設定の下にある「+カスタム・スニペットを追加」ボタンをクリックします。
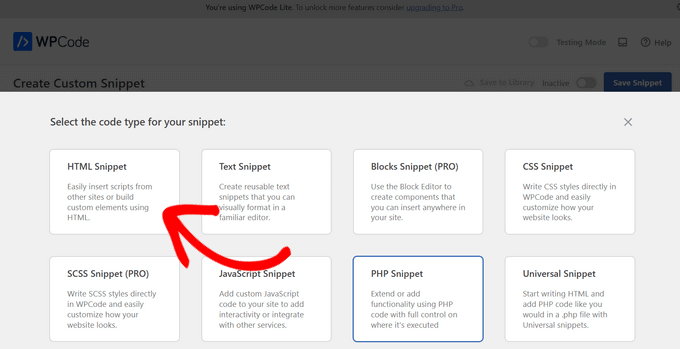
次に、画面にポップアップ表示されるオプションのリストから、コードタイプとして「HTMLスニペット」を選択する必要がある。
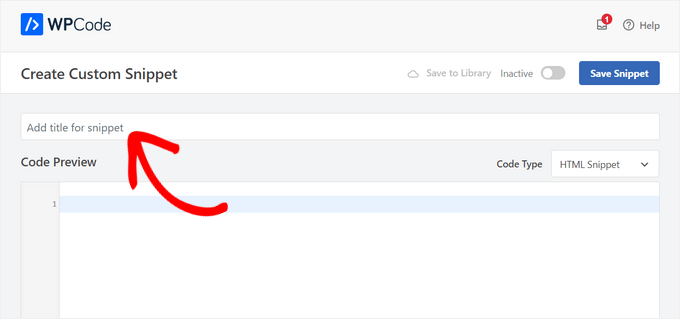
カスタムスニペットの作成」ページが表示されますので、まずはコードタイプ名を入力してください。
コード・スニペットのタイトルは参考用で、サイトのフロントエンドでユーザーに表示されることはありません。
次に、サイトに掲載する広告の種類を選ぶ必要がある。
Google Adsenseが提供する広告コードを使用している場合は、WordPressでAdSenseの収益を最適化する方法についてのガイドを参照してください。
しかし、自分で広告を作成する場合は、サイトに広告を表示するためにお金を払ってくれる人からコードをもらうか、自分でコードを書かなければならない。
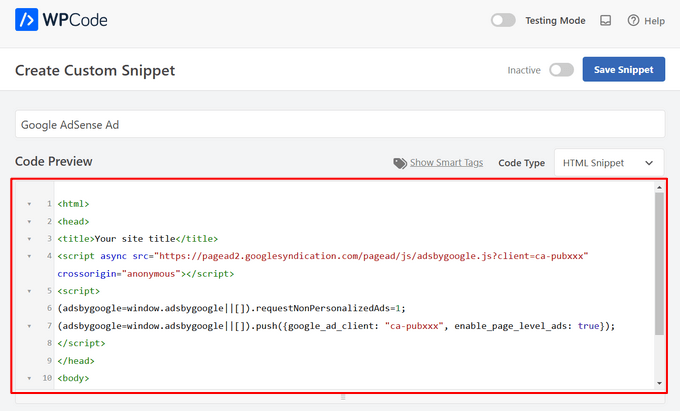
広告コードを取得したら、コピー&ペーストして「コードプレビュー」ボックスに貼り付けるだけです。
挿入」セクションまでスクロールダウンし、「自動挿入」モードを選択する。
広告は自動的にあなたが選んだ特定の投稿に表示されます。

次に、「Location」ドロップダウンメニューをクリックして展開し、左サイドバーから「Page-Specific」タブを選択する。
ここから「段落の後に挿入」オプションを選択する。
広告スニペットを挿入する段落数を変更することもできます。
例えば、第3段落の後に広告ブロックを表示したい場合は、「段落番号の後」にこの値を入力します。

次に、「Smart Conditional Logic」セクションまでスクロールダウンし、「Enable Logic」スイッチを有効化に切り替える。
その後、コード・スニペットの条件で「表示」オプションが選択されていることを確認してください。そうしたら、「+ Add new group」ボタンをクリックします。

これにより、「スマート条件ロジック」セクションの新しい設定がいくつか表示されます。
ここから、左側のドロップダウンメニューから「ページURL」オプションを選択する必要があります。

その後、真ん中のドロップダウンメニューから「Is」オプションを選択する必要があります。
次のステップでは、広告ブロックを表示したい特定の投稿のURLを画面右隅の空欄に追加します。
この広告を複数のページや投稿に表示したい場合は、「AND」をクリックし、同じ手順で他の投稿URLを挿入してください。
この条件ロジックを作成すると、広告ブロックは特定のWordPress投稿にのみ表示されるようになります。

一番上までスクロールし、「Inactive」スイッチを「Active」に切り替える。
最後に「スニペットを保存」ボタンをクリックすると、サイト上で広告コードが自動的に実行されます。

これで、選択した特定の投稿にアクセスして、広告ブロックの動作を見ることができる。
デモサイトではこんな感じ。

方法2:AdSanityを使用してWordPress投稿に広告ブロックを表示する。
サイト上でコードを使いたくないなら、この方法が向いている。
AdSanityは、広告ブロックを作成し、あなたのウェブサイト上の任意の場所に表示することができますプレミアムWordPress広告管理プラグインです。Google Adsenseを含むサードパーティの広告ネットワークで動作します。
まず、AdSanityプラグインをインストールして有効化する必要があります。詳しくは、WordPressプラグインのインストール方法のステップバイステップガイドをご覧ください。
有効化した後、WordPressの管理サイドバーからAdsanity ” 広告作成ページにアクセスします。
ここから、作成する広告の名前を入力します。
次に、独自のホスティングサービス広告を作成する場合は、上部にある「Ad Hosted On-Site」タブに切り替える必要があります。

ただし、サードパーティのプラットフォームから広告を表示する場合は、「外部アドネットワーク」タブに移動します。同様に、広告用のHTMLファイルをアップロードしたい場合は、「HTML5」タブに切り替える必要があります。
このチュートリアルでは、WordPressの特定の投稿にインストール型の広告を表示しますが、他のタイプの広告でも手順は同じです。
広告の名前を入力したら、ドロップダウンメニューからサイズを選択します。これが投稿広告のバナーサイズとなります。

その後、「広告の詳細」セクションまでスクロールダウンし、表示したい広告のトラッキングURLをコピー&ペーストします。
ユーザーが広告をクリックしたときに、別のウィンドウで広告を開きたい場合は、’Open in a new window?’オプションをチェックしてください。
広告画像を設定する」リンクをクリックして、広告画像を設定することもできます。WordPressのメディアライブラリが開き、画像をアップロードすることができます。
最後に、上部にある「公開する」ボタンをクリックして変更を保存します。
また、「公開する」セクションの「編集」リンクをクリックして、広告の開始日と有効期限を設定することもできます。
公開する」ボタンをクリックすると、WordPressサイトの任意のページや投稿に広告ブロックを表示することができます。

WordPressの特定の投稿に広告を表示する
まず、作成した広告を表示したいWordPressの既存または新規投稿を開きます。
画面左上のブロック追加「+」ボタンをクリックし、ブロックメニューを開きます。次に、AdSanity個別広告ブロックを探してWordPressの投稿コンテンツに追加します。

その後、ブロック内のドロップダウンメニューから表示したい広告を選択します。
広告ブロックの配置オプションも選択できます。

最後に、上部にある「更新」または「公開」ボタンをクリックして変更を保存します。
これで、あなたのサイトにアクセスして、広告ブロックの動作を確認することができます。

ボーナス:WordPressサイトにAmazon広告を追加する
他の中小企業やWooCommerceストアの広告を宣伝する以外に、WordPressサイトにAmazon広告を表示することもできます。
これらの広告は超高速で承認されるため、オンラインで簡単にお金を稼ぐことができます。さらに、Amazonを使えば、あなたのニッチに関連する様々な商品から選ぶことができ、より多くのユーザーにクリックを促すことができます。
Amazonアソシエイト・プログラムのサイトでアカウントを作成すれば、簡単にAmazon広告を掲載することができます。

そうしたら、Amazon広告のコードをジェネレータで生成し、Pretty Linksのようなプラグインを使ってサイトに広告を表示するだけです。
また、市場で最高のコンバージョン最適化ツールであるOptinMonsterを使って、Amazon広告用のポップアップを作成することもできる。
詳しい手順については、WordPressサイトにAmazon広告を追加する方法のチュートリアルをご覧ください。
この投稿が、WordPressの特定の投稿に広告ブロックを表示する方法を学ぶのにお役に立てば幸いです。また、WordPressブログで広告を販売する方法についてのチュートリアルや、WordPressでお金を稼ぐための最高のアフィリエイトマーケティングツールとプラグインについてのエキスパートピックもご覧ください。
If you liked this article, then please subscribe to our YouTube Channel for WordPress video tutorials. You can also find us on Twitter and Facebook.


 in 2024")
Jiří Vaněk
Thanks for the great tutorial. I currently have Adsense with Google, but I don’t use it on the site. I was waiting for my traffic to grow a bit more. For the year 2024, I would like to monetize the website in the form of Adsense and I was thinking about how to do it. This article showed me a lot. Thank you very much for the explanation and practical examples.
WPBeginner Support
Glad the guide was helpful
Admin
THANKGOD JONATHAN
Thank you for this tutorial. However, please between WPCode and Adsanity which one has a better free version?
I want to use the free version can you recommend any one for me?
WPBeginner Support
WPCode would be the option that has a free version.
Admin
Ahmed Omar
A game-changing tutorial on displaying ad blocks in specific posts in WordPress!
Your step-by-step guide, especially the use of conditional tags, is a smart way to monetize specific content.
A technical tip: consider experimenting with Ad Plugin for advanced ad management and tracking. Thanks
Ram E.
Thanks for this another helpful post.
I’m exploring options as I’m planning to directly sell ad space on my blog in the near future. I also already read your guide on the best ad management plugins.
WPBeginner Support
Glad to hear our guide was helpful
Admin
Ralph
I was using Google Adsense auto placement and it is not optimal. In short content it looks like spam, and in long content there are even 2 or 3 full screen between ads. I want to change it and use some plugin. I was using “adinserter” to put shortcode in posts and change everything at once but it was for my products or affiliate banners. I’m wondering if the plugin is even neccessary. We have built in WordPress blocks that can do the same. Isn’t it better for optimization to use that blocks rather than additional plugins?
WPBeginner Support
You can use the built-in blocks to include ads, the main thing that plugins allow is more options instead of only manual placements. There shouldn’t be a major optimization difference between using a default block and a plugin.
Admin
Kawsar Ahmed
Awesome article. Thank you so much for sharing tips.
I have a question, I have inserted multiple Google ads code inside an article with the wordpress default html block.
While doing this I have removed the bellow line only except the first one. It’s because the code is similar.
script/async=/src=/https://pagead2.googlesyndication.com/pagead/js/adsbygoogle.js/script
I thought if the resource was included once then it would work for all the available ads.
Please reply to me, is my thinking correct? Or if I am doing this, is there any possibility of mistracking to get the ads clicks revenue.
Thanks again!
WPBeginner Support
Unless we hear otherwise that should be doable with how Google’s ads work at the moment.
Admin
deepak Pandey
Thanks for this information. Amazing article.
WPBeginner Support
You’re welcome, glad you like our content
Admin
Bella
Hi there, I tried to install AdSanity but it does not come up in WP searches in the add new plugins section. Has it been discontinued and can you recommend a replacement?
WPBeginner Support
Hi Bella,
It is a paid plugin and you can buy it from AdSanity website.
Admin
raman
Great post. Wonderful information and really very much useful. Thanks for sharing and keep updating.
Narendra Singh
I have a website and I want to have a theme which has “Read More” or “Continue Reading” option and which is very easy to search in google search engine. Right now I have “Twenty Twelve” theme.
Kindly suggest
Narendra