Disqusに切り替えた後、カスタム投稿タイプからコメントが消えることがあります。
私たちは過去にDisqusを使用していたので、このツールの癖を熟知しており、コメントする内容が適切に移行されていないと、このようなことが起こりうることがわかりました。
ありがたいことに、素早く簡単に解決できる方法がある。
この投稿では、WordPressのカスタム投稿タイプでDisqusコメントシステムを無効化する方法を紹介する。いくつかの簡単な手順を踏むことで、この問題を解決し、コメントをあるべき場所に戻すことができます。
Disqusから移行した理由
過去に、WPBeginnerでDisqusコメントシステムを使う実験をしました。しかし、すぐに初期設定のWordPressコメントに戻しました。
Disqusから切り替えた理由はいくつかありますが、早い段階で、Disqusに移行した後、カスタム投稿タイプにいくつかのコメントが表示されないことに気づきました。
Disqusを使用してWordPressのコメントを管理し、モデレートしている場合、これらのコメントを手動でインポートすることも一つの解決策です。しかし、特にカスタム投稿に多くのコメントがある場合、これには多くの時間と労力がかかります。
ありがたいことに、Disqusユーザーにはより早い回避策があります。それを念頭に置いて、カスタム投稿タイプのDisqusを素早く簡単に無効化する方法を見てみよう。
WordPressのカスタム投稿タイプでDisqusを無効化する
始める前に、DisqusとWordPressサイト間の同期が有効化されていることを確認する必要があります。
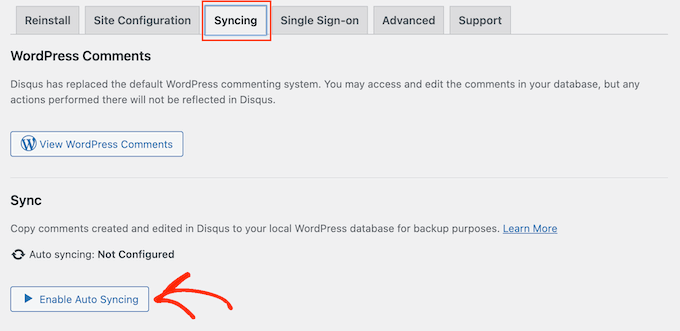
左側のメニューでDisqusを選択し、「Syncing」タブをクリックします。有効化していない場合は、’Enable Auto Syncing’をクリックしてください。
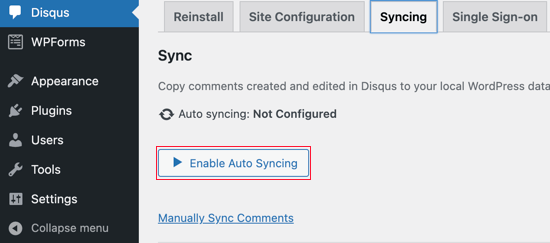
注: この時点で、以下のエラーが表示される場合があります:”この機能を有効化するには、サイトショート名、APIシークレットキー、APIアクセストークンが設定されている必要があります。”
このような場合は、投稿の最後にエラーを修正する方法をご紹介します。
その後、WordPressサイトにコードを追加する必要があります。
多くの場合、チュートリアルではテーマのfunctions.phpファイルを直接編集するように指示されますが、ちょっとしたミスでWordPressの一般的なエラーを引き起こしたり、サイトを完全に壊してしまう可能性があるため、この方法はお勧めしません。
とはいえ、代わりに無料のWPCodeプラグインを使用することをお勧めします。WordPressでカスタムコードを追加する最も簡単で安全な方法です。
私たちはこのツールを徹底的にテストし、超信頼性があることを発見しました。さらに詳しく知りたい方は、WPCodeのレビューをご覧ください。
注: WPCodeのプロプランに変更すると、コードスニペット、カスタムブロック作成、スマート条件ロジックなどのクラウドライブラリをアンロックすることもできます。
有効化したら、WordPressダッシュボードのCode Snippets “ + Add Snippetページにアクセスしてください。
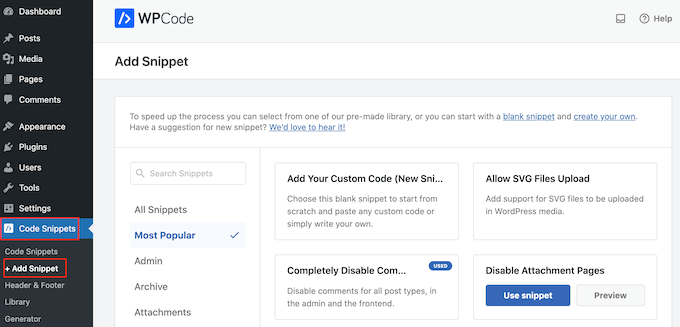
ここでは、サイトに追加できるさまざまな既製のスニペットがすべて表示されます。WordPressのウィジェットブロックを無効化したり、WordPressのバージョン番号を削除したりするスニペットも含まれています。
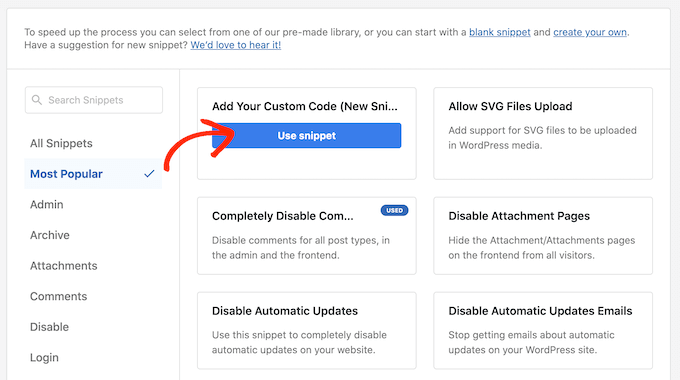
独自のスニペットを追加するには、「カスタムコードを追加」にマウスオーバーし、「スニペットを使用」をクリックします。
この画面で、カスタムコードスニペットのタイトルを入力します。これは、PHPスニペットを識別するのに役立つものであれば何でもかまいません。
次に、「コードタイプ」のドロップダウンを開き、「PHPスニペット」を選択するだけです。
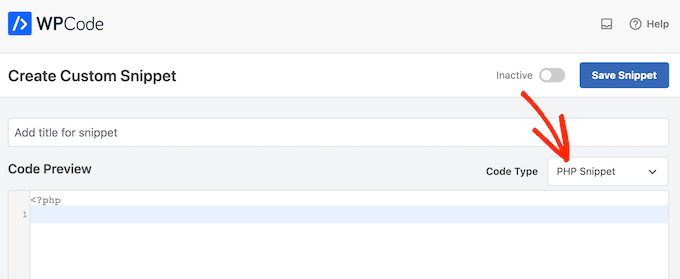
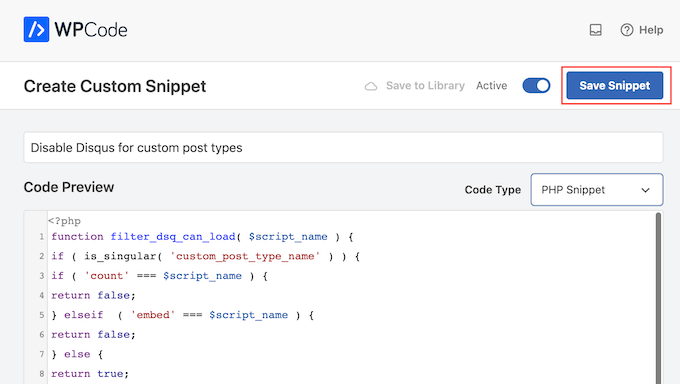
その後、以下のコード・スニペットをエディターに貼り付ける:
1 2 3 4 5 6 7 8 9 10 11 12 | function filter_dsq_can_load( $script_name ) {if ( is_singular( 'custom_post_type_name' ) ) {if ( 'count' === $script_name ) {return false;} elseif ( 'embed' === $script_name ) {return false;} else {return true;}}}add_filter( 'dsq_can_load', 'filter_dsq_can_load' ); |
このコードは、特定のカスタム投稿タイプをチェックし、Disqusコメントテンプレートを無効化するフィルターを作成します。
それを念頭に置いて、custom_post_type_nameをDisqusを無効化したいカスタム投稿タイプの名前に置き換えてください。
コードボックスの下に、挿入オプションが表示されます。まだ選択されていない場合は、「自動挿入」をクリックすると、スニペットが自動的に挿入され、WordPressブログ全体で実行されます。
その後、『場所』のドロップダウンを開き、『どこでも実行』をクリックする。
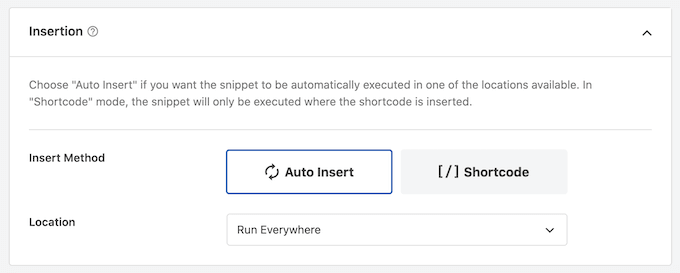
その後、画面を一番上までスクロールし、「Inactive」トグルをクリックして「Active」に変更する。
最後に、「保存」をクリックして、Disqusスニペットをライブにする。
トラブルシューティング: サイトのショートネーム、APIシークレットキー、APIアクセストークンが必要です。
Disqusの自動同期を有効化しようとすると、エラーが表示されることがあります:”この機能を有効化するには、サイトショート名、APIシークレットキー、APIアクセストークンが設定されている必要があります。”
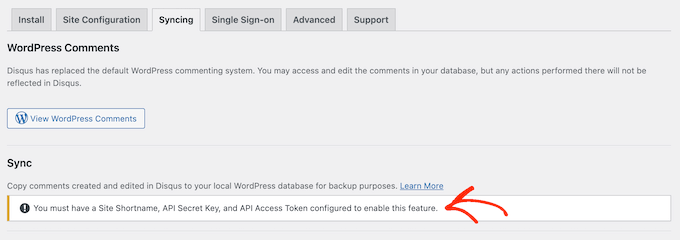
このような場合は、DisqusウェブサイトにアクセスしてDisqusアプリケーションを作成する必要があります。すでにアカウントをお持ちでない場合は、メールアドレスを使用して無料アカウントを作成するか、FacebookやTwitterなど他のアカウントでサインインしてください。
その後、「アプリケーションの登録」をクリックします。
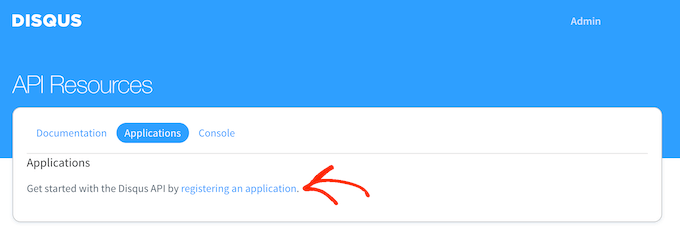
この画面では、アプリケーションの名前、組織、Disqusを使用する予定のサイトなど、アプリケーションに関する情報を入力することができます。
入力した情報に問題がなければ、「Register my application」をクリックします。
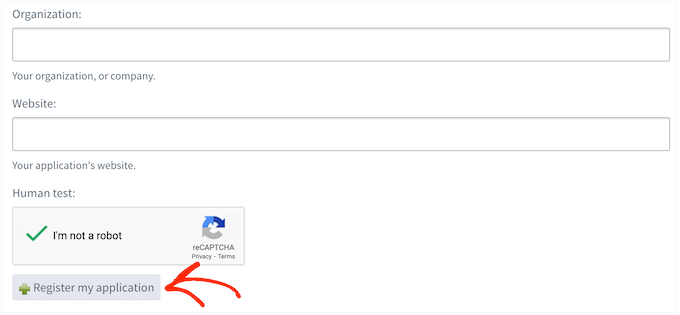
それが終わったら、「初期設定アクセス」セクションまでスクロールする。
ドロップダウンメニューから「フォーラムの読み書きと管理」を選択できるようになりました。
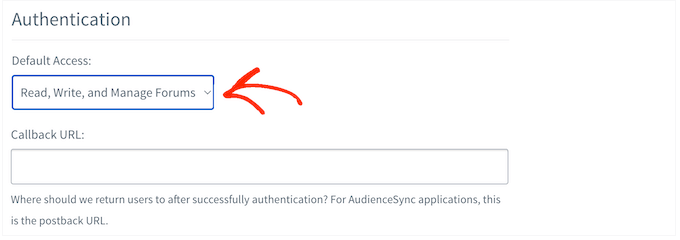
その後、画面を一番下までスクロールし、『変更を保存』をクリックする。
詳細」タブをクリックしてください。
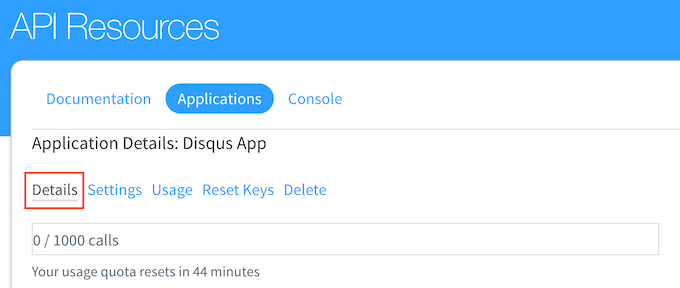
その後、「OAuth Settings」セクションまでスクロールします。
ここに、API キー、API シークレット、アクセストークンがあります。この情報を Disqus プラグイン設定に追加する必要があります。
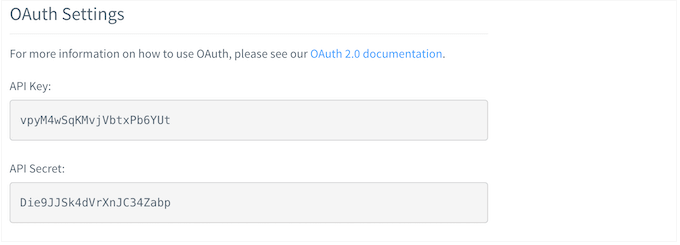
WordPressダッシュボードで、左側のメニューからDisqusを 選択します。
次に、「サイト構成」タブをクリックします。
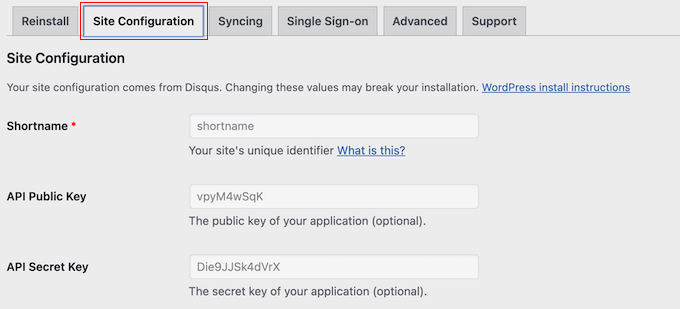
この画面で、「Click to make changes」リンクを選択する必要があります。
APIキー、APIシークレット、アクセストークンを各フィールドに追加します。すでに追加していない場合は、サイトのショートネームも追加する必要がある。
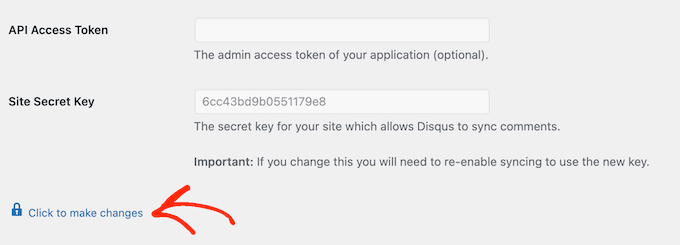
これで、「保存」ボタンをクリックする。
ここで「同期」タブを選択すると、エラーの代わりに「自動同期を有効化」ボタンが表示されるはずです。
WordPressのカスタム投稿タイプでDisqusを無効化する方法について、このチュートリアルがお役に立てれば幸いです。また、WordPressのコメントをすべて簡単に一括削除する方法や、WordPressコメントのモデレートに関する初心者向けガイドもご覧ください。
If you liked this article, then please subscribe to our YouTube Channel for WordPress video tutorials. You can also find us on Twitter and Facebook.


Ludy Amano
The new Disqus Plugin (2018) requires some changes on this code to work properly:
function filter_dsq_can_load( $script_name ) {
// $script_name is either ‘count’ or ’embed’.
if ( ‘count’ === $script_name ) {
return false;
}
return true;
}
add_filter( ‘dsq_can_load’, ‘filter_dsq_can_load’ );
Priyanka
Do we need to add this code along with what mentioned in this blog?
Arta
Disqusting….
Hemang Rindani
WordPress is a great enterprise web content management service that allows a company to control website(s) effortlessly. With unlimited built-in tools and their flexibility & scalability, a developer can design website for any business requirements. It is advisable to keep the site interesting where adding a comment box will play a crucial role. Disqus is one of the easiest ways to add comment box on any page however sometimes it is essential to disable it on a few sections where you don’t require reader’s inputs. The method described in article is spot-on as I readily implemented it. Thanks for sharing.
I feel Jetpack is a good alternative. It allows your readers to connect to your website and leave a comment in multiple ways. It uses default WordPress comment option, can connect to WordPress.com or allows users to login through Facebook, G+ and twitter. There are many other features that make Jetpack a great tool.
Raunak Hajela
You showed us how to disable disqus in custom post type but what about enable? I recently added disqus on my interview custom post type but it’s not working. Why? I created two custom post types i.e Interviews and Blog. It is working in blog post type but not in interviews post type. Tell me how should I fix it.
This is my code of both custom post types. I am using genesis template here –
//* Register Interviews Post Type (Changes by NSS)
add_action( ‘init’, ‘create_interview_post_type’ );
function create_interview_post_type() {
$labels = array(
‘name’ => __( ‘Interviews’ ),
‘singular_name’ => __( ‘Interviews’ ),
‘all_items’ => __(‘All Interviews’),
‘add_new’ => _x(‘Add new’, ‘Interviews’),
‘add_new_item’ => __(‘Add new’),
‘edit_item’ => __(‘Edit Interview’),
‘new_item’ => __(‘New Interview’),
‘view_item’ => __(‘View Interview’),
‘search_items’ => __(‘Search in Interviews’),
‘not_found’ => __(‘No Interviews found’),
‘not_found_in_trash’ => __(‘No Interviews found in trash’),
‘parent_item_colon’ => ”
);
$args = array(
‘labels’ => $labels,
‘public’ => true,
‘has_archive’ => true,
‘rewrite’ => array(‘slug’ => ‘interviews’),
‘taxonomies’ => array( ‘category’, ‘post_tag’ ),
‘supports’ => array( ‘title’, ‘editor’, ‘author’, ‘thumbnail’ , ‘custom-fields’, ‘excerpt’, ‘comments’)
);
register_post_type( ‘interview’, $args);
}
//* Register Blog Post Type (Changes by NSS)
add_action( ‘init’, ‘create_nssblog_post_type’ );
function create_nssblog_post_type() {
$labels = array(
‘name’ => __( ‘Blog’ ),
‘singular_name’ => __( ‘Blog’ ),
‘all_items’ => __(‘All Posts’),
‘add_new’ => _x(‘Add new’, ‘Blog’),
‘add_new_item’ => __(‘Add new’),
‘edit_item’ => __(‘Edit Post’),
‘new_item’ => __(‘New Post’),
‘view_item’ => __(‘View Post’),
‘search_items’ => __(‘Search in Posts’),
‘not_found’ => __(‘No Posts found’),
‘not_found_in_trash’ => __(‘No Posts found in trash’),
‘parent_item_colon’ => ”
);
$args = array(
‘labels’ => $labels,
‘public’ => true,
‘has_archive’ => true,
‘rewrite’ => array(‘slug’ => ‘blog’),
‘taxonomies’ => array( ‘category’, ‘post_tag’ ),
‘supports’ => array( ‘title’, ‘editor’, ‘author’, ‘thumbnail’ , ‘custom-fields’, ‘excerpt’, ‘comments’ )
);
register_post_type( ‘nssblog’, $args);
}
Wakil Nikzad
Thank you for this great post.
We’ve installed and configured Disqus plugin in our website. everything is almost great with it, except default commenting option. I wonder if there is any option for choosing Guest Commenting as default.
However there are a lots of people who have Disqus account, but it differs in different societies/countries. For example: in Afghanistan most of the internet users don’t know about Disqus.
Travis Pflanz
You don’t need a Disqus account to comment on the Disqus system. You have to option to use Facebook, Twitter, Google+, Name/Email or Guest.
I’m always logged in, so I had to logout to make sure this is the case.
Logout and take a look.
danh
I see what you are doing and like it. I think I’m having a load order problem. If I doctor the disqus plugin code to not add filter when my custom post type is being used, it addresses my problem:
if ( ‘custom_post_type_name’ != get_post_type() ){
add_filter(‘comments_template’, ‘dsq_comments_template’);
}
If I try your suggestion of removing the filter if it has been added, then it doesn’t work for me. I presume that functions.php is being executed before disqus.php, so there is no filter to remove at the time the removal is executed. I still haven’t worked out a fix.
Piku
Great article
Erik
Thanks for sharing.
Akash Agarwal
yes it is. I just in search of it. Its help me a lot. Thanks for sharing such useful and informative post.
Manuel Edburg
Woah. Interesting article! I noticed that and thought it was some error. I never knew this was possible.
Eduardinho Teixeira
Ok, i see… In case i disable Disqus in custom post type, what happens then? Does that post stay with comments disabled? Or in that case, WP Comments are back to the page?