WordPressサイトの更新や大幅な変更を行う場合、直接行うのは危険です。そこでステージングサイトの出番です。
ステージングサイトは、ライブサイトの完璧なクローンであり、メインサイトにデプロイする前に、変更を安全にテストし、トラブルシューティングを行い、更新を改良することができます。ステージングサイトを作成することで、ダウンタイムの可能性、壊れた機能、その他の複雑な問題を回避することができます。
WPBeginnerでは、ステージングサイトを使用して、ライブサイトで公開する前にサイトの更新をテストしています。
このステップバイステップのガイドでは、WordPressサイトのステージング環境を簡単に作成する方法をご紹介します。いくつかの異なる方法を取り上げますが、そのほとんどは数回クリックするだけで完了します。
ステージングサイトとは?
ステージングサイトは、ライブサイトのクローンであり、ライブサイトを作成する前に変更をテストするために使用されます。ステージングサイトは、本番サイトを壊さないようにエラーをキャッチするのに役立ちます。
以前はWordPressのステージングサイトを立ち上げるのはとても難しかったが、今では技術者でなくてもできるようになった。
多くのユーザーは、変更をテストするために、Windowsや MacコンピューターにWordPressをローカルにインストールします。更新が終わったら、ローカルホストからライブサーバーにアップロードします。
この方法の最大の問題は、ローカルホストでうまくいったことが、ライブサーバーでうまくいかなかったらどうするかということだ。
多くの場合、ローカルサイトとライブWordPressホスティングサービスサーバーは同じ環境で実行されていません。
ステージングサイトはWebホスティングサービスサーバー上にあり、ライブサイトと同じサーバー構成で動作するため、これらのエラーをすべて簡単に防ぐことができます。
ということで、WordPressのステージングサイトの立ち上げ方を見てみよう。
WordPressステージングサイトを簡単に作成する方法
WordPressのステージングサイトを作成する方法は複数あります。最も簡単なのは、ホスティングサービスにビルトインされているステージングサイト機能を使用することです。
最高のWordPressホスティングサービス会社のいくつかは、すでに1クリックステージングサイトを提供しています。もしあなたのサイトがホスティングサービスを利用しているのであれば、手間なく簡単にステージングサイトを作成することができます。
これらの一般的なホスティングサービスをお持ちでない場合は、プラグインを使用して(手動でも)WordPressステージングサイトを作成するためのソリューションもご用意しています。
より速く閲覧するために、以下のナビゲーションを使って、あなたに最も適したセクションにジャンプすることができます:
Bluehostでステージングサイトを作成する
Bluehostは最高のWordPressホスティングサービスの一つです。彼らはすべてのプランで迅速な1クリックステージングサイトソリューションを提供しています。
まず、Bluehostのダッシュボードに移動し、「マイサイト」セクションにアクセスする必要があります。
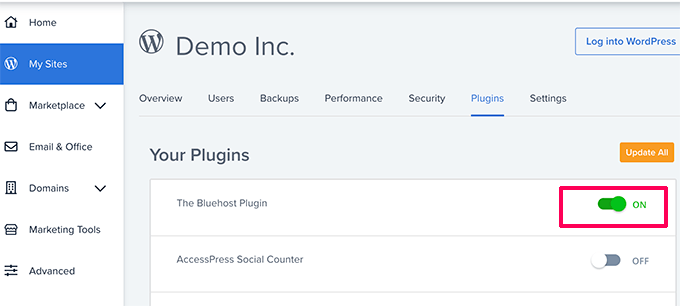
次に、「プラグイン」タブに切り替え、「Bluehostプラグイン」オプションの横にあるスイッチを切り替えます。
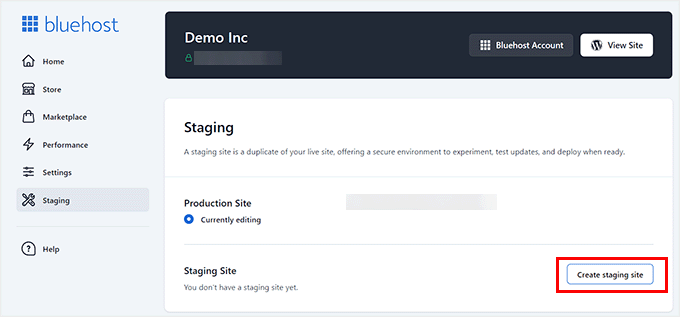
その後、WordPressサイトのダッシュボードに移動し、Bluehostの ” ステージングページにアクセスします。
次に「ステージングサイトを作成」ボタンをクリックする。
Bluehostはあなたのサイトのステージング環境を準備します。
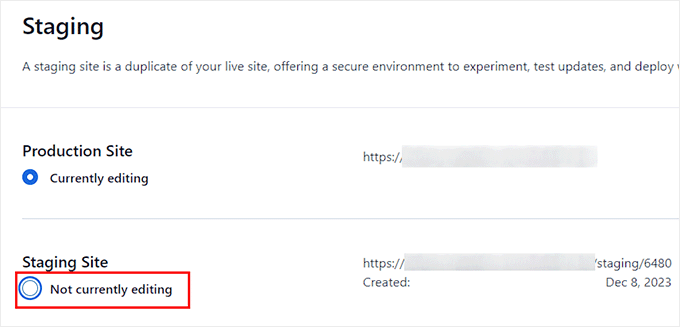
それが完了すると、「ステージング・サイト」セクションが表示されるので、「現在編集中ではありません」にチェックを入れる。
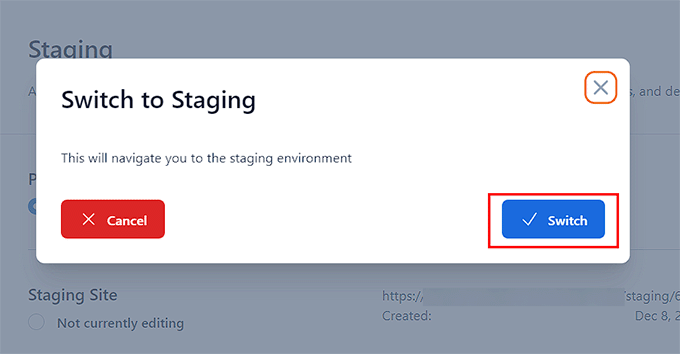
ステージング・サイトへの切り替えを促すプロンプトが画面に表示されます。
ここから「Switch」ボタンをクリックする。
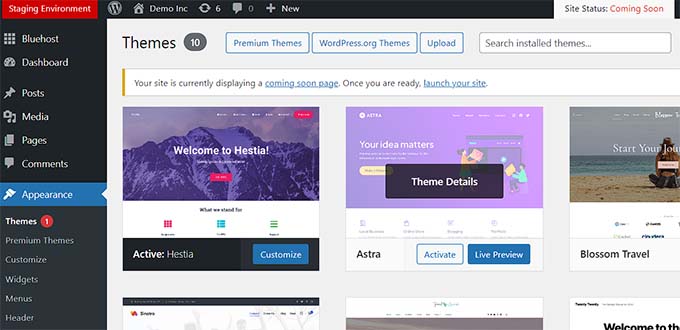
切り替えると、画面にステージングサイトで作業中であることを示すボタンが表示されます。
本番サイトへの影響を心配することなく、サイト制作を進めることができる。
Bluehostのステージングサイトからライブサイトへの変更のデプロイ
ステージングからライブサイトに変更をプッシュする準備ができたら、WordPress管理サイドバーからBluehost ” Stagingページに移動するだけです。
ここから、ステージングサイトの横にデプロイオプションのドロップダウンメニューが表示されます。ファイルのみ、データベースのみ、またはすべての変更をデプロイできます。
本当に〜してもよいですか?
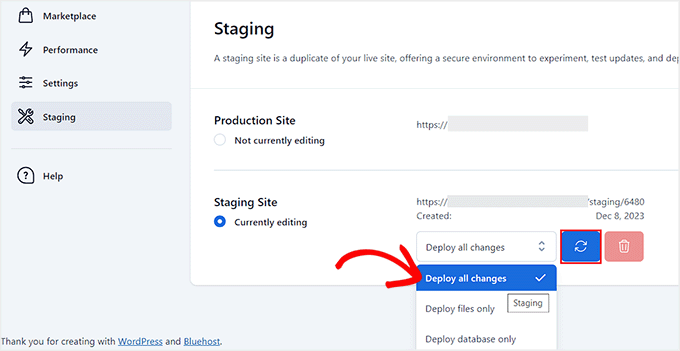
その後、ドロップダウンメニューの隣にある「サイトをデプロイ」ボタンをクリックする。
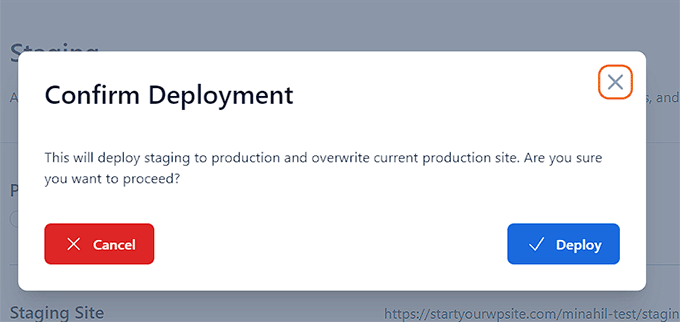
ポップアップが表示され、ステージング・サイトを本番サイトにデプロイすることを確認するよう求められます。Deploy’ ボタンをクリックして続行します。
Bluehostは今、ライブサイトにステージングサイトのデプロイを開始します。サイトのサイズによっては、しばらく時間がかかる場合があります。
本番サイトオプションのラジオボタンをクリックして、本番サイトに戻り、変更を確認することができます。
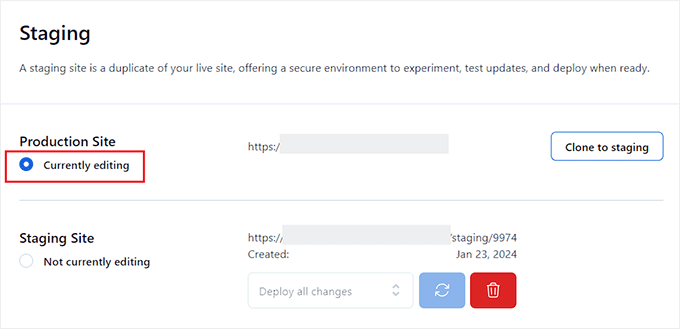
本番サイトをステージングにクローンする
本番サイトに戻ると、そこで行った変更はステージングサイトに自動的に同期されません。
将来、ステージングサイトでさらにいろいろなことをテストしたい場合は、サイトを複製する必要があります。
これを行うには、Bluehostの ” ステージングページにアクセスし、 “ステージングにクローン “ボタンをクリックする必要があります。
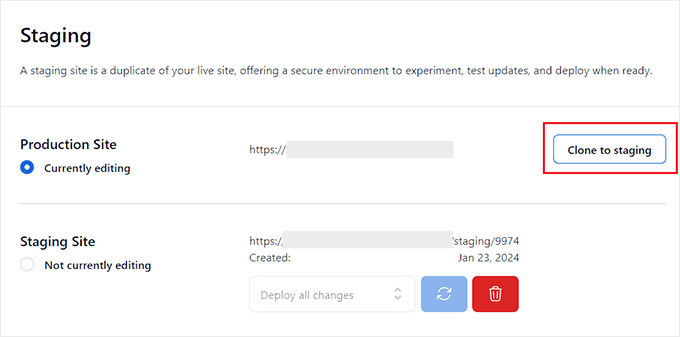
Bluehostはその後、ステージングウェブサイトにライブウェブサイトの最新の変更をクローンします。その後、テストと開発のためのステージングサイトに切り替えることができます。
SiteGroundでステージングサイトを作成する
SiteGroundは、GrowBigとGoGeekプランで1クリックステージング機能を提供しているWordPressホスティングサービスのトップ企業です。
お客様のサイトがSiteGroundでホスティングサービスされている場合、このようにステージングサイトを設定します。
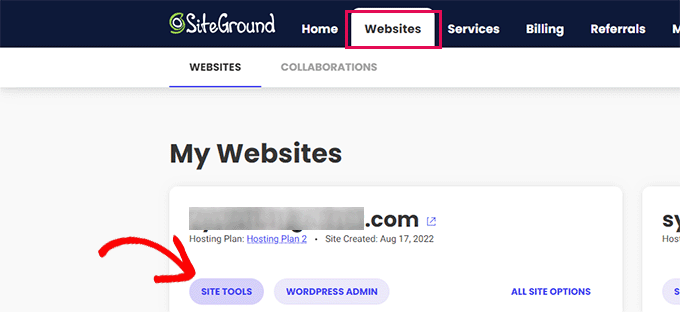
まず、SiteGroundのダッシュボードにログインし、ウェブサイトタブに切り替える必要があります。ここから、サイトの下にあるサイトツールを選択する必要があります。
次の画面では、左の列からWordPress ” Stagingメニューをクリックする必要があります。
ここからサイトを選択し、ステージングコピーの名前を入力します。
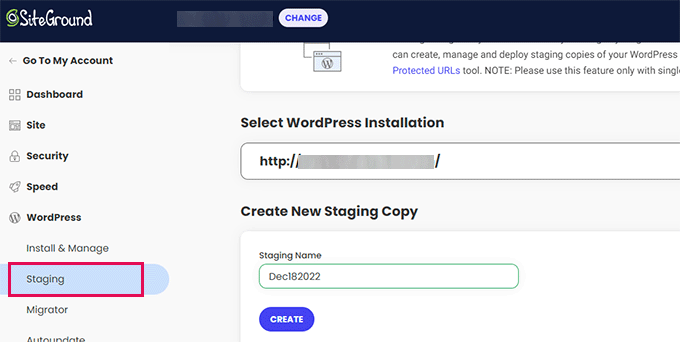
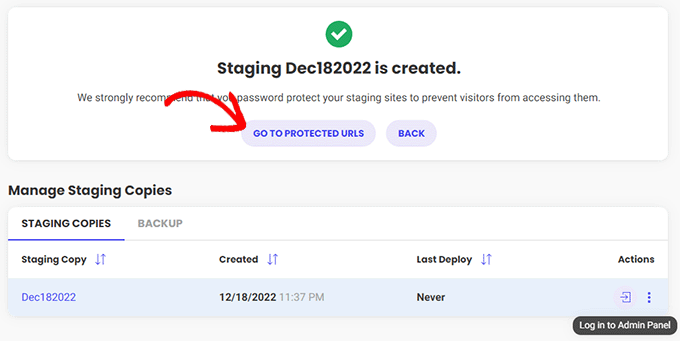
作成」ボタンをクリックして続行すると、Sitegroundがあなたのサイトのステージングコピーを作成します。
その後、’Go to protected URLs’ボタンをクリックして、ステージングサイトをパスワードで保護し、プライベートに保つことができます。
次の画面で、SitegroundはステージングサイトのURLとパスを自動的に入力します。
ステージングサイトを保護するために使用するユーザー名とパスワードを入力する必要があります。
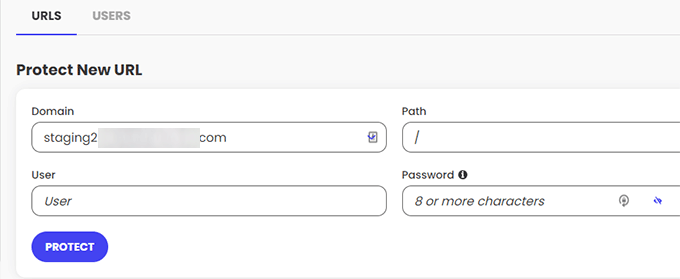
保護」ボタンをクリックして設定を保存します。
WordPress ” Stagingページに戻り、ステージングウェブサイトの横にある ‘Log in to Admin Panel’ ボタンをクリックします。

SiteGroundがステージングサイトのWordPress管理エリアを開きます。このステージングサイトで変更をテストできます。
変更をライブサイトに戻す
ステージングサイトで変更を試したら、本番サイトにマージしたくなるかもしれません。
SiteGroundならこれも簡単だ。
左のカラムからWordPress ” ステージングメニューをクリックします。次に、ステージングサイトの横にある「ステージングコピーの管理」セクションの3つの点のメニューをクリックします。

メニューには2つのデプロイオプションが表示されます。Full Deploy」または「Custom Deploy」オプションを選択できます。
フルデプロイ’オプションは、ステージングサイトからライブサイトにすべてをマージします。カスタムデプロイ」では、マージするファイルやデータを選択できます。
よくわからない場合は、「フルデプロイ」オプションを選択してください。
SiteGroundは、ステージングサイトをライブサイトにコピーします。
ライブをステージングサイトに統合する
ライブサイトに加えた変更は、ステージングサイトには自動的にコピーされません。
ステージングサイトで作業が必要になるたびに、上記のプロセスを繰り返し、新しいステージングサイトを作成します。
WP Engineでステージングサイトを作成する
WP Engineは世界最高のWordPressマネージドホスティングサービス会社です。マネージドWordPressホスティングサービスは、ホスティングサービスプロバイダーが更新、バックアップ、セキュリティ、パフォーマンスを管理するWordPressサイトのコンシェルジュサービスです。
WP Engineは、すべてのプランでワンクリックのステージングソリューションを提供しています。WP Engineを使用してサイトをホスティングサービスしている場合は、この方法でサイトのステージング環境をセットアップします。
まず、WP Engineのダッシュボードにログインする必要があります。次に、「サイト」ページに移動し、サイトをクリックして選択します。
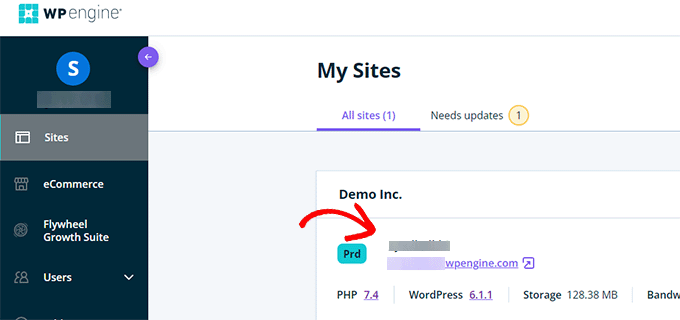
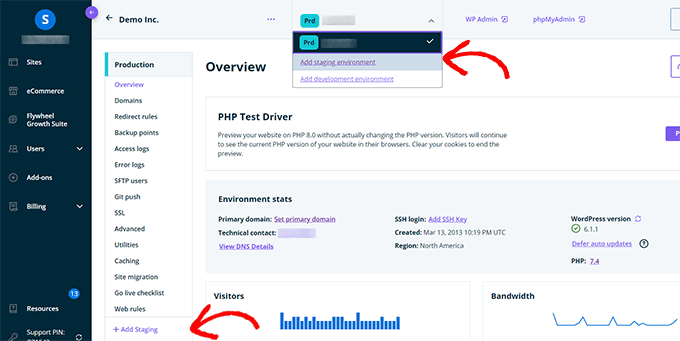
これでサイトのダッシュボードが表示されます。
ここで、左カラムの’Add Staging’リンクをクリックするか、上部のサイト名の下にある’Add Staging’リンクを選択する必要があります。
これで「環境の追加」画面になります。
ステージング環境をどのように進めるかを選択するよう求められます。
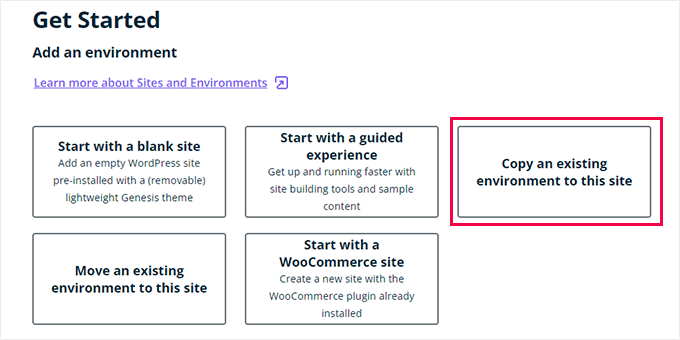
それぞれのオプションの設定は以下の通りだ:
- Start with a new blank site(新しい空白のサイトから始める)」は、新しい空のサイトを作成します。
- Start with a guided experience」は、ガイド付き体験とデモコンテンツを含む新規サイトを作成します。
- 既存の環境をこのサイトにコピー」は、本番環境または開発環境をこのサイトにコピーします(例:本番サイトをこの環境にコピー)。
- Move an existing environment’(既存の環境を移動)は、このサイトに環境を移動します(例:開発環境をステージングに移動)。
- Start with a WooCommerce site」は、WooCommerceがプリインストールされた新規WordPressサイトを作成します。
ライブサイトのステージングコピーを作成したいので、’Copy an existing environment to this site’ オプションをクリックする必要があります。
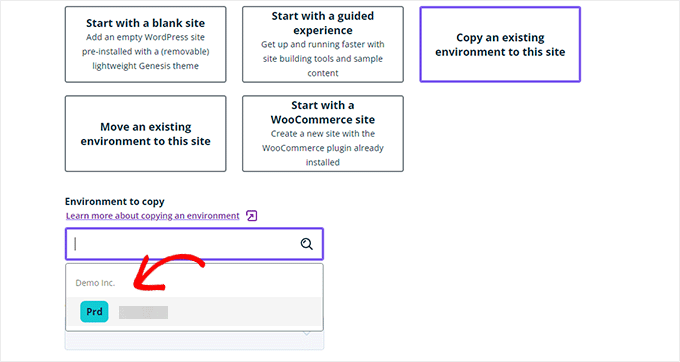
環境を選択した後、コピー元の最新のバックアップを選択し、「Next」ボタンをクリックして続行します。
ここで、ステージングサイトの名前をプロバイダーする必要があります。この名前はステージングサイトのURLで使われる。その後、環境タイプとしてSTG(ステージング)を選択します。
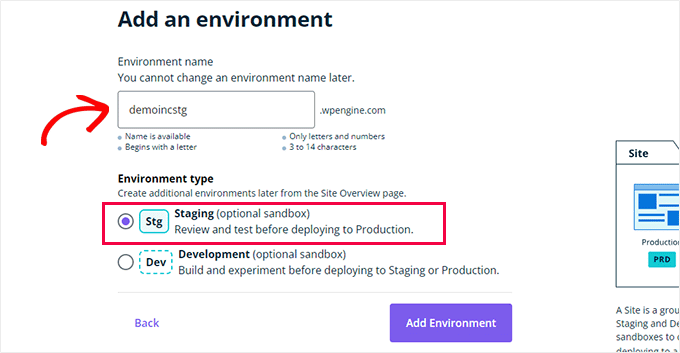
環境の作成」ボタンをクリックして続行します。
WP Engineがステージングサイトを作成します。その後、ステージング環境のダッシュボードにリダイレクトされます。
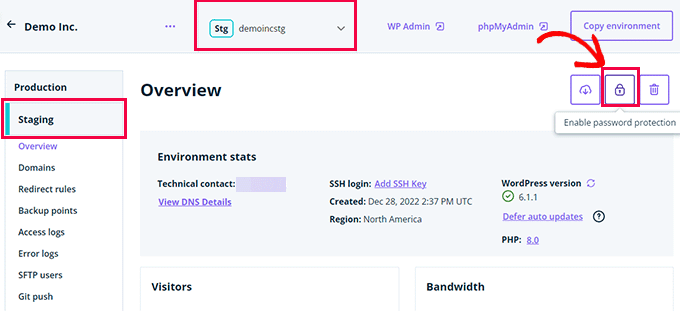
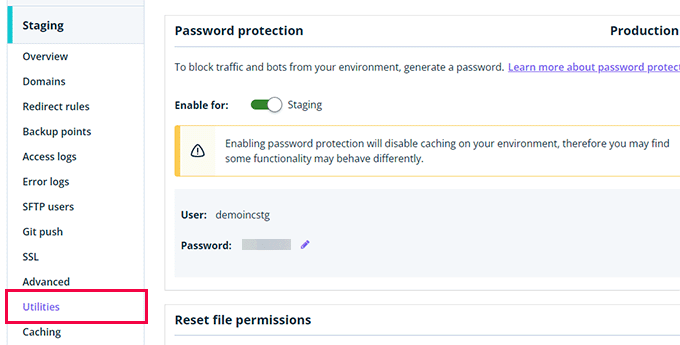
次に、南京錠ボタンをクリックして、ステージングサイトのパスワード保護を有効化する必要があります。
その後、「ユーティリティ」タブに切り替えて、ステージングサイトのユーザー名とパスワードをコピーする必要があります。
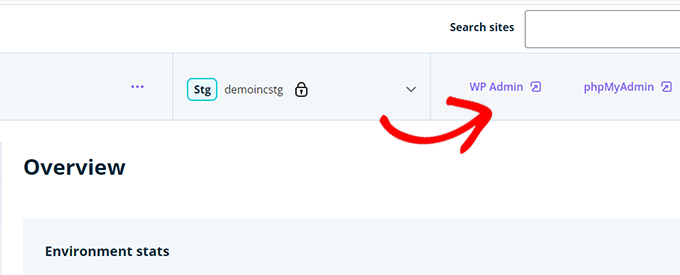
上部にある「WP Admin」ボタンをクリックして、ステージングサイトにログインすることができます。
ステージングサイトでは、他の場所にインストールする一般的なWordPressサイトと同じように、自由に変更を加えたり、機能を試したりすることができます。
WP Engineでステージングサイトからライブサイトに変更をデプロイする
ステージングサイトで行った変更をライブサイトにマージしたいですか?
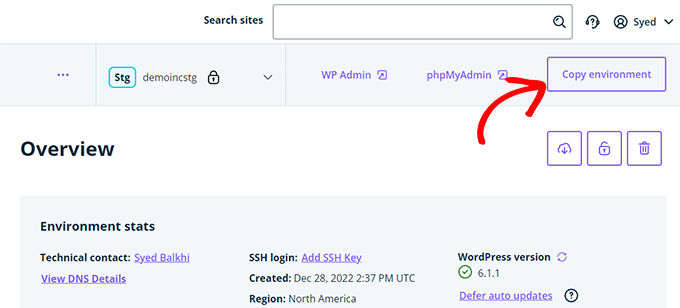
環境のコピー」ボタンをクリックするだけで、配備が開始されます。
オプションの設定ページが表示されます。ここから、コピー元とコピー先の環境を選択する必要があります。
ここでは、ソース環境としてステージングサイトを選択し、デスティネーション環境として本番サイトまたはライブサイトを選択します。
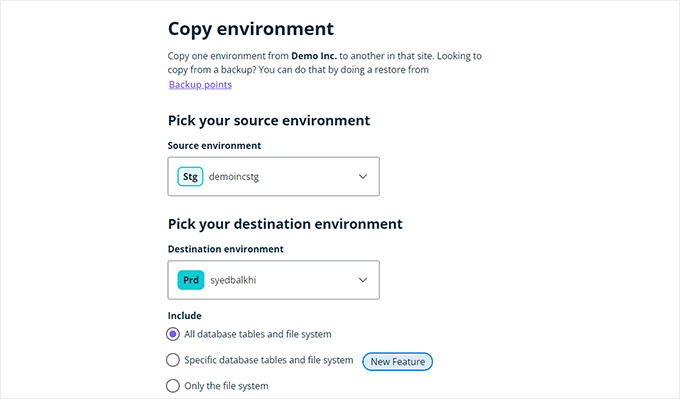
コピーする対象を選択できます。たとえば、データベーステーブルとファイルをすべてコピーすることも、特定のファイルとデータベーステーブルをコピーすることも、ファイルシステムだけをコピーすることもできます。
注意:すべてをコピーすると、ステージング環境を作成するために使用した後、ライブサイトに保存されているすべてのデータを失うことになります。これには、新規投稿、ページ、カスタマイザー、注文などの重要なデータが含まれる場合があります。そのため、ステージングからデプロイする前にライブサイトのバックアップを実行することをお勧めします。
次に、「Review and Confirm」ボタンをクリックしてデプロイを開始します。ライブサイトにすべてをコピーするにはしばらく時間がかかります。
手続きが完了するとメールでお知らせします。
WordPressプラグインを使ったステージングサイトの作成
WordPressホスティングサービスがステージングサイト機能を提供していない場合でも、WordPressプラグインを使用してステージングサイトを作成することができます。
この方法にはデメリットもある。
まず、プラグインがホスティングサービス・サーバーをコントロールできる範囲は限られています。そのため、必ずしも最良の結果が得られるとは限りません。
第二に、私たちが使用するプラグインは、ステージングサイトを独自のサーバーに保存します。もしあなたがプライバシーやデータ保護について懸念しているのであれば、これはあなたにとって理想的ではないかもしれません。
最後に、プラグインにはいくつかの既知の非互換性があります。非互換性ページをチェックして、あなたのサイトが互換性があることを確認してください。
とはいえ、WordPressプラグインを使ってステージングWordPressサイトを作成する方法を見てみましょう。
最初に必要なことは、WP Stagecoachプラグインをインストールして有効化することです。詳しくはWordPressプラグインのインストール方法をご覧ください。
プラグインを有効化すると、管理バーにWP Stagecoachという新しいメニュー項目が追加されます。クリックするとプラグインの設定ページに移動します。
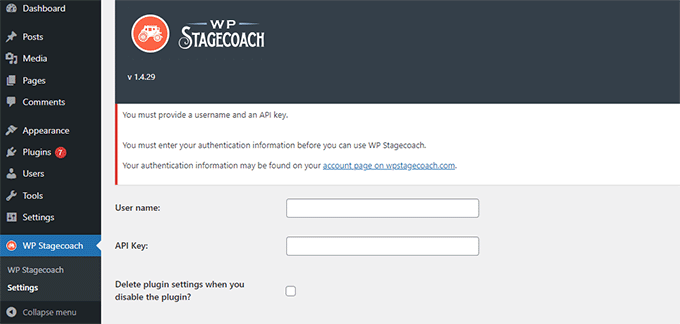
WP Stagecoachのユーザー名とAPIキーを入力する必要があります。APIキーはプラグインサイトのアカウントにあります。
その後、WP Stagecoach ” WP Stagecoachページにアクセスし、ステージングサイトの名前を選択する必要があります。この名前はWordPressステージングサイトのサブドメインとしても使用されます。
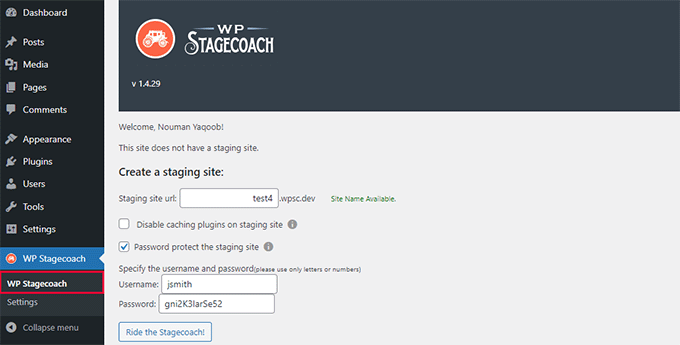
ステージングサイトをパスワードで保護する “オプションの隣にあるボックスにチェックを入れるのを忘れないでください。ステージングサイトを一般表示や検索エンジンから保護します。
Ride the Stagecoach(駅馬車に乗る)」ボタンをクリックして次に進む。
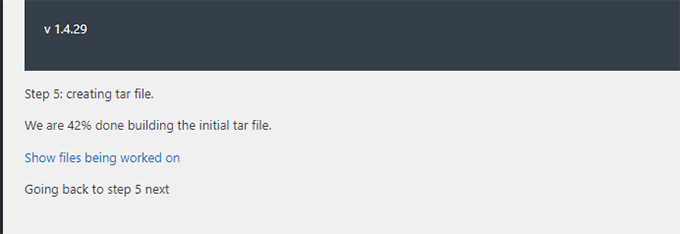
プラグインはWordPressファイルとデータベースのバックアップを作成し、ステージングサイト用にエクスポートします。
WordPressサイトの規模によっては時間がかかる場合があります。
完了すると、ステージングサイトとその管理エリアへのリンクが表示されます。
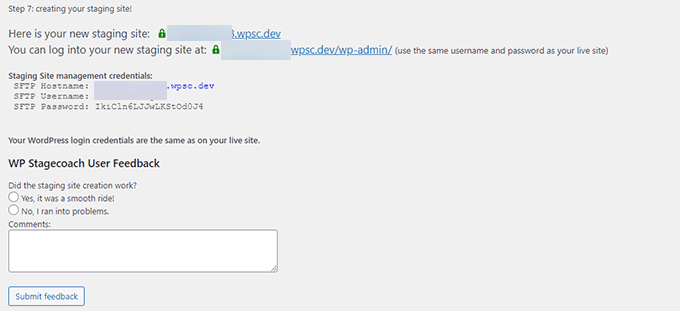
リンクをクリックしてステージングサイトにアクセスし、作業を開始することができます。
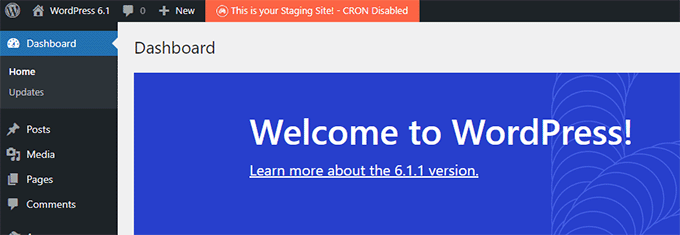
上部の管理バーには、ステージングサイトで作業中であることを示す明るいオレンジ色のメッセージが表示されます。
WP Stagecoachを使用してステージングサイトをライブにデプロイする
本番サイトに変更をインポートする準備ができたら、WP Stagecoach ” 変更のインポートページに移動し、変更のチェックボタンをクリックします。
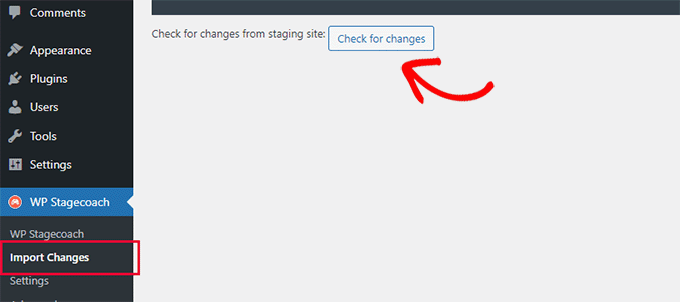
プラグインはステージングサイトの変更をチェックし、それらをインポートするオプションを表示します。
すべての変更、ファイルの変更、データベースの変更から選択できます。
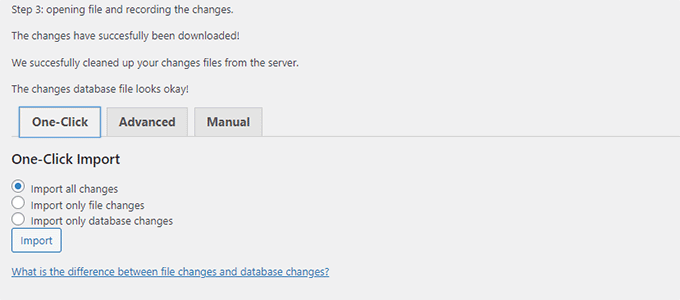
プラグインはインポートの進捗状況を表示し、完了すると通知します。
すべての変更が正常にインポートされたかどうか、ライブサイトをテストすることができます。
WordPressのステージングサイトを手動で作成する
この方法は、WordPressインストール用のステージングサイトを手動で作成する方法です。上級ユーザー向けで、上記の他の方法よりも作業が必須です。
この方法のもう一つの欠点は、ステージングサーバーからライブサーバーに変更を戻す際に、サイトが一時的に利用できなくなることです。
とはいえ、WordPressサイトのステージング環境を手動で作成する方法を見てみよう。
まず、ステージングウェブサイト用のサブドメインを作成する必要があります。あなたがBluehostを使用している場合は、ホスティングアカウントのダッシュボードに移動し、 “詳細設定 “タブに切り替えます。
次に、「cPanel」オプション設定の隣にある「Manage」ボタンをクリックします。
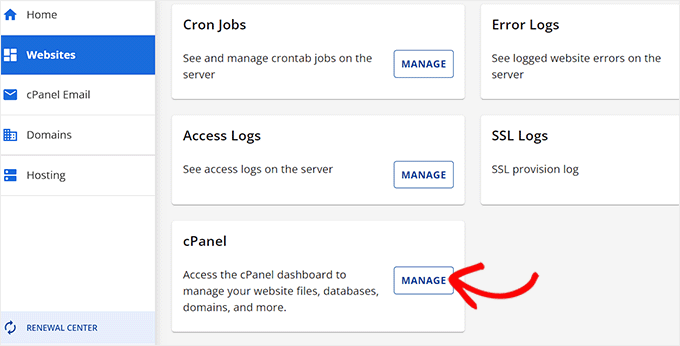
これにより、新しいタブでcPanelが開き、「ドメイン」セクションまでスクロールダウンする必要があります。
ここから、「ドメイン」オプションをクリックします。
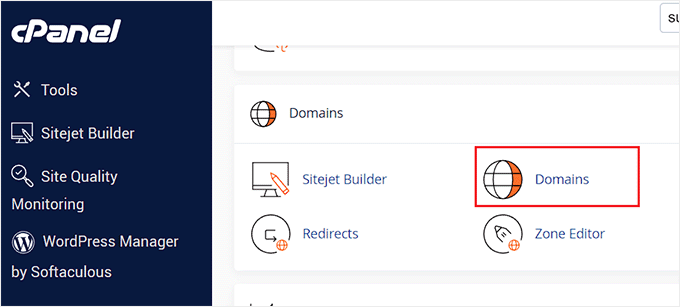
これにより、ホスティングサービスアカウント上のすべてのドメインのリストが開きます。ここで、「新規ドメインを作成」ボタンをクリックする必要があります。
そうすると、画面に新しいページが表示されるので、「Domain」フィールドにサブドメインとドメイン名を次のように入力する:
サブドメイン.example.com
その後、「送信」ボタンをクリックするだけで、設定が保存されます。
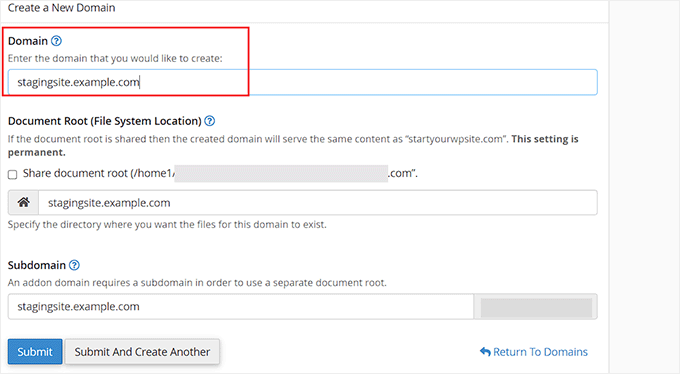
注: スクリーンショットの例ではBluehostを使用しているため、お使いの画面とは異なる場合があります。
ホスティングサービスのコントロールパネルにサブドメインが追加され、WordPressサイトをインポートできるようになります。
次に、あなたのライブサイトに無料のDuplicatorプラグインをインストールして有効化する必要があります。全機能が必要な場合は、Duplicatorのプレミアムバージョンをこちらから入手できます。
有効化したら、WordPress管理画面のサイドバーにあるDuplicatorメニューをクリックし、バックアップの下にある「新規作成」ボタンをクリックしてください。
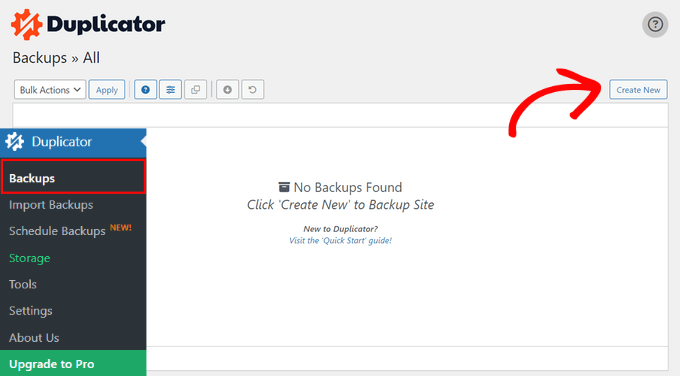
次に、バックアップの名前を入力し、「Next」ボタンをクリックして続行します。
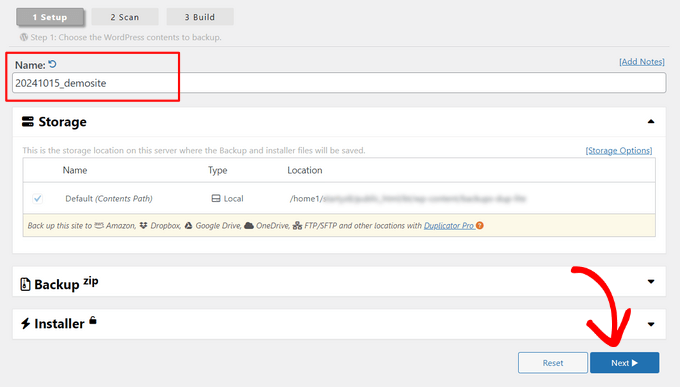
その後、Duplicatorはウェブサイト複製ウィザードを実行します。
まず、すべての項目に問題がないか、いくつかのテストが実行される。すべての項目が「Good」と表示されたら、「Build」ボタンをクリックする。
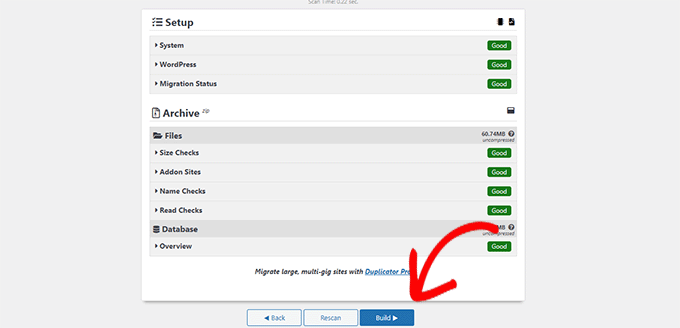
プラグインはWordPressサイトのDuplicatorバックアップパッケージの作成を開始します。このプロセスは、ウェブサイトのサイズによっては数分かかる場合があります。
完了すると、インストーラとアーカイブパッケージのダウンロードオプションが表示されます。両方のファイルをコンピューターにダウンロードするには、「Download Both Files」ボタンをクリックしてください。
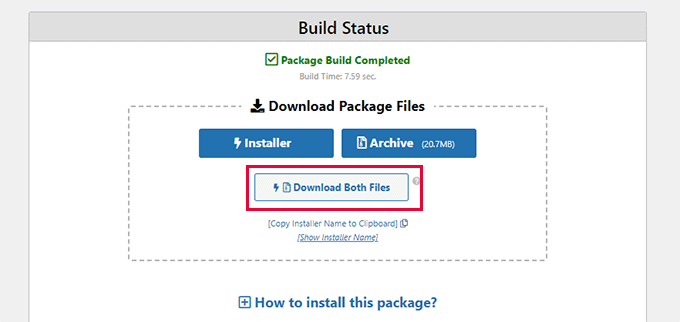
これらのファイルを、作成したサブドメインのファイル・ディレクトリにアップロードする必要があります。詳しくは、FTPを使ってWordPressサイトにファイルをアップロードする方法をご覧ください。
次に、新しいステージングWordPressサイトには新しいデータベースが必要です。作成しましょう。
WordPressホスティングアカウントのコントロールパネルに移動し、「詳細設定」タブに切り替えます。
その後、「データベース」セクションまでスクロールダウンし、その横にある「管理」ボタンをクリックする。
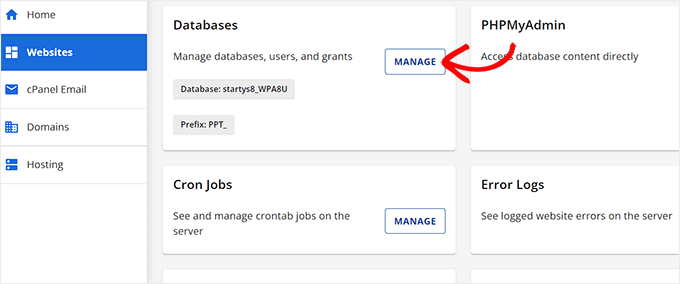
あなたはBluehostを使用していない場合は、WordPressのホスティングサービス環境は少し違って見えるかもしれません。心配しないで、データベースセクションを探してください。
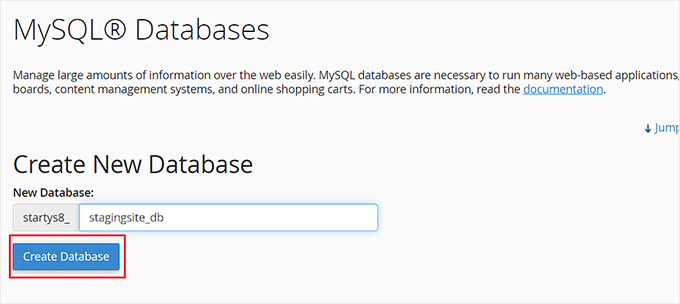
MySQL Databases’ページが表示されるので、データベースの名前をプロバイダーで指定します。
次に、「データベースを作成」ボタンをクリックする。
次に、データベース用の MySQL ユーザーを作成する必要があります。
MySQL Usersセクションまでスクロールダウンし、新しいデータベースユーザーのユーザー名とパスワードを入力します。
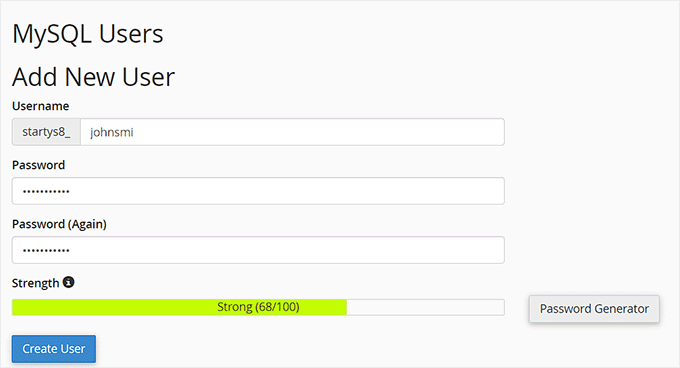
このユーザーに、先に作成したデータベースへのアクセスと変更の権限を与えなければならない。
Add user to database “セクションまでスクロールダウンし、データベースと作成したユーザーを選択します。
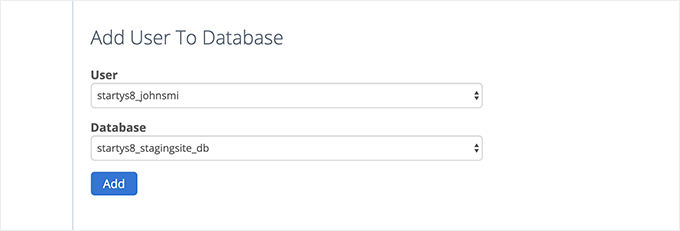
その後、「追加」ボタンをクリックして続行する。
ユーザーの権限を選択するよう求められます。先に進み、’All Privileges’ チェックボックスを選択し、’Make changes’ ボタンをクリックしてください。
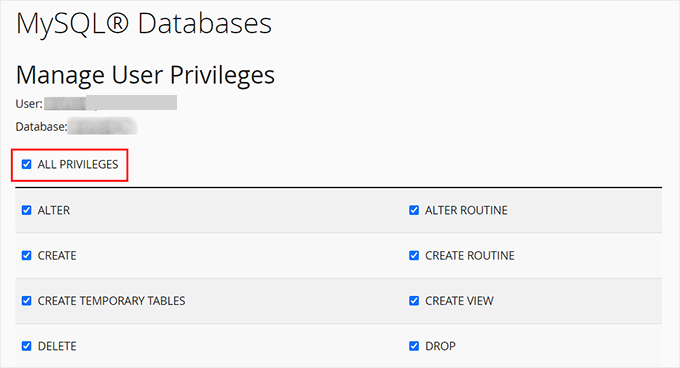
これで、ステージングサイトで使用するデータベースの準備が整いました。
次に、新しいブラウザータブを開き、ステージングサイトのサブドメインをこのように入力する必要があります:
https://yoursubdomain.example.com/installer.php
yoursubdomainを実際のサブドメインに、example.comを自分のドメイン名に置き換えることをお忘れなく。
Duplicator インストーラウィザードが起動します。
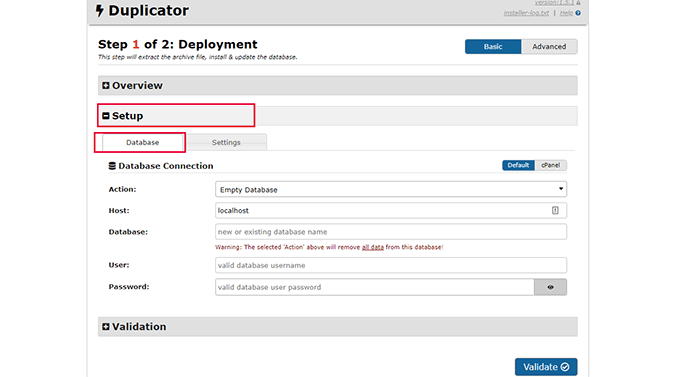
セットアップ」セクションで、インストーラはWordPressデータベース情報を入力するよう求めます。
ホスティングサービスはlocalhostになるでしょう。その後、先のステップで新規ドメイン名用に作成したデータベースの詳細を入力します。
Validate’ボタンをクリックし、Duplicatorがデータベースに接続できることを確認します。
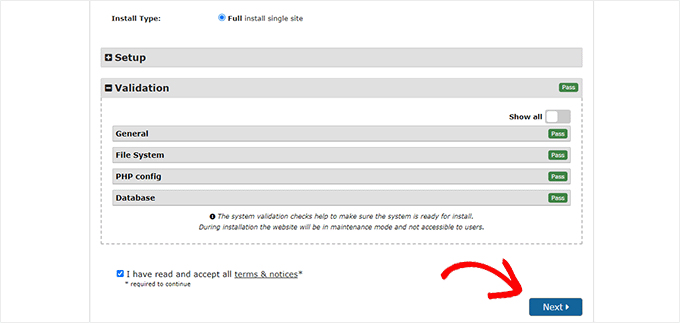
完了したら、「Next(次へ)」ボタンをクリックして続行します。
DuplicatorはWordPressデータベースとファイルを解凍し、ステージングサイトにインポートします。
完了すると、成功のメッセージが表示されます。
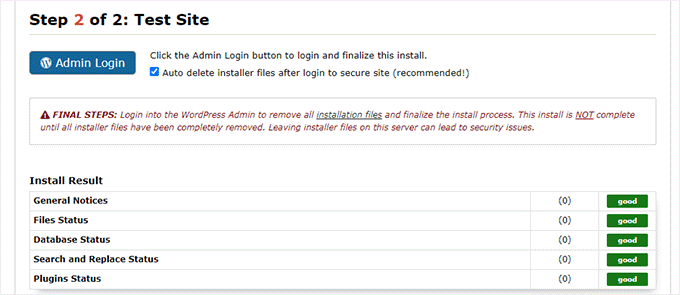
管理者ログイン」ボタンをクリックして、ステージングサイトのWordPress管理エリアに入ることができます。
これでステージングサイトの設定は完了です。サブドメインにパスワード保護を追加することで保護できます。
ホスティングサービスのダッシュボードに移動し、「詳細設定」タブに切り替えます。
その後、’cPanel’セクションまでスクロールダウンし、その横にある’Manage’ボタンをクリックします。
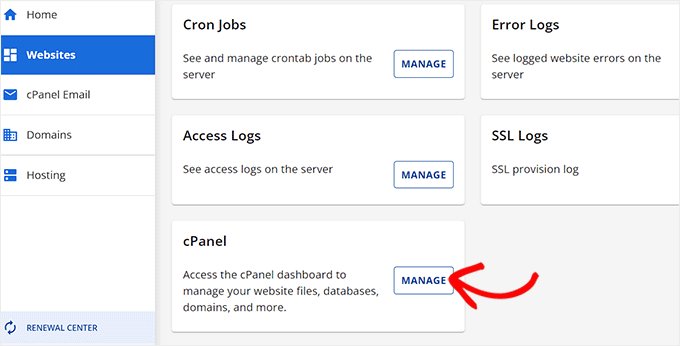
これにより、新しいウィンドウでcPanelが開き、’Files’セクションまでスクロールダウンする必要があります。
ここから「ディレクトリ・プライバシー」アイコンをクリックする。
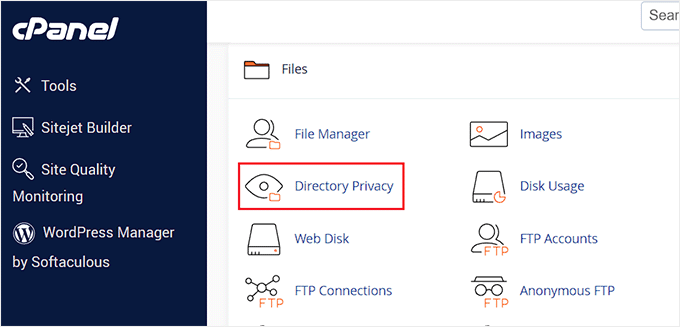
次に、サブドメインのフォルダーを選択し、「このディレクトリをパスワードで保護する」チェックボックスのオプションを選択する必要があります。
この設定の名前を入力し、「保存」ボタンをクリックします。
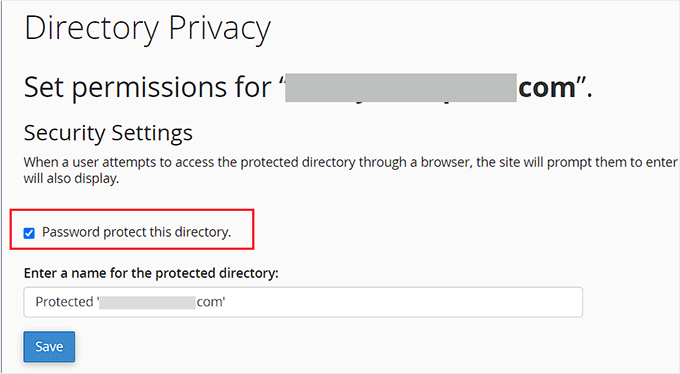
あなたのステージングサイトはパスワード保護で非表示になり、検索エンジンの手や一般の目に触れないようになります。
これでステージングサイトで作業し、変更を加えることができます。
ステージングサイトを手動で本番サイトにデプロイする
ステージングサイトからライブサーバーに変更をデプロイする準備ができたら、上記と同じ手順に従ってください。
ステージングサイトに新しいDuplicatorパッケージを作成し、インストーラとアーカイブファイルをコンピューターにダウンロードするだけです(上記の手順を参照してください)。
次に、ライブサイトに移動し、WordPressの完全なバックアップを作成する必要があります(Duplicatorを使用して完全なバックアップを作成することもできます)。
完了したら、ライブサイトからWordPressファイルとフォルダーをすべて削除する必要があります。これは、WordPressサイトがしばらくの間ダウンすることを意味します。
最後に、上記の指示に従ってDuplicatorインストーラウィザードを実行し、ステージングサイトをライブサーバーにインポートします。
おわかりのように、最後の方法はすべて最良の方法ではない。その過程で、サイトにダメージを与える可能性のあることがたくさんある。
他に選択肢がない場合を除き、この方法はすべて避けることをお勧めします。ステージングサイト機能がビルトインされているBluehost、SiteGround、またはWP Engineのような信頼できるホスティングサービスを使用することをお勧めします。
この投稿が、WordPressサイトのステージング環境を簡単に作成する方法を学ぶのにお役に立てば幸いです。もし何らかのエラーに遭遇した場合は、WordPressの最も一般的なエラーを修正する究極のガイドをご覧ください。また、ブラウザーで WordPress Playgroundを使ってテストする方法もご覧ください。
If you liked this article, then please subscribe to our YouTube Channel for WordPress video tutorials. You can also find us on Twitter and Facebook.


Jiří Vaněk
I recomend WP Staging plugin. This is really awesome plugin, with all feature you need for live website and copy as staging website. I use it for this purpose all the time and I must say, it is “must have” plugin.
Moinuddin Waheed
Staging site is a must have feature for anyone who is working for clients and .asking websites and blogs for clients.
it is really helpful as there is always requirements for some tweak at the time of development of the website.
Plugin option and the other doing manually is the only option for my client as I am using hostinger and there is not showing any staging website feature there.
Does any of the hostinger plan not have built in staging feature like that of bluehost and siteground?
WPBeginner Support
You would want to check with the hosting provider’s support for what they have currently available.
Admin
Jiří Vaněk
You can use any hosting you want, becouse for staging purpose exist awesome plugin. Look on plugin with name WP Staging. This is all you need.
Moinuddin Waheed
Thank you for the suggestion, This will be very useful as it is needed very often.
I will explore this plugin and see to it for the functionality it has at its end.
Chip Bearden
There IS a downside. I followed all the steps for BlueHost and made a number of changes to my home page. Worked perfectly on the staging site.
When I pushed it to production, my home page was a disaster. A few changes made it through but most did not. Worse, much of the content on the production site was trashed or even missing.
Panicky, I put the production site into maintenance mode to prevent users from seeing it. Then BlueHost’s tech support did a great job of moving the staging site to production for me and cleaning up a bunch of other problems that resulted. It took a long, tense 90 minutes before everything was back, mostly, to what I wanted. I just had to change some internal links and menu items that still pointed to the staging site.
Start to finish I was only down a couple of hours. The BlueHost customer support rep was wonderful but didn’t have a good explanation of what went wrong. Suffice it to say I’ll NEVER use staging again!
WPBeginner Support
Thank you for your feedback, we’ll look to make it more clear in the article but unless you sync changes like posts, they will not go to your staging site and if you overwrite your live site with your staging it won’t include your new content. For your design it would heavily depend on what you’re using on your site as that should normally include any design changes.
Admin
Audra
Is this something that can be used to test out a new theme? Can I keep my current website live and work on a new theme at the same time?
WPBeginner Support
Yes that is one of the more common reasons to use a staging site.
Admin
Jiří Vaněk
It’s one of the reasons why I use staging. When there’s a request to change the website’s design, a copy of the website is created where all the necessary adjustments are fine-tuned, and then the changes are easily transferred to the live version. It’s much more practical than copying the website to a subdomain and performing subsequent migration, which can be quite complicated.
Sharlene
HI there. Is there a way to test the speed on a staging site please?
WPBeginner Support
Our guide below gives a few options for testing the speed of your WordPress site. Depending on how your staging site is set up, there is only so much that can be tested for how helpful the speed test will be.
https://www.wpbeginner.com/beginners-guide/how-to-properly-run-a-website-speed-test-best-tools/
Admin
Carol Henrichs
Should I use the staging site just for plugin updates and such? Can I update pages and posts in staging then push to live? Otherwise I have to create a new staging site prior to every plugin/update test.
WPBeginner Support
You would want to use a staging site for major plugin and design updates for your site. Updating pages and posts is normally something you would do on your primary site and you can do minor updates safely as long as you have a backup of your site from before the update.
Admin
Kevin
Do the Staging URLs (for posts and pages) automatically change once you hit deploy? I am worried that I am going to have a ton of 404 errors and ruin my SEO.
WPBeginner Support
Unless we hear otherwise, the URLs should update so they are not 404s.
Admin
Philippe
I want to create a sandbox, I’m using WordPress on Bluehost, however I don’t have the Bluehost entries on my wordpress admin menu, and I can find no sandbox wizard directly on the Bluehost site. Where do I go from here?
WPBeginner Support
You may have removed the plugin that added that, if you reach out to your host they should be able to assist.
Admin
Jana Boswell
This worked like magic. I seriously could not live without wp beginner. My hosting service does not have a staging option, so I followed the instructions for manual set-up, no problems, everything went smoothly! Thanks for the great instructions!
WPBeginner Support
Glad our guide was able to help
Admin
Desmond Sim
after creating the staging site…how do you sync data between the staging and test site….the test site is used for updates and checking…whereas….the live site has new inputs from its users….
Is there a plugin you can recommend syncing databases when each database has two different pieces of new info,
WPBeginner Support
We do not have a recommendation for that at the moment as it is very difficult for a tool to know what specifically to sync or not.
Admin
Brandon
How does a person just delete a staging site? I believe I backed up the staging site with updraftplus, but if I back up the staging site with updraftplus, does it also back up the regular website too or vice versa?
WPBeginner Support
If you used a hosting provider’s method to create it then you would want to check with the host to see if there is a built-in method first, otherwise, you can follow step 2 in our guide below:
https://www.wpbeginner.com/wp-tutorials/how-to-permanently-delete-a-wordpress-site-from-internet/
You would only be backing up your staging unless you’ve also set up your backup service for your primary site.
Admin
S
so this manual staging does not work?
so how do users target ‘installer.php’ if the subdom URL is ‘staging.blahwebsite.com’, then.
WPBeginner Support
The method should still work, you would target the installer in the staging site’s subdomain. If you are having trouble with setting up or targeting the subdomain you may want to reach out to your hosting provider for their assistance.
Admin
Brandon
I used the manual method to set up a staging site for testing out updating plugins before they break something. Well, something broke in the staging site. How do I go back to the original configuration of the staging site?
WPBeginner Support
If you did not create a backup for the staging site then you would delete the staging site and recreate it as one option.
Admin
Ben
Looks like there’s a chunk missing for the manual staging site creation. No upload of files for Duplicator.
WPBeginner Support
Thank you for sharing that, we will look into updating the article when we are able
Admin
Ankur
I use bluehost hosting and they say they don’t recommend the beta version. So, the local host is the best option for me. Isn’t it?
WPBeginner Support
If they do not recommend beta for your site, you can use local as an alternative.
Admin
Jay
If I have new blog posts on the original production site, what will happen I push the staging site to the production site later in the future?
WPBeginner Support
The new content would be removed, we would recommend importing all new content to the staging site before overwriting the live site.
Admin
KIZITO
Hello friend.
Just today, I mistakenly activated the staging mode (I’m a newbie tho) and there wasn’t any more option.
Later I came on, I couldn’t login to my wordpress. It returns an error message that I can’t login to a site that’s on staging mode.
I contacted bluehost, that did all they can, yet my site still says it’s on staging mode and I can’t login my wordpress.
What do I do please?
WPBeginner Support
It sounds like you’re using a plugin to have that page appear when viewing your site, you would want to disable the plugin using the method in our guide below:
https://www.wpbeginner.com/plugins/how-to-deactivate-all-plugins-when-not-able-to-access-wp-admin/
Admin
Alice
Hi,
Thanks for this. I have WP engine and my WordPress theme got d-registered because I am using it on the stage environment and dev.
What’s the workaround that?
thank you
WPBeginner Support
You would need to reach out to your specific theme’s support for their workaround for this situation
Admin
Jim Jones
Hi I made changes in my WP Production site but not in the staging area. I want to reset my staging area to look like my Production site, or failing that delete my Staging area and start again. How can i do this?
WPBeginner Support
It would depend on the method you used but if you made changes to the live site’s design then the simplest method would be to remove the current staging site and create it again.
Admin
Jeff
Great article. I really learned a lot.
I have a question, please, about the manual method:
Is it required to password protect the directory of the subdomain in cPanel, since the admin access to the website is already protected by a password?
Thank you very much.
WPBeginner Support
While not required, it helps prevent your users from trying to access the staging site
Admin
Mujeeb
In that staging site
I want to give someone details to do something on my staging site, but I don’t want him to know my live site password, but is the Same thing with my live site. How can I do that
WPBeginner Support
You would create a new user for them on your staging site for what it sounds like you want to do and you can remove that staging user later.
Admin