WordPressサイトの更新や大幅な変更を行う場合、直接行うのは危険です。そこでステージングサイトの出番です。
本サイトに導入する前に、変更を安全にテストし、トラブルシューティングを行い、更新を改良することができる、本サイトの完璧なクローンです。
WPBeginnerでは、ステージングサイトを使用して、サイトの更新を本番サイトで公開する前にテストしています。これにより、潜在的なダウンタイム、壊れた機能、その他の合併症から私たちを救うことができます。
このステップバイステップのガイドでは、WordPressサイトのステージング環境を簡単に作成する方法をご紹介します。いくつかの異なる方法を取り上げますが、そのほとんどは数回クリックするだけで完了します。
ステージングサイトとは?
ステージングサイトは、ライブサイトのクローンであり、ライブサイトを作成する前に変更をテストするために使用されます。ステージングサイトは、本番サイトを壊さないようにエラーをキャッチするのに役立ちます。
以前はWordPressのステージングサイトを立ち上げるのはとても難しかったが、今では技術者でなくてもできるようになった。
多くのユーザーは、変更をテストするために、Windowsや MacコンピューターにWordPressをローカルにインストールします。更新が終わったら、ローカルホストからライブサーバーにアップロードします。
この方法の最大の問題は、ローカルホストでうまくいったことが、ライブサーバーでうまくいかなかったらどうするかということだ。
多くの場合、ローカルサイトとライブWordPressホスティングサービスサーバーは同じ環境で実行されていません。
ステージングサイトはWebホスティングサービスサーバー上にあり、ライブサイトと同じサーバー構成で動作するため、これらのエラーをすべて簡単に防ぐことができます。
ということで、WordPressのステージングサイトの立ち上げ方を見てみよう。
WordPressステージングサイトを簡単に作成する方法
WordPressのステージングサイトを作成する方法は複数あります。最も簡単なのは、ホスティングサービスにビルトインされているステージングサイト機能を使用することです。
最高のWordPressホスティングサービス会社のいくつかは、すでに1クリックステージングサイトを提供しています。もしあなたのサイトがホスティングサービスを利用しているのであれば、手間なく簡単にステージングサイトを作成することができます。
これらの一般的なホスティングサービスをお持ちでない場合は、プラグインを使用して(手動でも)WordPressステージングサイトを作成するためのソリューションもご用意しています。
より速く閲覧するために、以下のナビゲーションを使って、あなたに最も適したセクションにジャンプすることができます:
Bluehostでステージングサイトを作成する
Bluehostは最高のWordPressホスティングサービスの一つです。彼らはすべてのプランで迅速な1クリックステージングサイトソリューションを提供しています。
まず、Bluehostのダッシュボードに移動し、「マイサイト」セクションにアクセスする必要があります。
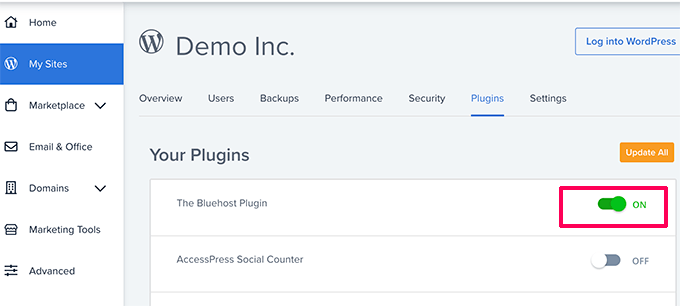
次に、「プラグイン」タブに切り替え、「Bluehostプラグイン」オプションの横にあるスイッチを切り替えます。
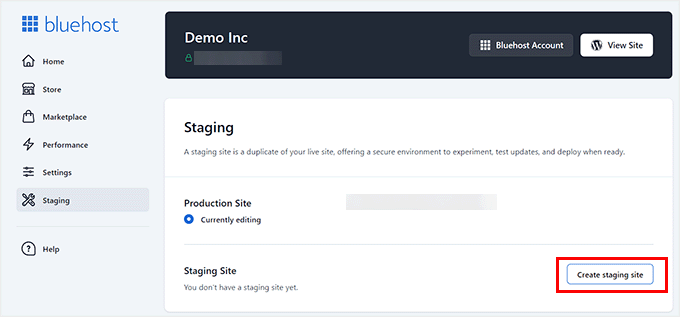
その後、WordPressサイトのダッシュボードに移動し、Bluehostの ” ステージングページにアクセスします。
次に「ステージングサイトを作成」ボタンをクリックする。
Bluehostはあなたのサイトのステージング環境を準備します。
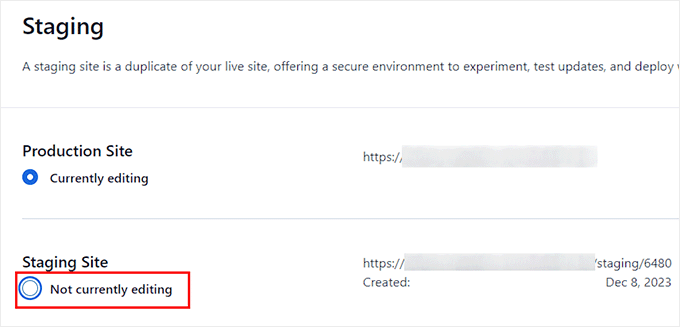
それが完了すると、「ステージング・サイト」セクションが表示されるので、「現在編集中ではありません」にチェックを入れる。
ステージング・サイトへの切り替えを促すプロンプトが画面に表示されます。
ここから「Switch」ボタンをクリックする。
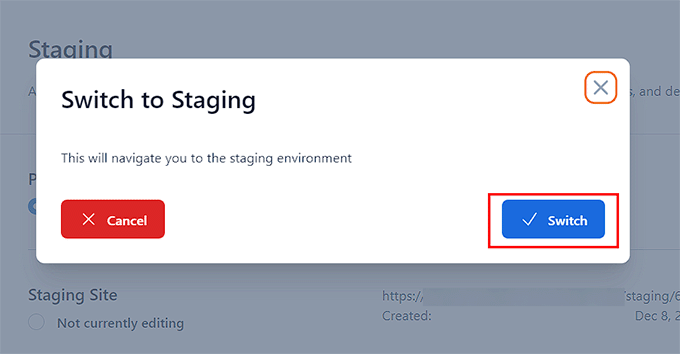
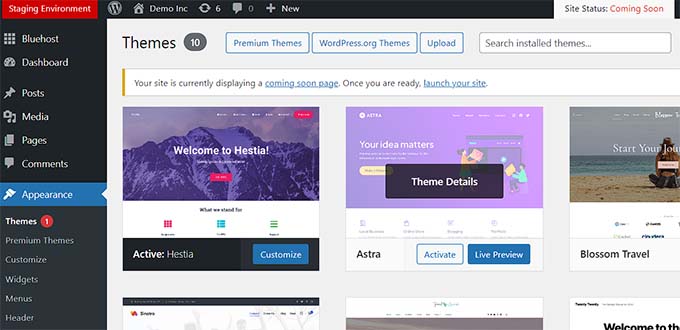
切り替えると、画面にステージングサイトで作業中であることを示すボタンが表示されます。
本番サイトへの影響を心配することなく、サイト制作を進めることができる。
Bluehostのステージングサイトからライブサイトへの変更のデプロイ
ステージングからライブサイトに変更をプッシュする準備ができたら、WordPress管理サイドバーからBluehost ” Stagingページに移動するだけです。
ここから、ステージングサイトの横にデプロイオプションのドロップダウンメニューが表示されます。ファイルのみ、データベースのみ、またはすべての変更をデプロイできます。
本当に〜してもよいですか?
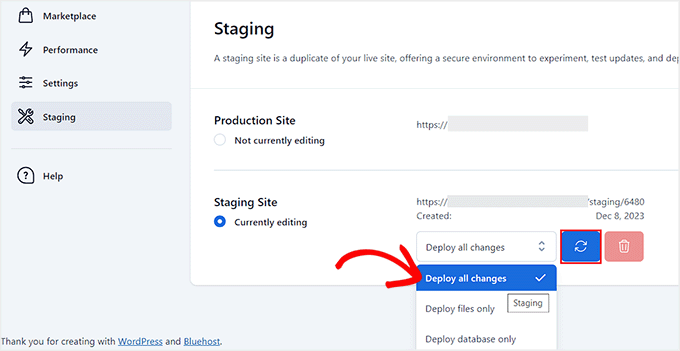
その後、ドロップダウンメニューの隣にある「サイトをデプロイ」ボタンをクリックする。
ポップアップが表示され、ステージング・サイトを本番サイトにデプロイすることを確認するよう求められます。Deploy’ ボタンをクリックして続行します。
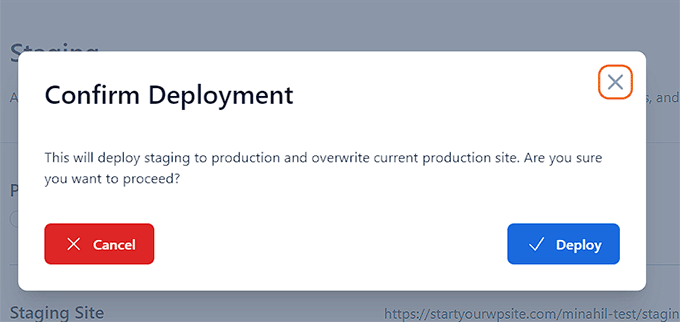
Bluehostは今、ライブサイトにステージングサイトのデプロイを開始します。サイトのサイズによっては、しばらく時間がかかる場合があります。
本番サイトオプションのラジオボタンをクリックして、本番サイトに戻り、変更を確認することができます。
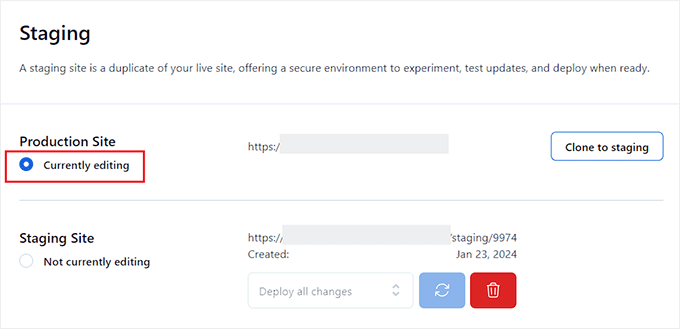
本番サイトをステージングにクローンする
本番サイトに戻ると、そこで行った変更はステージングサイトに自動的に同期されません。
将来、ステージングサイトでさらにいろいろなことをテストしたい場合は、サイトを複製する必要があります。
これを行うには、Bluehostの ” ステージングページにアクセスし、 “ステージングにクローン “ボタンをクリックする必要があります。
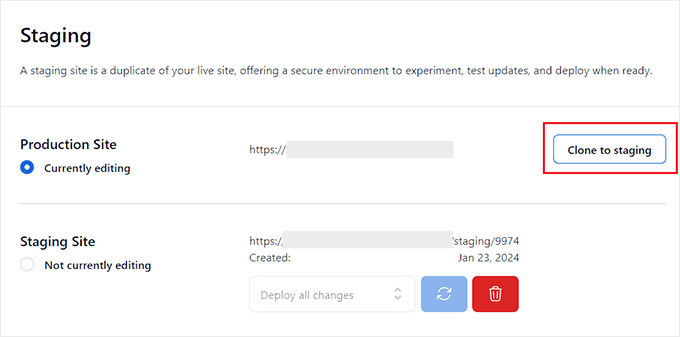
Bluehostはその後、ステージングウェブサイトにライブウェブサイトの最新の変更をクローンします。その後、テストと開発のためのステージングサイトに切り替えることができます。
SiteGroundでステージングサイトを作成する
SiteGroundは、GrowBigとGoGeekプランで1クリックステージング機能を提供しているWordPressホスティングサービスのトップ企業です。
私たちはWPBeginnerでこのホスティングサービスを使用しており、素晴らしい経験をしています。信頼性が高く、高速で、管理も簡単で、私たちのサイトにとって確かな選択肢となっています。
さらに詳しく知りたい方は、SiteGroundのレビューをご覧ください。
お客様のサイトがSiteGroundでホスティングサービスされている場合、このようにステージングサイトを設定します。
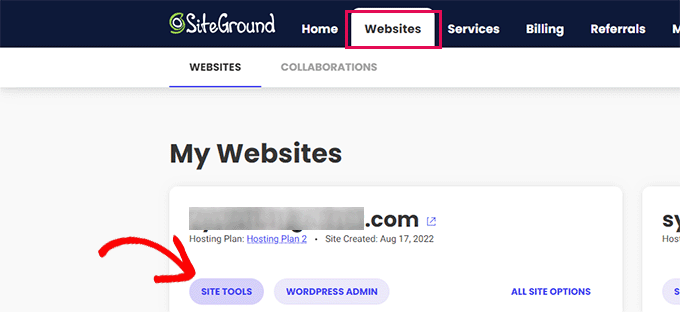
まず、SiteGroundのダッシュボードにログインし、ウェブサイトタブに切り替える必要があります。ここから、サイトの下にあるサイトツールを選択する必要があります。
次の画面では、左の列からWordPress ” Stagingメニューをクリックする必要があります。
ここからサイトを選択し、ステージングコピーの名前を入力します。
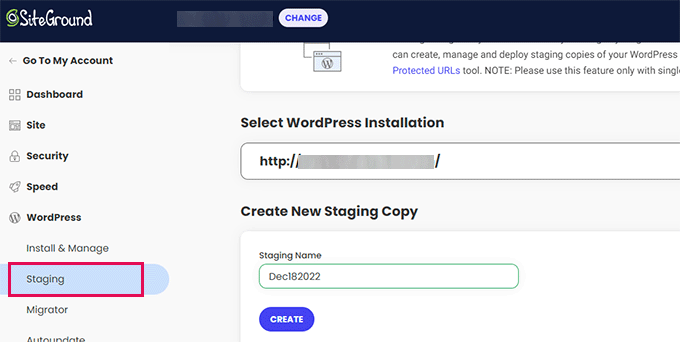
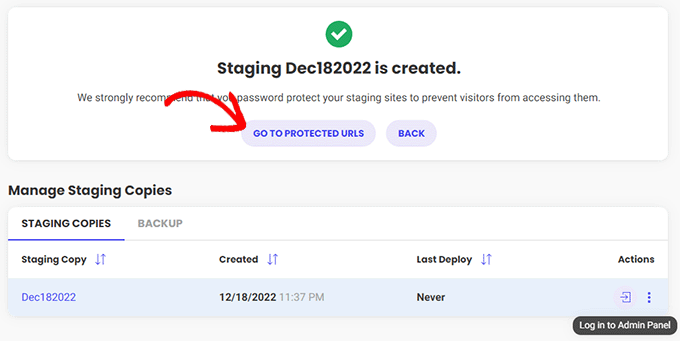
作成」ボタンをクリックして続行すると、Sitegroundがあなたのサイトのステージングコピーを作成します。
その後、’Go to protected URLs’ボタンをクリックして、ステージングサイトをパスワードで保護し、プライベートに保つことができます。
次の画面で、SitegroundはステージングサイトのURLとパスを自動的に入力します。
ステージングサイトを保護するために使用するユーザー名とパスワードを入力する必要があります。
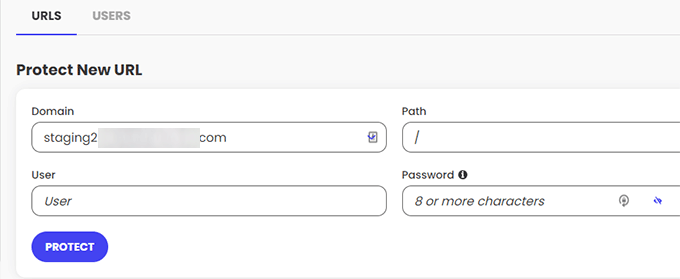
保護」ボタンをクリックして設定を保存します。
WordPress ” Stagingページに戻り、ステージングウェブサイトの横にある ‘Log in to Admin Panel’ ボタンをクリックします。

SiteGroundがステージングサイトのWordPress管理エリアを開きます。このステージングサイトで変更をテストできます。
変更をライブサイトに戻す
ステージングサイトで変更を試したら、本番サイトにマージしたくなるかもしれません。
SiteGroundならこれも簡単だ。
左のカラムからWordPress ” ステージングメニューをクリックします。次に、ステージングサイトの横にある「ステージングコピーの管理」セクションの3つの点のメニューをクリックします。

メニューには2つのデプロイオプションが表示されます。Full Deploy」または「Custom Deploy」オプションを選択できます。
フルデプロイ’オプションは、ステージングサイトからライブサイトにすべてをマージします。カスタムデプロイ」では、マージするファイルやデータを選択できます。
よくわからない場合は、「フルデプロイ」オプションを選択してください。
SiteGroundは、ステージングサイトをライブサイトにコピーします。
ライブをステージングサイトに統合する
ライブサイトに加えた変更は、ステージングサイトには自動的にコピーされません。
ステージングサイトで作業が必要になるたびに、上記のプロセスを繰り返し、新しいステージングサイトを作成します。
WP Engineでステージングサイトを作成する
WP Engineは世界最高のWordPressマネージドホスティングサービス会社です。マネージドWordPressホスティングサービスは、ホスティングサービスプロバイダーが更新、バックアップ、セキュリティ、パフォーマンスを管理するWordPressサイトのコンシェルジュサービスです。
WP Engineは、すべてのプランでワンクリックのステージングソリューションを提供しています。WP Engineを使用してサイトをホスティングサービスしている場合は、この方法でサイトのステージング環境をセットアップします。
まず、WP Engineのダッシュボードにログインする必要があります。次に、「サイト」ページに移動し、サイトをクリックして選択します。
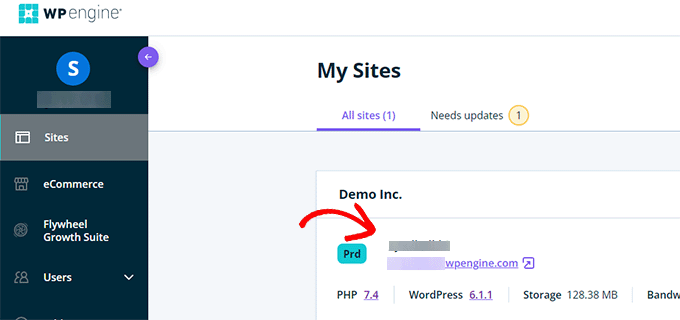
これでサイトのダッシュボードが表示されます。
ここで、左カラムの’Add Staging’リンクをクリックするか、上部のサイト名の下にある’Add Staging’リンクを選択する必要があります。
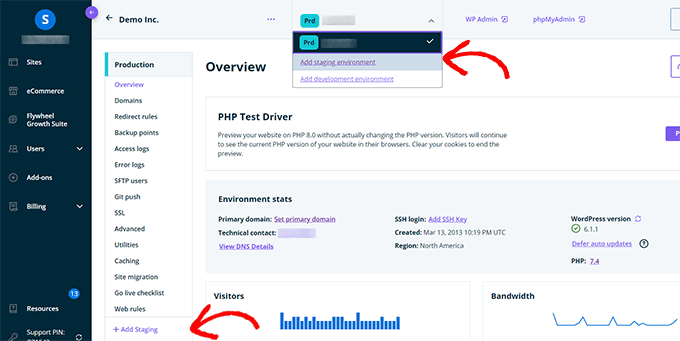
これで「環境の追加」画面になります。
ステージング環境をどのように進めるかを選択するよう求められます。
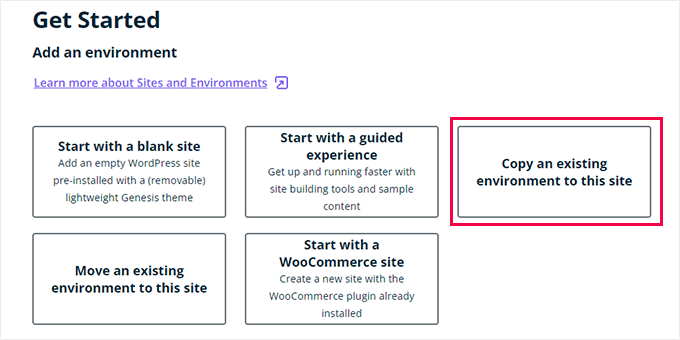
それぞれのオプションの設定は以下の通りだ:
- Start with a new blank site(新しい空白のサイトから始める)」は、新しい空のサイトを作成します。
- Start with a guided experience」は、ガイド付き体験とデモコンテンツを含む新規サイトを作成します。
- 既存の環境をこのサイトにコピー」は、本番環境または開発環境をこのサイトにコピーします(例:本番サイトをこの環境にコピー)。
- Move an existing environment’(既存の環境を移動)は、このサイトに環境を移動します(例:開発環境をステージングに移動)。
- Start with a WooCommerce site」は、WooCommerceがプリインストールされた新規WordPressサイトを作成します。
ライブサイトのステージングコピーを作成したいので、’Copy an existing environment to this site’ オプションをクリックする必要があります。
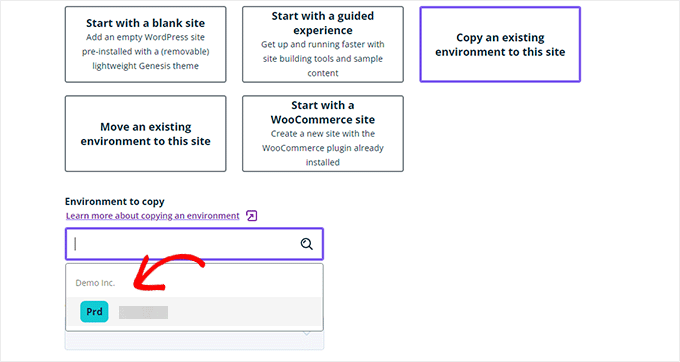
環境を選択した後、コピー元の最新のバックアップを選択し、「Next」ボタンをクリックして続行します。
ここで、ステージングサイトの名前をプロバイダーする必要があります。この名前はステージングサイトのURLで使われる。その後、環境タイプとしてSTG(ステージング)を選択します。
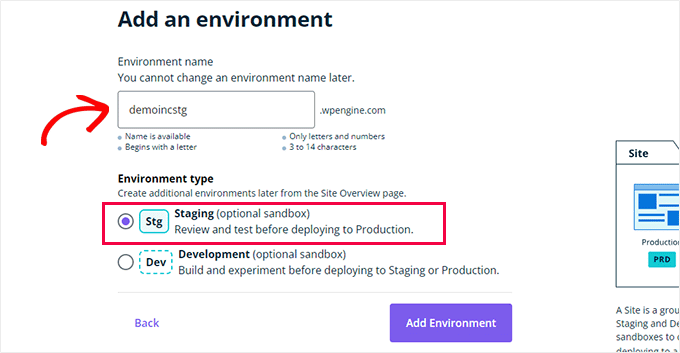
環境の作成」ボタンをクリックして続行します。
WP Engineがステージングサイトを作成します。その後、ステージング環境のダッシュボードにリダイレクトされます。
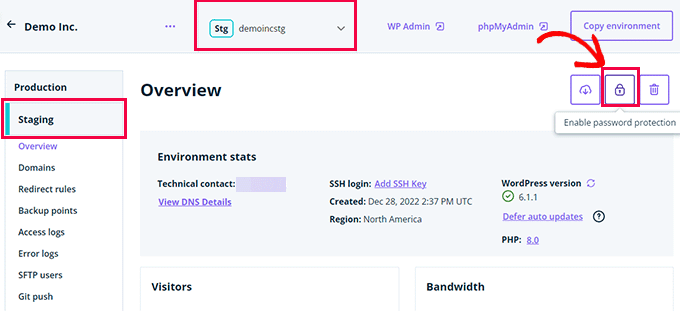
次に、南京錠ボタンをクリックして、ステージングサイトのパスワード保護を有効化する必要があります。
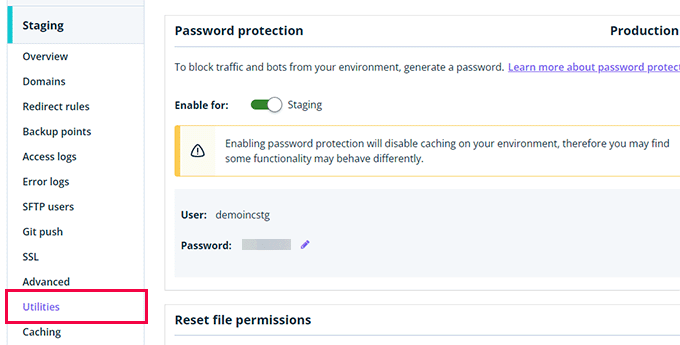
その後、「ユーティリティ」タブに切り替えて、ステージングサイトのユーザー名とパスワードをコピーする必要があります。
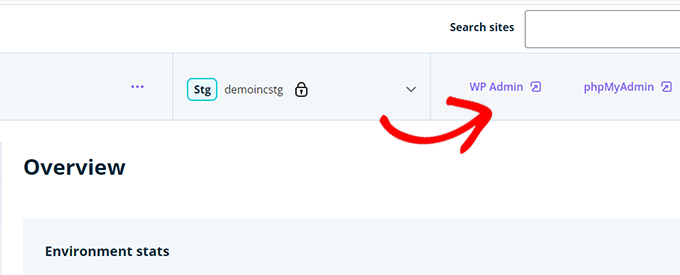
上部にある「WP Admin」ボタンをクリックして、ステージングサイトにログインすることができます。
ステージングサイトでは、他の場所にインストールする一般的なWordPressサイトと同じように、自由に変更を加えたり、機能を試したりすることができます。
WP Engineでステージングサイトからライブサイトに変更をデプロイする
ステージングサイトで行った変更をライブサイトにマージしたいですか?
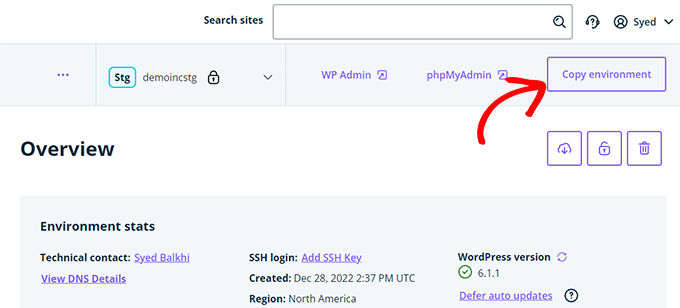
環境のコピー」ボタンをクリックするだけで、配備が開始されます。
オプションの設定ページが表示されます。ここから、コピー元とコピー先の環境を選択する必要があります。
ここでは、ソース環境としてステージングサイトを選択し、デスティネーション環境として本番サイトまたはライブサイトを選択します。
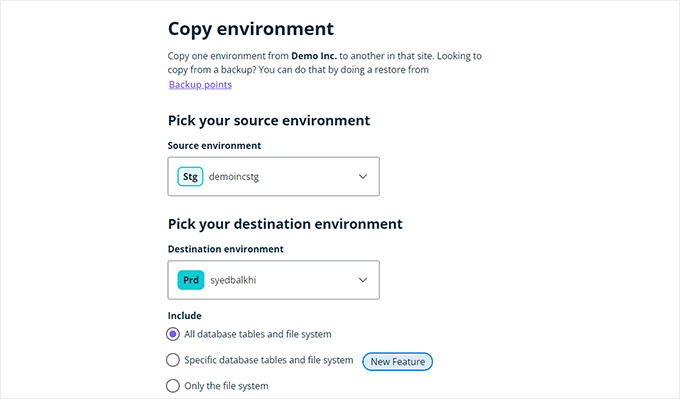
コピーする対象を選択できます。たとえば、データベーステーブルとファイルをすべてコピーすることも、特定のファイルとデータベーステーブルをコピーすることも、ファイルシステムだけをコピーすることもできます。
注意:すべてをコピーすると、ステージング環境を作成するために使用した後、ライブサイトに保存されているすべてのデータを失うことになります。これには、新規投稿、ページ、カスタマイザー、注文などの重要なデータが含まれる場合があります。そのため、ステージングからデプロイする前にライブサイトのバックアップを実行することをお勧めします。
次に、「Review and Confirm」ボタンをクリックしてデプロイを開始します。ライブサイトにすべてをコピーするにはしばらく時間がかかります。
手続きが完了するとメールでお知らせします。
WordPressプラグインを使ったステージングサイトの作成
WordPressホスティングサービスがステージングサイト機能を提供していない場合でも、WordPressプラグインを使用してステージングサイトを作成することができます。
この方法にはデメリットもある。
まず、プラグインがホスティングサービス・サーバーをコントロールできる範囲は限られています。そのため、必ずしも最良の結果が得られるとは限りません。
第二に、私たちが使用するプラグインは、ステージングサイトを独自のサーバーに保存します。もしあなたがプライバシーやデータ保護について懸念しているのであれば、これはあなたにとって理想的ではないかもしれません。
最後に、プラグインにはいくつかの既知の非互換性があります。非互換性ページをチェックして、あなたのサイトが互換性があることを確認してください。
とはいえ、WordPressプラグインを使ってステージングWordPressサイトを作成する方法を見てみましょう。
最初に必要なことは、WP Stagecoachプラグインをインストールして有効化することです。詳しくはWordPressプラグインのインストール方法をご覧ください。
プラグインを有効化すると、管理バーにWP Stagecoachという新しいメニュー項目が追加されます。クリックするとプラグインの設定ページに移動します。
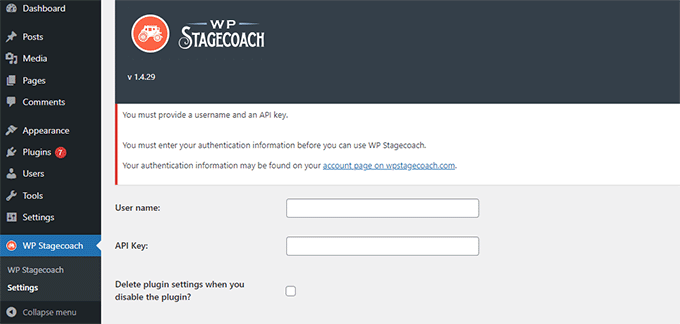
WP Stagecoachのユーザー名とAPIキーを入力する必要があります。APIキーはプラグインサイトのアカウントにあります。
その後、WP Stagecoach ” WP Stagecoachページにアクセスし、ステージングサイトの名前を選択する必要があります。この名前はWordPressステージングサイトのサブドメインとしても使用されます。
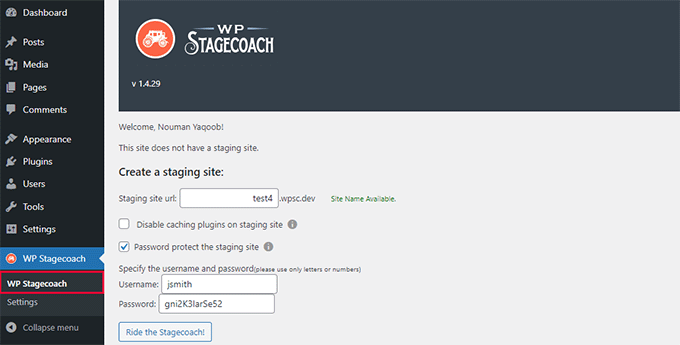
ステージングサイトをパスワードで保護する “オプションの隣にあるボックスにチェックを入れるのを忘れないでください。ステージングサイトを一般表示や検索エンジンから保護します。
Ride the Stagecoach(駅馬車に乗る)」ボタンをクリックして次に進む。
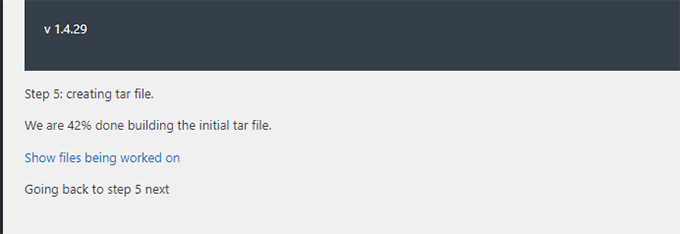
プラグインはWordPressファイルとデータベースのバックアップを作成し、ステージングサイト用にエクスポートします。
WordPressサイトの規模によっては時間がかかる場合があります。
完了すると、ステージングサイトとその管理エリアへのリンクが表示されます。
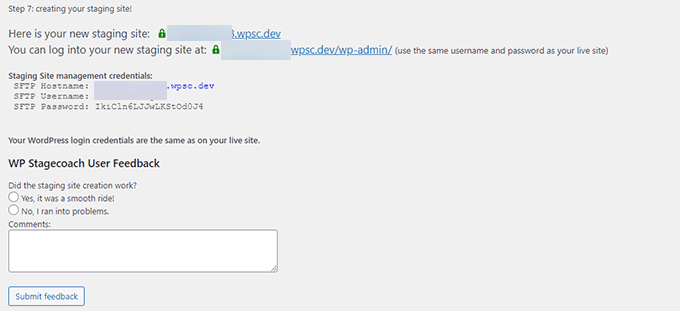
リンクをクリックしてステージングサイトにアクセスし、作業を開始することができます。
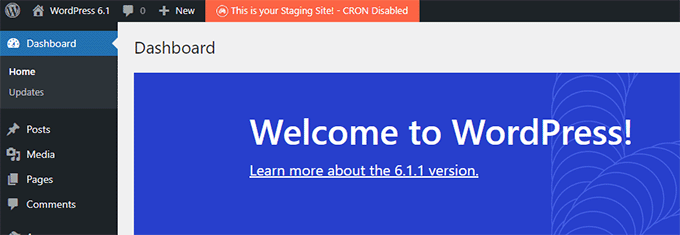
上部の管理バーには、ステージングサイトで作業中であることを示す明るいオレンジ色のメッセージが表示されます。
WP Stagecoachを使用してステージングサイトをライブにデプロイする
本番サイトに変更をインポートする準備ができたら、WP Stagecoach ” 変更のインポートページに移動し、変更のチェックボタンをクリックします。
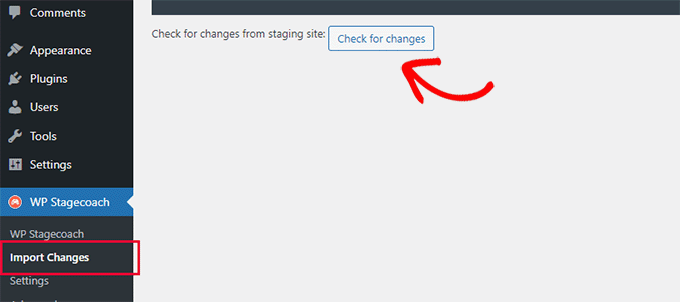
プラグインはステージングサイトの変更をチェックし、それらをインポートするオプションを表示します。
すべての変更、ファイルの変更、データベースの変更から選択できます。
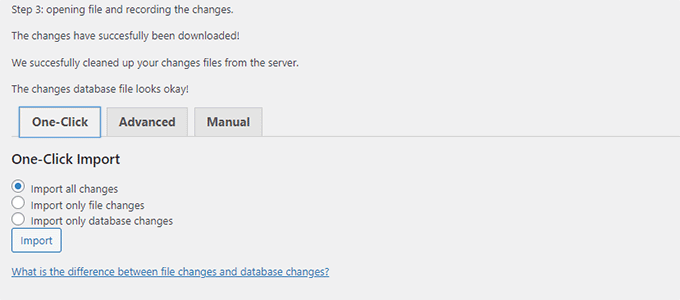
プラグインはインポートの進捗状況を表示し、完了すると通知します。
すべての変更が正常にインポートされたかどうか、ライブサイトをテストすることができます。
WordPressのステージングサイトを手動で作成する
この方法は、WordPressインストール用のステージングサイトを手動で作成する方法です。上級ユーザー向けで、上記の他の方法よりも作業が必須です。
この方法のもう一つの欠点は、ステージングサーバーからライブサーバーに変更を戻す際に、サイトが一時的に利用できなくなることです。
とはいえ、WordPressサイトのステージング環境を手動で作成する方法を見てみよう。
まず、ステージングウェブサイト用のサブドメインを作成する必要があります。あなたがBluehostを使用している場合は、ホスティングアカウントのダッシュボードに移動し、 “詳細設定 “タブに切り替えます。
次に、「cPanel」オプション設定の隣にある「Manage」ボタンをクリックします。
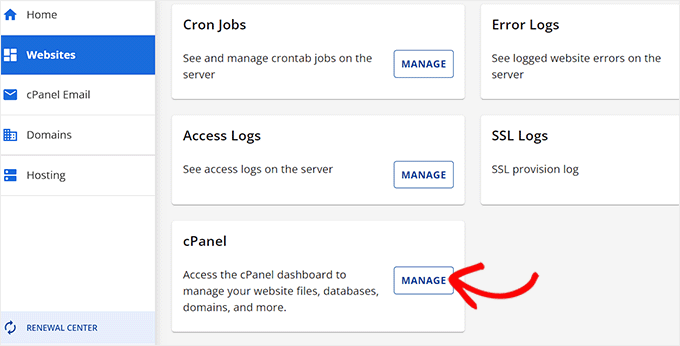
これにより、新しいタブでcPanelが開き、「ドメイン」セクションまでスクロールダウンする必要があります。
ここから、「ドメイン」オプションをクリックします。
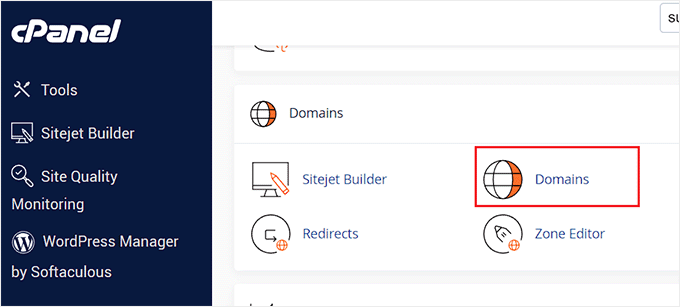
これにより、ホスティングサービスアカウント上のすべてのドメインのリストが開きます。ここで、「新規ドメインを作成」ボタンをクリックする必要があります。
そうすると、画面に新しいページが表示されるので、「Domain」フィールドにサブドメインとドメイン名を次のように入力する:
サブドメイン.example.com
その後、「送信」ボタンをクリックするだけで、設定が保存されます。
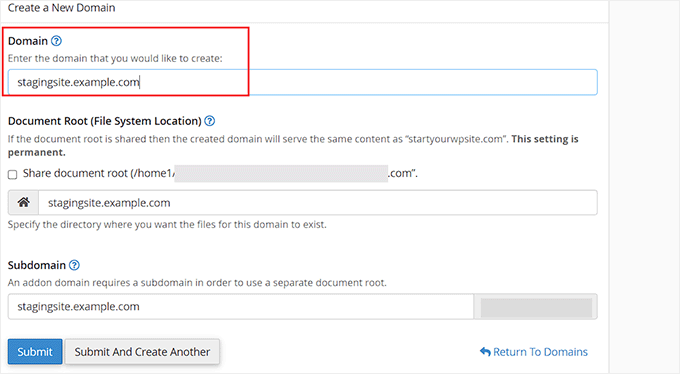
注: スクリーンショットの例ではBluehostを使用しているため、お使いの画面とは異なる場合があります。
ホスティングサービスのコントロールパネルにサブドメインが追加され、WordPressサイトをインポートできるようになります。
次に、あなたのライブサイトに無料のDuplicatorプラグインをインストールして有効化する必要があります。全機能が必要な場合は、Duplicatorのプレミアムバージョンをこちらから入手できます。
弊社のパートナーブランドのいくつかも、このツールを使ってバックアップを作成し、素晴らしい結果を得ています。詳しくはDuplicatorのレビューをご覧ください。
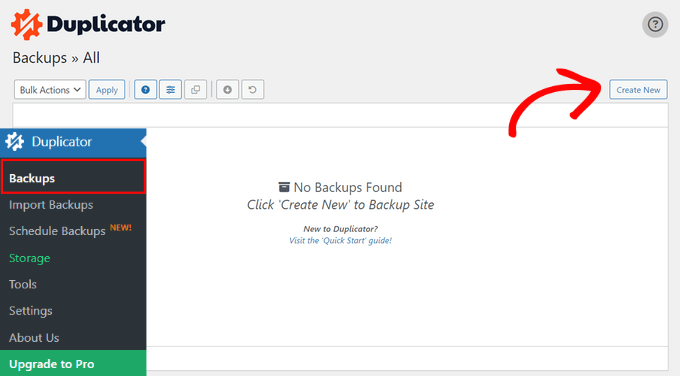
有効化したら、WordPress管理画面のサイドバーにあるDuplicatorメニューをクリックし、バックアップの下にある「新規作成」ボタンをクリックしてください。
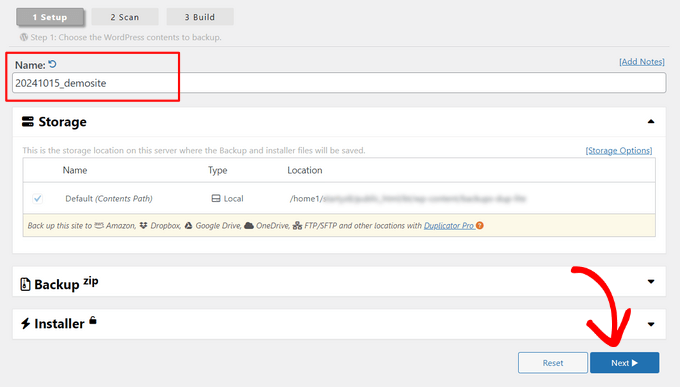
次に、バックアップの名前を入力し、「Next」ボタンをクリックして続行します。
その後、Duplicatorはウェブサイト複製ウィザードを実行します。
まず、すべての項目に問題がないか、いくつかのテストが実行される。すべての項目が「Good」と表示されたら、「Build」ボタンをクリックする。
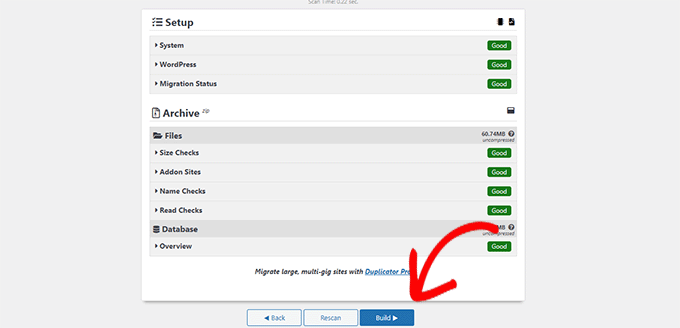
プラグインはWordPressサイトのDuplicatorバックアップパッケージの作成を開始します。このプロセスは、ウェブサイトのサイズによっては数分かかる場合があります。
完了すると、インストーラとアーカイブパッケージのダウンロードオプションが表示されます。両方のファイルをコンピューターにダウンロードするには、「Download Both Files」ボタンをクリックしてください。
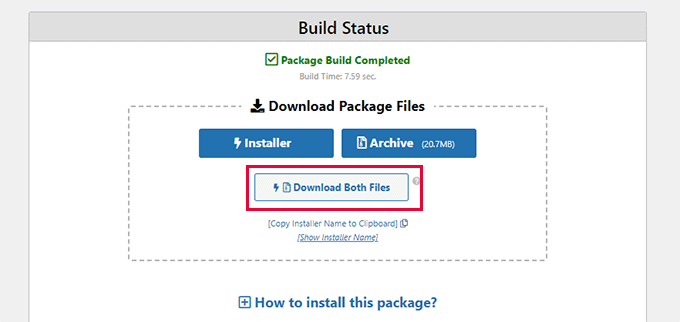
これらのファイルを、作成したサブドメインのファイル・ディレクトリにアップロードする必要があります。詳しくは、FTPを使ってWordPressサイトにファイルをアップロードする方法をご覧ください。
次に、新しいステージングWordPressサイトには新しいデータベースが必要です。作成しましょう。
WordPressホスティングアカウントのコントロールパネルに移動し、「詳細設定」タブに切り替えます。
その後、「データベース」セクションまでスクロールダウンし、その横にある「管理」ボタンをクリックする。
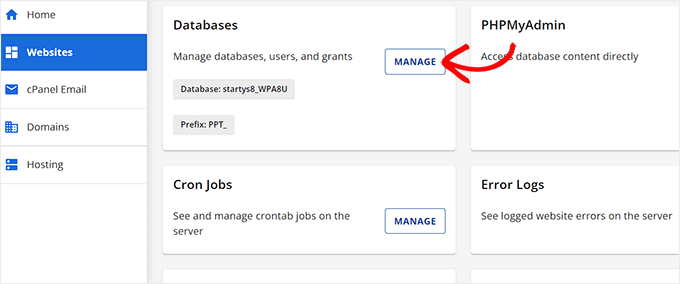
あなたはBluehostを使用していない場合は、WordPressのホスティングサービス環境は少し違って見えるかもしれません。心配しないで、データベースセクションを探してください。
MySQL Databases’ページが表示されるので、データベースの名前をプロバイダーで指定します。
次に、「データベースを作成」ボタンをクリックする。
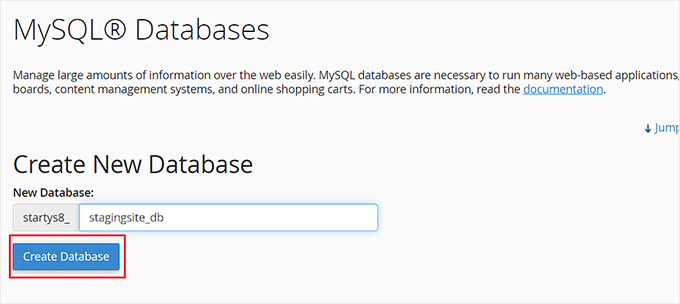
次に、データベース用の MySQL ユーザーを作成する必要があります。
MySQL Usersセクションまでスクロールダウンし、新しいデータベースユーザーのユーザー名とパスワードを入力します。
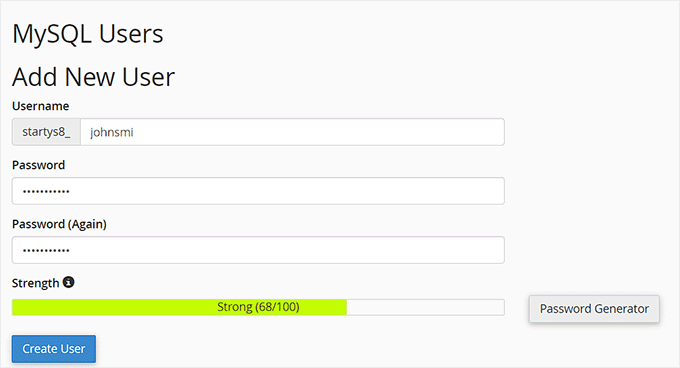
このユーザーに、先に作成したデータベースへのアクセスと変更の権限を与えなければならない。
Add user to database “セクションまでスクロールダウンし、データベースと作成したユーザーを選択します。
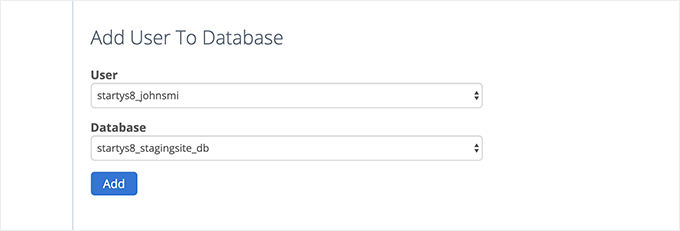
その後、「追加」ボタンをクリックして続行する。
ユーザーの権限を選択するよう求められます。先に進み、’All Privileges’ チェックボックスを選択し、’Make changes’ ボタンをクリックしてください。
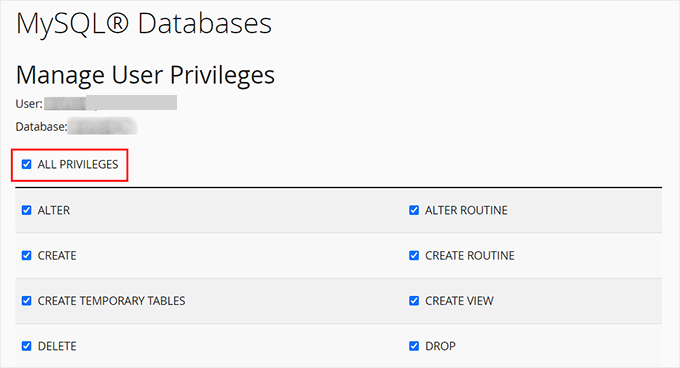
これで、ステージングサイトで使用するデータベースの準備が整いました。
次に、新しいブラウザータブを開き、ステージングサイトのサブドメインをこのように入力する必要があります:
https://yoursubdomain.example.com/installer.php
yoursubdomainを実際のサブドメインに、example.comを自分のドメイン名に置き換えることをお忘れなく。
Duplicator インストーラウィザードが起動します。
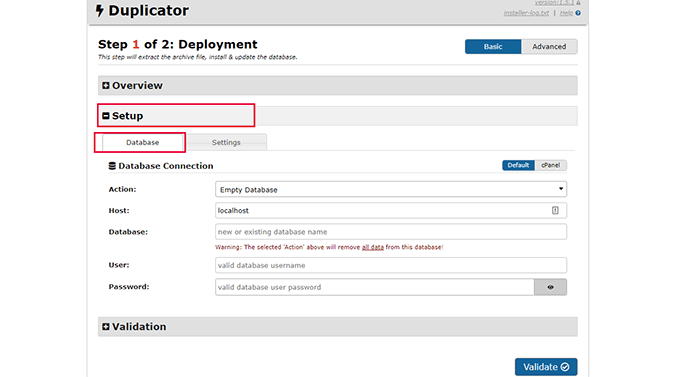
セットアップ」セクションで、インストーラはWordPressデータベース情報を入力するよう求めます。
ホスティングサービスはlocalhostになるでしょう。その後、先のステップで新規ドメイン名用に作成したデータベースの詳細を入力します。
Validate’ボタンをクリックし、Duplicatorがデータベースに接続できることを確認します。
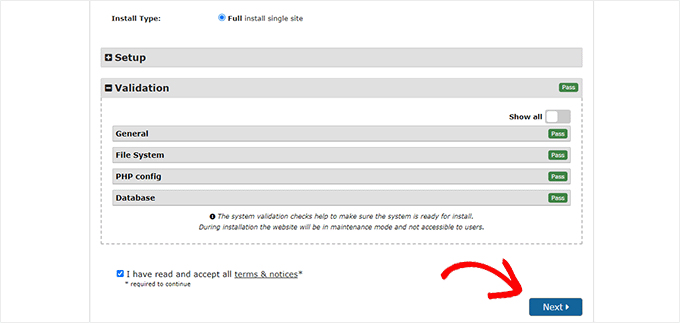
完了したら、「Next(次へ)」ボタンをクリックして続行します。
DuplicatorはWordPressデータベースとファイルを解凍し、ステージングサイトにインポートします。
完了すると、成功のメッセージが表示されます。
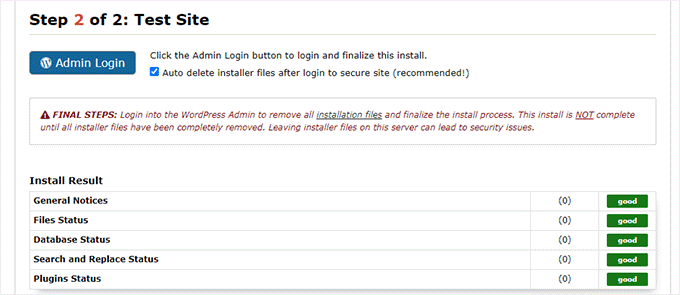
管理者ログイン」ボタンをクリックして、ステージングサイトのWordPress管理エリアに入ることができます。
これでステージングサイトの設定は完了です。サブドメインにパスワード保護を追加することで保護できます。
ホスティングサービスのダッシュボードに移動し、「詳細設定」タブに切り替えます。
その後、’cPanel’セクションまでスクロールダウンし、その横にある’Manage’ボタンをクリックします。
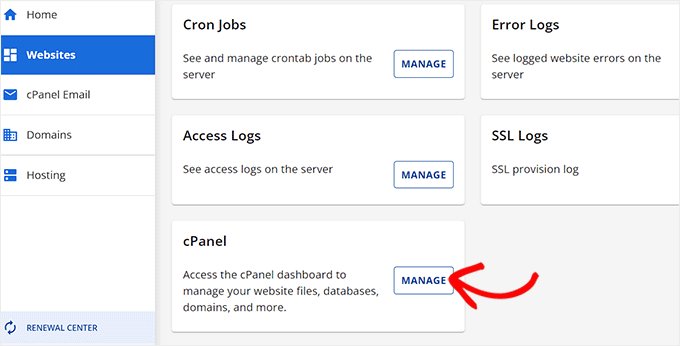
これにより、新しいウィンドウでcPanelが開き、’Files’セクションまでスクロールダウンする必要があります。
ここから「ディレクトリ・プライバシー」アイコンをクリックする。
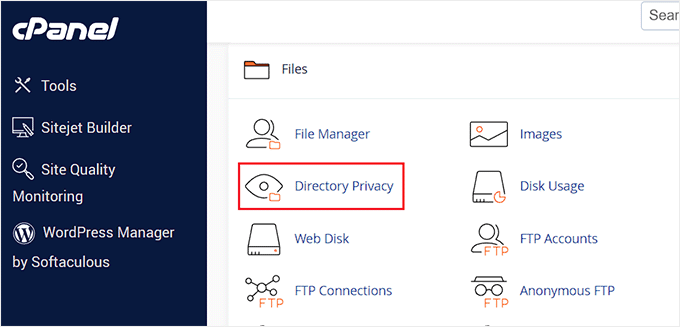
次に、サブドメインのフォルダーを選択し、「このディレクトリをパスワードで保護する」チェックボックスのオプションを選択する必要があります。
この設定の名前を入力し、「保存」ボタンをクリックします。
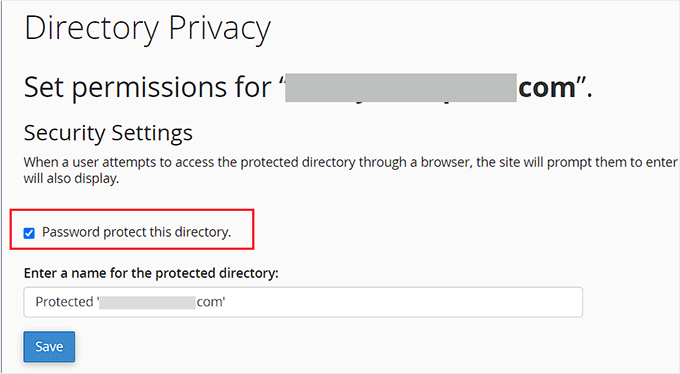
あなたのステージングサイトはパスワード保護で非表示になり、検索エンジンの手や一般の目に触れないようになります。
これでステージングサイトで作業し、変更を加えることができます。
ステージングサイトを手動で本番サイトにデプロイする
ステージングサイトからライブサーバーに変更をデプロイする準備ができたら、上記と同じ手順に従ってください。
ステージングサイトに新しいDuplicatorパッケージを作成し、インストーラとアーカイブファイルをコンピューターにダウンロードするだけです(上記の手順を参照してください)。
次に、ライブサイトに移動し、WordPressの完全なバックアップを作成する必要があります(Duplicatorを使用して完全なバックアップを作成することもできます)。
完了したら、ライブサイトからWordPressファイルとフォルダーをすべて削除する必要があります。これは、WordPressサイトがしばらくの間ダウンすることを意味します。
最後に、上記の指示に従ってDuplicatorインストーラウィザードを実行し、ステージングサイトをライブサーバーにインポートします。
おわかりのように、最後の方法はすべて最良の方法ではない。その過程で、サイトにダメージを与える可能性のあることがたくさんある。
他に選択肢がない場合を除き、この方法はすべて避けることをお勧めします。ステージングサイト機能がビルトインされているBluehost、SiteGround、またはWP Engineのような信頼できるホスティングサービスを使用することをお勧めします。
この投稿が、WordPressサイトのステージング環境を簡単に作成する方法を知る一助となれば幸いです。もし何か問題が発生した場合は、Gutenbergへの更新のためにサイトをテストする方法のガイドをご覧ください。また、ブラウザーでWordPress Playgroundを使用してテストする方法もご覧ください。
If you liked this article, then please subscribe to our YouTube Channel for WordPress video tutorials. You can also find us on Twitter and Facebook.


Lynda Joy
Hi,
I just did the first five or so steps of this, and then got lost at “upload your WordPress content to. So now I have completely messed up my site and I would like to know how to undo what I have done.
Thanks.
– Lynda
Rachel
Thanks so much for this – I am very much a beginner but trying to figure out how to do these things myself so I can launch a new design by first using a test site in order to get it right. I have managed to follow your instructions perfectly until this part:
“After copying your database, you need to copy your WordPress files, plugins, themes, and uploads. First download a fresh copy of WordPress from WordPress.org. Upload the contents of WordPress to your staging site. Note, do not run the WordPress install yet”
Can you please advise as to how this is done or direct me to another instruction article? I can’t seem to find out how to do it otherwise. Many many thanks in advance
Sanket D.
So I’ve managed to create my staging environment successfully — I’ve all my media, themes, plugins, everything else properly transferred. However, I’d made some changes to my theme (not through any codes, but through the theme’s inbuilt settings — basic stuff like a custom logo (which I can see in my media library), theme color, homepage layout, etc. These changes are the only thing that for some reason are missing from my staging site. Anybody knows why this might be?
byberkan
I’m hoping you can find the solution. Same problem exists for me.
Joe
It seems we have to do the steps in here after we have our theme, plugin etc.
Mark Park
Great article! Just one thing that isn’t clear to me.
If I have the current non-wordpress website on a domain name example.com and I want to build a new website using WordPress and develop it on a staging environment on a sub-domain dev.example.com – is this possible?
Can I make a sub-domain dev.example.com and install WP on the same server used by the current non-WP website?
Later when the website is finished I want to connect my WP developed site with the domain name example.com.
Thank you for your help.
WPBeginner Support
Yes this is possible. Make sure you block search engines on your development subdomain.
Admin
Maria
Thanks for a Very helpful article! I am in a similar situation as Mark, however my current website is a WordPress site. Can I still develop the redesigned website on a staging site within a sub domain? And if so do I have to create a new database?
byberkan
You really didn’t read the article, do you?
Benito
Hello, great article, but what if I don’t want to use XAMPP, and I just want to use a subdomain as a staging site and then push changes to live? What would be the best way to deploy the changes?
Raj
Will this process create a Database User and add it to the database we created while copying giving it all privileges by itself? or do we need to create a database user at some point?
Raj
Okay I tried it.. both ways.
Once I created the database user before installing wordpress on the staging site and it worked. The other time around, I didn’t and got the issue “We were able to connect to the database server (which means your username and password is okay) but not able to select the a*******_ata_d2db database.”
That to me means that one has to create a user manually, only copying database won’t do. Right?
Sanny
Raj, I see the same error (“Can’t select database”). How did you fix it ?
Scott
Hopefully you guys figured this out, but just to leave this here for others to find, you do indeed need to create a database user (which is not clear in this article). While using Bluehost, I had to do about three steps. First step is to use the MySQL Database cPanel to get access to the list of MySQL databases. Once there, I could see that the new staging database that I had copied using phpMyAdmin per the article, did not have a privileged user assigned to it. So, I created a user, but then discovered that the user I created had too many characters (16 is the max). Once I got that straightened out, I then had to Add this user to a database using the same MySQL page. As part of this assignment step, I was able to select “ALL PRIVILEGES” to make this user a privileged user for this new staging database. Once that was all setup, I was able to configure WordPress to connect up to the staging database.
Gayle
Terrific resource! Reached a WP staging breaking point and then found this. Lifesaver! Thank you! Only things I’d add would be some meta information for newbies like me. : )
LizP
Yikes, too hard for me!
Deborah
Thanks for the tutorial. I seem to be stuck on one of the very first steps. When clicking go after changing the URL’s in SQL, I get a message of ‘# MySQL returned an empty result set (i.e. zero rows)’
This is how I’ve entered the data:
UPDATE wp_options SET option_value = REPLACE(option_value, ‘http://www.example.co.za/wp’, ‘http://staging.example.co.za’);
UPDATE wp_postmeta SET meta_value = REPLACE(meta_value, ‘http://www.example.co.za/wp’, ‘http://staging.example.co.za’);
UPDATE wp_posts SET guid = REPLACE(guid, ‘http://www.example.co.za/wp’, ‘http://staging.example.co.za’);
UPDATE wp_posts SET post_content = REPLACE(post_content, ‘http://www.example.co.za/wp’, ‘http://staging.example.co.za’);
Can anyone please help me with this?
Thanks
Andreas Kofoed
Hi,
First of all thanks for an amazing tut on this.
I’ve encountered one problem so far and that is when I try to enter my subdomain through
www.staging.example.com. I get this message: err_connection_timed_out ???Andreas Kofoed
Hi,
I figured this out as I was due to some table prefix.
Now my staging.mysite.com is up and running, but the styling and layout is totally different.
How do I do, so my files in my child theme applies to the current theme???
It seems like it is missing a lot of pictures, css and some basic settings?…
Patrick
Thanks for this great tutorial!
I’m finding that after setting everything up, comments on the live blog are now going to the sub-domain staging blog. I can’t find anything in the settings that explains this behavior. Do subdomains perhaps take precedence for some reason?
Any ideas?
Jennifer Filgate
Perhaps when you ran the operation to update the URLs in your database you performed it on your live site’s database instead of the new staging site’s database? You have to select the staging site’s database after you create it before you run the operation. Maybe you missed that selecting step.
Arjun Singhal
I got errors regarding SSL certificates. I am a newbie when it comes to using Git and the command prompt on my Mac. So I couldn’t get to syncing everything like I wanted.
Also, how it appears is that the steps are good to sync the local disks files to the server – changes in the theme folder etc.
However, there is no syncing mechanism highlighted for the MySQL server changes in the case of WordPress.
Evan
I don’t know. This just seems really confusing.
So, a Git Bucket is like an intermediary between your local computer and the hosted dev server? For example, if I have website.com then I create dev.website.com then I create an account and empty repository in Git Bucket then I create an empty folder on my local computer, and I edit files locally and sync them to the Git Bucket repository and then how do I commit to the live site? Is there any connection and control to the live site? It seems like from here, you sync your Git Bucket repository to the dev.website.com
Then what? I wish this article had a diagram to understand how this all works. It might make sense to you guys because you do it all day, but for the first time, this is a dizzying experience. Especially since multiple points in this setup failed and I had to go about custom fixing each one. At this point, I have created dev.website.com, copied all files from the live site to it, copied the database, connected it in, logged into the dev.website.com wordpress site, made sure all is cool, but now … I am lost as to what I do next.
In your article, you ask us to INIT a local directory on our computer. Well, I’m trying out Git Bucket’s SOURCE TREE, which by the way looks great. But now what? Any help on what is the procedure from here? What’s the logic to all this?
I create a folder on my local drive, it syncs to a Git Bucket Repository so that people can develop collaboratively. But who uploads the changes to the dev.website.com server? Don’t users need to be able to do that to see live changes on the server? So how does that all connect?
And how do you update the final changes to the live website once you’re ready? Man I’m confused. I spent 3 days getting this setup and I can’t figure out this next step, because I don’t understand how that all works.
Any help?
Oscar
Hi Evan, although I am sure you figured it out by now as its months later, I figured it may help others with the same question. After you have committed your code to version control, you would move your changes over to the server of your choice (dev/staging/production) using the deploy feature. This is described in the section above titled, “Deploying Changes From BitBucket to Staging Site”. Hope this helps clarify!
vjohnson
I am truly a beginner at this, and I have read the article a couple of times. I think my environment is almost set up, the piece that appears to be missing is in the install step. The directions say copy the files but do not install “yet”, when in this process do I run an install of wp? I am unsure if some of the issues that i ran into are due to my host which is hostgator or something that I’ve done wrong. Any input would be great.
What is happening at this point is no errors but nothing is rendered on at the url for my staging area.
Martin
Nice article. Although, the whole way, you’re talking about setting up a development site on the server as a subdomain. But at the end your using a local Xammp server.
How would you setup a test environment on the server where the doomain is hosted? Do you use bitbucket for it as well?
Thanks, cheers.
Alberto Serrano
Hello , I made a staging site successfully but my live site already had a little problem with a plug in , I contacted the developer and he asked for my admin credentials , following your advice on other article I gave him log in credentials to my staging site and he fixed the issue , to make the changes on the live site he told me to import the database from the staging site to the live site , my concern is the sql changes I made to the staging database , if I copy the database isn’t my live site going to redirect to the staging site now ? I can’t find the SQL queries to delete them
Thanks
WPBeginner Support
See our tutorial on how to update URLS when moving WordPress site.
Admin
isagani
hey,
nice article, i followed all instructions and gave me a clean view process on using git and staging environment. hope all experienced people do what you did so many can step forward from beginner to advance.
Thanks a lot.
Isagani
Kristof Bernaert
Just a perfect article that helped me to setup the whole thing.
My staging environment is on the same shared linux hosting, just in another directory.
I used this also as the repo for git.
With Coda, I’m working online in that staging. As I save changed files (mainly css), I see instantly the updates.
So I don’t need the local files on my laptop.
But how to checkout those remote files under the staging folder, without fetching a local copy?
Thx!
Kristof
bcall
Thanks for the article!
I have one problem, though: I have two databases and am not sure which one (or maybe both) is connected to my live site. I checked the wp-config.php file and it’s linking to a database with a different name, one that does not appear in my database list (in phpMyAdmin). Is it possible that the database was renamed?
Nick Jubrey
Look in your wp-config.php file that’s where wp is directed to that particular database, the db your using will be listed there.
Tiffany Johnson
I’m having some issues with the dev site recognizing my theme and content. I copied over the following files prior to running my installation of wordpress, however the pages and content are still not being recognized. I checked the files and my media is in the uploads file, my themes are present, as are my plugins, but none of them are recognized in the actual wordpress site.
/wp-content/uploads
/wp-content/themes
/wp-content/plugins
Any suggestions on what else I can try? Thanks!
Nicole
I’m having this same problem. Any suggestions of what to try? I followed the instructions to copy those files from one folder to the other, and it is in the right place.
Brad Scott
@WPBeginner,
For my case.
Create subdomain: staging.example.com
Create Document Root: public_html/staging
Need to run the following SQL queries:
The NEW_URL should be http://example.com/staging not http://staging.example.com
Login: http://example.com/staging/wp-login.php
Cheers & Thanks
byberkan
Brad, so that means you are not using the subdomain. You are just using it as a subdirectory which you didn’t have to create a subdomain to use that..
Paula Lay
Thank you so much for this tutorial! The step-by-step instructions are perfect for someone who hasn’t done this before. I encountered a snag where I was getting an error message after creating a subdomain (something like a problem configuring the DNS). For anyone that encounters this problem – clear your browser cache and cookies, and then you will see the correct screen. Took me days to figure this out (I gave it a few days because I thought it would take 24hrs or so for the domain to propogate).
Random Dev
Whoa. Wouldn’t it be simpler, cutting down on quite a few steps and reducing the technical nature of this process, to just use a backup plugin with a migrator (search/replace the database) function… instead of copying the databases manually, *and* instead of using Git/Bitbucket? Or am I not understanding something?
Cannonpult
For smaller sites, maybe. But plugins like Duplicator start to fail or have significant diminishing returns on larger sites. For example, if you were working on a site with a lot of media, Duplicator will never be able to transfer everything. You will get warning messages and have to leave media behind in the transfer.
Yes, this tutorial would be overkill for a small blog. But it’s absolutely the way you should go for say, a woocommerce site with 3,000 products (including images and custom data).
The other big consideration is frequency of changes. Some sites are fairly hands-off after they go live. Maybe you just update core + plugins and perform a few minor changes per year. Other sites might require weekly or even more frequent changes. If this were the case, it would become a pain to wait for backups and then drop a backup on the new site (crossing your fingers that it works each time). By using the method described in the tutorial, you can commit smaller changes at a time right after testing them.
mgiulio
Excellent article.I was looking for info about best practices for wordpress staging sites. The additional section on the git-bitbucket workflow is very much appreciated.
nwesource
Fantastic tutorial, thank you! I know WPEngine.com has a staging site built into their hosting options which seems fantastic although I haven’t tried it just yet. Are there any other easier options you know of to setup and operate a staging site, with more of a plugin functionality like WPEngine? They literally have a clone to staging button and a clone to live button that makes this seem like a process from the 80’s LOL…
Amazing tutorial, thank you for enterprise level content!
WPBeginner Staff
No you first need to extract the zip folder and then upload the contents of wordpress directory to your staging site.
Tony Leary
Can someone elaborate on this one step:
“First download a fresh copy of WordPress from WordPress.org. Upload the contents of WordPress to your staging site. Note, do not run the WordPress install yet.”
I read that as “1) download WordPress zip file from WordPress.org and 2) upload .zip file to /staging folder via File Manager.” However, I don’t think that’s correct.
bcall
You can upload the .zip file and then extract the contents within file manager.
WPBeginner Staff
Most probably your subdomain is not configured correctly.
Julius
I actually found out the problem..and it’s been resolved…however, I am unable to add images to my library….anyone else experienced this challenge.
Hans Lindgren
Is the wordpress install running on Windows?
(If so, you need to grant Modify NTFS permissions to IUSR on C:WindowsTemp)
Julius
Awesome tutorial…however, after I attempt to log into the staging site I am taking to the “Opps! Google Chrome could not find http”. What am I doing wrong?
Julius
This is really a great tutorial and something I been wanting to do for quite sometime. My problem is that when I visit the WP login screen it appears that the styling from my theme isn’t applied. Is this normal? Also, when I enter my credentials from the live site into the fields for the staging site, it doesn’t log me in. It’s taking me to the “Oops! Google Chrome could not find http”. Am I doing something wrong?
Sloan Stewart
Very helpful article. Only issue I have is that when it begins discussing version control, it switches from focusing on the alternate wordpress installation on the server to a local installation on one’s machine.
I am assuming one would build your site locally (I am using WAMP) and then use Git/Bitbucket & Ftploy to update your dev/staging wordpress install? That would mean one would have three versions of the wordpress site at all times [Production, Dev/Staging, Local].
How does one ensure your local wordpress install remains compatible with the database and other configuration on the server? Or is there a way to utilize Git/Bitbucket/Ftploy on the server without having to involve a local copy of your wordpress site.
Karlis
Do you need to create user for your freshly created phpmyadmin database?
WPBeginner Staff
No this tutorial is not written for WordPress multisite.
Aathi
Hi,
Will the above process works for wordpress multisite ?
Cheryl S.
Because I typically develop in a staging area on my server and then move it to the clients server to go live, rolling back to previous versions is nearly impossible. This article has made me seriously consider implementing version control with Git and Bitbucket. Thank you so much for this tutorial.
WPBeginner Staff
Yes this would be a better approach.
Mimi Bondi
Thank you. Is it safe to simply copy all the files from the ”test” site and paste them over the current ”live” files via FTP? Or is there more to it?
Mimi Bondi
Would this be the best way to duplicate a website, set it up with a new theme/content then copy it over to the current live website?
I want to change theme but it’s quite a big job so instead of activating it then frantically trying to fix things for days, I’m looking for a way to copy my current site, change it all ”in the background” then make the new one live. Please let me know if it’s even possible?
Mimi Bondi
Once i have my site exacty how i want it in the staging environment,
is there a safeway to copy those files to the real live site?
My goal is to change themes but because this would involve quite a bit of
setting up, i am looking for a way to do this safely and only replace my
current content with the new content when it’s ready (without changing
permalinks and SEO hopefully). Is that possible?
Larry
Excellent article….I was able to follow the instructions step-by-step and complete the creation of development site on my hosting server. Kudos to the writter.
Mike
I’m having some issues when I try to run the SQL queries to change the references to the staging site. I am receiving the following error:
”
#1064 – You have an error in your SQL syntax; check the manual that corresponds to your MySQL server version for the right syntax to use near ‘1
UPDATE wp_options SET option_value = REPLACE(option_value, ‘http://example’ at line 1
”
My SQL query is as follows:
”
1
UPDATE wp_options SET option_value = REPLACE(option_value, ‘http://example.com’, ‘http://dev.example.com’);
2
UPDATE wp_postmeta SET meta_value = REPLACE(meta_value, ‘http://example.com’, ‘http://dev.example.com’);
3
UPDATE wp_posts SET guid = REPLACE(guid, ‘http://example.com’, ‘http://dev.example.com’);
4
UPDATE wp_posts SET post_content = REPLACE(post_content, ‘http://example.com’, ‘http://dev.example.com’);
”
As I missing a step or do I have something incorrect in query? Thanks for your help.
Mike
Never mind, I figured out my issue. Feel free to delete this comment.
djramc
i have the same problem. could i ask how did you solve this issue?
thanks by advance
#1064 – You have an error in your SQL syntax; check the manual that corresponds to your MySQL server version for the right syntax to use near ‘)’ at line 1
WPBeginner Support
You need to remove numbers from lines, replace example.com with your live site url and dev.example.com with your development or staging site URL.
Admin
Bevis Larsen
This article is most useful for the user who want to make advance wordpress application
Brad E
I followed the directions and am able to get the staging site to work. However, every link, page and even login revert to the live site not the staging site. How do I fix this?
WPBeginner Support
you need to change site address and wordpress address. To do that you need to run this SQL query in phpmyadmin for the database of your staging site:
UPDATE wp_options SET option_value = REPLACE(option_value, ‘ORIGINAL_URL’, ‘NEW_URL’);
UPDATE wp_postmeta SET meta_value = REPLACE(meta_value, ‘ORIGINAL_URL’, ‘NEW_URL’);
UPDATE wp_posts SET guid = REPLACE(guid, ‘ORIGINAL_URL’, ‘NEW_URL’);
UPDATE wp_posts SET post_content = REPLACE(post_content, ‘ORIGINAL_URL’, ‘NEW_URL’);
Don’t forget to replace the original url with the url of your live site and new url with the URL of your staging site.
Admin
Brad E
OK – it works now. I had to run the query several times, but got it to work. The problem I am having now, is that all of the theme settings are missing. The header, widgets, background, etc. are set to the theme’s defaults. I am not sure how to update the settings to what the live site has. I copied the 3 files from the wp-content directory. Thanks for the outstanding article and support.
ROHIT
Hi,
As usual, just read you well written article on staging. I’ve got only question in mind right now and is that if there is any changes made in database while working on any project then do I need to upload it seperately on server from local environment whereas files would automatically get deployed via ftploy.
Cheers and Thanks.
Keep your good work up.
Clive
If I make changes on my local WP project, I understand files in my theme are changed, and those are uploaded to staging via BitBucket/Ftploy. What about the database/tables from my local project? I don’t understand why those aren’t also included? Or would the database/tables in staging be updated based on theme changes that are uploaded? Thanks!!
WPBeginner Support
Clive, in your BitBucket repository you can only store your WordPress files. FTPloy simply syncs those files to your staging site.
Admin
Paul Sweany
What do you recommend for when database changes are made? Let’s say I create a new page; should I just re-import the database on the dev server after I make changes to it on my local copy? Also, moving it from dev to live, any recommendations other than manually importing it and running a search and replace to fix the URL?
Glen Clay
As usual, great article and right when I need it. Keep up the great work! On another note, I am on my iPhone and that annoying floating black ‘Trending’ bar keeps getting in the way of me commenting. This article benefited me so much that I went through the several tries it took for me to comment.
WPBeginner Support
Glen, thanks for your feedback. We will look into it.
Admin
Eben
I wasn’t really mentioned on what to do with the staging database and how to transfer the changes to the live database, especially if your client has been making changes to the live site while you’ve been making changes to the staging site and there are changes in both databases.
This is one area of staging environments with wordpress that I haven’t been able to get my head around.
WPBeginner Support
Staging is basically for development, when working on themes or plugins. We imported the database only so that we have actual data to test with. It is not supposed to be a synchronized mirror of your live site.
Admin
Juliana Maggioli
I don’t know if is the same as Eben’s question, but everything is going fine till…: upload/transfer the staging content to the live site. supposing everything is perfect in the staging, how do i make all this perfect structure/content be the live site, without risks?
Damien Carbery
I have started using WP Migrate DB (http://wordpress.org/plugins/wp-migrate-db/) to convert urls and paths in the DB. It will also convert urls and paths that are in serialised data.
So I copy the files to the staging server and create a database and then export the live db via WP Migrate DB and import it to the new database via phpMyAdmin.
The biggest issue is when the live site is updated before I bring the staging server db back.
Zimbrul
If you have Softaculous is even easier to deploy a staging site to the live site: you can clone the site to a location within the same server.
It’s what I’m doing: I create the staging environment and when done I just go the the list of my WordPress installs in Softaculous control panel and “clone” the site to the live location. The live location must be empty by other files for this to work.
WPBeginner Support
Thats another way to do it.
Admin
Giacomo Ardesi
Hey Zimbrul, can you give some more details about Softaculous and how you used it please?
Giacomo Ardesi
Hey Zimbrul, could you please give some more details on how you use Softaculous to clone your WP staging site? Thank you!
M Asif Rahman
Thanks Syed & The Team, that’s one of the most complete and understandable for normal readers Staging Guide for WP. Nicely done.