WordPressサイトでさまざまな種類のコンテンツを整理するのに苦労していませんか?
すべてに通常のブログ投稿を使用しようとしていて、商品リスト、お客様の声、ポートフォリオアイテムなどが、すぐに混乱した状態になってしまうことに気づいたかもしれません。🤦
それがどれほどイライラするか、私たちはよく理解しています。幸いなことに、混沌に秩序をもたらす簡単な方法があります:カスタム投稿タイプです。
カスタム投稿タイプを使用すると、すべてのコンテンツ専用のセクションを作成できます。つまり、製品、お客様の声、ポートフォリオはそれぞれ、通常のブログ投稿やページとは完全に分離された独自のレイアウトと構造を持つことができます。
このガイドでは、カスタム投稿タイプを作成するための2つの異なる方法を紹介します。これにより、あなたの快適レベルに合った方法を選択し、コンテンツを今日きれいに整理できます。

WordPressのカスタム投稿タイプとは?
カスタム投稿タイプとは、WordPressで作成できる、通常の投稿や固定ページとは異なるコンテンツタイプのことです。ポートフォリオ、商品、映画レビューなど、ユニークな種類のコンテンツをより構造化された方法で整理および表示できます。
すべてのコンテンツを一つの引き出しに放り込むのではなく、コンテンツの種類ごとに整理されたファイルキャビネットを持っているようなものだと考えてください!
詳細に入る前に、WordPressは投稿タイプを使用して異なるコンテンツを区別します。「投稿」と「ページ」が最も一般的なタイプですが、WordPressにはデフォルトで他にもいくつか含まれています。
- 投稿 – ブログ記事用
- ページ – Aboutページのような静的コンテンツ用
- 添付ファイル – メディアファイル用
- 改訂 – コンテンツの下書きと編集用
- ナビゲーションメニュー – メニュー項目用
カスタム投稿タイプを使用すると、WordPressウェブサイト内に特定の種類のコンテンツ専用のセクションを作成できます。
例えば、映画レビューサイトを運営しているとしましょう。その場合、「映画レビュー」というカスタム投稿タイプを作成したいと思うでしょう。ポートフォリオサイトでは、「プロジェクト」という投稿タイプを作成するかもしれません。一方、eコマースサイトでは、「商品」という投稿タイプが役立つでしょう。
次に、各カスタム投稿タイプは独自のレイアウト、カスタムフィールド、さらには独自のカスタムカテゴリまたはタグ構造を持つことができます。これにより、サイトがより整理され、ユーザーフレンドリーになります!
さらに、多くの人気のWordPressプラグインは、WordPressウェブサイトにデータを保存するためにカスタム投稿タイプを使用しています。以下は、カスタム投稿タイプを使用するいくつかのトッププラグインです。
- WooCommerce は、オンラインストアに「商品」投稿タイプを追加します
- WPFormsは、すべてのフォームを保存するために「wpforms」投稿タイプを作成します
- MemberPress は「memberpressproduct」というカスタム投稿タイプを追加します
カスタム投稿タイプを作成する必要がありますか?
WordPressサイトでカスタム投稿タイプを作成する前に、ニーズを評価することが重要です。多くの場合、通常の投稿またはページで同じ結果を得ることができます。
カスタム投稿タイプが必要かどうか不明な場合は、WordPressでカスタム投稿タイプまたはタクソノミーが必要なのはいつかに関するガイドを参照してください。
それを踏まえて、WordPressで独自のカスタム投稿タイプを簡単に作成する方法を見てみましょう。2つの方法を紹介し、WordPressウェブサイトにカスタム投稿タイプを表示する方法もいくつかカバーします。
- 方法1:WPCodeを使用してカスタム投稿タイプを(より柔軟に)手動で作成する
- 方法2:プラグインでカスタム投稿タイプを作成する(コーディング不要)
- ボーナスヒント:サイトにカスタム投稿タイプを表示する
- よくある質問 (FAQ): WordPress カスタム投稿タイプ
- 動画チュートリアル – WordPressでカスタム投稿タイプを作成する方法
- WordPressの投稿とページの管理に関するその他のガイド
準備はいいですか?始めましょう。
方法1:WPCodeを使用してカスタム投稿タイプを手動で作成する
カスタム投稿タイプの作成には、テーマのfunctions.phpファイルにコードを追加する必要があります。ただし、これは上級ユーザー以外にはお勧めしません。なぜなら、わずかな間違いでもサイトが壊れる可能性があるからです。また、テーマを更新すると、コードは削除されます。
代わりに、WordPressウェブサイトにカスタムコードを追加するのに最適なプラグインであるWPCodeを使用します。
WPCodeを使用すると、カスタムスニペットを追加したり、組み込み済みの事前設定されたコードライブラリから多くの機能を利用したりできます。言い換えれば、インストールされている多くの専用プラグインや単一目的のプラグインを置き換えることができます。
WPCodeの詳細レビューで、テストしたすべての機能をご覧ください。

まず、無料のWPCodeプラグインをインストールして有効化する必要があります。詳細な手順については、WordPressプラグインのインストール方法に関するステップバイステップガイドをご覧ください。
📝 注: WPCodeの無料版はこのチュートリアルで問題なく動作します。ただし、WPCode Proにアップグレードすると、カスタムコードのスケジュール設定や完全な改訂履歴などの高度な機能が利用できるようになります。
有効化したら、WordPressダッシュボードからCode Snippets » Add Snippetに移動してください。
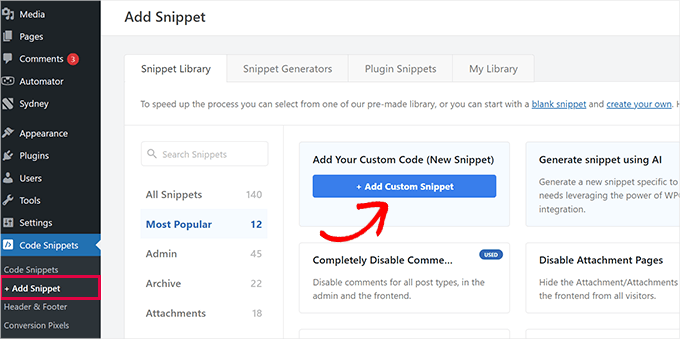
次に、「カスタムコードを追加(新規スニペット)」にマウスカーソルを合わせ、「+カスタムスニペットを追加」をクリックします。
表示されるポップアップで、オプションのリストからコードタイプとして「PHPスニペット」を選択します。
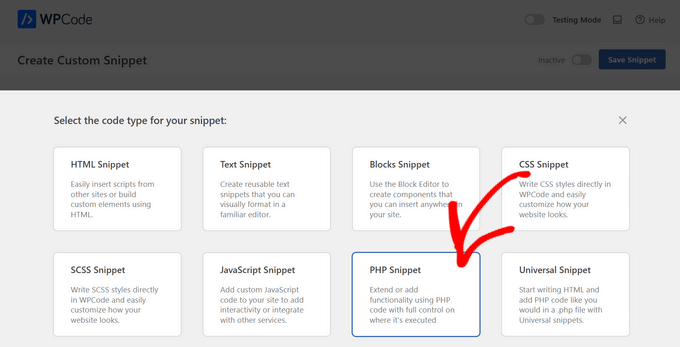
これにより、「カスタムスニペットを作成」ページが開きます。
コードが何のためのものかを覚えるのに役立つ、コードスニペットのタイトルを追加できます。
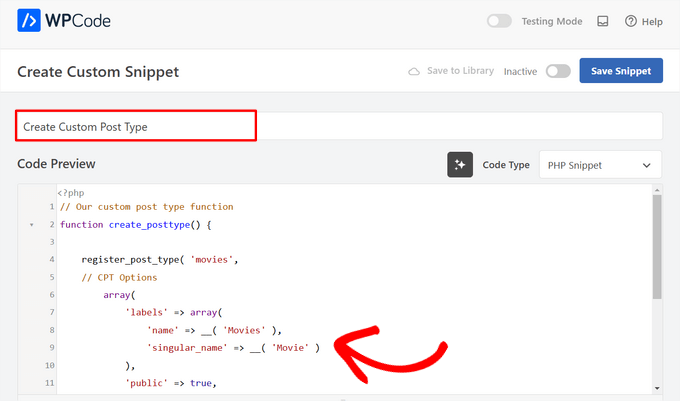
その後、次のコードを「コードプレビュー」エリアに貼り付けるだけです。
このコードは、「Movies」という基本的なカスタム投稿タイプを作成します。これは管理画面のサイドバーに表示され、あらゆるWordPressテーマで使用できます。
// Our custom post type function
function create_posttype() {

    register_post_type( 'movies',
    // CPT Options
        array(
            'labels' => array(
                'name' => __( 'Movies' ),
                'singular_name' => __( 'Movie' )
            ),
            'public' => true,
            'has_archive' => true,
            'rewrite' => array('slug' => 'movies'),
            'show_in_rest' => true,

        )
    );
}
// Hooking up our function to theme setup
add_action( 'init', 'create_posttype' );
基本的なカスタム投稿タイプが必要な場合は、moviesとMoviesを独自のCPTスラッグと名前に置き換えて、「更新」ボタンをクリックするだけです。
ただし、カスタム投稿タイプでさらに多くのオプションが必要な場合は、上記のコードの代わりに次のコードを使用してください。
以下のコードは、「Movies」カスタム投稿タイプに、リビジョン、アイキャッチ画像、カスタムフィールドのサポートを追加し、カスタム投稿タイプを「genres」と呼ばれるカスタムタクソノミーに関連付けるなど、さらに多くのオプションを追加します。
☝ 重要: これらの2つのスニペットを組み合わせないでください。同じカスタム投稿タイプを登録するため、WordPressはエラーを発生させます。登録したい追加の投稿タイプごとに、WPCodeを使用して新しいスニペットを作成することをお勧めします。
/*
* Creating a function to create our CPT
*/

function custom_post_type() {

// Set UI labels for Custom Post Type
    $labels = array(
        'name'                => _x( 'Movies', 'Post Type General Name', 'twentytwentyone' ),
        'singular_name'       => _x( 'Movie', 'Post Type Singular Name', 'twentytwentyone' ),
        'menu_name'           => __( 'Movies', 'twentytwentyone' ),
        'parent_item_colon'   => __( 'Parent Movie', 'twentytwentyone' ),
        'all_items'           => __( 'All Movies', 'twentytwentyone' ),
        'view_item'           => __( 'View Movie', 'twentytwentyone' ),
        'add_new_item'        => __( 'Add New Movie', 'twentytwentyone' ),
        'add_new'             => __( 'Add New', 'twentytwentyone' ),
        'edit_item'           => __( 'Edit Movie', 'twentytwentyone' ),
        'update_item'         => __( 'Update Movie', 'twentytwentyone' ),
        'search_items'        => __( 'Search Movie', 'twentytwentyone' ),
        'not_found'           => __( 'Not Found', 'twentytwentyone' ),
        'not_found_in_trash'  => __( 'Not found in Trash', 'twentytwentyone' ),
    );

// Set other options for Custom Post Type

    $args = array(
        'label'               => __( 'movies', 'twentytwentyone' ),
        'description'         => __( 'Movie news and reviews', 'twentytwentyone' ),
        'labels'              => $labels,
        // Features this CPT supports in Post Editor
        'supports'            => array( 'title', 'editor', 'excerpt', 'author', 'thumbnail', 'comments', 'revisions', 'custom-fields', ),
        // You can associate this CPT with a taxonomy or custom taxonomy.
        'taxonomies'          => array( 'genres' ),
        /* A hierarchical CPT is like Pages and can have
        * Parent and child items. A non-hierarchical CPT
        * is like Posts.
        */
        'hierarchical'        => false,
        'public'              => true,
        'show_ui'             => true,
        'show_in_menu'        => true,
        'show_in_nav_menus'   => true,
        'show_in_admin_bar'   => true,
        'menu_position'       => 5,
        'can_export'          => true,
        'has_archive'         => true,
        'exclude_from_search' => false,
        'publicly_queryable'  => true,
        'capability_type'     => 'post',
        'show_in_rest' => true,

    );

    // Registering your Custom Post Type
    register_post_type( 'movies', $args );

}

/* Hook into the 'init' action so that the function
* Containing our post type registration is not
* unnecessarily executed.
*/

add_action( 'init', 'custom_post_type', 0 );
階層値がfalseに設定されている部分に気づくかもしれません。カスタム投稿タイプを投稿ではなくページのように動作させたい場合は、この値をtrueに設定できます。
もう1つ注意すべき点は、twentytwentyone 文字列の繰り返し使用です。これは「テキストドメイン」と呼ばれます。テーマが翻訳準備完了であり、カスタム投稿タイプを翻訳したい場合は、テーマで使用されているテキストドメインを指定する必要があります。
テーマのテキストドメインは、テーマディレクトリ内のstyle.cssファイル内、または管理画面の外観 » テーマファイルエディターから見つけることができます。テキストドメインはファイルのヘッダーに記載されています。
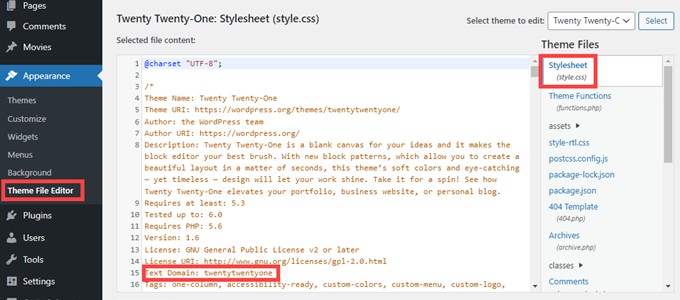
twentytwentyoneを、ご自身のテーマの「Text Domain」に置き換えてください。
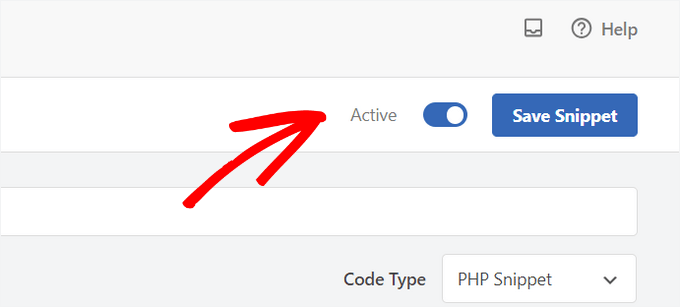
変更に満足したら、ページの上部にあるトグルを「非アクティブ」から「アクティブ」に切り替えるだけです。
最後に、「スニペットを保存」ボタンをクリックすると、WPCodeが残りを処理します。
方法2:プラグインでカスタム投稿タイプを作成する
WordPress でカスタム投稿タイプを作成するもう 1 つの簡単な方法は、プラグインを使用することです。この方法は、安全で非常に簡単なため、初心者にお勧めです。
まず最初に行うべきことは、Custom Post Type UI プラグインをインストールして有効化することです。詳細については、WordPress プラグインのインストール方法に関するステップバイステップガイドをご覧ください。
有効化後、新しいカスタム投稿タイプを作成するには、CPT UI » Add / Edit Post Typesに移動する必要があります。「Add New Post Type」タブが表示されているはずです。
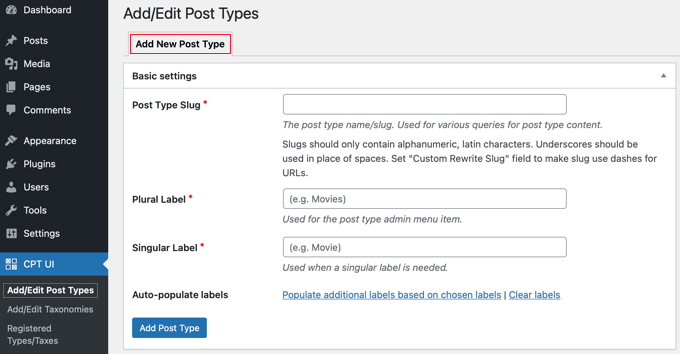
このエリアでは、カスタム投稿タイプのスラッグ(例:「movies」)を提供する必要があります。このスラッグはURLやWordPressのクエリで使用されるため、文字と数字のみを含めることができます。
スラッグフィールドの下に、カスタム投稿タイプの複数形と単数形の名前を提供する必要があります。
必要であれば、「選択したラベルに基づいて追加のラベルを自動入力する」というリンクをクリックできます。これにより、下の追加のラベルフィールドが自動的に入力され、通常は時間を節約できます。
これで、「追加ラベル」セクションまでスクロールダウンできます。言及したリンクをクリックしなかった場合は、投稿タイプの説明を提供し、ラベルを変更する必要があります。
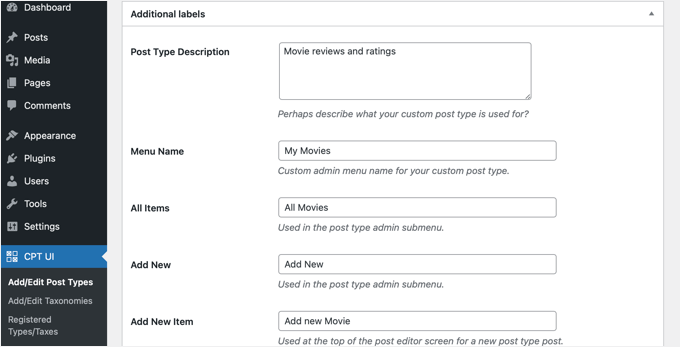
これらのラベルは、特定の投稿タイプのコンテンツを管理しているときに、WordPressユーザーインターフェース全体で使用されます。
次に投稿タイプの設定を行います。
ここから、投稿タイプにさまざまな属性を設定できます。各オプションには、その機能の説明が簡単に記載されています。
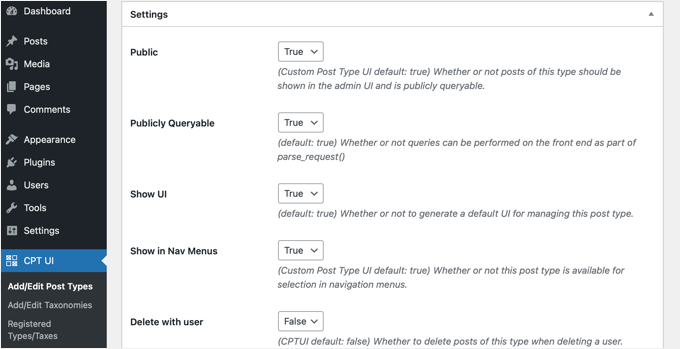
例えば、ページのように投稿タイプを階層化しないようにしたり、時系列の投稿を逆順に並べ替えたりすることができます。
一般設定の下に、この投稿タイプがサポートする編集機能を選択するオプションが表示されます。含めたいオプションにチェックを入れるだけです。
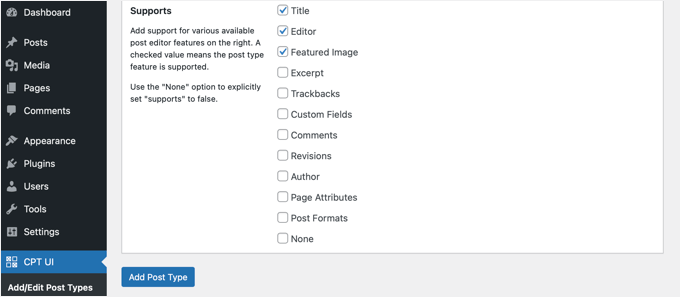
最後に、「投稿タイプを追加」ボタンをクリックして、カスタム投稿タイプを保存して作成します。
これで、カスタム投稿タイプを正常に作成できました!コンテンツの追加を開始できます。
ボーナスヒント:サイトにカスタム投稿タイプを表示する
WordPressには、カスタム投稿タイプを表示するための組み込みサポートがあります。新しいカスタム投稿タイプにいくつかの項目を追加したら、ウェブサイトに表示する準備が整いました。
いくつかの方法があり、それぞれに独自の利点があります。
デフォルトのアーカイブテンプレートを使用したカスタム投稿タイプの表示
まず、外観 » メニューに移動して、カスタムリンクをメニューに追加するだけです。このカスタムリンクは、カスタム投稿タイプへのリンクです。
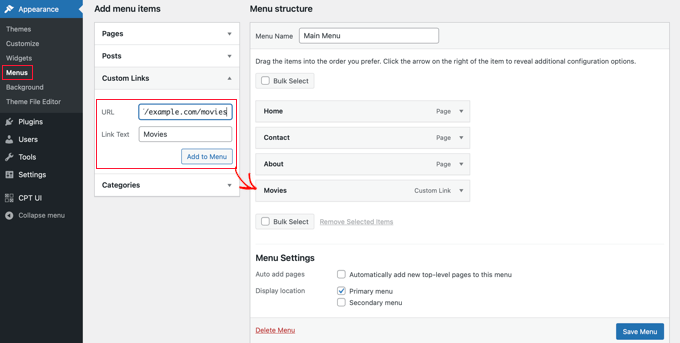
SEOフレンドリーなパーマリンクを使用している場合、カスタム投稿タイプのURLは次のようになります。
http://example.com/movies
SEOフレンドリーなパーマリンクを使用していない場合、カスタム投稿タイプのURLは次のようになります。
http://example.com/?post_type=movies
「example.com」を独自のドメイン名に、「movies」をカスタム投稿タイプ名に置き換えるのを忘れないでください。
メニューを保存してから、ウェブサイトのフロントエンドにアクセスできます。追加した新しいメニュー項目が表示され、それをクリックすると、テーマ内のarchive.php テンプレートファイルを使用してカスタム投稿タイプのアーカイブページが表示されます。

カスタム投稿タイプテンプレートの作成
カスタム投稿タイプのアーカイブページの表示が気に入らない場合は、カスタム投稿タイプアーカイブ専用のテンプレートを使用できます。
テーマディレクトリに新しいファイルを作成し、archive-movies.phpという名前を付けるだけです。「movies」をカスタム投稿タイプの名前に置き換えてください。
開始するには、テーマのarchive.phpファイルの内容をarchive-movies.phpテンプレートにコピーし、必要に応じて変更できます。
これで、カスタム投稿タイプのアーカイブページにアクセスするたびに、このテンプレートが表示に使用されます。
同様に、カスタム投稿タイプの単一エントリ表示用のカスタムテンプレートを作成することもできます。そのためには、テーマディレクトリにsingle-movies.phpを作成する必要があります。「movies」をカスタム投稿タイプの名前に置き換えることを忘れないでください。
テーマのsingle.phpテンプレートの内容をsingle-movies.phpテンプレートにコピーし、必要に応じて変更することで開始できます。
詳細については、WordPressでカスタムシングル投稿テンプレートを作成する方法に関するガイドをご覧ください。
フロントページにカスタム投稿タイプを表示する
カスタム投稿タイプを使用する利点の1つは、カスタムコンテンツタイプを通常の投稿から分離できることです。ただし、必要に応じてカスタム投稿タイプをウェブサイトのフロントページに表示することもできます。
無料のWPCodeプラグインを使用して、このコードを新しいスニペットとして追加するだけです。
手動でコードを追加する方法については、この記事のコードを手動で追加するセクションを参照してください。
add_action( 'pre_get_posts', 'add_my_post_types_to_query' );

function add_my_post_types_to_query( $query ) {
    if ( is_home() && $query->is_main_query() )
        $query->set( 'post_type', array( 'post', 'movies' ) );
    return $query;
}
「movies」をカスタム投稿タイプに置き換えるのを忘れないでください。
カスタム投稿タイプのクエリ
コーディングに慣れていて、テンプレートでループクエリを実行したい場合は、次の方法で行います。データベースをクエリすることで、カスタム投稿タイプから項目を取得できます。
カスタム投稿タイプを表示したいテンプレートに、以下のコードスニペットをコピーして貼り付ける必要があります。
<?php
$args = array( 'post_type' => 'movies', 'posts_per_page' => 10 );
$the_query = new WP_Query( $args );
?>
<?php if ( $the_query->have_posts() ) : ?>
<?php while ( $the_query->have_posts() ) : $the_query->the_post(); ?>
<h2><?php the_title(); ?></h2>
<div class="entry-content">
<?php the_content(); ?>
</div>
<?php endwhile;
wp_reset_postdata(); ?>
<?php else:  ?>
<p><?php _e( 'Sorry, no posts matched your criteria.' ); ?></p>
<?php endif; ?>
このコードは、新しいWP_Queryクラスの引数で投稿タイプと1ページあたりの投稿数を定義します。次に、クエリを実行し、投稿を取得し、ループ内に表示します。
ウィジェットでのカスタム投稿タイプの表示
WordPressには最近の投稿を表示するためのデフォルトウィジェットがありますが、カスタム投稿タイプを選択することはできません。
作成したカスタム投稿タイプの最新のエントリをウィジェットに表示したい場合はどうすればよいですか?幸いなことに、簡単な方法があります。
まず、Custom Post Type Widgetsプラグインをインストールして有効化する必要があります。詳細については、WordPressプラグインのインストール方法に関するステップバイステップガイドをご覧ください。
有効化したら、外観 » ウィジェット にアクセスし、「カスタム投稿タイプからの最新投稿」ウィジェットをサイドバーにドラッグアンドドロップするだけです。
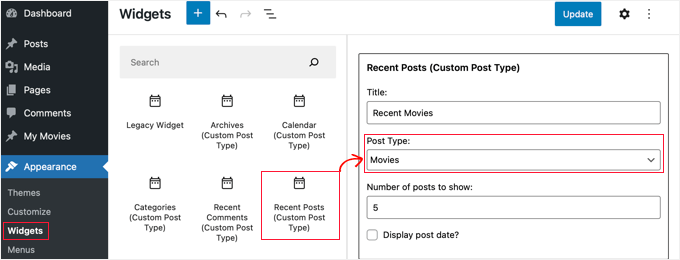
このウィジェットを使用すると、任意の投稿タイプから最新の投稿を表示できます。「投稿タイプ」ドロップダウンからカスタム投稿タイプを選択し、希望するオプションを選択する必要があります。
その後、画面上部にある「更新」ボタンをクリックし、ウェブサイトにアクセスしてウィジェットが機能していることを確認してください。

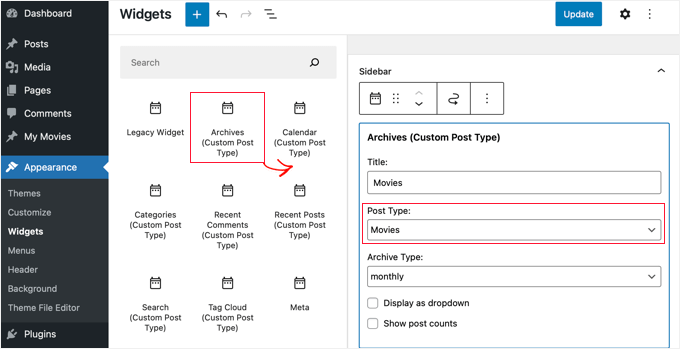
このプラグインは、アーカイブ、カレンダー、カテゴリ、最近のコメント、検索、タグクラウドを表示するカスタム投稿タイプウィジェットも提供します。
ですので、自由に探して必要なものを選んでください。
よくある質問 (FAQ): WordPress カスタム投稿タイプ
WordPressでカスタム投稿タイプを作成することについて、よく寄せられる質問をいくつかご紹介します。
カスタム投稿タイプとカテゴリーの違いは何ですか?
カスタム投稿タイプは、まったく新しい種類のコンテンツを作成するためのものであり、カテゴリは既存のコンテンツをグループ化するためのものです。たとえば、「書籍レビュー」はカスタム投稿タイプになります。「フィクション」と「ノンフィクション」は、それらの書籍レビューを整理するためのカテゴリになります。
カスタム投稿タイプを削除すると、そのコンテンツもすべて削除されますか?
いいえ、コンテンツはデータベースから削除されませんが、非表示になりアクセスできなくなります。投稿を再度表示するには、まったく同じ名前でカスタム投稿タイプを再登録する必要があります。
投稿タイプを削除する前に、WordPressの完全バックアップを作成することを常にお勧めします。
カスタム投稿タイプにカスタムフィールドを追加するにはどうすればよいですか?
カスタムフィールドを簡単に追加して、投稿タイプに構造化された情報を追加できます。例えば、「映画」投稿タイプに「監督」フィールドを追加するなどです。これはコードで行うか、ユーザーフレンドリーなインターフェースのためにAdvanced Custom Fields(ACF)のような人気のプラグインを使用できます。
動画チュートリアル – WordPressでカスタム投稿タイプを作成する方法
その前に、WordPress でカスタム投稿タイプを作成する方法に関するビデオチュートリアルをぜひご覧ください。
WordPressの投稿とページの管理に関するその他のガイド
このチュートリアルで、WordPressでカスタム投稿タイプを作成する方法を学べたことを願っています。次に、次のことも学びたいかもしれません:
- WordPressでブログ投稿にカスタム投稿ステータスを追加する方法
- WordPress検索結果にカスタム投稿タイプを含める方法
- 特定のWordPressページにウィジェットを表示または非表示にする方法
- WordPressで子ページを作成する方法
- WordPressでカスタムアーカイブページを作成する方法
- すべてのWordPressブログが持つべき重要なページ
- 最も役立つWordPressカスタム投稿タイプチュートリアル
この記事が気に入ったら、WordPressのビデオチュートリアルについては、YouTubeチャンネルを購読してください。 TwitterやFacebookでもフォローできます。


R Davies
2番目の(より詳細な)例に構文エラーがあります。コードは最新のWordpress 7.4.3では動作しません。
) Warning: call_user_func_array() expects parameter 1 to be a valid callback, function ‘custom_post_type’ not found or invalid function name
更新/修正の可能性はありますか?
WPBeginnerサポート
R Davies様
確認したところ、完璧に動作しました。
管理者
Archit
カスタム投稿タイプのオプションにあるsupports配列の末尾のカンマは意図的なものですか?
ロバート・スチュアート
31行目ですか? はい、それは通常のPHPコードです。
「最後の配列要素の後のカンマは任意であり、省略できます。これは通常、単一行の配列に対して行われます。つまり、array(1, 2, ) よりも array(1, 2) が好まれます。一方、複数行の配列では、末尾のカンマが一般的に使用されます。これにより、末尾に新しい要素を簡単に追加できます。」
saurabh
カスタム投稿タイプで「投稿設定」を有効にする方法(カスタム投稿タイプUIプラグインを使用)?
アリアス
こんにちは、このプラグインで問題が発生しています。
カテゴリーとタグを作成するオプションが無効になりました。
手動で配置する例を探しましたが、まだ何も見つかっていません。
この方法で問題を解決できるかどうか試していますが、ご協力いただけると大変助かります。
stormonster
「taxonomies」インデックスの $args 配列に、「category」と「post_tag」を追加してください。
これでうまくいきます。
John D
コーディングが多すぎます。WordPress はもっとシンプルに保つ必要があります。
Ilija
だから私は自分のCMSを使用しています。そこでは、CMS自体を通じて一瞬で新しい投稿タイプを作成できます。コーディングなしで、残念ながら大企業はWordPress開発者を求めており、それを学ばなければならないので、非常に複雑に思えます。
Sarah A
ポップアップで特定のデザインのカスタム投稿タイプグループを表示することに成功しましたが、画像をクリックすると新しいページが開いてしまい、ポップアップの外をクリックして閉じてもホームページに戻りません。ホームページに戻ってほしいのです。
CPTのコードを「single-chg_projet.php」でポップアップとして表示し、JavaScriptでポップアップを開閉するようにしました。indexにsingle-chg_projet.phpのコードをすべて入れようとしましたが、何も表示されません。あるいは、どこかで失敗したのかもしれません。助けてください。よろしくお願いします。
Ghulam Mustafa
こんにちは、
素晴らしいコードをありがとうございます。コードに軽微な修正があります。Querying Custom Post Typesセクションで、else: ステートメントの前にendwhile; ステートメントが欠けています =)
トニー・ピーターソン
これです!この構文エラーを反映するようにコードを更新してください。Ghulamのコメントを見つけるまで、かなりの苦労をしました。今は動作しています。
Arkanum
Yes! True. It’s miss befire wp_reset_postdate();
The cycle while does not end
Azamat
タイプミス:「カスタム投稿タイプが必要なのはいつですか?」
WPBeginnerサポート
Thanks for notifying us We have updated the article.
管理者
ジョン
あなたのサイトにあるようなカスタム用語集を作成するプロセスについて、教えていただけますか?
WPBeginnerサポート
用語集の用語を表示するために、カスタムフィールドとカスタムテンプレートを使用しています。
管理者
Anil Reddy
ウェブサイトのカテゴリページで投稿のリストタイプを作成したい
デビッド・ベン・オレン
特定のテーブルを持つカスタム投稿タイプを複製するにはどうすればよいですか?他のテーブル用に別の投稿タイプを作成する必要があります。
ベティ
カスタムフィールドを投稿タイプに追加するにはどうすればよいですか?
WPBeginnerサポート
ガイドをご覧ください。WordPress Custom Fields 101。
管理者
Megan
プラグインをダウンロードしました。カスタム投稿タイプを2つ追加したいです。1. すべての執筆作品のための「ファンフィクション」、2. すべての作品のための「ファンアート」。
ファンフィクション向け – 章をストーリーにリンクし、執筆中に章をストーリーにアップロードできるようにしたいです。
ファンアートの場合 – (当然ながら)画像を中心に、その下に説明を付けたいと考えています。
この記事は私が求めているものですか、それとも全く別のものですか?
ありがとうございます。
メーガン
Zubair Abbas
こんにちは、
コードをサイトのfunctions.phpにコピーしました。新しい投稿タイプはダッシュボードに表示されますが、公開後に投稿を表示しようとすると、空白のページが表示されます。後で、デフォルトの投稿さえ開かないことに気づきました。
functions.phpからコードを削除すると、すべて正常に動作します。
Please help
ありがとう、
Zubair Abbas
Jouke Nienhuis
空白のページが表示される場合、文字を忘れていることがよくあります。カスタムコードを削除すると投稿が表示されるという事実は、タイプミスがあることを確認します。セミコロン「;」と開き括弧、閉じ括弧を確認してください。
間違いを正確に確認するには、wp-configファイルを編集できます。ERROR REPORTINGを探し、この値をtrueに設定します。その後、再度テストすると、エラーと省略された行が表示されます。
Alex
CPTを作成し、うまく機能していますが、サイトマップの更新、SEOプラグインの使用、Google Webmaster Toolsでの取得後もGoogleで見つけることができません。なぜそうなるのか何か考えはありますか?
WPBeginnerサポート
Googleが新しいコンテンツを検索結果に表示し始めるまでには時間がかかります。念のため、SEOプラグインの設定を確認し、CPTやCPTアーカイブページがインデックスされないようにブロックしていないことを確認してください。
管理者
アムネット
カスタム投稿タイプの作成は、特にプラグインを使用すると簡単です。実際のトリックは、それらをページに表示することです。通常、高度なカスタム開発や、Avadaのようなテーマ固有のプラグインが必要になります。
残念ながら、WordPressでCPTを表示する普遍的な方法はありません。
WPBeginnerサポート
実際、WordPressでCPTを表示するには、簡単で標準的な方法があります。記事の上部でそのうちの1つに言及しました。
管理者
Jouke Nienhuis
著者が言ったように、しかし私は回答を繰り返します。
要するに、ナビゲーションメニューにリンクを作成します。
高度な回答を要約すると、アーカイブページとシングルページを作成します。
チャック
素晴らしい記事です。カスタムタクソノミーに基づいて、単一投稿のCPT投稿情報をどのように変更できますか?例えば:
日付 | 作成者 | シリーズ | 書籍 | トピック
これは書きやすいですが、Seriesのような欠落しているタクソノミーの1つがある場合に、変更された投稿情報を表示する方法を見つけたいです。
日付 | 著者 | 書籍 | トピック
それ以外の場合、デフォルトの投稿情報は次のように表示されます。
日付 | 作成者 | | 書籍 | トピック
borahan
現在のユーザーに特定のカテゴリの投稿をページに表示したいのですが、どうすればよいですか?
Moazam Ali
親愛なる皆様、
投稿ありがとうございます。電子書籍のライブラリを作成したいのですが、カスタム投稿タイプとポートフォリオを使用して、フロントエンドに本のサムネイルを表示したいと考えています。それをどのように行うか教えていただけますか?
シャロン・ウォレス
皆さん、こんにちは。
これは素晴らしいプラグインです。タクソノミーをページに表示させようとしています。「Presenters」という名前で作成しました。こちらで確認できます。
どうすればそれを実現できますか?
ありがとうございます
WPBeginnerサポート
WordPressでカスタムタクソノミーを作成する方法をご覧ください。ご質問にお答えできれば幸いです。
管理者
シャロン・ウォレス
Hello,
ご返信ありがとうございます。まだ動作していませんが、正しい方向を示してくれました。引き続き試してみます。
素晴らしい一日をお過ごしください。
Dave S.
こんにちは。
ArFormsプラグインを使用してフォームを作成しましたが、これをカスタム投稿タイプに変換する必要があります。これを実現するための提案はありますか?
ありがとうございます。
マーク・グリーンウェイ
これ、カスタム投稿タイプの理解に役立つまさに求めていた情報です。ありがとうございます。
Mark.
shashik
ありがとう、とても役に立ちました..
Graham
ありがとうございます!まさに探していたものです。WordPressの回避策を見つけて、やり方を忘れてしまい、何度も戻ってくる必要があることがどれほど多いか、驚くばかりです。
とても感謝しています!
Ram
とても役に立ちました!ありがとうございます…。
MELAS
親愛なる皆様、
コーディングに関する知識があまりありません。特定のページでこれらのカスタム投稿タイプとタクソノミーを表示するにはどうすればよいですか?
よろしくお願いいたします!
MELAS
マイク・リッター
エラーがありますか?関数は`create_post_type`であるべきではありませんか?
WPBeginnerサポート
いいえ、それはコア機能ではありません。この関数はどのようにでも定義できます。
管理者
Vera
こんにちは、
この美しいチュートリアルをありがとうございます。
おっしゃる通りにすべて行いました。
理解できない点が2つあります:
1。
「ジャンル」という分類法を指定されました。それはどこで設定されていますか?その下に実際のジャンルを作成したい場合はどうすればよいですか?それらはどのように作成しますか?どこで見ることができますか?
2。
「映画」へのメニューリンクを作成し、その下に「ジャンル」へのサブリンクを作成したいです。「メニュー」セクションで「映画」を見ることができます。各投稿、ページのように。それはあまり必要ありませんが、構いません。「ジャンル」をそこに表示するにはどうすればよいですか?
ありがとうございます、
Vera
WPBeginnerサポート
カスタム投稿タイプ、つまり「映画」を正常に作成できたようです。次のステップは、カスタム分類「ジャンル」を作成することです。分類とは、WordPressでコンテンツをソートする方法です。カテゴリーとタグは、WordPressに組み込まれている2つのデフォルトの分類であり、デフォルトで「投稿」に関連付けられています。WordPressでカスタム分類を作成する方法に関するチュートリアルをご覧ください。そのチュートリアルで、カスタム分類「ジャンル」を作成し、「映画」投稿タイプに関連付ける手順に従ってください。カスタム分類は、WordPress管理エリアの「映画」メニューの下に表示されます。
管理者
Hamed 3daJoo
私はこれらすべてを行いますが、この投稿タイプで投稿を公開しようとすると、投稿タイプがメインページにリダイレクトされます(コードは変更せずにそのままコピーしました)
たとえば、Movies投稿タイプでこの投稿を作成します
手伝ってください。ポストタイプは好きですが、正しく使えません。
チプリアン
パーマリンク構造を再保存してみましたか?
Cheers!
アーロン
素晴らしい投稿です!コンテンツをありがとうございます。大変参考になりました。
antonio
こんにちは。投稿タイプ movie のスニペットを追加しようとしています… functions.php にコピーしましたが、ページを更新しても何も表示されません。twenty fourteen テーマを使用しています… 何が間違っている可能性がありますか?
アシシュ・シェスタ
カスタム投稿タイプをフロントエンドに表示するには?
Fahd
こんにちは。私のWordPressウェブサイトのカスタム投稿タイプは、過去2年間正常に動作していました。しかし、投稿のタイトルを変更して更新をクリックすると、他の変更も保存されます。しかし、投稿のタイトルをそのままにして投稿内の変更を行うと、保存されません。何かおすすめはありますか?
WPBeginnerスタッフ
WordPressの投稿でテキストを表示/非表示するトグル効果に関するこのチュートリアルをご覧ください: WordPressの投稿でテキストを表示/非表示するトグル効果。
Arup Ghosh
情報ありがとうございます。
Arup Ghosh
クーポン表示オプション付きのカスタム投稿タイプ「クーポン」を作成し、コードがストアURLにリンクするようにしたいのですが、その方法を教えていただけますか?コーディングの知識はあまりありません。
Isaías Subero
素晴らしい記事です。写真に示されているように、WordPressのバックエンドでカスタム投稿タイプにアイコンを追加するにはどうすればよいですか?
Jouke Nienhuis
カスタム投稿タイプを定義する際の引数($args)の1つです。
$args リストに「menu-icon」=>「dashicons-cart」を追加します。
WordPressは組み込みのdashiconsを使用しますが、独自のアイコンを使用することもできます。
詳細はこちらのリンクをご覧ください:
ヨハン
こんにちは、抜粋とカスタムフィールドのデータがフロントエンドに表示されません…何が原因か分かりますか?
ビル・クエリー
コード経由で、できればfunctions.phpファイルでお願いします。現在のCPTが定義されている場所なので。
ビル・クエリー
既存のカスタム投稿タイプにカテゴリを追加する方法を探しています。どなたか正しい方向性を示していただけますか?
Jouke Nienhuis
既存の投稿タイプ(カスタムか否か)に新しい分類を追加するには、作成する関数を記述する際に、適切な投稿タイプを入力するだけです。カテゴリーは、すべての投稿を含む分類名です。
新しいカテゴリーを作成したい場合は、メニューのカテゴリーをクリックして新しいカテゴリーを作成してください。
カテゴリーの例としては、投稿がボートに関するものであれば「Boats」、飛行機に関するものであれば「planes」などがあります。複数のカテゴリーも可能です。新しい投稿を作成または編集する際に、右側のサイドバーで選択または追加してください。
投稿タイプは特定のカテゴリーに添付またはリンクされていません。投稿は、
Robey Lawrence
カスタム投稿タイプのクエリの下のスニペットを試しましたが、リセットの前に が必要であることがわかりました。
YassinZ
カスタム投稿のテキストエディタを使用してHTMLタグを使用したいので、きれいで便利な記事をありがとうございます。
Yassin
素晴らしい、分かりやすいチュートリアルをありがとうございます。
しかし、CPTの表示に問題があります。SEOフレンドリーなパーマリンクを使用しており、私のウェブサイト/moviesに直接アクセスすると、CPTが重複して表示されます。
Aris Giavris
とても役に立ちました!ありがとうございます。
各投稿のタグに、+, -, +/- のいずれかの記号を追加したいのですが、可能でしょうか?
もしそうなら、署名されたタグを次のように表現する選択肢が欲しいです:すべての+タグ、すべての-タグ、すべての+/-タグ。
色々なことを疑問に思っている気がします。
Placid
こんにちは、
カスタム投稿タイプを正しく実装するのに苦労しています。長い間解決策を探しましたが、見つかりませんでした。以下は私がやったことです。
1. ローカルの WAMP サーバーに WordPress を新規インストール(まず Apache の rewrite_module を有効にする)。
2. デフォルトテーマ(twenty fourteen)を使用。プラグインはインストールされていません。
3. パーマリンクを「投稿名」に変更しました
4. プラグインフォルダ内に、pr_custom_postsという名前のフォルダを作成し、その中にpr_custom_posts.phpという名前のファイルを作成しました。ファイル内にカスタム投稿タイプを作成しました。コードは以下の通りです。
register_post_type();
//flush_rewrite_rules();
}
public function register_post_type () {
$args = array(
‘labels’ => array (
‘name’ => ‘映画’,
‘singular_name’ => ‘映画’,
‘add_new’ => ‘新規映画追加’,
‘add_new_item’ => ‘新しい映画を追加’,
‘edit_item’ => ‘映画を編集’,
‘new_item’ => ‘新しい映画を追加’,
‘view_item’ => ‘映画を見る’,
‘search_items’ => ‘映画を検索’,
‘not_found’ => ‘映画が見つかりませんでした’
‘not_found_in_trash’ => ‘ゴミ箱に映画が見つかりませんでした’
、
‘query_var’ => ‘movies’,
'rewrite' => array (
‘slug’ => ‘movies/’
‘with_front’=> false
、
「public」=> true,
'publicly_queryable' => true,
‘has_archive’ => true,
‘menu_position’ => 10,
‘menu_icon’ => admin_url().’/images/media-button-video.gif’,
‘supports’ => array (
‘title’、
‘thumbnail’
‘エディター’
)
);
register_post_type(‘jw_movie’, $args);
//flush_rewrite_rules();
}
}
add_action(‘init’, function() {
new PR_Movies_Custom_Post();
//flush_rewrite_rules();
});
?>
良い点:CPTは管理パネルに表示され、そこで映画を追加したり表示したりできます。
問題:フロントエンドで movie をプレビューできません(管理パネルの CPT で「表示」をクリックしても)。パーマリンクをデフォルト(http://localhost/wp02/?p=123)に設定した場合にのみ、フロントエンドに表示されます。
試したこと:
1. パーマリンク設定に移動し、パーマリンク設定を「投稿名」に保ち、変更を保存します。
2. コードのいくつかの場所に flush_rewrite_rules() を(一つずつ)使用してください。上記のコードでコメントアウトされている部分を参照してください。
3. メニュー項目を作成しました:
URL: http://localhost/wp02/movies
ナビゲーションラベル:映画
これによりフロントエンドにメニュー項目が作成されますが、「Movies」リンクをクリックすると「Not Found」と表示されます。
これは私を狂わせています。誰か助けてくれませんか?本当に感謝します。
kikilin
私も同じ「見つかりません」の問題で気が狂いそうになっていましたが、これを試しました:設定 > パーマリンクに移動し、設定を再保存します。私は設定をデフォルトに変更し、その後(プロジェクトのニーズに合わせて)投稿名に変更しました。その後、リンクは期待どおりに機能しました。
WPBeginnerスタッフ
はい、承知いたしました。まもなくビデオチュートリアルを作成する予定です。最新情報については、当社のYouTubeチャンネルを購読してください。
レハン
Helpfull tutorials and posts thanks
ceslava
もう1つの簡単な方法は、archive.phpを複製してarchive-movies.phpに名前を変更し、single.phpも同様にsingle-movies.phpに変更することです。
その後、テーマのphpファイルを調整できます。
敬具
Mladen Gradev
lol、そのプラグインは非常に便利そうですね、ありがとう。
Achilles Khalil
表示するのが非常に難しいです。ビデオチュートリアルを作成してもらえませんか?
Mik
こんにちは、あなたの投稿を長い間読んでフォローしています。あなたは素晴らしいですし、初心者のための不足しているものをターゲットにしています…ありがとうございます。
ダヴィデ・デ・マエストリ
This plugin should be okay, but after every upgrade they’ve got some bug. Due to exporting field, or while migrating from local to remote etc… So It’s better to hand-write the code and put into functions.php