WordPressウェブサイトの画像の表示方法に不満がありますか?おそらく、アイキャッチ画像がぼやけてピクセル化しているか、大きすぎてページの読み込みが遅くなっているのでしょう。
これは多くの異なるWordPressサイトで見られることで、ユーザーが直面する最も一般的な問題の1つです。理由は次のとおりです。WordPressのデフォルトの画像サイズは、すべてのサイトに常に適しているわけではありません。
良いニュースは、カスタム画像サイズを作成することがあなたが思うよりも簡単であるということです。これにより、サイトがシャープに見え、ページの読み込みが速くなる可能性があります。
このガイドでは、WordPressで追加の画像サイズを作成する方法を学びます。わずか数ステップで、サイトのデザインとパフォーマンスを向上させる最適化された画像が手に入ります。

WordPressで追加の画像サイズを作成する理由
WordPressまたはテーマが生成する画像サイズがニーズに合わない場合は、追加の画像サイズを作成する必要がある場合があります。
ほとんどの人気のテーマやプラグインは、サムネイルやカスタムレイアウトなどのために独自の画像サイズを自動的に作成します。しかし、これらの組み込みサイズでも、特定のケースでは不十分な場合があります。
例えば、子テーマを作成したり、グリッドレイアウトを設定したり、サイトの特定のセクションの画像を最適化したりする場合などです。
そこでカスタム画像サイズが登場します。これにより、希望する正確な寸法を生成し、最も適した場所にそれらを使用できます。
これを踏まえて、WordPressで追加の画像サイズを作成する方法をご紹介します。
この記事で説明するすべてのヒントの簡単な概要を以下に示します。
- Registering Additional Image Sizes for your Theme
- WordPressテーマに追加の画像サイズを表示する
- 追加の画像サイズの再生成
- 投稿コンテンツで追加の画像サイズを有効にする
- ボーナスヒント:WordPressでの画像アップロードの問題の修正
- よくある質問:WordPressで追加の画像サイズを作成する方法
- WordPressで画像を使用するための役立つガイド
準備はいいですか?始めましょう!
テーマに追加の画像サイズを登録する
ほとんどのWordPressテーマは、アイキャッチ画像(投稿サムネイルとも呼ばれます)をサポートしています。
ただし、カスタム WordPress テーマを作成している場合は、アイキャッチ画像のサポートを追加する必要があります。
ほとんどのWordPressの専門家は、次のカスタムコードスニペットをテーマのfunctions.phpファイルに追加することを推奨するかもしれません。
add_theme_support( 'post-thumbnails' );
ただし、ほんの少しの間違いでサイトを壊してしまうリスクがあるため、初心者にはあまり優しくありません。代わりに、カスタムスニペットはWPCodeを使用して追加することをお勧めします。

WPCodeは、WordPressにカスタムコードを追加することを簡素化する強力なコードスニペットプラグインで、200万人以上のウェブサイト所有者に利用されています。テーマファイルにあるかのようにスニペットを実行するため、初心者でもカスタマイズを将来性があり、管理しやすくします。
✏️ 注意:多くのブランドパートナーは、WPCodeを使用してカスタムコードスニペットをウェブサイトに追加しています。それがどれほどシンプルでありながら強力であるかを直接見てきました。そのため、強くお勧めします。もっと知りたいですか?WPCodeの完全なレビューをご覧ください。
幸いなことに、WPCode の無料版ではカスタムコードスニペットを追加できます。それでは、プラグインをインストールして有効化しましょう。ヘルプが必要な場合は、WordPress プラグインのインストール方法に関するガイドでステップバイステップの説明を確認できます。
有効化すると、WordPressダッシュボードからコードスニペット » + スニペットを追加に移動できます。次に、「カスタムコードを追加(新規スニペット)」ボタンをクリックします。
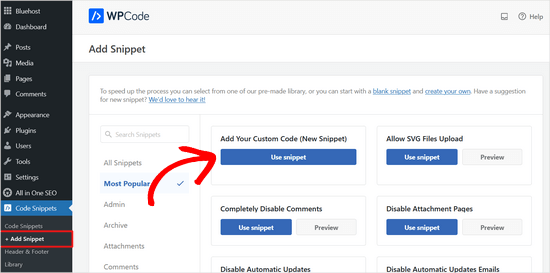
次の画面で、カスタムコードスニペットに名前を付けます。たとえば、このスニペットには「投稿サムネイルサポート」と名前を付けることができます。
次に、このコードを「コードプレビュー」エリアにコピー&ペーストできます。
add_theme_support( 'post-thumbnails' );
エディターでどのように見えるかの例を次に示します。
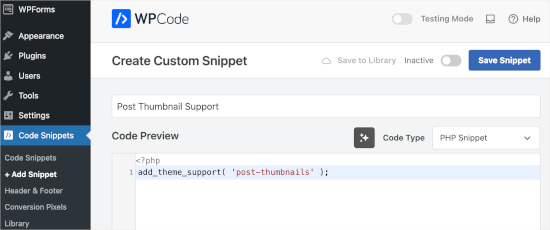
その後、コードタイプを「PHPスニペット」に変更したことを確認しましょう。
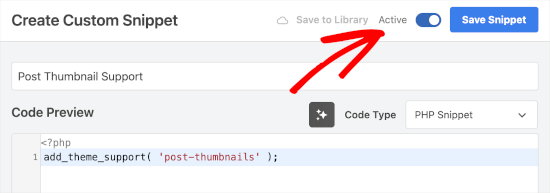
次に、トグルを「非アクティブ」から「アクティブ」に切り替え、「スニペットを保存」をクリックします。
サムネイルのカスタムコードスニペットサポートを追加したら、add_image_size()関数を使用して追加の画像サイズを登録できます。
再度、Code Snippet » + Add Snippet に移動して、WPCodeカスタムコードスニペットエディタを開きましょう。その後、「Add Your Custom Code (New Snippet)」ボタンを選択しましょう。

次に、このコードスニペットに「追加の画像サイズ」という名前を付けることができます。
次に、コードエディタで、add_image_size 関数を次の形式で使用します。
add_image_size( 'name-of-size', width, height, crop mode );
フル機能がどのように見えるかの例をいくつかご紹介します。
add_image_size( 'sidebar-thumb', 120, 120, true ); // Hard Crop Mode
add_image_size( 'homepage-thumb', 220, 180 ); // Soft Crop Mode
add_image_size( 'singlepost-thumb', 590, 9999 ); // Unlimited Height Mode
無制限の高さの例では、高さに9999のような非常に大きな数を使用します。これにより、WordPressは画像の高さを制限しないため、幅を固定したまま必要なだけ高くすることができます。
ご覧のとおり、各例では異なるモードが使用されています:ハードクロップ、ソフトクロップ、無制限の高さ。ニーズに最適なものを選択できます。
コードエディターでの表示は以下のようになります。
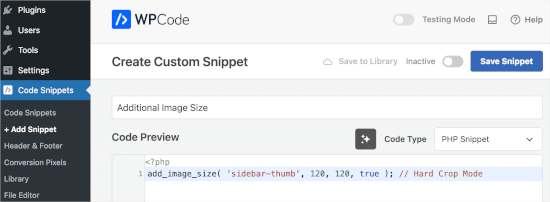
コードタイプを「PHP」に変更し、「非アクティブ」から「アクティブ」に切り替え、「保存」ボタンをクリックすることを忘れないでください。
これを踏まえて、ご自身のWordPressブログやウェブサイトで各モードをどのように使用できるか見ていきましょう。
1. ハードクロップモード
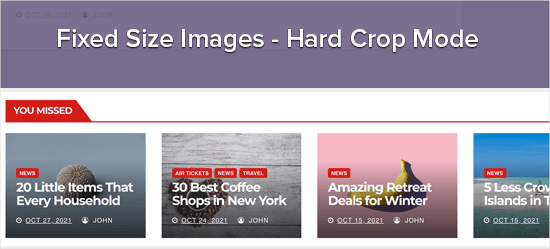
上記の例では、高さの後に「true」という値を使用しました。これは、WordPressに画像を定義した正確なサイズ(この場合は120px x 120px)にクロップするように指示しています。
この機能は、画像のサイズに応じて、側面または上下から自動的に画像をトリミングします。これにより、すべての画像が均整が取れており、WordPressウェブサイトで見栄えが良くなることを確認できます。
2. ソフトクロップモード
ソフトクロッピングの例でご覧いただけるように、高さの後に「true」という値を追加していません。
add_image_size( 'homepage-thumb', 220, 180 );
これは、ソフトクロップモードがデフォルトでオンになっているためです。
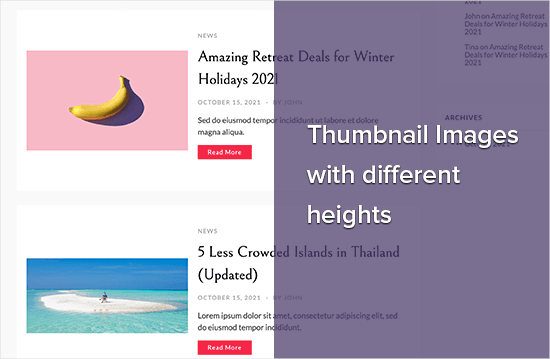
ソフトクロップは、元の縦横比を維持したまま、設定した寸法に収まるように画像をリサイズします。これは、画像の一部が歪んだり切り取られたりしないことを意味します。
元の画像の形状によっては、最終的なバージョンは幅が一致するが短くなるか、高さが一致するが狭くなる可能性があり、引き伸ばされることはありません。
以下に、これがどのように見えるかの例を示します:
3. 無制限の高さモード
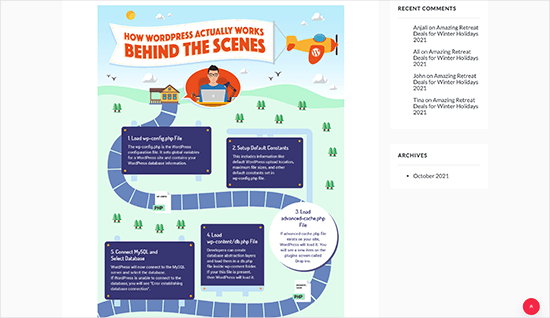
時には、ウェブサイトで使用したい長い画像があるものの、その幅を制限したい場合があります。例えば、ビジネスウェブサイトのためにインフォグラフィックを作成したとします。インフォグラフィックは非常に長く、通常はコンテンツの幅よりも広くなる傾向があります。
無制限の高さモードでは、レイアウトを壊さない幅を指定できますが、高さを制限することはありません。
WordPressテーマに追加の画像サイズを表示する
ウェブサイトに画像サイズを追加したら、WordPressテーマにそれらを表示する番です。
さて、独自のテーマを構築またはカスタマイズしていて、コードの編集に慣れている場合は、これらの新しい画像サイズをテーマファイルに直接表示できます。
✏️ 注記: これは高度な手順であり、テーマファイルを直接編集することは推奨しません。小さなミスがサイトを壊す可能性があります。このようなカスタマイズには、子テーマを使用するのが常に最善の方法です。
これを行うには、画像を表示したいテーマファイル(single.php や archive.php など)を開き、投稿ループ内に以下のコードを追加します。
<?php the_post_thumbnail( 'your-specified-image-size' ); ?>
画像がサイトの他の部分に完全にフィットするように、いくつかのスタイリングを追加したい場合があります。ただし、テーマにその他の画像サイズを表示するために必要なのはこれだけです。
追加の画像サイズの再生成
add_image_size() 関数は、新しい画像をアップロードしたときにのみ追加サイズを作成します。これは、add_image_size() 関数を作成する前にアップロードした画像には新しいサイズがないことを意味します。
この問題を解決するには、Perfect Images を使用してWordPressウェブサイトのサムネイルを再生成する必要があります。このプラグインは、フィーチャー画像とRetina画像も再生成し、メディアメタデータを更新します。
まず、プラグインをインストールして有効化する必要があります。ヘルプが必要な場合は、WordPressプラグインのインストール方法に関するガイドを参照してください。
有効化したら、メディア » Perfect Images に移動できます。
Perfect Images は WordPress のメディアライブラリをスキャンしますので、完了するまでしばらくお待ちいただく必要がある場合があります。
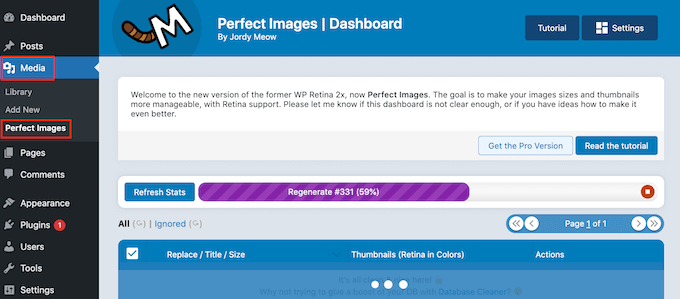
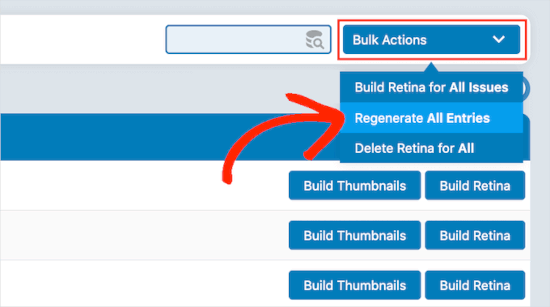
完了したら、デフォルトで「一括操作」と表示されているドロップダウンメニューを開き、「すべてエントリを再生成」を選択します。
Perfect Images がすべてのサムネイルを再生成します。
このトピックに関する詳細については、新しい画像サイズを再生成する方法についての記事をご覧ください。
投稿コンテンツで追加の画像サイズを有効にする
新しい画像サイズを追加しても、WordPressテーマでのみ使用でき、投稿コンテンツでは使用できません。
これらの新しいサイズをWordPressコンテンツエディターで利用可能にするには、WPCodeに次のコードを登録する必要があります。
function wpb_custom_image_sizes( $size_names ) {
    $new_sizes = array(
        'homepage-thumb' => 'Homepage Thumbnail',
        'singlepost-thumb' => 'Infographic Single Post'
    );
    return array_merge( $size_names, $new_sizes );
}
add_filter( 'image_size_names_choose', 'wpb_custom_image_sizes' );
共有したカスタムスニペットコードを追加するには、同じプロセスを繰り返すだけです。その後、コードを追加した後にスニペットを有効化して保存することを忘れないでください。
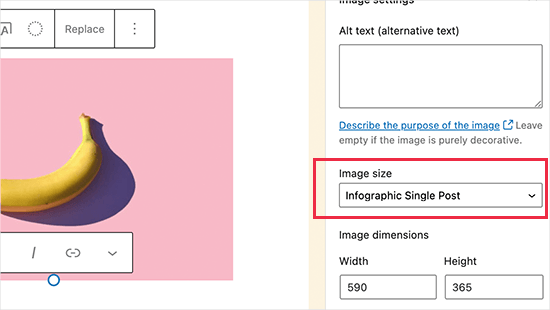
これで、画像をWordPressにアップロードすると、「画像サイズ」の下にすべてのカスタムサイズが表示されます。これで、任意のページまたは投稿で作業するときに画像サイズを変更できます。
ボーナスヒント:WordPressでの画像アップロードの問題の修正
カスタム画像サイズの作成と管理方法がわかったところで、多くのWordPressユーザーが直面するもう1つの一般的な問題、画像のアップロードに関する問題について触れてみましょう。
サイトに画像を追加しようとしたときにエラーメッセージが表示されたことがある場合でも、心配しないでください。これは一般的であり、いくつかの異なる理由で発生する可能性があります。
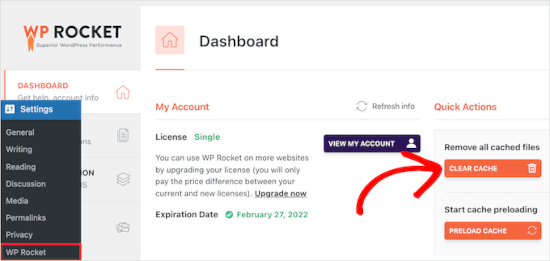
まず、ブラウザによってアップロードの処理方法が異なるため、あるブラウザで機能しても別のブラウザでは機能しない場合があります。また、サイトのキャッシュが問題を引き起こしている可能性もあります。キャッシュが古いとアップロードに干渉する可能性があるため、クリアすることで解決するかもしれません。
✏️ 注意: WPBeginnerでは、WP Rocketを使用してキャッシュを管理し、サイトを高速化しています。これにより、ページの読み込みが速くなり、このような問題を防ぐことができます。詳細については、WP Rocketのレビューをご覧ください。
時には、プラグインやテーマが問題となることもあります。
特定のプラグインは、気づかないうちにアップロードプロセスに問題を引き起こす可能性があります。一部のテーマは適切にコーディングされておらず、画像をアップロードしようとしたときに競合を引き起こす可能性があります。
トラブルシューティングのヒントについては、WordPressで画像アップロードの問題を修正する方法に関するガイドをお読みください。
よくある質問:WordPressで追加の画像サイズを作成する方法
WordPressのデフォルトの画像サイズは何ですか?
デフォルトでは、WordPressは画像をアップロードするたびにいくつかの異なるサイズを作成します。
- サムネイル – 150×150 ピクセル(切り抜き)
- 中 – 最大300×300ピクセル
- 大(中) – 最大768×768ピクセル
- 大 – 最大1024×1024ピクセル
WordPressのプラグインやテーマも、その機能に応じて独自のカスタムサイズを追加できます。
新しい画像サイズを作成すると、古い画像に影響しますか?
新しい画像サイズは、サイズ作成後にアップロードした画像にのみ適用されます。WordPressメディアライブラリに既存の画像を新しいサイズで含めたい場合は、Perfect Imagesのようなプラグインを使用してサムネイルを再生成する必要があります。
どのような画像サイズを作成すればよいかわかりません。
テーマのレイアウトによります。まず、画像を使用する場所(メインコンテンツ列、サイドバー、または全幅セクションなど)を確認するのが良い方法です。右クリックしてブラウザのInspectツールを使用して、それらの領域の正確な寸法を確認できます。
WordPressで画像を使用するための役立つガイド
この記事が、WordPressで追加の画像サイズを作成する方法を学ぶのに役立ったことを願っています。
他の役立つガイドも参照してください。
- 画像管理に最適なWordPressプラグイン
- WebP vs PNG vs JPEG: WordPressに最適な画像フォーマット
- WordPressに背景画像を追加する方法(簡単な方法)
- WordPress で画像ギャラリーを作成する方法
- WordPressでレスポンシブスライダーを簡単に作成する方法
- WordPressで画像のホバーエフェクトを追加する方法
- WordPressで大量の大きな画像をリサイズする方法
この記事が気に入ったら、WordPressのビデオチュートリアルについては、YouTubeチャンネルを購読してください。 TwitterやFacebookでもフォローできます。


Mrteesurez
追加の画像サイズ作成というトピックを挙げていただきありがとうございます。これは、視覚的に魅力的で効率的なサイトを管理する上で非常に重要な側面です。ブログのデザインを始めたばかりの頃、私はこのことを苦労して学びました。当初は、サイトのさまざまなセクションでどのように表示されるかを考慮せずに、フルサイズの画像をアップロードしていました。これにより、サイトの速度が大幅に低下しました。カスタム画像サイズを作成する方法を理解してからは、品質を犠牲にすることなく、さまざまなレイアウトに合わせて画像を最適化できるようになりました。これにより、サイトの速度が向上しただけでなく、すべてのデバイスで画像が完璧に表示されるようになりました。
メディアを多用するサイトを管理している人にとって、このプロセスを習得することは、サイトのパフォーマンスにとって非常に役立つと思います。WPbeginner、よくやりました!
イジー・ヴァネック
画像サイズだけでなく、画像の形式も考慮することが重要です。ある記事に従って画像をさまざまなサイズに調整したところ、ウェブサイトの速度が大幅に向上しましたが、PNGやJPGからWebPへの変換も検討する価値があります。WebPは比較的モダンな形式で、同等の品質を維持しながら画像サイズを最大90%削減できます。これが読み込み速度における真の魔法です。さらに、既存の画像を自動的にWebPに変換できる無料のWordPressプラグインもあります。
イジー・ヴァネック
このチュートリアルはとても参考になりました。別のチュートリアルで同じことを試しましたが、うまくいきませんでした。これは完璧に機能します。
axel
それは簡単でした、ありがとう。
Something harder:
How do i get rid of old, unused thumbnail sizes?
(best without a plugin)
敬具
アクセル
WPBeginnerサポート
未使用の画像サイズを削除する方法については、以下の記事で説明しています。
https://www.wpbeginner.com/wp-tutorials/how-to-prevent-wordpress-from-generating-image-sizes/
プロセスを簡素化するためにプラグインをお勧めします。サイトのプラグインの数について心配している場合は、以下の記事をご覧ください。
https://wpbeginner.com/opinion/how-many-wordpress-plugins-should-you-install-on-your-site/
管理者
B Toro
とてもシンプルで役立ちます
WPBeginnerサポート
Glad our guide was helpful
管理者
JKLYN
とても役立つチュートリアルです。しかし、画像のクラスはどう設定すればいいですか?
Kim
WPBeginner さん、ありがとうございます。これは素晴らしい効果がありました!
チアゴ
こんにちは、
素晴らしい記事です!しかし、ハードクロップツールの有用性がまだ理解できません。306×165の画像をアップロードし、その後2つのカスタムサイズ(ソフトクロップ:256×148、ハードクロップ:256×148)を作成しましたが、投稿からのこのプリントでご覧いただけるように:[http://prnt.sc/eromp3] 両方のオプションは同じままです。Photoshopで256×148のファイルを作成し、何もリサイズせずに元の画像をドラッグしましたが、その結果は上記の画像例4で見ることができます。それで、私の質問はこうです:画像2はPhotoshopで生成された画像のように見えるべきではないのでしょうか?
functions.php で使用されているコードは以下の通りです。
//例2で使用されるソフトクロップ
if ( function_exists( ‘add_image_size’ ) ) {
add_image_size( ‘new-size8’, 256, 148 );
}
add_filter(‘image_size_names_choose’, ‘my_image_sizes8’);
function my_image_sizes8($sizes) {
$addsizes = array(
“new-size8” => __( “New Size8”)
);
$newsizes = array_merge($sizes, $addsizes);
return $newsizes;
}
////例3で使用されるハードクロップ
if ( function_exists( ‘add_image_size’ ) ) {
add_image_size( ‘new-size9’, 256, 148, true, array( ‘center’, ‘center’ ) ); //(クロップ済み)
}
add_filter(‘image_size_names_choose’, ‘my_image_sizes9’);
function my_image_sizes9($sizes) {
$addsizes = array(
“new-size9” => __( “新しいサイズ9”)
);
$newsizes = array_merge($sizes, $addsizes);
return $newsizes;
}
事前に感謝します!
Kevin
これはうまく機能しますが、常に気になるのは、誰かがあなたのクロップサイズよりも小さい画像をアップロードした場合、その画像は作成されず、均等な高さの画像にしたかった場合にレイアウトが崩れてしまうことです。
マット・ロック
同じ問題に苦労しています。ケビン(小さい画像をアップロードしてもクロップされたサイズが作成されない)。これは理にかなっている(システムは不要な画像を生成しない)ということは理解していますが、低解像度や低品質な画像でも、不適切にクロップされた画像よりはましだと思います…
gonza
情報ありがとうございます。
とても助かります!
Sakshi
このコードを書くことができます。
実際には、バックグラウンドでアイキャッチ画像としてアップロードしていたバナー画像の投稿サムネイルサイズを設定したいです。何か提案をお願いします。
Aakash
こんにちは。
WordPressは初めてで、たくさんの問題があります。最初の問題は、WordPressで多くの投稿を作成したことです。例えばA、B、C、Dとします。ウェブサイトで更新すると、D、次にC、次にB、次にAのように表示されます。つまり、アップロードした順序とは逆になります。最初にDCBAのように表示されるのではなく、ABCDのように順番に表示される解決策があれば教えてください。お願いします。
Daniel Knoflicek
素晴らしい…多くのギャラリープラグインに役立ちます…
Lavinia Manzanarez
素晴らしいです!Codex of Wordpressでこの関数の使い方を読みましたが、時々ステップバイステップの説明が必要になります。ありがとうございます!
WPBeginnerスタッフ
はい、可能です。
ファーマー・ジョン
私もAli Rohanさんがやりたいことと同じことをしたいです。もう少し詳しく説明していただけますか?説明された方法を試しましたが、うまくいきませんでした。どこで間違っているのか分かりません。解像度のテキストを画像ファイルにどうやってリンクさせるのですか?
Ali Rohan
素敵な記事をありがとうございます。
WordPressで壁紙サイトを始めたいのですが、大きな壁紙を1つアップロードすると、ユーザーのために自動的に複数の解像度にリサイズすることは可能でしょうか?例えば、1920×1280の壁紙をアップロードした場合、1024×768、800×600などの解像度にリサイズされ、ユーザーが希望するサイズの壁紙を簡単に表示・ダウンロードできるようにしたいのですが?
Aayush
こんにちは、親愛なる方。緊急の助けが必要です。画像のサイズに問題があります。実際、プラグインWP Gallery Custom Linksを使用しています。投稿に多くの画像をアップロードしましたが、すべての画像の高さと幅が異なるため、さまざまなサイズで表示されています。私が設定したい同じサイズに設定したいです。この問題を解決するアイデアを教えてください。
ここ
これを言ってくれてありがとう。その通りです。|
Shoaib
素晴らしい説明
アンドリュー
これを設定しましたが、MIKE LITTLE が上記で提案したこと以外はうまくいっています。サムネイルは変更され、メディアギャラリーのバックエンドではそのように表示されます。しかし、フロントエンドのループでは、画像サムネイルは依然として WP のデフォルトのままです。REGEN THUMBS を実行しても、問題は解決しません。他にこの問題が発生している人や、解決策を知っている人はいますか??
WPBeginnerサポート
ループを確認し、
the_post_thumbnail() の代わりに<?php the_post_thumbnail('your-specified-image-size'); ?>を使用します。管理者
トマシュ
素晴らしいチュートリアルです!
登録済み画像のサイズを手動でトリミングできるプラグインをチェックしてみてください:
http://wordpress.org/plugins/manual-image-crop
WPBeginnerサポート
ありがとう、良いプラグインのようですね。検討します。
管理者
Marc C
良いチュートリアルです – WPBEGINNERに大変感謝します。
私も新しく登録した画像サイズのクロップができない問題がありましたが、TOMASZさんが投稿したプラグインがうまく機能しました – TOMASZさん、ありがとう!
Robbe Clerckx
長い間役立っています :)。ありがとうございます。
Danny
この非常に明確で役立つチュートリアルをありがとうございます。WP のドキュメントは非常に難解だったので、多くの時間を節約できました。
リディア・カランジャ
WordPressのアカウントを持っていますが、管理方法がわかりませんでした。しかし、このチュートリアルのおかげで今ではすべてわかります。作成方法とウェブサイトの管理方法をより理解できるようにしていただき、本当にありがとうございます。
andy19at
@jezThomp Great if your images work
jezThomp
@andy19at リンク…?
andy19at
@jezThomp リンクですか?機能しなかったので投稿しませんでした。
jezThomp
@andy19at http://t.co/YvmiX9hR
mikelittle
あなたは「ハードクロップの欠点は、画像のどの部分が表示されるかを制御できないことです。」と言いますが、それは真実ではありません。
画像をアップロードした後、投稿に挿入する前に、「画像を編集」をクリックすると、サムネイルまたは画像全体を変更したり、画像を拡大縮小、回転、または反転したり、サムネイルの場合は画像の正確な部分を選択したりできます。
wpbeginner
@mikelittle Thanks for the correction Mike. Just edited the article
clelandillustration
カスタムクロップが新しい画像サイズで機能しないようです。カスタムクロップはデフォルトの「サムネイル」サイズのバージョンでは機能しますが、そのクロップは新しい画像サイズには適用されません。カスタム画像サイズでは、クロップは依然として制御不能なようです。
Brent Norris
編集フローに関する良い洞察…
TdGon
良い記事です。それに付随する写真も…素晴らしいです。いくつかの場所でこれを実行する方法を見ましたが、ここではあなたが説明しているほどよく説明されていませんでした。試してみます。
どうもありがとうございます! (0.o)
PaulDeWoutersd'Oplinter
わかりにくいトピックに関する優れた説明です。そして非常に役立つプラグインです
mssbee
素晴らしいチュートリアルです!さまざまな切り抜きオプションについて説明していただきありがとうございます。それらがどのように機能するかを理解するのに本当に役立ちました。
tjhakan
良いチュートリアルです。よくできました
defries
デフォルトのアイキャッチ画像機能だけで何ができるかの素晴らしいまとめです。追加のヒントとして、コンテンツエリアの幅をアイキャッチ画像として設定し、設定 > メディアで同じ幅を定義することもできます。これにより、テーマで使用するアイキャッチ画像を選択でき、コンテンツエリアの最大サイズに自動的に設定されます。
<a href=”http://codex.wordpress.org/Embeds”>oEmbed</a>用の値も含まれていて素晴らしいです。
通常のランダム性
このチュートリアルをありがとうございます。なぜ時々、コードで指定したサイズに画像がクロップされないのか疑問に思っていました。