
私たちは長年にわたって多くのWordPressプラグインを作成し、私たち自身と何千人ものユーザーを助けてきました。多くの読者から、自分たちでもプラグインを作るにはどうしたらいいかという質問を受けました。
WordPressのプラグインを作るのは最初は難しく感じるかもしれませんが、実はとても楽しく、やりがいのある作業です。自分のサイトに新しい機能を追加したい場合でも、他の人と便利なものを共有したい場合でも、プラグインを作成するのは素晴らしい方法です。
このガイドでは、最初のWordPressプラグインの作り方を順を追って紹介します。

最初のWordPressプラグインを作成するために必要なものは?
WordPressプラグインは、WordPressサイトのアプリのようなものです。携帯電話のアプリのように、WordPressにプラグインをインストールして新しい機能を追加することができます。
WordPressプラグインについてさらに詳しく知りたい方は、WordPressプラグインとその仕組みについてのガイドをご覧ください。
最初のWordPressプラグインを作成するには、PHP、CSS、HTML、JavaScriptなどのコーディング言語の基本的な知識が必要です。
このチュートリアルは大変なように聞こえるかもしれませんが、ご心配なく。このチュートリアルでは、段階を追って手順を説明し、最後には簡単なWordPressプラグインを作成するのに十分なWordPressプログラミングの知識を身につけることができます。
このような理由から、私たちは基本に先頭に固定表示し、高度なWordPressコーディングスキルに飛び込むことはありません。
次に、コンピューター上でWordPressプラグインをテストするためにローカル開発環境が必要です。これを設定するには、WindowsコンピューターまたはMacに WordPressをインストールする方法のガイドを参照してください)。
プラグインをステージングサイトでテストすることもできる。しかし、エラーが発生した場合、サイトが壊れてアクセスできなくなる可能性があります。
WordPressの一般的なエラーを修正する方法をご覧ください。
コードを書くには、プレーンテキストエディターも必要です。メモ帳やテキストエディットで十分です。しかし、もっと高度なものを試したいのであれば、開発者向けのコードエディターをチェックしてみてください。
それではチュートリアルを始めましょう。以下のクイックリンクを使って、特定のトピックに飛ぶことができます:
ステップ1:基本的なWordPressプラグインを作成する
最初のステップは、デスクトップまたはドキュメンテーションフォルダーに新しいフォルダーを作成し、wpb-plugin-tutorialやmy-first-pluginのような名前を付けることです。
次に、テキストエディターで新規ファイルを作成し、プラグインフォルダー内にwpb-plugin-tutorial.phpまたはmy-first-plugin.phpとして保存する必要があります。重要なのは拡張子が.phpであることですが、ファイル名は何でもかまいません。

テキストエディターでPHPファイルを開く必要があります。
プラグインファイルに最初に追加する必要があるのは、プラグインヘッダーです。このコメントブロックは、プラグインの名前、バージョン、サイト、プラグイン作者名などをWordPressに伝えるだけです:
1 2 3 4 5 6 7 8 9 10 11 12 | /*Plugin Name: WPBeginner Plugin TutorialPlugin URI: https://www.wpbeginner.comDescription: A short little description of the plugin. It will be displayed on the Plugins page in WordPress admin area.Version: 1.0Author: WPBeginnerAuthor URI: https://www.wpbeginner.comLicense: GPL2License URI: https://www.gnu.org/licenses/gpl-2.0.htmlText Domain: wpb-tutorialDomain Path: /languages*/ |
プラグインヘッダーを追加したら、その下にプラグインコードを追加します。
このチュートリアルでは、各投稿の最後にユーザーにTwitterのフォローを求めるメッセージを追加するシンプルなプラグインを作成する。
以下のコードをプラグインのヘッダーブロックの下にコピー&ペーストするだけです:
1 2 3 4 5 6 7 8 9 10 11 12 13 14 15 16 17 18 | <?phpfunction wpb_follow_us($content) {// Only do this when a single post is displayedif ( is_single() ) { // Message you want to display after the post// Add URLs to your own Twitter and Facebook profiles$content .= '<p class="follow-us">If you liked this article, then please follow us on <a href="http://twitter.com/wpbeginner" title="WPBeginner on Twitter" target="_blank" rel="nofollow">Twitter</a> and <a href="https://www.facebook.com/wpbeginner" title="WPBeginner on Facebook" target="_blank" rel="nofollow">Facebook</a>.</p>';}// Return the contentreturn $content; }// Hook our function to WordPress the_content filteradd_filter('the_content', 'wpb_follow_us'); |
変更を保存する前に、TwitterとFacebookのプロフィールURLを自分のものに置き換えることをお忘れなく。
コンピューターのデスクトップに移動し、プラグイン・フォルダーのzipファイルを作成する。
Macユーザーはフォルダーを右クリックし、「wpb-plugin-tutorialを圧縮」を選択します。Windowsユーザーはフォルダーを右クリックし、「zipファイルに圧縮」を選択してください。

ステップ2:最初のWordPressプラグインのインストールと有効化
プラグインを作成したので、次はそれをインストールして試してみましょう。ステップバイステップの手順については、WordPressプラグインのインストール方法の投稿をご覧ください。
サイトのWordPress管理エリアに移動し、プラグイン ” 新規追加ページにアクセスします。

プラグインをアップロードするには、上部にある「プラグインのアップロード」ボタンをクリックする必要があります。プラグインのアップロードボックスが表示されます。
ファイルを選択」ボタンをクリックして、作成したzipファイルを選択します。次に、「今すぐインストール」ボタンをクリックして、プラグインをアップロードしてインストールします。
インストールしたら、プラグインを有効化してください。

プラグインが実際に動作している様子を、あなたのサイトでご覧いただけます。
すべての個別投稿の最後に新しい段落が表示されます。

ステップ3:WordPress.orgのプラグインリポジトリにプラグインを送信する
もしあなたのプラグインを他のWordPressユーザーに知ってもらい、使ってもらいたいのであれば、WordPress.orgのプラグインリポジトリに送信することができます。
そのためにはまず、プラグイン用の「Read Me」ファイルを作成する必要があります。空白のテキストファイルを開き、readme.txtとしてプラグインフォルダーに保存してください。
このreadme.txtファイルはWordPress.orgのreadmeファイルの構文を満たしている必要があります。readme.txtファイルに追加した情報は、WordPress.orgのプラグインのページに表示されます。
Readme.txtのサンプルです:
1 2 3 4 5 6 7 8 9 10 11 12 13 14 15 16 17 18 19 20 21 22 23 24 25 26 27 28 29 30 31 32 33 34 35 36 37 | === Your Plugin Name ===Contributors: WPBeginnerTags: wpbeginner, plugin tutorialRequires at least: 6.0Tested up to: 6.2Stable tag: 1.0License: GPLv2 or laterLicense URI: http://www.gnu.org/licenses/gpl-2.0.htmlA WordPress plugin to teach beginners how to write a WordPress plugin. == Description ==This simple plugin is part of our beginner's guide to writing a WordPress plugin. == Installation ==1. Upload the plugin folder to your /wp-content/plugins/ folder.1. Go to the **Plugins** page and activate the plugin.== Frequently Asked Questions === How do I use this plugin? =Answer to the question= How to uninstall the plugin? =Simply deactivate and delete the plugin. == Screenshots ==1. Description of the first screenshot.1. Description of the second screenshot. == Changelog === 1.0 =* Plugin released. |
それでは、WordPressプラグインのreadmeファイルの構文がどのように機能するのか、あなたのプラグイン用にカスタマイズできるように、少し説明しましょう。
プラグインのread meの最初の行は、あなたのプラグイン名です。この名前はWordPress.orgのプラグインディレクトリでプラグインのタイトルとして表示されます。
次の行は寄稿者です。これらはWordPress.org上であなたのプラグインを管理するためのユーザーIDです。WordPress.orgのユーザーアカウントをすでにお持ちでない場合は、無料のWordPress.orgユーザーアカウントを作成してユーザーIDを取得してください。
Requires at least」と「Tested up to」は、プラグインが動作するWordPressのバージョンを示しています。Stable tag’はあなたのプラグインのバージョンです。
License’フィールドはGPLのままで、URLもそのままでいい。
次に、説明エリアを編集して、プラグインが何をするのかを説明することができます。
プラグインのReadmeファイルを編集したら、変更を保存することを忘れないでください。
これであなたのプラグインはWordPress.orgのプラグイン・チームの審査を受ける準備ができました。プラグインを送信するには、WordPress.org の無料アカウントが必要です。
プラグインの追加ページにアクセスし、すでにログイン中でなければ、「ログインしてください」ボタンをクリックしてください。
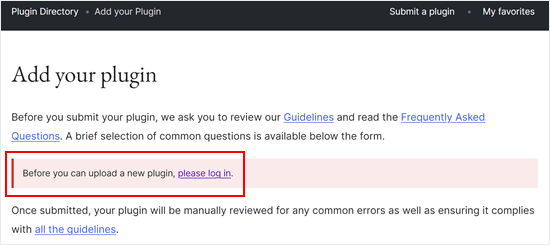
ログイン中、プラグインをアップロードして送信し、レビューを受けることができます。
ファイルを選択」ボタンをクリックして、プラグインのzipファイルを選択します。その後、該当するボックスにすべてチェックを入れ、「アップロード」をクリックするだけです。
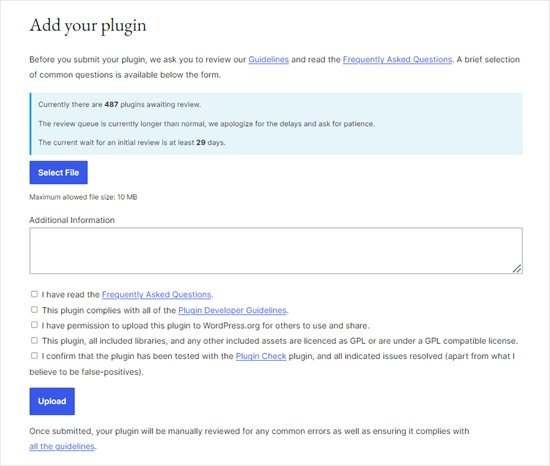
WordPress.orgのプラグインレビューチームがあなたのプラグインコードを見て、一般的なエラーやセキュリティチェックを行います。承認されると、プラグイン・チームからメールが届きます。
このメールには、WordPress.org でホストされているプラグインの Subversion (SVN) リポジトリへのリンクがコンテナとして含まれます。
ステップ4: Subversion (SVN)を使ってプラグインをアップロードする
Subversionはバージョンコントロールソフトウェアです。ユーザーがファイルやディレクトリに変更を加えながら、変更の記録を残し、異なるバージョンを管理し、共同作業を可能にします。
プラグインをWordPress.orgにアップロードするには、コンピューターにSVNクライアントがインストールされている必要があります。
Windowsユーザーは、SilkSVNまたはTortoiseSVN(無料)を使用できます。MacユーザーはSmartSVNまたはVersions Appをコンピューターにインストールできます。
この投稿では、Versions App for Macのスクリーンショットをお見せします。しかし、GUIを持つすべてのSVNアプリで、プロセスは非常によく似ています。
インストーラをインストールしたら、Versionsアプリを開き、WordPressプラグインのリポジトリのコピーをチェックアウトする必要があります。新規リポジトリブックマーク」ボタンをクリックしてください。

ポップアップが表示されるので、まずブックマークの名前を入力してください。プラグインにちなんだ名前をつけることができます。
その後、WordPressプラグインのSVNリポジトリURLを追加する必要があります。

作成」ボタンをクリックしてリポジトリに接続します。
Versions App はプラグインのリポジトリのコピーをコンピューターにダウンロードします。次に、ブラウザー表示でリポジトリ名を右クリックし、「購入手続き」を選択します。

フォルダーの名前を入力し、コンピューターに保存する場所を選択します。プラグインディレクトリと同じフォルダー名を使用することができます。
Versionsアプリはプラグインのローカルコピーをコンピューターに作成します。プラグインのリポジトリで表示したり、Finderアプリで閲覧することができます。

プラグインファイルをコピー&ペーストして、ローカルリポジトリのtrunkフォルダに貼り付けます。
そうすると、「バージョン」アプリの新規ファイルの横にクエスチョンマークのアイコンが表示されます。
これらのファイルは以前には存在しなかったので、「追加」する必要があります。新規ファイルを選択し、「追加」ボタンをクリックして、これらのファイルをローカル・フォルダーに追加します。

プラグインファイルが Subversion に追加されたので、アップロードする準備ができました。基本的には、ローカルフォルダーと Subversion ディレクトリの変更を同期させます。
ローカルリポジトリをクリックして選択し、「Commit」ボタンをクリックします。

新しいポップアップが外観されます。
変更点のリストと、コミットメッセージを追加するボックスが表示されます。Commit’をクリックしてください。

SVNアプリがあなたの変更を同期し、プラグインのリポジトリにコミットします。
プラグインファイルをトランクにアップロードしたので、次はバージョンにタグを付けましょう。
プラグインのローカルコピーに行き、trunkフォルダー内のファイルをコピーしてください。その後、tagsフォルダーを開き、その中に新しいフォルダーを作成してください。
このフォルダーにバージョン名を付けてください。プラグインのヘッダーに入力したバージョンと一致していることを本当に〜してもよいですか?上のサンプルコードでは、プラグインにバージョン1.0を使用しています。
tags/フォルダーに1.0フォルダーを追加します。Versionアプリのフォルダー名の横にクエスチョンマークアイコンが表示されます。
これは新規フォルダーなので、フォルダーとそのすべてのファイルをリポジトリに含めるには、「追加」ボタンをクリックする必要があります。
その後、’Commit’ ボタンをクリックして変更を同期します。ローカルコピーでプラグインファイルの編集を続けることができます。
変更が完了したら、コミットボタンをクリックするだけで WordPress.org のリポジトリと同期されます。
プラグインに大きな変更を加えた場合は、バージョン番号にちなんだ新しいフォルダーを追加して、新しいバージョンを追加します。バージョン番号がプラグインのヘッダーと一致していることを確認してください。
WordPress.orgのプラグインディレクトリでプラグインをプレビューできるようになりました。
ステップ5:WordPress.orgでプラグインにアートワークを追加する

WordPress.orgでは、プラグインにアートワークやスクリーンショットを追加することができます。これらの項目は標準的な命名規則に従う必要があり、Subversion を使用してアップロードする必要があります。
プラグイン・ヘッダー・バナー
プラグインページの上部に表示される大きな画像です。ファイル形式は772 x 250または1544 x 500ピクセルで、jpegまたはpngです。ファイル名は必ずこのようにします:
- バナー-772×250.jpg または バナー-772×250.png
- バナー1544×500.jpg または バナー1544×500.png
プラグインアイコン
この小さいSquare型の画像ファイルは、検索結果やプラグインリストにプラグインアイコンとして表示されます。ファイル形式は125 x 125または250 x 250ピクセルで、jpegまたはpngです。
このアイコンファイルは次のような名前にする:
- icon-128×128.jpg または icon-128×128..png
- icon-256×256.jpg または icon-256×256.png
スクリーンショット
スクリーンショットのファイル名は、以下のフォーマットで命名してください:
- スクリーンショット-1.png
- スクリーンショット-2.png
お好きなだけ追加してください。これらのスクリーンショットは、readme.txtファイルのスクリーンショットの説明と同じ順序で表示される必要があります。
アートワークをすべて用意したら、プラグインのローカルコピーのassetsフォルダーに入れます。
その後、assetsフォルダーの横にクエスチョンマークアイコンが表示されます。Add’ボタンをクリックすると、assetsファイルがリポジトリに追加されます。

最後に、コミットボタンをクリックしてWordPress.orgリポジトリにファイルをアップロードしてください。しばらくすると、プラグインページにアートワークが表示されます。
WordPressプラグイン開発を学ぶための究極のガイド
WordPressのプラグインは、上でご紹介したようなシンプルなものから、クイズやカウントダウンタイマー、投票、Googleレビューなど、もっとパワフルなものまであります。また、クイズ、カウントダウンタイマー、RSVP、投票、Googleレビューなど、よりパワフルなものもあります。
WordPressの強力なプラグインには、アドオンもあります。これらのアドオンは、他のプラグインを拡張するプラグインのように機能します。
WordPressプラグインに機能を追加する方法をさらに詳しく学ぶのに役立つリソースをいくつかご紹介します:
- 初心者のためのWordPress便利なコードスニペット
- WordPressにショートコードを追加する
- functions.phpファイルのトリックをサイト固有のプラグインで使えるようにした。
- カスタム投稿タイプとタクソノミーの作成
- WordPressでスタイルシートとJavaScriptを適切に追加する
この投稿がWordPressプラグインの作成方法を学ぶのにお役に立てば幸いです。WordPressの新機能を提案する方法についてのガイドと、最も成功しているWordPressビジネスと企業のリストもご覧ください。
If you liked this article, then please subscribe to our YouTube Channel for WordPress video tutorials. You can also find us on Twitter and Facebook.


Dennis Muthomi
As someone with no coding experience, I found this article on WordPress plugin development to be incredibly helpful and well-explained.
Even though I don’t see myself coding a plugin anytime soon, I managed to understand some key concepts thanks to the clear step-by-step instructions. I especially liked learning about how developers can submit their plugins to the WordPress Plugin Repo.
even though I do not see myself coding one, one thing for sure is that I have learned something new today! Thank you WPBeginner!
WPBeginner Support
Glad to hear you found our guide helpful!
Admin
mohadese esmaeeli
How interesting that every feature we have in mind can be created as a plugin and installed in WordPress. I’ve installed the Jannah theme on my site, but it has some shortcodes, and I’m planning to change the theme. With the method you provided, maybe I can keep the shortcodes of the previous theme as a plugin alongside the new theme.
WPBeginner Support
It would require some coding knowledge but you could look to add the features to your new theme
Admin
maven
How do you end the plugin code? with this } or what?
WPBeginner Support
It would depend on the code you are using, you want to use } if there is an opening { that needs to be closed but you do not need a specific end of file marker.
Admin
andrea vironda
What would happen if I avoid to use “add_filter(‘the_content’, ‘wpb_follow_us’);”?
WPBeginner Support
If you don’t use that code then the paragraph with your follow links would not be added to the end of the content. The $content is the links to be added and the add_filter is what includes it in the content.
Admin
andrea vironda
What’s the meaning of “Text Domain” and “Domain path”?
WPBeginner Support
The Text domain is used to tell where your text is located for translation purposes and must be the same as the folder name.
The Domain path is where translations for your plugin can be found.
Admin
Ritik
Thanks,
its very helpfull.
WPBeginner Support
Glad we could show how to create a plugin in a beginner friendly way
Admin
Raja Poudel
Your explanation is very simple to understand for me as a beginner in wordpress plugin development.
WPBeginner Support
Glad you found our guide helpful
Admin
Ahroihan
Hello,
I want to make a plugin, can you give me tutorial about it?
Thank you
mamta
hi,i’m php developer and wordpress developer.i would like to create custom wordpress plugin.please send tutorials.
Siva
Hi i am php and wordpress developer, so i want to create custom wordpress plugin
please give me plugin tutorials and help to create plugin.
ramesh ram
hi,i’m php developer and wordpress developer.i would like to create custom wordpress plugin.please send tutorials.
Marcy
I’m a virgin programer, but have decided to create my own plug in for a fund raiser thermometer for my adoption blog because none of the ones I’ve found are comparable with my WP version and have what I want on them… and needless to say, I need help, direction, tips, something similar to what I need that I can tweek… etc. Please help ! thanks
suresh
It’s Good Article and it’s much simple
Shrini
Good article to learn WP plugin development…
JasonCrews
WordPressmodder is a viagra site now
rakeshtiwary022
hi am php and wordpress developer, so i want to create custom wordpress plugin
please give me plugin tutorials and help to create plugin
email:-rakeshtiwary022@gmail.com
HomeTivi
hi am php and wordpress developer, so i want to create custom wordpress plugin
please give me plugin tutorials and help to create plugin
MannuSingh
hi am php and wordpress developer, so i want to create custom wordpress plugin
please give me plugin tutorials and help to create plugin
BanksBen
I have a limited knowledge of php . I am integrating my old site in to my new wp site my old site is a PHP SQL driven system that collects leads and stores them.My site is http://www.moverscommunity.com/ and http://tsveetech.com
Bagesh Singh
I am a programmer. From last two days I am trying to create custom plugin and it’s help me better thanks a lot.
Nigel
Thanks for this great collection of articles. I can’t wait to get started hacking together my own plugin
Dadang Iskandar
I am very grateful to find this article because I’m learning php programming. very nice brother
John Franklin
Very nice, I’m a huge fan of WordPress and it’s great to see new really useful plugins getting released. I’ll download and check it out, looks exactly like what I have been looking for for weeks. So, thanks alot!
Kent Tan
Nice collection of tutorials. Where can I get the more advanced stuff – e.g. creating an options page to configure the plugin etc?
Editorial Staff
Buy one of the plugin books… Study the Codex, and the Trunk.
Admin
Brad
Thanks for the article, have always wanted to know a little more about making plugins so now I will give it a try!
Rosti The Snowman
I think this list will be really helpful
thanks
I also agree you should change the title
Tim Trice
Two of the first four cover the same function of echoing “Hello World” (the first, at least, let’s you customize the echo statement). I’d like to see some more articles focused on plugin standards, deactivation hooks and removing data from the DB as well as exports.
Joe
+1 change title
Marco
Well, I suggest to change the title from “How to Create a WordPress Plugin” to “A list of the best tutorials to help you create your own WordPress Plugin”.
Anwer
Well that’s good Idea..!!!Agree with you
Nikunj Tamboli
Nice article will try to create couple of plugin using the article here