もしあなたがオンラインビジネスを展開しているのであれば、ユーザーの声を集めることは、オーディエンスを理解するために重要です。そこで、アンケートの出番です。
ユーザーの嗜好、経験、満足度に関する貴重な洞察を収集するための強力なツールであり、ユーザーエンゲージメントを向上させることができる。
フィードバックを求めるにせよ、アンケートを実施するにせよ、市場調査を行うにせよ、双方向のアンケートがあれば世界が変わります。
このガイドでは、WordPressサイトにアンケートを作成する手順を初心者にもわかりやすく説明します。

WordPressでアンケートを作成する理由
アンケートを作成することは、オーディエンスについてより詳しく知るための素晴らしい方法です。これにより、彼らのニーズに合わせてコンテンツを調整することができます。また、その結果を利用して、オーディエンスに最も役立つ商品/サービスを作成したり、変更したりすることもできます。
サイト外で使用できるアンケートツールはいくつかありますが、WordPressサイト自体にアンケートを設置することで、表示方法を完全にコントロールすることができます。さらに、視聴者にとっても、より親しみやすく安心感があります。
ということで、WordPressサイトにアンケートを簡単に追加する方法を見てみましょう。
WordPressでアンケートフォームを作成する方法
WPFormsを使って簡単にアンケートを作成することができます。シンプルなドラッグアンドドロップビルダーを提供し、WordPressダッシュボードで直接すべてのフォームエントリを表示することができます。
お問い合わせフォームはすべてWPFormsを使用しています。また、アンケートの一種である年間調査の作成にも使用しています。さらに詳しく知りたい方はWPFormsのレビューをご覧ください。
まず、WPFormsをインストールして有効化する必要があります。詳細については、WordPressプラグインのインストール方法のステップバイステップガイドを参照してください。
注:WPFormsには無料版もあります。ただし、チュートリアルで使用するアドオンをアンロックするにはプラグインのプロバージョンが必要です。
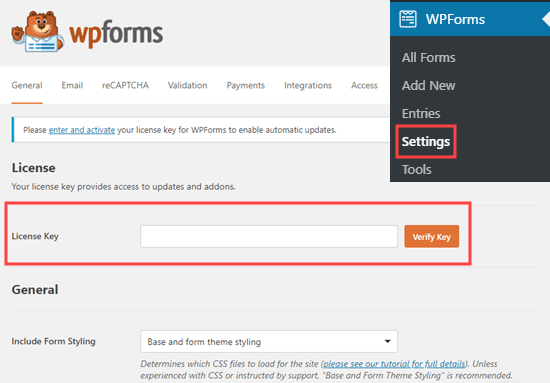
有効化した後、WordPress管理エリアのWPForms ” 設定ページにアクセスし、ライセンスキーを入力してください。
ライセンスキーはWPFormsサイトのアカウントにあります。
さて、次はいよいよアンケートの作成だ。
方法1: WPFormsのアンケート・投票機能を使ってアンケートを作成する
WPFormsの強力なアンケート&投票アドオンはアンケートを簡単に作成することができ、市場で最高のWordPressアンケートプラグインとなっています。また、結果の美しいビジュアルグラフも作成できます。
まず、WPForms ” Addons のページにアクセスして Survey and Polls アドオンをインストールします。
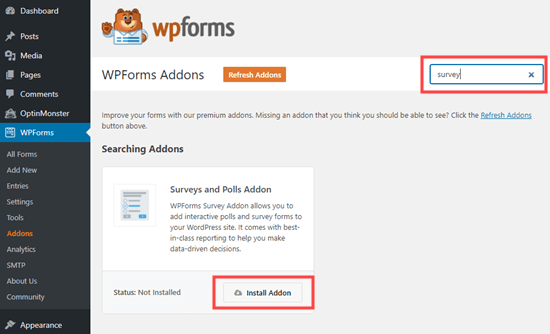
アドオンが見つかったら、「アドオンのインストール」ボタンをクリックしてインストールし、有効化します。
その後、WordPress ダッシュボードからWPForms ” 新規追加ページに移動し、新規フォームを作成します。
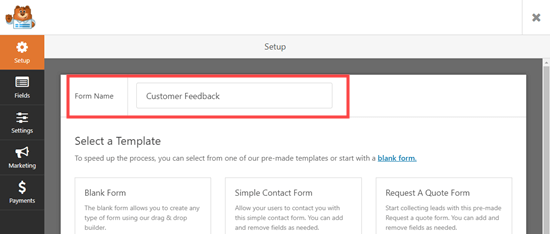
ここから、画面上部にこれから作成するフォームの名前を入力します。
次に、4つの異なるビルトインアンケートフォームテンプレートから選択することができます。投票フォーム、アンケートフォーム、NPS アンケートシンプルフォーム、NPS アンケート拡張フォームです。
アンケートにはアンケートフォームを使用します。
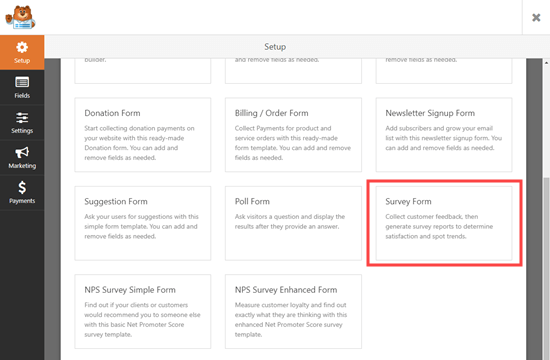
テンプレートを選択すると、WPFormsフォームビルダーで開きます。
ここでは、左の列にフィールドオプション、画面の右隅にフォームプレビューが表示されます。
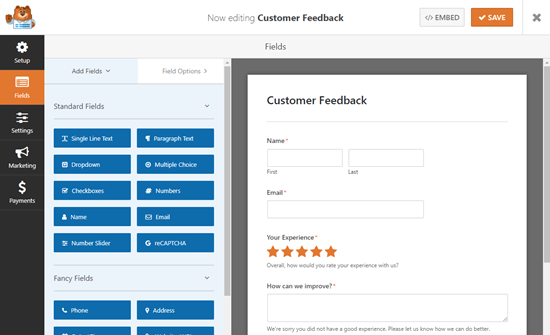
あなたの聴衆やニーズに合うように質問を編集することをお勧めします。
例えば、製品や配送に関するカスタマーのフィードバックを収集するためにフォームを使用するつもりです。
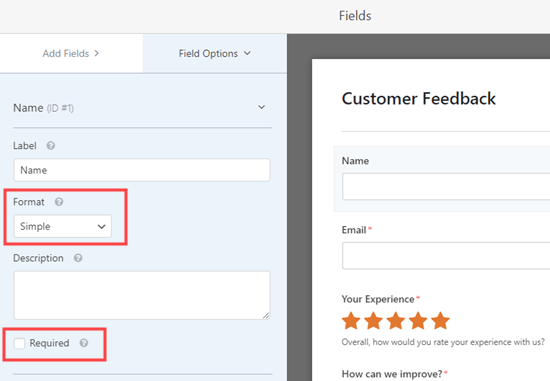
フィールドを編集するには、そのフィールドをクリックします。左カラムに編集オプションが表示され、フィールドのラベル、説明、フォーマットを変更することができます。
ここでは、一番上の「名前」フィールドを編集しています。ドロップダウンを使って、フォーマットを「Simple」に変更しました。
また、『必須』のチェックを外してオプション設定にした。
次に、フォームの「How can we improve?
このフィールドは、ユーザーが自分の経験を1つ星または2つ星と評価した場合にのみ外観されます。
しかし、ユーザーがあなたのWordPressブログでの経験を3つ星または4つ星として評価した場合に表示される同様のフィールドを追加することもできます。
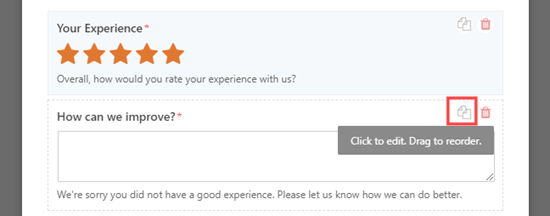
これを行うには、マウスカーソルを「どのように改善できるか」ボックスの上に持っていき、「コピー」ボタンをクリックするだけです。
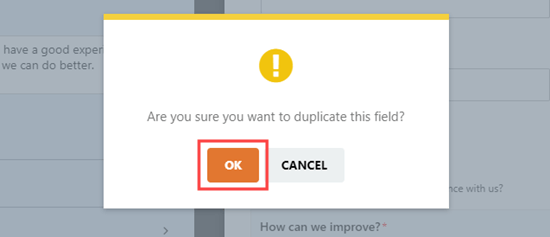
これで画面にプロンプトが表示され、本当にこのフィールドを複製したいのか確認することができます。
ここで「OK」ボタンをクリックして続行する。
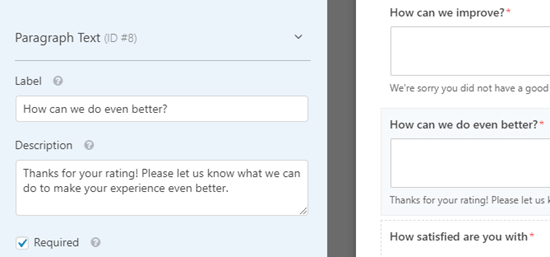
次に、画面左側の新しいフィールドを編集して、3つ星または4つ星評価のお客様に適した質問ボックスにすることができます。
例えば、ユーザーがあなたのWordPressサイトに4つ星をつけたとしたら、5つ星を獲得するためにはどうすればよいかを尋ねることができます。
また、説明を変更したり、ユーザーにとって必須のフィールドにすることもできます。
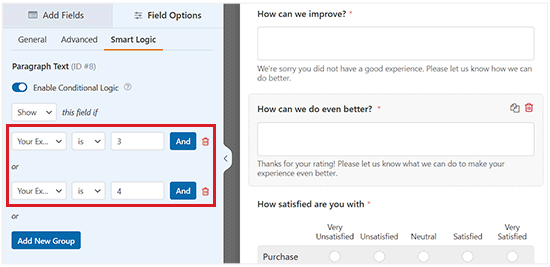
その後、このフィールドに条件ロジックを設定する必要があります。
これを行うには、上部から「スマートロジック」タブに切り替える。
次に、フィールドに書かれている数字を1と2ではなく、3と4に変更する。
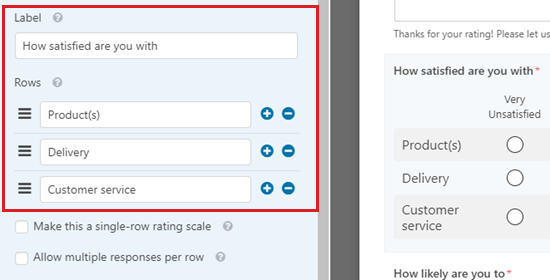
最後に、「どの程度満足しているか」のリッカート尺度を編集します。
リッカート尺度とは、満足度や態度を測るためによく使われる5段階または7段階の尺度である。
この場合も、フィールドをクリックするだけで編集できる。そして、行またはカラムのラベルを使用したいテキストに変更する。
行のラベルを変更し、より具体的にする。
その後、好きなだけフォームを変更してください。
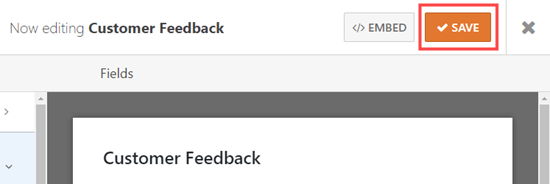
最後に、画面上部の「保存」ボタンをクリックするのをお忘れなく。
アンケートの通知を設定する
WPForms は記入されたアンケートをサイト設定で設定されたビジネスメールアドレスに送信します。フォームビルダーから設定 ” 通知タブで簡単に変更できます。
Send To Email Address’ボックスの{admin_email}を削除し、代わりに使用したいメールアドレスを入力します。
より詳細な手順については、WordPress フォーム送信後に確認メールを送信する方法のチュートリアルをご覧ください。
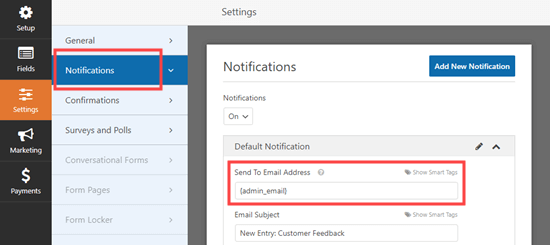
ヒント:WordPressの管理者メールアドレスがわからないですか?管理者サイドバーから設定 ” 一般ページにアクセスし、’管理者メールアドレス’ ボックスをチェックしてください。
変更後はアンケートを保存することを忘れないでください。
サイトにアンケートを追加する
あなたのサイトのどの投稿やページにもアンケートを埋め込むことができます。サイドバーに追加することもできます。
ページにフォームを追加するには、ページを編集するか、WordPressの管理メニューからページ ” 新規追加の画面へ進み、フォームを新規作成します。
ここから「ブロックを追加」(+)ボタンをクリックすると、ブロックメニューが開きます。
次に、WPFormsブロックをWordPressのページ/投稿に追加します。
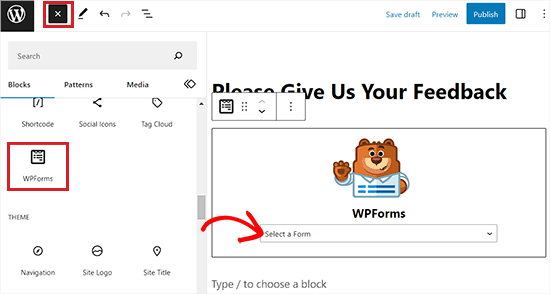
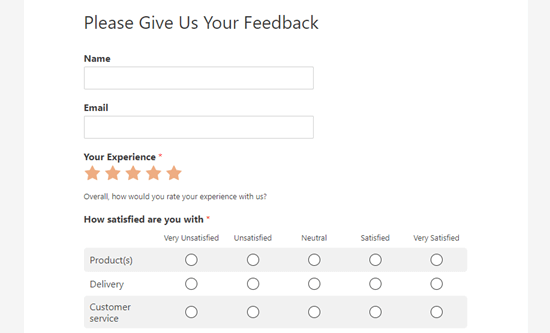
それが完了したら、ドロップダウンメニューをクリックし、アンケートフォームを選択します。
投稿をプレビューまたは公開するだけで、WordPressサイトにフォームが表示されます。
方法2:会話フォームを使ったアンケートの作成
WPFormsの会話型フォームアドオンを使ってアンケートを作成することもできます。
会話型フォームは、会話のように流れるインタラクティブなフォームです。ユーザーが質問に答えると、自動的に次の質問が表示されます。
アンケートのような長いフォームも記入しやすくなり、フォームの放棄を減らすことができる。
まず、WordPressの管理サイドバーからWPForms ” Addonsのページにアクセスする必要があります。
Conversational Forms Addon を探してインストールします。
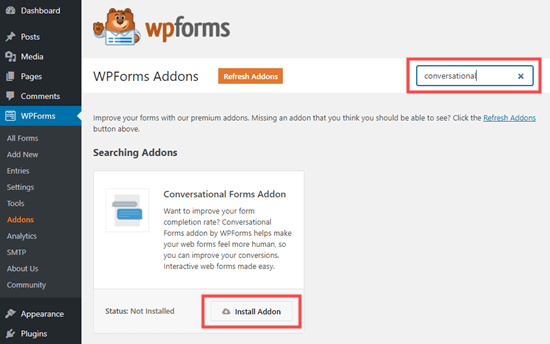
その後、WPForms ” Add New画面にアクセスし、先ほどの方法で新規フォームを作成します。
すでにフォームを作成している場合は、WPForms ” All Forms のページでフォームをクリックして編集してください。
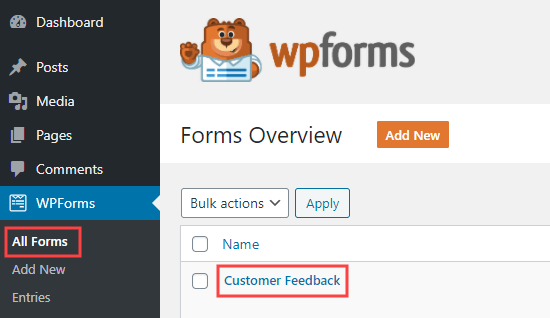
では、フォームを会話型フォームに変換します。
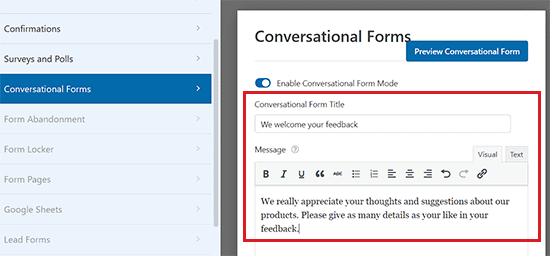
これを行うには、WPForms フォームビルダーから設定 ” 会話型フォームタブに移動します。
次に、「会話フォームモードを有効化」スイッチを有効化に切り替えるだけです。

その後、記入すべき追加オプションがいくつか表示されます。
会話型フォームは投稿やページに埋め込むことができないので、ここでフォームにタイトルをつける必要があります。
また、フォームの上に表示したいテキストを「メッセージ」セクションに書くこともできます。
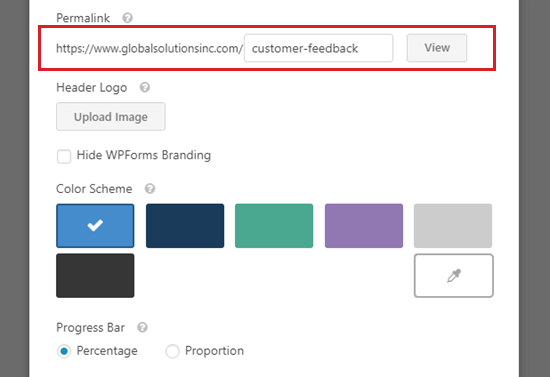
WPFormsはフォーム名に基づいて会話型フォームのURLを自動的に作成します。これを変更したい場合は、ここに別のURLを入力するだけです。
オプションで、ヘッダー画像のアップロード、配色の選択、プログレスバーのスタイルの変更も可能です。
フォームの設定が完了したら、画面上部の「保存」ボタンを忘れずにクリックしてください。
その後、フォームのパーマリンクの横にある「表示」ボタンをクリックすると、サイトにフォームが表示されます。

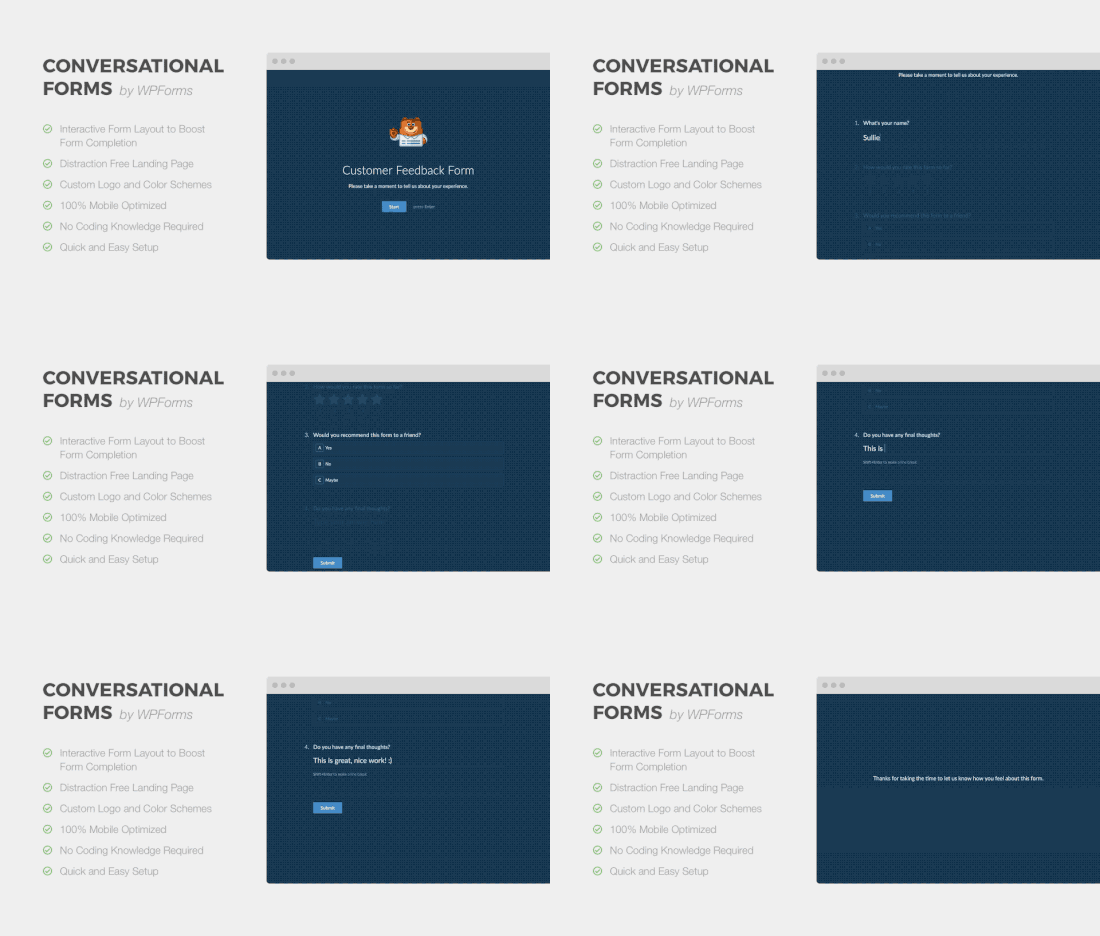
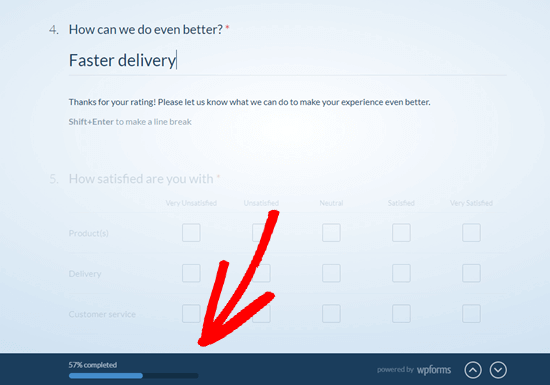
これは私たちのデモサイトでの会話型アンケートの様子です。
ここでは、カスタマイザーは単にフォームを開始するために開始ボタンをクリックする必要があります。

その後、1問ずつ回答を入力することができる。
有効化しなかった質問は、カスタマイザーがその質問に移るまでフェードアウトする。

また、カスタマイザーには画面下部に先頭固定表示のプログレスバーが表示される。
このバーは、カスタマイザーがフォームのどの辺りまで進んだかを示します。
以上です。これで会話式アンケートの作成は完了です。
アンケート結果の表示
通常のアンケートでも会話形式のアンケートでも、結果を表示するプロセスは同じです。
各アンケートの回答は、フォームビルダーの設定 ” 通知タブで設定したメールアドレスにメールで送信されます。
WPForms はまた、すべてのアンケート結果を WordPress データベースに保存します。表示するには、WordPress ダッシュボードのWPForms ” Entriesページに移動します。
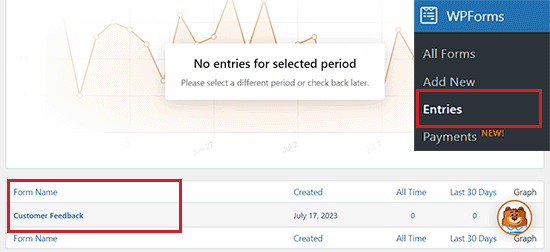
ここから、アンケートフォームの名前をクリックします。
アンケートの回答の一部が表示されます。アンケート結果を表示」ボタンをクリックすると、すべてのアンケート結果が表示されます。
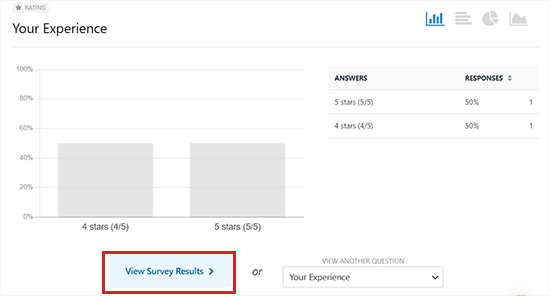
WPFormsはグラフやチャートを自動的に作成し、結果の解釈を容易にします。
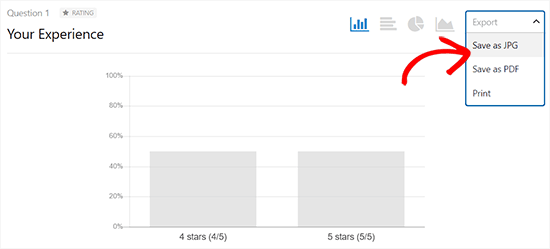
また、グラフをPDFやJPGとしてエクスポートすることもできます。グラフを印刷して、組織内の他の人と共有することもできます。
項目の横にある「エクスポート」リンクをクリックし、ドロップダウンメニューから選択するだけです。
個々のカスタマイザーからのアンケート回答を表示したい場合は、上部にある「すべてのエントリーに戻る」ボタンをクリックしてください。
次に、画面下部の表までスクロールダウンし、表示したいエントリーの「表示」ボタンをクリックする。
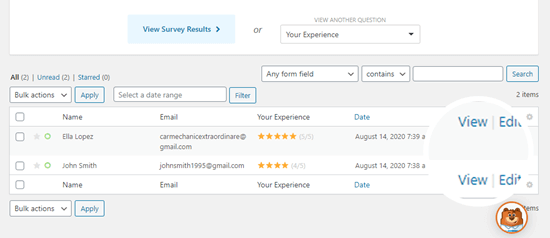
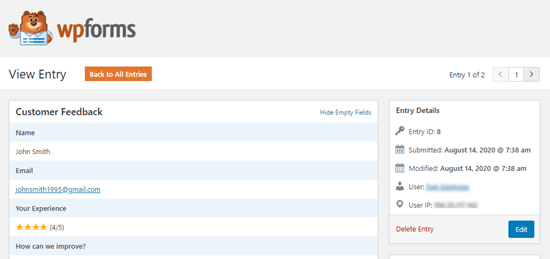
その人が送信したすべての回答が表示されます。
以下に例を挙げる:
ボーナス:UserFeedbackを使ってWordPressでアンケートを作成する
UserFeedbackのような無料のプラグインを使って、WordPressで簡単なアンケートを作成することもできます。
UserFeedbackでは、ポップアップアンケートウィジェットを簡単に作成し、サイト訪問者からのフィードバックをリアルタイムで収集することができます。
私たちはこのプラグインを使って訪問者からのフィードバックを集めました。さらに詳しく知りたい方は、UserFeedbackのレビューをご覧ください。
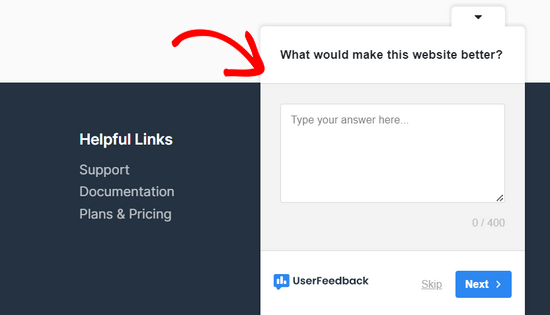
複数選択式の質問、自由形式の質問、さらにメールアドレスを取得してニュースレターを増やし、リードを生成することもできます。さらに、無制限にアンケートを作成し、無制限にレスポンスを受け取ることができます。
UserFeedbackには、高度なターゲティングルール、カスタマイザー、すべての質問タイプなどの機能を提供するプレミアムバージョンもあります。
詳細な手順については、WordPress でアンケートを作成する方法のチュートリアルを参照してください。
この投稿が WordPress でアンケートを作成する方法を学ぶのにお役に立てば幸いです。WordPress で投稿記事のフィードバックを素早く得る方法についての初心者向けガイドや、よりインタラクティブな WordPress フォームを作成するための専門家のヒントもご覧ください。
If you liked this article, then please subscribe to our YouTube Channel for WordPress video tutorials. You can also find us on Twitter and Facebook.


Jiří Vaněk
The questionnaire is a very important part of communication with users to get feedback for your blog, website or e-shop. It’s great that WP Forms is so versatile that apart from the classic contact form, it can do many other things like questionnaires, polls and much more. I’m glad I have it in full version now and can use it. It’s a great plugin.
Johnpaul
I love using wpforms
WPBeginner Support
Glad to hear you enjoy using the plugin
Admin
Ajayi Victor Semiloore
Does this work for the free wpform?
WPBeginner Support
As we state in the article, you will need the pro version for these features.
Admin