ウィジェットを使用すると、サイドバーやWordPressサイトのウィジェット対応エリアにコンテンツ以外の要素を追加できます。バナー、広告、ニュースレター登録フォーム、その他の要素をサイトに追加することができます。
カスタムウィジェットを作成して、ソーシャルメディアフィード、最近の投稿、HTMLタグのようなパーソナライズされたユニークな機能を埋め込むこともできます。
WPBeginnerでは、カスタムウィジェットを使用して、サイトのサイドバーにさまざまなタイプのコンテンツを表示しています。この投稿では、WordPressカスタムウィジェットの作成方法を順を追って説明します。

注:このチュートリアルは、WordPressの開発とコーディングを学んでいるDIY WordPressユーザーのためのものです。
WordPressウィジェットとは?
WordPressウィジェットは、サイトのサイドバーやウィジェット対応エリアに追加できるコードの断片です。
サイトにさまざまな要素や機能を追加するためのモジュールと考えてください。
WordPressのデフォルト設定では、どのWordPressテーマでも使用できるウィジェットが標準で用意されています。詳しくは、WordPressでウィジェットを追加して使用する方法についての初心者ガイドをご覧ください。
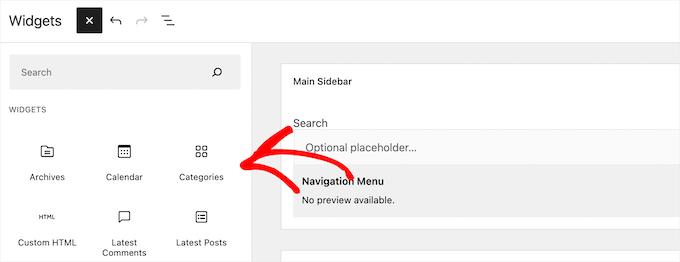
WordPressでは、開発者が独自のカスタムウィジェットを作成することもできます。
多くのプレミアムWordPressテーマやプラグインには、サイドバーに追加できる独自のカスタマイザーウィジェットが付属しています。
例えば、お問い合わせフォーム、カスタムログインフォーム、フォトギャラリー、メールリストサインアップフォームなどを、コードを書くことなくサイドバーに追加することができます。
それでは、WordPressでカスタムウィジェットを簡単に作成する方法を見ていきましょう。
WordPressでカスタムウィジェットを作成する前に
WordPressのコーディングを学ぶなら、ローカルの開発環境が必要です。これにより、サイトが稼動していることを心配することなく、自由に学習やテストを行うことができます。
MacではMAMP、WindowsではWAMPを使ってローカルにWordPressをインストールできます。
すでにライブサイトをお持ちの場合は、ローカルホスティングサービスに移動することができます。詳しくは、WordPress サイトをローカルサーバーに移動する方法をご覧ください。
その後、WordPressでカスタマイザーコードを追加するには、いくつかの方法があります。
理想的には、サイト固有のプラグインを作成し、そこにウィジェットのコードを貼り付けることができる。これにより、WordPressテーマに依存しないコードをWordPressに追加することができます。
テーマのfunctions.phpファイルにコードを貼り付けることもできます。ただし、特定のテーマが有効化されたときのみ利用可能です。
WPCodeプラグインを使えば、サイトにカスタマイザーコードを簡単に追加することができる。
このチュートリアルでは、訪問者を迎えるだけのシンプルなウィジェットを作成します。ここでの目標は、WordPress ウィジェットクラスに慣れることです。
準備はいいかい?始めよう
基本的なWordPressウィジェットの作成
WordPressには、ビルトインのWordPressウィジェットクラスがあります。新しいWordPressウィジェットはWordPressウィジェットクラスを継承しています。
WordPress開発者ハンドブックには、WP Widgetクラスで使用できる19のメソッドが記載されています。
しかし、このチュートリアルでは、以下の方法を取り上げます。
- __construct() :ウィジェットのID、タイトル、説明を作成する部分です。
- widget : ウィジェットが生成する出力を定義します。
- フォーム :この部分では、バックエンド用のウィジェットオプションを含むフォームを作成します。
- 更新: ウィジェットのオプションをデータベースに保存する部分です。
カスタムウィジェットを作成するには、以下のコードスニペットをコピー&ペーストして、functions.phpファイルまたはWPCode(推奨)に貼り付けてください:
1 2 3 4 5 6 7 8 9 10 11 12 13 14 15 16 17 18 19 20 21 22 23 24 25 26 27 28 29 30 31 32 33 34 35 36 37 38 39 40 41 42 43 44 45 46 47 48 49 50 51 52 53 54 55 56 57 58 59 60 61 62 63 64 65 66 67 68 69 70 71 72 73 74 75 | <?php// Creating the widgetclass wpb_widget extends WP_Widget { function __construct() { parent::__construct( // Base ID of your widget 'wpb_widget', // Widget name will appear in UI __( 'WPBeginner Widget', 'textdomain' ), // Widget description [ 'description' => __( 'Sample widget based on WPBeginner Tutorial', 'textdomain' ), ] ); } // Creating widget front-end public function widget( $args, $instance ) { $title = apply_filters( 'widget_title', $instance['title'] ); // before and after widget arguments are defined by themes echo $args['before_widget']; if ( ! empty( $title ) ) { echo $args['before_title'] . $title . $args['after_title']; } // This is where you run the code and display the output echo __( 'Hello, World!', 'textdomain' ); echo $args['after_widget']; } // Widget Settings Form public function form( $instance ) { if ( isset( $instance['title'] ) ) { $title = $instance['title']; } else { $title = __( 'New title', 'textdomain' ); } // Widget admin form ?> <p> <label for="<?php echo $this->get_field_id( 'title' ); ?>"> <?php _e( 'Title:', 'textdomain' ); ?> </label> <input class="widefat" id="<?php echo $this->get_field_id( 'title' ); ?>" name="<?php echo $this->get_field_name( 'title' ); ?>" type="text" value="<?php echo esc_attr( $title ); ?>" /> </p> <?php } // Updating widget replacing old instances with new public function update( $new_instance, $old_instance ) { $instance = array(); $instance['title'] = ( ! empty( $new_instance['title'] ) ) ? strip_tags( $new_instance['title'] ) : ''; return $instance; } // Class wpb_widget ends here}// Register and load the widgetfunction wpb_load_widget() { register_widget( 'wpb_widget' );}add_action( 'widgets_init', 'wpb_load_widget' ); |
WordPressサイトにカスタムコードを追加する最も簡単な方法は、WPCodeを使用することです。WPCodeは、コードスニペットを管理し、サイトに挿入するのに役立つ最高のコードスニペットプラグインです。
まず、あなたのサイトにWPCodeプラグインをインストールし、有効化する必要があります。WordPressプラグインのインストール方法については、こちらをご覧ください。
有効化した後、WordPressの管理画面からCode Snippets ” + Add Snippetに向かうことができます。ここから、「カスタムコードを追加(新規スニペット)」オプションを選択します。

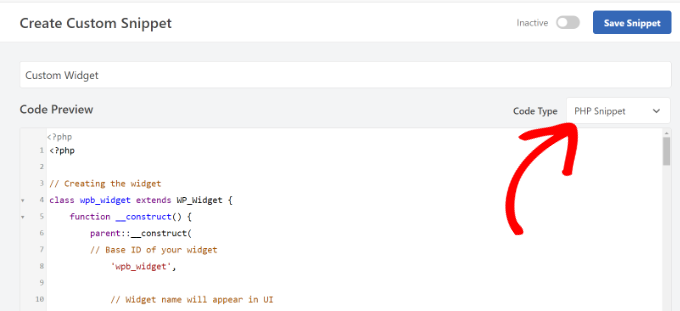
その後、カスタムウィジェットコードをコードプレビューエリアに貼り付けることができます。
また、「コードタイプ」ドロップダウンメニューをクリックし、「PHPスニペット」オプションを選択する必要があります。
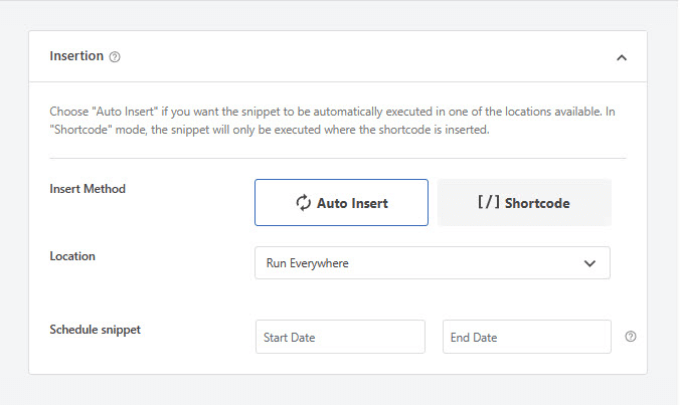
次に、下にスクロールして、コードのインサーター・メソッドを選択します。
WPCodeでは、コードを実行する場所を選択できます。このチュートリアルでは、初期設定のオプションを使って、どこでも実行できます。
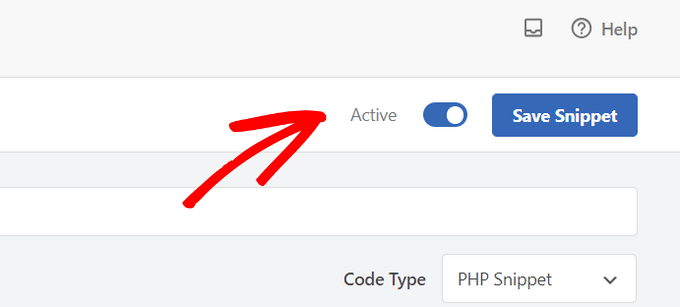
それが完了したら、一番上までスクロールしてスニペットを保存します。
スニペットを有効化するには、トグルを「有効」にクリックするだけです。
さらに詳しく知りたい方は、WordPressサイトにカスタムコードを追加する方法をご覧ください。
WordPressにコードを追加したら、WordPress管理画面の外観 ” ウィジェットページに移動する必要があります。
次に、「プラス」追加ブロックアイコンをクリックし、「WPBeginner Widget」を検索し、新規ウィジェットを選択します。

このウィジェットには、入力するフォームフィールドが1つしかありません。
テキストを追加し、「更新」ボタンをクリックして変更を保存することができます。
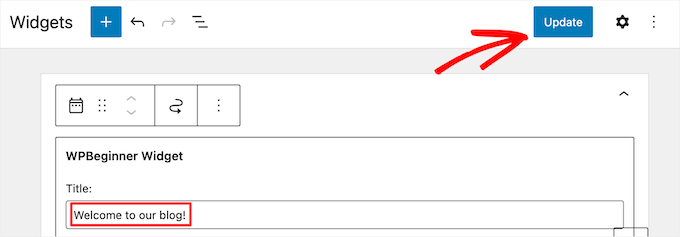
これで、WordPressサイトにアクセスして、カスタムウィジェットの動作を確認することができます。
以下はデモサイトでの例です。

WordPressクラシックエディターでカスタムウィジェットを追加する
サイトに新しいウィジェットを追加するためにクラシック・ウィジェット・エディターを使っている場合、手順は似ています。
利用可能なウィジェットのリストに「WPBeginner Widget」という新しいウィジェットが追加されます。このウィジェットをサイドバーにドラッグ&ドロップしてください。
そして、タイトルを入力し、ウィジェット設定を保存するために「保存」をクリックしてください。
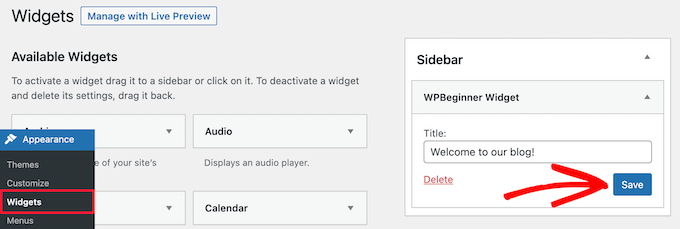
新しいカスタムウィジェットがサイトに表示されます。
さて、もう一度コードを勉強してみよう。
まず、’wpb_widget’を登録し、カスタムウィジェットをロードした。その後、ウィジェットの機能とウィジェットのバックエンドの表示方法を定義します。
最後に、ウィジェットに加えられた変更を処理する方法を定義した。
さて、お聞きになりたいことがいくつかあるでしょう。例えば、textdomainの目的は何なのか?
WordPressは’gettext’を使って翻訳とローカライズを行います。このtextdomainと _eは 、’gettext’に文字列を翻訳可能にするよう指示します。さらに詳しく知りたい方は、翻訳対応のWordPressテーマを探す方法をご覧ください。
テーマにカスタマイザーウィジェットを作成する場合、textdomainをテーマのテキストドメインに置き換えることができます。
また、WordPressの翻訳プラグインを使用すれば、WordPressを簡単に翻訳し、多言語WordPressサイトを作成することができます。
ボーナス:WordPressウィジェットにカスタマイザーを追加する
WordPressウィジェットを作成したら、カスタムスタイルを追加することもできます。これにより、サイトの外観を向上させ、一貫性を維持し、重要な情報に注目を集めることができます。
これを行うには、外観 ” ウィジェットページにアクセスし、カスタマイズしたいウィジェットを追加します。右側のブロックパネルに、色とタイポグラフィを変更するオプションが表示されます。
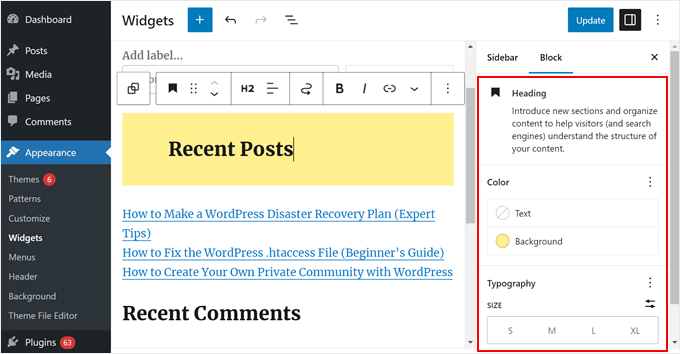
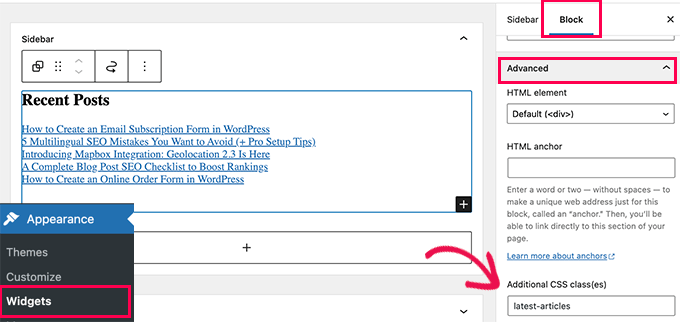
しかし、ウィジェットがそのオプションを表示しない場合、’Advanced’タブを展開した後、CSSクラスを追加することでカスタマイズできる。
これで、WordPressテーマに特定のCSSクラスをターゲットにしたカスタマイザーを追加できる。
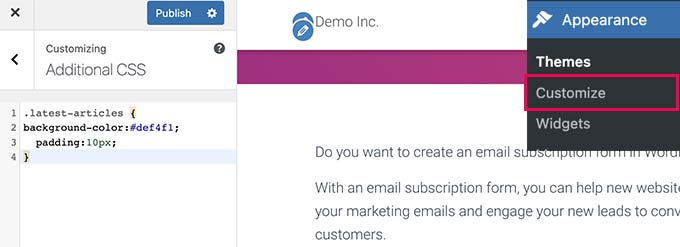
そのためには、外観 ” カスタマイズページに行き、追加CSSタブに切り替えてください。あなたのサイトのプレビューが表示され、CSSルールを追加するボックスが表示されます。
カスタムCSSを使ってウィジェットの外観をカスタマイズできるようになりました。詳しくは、WordPressウィジェットにカスタムスタイルを追加する方法のチュートリアルを参照してください。
この投稿が、WordPressカスタムウィジェットを簡単に作成する方法のお役に立てば幸いです。WordPressでウィジェットブロックを無効化する方法と、WordPressで非アクティブなウィジェットを削除する方法のチュートリアルも参考にしてください。
If you liked this article, then please subscribe to our YouTube Channel for WordPress video tutorials. You can also find us on Twitter and Facebook.


Dan
The ‘wpb_text_domain’ string is not found in the example code. I’m guessing the example code was updated and the article verbiage was not?
Also to confirm, is ‘wpb_text_domain’ actually ‘web_widget_domain’ from the sample code?
Thanks in advance for any feedback.
WPBeginner Support
Thank you for pointing this out, we’ll update this article and clarify this better and make it clear.
Admin
marwan
hi,
can I put the code as separate class.php and not in the functions.php
Karel Hanton
Thank you for great tutorial. I add code to my test plugin and It works perfectly as described – I see the Widget in Appearance » Widgets list and I can add it to Sidebar.
But I do not see the new Widget on page editor list. Do I miss something, is there need another registration or settings?
Thanks again for help.
Aldo
This is now displayed as a “Legacy Widget” in WordPress. Is there a new way to create widgets?
JP
this is great, simple cut and paste example was exactly what I was looking for. Thanks!
WPBeginner Support
You’re welcome
Admin
Banu
I have created a CRUD Plugin and i need to use it in one page could you please guide me how to use that plugin in page ?
WPBeginner Support
It would depend on how you set up the plugin, for having it on one page you could either look to use a shortcode for front-end display or look into the options API if you wanted to display it on the admin side of a site.
Admin
Kishan
How can I create more than 1 custom widget?
And also, how can I set other fields like radio, checkbox, dropdown, text in widget?
WPBeginner Support
You would need to replace the wpb_widget with what you want your new widget to be called and then the code would depend on what specifically you would like to add. If you take a look at the WordPress codex you can see the different codes available.
Admin
Carmen
Hello!
Currently, I am developing a plugin and I need to create a widget to let the user add a specific functionality to his/her site.
I copied the code for your widget in a file and saved the file in my plugin’s directory. I used add_action and do_action in my plugin’s main file to load it but it still doesn’t work. Can you help me, please?
Thank you!
WPBeginner Support
Sadly, that would depend heavily on how your plugin is set up, you may want to ensure both sections of this code are being loaded for the widget to be added and displayed
Admin
Maximilian K.
A short question, what if i want to create widgets in where i also can place other widgets? Like empty bootstrap columns 6-3-3 e.g. and in each column i can place then widgets like image, text, latest posts etc.
Is there a command / keyword to signalize that there is place for other widgets in this widget…
because im kind of confused about my own created theme and how WP is working… you see im a beginner ^^
I already placed general information like page title, make widget areas in my footer so ich can place menus, related links etc. on it. It worked.
But now im confused how i can realize my content in wordpress as i designed it before. Maybe some keywords are helpful to read more about them.
WPBeginner Support
That would require more customization than we go into in this article, you may need to look into how to create a sidebar for code you can use: https://www.wpbeginner.com/wp-themes/how-to-add-dynamic-widget-ready-sidebars-in-wordpress/
Admin
Lars
Great tutorial! Worked perfectly.
WPBeginner Support
Glad our tutorial could help
Admin
Watson Anikwai
How do you get a custom post type field from wp database and use a widget to display on front end?
vicky
i can’t add two custom widgets .. the second widget is not showing up….
what should i do???.. pls help
Ahad Bhatti
Really understandable and helpful. Thank you.
Belitza Gomez
hello, i would like to know where i can find in available widgets the “custom menu”. it doesn’t show and i haven’t been able to add a page to the footer through this widget.
thank you for your help!!!!
Samdoxer
hi, how would i show a logo in place of text. would replacing logo url with the text suffice.
Thanks in advance.
WPBeginner Support
Please see your theme settings or visit Appearance » Customizer page in admin area. There you will find an option to upload your logo image.
Admin
Gary Foster
Which came first the widget or the app?
Does a widget have to be registered if so how Please?
How do you best protect your idea of a widget or app?
Thanks all
shelley
These instructions worked beautifully for creating my custom widget. I cannot, however, figure out how to change the font size to 60px. I did manage to add CSS to Divi theme options that centered the text and added a line border. But how do I change the styling of the font please? Adding “font-size:60px” does not work. I want the font to be large, like a tagline running across the page. Thanks.
Ahmad Farhan
Very helpfull. tankyou
Eyad
Thanks so much for your tutorials
Luigi Briganti
Hi! I hope you can help me.
I’ve created a custom post type that show the timetable for a shop. Of course, you can create as much timetables as you want, but my necessity is to show a given timetable in the sidebar of the website.
For this purpose I made a widget that loop the timetable posts showing only 1 (namely the first one, since I ordered in ASC order). This is a temporary solution, just to see if the widget works and it does, actually.
What I really want to do is to show in the backend a dropdown list of all posts belonging to “timetable” post type so that I can choose the one I need when I need it and show it in the frontend. How can I do this?
Thanks if you may/want to help.
Anees Ijaz
Thanks Man for saving my time ..
Kevin
I love this post, helped me often a lot! Thanks!