Microsoft OutlookをWordPressに接続し、WordPressサイトからメールを送信する方法をお探しですか?
WordPressサイトから直接メールを送信するのは便利なように思えます。しかし、私たちの経験では、到達性に問題があることがよくあります。プロバイダーが大量のメールにフラグを立てたり、ドメインのレピュテーションが到達率に影響している可能性があります。
そこで、Microsoft Outlookのような信頼性の高いプラットフォームの出番です。Microsoft OutlookとWordPressを接続することで、たとえ大量のメールを送信していても、確実に購読者の受信トレイに届くようになり、メール到達性を向上させることができます。
この投稿では、Microsoft OutlookとWordPressを簡単に接続する方法を順を追って説明します。
なぜWordPressのメール送信にMicrosoft Outlookを使うのか?
Microsoft Outlookは、Office 365を常用している企業オーナーにとって素晴らしい設定だ。
既存のMicrosoft Outlookアカウントを使用して、WordPressサイトから購読者にメールを送信できます。
Outlookを使う一番の利点は、一度にたくさんのメールを送信できることです。1日に送信できるメールの数は10,000通までと、他のメールサービスよりもはるかに多い。
多忙なオンラインショップを運営されている場合、領収書やトラッキング情報、お買い物カゴの放棄メールをすべてのお客様に送信するのに役立ちます。
Microsoft Outlookが提供するもう一つの利点は、WordPress PHPの初期設定であるmail()関数を使わずにメールを送信できることです。
初期設定のメール送信方法には多くの問題があります。さらに、多くのWordPressホスティングサービスでは、PHPメールが適切に設定されていないため、メールの到達性に問題があります。
Gmailのようなメールサービスプロバイダがメール送信者を検出できないため、あなたのメールはスパムフォルダに入ってしまう可能性があります。
しかし、WordPressでOutlookアカウントを使ってメールを送信するSMTPサービスプロバイダーを使えば、この問題を簡単に克服できます。
SMTPとは?
SMTP(Simple Mail Transfer Protocol)は、メールを送信するための業界標準の技術である。
適切な認証を使用し、ユーザーの受信トレイにメールが届き、スパムフォルダに入らないようにします。
メールの送信には、SendLayer、SMTP.com、Brevo、Office 365 / Outlook、Gmail、Amazon SESなどの一般的なサービスを接続できます。
とはいえ、Microsoft OutlookアカウントをWordPressに接続する方法を見てみよう。
WordPressサイトにOutlookを接続する方法
WordPressにMicrosoft Outlookを追加する最も簡単な方法は、WP Mail SMTPプラグインを使用することです。このプラグインを使用すると、Microsoft APIを安全に使用してサイトのメールを認証できます。
このチュートリアルでは、Office 365 / Outlook.comとの統合を含むWP Mail SMTP Proバージョンを使用します。
複数の統合機能を持つWP Mail SMTPの無料版もあるが、OutlookアカウントとWordPressを接続することはできない。
WP Mail SMTPプラグインの使用に関する詳細は、WP Mail SMTPレビューをご覧ください。
WP Mail SMTPのセットアップ
まず、WordPressサイトにWP Mail SMTPプラグインをインストールして有効化する必要があります。WordPressプラグインのインストール方法については、ステップバイステップのガイドを参照してください。
注:Outlookメーラーは、サイトにSSL証明書がある場合にのみ機能することを覚えておくことが重要です。WordPressサイトにSSLを設定する方法については、こちらのガイドをご覧ください。
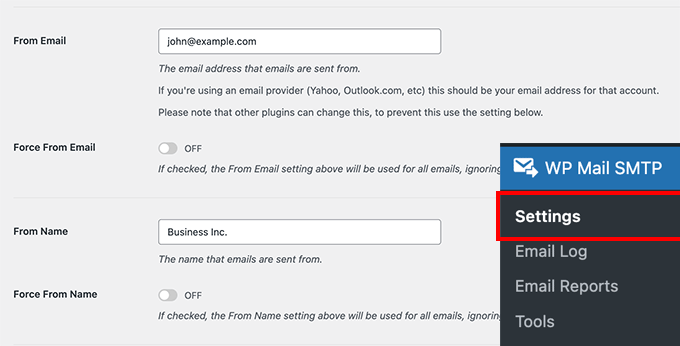
有効化した後、WordPressの管理エリアからWP Mail SMTP ” Settingsにアクセスして、Outlookアカウントに接続することができます。
設定ページでは、「差出人メール」と「差出人名」の設定が表示されます。Outlookアカウントの設定が上書きされるため、これらの設定は省略できます。
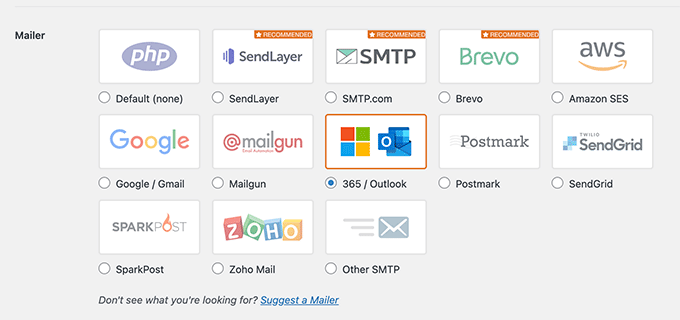
その下に、メーラー設定の隣にさまざまなオプションが表示されます。
メーラーの設定として「Outlook」を選択してください。
次に、WP Mail SMTPは、Outlookアカウントの設定がある新しいセクションを表示します。
このようになる。
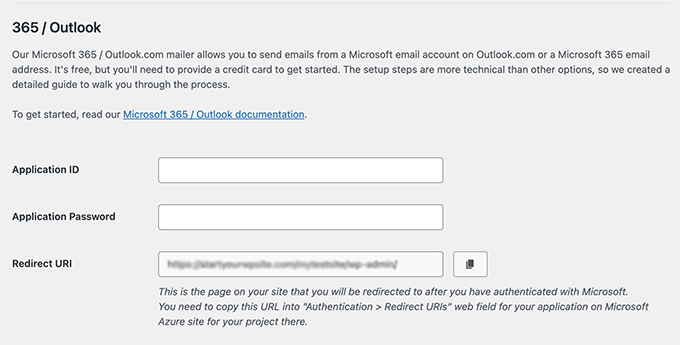
アプリケーションID、アプリケーションパスワード、およびリダイレクトURLを見つけるには、Microsoft Azureアカウント内にWebアプリケーションを作成する必要があります。ご心配なく。この方法を順を追って説明します。
このページに戻って情報を入力する必要があるため、WP Mail SMTP Outlook設定を別のタブまたはウィンドウで開いておくことをお勧めします。
Microsoft Azureへのログインには、既存のMicrosoftメールアカウント(Live、Outlook、Hotmail、Office 365など)を使用できます。その場合、WordPressのメールはすべてそのメールアドレスから送信されることに注意してください。
Microsoft Outlookのアカウントをお持ちでない場合や、別のメールアドレスからメッセージを送信したい場合は、Microsoft Azureのサイトでアカウントを作成することができます。作成したアカウントにメール送信権限が含まれていることを確認してください。
アカウントは無料で作成でき、メーラーをセットアップするのに有料サービスは必要ない。ただし、マイクロソフトはスパム登録を減らすためにクレジットカード情報の入力を求めてくる。
その後、使用するメールアドレスを使用してMicrosoft Azure Portalにログインします。
アプリケーションIDの作成
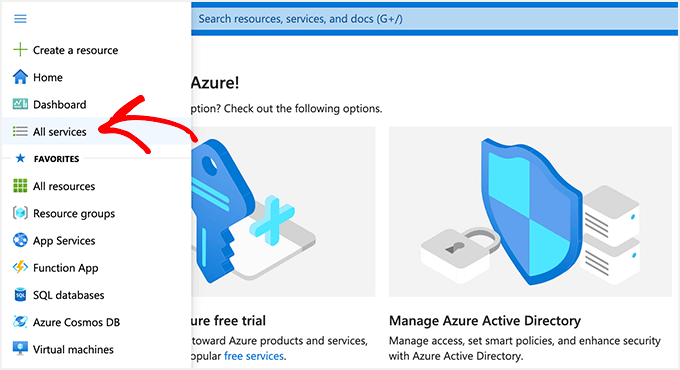
Azureポータルを開いたら、左側のサイドバーから「すべてのサービス」設定をクリックします。
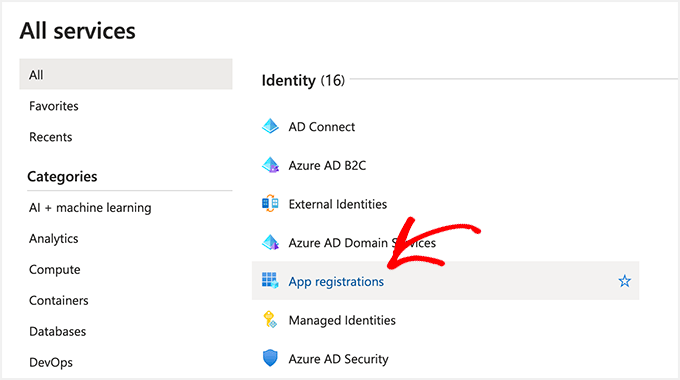
次の画面では、Microsoft Azureが提供するさまざまなサービスが表示されます。
Identity」セクションまでスクロールダウンし、「App registrations」オプションをクリックすることができる。
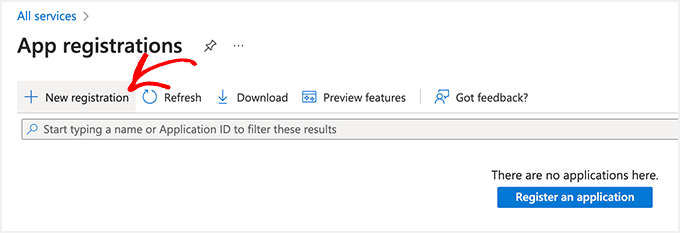
その後、「+新規登録」ボタンをクリックしてください。
これでアプリケーションが作成される。
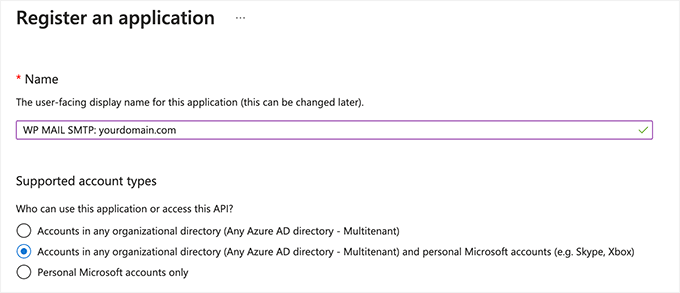
ここで、アプリケーションの名前を入力する必要があります。これはあなた自身が使用するためのものなので、いつでも好きなときに名前を変更することができます。
例えば、’WP Mail SMTP: yourdomain.com’のような名前を付けることができます。
以下の「Supported account types」セクションに関しては、「Accounts in any organizational directory (Any Azure AD directory – Multitenant) and personal Microsoft accounts (for example, Skype, Xbox)」オプションを設定するのがベストプラクティスです。
ただし、アカウントの種類にこのオプションが表示されない場合は、「Accounts in any organizational directory (Any Azure AD directory – Multitenant)」オプションを選択することもできます。
その後、リダイレクトURIの設定までスクロールダウンしてください。
フォームの最初のフィールドは、ドロップダウン設定を「Web」のままにしておくことができます。

2番目のフィールドには、WP Mail SMTP Outlook設定で指定されたリダイレクトURIアドレスを入力する必要があります。
リダイレクトURIを見つけるには、ブラウザーからWP Mail SMTP設定タブまたはウィンドウに戻るだけです。そして、「Redirect URL」フィールドに表示されているウェブアドレスをコピーしてください。
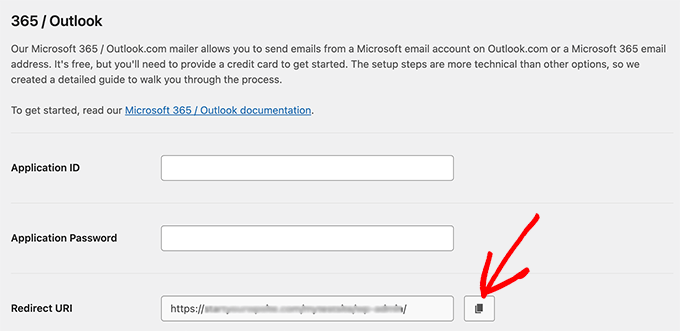
Microsoft Azureアプリ登録フォームにURLを貼り付ける必要があります。
次に、「登録」ボタンをクリックします。

Microsoft Azureは、アプリケーション(クライアント)IDが表示される別の画面を表示します。
コピー」アイコンをクリックするだけで、アプリケーションIDがコピーされます。
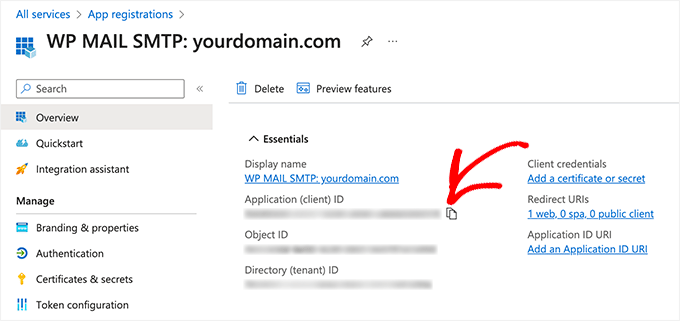
その後、WP Mail SMTP設定にアプリケーションIDを入力します。
これを行うには、WP Mail SMTP設定ウィンドウに移動し、’アプリケーションID’フィールドに値を貼り付ける必要があります。

アプリケーションパスワードの作成
アプリケーションIDを入力したら、次に必要なのはアプリケーションパスワードの作成です。
左側のサイドバーにある「Certificates & secrets(証明書と秘密)」オプションをクリックすることで開始できます。
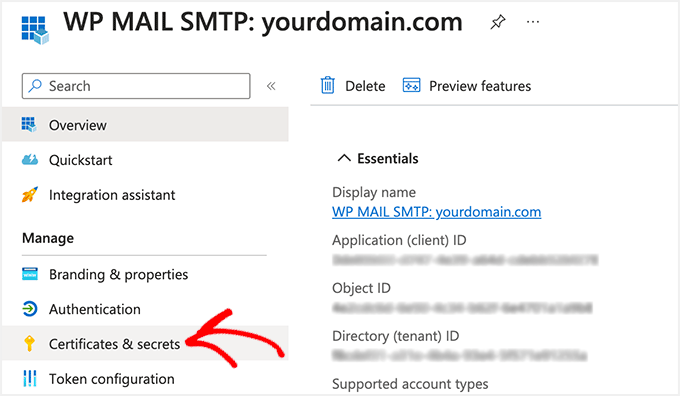
次の画面では、証明書のセクションをスキップして、クライアント・シークレットのセクションまでスクロールダウンすることができます。
次に、「+ 新規クライアントシークレット」オプションをクリックしてクライアントシークレットを追加します。

新しいオーバーレイウィンドウが右からスライドして表示されます。このウィンドウでは、説明を入力し、アプリのパスワードの有効期限を選択することができます。
Microsoft Azureでは、プリセットの有効期限(3ヶ月、6ヶ月(推奨)、12ヶ月、18ヶ月など)を選択するか、カスタマイザーで期間を設定することができます。
最初のうちは、プリセット設定のいずれかを選択することをお勧めします。パスワードの有効期限は、将来いつでもカスタム設定に変更することができます。
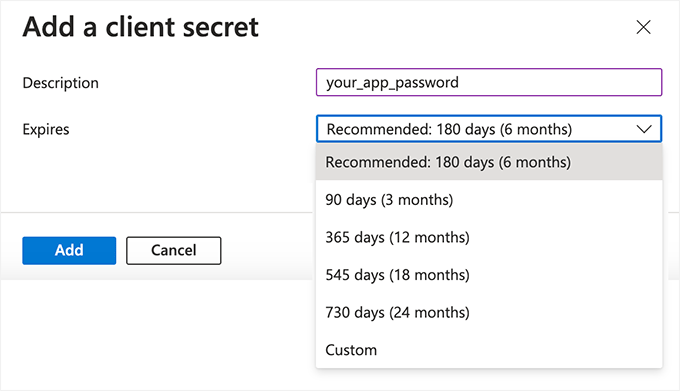
設定が完了したら、「追加」ボタンをクリックします。
その後、Microsoft Azure はアプリケーションパスワードを生成する。Copy to clipboard “トリガーをクリックすると、”Value “カラムの下にパスワードがコピーされます。

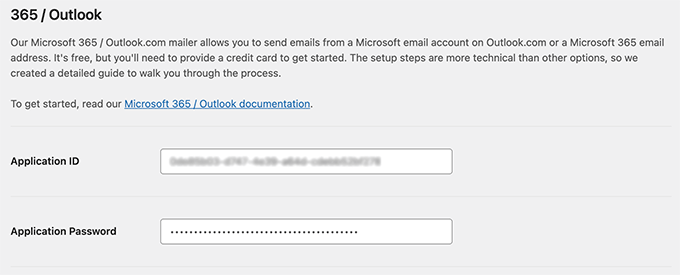
次に、このパスワードを WP Mail SMTP 設定に入力する必要があります。
そのためには、WP Mail SMTP設定に戻り、「アプリケーションパスワード」フィールドにパスワードを貼り付けます。
API権限の設定
WP Mail SMTPでアプリケーションIDとアプリケーションパスワードを設定したら、次はAPI権限を追加します。
まずは、左のメニューから「API権限」の設定をクリックしてください。
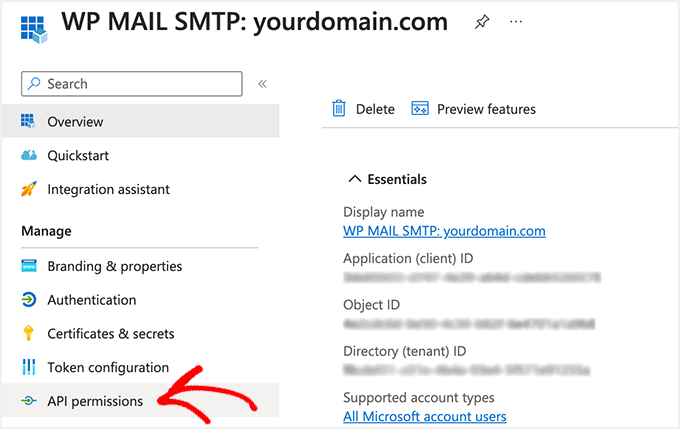
次に、「権限を追加する」ボタンをクリックします。
左上隅にあります。

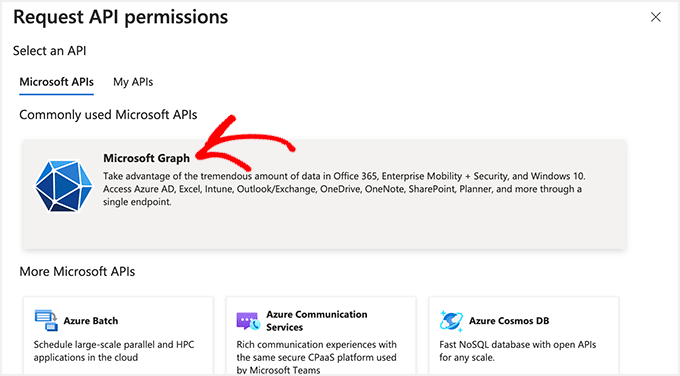
ボタンをクリックすると、API権限をリクエストするための新しいウィンドウが右からスライドしてきます。
API権限を設定するには、「Microsoft Graph」オプションを選択する必要があります。
次の画面で、Microsoft Azureはアプリケーションが必須とする権限の種類を尋ねてきます。
権限の委譲」オプションを設定することができます。

次に、権限を選択するための複数のオプションが表示されます。
しかし、正しい設定を見つけるより簡単な方法は、「権限の選択」の見出しの下にある検索バーに「送信」というキーワードを入力することである。
その後、表示されるオプションから「メール」タブを選択し、「Mail.Send.Shared」のチェックボックスをクリックします。
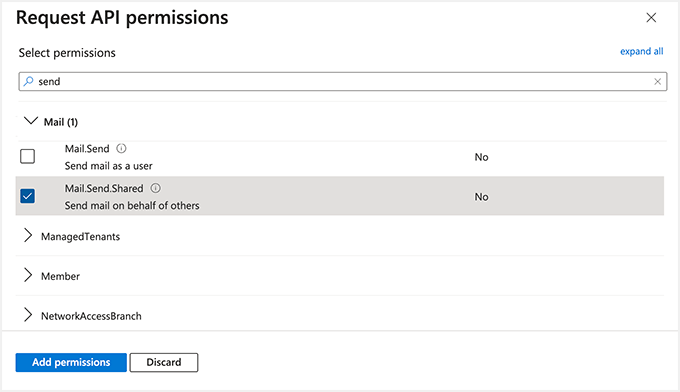
準備ができたら、一番下にある「権限を追加」ボタンをクリックするだけです。
権限の追加」ボタンをクリックし、「Microsoft Graph」を選択して、API権限の手順を繰り返す必要がある。ただし、今回は「アプリケーション権限」オプションを選択する必要がある。

ここで、「権限の選択」検索バーに同じ検索キーワード「送信」を入力することができる。
メールタブが表示されたら、それをクリックし、「Mail.Send」のチェックボックスを選択します。

次に、「権限を追加」ボタンをクリックします。
API権限を設定した後、WP Mail SMTP設定に戻り、「設定を保存」ボタンをクリックしてOutlookメーラー設定を完了する必要があります。
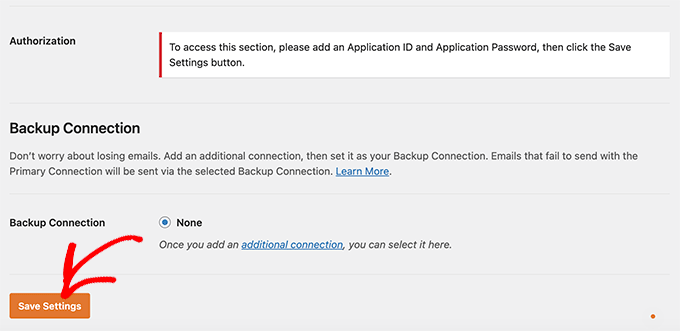
設定を保存したら、WP Mail SMTP設定の投稿者セクションまでスクロールダウンする必要があります。
次に、「プラグインでMicrosoftアカウントを使用したメール送信を許可する」ボタンをクリックします。

ボタンをクリックするとすぐに、マイクロソフトの権限フォームにリダイレクトされます。
すべて下の「はい」ボタンをクリックするだけです。これでWP Mail SMTPがMicrosoftアカウントに接続できるようになります。
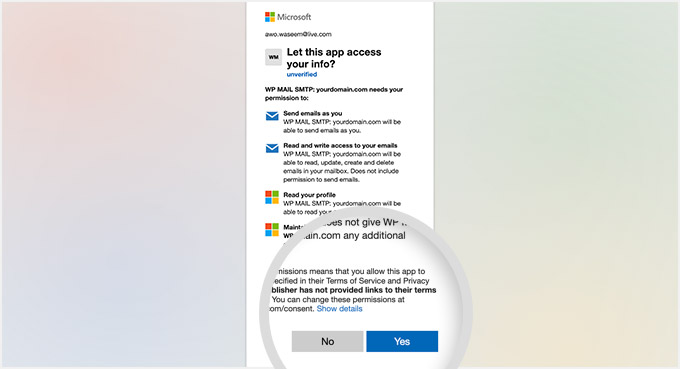
その後、WP Mail SMTP設定ページにリダイレクトされます。
Outlookでメールを送信する準備ができたことを示す通知が上部に表示されます。

テストメールを送信して、すべてが正しく機能するかどうかを確認できます。
テストメールを送信するには、WP Mail SMTP ” Settingsに行き、一番上の’Email Test’タブをクリックするだけです。
設定が完了したら、下部にある「メールを送信」ボタンをクリックします。
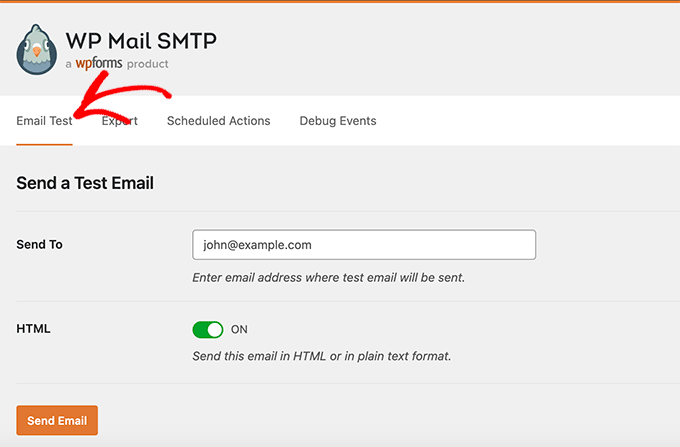
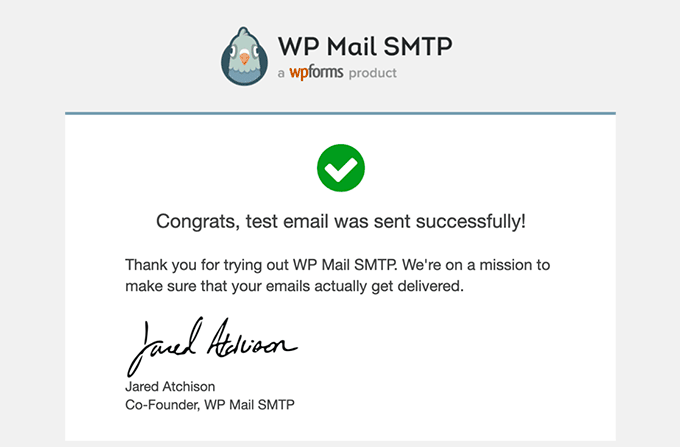
メール送信後、受信トレイにアクセスする必要があります。
ここで、テストメールが届いたかどうかを確認できます。
おまけ:WP Mail SMTPでメールログ表示
Microsoft OutlookとWP Mail SMTPを接続すると、WordPressダッシュボードからすべてのメール記録を簡単に表示できます。
これにより、ユーザーの受信トレイにメールが確実に配信され、ユーザーのアクティビティを追跡することができます。
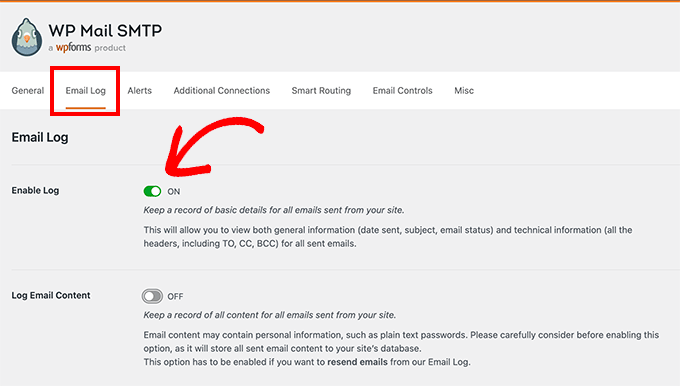
この機能を有効化するには、WP Mail SMTP ” 設定ページにアクセスし、’メールログ’タブに切り替えます。次に、’有効化ログ’スイッチを切り替え、’設定を保存’ボタンをクリックします。
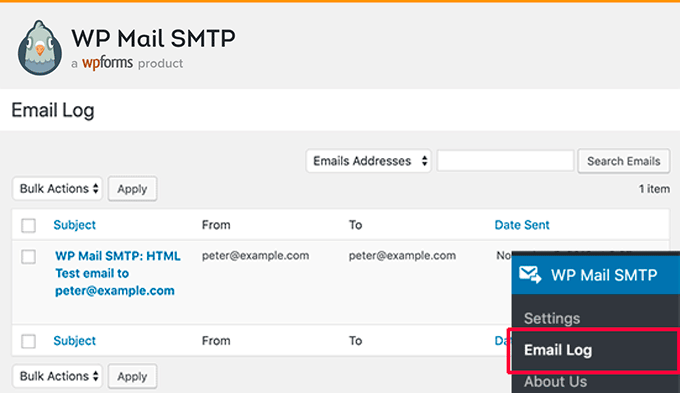
WordPressの管理サイドバーからWP Mail SMTP ” メールログページに移動します。ここでは、この機能を有効化してから送信したすべてのメールのリストを表示することができます。
マウスオーバーして「編集」リンクをクリックすれば、個々のエントリーの詳細を表示することもできる。
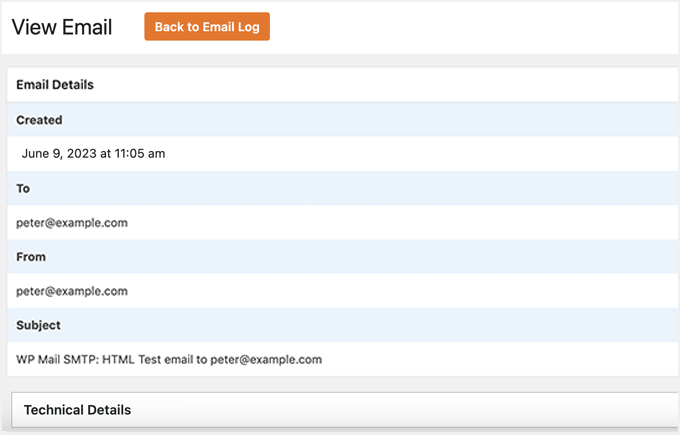
ユーザーのメールアドレス、送信したメールの件名と本文を表示する新しい画面が表示されます。
詳しくは、WordPressメールログの設定方法のチュートリアルをご覧ください。
動画チュートリアル
文章での説明が苦手な方は、Microsoft OutlookとWordPressの接続方法についてのチュートリアル動画もご覧ください:
この投稿が、Microsoft OutlookをWordPressに接続する方法のお役に立てば幸いです。メールマーケティングキャンペーンに役立つ他のWordPressガイドもご覧ください:
サイトに最適なWordPressメールガイド
- 中小企業に最適なメールマーケティングサービス
- WordPressサイトにWebプッシュ通知を追加する方法
- WordPressメールマーケティング自動化入門ガイド
- 正しいメールマガジンの作り方(ステップバイステップ)
- メールブラストとは?正しいメール配信の方法
- 明らかになったこと今日、メールリスト作成が重要な理由
- WordPressメールトラッキングの設定方法(開封、クリックなど)
- Google アナリティクスでメールマガジンのトラッキングを設定する方法
If you liked this article, then please subscribe to our YouTube Channel for WordPress video tutorials. You can also find us on Twitter and Facebook.


Jiří Vaněk
One wouldn’t think how sometimes connecting SMTP can be difficult and other times easy. I’ve always been used to using SMTP on my own domains, where it was very straightforward. The biggest problem I encountered with SMTP was the first time I tried it with Gmail. Every time I have to connect someone’s SMTP to these services, I pray that someone has a similarly well-documented guide. At least now I know where to look for SMTP settings for Microsoft services when I need them.
WPBeginner Support
For Gmail SMTP we would recommend taking a look at our article below but we’re glad you found our guide helpful
https://www.wpbeginner.com/plugins/how-to-send-email-in-wordpress-using-the-gmail-smtp-server/
Admin
Jiří Vaněk
Thanks for the link. Sometimes Gmail settings are really troublesome for me. So I’d love to learn how you do it.