
サイトをリニューアルする際、私たちが最初に行うことのひとつは、ステージング環境やローカル環境にサイトのクローンを作成することです。こうすることで、本番バージョンに影響を与えることなく、作業中のサイトの正確なレプリカを作成することができます。
技術的なスキルがほとんどないサイトオーナーなら、自分が行った変更が予期せぬエラーにつながるのを見てうんざりしていることでしょう。テスト目的でWordPressサイトのクローンを作成したいが、そのプロセスが難しすぎるのではと心配されていることでしょう。
実は全く逆なのだ。Duplicatorプラグインを使えば、WordPressサイトのクローンを作るのはとても簡単で、この投稿でその方法を紹介しよう。

WordPressサイトクローニングとは?
WordPressサイトのクローンとは、あるサイトの完全なコピーを作成し、それを別のサイトに適用するというものです。
サイトのクローンが必要になる理由は様々です。例えば、サイトを新しいホスティングサービスや 新しいドメイン 名に移行する場合などです。サイトのクローンを作成することで、時間と労力を大幅に節約し、移行プロセスをより早く完了することができます。
もう一つの例は、自分のローカルホスト上でクライアントのサイトを開発することです。作業が完了したら、サイトをクローンしてクライアントのライブサーバーに移すだけです。
また、本番のWordPressサイトをクローンしてステージングサイトを立ち上げ、本番前に変更をテストすることもできる。
それでは、WordPressサイトのクローンを簡単なステップで作成する方法をご紹介しましょう。 チュートリアルのナビゲーションには、以下のクイックリンクをご利用ください:
- Step 1: Set Up the Duplicator WordPress Plugin for Easy Cloning
- Step 2: Create a Duplicator Package of Your WordPress Site
- Step 3: Upload Your WordPress Site Archive and Installer to a New Location
- Step 4: Create a New WordPress Database for Your Website
- Step 5: Run the WordPress Website Importer Script
- Step 6: Test Your Cloned Website and Delete Temporary Files
ステップ1:Duplicator WordPressプラグインをセットアップして簡単にクローンを作成する
WordPressサイトのクローンを作成する最良の方法は、Duplicatorプラグインを使用することです。これは強力なWordPressクローンと複製プラグインでありながら、非常に使いやすい。
プラグインはサイトのすべてを個別ファイルにバックアップし、新しい場所に移動するだけです。
最初に必要なことは、クローンしたいサイトにプラグインを有効化してインストールすることです。詳しくは、WordPressプラグインのインストール方法のステップバイステップガイドをご覧ください。
注: Duplicatorのプロバージョンがあり、スケジュールバックアップ、マルチサイト移行などの追加機能があります。しかし、このガイドではWordPressサイトのクローンに必要なものがすべて揃っている無料版を使用します。
ステップ2:WordPressサイトのDuplicatorパッケージを作成する
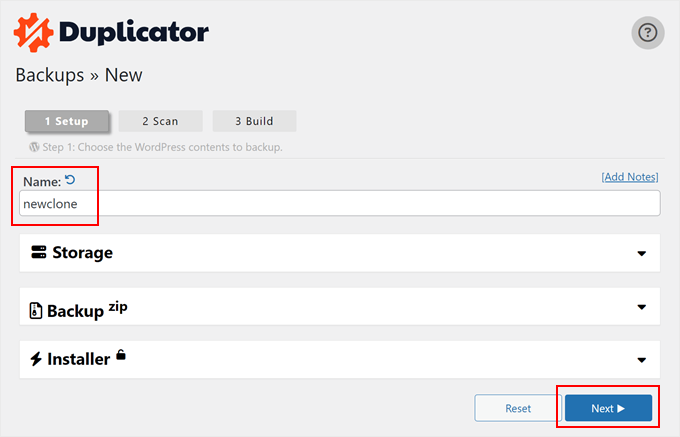
有効化した後、Duplicator ” Backupsに行き、ページ上部の’Create New’ボタンをクリックします。

その後、複製ファイルの名前を入力する画面が表示されます。これはあくまで参考用ですので、何でも結構です。
そして「Continue」ボタンをクリックする。
Duplicatorはあなたのサイトをスキャンします。
WordPressサイトのどこかに問題が見つかれば、問題の修正方法に関する警告が表示されます。そうでない場合は、単に「Good」と表示されます。

では、ページを下にスクロールしてください。
次に、「Build」をクリックしてバックアップファイルを作成します。

このプラグインは、WordPressのデータベース、画像、テンプレート、プラグイン、その他すべてのファイルを、ダウンロード可能な個別パッケージでバックアップします。
サイトの規模にもよりますが、数分で完了する場合もあります。
バックアッププロセスが終了したら、いよいよファイルをダウンロードします。
バックアップを含むアーカイブファイルと、アーカイブを解凍するインストーラの両方をダウンロードする必要があります。

そのためには、「Download Both Files」ボタンをクリックしてください。
プロのヒント Duplicatorでバックアップファイルをインポートする方法をご紹介しています。
とはいえ、空の環境でクローンサイトをリストアしたい場合は、以下の残りのステップを踏んでください。
ステップ 3: WordPressサイトのアーカイブとインストーラを新規場所にアップロードする
これでサイトとインストーラファイルの完全なバックアップができましたので、次のステップはそれらを新しい場所にアップロードします。
この新しい場所は、ライブWordPressブログでも、ローカルサーバー上のサイトでもかまいません。サイトがローカルサーバーにある場合は、ローカルサーバーのルートフォルダーに新しいフォルダーを作成する必要があります。これは、ローカルサーバーがすべてのサイトを保存するファイルです。
例えば、MAMPを使用している場合、「/Applications/MAMP/htdocs/」フォルダーになります。
または、WAMPを使用している場合は、「C:⊖WAMP⊖WAMP⊖」フォルダーになります。
その後、クローンサイト用に作成したフォルダーを開き、アーカイブファイルとインストーラの両方をそのフォルダーにコピーする必要があります。

あなたのウェブサイトを別のWordPressホスティングサービスにクローンしたい場合は、まず空のサイトを作成し、プロバイダーのファイルマネージャを使用してファイルをアップロードすることができます。
あなたがBluehostを使用している場合は、単にあなたのホスティングアカウントのダッシュボードにログインし、 ‘ウェブサイト’タブに移動します。その後、’サイトを追加’をクリックします。

次の画面では、いくつかのサイトタイプのオプションが表示されます。
その他(空の環境)』を選択し、『続行』をクリックするだけだ。

次に、サイトのタイトルを入れる。
必要に応じてこのステップをスキップし、「続ける」をクリックするだけでもよい。

この段階で、サイトとドメイン名を結びつけることができる。
あるいは、まだドメイン名を持っていない場合は、その間に一時的なドメインを使うこともできる。
続行」をクリックして次に進む。

空のサイトの準備ができたら、「ウェブサイト」タブに戻ります。
新しく作成したサイトで、「設定」ボタンをクリックします。

次に、「クイックリンク」セクションまでスクロールダウンする。
そこで「File Manager」ボタンをクリックする。

Bluehostは、あなたのウェブサイトのファイルマネージャを表示します。
アップロード」ボタンをクリックして、ファイルをアップロードしてください。

ここで、空のサイトにアップロードしたいファイルを選択する。
完了したら、「…に戻る」をクリックする。

これでファイルマネージャにアーカイブとインストーラファイルが表示されるはずです。
後でインストールがうまくいくように、このディレクトリにある他のファイルも削除しておいてください。

または、FTPクライアントを使用して、インストーラとアーカイブをルートディレクトリにアップロードすることもできます。
FTPでWordPressにファイルをアップロードする方法については、初心者向けガイドをご覧ください。
どこにファイルをアップロードするにしても、そのフォルダーにはインストーラー.phpとアーカイブのzipファイルしか入っていないことを確認する必要があります。

ステップ4:新規WordPressデータベースの作成
次に、クローンしたWordPressを解凍するために、新しいWordPressデータベースを作成する必要があります。 すでにデータベースを作成している場合は、このステップは省略できます。
新しい場所がライブサイトかローカルサーバー上のサイトかによって、データベースを作成する方法はいくつかあります。
ライブサイトを使用している場合は、WordPressホスティングアカウントのダッシュボードにログインするだけです。
Bluehostユーザーの場合は、以前のように空のサイトの ‘設定’タブに移動する必要があります。次に、「詳細設定」タブに切り替え、cPanelの横にある「管理」をクリックします。

cPanelの中で、’Databases’セクションまでスクロールしてください。
その後、「MySQLデータベース」を選択する。

データベースの名前を入力する画面が表示されます。
次に、「データベースを作成」ボタンをクリックする。

次に、MySQLデータベースに新しいユーザーを追加する必要がある。
MySQL Users」セクションまでスクロールします。次に、新規ユーザのユーザ名とパスワードを入力し、’Create a user’ ボタンをクリックします。

それができたら、次のステップはユーザーをデータベースに追加することです。
Add User to a Database」セクションまでスクロールし、「User」ドロップダウンを開きます。ここで、前のステップで作成したデータベースユーザーを選択します。
その後、’Database’ ドロップダウンを開き、先ほど作成したデータベースを選択する。

次のステップで必要になるので、データベース名、ユーザー名、パスワードを本当に〜してもよいですか?
これで「追加」ボタンをクリックする。
XAMPPや他のツールを使ってローカルホストにインストールしている場合は、ウェブブラウザで’http://localhost/phpmyadmin/’または’http://localhost:8080/phpmyadmin/’にアクセスするだけで、phpMyAdminが起動します。
その後、’Menu’タブをクリックし、’Database’オプションを選択する。

次に、データベースの新しい名前を入力する必要があります。
そして、「作成」ボタンをクリックします。

このデータベース名は次のステップで使用します。ほとんどのローカルホストのインストールでは、ホスティングサービスはlocalhostとなり、ユーザ名はroot、パスワードは空白となります。
ステップ5:WordPressサイトインポートスクリプトの実行
これですべてのファイルが揃いましたので、いよいよDuplicatorインストーラスクリプトを実行します。このスクリプトは数クリックでアーカイブファイルを解凍します。
まず、ウェブブラウザーにあなたのサイトのURLを入力し、その最後にインストーラ.phpを追加します。これは’https://example.com/installer.php’のようになります。本当に〜してもよいですか?’example.com’を自分のドメイン名またはサイトのローカルホストのアドレスに置き換えてください。
次に、Duplicatorインストーラ・スクリプトが画面に表示されます。まず、WordPressデータベース情報を入力する必要があります。
これは、上記でコピーしたデータベース情報です。
完了したら、’Validate’をクリックする。

エラーがなければ、一番下にあるterms and noticesのチェックボックスにチェックを入れる。
その後、「Next(次へ)」をクリックして進みます。

次に、インストールを確認するポップアップが表示されます。
OK」ボタンをクリックしてください。

インストールに成功したら、すぐに新しいWordPressサイトにログインできます。
これを行うには、’Auto delete installer files after login to secure site (recommended!)’ をチェックし、’Admin Login’ ボタンをクリックしてください。

このボックスにチェックを入れると、インストーラファイルが自動的に削除され、潜在的なセキュリティ問題が取り除かれ、インストールが完了します。
ステップ6:クローンサイトのテストと一時ファイルの削除
クローンサイトをテストすることができます。
WordPressの管理エリアとウェブサイトの公開フロントエンドの両方をテストし、データがすべて存在し、サイトが期待通りに動作していることを確認することをお勧めします。
WordPressのエラーが発生した場合は、初心者向けのWordPressエラーのトラブルシューティングをご覧ください。
インストーラファイルがまだ存在するかどうかも確認する必要があります。念のため、Duplicator ” Toolsに行き、’Remove Installation Files’ボタンをクリックすることをお勧めします。

以上でWordPressサイトのクローン作成は完了です。
WordPressサイトのクローンを作りました。
WordPressサイトのクローン作成に成功したら、次にやるべきことがあります:
- この究極の移行チェックリストを使って、サイトが正しく移行されているかチェックしてください。
- クローンサイトのパーマリンク設定を確認してください。
- WordPressの必須プラグインをインストールして、サイトを成長させましょう。
- ブログ以外のサイトを運営する場合は、ブログ機能を無効化する。
- サイトを公開する前に、このサイト開設チェックリストを参照してください。
- あなたのサイトをプレビューし、すべてが機能しているかどうかを確認します。
- WordPressのデバッグモードを有効化して、潜在的なエラーを素早く解決しましょう。
- ディスク領域を解放し、inodeの使用量を減らしてWebサーバーを健全に保つ方法をご紹介します。
- サイトのスピードテストを行って、サイトパフォーマンスの改善が必要かどうかを確認しましょう。
この投稿が、WordPressサイトのクローンを簡単に作成する方法のお役に立てば幸いです。また、1つのダッシュボードから複数の WordPress サイトを管理する方法や、専門家が選ぶ最高の WordPress アクティビティログとトラッキングプラグインのガイドもご覧ください。
If you liked this article, then please subscribe to our YouTube Channel for WordPress video tutorials. You can also find us on Twitter and Facebook.
")


 in 2024")
Jiří Vaněk
The Duplicator is an absolutely fantastic plugin that I personally enjoy using for duplicating websites from development environment to server. The only issue I’ve encountered with it is that it creates a .htaccess file in the backup folder, where not all directives may be allowed. Fortunately, this behavior can be resolved in the settings, and .htaccess can be disabled. Otherwise, the plugin always works great and without any problems. Additionally, with a guide like yours, anyone can handle it really well. And as a bonus, it works quite well even in the free version.
Dennis Muthomi
This step-by-step guide was extremely helpful! I followed the tutorial to clone my existing WordPress site to a new server with a different host. Everything went smoothly except I ran into an SSL issue initially on the cloned site. However, after contacting my new host’s support team, they were able to resolve the SSL problem quickly. Thanks so much for providing such a clear and valuable walkthrough
WPBeginner Support
Glad our guide could help you
Admin
Dan
Hi, I have done this however upon completing the Install and clicking the admin button, it takes me back to the original domain page prior to a WordPress Install. I’ve double checked the process and I don’t think I’ve missed any steps?
It just appears that everything was wiped (just an original WP install) but the duplicate file hasn’t been installed?
WPBeginner Support
Your domain is pointing to your original host. You can either change your hosts file to see the cloned site or point your domain to the new host location. For moving your site to a new domain, we would recommend taking a look at our article below:
https://www.wpbeginner.com/wp-tutorials/how-to-properly-move-wordpress-to-a-new-domain-without-losing-seo/
Admin
Martin Page
I have followed your instructions and uploaded the 2 files to an otherwise empty file but when i go to the site/installer.php I get a 404 page.
My FileZilla screen loos exactly like your example.
Any suggestions?
Thanks
WPBeginner Support
You would want to visit the duplicator plugin’s FAQ page and they cover the different troubleshooting steps for that error.
Admin
Rene Young
Thanks. I did that and I have successfully completed creating the clone. I have a question about the step to install the database in the new location (Step 2 of 4 – Install Database): The screen shot shows a choice between “Basic” and “cPanel” but you don’t discuss this.
WPBeginner Support
In this tutorial, we went with Basic
Admin
Rene Young
I could not complete Step 2. I do get warnings in Duplicator, under Paths:
“If the root WordPress path is not writable by PHP on some systems this can cause issues.
If Duplicator does not have enough permissions then you will need to manually create the paths above.”
WPBeginner Support
You would want to either follow our guide below for updating your file permissions:
https://www.wpbeginner.com/beginners-guide/how-to-fix-file-and-folder-permissions-error-in-wordpress/
Or you can reach out to your hosting provider for assistance with the folder permissions.
Admin
Sue
I’m trying to clone a demo site I’m making for people to use as a template. Using Duplicator I’ve created the package, gone into File Manager of CPanel and navigated to the root directory for the subdomain I’m testing it on, and uploaded the zip file and installer file. There is nothing else in the folder.
When I follow the instructions and go to the website address with installer.php added to the end, I do not get the Duplicator import info. I get a Page Not Found….though it does have the header, footer and top menu of the site I’m cloning. What did I do wrong?
WPBeginner Support
If you are using the same domain then you are likely still looking at the old site and not the new one, if you reach out to your hosting provider, they can normally assist with setting up a temporary domain that you can use.
Admin
Tarık Hacıalioğulları
Thank you very much, this saved me so much time. It worked very good!!!
WPBeginner Support
You’re welcome
Admin
saad
Everything s clear thank you but what about login and password to WordPress dashboard can we duplicate ?
WPBeginner Support
It copies your users table so it would transfer your user and password over for you.
Admin
Kara
I’m having a bit of trouble with step 4. With my Hostgator account I don’t have access to my server panel but when I try to add the file via an FTP client, I’m under able to find the folder containing the installer.php. Am I missing something? Could the file name be different or could someone tell me where exactly to put the zip file?
WPBeginner Support
You would want to reach out to your hosting provider and they would be able to assist
Admin
ed
HI there, what if i have paid plugins and themes specific for 1 wordpress site
Will it still work ? Thanks alot, your tutorial so far is the easiest to follow
WPBeginner Support
You would want to reach out to the support for those tools for how they handle that.
Admin
Emma
What do you do when there is a size check notice? Limit is 500mb and my site is 1.32gb uncompressed. Not sure how to compress. It is recommending a 2 part install manually from c panel which is sadly beyond my tech abilities.
WPBeginner Support
You would want to reach out to your hosting provider’s support and they should be able to assist
Admin
Dominique
uploaded zip and installer script to root and i am getting this message when i enter domain.com/installer.php
403 Forbidden
Request forbidden by administrative rules.
What next?
WPBeginner Support
There are a few different options you can try, for a starting point, you would want to take a look at our article below:
https://www.wpbeginner.com/wp-tutorials/how-to-fix-the-403-forbidden-error-in-wordpress/
Admin
Loz Bigrave
Great article, worked like a charm.
WPBeginner Support
Thank you, glad our article was helpful
Admin
Derek
I’ve successfully copied across to a new URL and the cloned website seems to be working. However, when I go into wordpress it’s a reduced version with quite a few tabs missing such as: users/plugins/settings to name a few. How can I get a full version of wordpress the same as the site I copied from?
WPBeginner Support
You may want to ensure you are logged in as an admin user on your cloned site as the most likely reason for that issue.
Admin
Adi
How do you change the name of the website, the url and also the database when installing the cloned site using Duplicator?
WPBeginner Support
To do that, you would want to take a look at our article here:
https://www.wpbeginner.com/wp-tutorials/how-to-properly-move-wordpress-to-a-new-domain-without-losing-seo/
Admin
diana
Hi, I have a question , can a clone my site without erased the other one , i mean the original website ?
WPBeginner Support
Yes, cloning your site does not remove the original
Admin
Todd Murray
This is a great post. Just one clarification before I run the import…on STEP 4, these are the instructions:
No matter where you are copying the files, you need to make sure that the folder is completely empty and has no other files or folders inside it except installer.php file and your backup zip file.
If I already have a theme and started building a site before finding this article, do I need to delete everything from the destination? “folder completely empty” refers to which folder?
Thanks!
Todd
WPBeginner Support
If you want to duplicate a site from elsewhere then you would need to remove what is currently there for your site.
Admin
Christie Bellah
Been using this article for years. Thanks so much!
WPBeginner Support
You’re welcome, glad our guide has been so helpful
Admin
Alexandre
You were right, I didn’t put in the root folder :/
So I tried again, but in the end, I got an error 404 result.
I’ve fixed the wp_config (name, user, pw & host) and made the changes to the htaccess (copied the NEW .htaccess).
All files are deleted, besides the now unzipped folder which contain all the files. *what about the __MACOSX folder? I tried with and without, but get the same result.
Even after this, in Step 4, I still get the 2 warnings in the General Notices:
wp-config not found
wp-config.php not found.
I found the wp-config.php, but seem like I don’t have the wp-config. Are they the same?
Anything else missing?
Thank you
WPBeginner Support
The macosx you don’t need, the wp-config files should be the same. For moving from the subfolder if the original site is still available you would likely want to go through the steps in: https://www.wpbeginner.com/wp-tutorials/how-to-get-rid-of-wordpress-from-your-wordpress-site-url/
Admin
Alexandre
I end up on a “Index of” page showing the file in my sub folder. Anyone know why?
Thanks
WPBeginner Support
You likely installed your WordPress site in the subfolder rather than the root folder for your site.
Admin
Alexandre
Sorry, forgot to say. If I type in the full path on my web browser, I have a loading time, but end up on a white page.
Thanks
WPBeginner Support
If you are getting that white screen you may want to try the recommendations in our article here: https://www.wpbeginner.com/wp-tutorials/how-to-fix-the-wordpress-white-screen-of-death/
JanysF
Does anyone know why the Packages option under Duplicator » Packages isn’t showing for me? I only see under Duplicator: Tools, Settings, and Go Pro.
WPBeginner Support
You may want to try reinstalling the plugin and if that doesn’t work you would want to reach out to the plugin’s support and let them know about that not appearing properly
Admin
ouiouiphoto
Cloning works well with duplicator but having a clone site online seems not to be liked by jetpack
During my tests Jetpack have put himselt in failure on the original site even if jetpack was not active one the cloned site telling me the original was a copy of the clone
If google find your clone you have also some possible issues
WPBeginner Support
While there is a problem with simply cloning a site without any new content, the primary goal would normally be to use this when transferring your site from one location to another and then removing the old site or using the copied site as a template and adding new content to your new site.
Admin
Bidmead
For some inexplicable reason, when I save this useful page to Pocket, what actually arrives there is the old 11 May 2015 version, which discusses a completely different method based on a plugin called BackupBuddy which costs $52 for the 1-site version.
—
Chris
WPBeginner Support
We’ll certainly take a look if it is something on our end. You may want to check with Pocket if there is a cache that needs to be cleared on their end as well
Admin
Chris Bidmead
I’ve been in touch with Pocket. They suggest it might be a problem with their Parser, which checks the content and determines the best way to display it. They’ve managed to reproduce the bug and are investigating.
—
Chris
Gary Andrews
I wand to upgrade my production site to WP 5 and change themes. I thought it might be a good idea to clone my site on my local windows machine under Desktop Server.
I’ve been trying for 2 days to clone my site.
Let me just add that your tuto is perfectly straightforward as long as things go well. It doesn’t go into what might not work correctly.
Firstly Duplicator package creation times out (despite having filtered out the big files). Of course my hosting company doesn’t support Duplicator because it tries to change the time limit, can’t really blame the host company.
I also tried the Duparchive option which doesn’t time out and generates a .daf archive instead of a .zip.
On the Desktop Server local side I tried to run installer.php from my browser but got messages saying I needed to enable ziparchive and/or shell exec. I contacted Desktop Server support about that and have had no answer.
I thought I’d try to extract the data from the daf archive manually but the software that is needed to do this no longer seems to be available.
I imagine that the Duplicator Pro version would work better but I don’t have the budget (association website).
Oh woe is me, looks like I’ll have to do it all by hand.
WPBeginner Support
From the sound of it you sadly may need to manually import/export the data, the other option would be if you have a backup of your site that you could restore to your local installation.
Admin
Adam
Awesome article!!!
Followed your steps and it worked perfectly.
I did make one error though, I extracted the zip file and uploaded the files in ftp which did create errors. Much easier to simply upload the zip instead.
Thanks heaps!
WPBeginner Support
You would likely need to extract the zip once it is on your hosting provider but glad you found a solution for your error
Admin
Donna Lutheran
I copy sites all the time.
The plugins actually look more complicated than doing it manually.
Just download your files, back up your database, ftp to the new server, restore your database to your new database, edit the wp-config file to point to the new database, edit the url in your database to point to the new url.
I also download velvet blue to correct any url problems.
I had a site not pass our security scan that used the plugin. Also, the database back up was stored in the root of your site.
James Cook
I used a much simpler way. My WP installation is with Godaddy…so logged in the cPanel of the site I wanted to cloned…went to subdomains and created the domain for the site destination…then I went to applications and the top of cPanel and clicked the little check box next the primary site I wanted to clone…then hit the clone button…and voila…and exact copy of our site was created in less than 10 minutes…
Indusekar S K
Is there any plugin or other software that could clone a wordpress website to another wordpress on the live?
Mark C
The price for this is riduculous. Even the cheapest option is $80 PER YEAR! What an absolute rippoff!
Better off just going to Control Panel, zipping up your files and download them … then go to PHPMyAdmin and downloading a copy of your database. Then upload your zipped files to the new location…edit the config file, then import the database.
If that’s too hard for website retards … just install the free version of “Duplicate” (similar to Backup Buddy … but FREE).
Carlos A. B. S.
You’re right man, no need to spend a dime on such a a simple task…
Felisha
Either of you have a step by step guide? I am trying to copy my site to a subdomain to target a different city from the main site.
The only thing I understand so far is that I have to:
1. create a subdomain
2. create a new database
3. copy the public html folder of the main site over to the subdomain pubic html folder
After that, every tutorial I’ve seen on the internet gets too confusing
Jerri
What are you talking about? Duplicator is free. I mean, there’s a pro version, but I use the free version all the time to duplicate websites.
The only thing these instructions didn’t add is that you need to first create a new database and add a user to it on the new site before running the installer.
But it’s all easy and free.
Lipa
thx a lot !!! ;]
Mack
Can i copy someone’s site page to my site??
Allan Seabrook
Hi,
I really appreciate all the posts you share with us! Please keep them coming!
My question regarding this post is…
This technique using BackupBuddy works flawlessly.
However, I now have a problem:
When I type in the URL of my original site (where I took the backup), I get directed to the site I cloned from that backup. It’s as if my original site now has a redirect to the cloned site.
What on earth have I broken?
Any advice would be much appreciated!
Thanks,
Allan
Stephen
Check your DNS record. That would be one of the only ways this would happen.
Jonathan
Thanks! Worked perfect!
Mamun sarkar
Hi,
I would like to know how to clone any wordpress website have no hosting access information as well. I mean, suppose a buyer order your wpbeginner like website. Then, How to do it sir. Do you have any tutorials plz.
Hanna
not possible anymore to use backup buddy unless you want to pay. Is their a different method?
Nelson
Duplicator is perfect.
sandeep
i want to copy the theme of running website to another website…
Moses
Hi Sandeep,
Did you get solution to this. I also want to copy a theme to another website(subdomain)
Chris
I’ve used another service to clone WordPress sites and have discovered a problem with residual tables, and I was curious whether this was an issue with BackupBuddy as well.
In the scenario I recently encountered, I create WP Site A with table prefix wp1_.
Then I have to create a new environment to clone to, so I install WordPress at WP Site B with table prefix wp2_.
Now I use my [unnamed] tool to clone site A to site B, which appears good on the admin and public side but when I look in the database I have both wp1_ and wp2_ sets of tables, and all of the GUIDs in the functioning tables for the new cloned site have WP Site A’s URL, not WP Site B’s as I would have expected.
These have to be cleaned up manually. So I wonder, does BackupBuddy do the same thing? Is this to be expected?
WPBeginner Support
BackupBuddy’s sales/support team can probably answer this better.
Admin
Andrew Lopez
I’d be curious to know how to manually perform this task without a plugin or is a plugin recommended for backing up and migrating over to a new website?
Dave Navarro
BackupBuddy fails on large WordPress installs. I can’t get it to back up our site which between database all files is over 400GB in size.
I had to manually download all of the files, then re-upload them to the new site and use importbuddy with just the database. Even that fails if the raw database is too large (failed around 200MB in size).
Nitin
wonderful technique but there is use of another plugin
Gf
I recently moved a small simple blog with all-in-one wordpress migration and it worked great. But when I attempted a larger site on wp4.1 it failed. I think I would like back up buddy but the price is staggering. It would be my biggest wordpress expense, almost twice as much as my hosting!
Jean
I love using BackupBuddy for backups and migrations.
All you need is access to install the plugin and your set to move.
Great article!
johnraf
I used to have similar problems too, but after using
“long path tool” You can use to solve this problem.
yaser
How about if we want to clone a website that we have no backend access? Is there an easy way?
fletch
Do you have ftp access? Do you have access to the database? You would need those two things to backup a website if you don’t have access to wp-admin.