
最近、ある読者から、WordPressの各コメントの横にユーザーの権限グループをハイライト表示できないかという質問を受けました。これはよくある質問で、私たちは多くのサイトオーナーがこの機能を追加し、より強力なコミュニティ感覚を構築できるようお手伝いしてきました。
ユーザーの権限グループラベルを表示することで、投稿者、エディター、管理者など、サイトで信頼されているユーザーからのコメントであることを即座に知らせることができます。
この投稿では、WordPressでコメントの横にユーザー権限グループのラベルを簡単に追加する方法を紹介します。

WordPressでコメント投稿者名の横にユーザー権限グループを表示する理由
サイトでユーザー登録を許可している場合、または複数の投稿者がいるWordPressサイトを運営している場合、ユーザーラベルはユーザーの権限グループに基づいてユーザーを紹介することができます。
例えば、エディター権限グループを持つユーザーは、コメントの自分の名前の横にバッジが表示され、このコメントがエディターによってなされたことを他のユーザーに知らせることができます。
ユーザーとの信頼関係を築き、サイト上でコメントするユーザーのエンゲージメントを高めます。
多くのWordPressテーマは、投稿者のコメントだけをハイライトします。たとえ登録ユーザーやサイト管理者のコメントであっても、他のユーザーグループのラベルは表示されません。
ということで、WordPressでコメントの横にユーザー権限グループのラベルを簡単に追加する方法を見てみましょう。
WordPressでコメント投稿者名の隣にユーザー権限グループのラベルを追加する
このチュートリアルでは、WordPressテーマファイルにコードを追加する必要があります。この作業を行ったことがない場合は、WordPressでコードスニペットをコピー&ペーストする方法をご覧ください。
まず最初に、テーマのfunctions.phpファイル、サイト固有のプラグイン、またはコード・スニペット・プラグインに以下のコードを追加します。
1 2 3 4 5 6 7 8 9 10 11 12 13 14 15 16 17 18 19 20 21 22 23 24 25 26 27 28 29 | if ( ! class_exists( 'WPB_Comment_Author_Role_Label' ) ) :class WPB_Comment_Author_Role_Label {public function __construct() {add_filter( 'get_comment_author', array( $this, 'wpb_get_comment_author_role' ), 10, 3 );add_filter( 'get_comment_author_link', array( $this, 'wpb_comment_author_role' ) );} // Get comment author role function wpb_get_comment_author_role($author, $comment_id, $comment) { $authoremail = get_comment_author_email( $comment); // Check if user is registeredif (email_exists($authoremail)) {$commet_user_role = get_user_by( 'email', $authoremail );$comment_user_role = $commet_user_role->roles[0];// HTML output to add next to comment author name$this->comment_user_role = ' <span class="comment-author-label comment-author-label-'.$comment_user_role.'">' . ucfirst($comment_user_role) . '</span>';} else { $this->comment_user_role = '';} return $author;} // Display comment author function wpb_comment_author_role($author) { return $author .= $this->comment_user_role; } }new WPB_Comment_Author_Role_Label;endif; |
上記の関数コードは、コメント作成者名を表示するために使用されるWordPressフィルターにフックし、ユーザー権限グループのラベルを含めます。
WordPressに最適なコードスニペットプラグインであるWPCodeを使用して、このコードを追加することをお勧めします。テーマのfunctions.phpファイルを編集せずにコードを追加する最も安全で簡単な方法です。

開始するには、無料のWPCodeプラグインをインストールし、有効化する必要があります。詳しい手順は、WordPressプラグインのインストール方法のチュートリアルをご覧ください。
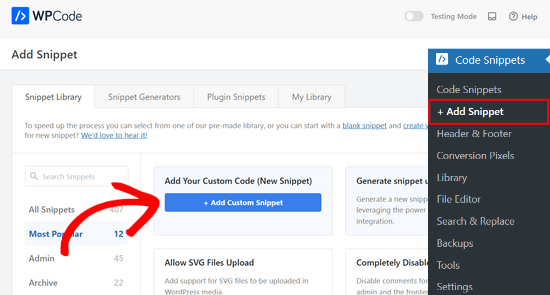
プラグインを有効化したら、WordPressダッシュボードからCode Snippets ” + Add Snippetに移動します。そこから、「カスタムコードを追加(新規スニペット)」設定の下にある「+カスタム・スニペットを追加」ボタンをクリックします。
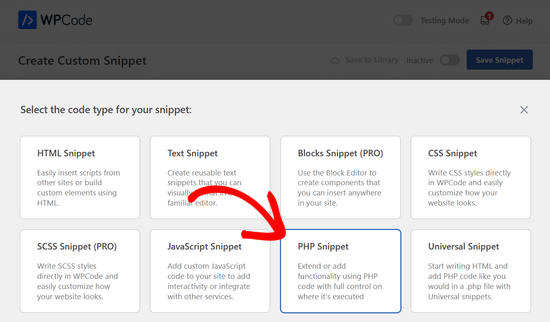
次に、画面に表示されるオプションの一覧から、コードタイプとして「PHP Snippet」を選択する必要があります。
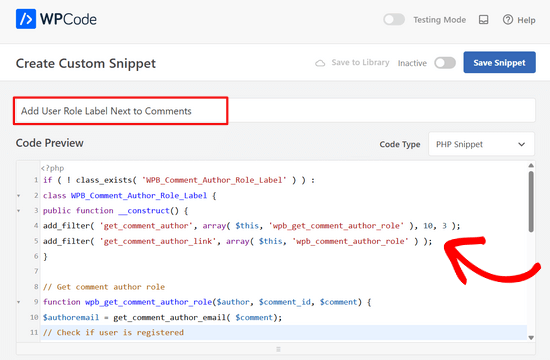
カスタムスニペットの作成ページが表示されます。
ここから、コード・スニペットのタイトルを追加する必要がある。これは、何のためのコードなのかを覚えておくのに役立つものであれば何でも構いません。
次に、上記のコードを「コード・プレビュー」ボックスに貼り付けます。
その後、ページ上部のスイッチを「非活性化」から「有効化」に動かすだけでよい。
最後に「スニペットを保存」ボタンをクリックする。

コメントする投稿にアクセスし、その動きを見ることができる。
登録ユーザーによって投稿されたコメントには、コメント作成者名の横にユーザー権限が表示されます。非登録ユーザーによって投稿されたコメントは、コメント作成者名のみが表示されます。

ユーザー権限グループを追加したので、次はそれをスタイルしてきれいに見せましょう。
私たちのコードでは、各ユーザー権限にCSSクラスを追加しているので、これらのCSSクラスを使用して、各ユーザーバッジを異なるようにカスタマイズすることができます(異なる色を使用するなど)。
以下のサンプルCSSを出発点として使用することができます:
1 2 3 4 5 6 7 8 9 10 11 12 13 14 15 16 17 18 19 20 21 22 23 | .comment-author-label { padding: 5px; font-size: 14px; border-radius: 3px;} .comment-author-label-editor { background-color:#efefef;}.comment-author-label-author {background-color:#faeeee;} .comment-author-label-contributor {background-color:#f0faee; }.comment-author-label-subscriber {background-color:#eef5fa; } .comment-author-label-administrator { background-color:#fde9ff;} |
CSSはご自由に調整してください。デモサイトではこのように表示されました:

詳しくは、WordPressサイトにカスタムCSSを簡単に追加する方法をご覧ください。
この投稿が、WordPressでコメントの横にユーザー権限グループのラベルを追加する方法を学ぶのにお役に立てば幸いです。また、WordPressのコメントでグラビアを遅延ロードする方法や、WordPressのコメントを改善するプラグインもご紹介しています。
If you liked this article, then please subscribe to our YouTube Channel for WordPress video tutorials. You can also find us on Twitter and Facebook.


")
Jack
What if a user has multiple roles? Let say, I have a user with “verified” and “subscriber” roles. I need to put verified badge next to the comment author with “verified” role. How can I do this?
WPBeginner Support
By default WordPress only allows a user to have 1 role at a time, if you’re using a plugin to allow for multiple roles then it would depend on the specific plugin that you are using
Admin
John
How to integrate it in Profile Page or lets say, i want to add a code in about Me widget.
Matt
Hey,
Great tutorial.
Is there anyway to customize the text within the badge?
Instead of the user role, displaying something like “Post Author”? I feel like displaying ‘Administrator’ for some blogs is a bit of a buzz kill and too serious.
Kelly
Instead of saying “Administrator” or whatever their role beside their name, if I wanted to show an icon based on user role, how could I do that? I’ve tried playing with your code but cannot figure out how to display a different icon based on user role.
Eddie
That would be great. I’m looking for this so I can show an icon only for contributors
Mahmudul Hasan
where put the css code..?
WPBeginner Support
Hi Mahmudul Hasan,
Please see our guide on how to add custom CSS in WordPress.
Admin
javad
Hi this code is wrong and when I put it on functions.php my website got 500 error!!!
WPBeginner Support
Hi Javad,
This code is working fine on our test site. 500 internal server error can be caused by many other things.
Admin