
せっかくFacebookのフォロワーを増やしたのに、サイト訪問者がページとつながってくれない。イライラしますよね?
私たちは、WordPressとFacebookを統合する様々な方法をテストし、シンプルな「いいね!」ボックスがソーシャルフォロワーの増加に大きな違いをもたらすことを発見しました。
うまく配置されたFacebookいいね!ボックスは、サイトとソーシャルメディアのギャップを埋め、訪問者がサイトにいながらにしてFacebookページに参加できるようにします。これは、あなたの社会的証明に大きな影響を与えることができる小さな追加の一つです。
このガイドでは、WordPressサイトにFacebook Like Boxを追加する2つの簡単な方法を紹介します:Facebook Like Boxプラグインアプローチとコードソリューション。

なぜWordPressサイトにFacebookの「いいね!」ボックスを追加するのか?
WordPressサイトにFacebookの「いいね!」ボックスを追加すると、素晴らしい特典があります。
まず、Facebookのファンページやビジネスページに簡単に「いいね!」を押してもらうことができます。これは、あなたの投稿が彼らのFacebookのフィードに表示されることを意味し、あなたはあなたのウェブサイトを越えて人々に到達し続けることができます。
また、Facebookページの「いいね!」ボックスには、何人があなたのFacebookページに「いいね!」を押したかが表示されます。これは社会的証明として機能し、より多くの訪問者に「いいね!」をクリックしてもらうことができます。
このチュートリアルでは、Facebookの「いいね!」ボックスを追加する2つの方法を紹介します:ひとつはソーシャルプラグインを使う方法、もうひとつはコードを使う方法です。以下のクイックリンクを使って、投稿をナビゲートすることができます:
注意:Facebookいいね!ボックスは、いいね!ボタンとは異なります。もし、あなたのサイトにFacebookの「いいね!」ボタンを表示したい場合は、WordPressにFacebookの「いいね!」ボタンを追加する方法をご覧ください。
方法1:WordPressのFacebookいいね!ボックスプラグインを使う(初心者向け)
この最初の方法は、初心者が自分のサイトにFacebookの「いいね!」ボックスを追加する最も簡単でお勧めの方法です。また、Facebookのフィードをサイトに表示することもできます。
Smash BalloonはユーザーフレンドリーなWordPressプラグインで、WordPressに様々なソーシャルメディアのフィードを埋め込むことができる。
このチュートリアルでは、Smash Balloon Social Postフィードプラグインの無料版を使用することができます。しかし、いいね!ボックス以外の機能(動画、写真、イベントの表示など)が必要な場合は、プロバージョンへのアップグレードをお勧めします。
Smash Balloon Facebook Feedプラグインの設定
まず、管理エリアにWordPressプラグインをインストールする必要がある。その後、Facebook Feed ” All Feedsに 行き、’Add New’をクリックする。

ここで、「タイムライン」のフィードタイプを選択する。
そして、「次へ」ボタンをクリックするだけです。

この段階で、FacebookページをWordPressサイトに接続する必要があります。
新規追加』ボタンをクリックします。

Smash Balloonで新しい画面が表示されます。
ここでは、ソースの種類に「ページ」を選択し、「Facebookに接続」をクリックするだけだ。

ここで、Facebookアカウントにログインする必要があります。
その後、WordPressブログやサイトに「いいね!」ボックスを表示させたいページを選択します。そして、「次へ」をクリックします。

Smash Balloonの権限設定が表示されます。すべてを有効化して、うまく動作するようにすることをお勧めします。
では、『完了』をクリックしてください。

最後のポップアップでは、Smash BalloonとFacebookの連携が完了したことを確認します。
OK」をクリックして続行します。

Smash Balloonの管理エリアに移動し、タイムラインフィードで使用するFacebookページを選択します。
ページを選んで「追加」をクリックするだけ。

Smash Balloonプラグインのページに、先ほど接続したFacebookページがソースとして表示されます。
それを選んで『次へ』をクリックするだけだ。

Facebookの「いいね!」ボックスのカスタマイズ
この段階で、Smash BalloonはあなたをFacebookのフィードエディターに連れて行きます。
最初のステップは、配色オプションの上にある「フィードレイアウト」をクリックすることです。

投稿数」セクションまでスクロールするだけです。
これで、最近の投稿がすべて表示されなくなり、「いいね!」ボックスだけがフィードに表示されるようになります。
また、いいね!ボックスと一緒にFacebookのフィードも表示させたい場合は、WordPressでFacebookのカスタムフィードを作成する方法のチュートリアルを参考にしてください。

さあ、上に戻るんだ。
次に「カスタマイザー」をクリックしてフィードエディターページに戻ります。

この段階で、Facebookフィードのヘッダーを削除することができます。
必要なのは、「セクション」の部分まで移動し、「ヘッダー」を選択することだ。

このヘッダー設定は、Facebookフィードのヘッダーをどのように表示するかを決定します。
しかし、この場合は非表示にする必要があるので、『有効化』トグルをオフにするだけでよい。

メインのフィードエディターページに戻り、「Like Box」設定を開きましょう。その後、「Like Box」機能をオンにするだけです。
このページでは、いいね!ボックスのサイズ、位置、カバー写真の表示、カスタム幅、カスタムCall-to-Actionテキストなどを調整することもできます。

それが終わったら、右上の「保存」ボタンを押すだけだ。
WordPressのページや投稿にFacebookの「いいね!」ボックスを埋め込む
この段階で、Facebookいいね!ボックスをページやサイドバーなどのウィジェット対応エリアに表示することができます。
これを行うには、右上の「Embed」をクリックします。フィードの埋め込みポップアップが表示され、いいね!ボックスを表示するための2つのオプションが表示されます。
一つはショートコードを使う方法で、もう一つはページやウィジェット対応エリアに直接追加する方法です。2番目のオプションの方がはるかに簡単なので、最初にその方法を紹介します。

特定のページに「いいね!」ボックスを追加したい場合は、「ページに追加」ボタンをクリックしてください。
あとは、機能を追加するページを選択し、「追加」をクリックするだけです。

Gutenbergブロックエディターに到着します。
Smash Balloonの指示に従い、「+ブロックを追加」ボタンをクリックする。

ブロックインサーターライブラリを開いたら、Facebook Feedブロックを見つける必要があります。
あとは、ページ上の最適な場所にドラッグ&ドロップするだけ。

ブロック内で、先ほど作成した「いいね!」ボックスのあるFacebookフィードを選択します。
ブロックに「いいね!」ボックスが表示されます。

しかし、複数のFacebookページを持っていて、Smash Balloonを使ってそれぞれのページに「いいね!」ボックスを設定している場合はどうでしょうか?
また、ブロック設定のサイドバーで「フィードの選択」ドロップダウンメニューからフィードを選んで切り替えることもできる。

あとは、「更新」ボタンをクリックするだけで、変更が正式に反映されます。
デモサイトでの「いいね!」ボックスはこんな感じです:

ブロックWordPressテーマを使用している場合は、フルサイトエディターを使って、テーマのページテンプレートにFacebookいいね!ボックスを追加することもできます。
フルサイトエディターの詳細については、フルサイト編集の初心者ガイドをお読みください。
WordPressにFacebookの「いいね!」ボックスウィジェットを埋め込む
クラシックなWordPressテーマを使っている場合、サイドバーやヘッダー、フッターなどのウィジェット対応エリアにFacebookの「いいね!」ボックスを表示したいかもしれません。ページのメインコンテンツからユーザーを引き離すことなく、いいね!ボックスを表示することができます。
フィード埋め込みポップアップで、「ウィジェットに追加」を選択し、ブロックベースのウィジェットエディターに移動します。
先ほどの方法と同じように、「+ブロックを追加」ボタンをクリックし、Facebookフィードブロックを見つけて、希望のエリアにドラッグするだけです。
デモサイトでは、「いいね!」ボックスをWordPressのサイドバーウィジェットとして使用します。

ブロックの中で、先ほど作成した「いいね!」ボックスのあるFacebook Feedを選択します。
その後、「更新」をクリックして変更を有効にします。

それで終わりだ!
テストサイトのサイドバーに「いいね!ボックス」ウィジェットを設置すると、こんな感じになります:

Facebookの「いいね!」ボックスウィジェットをショートコードで埋め込む
前の2つの方法がうまくいかない場合は、ショートコードを使ってFacebookの「いいね!ボックス」や「ファンボックス」を追加することをお勧めします。
先ほどの「フィードを埋め込む」ポップアップからショートコードをコピーし、あなたのサイトの任意の場所に追加するだけです。

ショートコードの使い方については、WordPressでショートコードを追加する方法をご覧ください。
方法2:コードを使ってFacebookの「いいね!」ボックスを追加する
もし、他のFacebookフィードを追加せずに、Facebookファンボックスやいいね!ボックスだけを表示させたいのであれば、Facebookページプラグインを使うのはやりすぎと思われるかもしれません。この場合、コードを使って「いいね!」ボックスを追加することができます。
この方法は初心者には敷居が高く感じるかもしれないが、WPCodeを使ってコードを挿入する確実な方法を紹介する。これはWordPressプラグインで、サイトを壊すことなくWordPressにカスタム・コード・スニペットを簡単に追加できる。
このガイドでは、無料のWPCodeバージョンで十分ですが、テストモードやクラウドベースのコードスニペットライブラリのような高度な機能を使用するには、Proバージョンにアップグレードすることができます。
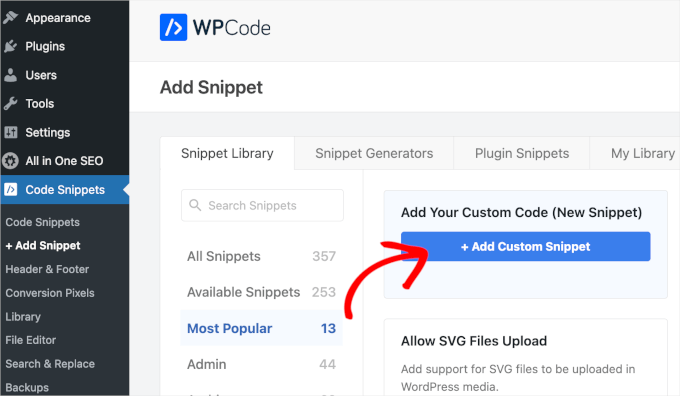
まず、WordPressにプラグインをインストールしよう。有効化したら、Code Snippets ” + Add Snippetにアクセスする。そして、「Add Your Custom Code (New Snippet)」を選択し、「+ Add Custom Snippet」をクリックします。
コードエディターに到着します。カスタム・コード・スニペットを後で簡単に識別できるように、まず名前をつけましょう。ここでは、’Facebook JavaScript SDK’という名前にします。
このタブを開いたまま、ブラウザーに新しいタブを作成し、Facebook開発者ページにアクセスします。
メニューで「ログイン」をクリックし、Facebookアカウントにログインします。

初めてこのページにアクセスする場合は、オンボーディング・ウィザードを完了し、無料アカウントを作成してください。
Facebook Developersのダッシュボードが表示されます。アプリを作成」ボタンをクリックしましょう。

次のページでは、ユースケースに「その他」を選択します。
その後、「次へ」ボタンをクリックする。

Facebookページ用に作成できるさまざまなアプリがすべて表示されます。
ライクボックスを作成するには、「ビジネス」を選択し、「次へ」をクリックすればよい。

アプリの名前をつけましょう。これは単なる参考なので、何でもかまいません。メールアドレスを入力し、オプションでビジネスアカウントを設定することもできます。
最後に「アプリを作成」をクリックする。

それでは、ソーシャルプラグインのFacebook開発者ページにアクセスしてみよう。
そして、下のスクリーンショットのようなセクションが見つかるまで下にスクロールする:

ここで、FacebookページのURLを入力し、「タブ」フィールドを空にし、必要に応じて「いいね!」ボックスの幅と高さを指定します。
また、ヘッダーを小さくしたり、カバー写真を無効化したりすることもできます。また、「いいね!」ボックスをコンテナの幅に合わせることで、サイト上の配置に合わせてレスポンシブにサイズが調整されます。
完了したら、「コードを取得」ボタンをクリックします。すると、2種類のコード・スニペットがポップアップで表示されます:JavaScript SDKとiFrameです。どちらもあなたのLike Boxを表示しますが、一般的にはJavaScript SDKの方がより良い設定です。

JavaScript SDKは通常、ウェブページに直接埋め込まれ、メインドキュメントの一部として読み込むことができるため、より高速です。
JavaScript SDKタブで、先ほど作成したアプリ名が選択されていることを確認してください。
次に、ステップ2のJavaScript SDK APIコードをコピーします。次に、このタブを開いたまま、WPCodeタブに切り替え、そこにコードを貼り付けます。
コードタイプは「HTMLスニペット」のままでよい。

次に、「インサーター」セクションまでスクロールダウンする。
挿入方法」は「自動挿入」のままでよいが、「場所」は「サイト全体の本文」に変更する。
最後に、コードを有効化して「スニペットを保存」をクリックするだけだ。

次に、2つ目のコード・スニペットを作成します。先ほどと同じ手順で、’Facebook Like Box’のような名前にします。
その後、先ほどのソーシャルプラグインのFacebook開発者ページに切り替え、ステップ3のコードをコピーする。
再びWPCodeタブにナビゲーションし、コード・プレビュー・ボックスにステップ3のコードを貼り付けます。コードタイプは「HTMLスニペット」でもよい。

インサーター」セクションまでスクロールダウンしてみよう。
オートインサート」を使えば、「場所」のカテゴリーに合った複数の場所に、自動的に「いいね!」ボックスを表示させることができます。
この例では、「サイト全体のフッター」を選択し、「いいね!」ボックスがフッターに表示されるようにしています。
他にも、WordPressブログのすべての投稿の前に「いいね!」ボックスを表示する「投稿の前に挿入」などのオプション設定もあります。

一方、「ショートコード」メソッドでは、カスタムのショートコードを作成することができる。
その後、ショートコードブロックを使ってサイトの特定の部分に追加することができます。

インサーター設定を有効化したら、コードをアクティブにして「スニペットを保存」をクリックするだけです。
これだけです!あなたのサイトにアクセスして、Like Boxがどのように見えるか見てみましょう:

WordPressサイトにソーシャルフィードを表示するガイドについては、WordPressにソーシャルメディアフィードを追加する投稿をご覧ください。
ボーナス:WordPressとFacebookを統合するその他の方法
Facebookとの統合を次のレベルに引き上げたいですか?以下の追加ガイドをご覧ください:
- WordPressでFacebookいいね!ボックスのポップアップを作成する方法– 戦略的なタイミングでいいね!ボックスのポップアップでエンゲージメントを高めよう。
- WordPressでFacebookのステータス投稿を埋め込む方法– 特定のFacebookの更新を直接サイトで共有しましょう。
- WordPressにFacebookのグループフィードを埋め込む方法– あなたのサイトにコミュニティのディスカッションを表示します。
- WordPressでFacebookページのレビューを表示する方法– Facebookからのカスタマイザーレビューで社会的証明を表示しましょう。
- WordPressを使ってFacebookの「いいね!」を増やす簡単な方法– Facebookのフォロワーを増やすためにこれらの戦略を実行しましょう。
- プロフィールページに投稿者のTwitterとFacebookを表示する方法– ソーシャルメディアで読者と寄稿者をつなげよう。
- WordPressの投稿にFacebookの「いいね!」リアクションを追加する方法 – Facebookの人気リアクション機能をブログ投稿に導入しよう。
- WordPressでFacebook広告のランディングページを作成する方法– Facebook広告キャンペーン用にコンバージョンの高いランディングページをデザインしましょう。
- WordPressからFacebookに自動投稿する方法– 自動投稿でソーシャルメディア戦略を効率化しましょう。
この投稿が、WordPressにFacebookの「いいね!」ボックスやファンボックスを追加する方法を学ぶのにお役に立てば幸いです。また、究極のソーシャルメディア・チートシートや WordPressに最適なソーシャルメディア・プラグインのリストもご覧ください。
If you liked this article, then please subscribe to our YouTube Channel for WordPress video tutorials. You can also find us on Twitter and Facebook.


 in 2024")
Mrteesurez
This is awesome. It’s really a useful feature, it will let users quickly like my contents directly from my website. But can it show like count ?
WPBeginner Support
Unless Facebook has made a change it should show the like count.
Admin
dharm
i complete all steps but my website show error plz help me i dont understend proprly
nareshdetruja
Aewson information bro nice a article
Hector Jayat
Amazing Tip, I was able to set this up in only 5 minutes. Thanks
Tina Gleisner
Thanks for explaining the JavaScript code can go in the footer, and not the header as indicated by Facebook … although I’m only guessing at why this is better & would appreciate knowing the real reason (load time?)
Richard
To update your post, sadly it looks like the official Facebook plugin is now (2015) no longer official.
It also has not been updated in a year and a half and now has a poor user rating.
Kitty
One question: I use the plugin, but why wordpress tells me that it’s not a valid facebook page url. It’s my own facebook site. How can I get the right url?
Jurgen
I’ve got the same issue … it says not a valid facebook url and it is mine
Peter
I installed the plugin but I then received a warning the it is not compatible with WordPress seo by Yoast.
Here is the message below.
The Facebook plugin(s) might cause issues when used in conjunction with WordPress SEO by Yoast.
Both WordPress SEO by Yoast and Facebook create OpenGraph output, which might make Facebook, Twitter, LinkedIn and other social networks use the wrong texts and images when your pages are being shared.
Recommended solution
We recommend you deactivate Facebook and have another look at your WordPress SEO configuration using the button above.
I will try to install it manually and see if that works.
WPBeginner Staff
You are probably using WordPress.com see our guide on the difference between WordPress.com and WordPress.org.
frank jer
why i cannot use the wordpress plugins?
carol neumann
Am confused; WordPress plugins do not download into Widgits. Plugins can only be placed before and/or after a post, not in the sidebar.
Sohail
WELL DONE nice job Thats the real way to explain some thing. Thanks again for making such good tuts
Chrys
Hi,
I’ve tried everything to add it manually but the like box won’t appear! I really cannot figure out why..I put the codes in the right places though…
Any idea?
Kind regards
Chrissy
Simple. Real and to the point. Thank you guys as usual very helpful!
Jeanette O'Hagan
Great post, thanks. Just what I needed.
rajeshwar sharma
great work …keep the good work going…
giacomo
Hello! thanks for the tips…everything works like a charm
Pummy
Hi Sayyed.
Your header and footer plugin is awesome. I think this is a must have plugin for wp beginners,
You publish great posts with great detail.
Thanks.
Ankit
Great piece of information.
Ajay
I use Jetpack’s widgets to add the Facebook box. I’ve found it easy to use with decent number of options
Bob Downs
I’m with Ajay – the Jetpack Facebook Like Box widget is simple and easy to use without adding any other plugins than the Jetpack one.
Editorial Staff
Agreed that’s why we have it mentioned at the top because most folks find it easier.
Admin
Scott
iframe seems like the easiest way, not having to deal with the javascript. Are there any major disadvantages to using iframe?
Editorial Staff
The only major disadvantage is that you can’t see Facebook Insights data.
Admin