初期設定では、カスタム投稿タイプはすべて同じように見えるため、混乱する可能性があります。ユニークなアイコンを使えば、異なるタイプのコンテンツをすぐに見分けることができます。
さらに、カスタム投稿タイプに適切なアイコンを設定することで、WordPressダッシュボードのナビゲーションに大きな違いが生まれます。ログイン中、サイドバーに投稿、ページ、カスタム投稿タイプのエントリーが表示されます。
この投稿では、カスタム投稿タイプに様々なアイコンを追加する方法を説明します。

なぜWordPressのカスタム投稿タイプにアイコンを追加するのか?
WordPressサイトで作業する場合、通常は投稿かページを使用します。しかし、カスタム投稿タイプを使って他の種類のコンテンツを作成することもできます。
例えば、WooCommerceは‘Product’というカスタム投稿タイプを使用してストアをストックします。
カスタム投稿タイプは、WordPressの管理エリアの左メニューに投稿やページと並んで表示されます。WordPressの各メニュー項目にはアイコンが付いており、これはDashiconsと呼ばれるアイコンフォントに由来しています。
問題は、すべてのカスタム投稿タイプが投稿と同じアイコンを使用することです。そのため、複数のカスタム投稿タイプがある場合、すべてアイコンが異なれば、正しい投稿タイプを見つけやすくなります。

今回は、WordPressのカスタム投稿タイプにアイコンを追加する方法をご紹介します。このチュートリアルで扱う内容は以下の通りです:
準備はいいかい?始めよう
プラグインによるカスタム投稿タイプのアイコンの追加
カスタム投稿タイプの登録が初めてだったり、コードタイプに慣れていない場合は、カスタム投稿タイプUIプラグインを使って投稿タイプやタクソノミーを作成することをお勧めします。
プラグインでカスタム投稿タイプを作成する
まず、カスタム投稿タイプを作成する必要があります。すでに作成済みの場合は、以下の「プラグインでカスタム投稿タイプにアイコンを追加する」のセクションに進んでください。
プラグインをインストーラして有効化したら、CPT UI ” Add/Edit Post Typesに移動して、新規カスタム投稿タイプを作成します。そして、「新規投稿タイプを追加」タブにいることを確認してください。
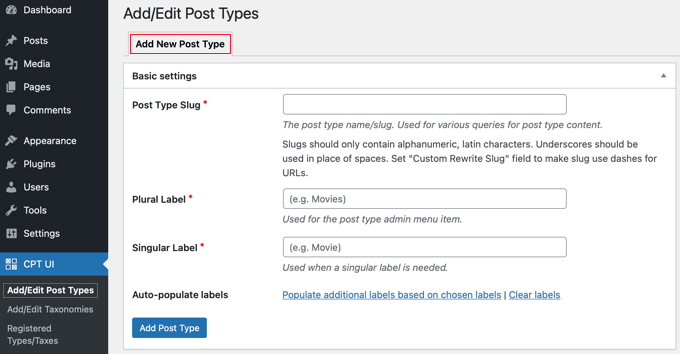
次に、’movies’のようなカスタム投稿タイプのスラッグを入力する必要があります。その下に、’books’や’book’のように複数形と単数形の名前を入力する。
その後、「選択したラベルに基づいて追加ラベルを入力する」というリンクをクリックします。これにより、以下の追加ラベルフィールドが自動的に入力され、通常は時間を節約できます。
または、手動で「追加ラベル」セクションにラベルを追加することもできます。
次に、「設定」セクションにスクロールダウンして、投稿タイプにさまざまな属性を設定しましょう。各オプションには、その機能を説明する簡単な説明があります。
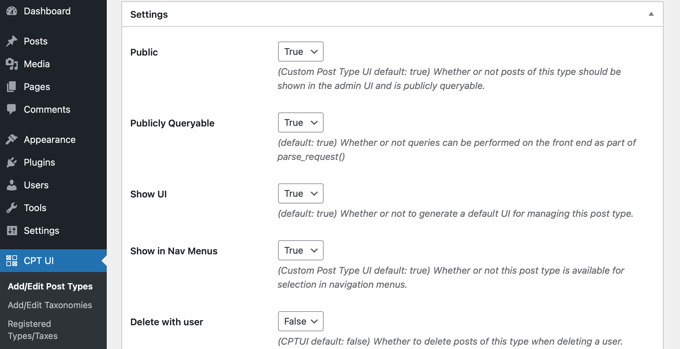
例えば、投稿タイプの並べ替えや階層化するかどうかを選択できる。
一般設定の下に、この投稿タイプがサポートする編集機能を選択するオプションが表示されます。設定したいオプションにチェックを入れてください。
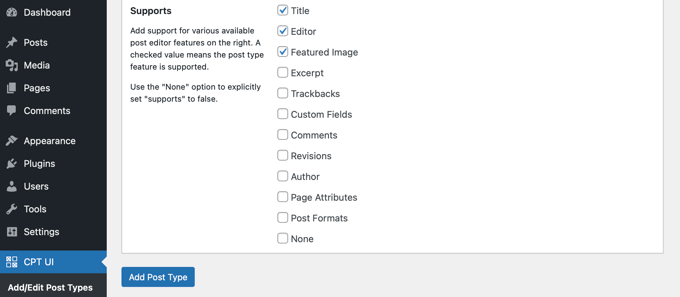
最後に、「投稿タイプを追加」ボタンをクリックして、カスタム投稿タイプを保存・作成します。
カスタム投稿タイプUIを使用してカスタム投稿タイプを作成する詳細な手順については、WordPressでカスタム投稿タイプを作成する方法のガイドの最初の方法を参照してください。
プラグインを使ったカスタム投稿タイプへのアイコンの追加
カスタム投稿タイプを作成したら、アイコンを選びましょう。カスタム投稿タイプUIプラグインは初期設定でダッシュアイコンをサポートしているので、このステップは簡単です。
まず、CPT UI ” Add/Edit Post Typesにアクセスして、ページ上部の’Edit Post Types’タブをクリックします。ここで、ドロップダウンメニューから正しい投稿タイプが選択されていることを確認してください。

それが済んだら、同じページの一番下にある「設定」までスクロールダウンし、「メニューアイコン」のセクションを見つけるだけです。
カスタム投稿タイプにアイコンを追加するための2つのオプションが表示されるはずです。
Choose dashicon’ボタンでは、任意のダッシュアイコンを選ぶことができ、’Choose image icon’では、メディアライブラリから画像アイコンをアップロードまたは選択することができます。

このチュートリアルでは、「Choose dashicon」ボタンをクリックします。
ポップアップの上部にある矢印を使って、何百ものアイコンをブラウズできるようになった。さらに、Dashiconを検索することもできます。
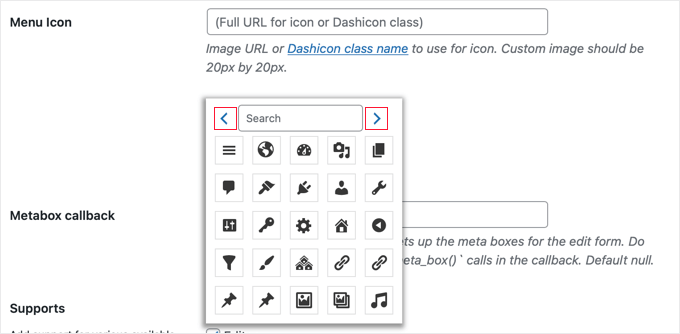
このチュートリアルでは、「本」を検索する。
すると、「Facebook」アイコンが2つ、「ブック」アイコンが2つ、合計4つの一致するアイコンが見つかった。使いたいものをクリックすればいい。
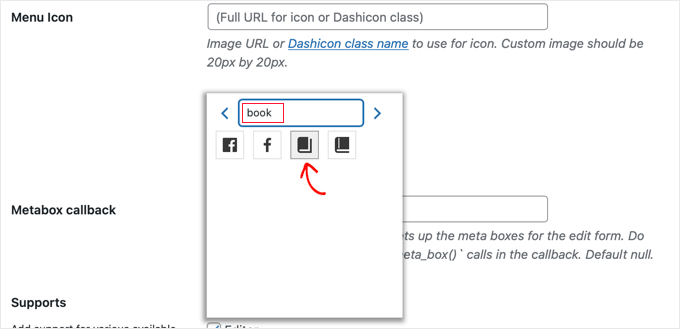
選択したアイコンのCSSクラスが自動的に「Menu Icon」フィールドに入力されます。
そして、スクロールダウンして「投稿タイプを保存」ボタンをクリックし、設定を保存することを確認しよう。

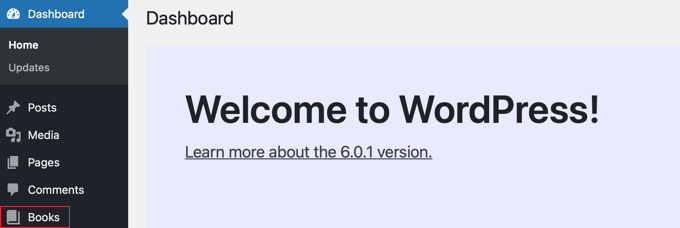
ここから、管理画面のダッシュボードに戻り、左側のサイドバーでカスタム投稿タイプを見つけることができます。
メニューの投稿タイプの横に新しいアイコンが表示されるはずです。
カスタム投稿タイプのアイコンを手動で追加する
カスタム投稿タイプをコードを使って手動で作成した場合は、アイコンも手動で追加する必要があります。
まず、Dashiconsのサイトにアクセスして、投稿タイプに使いたいアイコンを探そう。
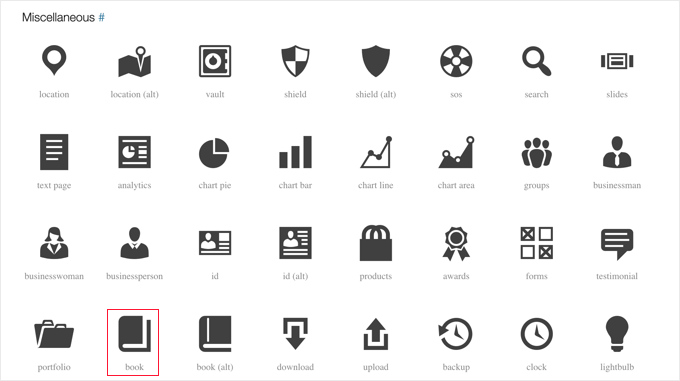
このチュートリアルでは、「その他」セクションまでスクロールダウンし、「ブック」アイコンをクリックします。
すると、カテゴリー名やアイコンのCSSクラスなど、アイコンに関する詳細情報が掲載されたページが表示されます。
例えば、以下のスクリーンショットでは、カテゴリーが「その他」で、CSSクラスが「dashicons-book」になっている。

CSSクラスをクリップボードにコピーしよう。
次に、カスタム投稿タイプを作成した場所にコードを追加する必要があります。それはテーマのfunctions.phpファイルかもしれないし、WPCodeのようなコードスニペットプラグインを使ったかもしれない。
これを実際に見るために、以下のコードスニペットは’Books’というカスタム投稿タイプを作成し、45行目にDashicons CSSクラスを追加してメニューアイコンを追加しています。
1 2 3 4 5 6 7 8 9 10 11 12 13 14 15 16 17 18 19 20 21 22 23 24 25 26 27 28 29 30 31 32 33 34 35 36 37 38 39 40 41 42 43 44 45 46 47 48 49 50 51 52 53 54 55 56 57 58 59 60 61 62 63 64 65 | /** Creating a function to create our CPT*/ function custom_post_type() { // Set UI labels for Custom Post Type $labels = array( 'name' => _x( 'Books', 'Post Type General Name', 'twentytwentyone' ), 'singular_name' => _x( 'Book', 'Post Type Singular Name', 'twentytwentyone' ), 'menu_name' => __( 'Books', 'twentytwentyone' ), 'parent_item_colon' => __( 'Parent Book', 'twentytwentyone' ), 'all_items' => __( 'All Books', 'twentytwentyone' ), 'view_item' => __( 'View Book', 'twentytwentyone' ), 'add_new_item' => __( 'Add New Book', 'twentytwentyone' ), 'add_new' => __( 'Add New', 'twentytwentyone' ), 'edit_item' => __( 'Edit Book', 'twentytwentyone' ), 'update_item' => __( 'Update Book', 'twentytwentyone' ), 'search_items' => __( 'Search Book', 'twentytwentyone' ), 'not_found' => __( 'Not Found', 'twentytwentyone' ), 'not_found_in_trash' => __( 'Not found in Trash', 'twentytwentyone' ), ); // Set other options for Custom Post Type $args = array( 'label' => __( 'books', 'twentytwentyone' ), 'description' => __( 'Book reviews', 'twentytwentyone' ), 'labels' => $labels, // Features this CPT supports in Post Editor 'supports' => array( 'title', 'editor', 'excerpt', 'author', 'thumbnail', 'comments', 'revisions', 'custom-fields', ), // You can associate this CPT with a taxonomy or custom taxonomy. 'taxonomies' => array( 'genres' ), /* A hierarchical CPT is like Pages and can have * Parent and child items. A non-hierarchical CPT * is like Posts. */ 'hierarchical' => false, 'public' => true, 'show_ui' => true, 'show_in_menu' => true, 'show_in_nav_menus' => true, 'show_in_admin_bar' => true, 'menu_position' => 5, 'menu_icon' => 'dashicons-book', 'can_export' => true, 'has_archive' => true, 'exclude_from_search' => false, 'publicly_queryable' => true, 'capability_type' => 'post', 'show_in_rest' => true, ); // Registering your Custom Post Type register_post_type( 'books', $args ); } /* Hook into the 'init' action so that the function* Containing our post type registration is not * unnecessarily executed. */ add_action( 'init', 'custom_post_type', 0 ); |
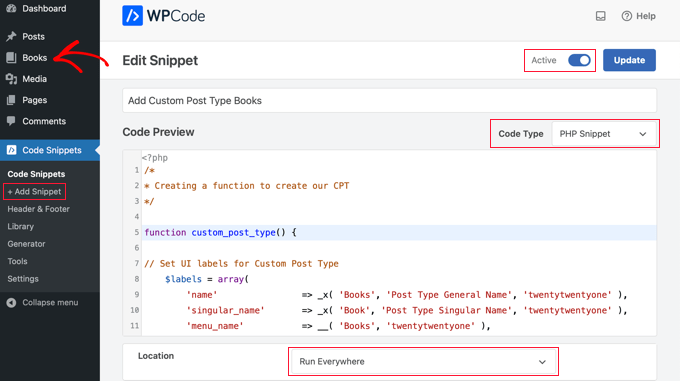
上記のコードを使用してカスタム投稿タイプを登録する際にアイコンをカスタマイズするには、以下のスニペットのいずれかを45行目に追加するだけです。
'menu_icon' => 'dashicons-book', |
あるいは、画像アイコンを「メディアライブラリ」に追加し、CSSクラスの代わりにアイコンのURLを使用することもできます:
'menu_icon' => 'http://www.example.com/wp-content/uploads/2022/08/your-cpt-icon.png', |
これらのスニペットの余分なスペースは意図的なもので、上の大きなコードブロックに貼り付けたときにコードがきれいに並ぶようにするためのものです。
このコードを使用する場合は、独自のDashicon CSSクラスまたは画像アイコンURLに変更する必要があることを覚えておいてください。

そうだ!
このチュートリアルで、WordPressでカスタム投稿タイプのアイコンを追加する方法をご理解いただけたでしょうか。次の投稿では、WordPressの検索結果にカスタム投稿タイプを含める方法や、WordPressでカスタム投稿タイプを切り替える/変換する方法についてのガイドもご覧ください。
If you liked this article, then please subscribe to our YouTube Channel for WordPress video tutorials. You can also find us on Twitter and Facebook.


Tasawar
Thanks This article just saved my day
Jonathan
Thanks for this post. I’m not sure why it is not working for me. Any ideas on where to look?
md alamgir miah alam
Your items are good work . Every body can use it .Thanks for it
Karl
Thanks for your helpful article! A tiny information missing is the pixel dimensions of an icon in case you refer to an image by defining a full url. Otherwise very nice!
ryanbowden
Ah that is really Helpful thank you!