WooCommerceはWordPressの最高のeコマースプラグインだと聞いたことがあると思いますが、それには理由があります。パワフルで柔軟性があり、ほとんどのオンラインストアに対応します。
しかし、もしあなたが機器のレンタルビジネスを計画しているなら、重要なピースが欠けているかもしれません:WooCommerceは最初からレンタル注文を扱っているわけではありません。
長年のWooCommerceでの作業後、私たちはあなたが必要とするすべてのレンタル機能を追加する無料の予約プラグインを見つけました。
WooCommerceストアを、パーティー用品、建設機械、またはその中間を問わず、完全な設備レンタルプラットフォームに変えることができます。
このガイドでは、具体的な設定方法を順を追って説明する。
WooCommerceストアに備品レンタルを追加するには何を使うべきですか?
このガイドでは、すでにWooCommerceストアをお持ちだと仮定します。もしお持ちでない場合は、WooCommerceを簡単にする完全ガイドをご覧ください。
私たちが試したすべてのレンタルプラグインのうち、あなたのストアに機器レンタルを追加する最も簡単な方法は、WooCommerceのための予約を使用することです。
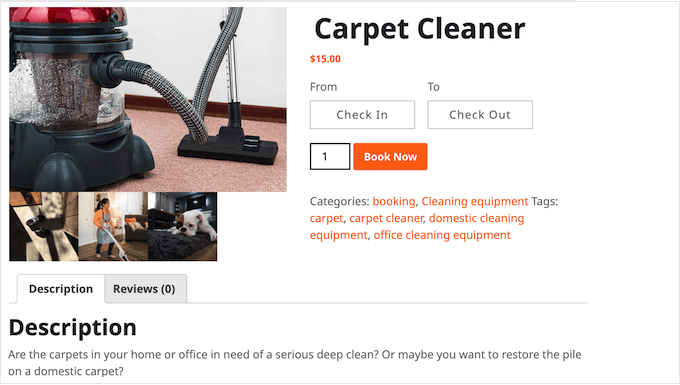
このWooCommerceプラグインを使用すると、任意のWooCommerce製品を、カスタマイザーが特定の日数または時間レンタルできる予約可能な項目に変えることができます。
このチュートリアルのナビゲーションには、以下のクイックリンクをご利用ください:
- Step 1: Create a Rental Product in WooCommerce
- Step 2: Offer Hourly or Daily Equipment Rentals in WooCommerce
- Step 3: Set How Many Units Customers Can Rent
- Step 4: Require Admin Approval for Equipment Rentals
- Step 5: Add Base and Additional Costs (Optional)
- Step 6: Set Up Services and Additional Costs for Your Equipment Rental Store
- Step 7: Manage Equipment Rentals on Your WooCommerce Store
ステップ1:WooCommerceでレンタル商品を作成する
まず、Bookings for WooCommerceプラグインをインストールし有効化する必要があります。WordPressプラグインのインストール方法については、こちらをご覧ください。
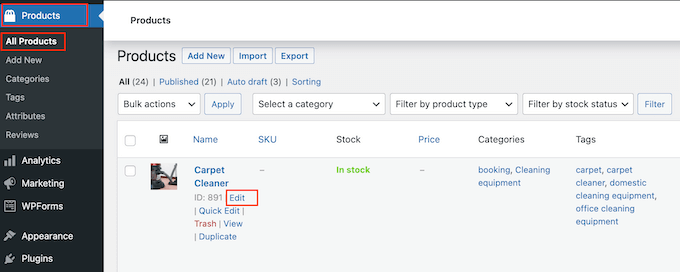
有効化した場合、WooCommerceの商品を予約可能な商品に変えることができます。すでに商品をオンラインストアに追加している場合は、商品 ” すべて商品.
ここで、予約可能な商品にしたい項目にマウスオーバーし、「編集」リンクが表示されたらクリックするだけです。
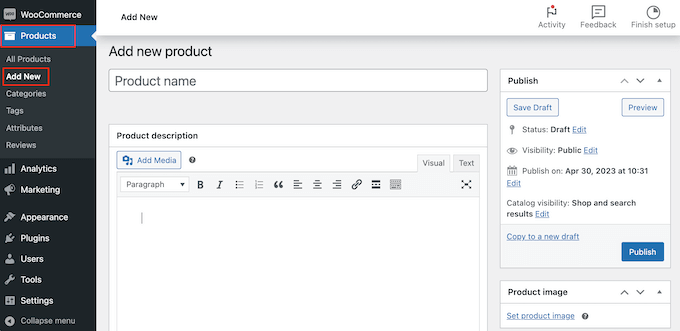
また、「商品」 ” 「新規追加」をクリックすると、新規商品として追加することもできます。ここでは、商品名の入力、写真のアップロード、商品カテゴリーとタグの追加、説明の入力などができます。
WooCommerce製品のセットアップ方法の詳細については、WooCommerce made simpleガイドをご覧ください。
新規に商品を作成しても、既存の商品を編集しても、全く同じ方法で予約可能な商品にすることができます。
商品データボックスまでスクロールし、初期設定では「シンプル商品」と表示されているドロップダウンメニューを開きます。
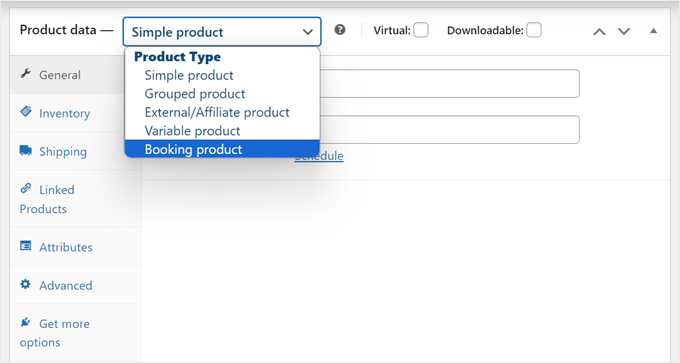
予約商品’を選択できるようになりました。これにより、予約可能な商品を設定できる多くの新しい設定にアクセスできるようになります。
ステップ2:WooCommerceで時間貸しまたは日貸し備品を提供する
ここで、WooCommerceで備品のレンタルを1時間単位で行うか、1日単位で行うかを設定します。
まず、予約タイプを個別カレンダーにするかデュアルカレンダーにするかを選択します。
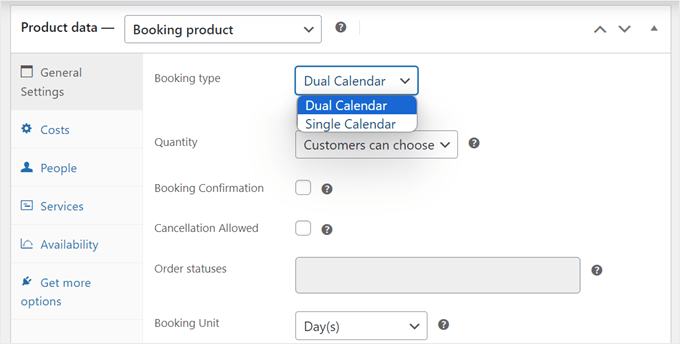
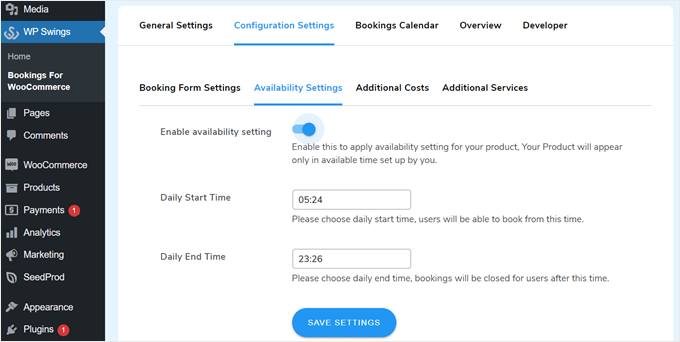
すべてのレンタル商品に同じ時間単位または日単位の予約単位を使用する場合は、’個別カレンダー’をお勧めします。ただし、ユーザーが営業時間外に予約できないように機器の利用可能時間を設定する必要があります。
これを行うには、WP Swings ” Bookings for WooCommerceにアクセスし、’Configuration Settings’タブに移動します。その後、’利用可能時間設定’に切り替え、レンタルサービスの利用可能な開始時間と終了時間を設定します。
変更を適用するには「設定を保存」をクリックするのをお忘れなく。
もし’デュアルカレンダー’を選択した場合、予約単位と予約開始・終了時刻を商品毎にカスタマイズすることができます。様々な機器をお持ちで、すべて同じ予約設定を使用できない場合にお勧めします。
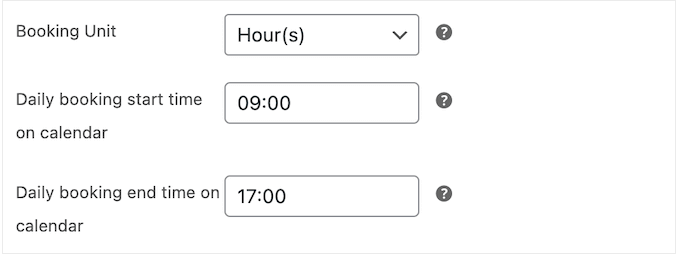
このプラグインでは、予約単位を「時間」または「日」のどちらかを選択できます。
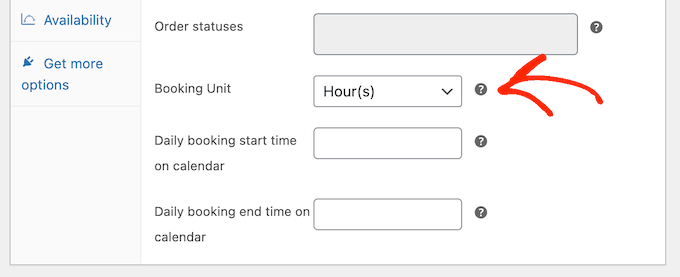
予約期間の開始時間と終了時間は’毎日の予約…’ドロップダウンメニューを使用して選択することができます。
以下の画像では、カスタマイザーがレンタルできるのは午前9時から午後5時までの間だけである。
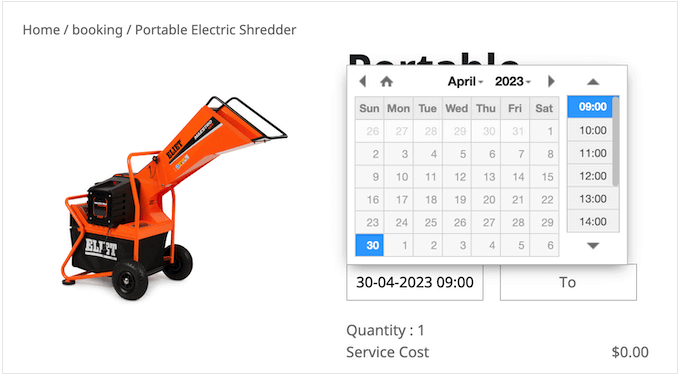
この変更を行うと、WooCommerceはサイト上でカスタマイザーが開始時間と終了時間を選択できるセクションを追加します。
これは、人々が非常に短い時間だけ必要とする機器に最適です。例えば、パーティー用品のレンタルを行っている場合、カスタマイザーがパーティー用品を必要とするのは数時間だけかもしれません。
ステップ3:カスタマイザーがレンタルできる台数の設定
レンタルするユニット数を設定することもできますし、「数量」ドロップダウンメニューを使ってカスタマイザーにレンタルするユニット数を選択させることもできます。
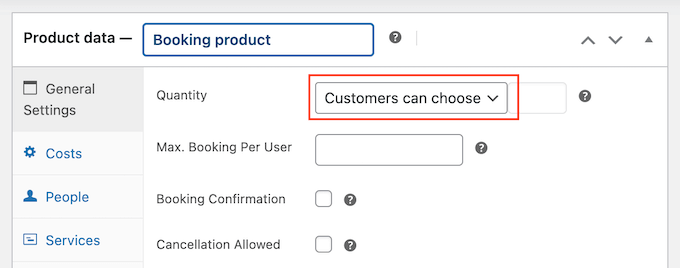
カスタマイザーが複数のユニットをレンタルできるようにするには、「カスタマイザーが選択できる」を選択します。
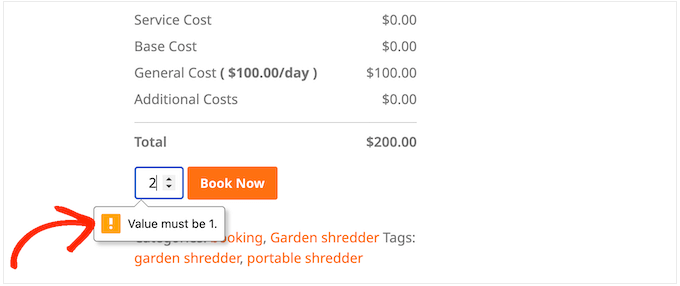
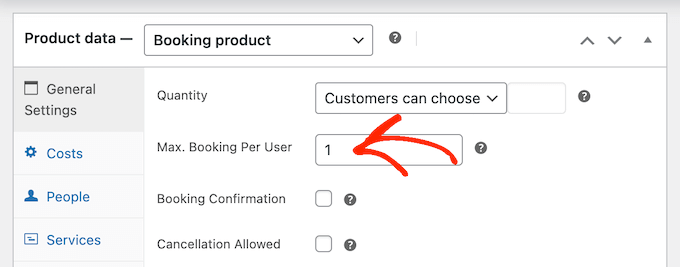
初期設定では、カスタマイザーは何台でもレンタルできますが、上限を追加することもできます。もしカスタマイザーがそれ以上の数を入力した場合、WooCommerceはエラーメッセージを表示します。
在庫に限りがある場合や、需要の高い設備がある場合に便利です。
制限を設定するには、’ユーザーごとの最大予約’フィールドに数値を入力します。
もう一つのオプションは、カスタマイザーが予約できる台数を設定することです。例えば、農業用重機のような大型で高価な機器をレンタルする場合、カスタマイザーは個別予約しか必要としないかもしれません。
事前に数量を設定することで、予約プロセスからステップを削除し、カスタマーエクスペリエンスを向上させることができます。
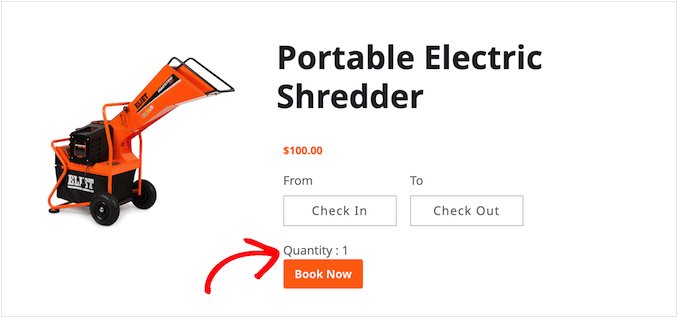
数量」のドロップダウンを開き、「固定単位」を選択するだけです。
ここで、使いたい番号を入力する。

ステップ4:備品のレンタルには管理者の承認が必須
次に、レンタルリクエストをすべて自動的に承認するか、手動で承認できるまで保留にするかを決めることができます。
承認を必須にするには、「予約確認」の横にあるチェックボックスをオンにします。
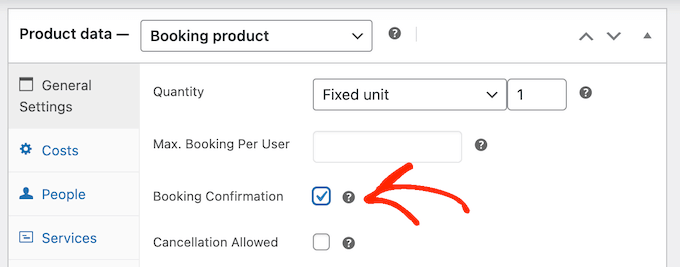
在庫が少ない場合は、承認必須とすることで重複レンタルを避けることができる。また、支払いに応じる前に、レンタル依頼に関する問題を発見することもできる。
管理者承認を有効化すると、誰かがレンタルリクエストを送信するたびに通知が届きます。
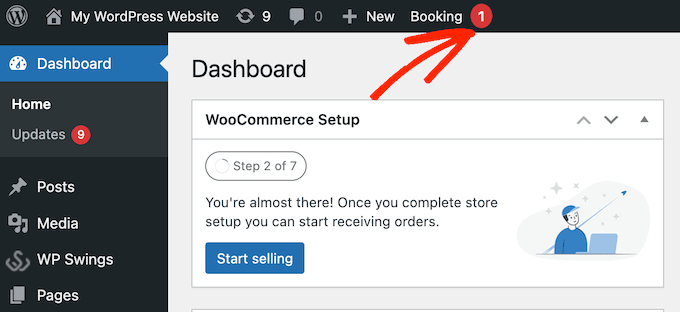
この通知をクリックすると、WooCommerce ” Orders(注文管理ページ)に移動します。
ここでは、WordPressサイト上のすべての注文が表示され、新しい予約は「保留中」と表示されます。

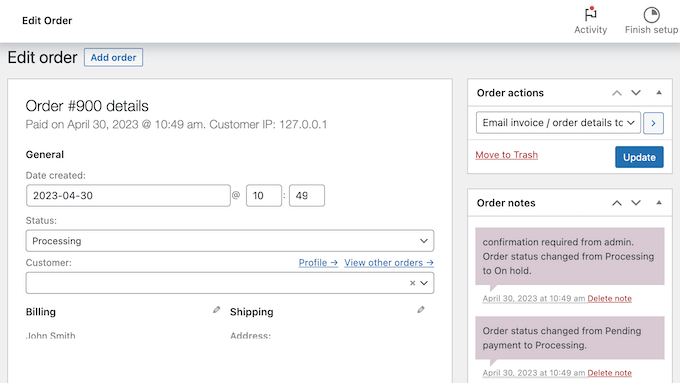
新規注文をクリックすると、その予約に関するすべての情報を見ることができます。
注文の状態を変更したい場合は、「ステータス」ドロップダウンを開き、リストから設定を選択する必要があります。
例えば、予約を承認する場合、ワークフローに応じて、支払い保留、完了、または処理を選択することができます。
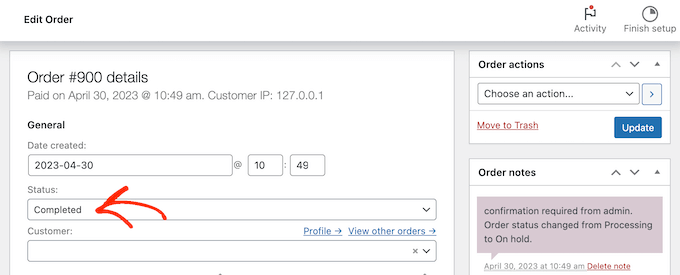
更新」をクリックして変更を保存します。
ステップ5:基本料金と追加料金の設定(オプション)
ここまで入力した情報に満足したら、「費用」タブをクリックする必要があります。
まずは予約単価を入力してください。
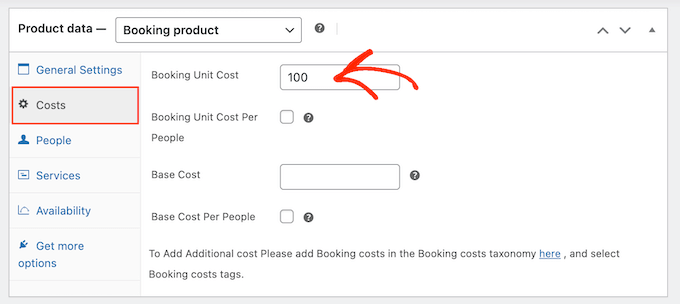
その後、「基本料金」フィールドに入力してオプションの追加料金を追加することができます。
これは、予約料、清掃料、またはレンタル機材に関連するその他の費用かもしれない。
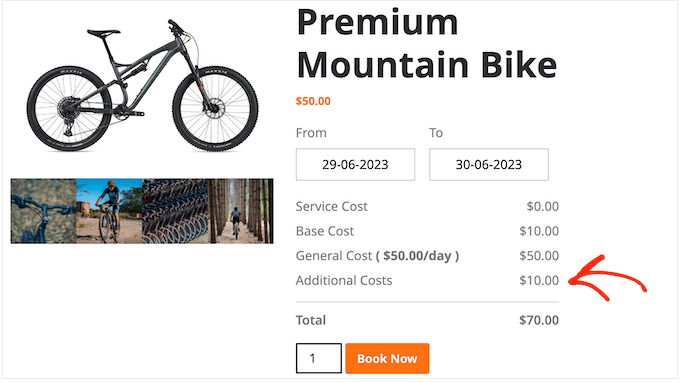
ベースコストを追加すれば、カスタマイザーはそれをコスト内訳の一部として見ることができます。
以下の画像では、商品は1日あたり50ドルでレンタルされ、基本料金は10ドルである。
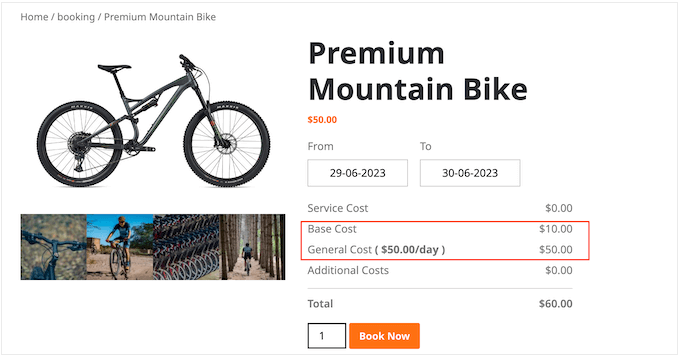
レンタルする機材の種類にもよりますが、その機材を使用する予定の人数に応じて料金を掛け合わせるとよいでしょう。こうすることで、多くの人が同じ製品を使用する際の消耗をカバーすることができます。
人数に応じた料金を乗じるには、まず「1人あたりの予約単価」と「1人あたりの基本料金」の横のボックスにチェックを入れます。
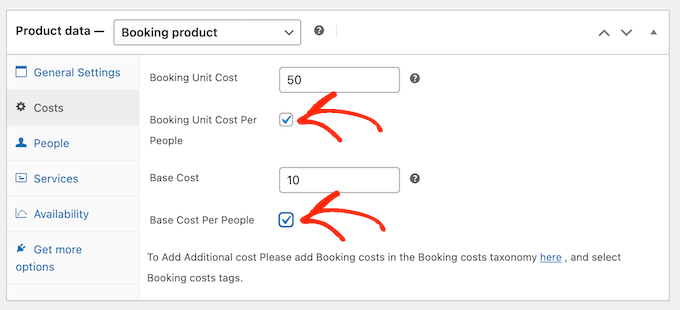
それが終わったら、「人々」タブをクリックする。
ここで、’Enable People Option’の隣のボックスをチェックする必要があります。
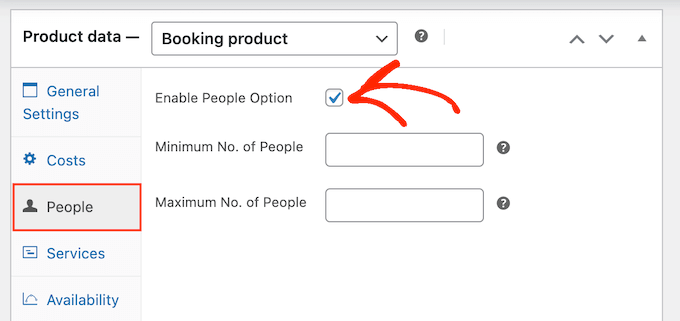
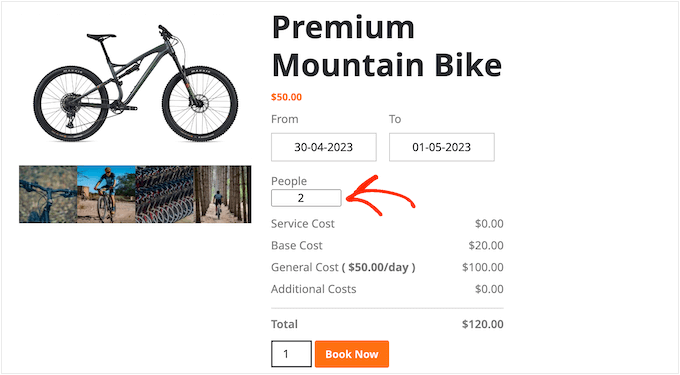
これで、カスタマイザーは新しいフィールドが表示され、そこに何人がその機器を使用する予定かを入力することができます。
WooCommerceはこの情報をコスト内訳にも表示します。
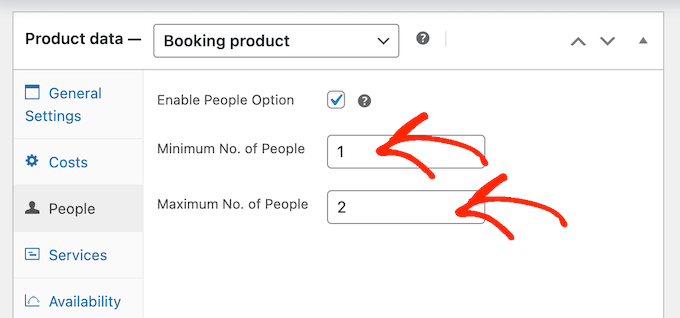
また、1回の予約で利用できる最小人数と最大人数を設定しておくとよいでしょう。これにより、カスタマイザーが設備を悪用するのを防ぐことができます。
例えば、従業員全員に同じ製品を使わせたくない場合もあるでしょう。
配送や清掃に費用がかかる大型機器を使用している場合は、最低人数を設定することで、利益率を健全に保つことができる。
これらの制限を設定するには、「最小人数」と「最大人数」フィールドに数字を入力するだけです。
WooCommerceストアに備品レンタルを追加するために必要な設定はすべて揃っています。
更新’または’公開’をクリックして、WooCommerceサイトで商品を公開することができます。これで、WooCommerceの商品ページから直接レンタルすることができます。
ステップ6:機器レンタル店のサービスと追加費用の設定
時には、機材レンタル店に追加費用やサービスを設けたい場合もあるでしょう。例えば、追加料金で機材の配送を依頼することもできます。
このことを念頭に置いて、WooCommerceストアに追加費用とサービスを設定する方法を見てみましょう。
WooCommerceで追加コストを追加する方法
追加費用とは、WooCommerceが1つまたは複数の商品に自動的に追加する費用です。この機能は、異なる備品に関連する異なる費用がある場合に便利です。
例えば、使用後に給油が必要な製品もあれば、新しいオイルが必要な製品もあるでしょう。
WordPressの管理エリアにこれらのコストを追加することで、簡単に異なる商品に適用することができます。また、コストを変更できる個別場所も提供します。
例えば、ガソリンの値段が高くなった場合、給油コストを一度更新すれば、その変更はオンラインレンタルマーケットプレイスや店舗全体に適用されます。
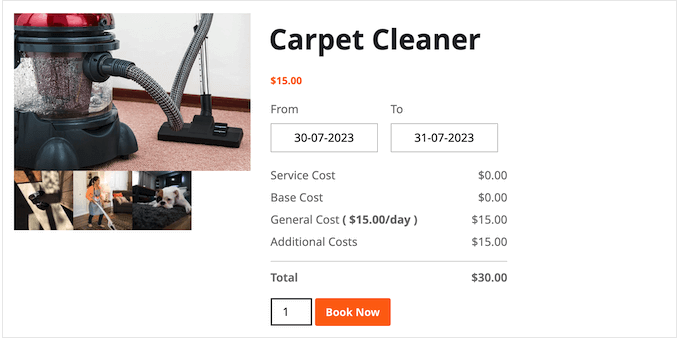
上の画像でわかるように、追加費用は単に「追加費用」として費用の内訳に表示されます。もし買い物客にこれらの料金についてより詳しい情報を与えたいのであれば、代わりにサービスを作成することをお勧めします。
追加費用を登録するには、WP Swings ” Bookings for WooCommerceにアクセスする必要があります。ここで、’コンフィギュレーション設定’、’追加費用’の順にクリックするだけです。
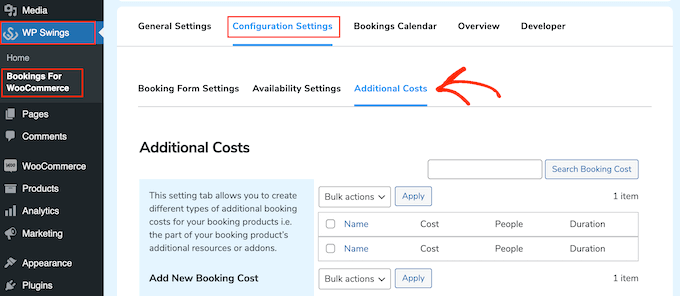
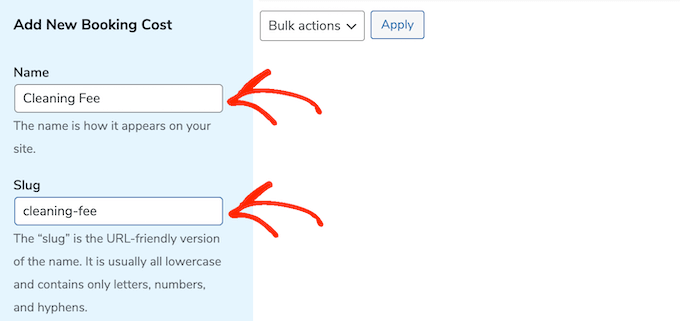
まず、追加料金の名前を入力します。これはあくまで参考なので、好きなものを使ってください。
その後、追加料金に使用したいスラッグを入力する必要がある。
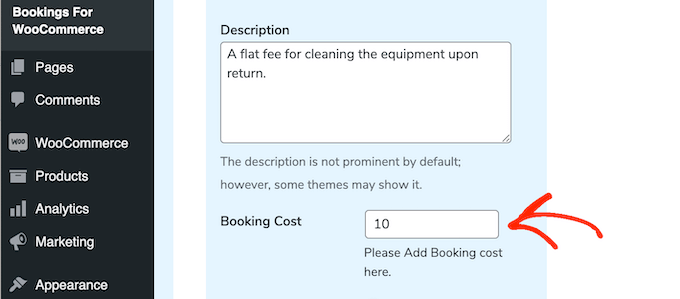
これで、オプションの説明を入力することができます。これは通常サイトには表示されませんが、WooCommerceテーマによっては表示されるものもあります。
次に、’Booking Cost’フィールドに料金を入力します。
初期設定では、追加コストは注文に一度だけ追加されます。
しかし、あなたは予約期間または機器を使用する予定の人数に基づいて追加料金を掛けることができます。これを行うには、’人数による乗算’または’期間による乗算’トグルをクリックして有効化します。
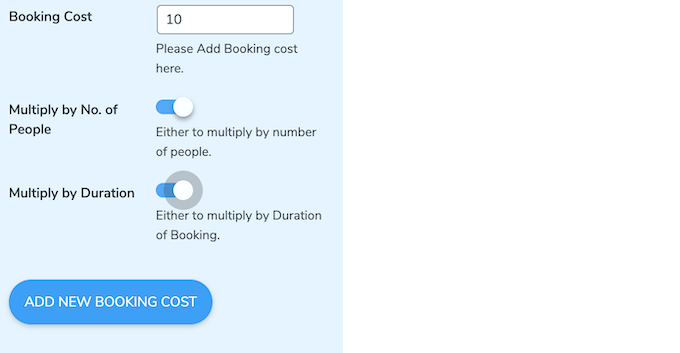
入力した情報に問題がなければ、’Add New Booking Cost’と入力するだけです。
さらに追加コストを作るには、上記と同じプロセスを繰り返すだけだ。
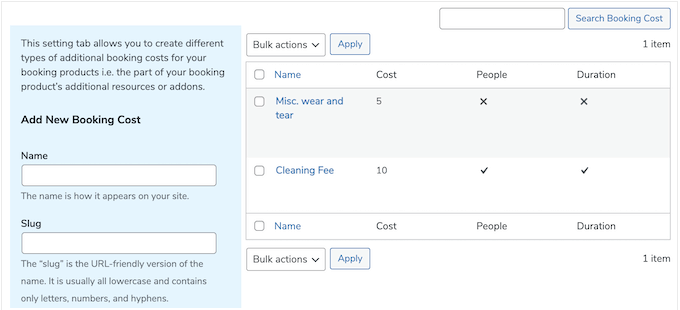
これで、WooCommerceの商品にこのコストを追加することができます。
商品を編集するために開き、「追加費用」ボックスまでスクロールするだけです。
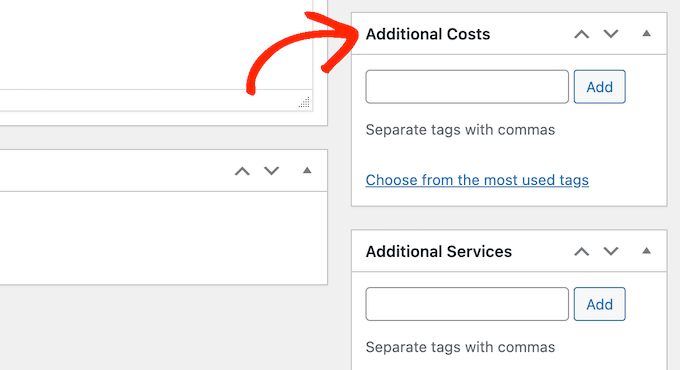
追加料金の名前を入力することができます。
適切なオプションが表示されたら、それをクリックし、「追加」を選択する。
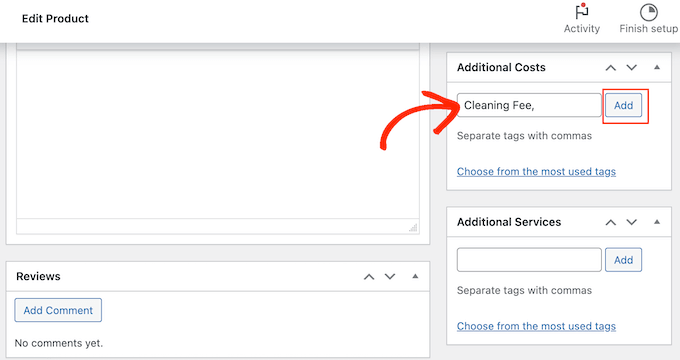
更新」または「公開」をクリックして変更を保存することができます。これで、誰かがこの機器をレンタルする際、追加料金が自動的に適用されます。
WooCommerceで追加サービスを作成する方法
追加サービスを作成することもできます。追加費用とは異なり、費用の内訳にサービス名が表示されます。
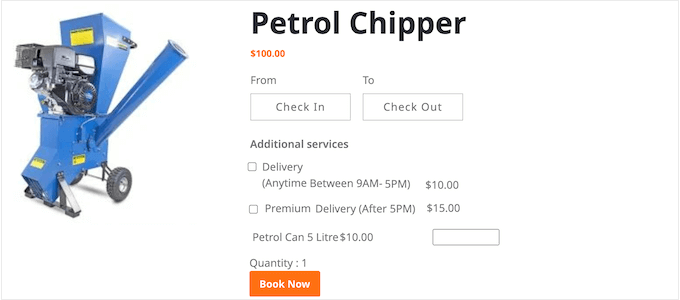
これは、カスタマイザーが追加料金を理解するのに役立ちますので、より高額な料金にはサービスを使用することをお勧めします。また、カスタマイザーが詳細な料金内訳を確認できるように、注文に複数の料金を追加する必要がある場合は、サービスを使用することをお勧めします。
また、サービスをオプション設定にして、カスタマイザーが注文に追加するかどうかを選択できるようにすることもできます。これにより、翌日配達などのプレミアムな追加サービスを提供することができます。
WooCommerceストアにサービスを追加するには、WP Swings ” Bookings for WooCommerceにアクセスする必要があります。ここで、’Configuration Settings’をクリックし、’Additional Services’をクリックします。
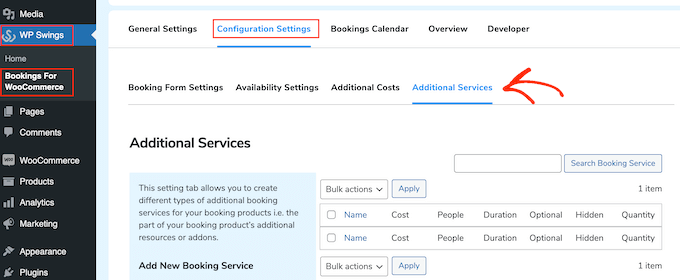
Name’フィールドにサービス名を入力します。
これはカスタマイザーに表示されるものなので、追加料金を理解しやすいものを使いたい。
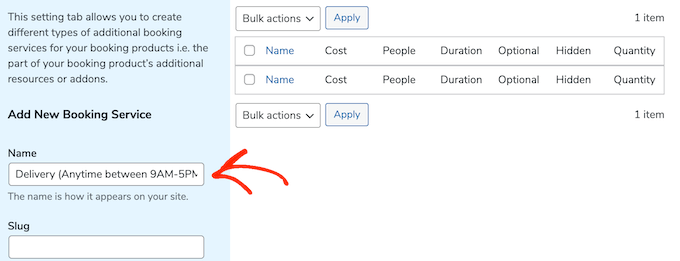
その後、スラッグ、オプションの説明、そして上記と同じプロセスでサービスの料金を入力しなければならない。
この場合も、予約期間に応じて料金を乗じるか、使用予定人数に応じて乗じるかを選択できます。
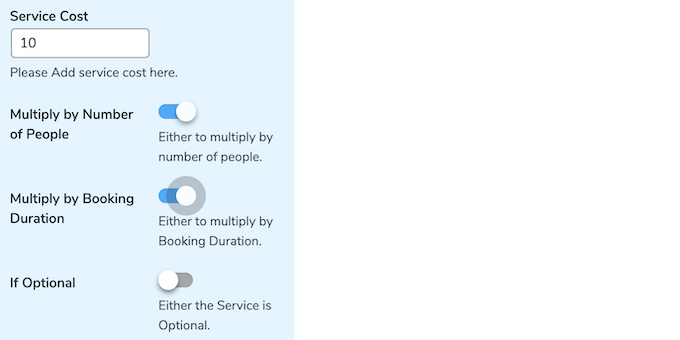
サービスをオプション設定にすることもできる。
これは、カスタマイザーが注文にサービスを追加するためのボックスをチェックできることを意味する。
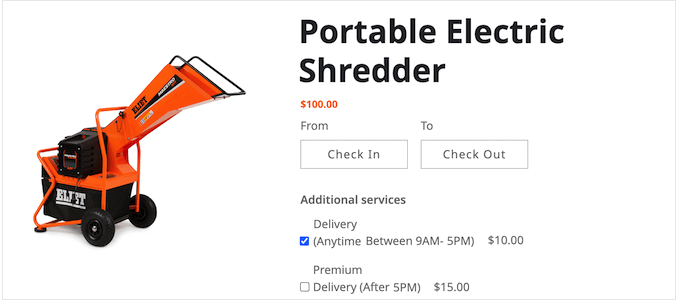
これにより、WooCommerceストアで備品をレンタルする際の料金をよりコントロールできるようになります。
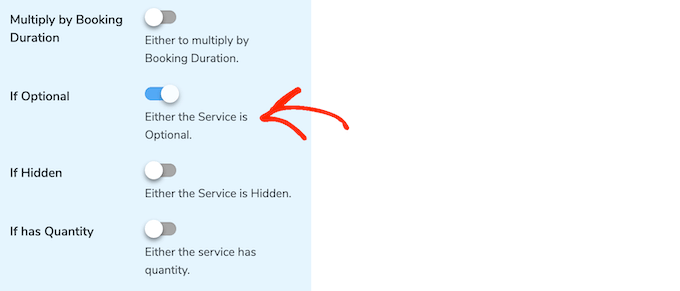
サービスをオプション設定にするには、’If Optional’トグルをクリックして有効化するだけです。
もうひとつのオプションは、サービスを「非表示」にすることだ。
非表示のサービスは、単に「サービス費用」として商品ページに表示される。
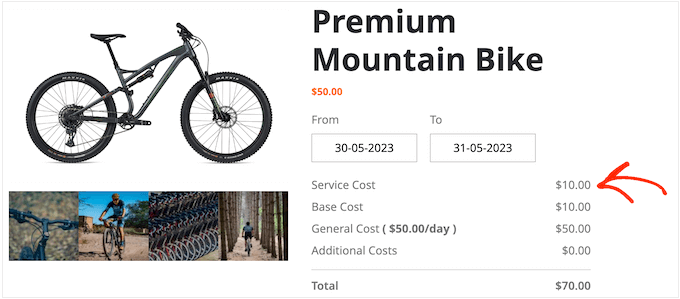
サービスを非表示にするには、クリックして「非表示の場合」トグルを有効化します。
次に、「数量がある場合」スライダーを有効化するとよいでしょう。これにより、買い物客は同じサービスを何度も注文に追加することができます。
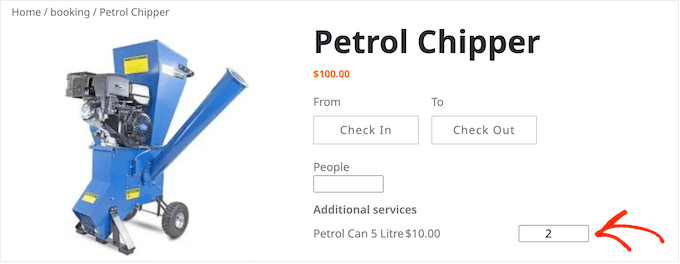
数量がある場合」スライダーをクリックして有効化した後、最小数量と最大数量を設定することができます。
最小数量」と「最大数量」の欄に数字を入力するだけです。
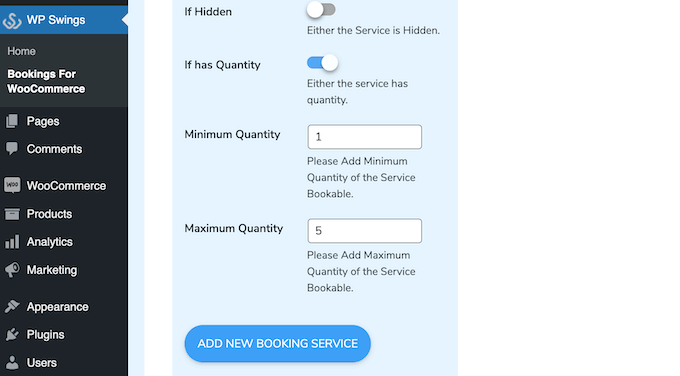
入力した情報に問題がなければ、「新規予約サービスを追加」をクリックします。
オンラインストアにサービスを追加するには、上記と同じプロセスを踏むだけです。
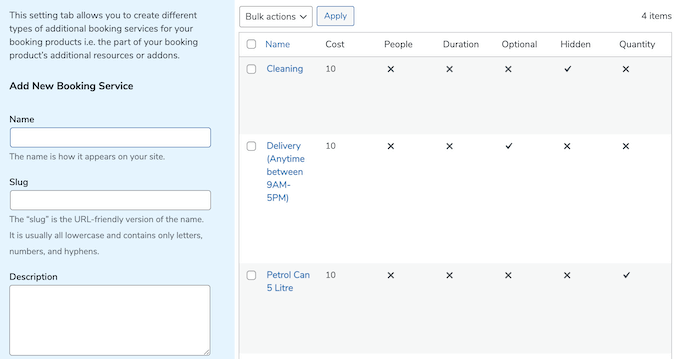
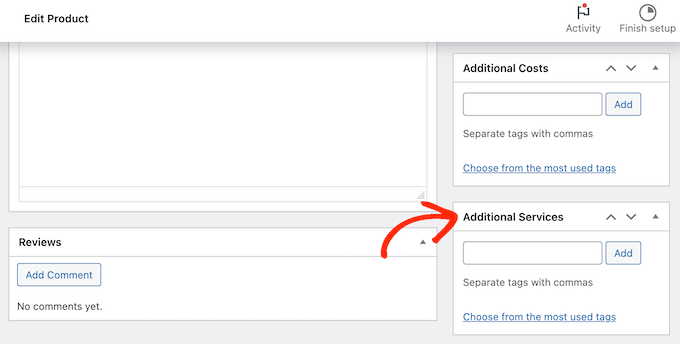
サービスを追加するときは、製品を開いて編集するだけです。
その後、「追加サービス」ボックスまでスクロールしてください。
追加したいサービス名を入力します。
適切なオプションが表示されたら、それを選択し、「追加」ボタンをクリックするだけです。
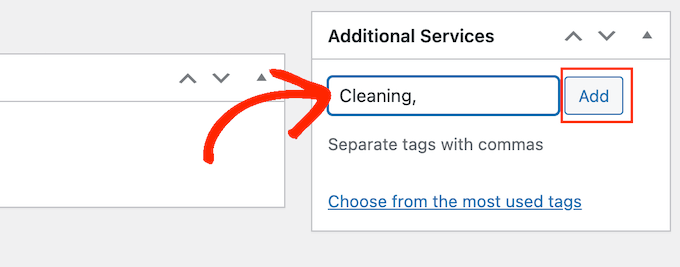
更新」または「公開」をクリックして変更を保存します。
ステップ 7: WooCommerceストアで備品レンタルを管理する
サイトに設備を追加したら、レンタル予約を管理する方法が必要です。
新規予約が入る度にWordPressツールバーに通知が表示されます。
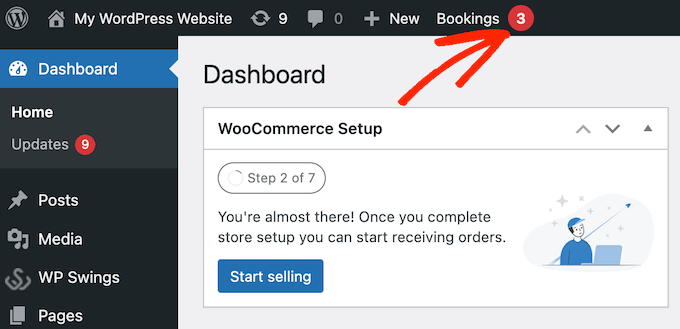
この通知をクリックするだけで、すべての予約が表示されます。
WooCommerce ” Ordersから同じ画面に行くことができます。
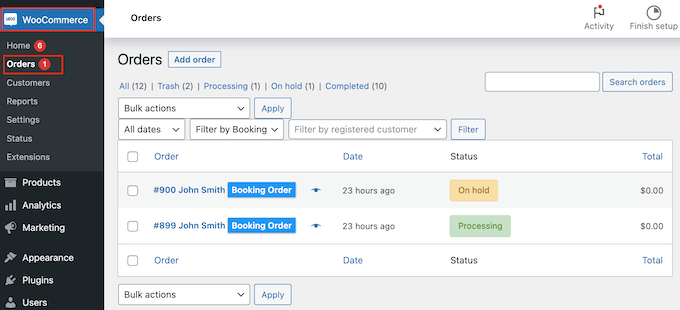
注文の詳細情報を見るには、その注文をクリックしてください。この画面では、メールアドレスや電話番号など、注文やカスタマーの詳細情報を確認することができます。
また、レンタル申し込みのキャンセルや払い戻しなど、注文状態を変更することもできます。
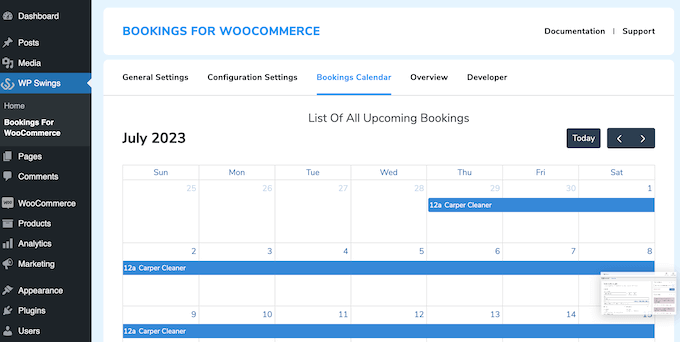
Bookings for WooCommerceWordPressプラグインは、すべての予約を一目で表示するカレンダーも付属しています。
このカレンダーを見るには、WP Swings ” Bookings For WooCommerceにアクセスしてください。そして’予約カレンダー’タブをクリックしてください。
WooCommerceレンタルショップを最適化する究極のガイド
WooCommerceストアに備品レンタル機能を追加した今、成功のためにサイトを最適化する方法についてのガイドもご用意しています:
- 会員制WooCommerceストアの作り方– 特定のユーザーだけに備品をレンタルしたいですか?この投稿では、ストアを会員のみに制限する方法を説明します。
- WooCommerceチェックアウトページをカスタマイズする方法– 現在のチェックアウトページが気に入らない場合は、投稿を読んで改善し、コンバージョンを増やしましょう。
- WooCommerceのパフォーマンスを高速化する方法– ビジネスにおいてスピードは重要です。この投稿をチェックして、サイトをより速く、よりユーザーフレンドリーにする方法を学びましょう。
- WooCommerceで人気商品を表示する方法– このガイドを読んで、見込み客にベスト商品や最もレンタルされている商品をアピールする方法を学びましょう。
このチュートリアルでWooCommerceストアに備品レンタルを追加する方法を学んでいただけたら幸いです。また、WooCommerce SEOの究極のガイドをお読みいただくか、WooCommerceプロダクトグリッドプラグインのエキスパートピックをご覧ください。
If you liked this article, then please subscribe to our YouTube Channel for WordPress video tutorials. You can also find us on Twitter and Facebook.


Have a question or suggestion? Please leave a comment to start the discussion.