WordPressで、特別なメモスタイルやブランド化された引用フォーマットのような独自のフォーマットボタンを作成できたらと思ったことはありませんか?カスタムスタイルはまさにそれを行います。
WordPressでのカスタムスタイルのさまざまなアプローチを、単純なCSSの追加からより高度なソリューションまで、かなりの時間をかけてテストしてきました。
この経験により、チームの誰でも使用できるカスタムフォーマットオプションでエディターを改善するための最も実用的な方法を特定することができました。
今日は、WordPressのビジュアルエディターにカスタムスタイルを追加する方法を説明します。カスタムスタイルとは何か、なぜそれが役立つのか、そして私の実際のテスト経験に基づいて、サイトに追加するためのステップバイステップの手順を学びます。✨
💡クイック要約:カスタムスタイルを追加する最良の方法
WordPressブロックエディターにカスタムスタイルを追加する最も効果的な方法は、サイトにPHPコードスニペットを追加することです。これにより、ボタン、見出し、引用などのブロックの新しいスタイルバリエーションを登録できます。
最も安全で簡単な方法として、コードを挿入するためにWPCodeプラグインを使用することをお勧めします。これにより、テーマのfunctions.phpファイルを直接編集するリスクを回避できます。
この記事で説明する内容の簡単な概要を以下に示します。
- カスタムスタイルとは何か、そしてWordPressの使用方法をどのように変えることができるか
- WordPressビジュアルエディター(ブロックエディター)にカスタムスタイルを追加する方法
- ボーナス:WordPressウィジェットにカスタムスタイルを追加する方法
- カスタムスタイルに関するよくある質問
さあ、始めましょう!
カスタムスタイルとは何か、そしてWordPressの使用方法をどのように変えることができるか
簡単な言葉で言うと、カスタムスタイルとは、WordPressエディター内の事前にデザインされた書式設定ショートカットです。
コンテンツを作成するたびにフォント、色、レイアウトを手動で調整する必要があるという問題を解決し、時間のかかる作業や一貫性の低下を防ぎます。
例えば、見出し用のカスタムフォントを作成したり、コールアウトボックスの背景色を選択したり、お客様の声に一貫したスタイルを適用したりできます。
デザイン要素のテンプレートと考えてください。毎回手動でパディング、フォント、色を調整する代わりに、カスタムスタイルを選択すると、好みのデザインが即座に適用されます。
たとえば、ビジネスブログを運営していて、常に製品の推奨事項や投稿の最後に免責事項を含めるとします。毎回スタイルを設定する代わりに、「製品のヒント」または「重要な注意」というカスタムスタイルを作成して、すぐに適用できます。
これにより時間の節約になり、特にチームで作業している場合や多くのコンテンツを公開している場合に、すべてが洗練された状態に保たれます。
とはいえ、WordPressのビジュアルエディターにカスタムスタイルを簡単に追加する方法を見ていきましょう。
WordPressビジュアルエディター(ブロックエディター)にカスタムスタイルを追加する方法
ブロックエディターにカスタムスタイルを追加したい場合、最も効果的な方法はPHPコードを使用することです。ただし、このアプローチは中級のWordPressユーザーに最適であることを覚えておいてください。
それは、テーマのfunctions.phpファイルを編集する必要があるためです。わずかなエラーでもサイトが壊れる可能性があります。とはいえ、初心者向けのプラグインを使用してプロセスを簡素化できます。
このようなカスタマイズには、常にWPCodeをお勧めします。私の意見では、これは市場で最高のWordPressコードスニペットプラグインです。徹底的にテストした結果、エラーのリスクなしにカスタムコードを追加する最も簡単で安全な方法であることがわかりました。
詳細については、私のチームによるWPCodeの完全レビューをご覧ください。
📌 重要事項:スキルレベルに関係なく、重要なコードをいじる前に必ずサイト全体のバックアップを作成することをお勧めします。その方法については、WordPressサイトのバックアップ方法のガイドを参照してください。
ここで使用するコードスニペットは、デフォルトでボタンブロックのカスタムスタイルを追加するように設定されていることに注意してください。しかし、少し調整するだけで、次のような他のブロックも簡単にサポートできます。
- 🔷 ファンシーまたはアウトラインスタイルの見出し
- 💬 引用、プルクォート、詩ブロック
- 🗂️ アーカイブまたはカテゴリブロック
- ➕ その他
これにより、サイト全体で再利用可能なスタイルをデザインする際に、多くの柔軟性が得られます。
まず、WPCode プラグインをインストールして有効化する必要があります。ヘルプが必要な場合は、WordPressプラグインのインストール方法に関する初心者向けガイドをご覧ください。
📌 注: WPCode には無料プランもありますが、プロバージョンにアップグレードすると、コードスニペットのクラウドライブラリ、ブロック スニペット機能、スマート条件付きロジックなどの機能にアクセスできます。
プラグインを有効化したら、ダッシュボードからコードスニペット » +スニペットを追加のページに移動します。ここで、「カスタムコードを追加(新規スニペット)」オプションの下にある「スニペットを使用」ボタンをクリックします。

ここで「カスタムスニペットの作成」ページに移動します。ここでコードスニペットに名前を付ける必要があります。この名前はあなたの識別用であり、ユーザーには表示されません。
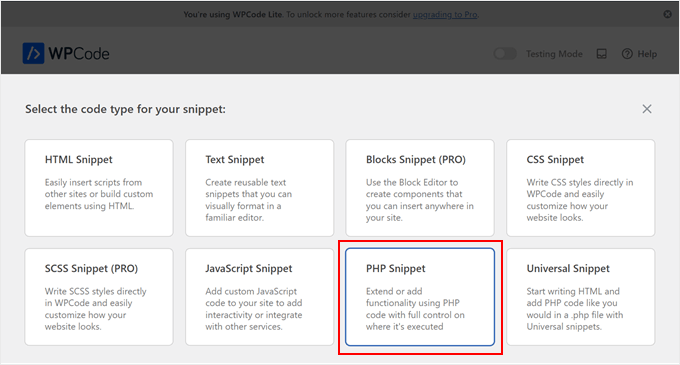
次に、「コードタイプ」オプションをクリックして表示されるプロンプトからPHPスニペットを選択します。
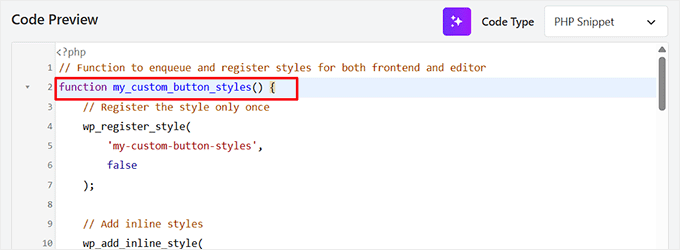
その後、ボタンのカスタムスタイルを作成したい場合は、次のカスタムコードを「コードプレビュー」ボックスに追加してください。
// Function to enqueue and register styles for both frontend and editor
function my_custom_button_styles() {
    // Register the style only once
    wp_register_style(
        'my-custom-button-styles',
        false
    );

    // Add inline styles
    wp_add_inline_style(
        'my-custom-button-styles',
        <<<CSS
        .is-style-fancy-button .wp-block-button__link {
            background-color: #f0c040;
            color: #fff;
            border: none;
            border-radius: 15px;
            padding: 10px 20px;
        }
        .is-style-outline-button .wp-block-button__link {
            background-color: transparent;
            color: #333;
            border: 2px solid #333;
            border-radius: 5px;
            padding: 10px 20px;
        }
        CSS
    );

    // Enqueue the style for both frontend and editor
    wp_enqueue_style('my-custom-button-styles');
}

// Function to add custom styles for Gutenberg editor
function my_custom_gutenberg_button_styles() {
    // Call the general styles function for the editor
    my_custom_button_styles();

    // Enqueue inline script for the editor to register block styles
    wp_add_inline_script(
        'wp-blocks',
        <<<JS
        wp.domReady(function() {
            wp.blocks.registerBlockStyle('core/button', {
                name: 'fancy-button',
                label: 'Fancy Button'
            });

            wp.blocks.registerBlockStyle('core/button', {
                name: 'outline-button',
                label: 'Outline Button'
            });
        });
        JS
    );
}

// Hook the styles function to frontend
add_action('wp_enqueue_scripts', 'my_custom_button_styles');

// Hook the custom block style registration
add_action('enqueue_block_editor_assets', 'my_custom_gutenberg_button_styles');
このコードスニペットは、WordPressのボタンブロックに2つのカスタムスタイルを追加します。
素晴らしいのは、このコードを他のブロックのスタイルを作成するために適応させることができることです。ただし、単に「button」という単語を置き換えるだけでは不十分です。正しく機能させるには、コードの 2 つの重要な部分を更新する必要があります。
- ブロック名 (スラッグ): コードの JavaScript 部分には
'core/button'があります。これは WordPress ボタンブロックの公式名です。これを、スタイルを設定したいブロックのスラッグ (例:'core/heading') に置き換える必要があります。 - CSS セレクター: CSS コード (
.is-style-fancy-button .wp-block-button__linkなど) は、ボタンブロックの HTML 専用に記述されています。他のブロックは構造が異なるため、それらを正しくターゲットにするには新しい CSS ルールを作成する必要があります。
CSS を調整して、背景色を変更したり、境界線の半径を調整したり、その他のスタイル変更を行ってニーズに合わせることもできます。
💡 専門家のアドバイス: コードのカスタマイズに躊躇している場合は、ChatGPT のような AI アシスタントが良い出発点になる可能性があります。ただし、正しいコードを取得するには、非常に明確で詳細なプロンプトを与える必要があります。
たとえば、単純なリクエストの代わりに、次のようなプロンプトを提供できます。
Here is a PHP, CSS, and JS snippet that adds custom styles to the 'core/button' block in WordPress. Please adapt it to target the 'core/heading' block instead. The new style should be named 'Green Highlight' and it should add a light green background color.
ただし、AIが生成したコードは、ライブウェブサイトに追加する前に、必ずステージングサイトでテストすることをお勧めします。これにより、リスクなしに潜在的なエラーを検出できます。
次に、「非アクティブ」スイッチを「アクティブ」に切り替えます。
最後に、「スニペットを保存」ボタンをクリックして変更を保存します。
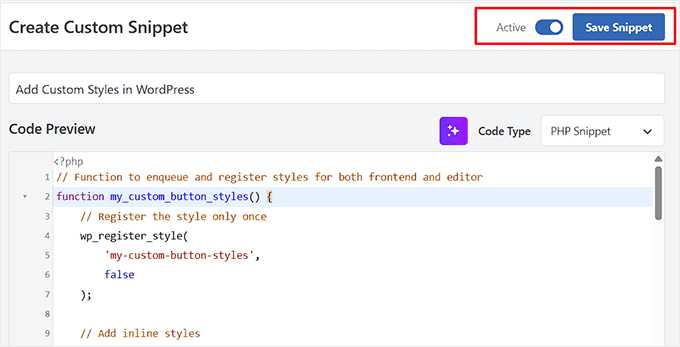
次に、ブロックエディターで投稿を開き、カスタムスタイルを追加したブロックを追加します。
例えば、ボタンブロックにカスタムスタイルを追加した場合は、それを投稿に挿入してください。
それを行うと、ブロックパネルの「スタイル」セクションでカスタムスタイルが利用可能になります。
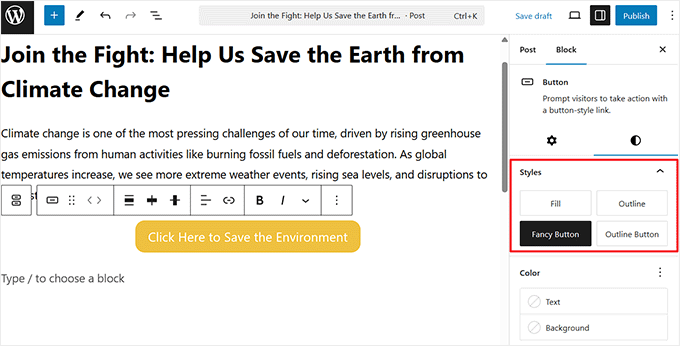
その後、「更新」または「公開」ボタンをクリックして変更を保存します。
次に、WordPressウェブサイトにアクセスして、カスタムスタイルが機能していることを確認します。

ボーナス:WordPressウィジェットにカスタムスタイルを追加する方法
WordPressのビジュアルエディターにカスタムスタイルを追加する方法を学んだので、次に、WordPressウィジェットにカスタムスタイルを追加するという、もう1つの便利なカスタマイズを見てみましょう。
ウィジェットをユニークな色、フォント、またはレイアウトでカスタマイズすると、サイト全体のデザインと一致させることができ、ユーザーエクスペリエンスが向上します。
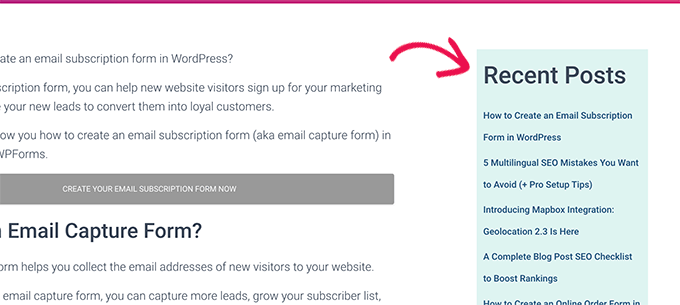
WordPressウィジェットにカスタムスタイルを追加する最も簡単な方法は、CSSコードスニペットを使用することです。これは、WPCodeのようなプラグインで追加できます。
特定のウィジェットを対象とするカスタムCSSを追加するだけで、フォントサイズ、背景色、パディング、さらには境界線などを調整できます。
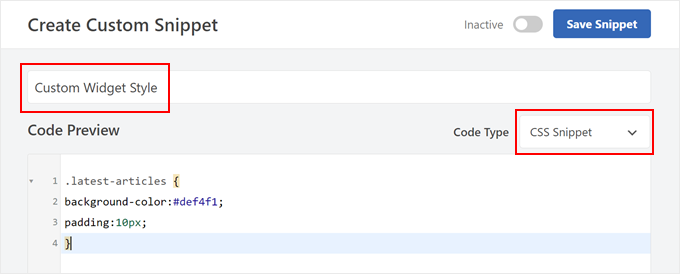
これは、技術的になりすぎる必要なく、ウィジェットが全体的なデザインと一致していることを確認するのに最適です。
WordPressウィジェットにカスタムスタイルを追加する方法に関するチュートリアルをご覧ください。
カスタムスタイルに関するよくある質問
WordPressビジュアルエディターにカスタムスタイルを追加することについて、読者からよく寄せられる質問を以下に示します。
プラグインを使わずにカスタムスタイルを追加できますか?
はい、コードをテーマのfunctions.phpファイルに直接追加することは可能です。ただし、初心者にはこの方法は強くお勧めしません。
そのファイルに小さな間違いがあるとサイトが壊れる可能性があり、テーマを更新するとカスタマイズが失われます。WPCodeを使用するのが最も安全で信頼性の高い方法です。
これらのカスタムスタイルはどのWordPressテーマでも機能しますか?
一般的には機能します。このチュートリアルで使用されているコードはWordPressコアエディターにスタイルを登録するため、最新で適切にコーディングされたテーマであれば互換性があるはずです。
まれに、非常に攻撃的または質の悪いCSSを持つテーマがカスタムスタイルを上書きする可能性がありますが、これは一般的ではありません。
スタイル設定したい他のブロックの正しい名前(スラッグ)を見つけるにはどうすればよいですか?
ブロックのスラッグを見つける簡単な方法は、WordPressエディターに入り、目的のブロックを選択してから、ブロックツールバーの3点メニューをクリックすることです。
そのメニューの一番下にある「ブロックタイプをコピー」をクリックします。これにより、ブロックのスラッグ(例:core/image、core/quote)がクリップボードにコピーされ、コードスニペットに貼り付けることができます。
同じブロックに対して2つ以上のカスタムスタイルを作成できますか?
もちろんです。コードスニペットのJavaScript部分で、追加したい新しいスタイルごとにwp.blocks.registerBlockStyle(...)関数を複製するだけです。
それぞれに一意の名前とラベルを付けることを確認してください。また、登録する新しいスタイルごとに対応するCSSルールを追加する必要があります。
この記事がWordPressのビジュアルエディターにカスタムスタイルを追加する方法を学ぶのに役立ったことを願っています。また、カスタムWordPressブロックの作成方法に関する初心者向けガイドや、WordPressにおけるパディングとマージンの違いの比較もご覧ください。
この記事が気に入ったら、WordPressのビデオチュートリアルについては、YouTubeチャンネルを購読してください。 TwitterやFacebookでもフォローできます。


Toufic Ahemmed
この人たちは素晴らしいです。ほとんどの場合、助けてくれます。本当に本当にありがとうございます。
WPBeginnerサポート
Glad we could help
管理者
アスラン・フレンチ
この記事はGutenbergを念頭に置いて更新されるべきです。最近、この種の機能がリッチテキストAPIに追加されました。
WPBeginnerサポート
Aslanさん、こんにちは。
ご提案ありがとうございます。Gutenbergがリリースされたら、古い記事も必ず確認します。
管理者
Mehrdad
どうもありがとうございます。
この記事は本当に助かりました。
sabbi
これはpタグにクラスを追加するということですね。
独自のタグを作成する方法はありますか?
あるいは、別のことですが、選択したカスタムフォーマットは、以前に選択したhタグをpタグで上書きしますか?クライアントがデフォルトのスタイルとカスタムスタイルの両方をクリックしたときに問題が発生するのを防ぐために必要になります。
ブリタニー
残念ながら、これは全く役に立ちませんでした。入力する必要のある各フィールドの意味を説明している記事はありますか?
私が必要なのは、ポッドキャストのショーノートページにある引用符に同じ書式を適用する方法だけです。各引用符は同じフォント(見出しスタイルとして設定済み)、太字、中央揃えです。
すべての引用符にフォーマットの各部分を手動で適用するのにうんざりしており、ボタンを1回クリックするだけで完了する方法を求めています。
Syams
WPビジュアルエディターに新しいフォントを追加する方法を教えてください。
Moya Nicholson
ありがとうございます。大変参考になりました。
stanley
テーマWPを修正する必要があります
hell me please
サンディ・コノリー
これ本当にありがとうございます!!!OMG!!!!私たちのデザインに基づいて、クライアントが自分でコンテンツを追加できるようにサイトを引き渡す際に、どれほど役立つことか!
Marcin
こんにちは、私は毎日WordPressを開発しており、WPで何でもやっていますが、このコード片は私が長い間見てきた中で最も役立つものの一つです…デフォルトのWYSIWYGが(今なら言えます:かつて)欠けていたまさにそのものです!コンテンツフィールド内でいくつかの素晴らしいことを可能にします。共有してくれてありがとう!
フォックスグローブ
このプラグインをしばらく使用していますが、wordpress.orgからはもう利用できません。明らかに更新またはサポートされていません。あなたが説明する手動の方法以外の代替手段を知っている人はいますか?
リサ・マクマホン
こちらは、記事で言及されている元のプラグインの更新版/フォーク版です:TinyMCEカスタムスタイル
WPBeginnerサポート
リサさん、ご指摘ありがとうございます。更新されたバージョンで記事を更新しました。
管理者
シュバ・ダス
spanの代わりにpを追加したいのですが、spanをpに変更しても機能しません。
‘title’ => ‘注’,
‘block’ => ‘p’,
‘classes’ => ‘note’,
‘wrapper’ => true,
マッケンジー
これは非常に役立つと感じ、ほとんどできたと思いますが、まだうまくいっていません。エディタで選択すると、テキストはspanタグとclassタグで正しくタグ付けされますが、スタイルシートに入力したスタイルは公開されたノートに適用されていません。
Frank
WordPressの調整が必要なお客様がいると、いつも緊張して吐き気がします。クールなスタイルプルダウンですが、前述のように、スタイルが後で削除できず、追加される一方であれば、完全に無用です…
WordPressでは、このような中途半端な解決策に慣れています。通常、最初のものを半ば修正するための補完的な中途半端な解決策もあります。しかし、ここでは?
スタイルプルダウンから追加されたカスタムスタイルを削除するには、どのように提案しますか?コードビューはクライアントにとって全く受け入れられません。
誰かがその方法を見つけて、この知識を共有してくれるなら、私は信じられないほど幸運です(そして、私が長い間(願わくば)手の届かないところに置いたWordPressと呼ばれる大惨事のために)。
事前に大変感謝いたします!
Frank
Chris
プルダウンでスタイルをもう一度クリックします。完了です。
Shafi ken
役立つチュートリアルをありがとうございます。ありがとうございます。
K Shazzad
Whole tutorial worked flawlessly for me. Thanks a bunch
Stef
このプラグインを試しましたが、カスタムスタイルを変更すると、すでに挿入したスタイルが更新されないことに気づきました。スタイルシート経由ではなくインラインでスタイルを追加するため、戻って再挿入する必要があります。
フィル
役立つチュートリアルをありがとうございます。プラグインを使用することと、手動でコーディングすることにパフォーマンスの差はありますか?よろしくお願いします。
WPBeginnerサポート
いいえ、しかし要素の再利用にはこの方法は非常に便利です。クライアントのためにサイトを構築していて、ビジュアルエディターから要素を追加できるようにしたい場合にも役立ちます。
管理者
Sei
チュートリアルをありがとうございます!
一度に2つのマークアップを追加する方法はありますか?例えば、テキストのようなものを取得するような方法です。
Sei
OK、コメントはHTMLに変換されるのですね。つまり、1つのスタイルをクリックするだけで、テキストの周りに「h1」と「span」の両方のマークアップを取得したいのです。
Lily
カスタムクラスを作成し、テキストエディタとページで要素が正しいクラスで表示されるようにしましたが、ビジュアルエディタにはクラスが適用されないため、ユーザーにとって機能したかどうか不明瞭になります。これを修正する方法はありますか?
Bonnie Dasher-Andersen
2つのカスタムスタイルを追加しました。ページを編集すると、2つのフォーマットメニューが表示され、それぞれに同じ項目(作成した2つのスタイル)が含まれています。これらのスタイルを適用しようとしても、何も起こりません。テキストビューにはタグが表示されますが、ページを表示してもスタイルは適用されていません。
何か提案はありますか?あまり詳しくないクライアントのために、このWPサイトを更新する予定なので、この問題を解決する必要があります。
マルチェロ
同じ問題を抱えていました。タグがコードに適用されていませんでした。「wrapper」を「false」に設定することで修正しました。技術的な理由はわかりませんが、テストしたところうまくいきました。お役に立てば幸いです!
hugotom
スタイルシートが記録されないという同じ問題を抱えていました。
解決策
既にこの記録スタイルシートがfunctions.phpファイルにある場合は、そこにstylesheet custom-editor-style.cssを追加する必要があります
例:
function styles_theme(){ wp_enqueue_style(‘bootstrap_css’, get_template_directory_uri() . ‘/sources/bootstrap/bootstrap.min.css’); wp_enqueue_style(‘main_css’, get_template_directory_uri() . ‘/style.css’); wp_enqueue_style(‘theme_css’, get_template_directory_uri() . ‘/custom/css/theme.css’); wp_enqueue_style(‘editor_css’, get_template_directory_uri() . ‘/custom-editor-style.css’); // HERE };
ラファエル・ランドー
これを使用しましたが、スタイル/クラスが段落全体に適用されるという問題もありました。これは、スタイルフォーマットを「ブロック」に設定したためです。(‘block’ => ‘span’,)。
公式WordPressコーデックスを素早く確認したところ、スタイルフォーマットのオプションがさらに多く見つかりました。
http://codex.wordpress.org/TinyMCE_Custom_Styles
spanはデフォルトでインラインスタイルなので、「block」を「inline」に置き換えると、期待どおりにスタイルが機能するはずです。
つまり、要約すると:
array( ‘title’ => ‘あなたのタイトル’, ‘inline’ => ‘span’, ‘classes’ => ‘your-class’, ‘wrapper’ => true, ),
nemaha
こんにちは。
素晴らしいチュートリアルをありがとうございます!私も、スタイル(span)が段落全体に適用されてしまう問題があります。私が意図していることは、見出しを書いてそれをh1としてフォーマットし、その後、その見出し内の特定の単語だけをマークしてカスタムスタイルを追加することです。この問題を解決する方法について、何かアップデートはありますか?ありがとうございます!
bekee
私も、選択した要素だけでなく、段落全体にスタイルが適用されるという問題を抱えています。これに関するアップデートはありますか?ありがとうございます!
Debbie
同じ問題が発生しています。単語を1つハイライトしても、段落全体に影響します。
ジェームズ
いくつかの問題が見つかりました。機能しているようですが、期待どおりではありません。コードを知らない人には役立ちません。
1. 段落内の単語を1つハイライトして追加しますが、追加されるのはハイライトされた単語だけでなく、段落全体に適用されます。
2. コードを編集せずにCSSを削除する方法がありません。クライアントはコードを扱えません!.nothing というクラスを作成しようとしましたが、新しいクラスは他のクラスに追加されるだけで、既存のクラスを置き換えることはありませんでした。
WPBeginnerスタッフ
WordPressで一般的な画像の問題を修正する方法に関するガイドをご覧ください。
Sheikh Zuhaib Siddiqui
メディア追加でエラーが発生しています。メディアをアップロードしようとすると、ロードが続くだけで、メディアが表示されず、メディアをアップロードできません……。何が間違っているか教えてください???
しかし、これは正常に動作しています…………メディアアップローダーにエラーがあるだけです。このソリューションを提供してください。
Marlice
こんにちは。この素晴らしいチュートリアルをありがとうございます。エディターに既に存在するコンテンツで問題が発生しています。「青いボタン」(あなたのコードから)のようなスタイルを選択して単語やテキストの一部を選択すると、選択した単語やテキストの一部だけでなく、それ以外の部分も囲まれてしまいます。代わりに、コンテンツ全体がマークされ、.blue buttonというクラスが付いたspanタグが適用されます。他のページや投稿で何度か試しましたが、常に同じ結果でした。コンテンツが既に存在する場合にそれを選択すると、コンテンツ全体にspanクラスが適用されます。これは、ページ/投稿に新しく編集されたテキストを囲む場合には発生しません。その場合はすべて正常に機能します。他にこの現象を経験した方はいらっしゃいますか?
ありがとうございます。
Ute
ジョン=ヘンリー・ロス
こんにちは。この方法を試しましたが、驚くほどうまくいきました。まさに探していたものです。ありがとうございます。フォーマットボタンの下に追加するだけでなく、サブフォルダーにスタイルを追加する方法があるかどうかを知りたいだけです。例えば、すべての見出しスタイルを含む見出しサブフォルダーを追加したり、divスタイルを含むdivサブメニューを追加したりします。
デイブ
ありがとうございます!
2つの方法を示すのも良いですね…私のクライアントはコードの扱いに恐怖を感じます。
I will sometimes use custom fields to “force” safe additional styles, but the TinyMCE can be handled by some people, so I’ll kee that in mind.
Ciao, Dave
WPBeginnerスタッフ
ドットを追加する必要はありません
classes’ => ‘.alert-blue’,
そうあるべきです
classes’ => ‘alert-blue’,
ジェフ・ゴーデット
残念ながら、これはうまくいきませんでした。ピリオドを削除しましたが、エディターには何も適用されません。ヘルプデスクではないことは承知していますが、もし興味があればスクリーンショットはこちらです: http://screencast.com/t/JI0zMvcH
あなたが提供するすべての素晴らしいものに感謝します!
WPBeginnerスタッフ
functions.phpファイルに追加したコードを貼り付けていただけますか。これらのボタンに使用しているCSSも貼り付けてください。
ジェフ・ゴーデット
もちろんです。関数:
/* * MCE設定をフィルタリングするためのコールバック関数 */
function my_mce_before_init_insert_formats( $init_array ) {
// style_formats 配列を定義します
$style_formats = array( // 各配列の子は、独自の СSettings を持つフォーマットです array( 'title' => 'アラート', 'block' => 'span', 'classes' => 'entry p.alert-blue', 'wrapper' => true )
),
array(
‘title’ => ‘アラートブルー’,
‘block’ => ‘p’,
‘classes’ => ‘alert-blue’,
‘wrapper’ => true,
),
array(
‘title’ => ‘ブルーボタン’,
‘block’ => ‘span’,
‘classes’ => ‘alert-blue-button’,
‘wrapper’ => true,
),
);
// 配列をJSONエンコードして‘style_formats’に挿入
$init_array[‘style_formats’] = json_encode( $style_formats );
return $init_array;
}
// コールバックを「tiny_mce_before_init」にアタッチします
add_filter( ‘tiny_mce_before_init’, ‘my_mce_before_init_insert_formats’ );
CSS
.alert-blue { background: none repeat scroll 0 0 #E7F4FD; border: 1px solid #C5D7E3; color: #3A5971; font-size: 18px; line-height: 24px; text-align: center; margin: 0 0 15px !important; padding: 15px 25px; width: auto; }
WPBeginnerスタッフ
スタイルシートにCSSを追加しましたか?
CSSに追加するスタイルルールが、MCE設定をフィルタリングするコールバック関数に追加するクラスと一致していることを確認してください。
Kemi O
TinyMCE Advanced Professsional Formats and Stylesは、WPバージョン3.6.1までしかサポートされていません。
キーリー・ワース
私はビジュアルエディタを疫病のように避けています!テーマに組み込まれたショートコードボタンを使用するために切り替える必要がある場合のみ使用します。それ以外は – 使用しません。
Blair2004
最初の方法を試しましたが、新しいスタイルは利用可能ですが、選択しても何も起こりません…
ジェフ・ゴーデット
ブロックでこれをやろうとしていますが、うまくいきません。コードは次のとおりです。
array( ‘title’ => ‘アラートブルー’, ‘block’ => ‘p’, ‘classes’ => ‘.alert-blue’, ‘wrapper’ => true, ),
spanを使用すると機能しますが、これはspanクラスが必要であり、使用できません。
上記のコードを使用しても、wpエディタでは何も起こりません。テキストを選択し、Alert Blueフォーマットオプションをクリックしても何も起こりません: http://screencast.com/t/dijujZ2ZdqBy
何かアドバイスはありますか?