WordPressの管理ツールバーをカスタマイズしたいですか?
管理バーには、よく使う管理ページへの便利なリンクがあります。しかし、サイト上で作業する際に最も使用するページに独自のショートカットを追加することもできます。
この投稿では、WordPressの管理ツールバーにカスタム・ショートカットリンクを追加する方法を紹介する。
なぜWordPress管理ツールバーにカスタマイザーリンクを追加するのか?
WordPressサイトにログイン中、画面上部にツールバーがあることに気づくでしょう。これがWordPressの管理ツールバーまたは管理バーです。
WordPressの管理バーをコントロールする方法はいくつかあり、サイトを表示するときにオフにしたり、管理者以外のユーザーにはすべて無効化したりすることができます。
初期設定では、ツールバーには、管理者サイドバーにある特定の管理画面へのリンクが表示されます。これらのリンクにより、一般的な管理タスクを素早く実行することができます。
しかし、投稿をするときやサイトで作業するときによく訪れるお気に入りのリンクのリストは誰にでもあるものです。これらは管理エリアのページであったり、外部のリソースやサービス、サイトへのリンクであったりします。
WordPressツールバーにカスタムショートカットリンクとして追加することができます。そうすれば、あなたもユーザーもサイトや管理エリアから簡単にアクセスすることができます。これは、複数の投稿者がいる忙しいサイトを運営している場合に特に便利です。
ということで、WordPressの管理ツールバーにカスタムのショートカットリンクを追加する方法を見ていきましょう。ここでは3つの方法を取り上げます:
プラグインでツールバーにカスタムショートカットリンクを追加する
最初に行う必要があるのは、WP Custom Admin Interfaceプラグインをインストールして有効化することです。詳しくはWordPressプラグインのインストール方法をご覧ください。
有効化した後、プラグインを設定するためにカスタマイザー ” 管理ツールバーページにアクセスする必要があります。このページはツールバーに表示される全ての項目を表示し、新しい項目を追加することができます。
カスタムショートカットリンクを管理ツールバーに追加するには、画面上部の「+メニュー項目を追加」ボタンをクリックする必要があります。

新しい項目がリストの一番上に追加され、2つのコンテナが含まれる。
ひとつは項目のタイトル用、もうひとつはリンク用だ。

タイトルを追加するには、ノートブックの項目をクリックして、タイトルフィールドを編集モードにする必要があります。タイトルを入力し、チェックマークアイコンをクリックして保存します。
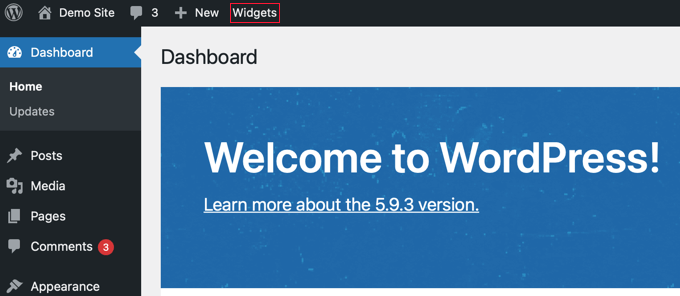
このチュートリアルでは、「ウィジェット」と入力します。

同様に、リンクを追加するには、リンクアイコンをクリックし、リンクを入力する必要があります。入力が終わったら、チェックマークアイコンをクリックしてリンクを保存します。
このチュートリアルでは、ウィジェット・ページへのリンクを貼り付けます。http://example.com/wp-admin/widgets.php。example.com’を自分のドメイン名に置き換えることを忘れないでください。

本当に〜してもよいですかですか?’example.com’をあなたのドメイン名に変更し、リンクを保存するためにチェックマークアイコンをクリックするのを忘れないでください。
新規項目はリストの一番上にあるので、管理ツールバーの左側に追加されます。さらに右に移動させるには、ドラッグ&ドロップで項目をリストのさらに下に移動させる必要があります。

カスタムショートカットリンクを複数追加したいですか?その場合は、同じ手順を繰り返して別の項目を作成してください。
管理バーのカスタマイズ中にミスをした場合は、上部にある「WordPressツールバーの初期設定に戻す」ボタンをクリックすると、カスタマイズした内容をすべて削除することができます。また、「最後に保存した内容に戻す」ボタンをクリックすると、最後に保存した以降の変更をすべて削除することができます。
最後に、ページの一番下までスクロールする必要があります。ここで、どのユーザー権限グループが新しい項目を見ることができるかを決定し、設定を保存します。
ログイン中のすべてのユーザーに新しいリンクを表示させたい場合は、ドロップダウンメニューから「Everyone」を選択し、設定が「Implement this for Everyone except」になるようにする必要があります。例外を追加しない場合、すべてのユーザーが項目を見ることができます。

しかし、購読者または寄稿者のユーザー権限を持つユーザーに項目を表示させたくない場合は、例外としてこれらのロールを選択する必要があります。
まず、「+ 例外ケースの追加」リンクをクリックします。権限グループ」を選択するドロップダウンが表示されます:購読者」を選択します。次に、「+」アイコンをクリックし、「権限グループ」を追加します:寄稿者」を追加します。

もう一つの例は、リンクを自分自身や個別ユーザーにだけ見せたい場合です。
その場合、ドロップダウンメニューからオプションを選択し、設定が「ユーザー:個人名以外には実施しない」となるようにします。

ほぼ完了です。カスタムリンクを表示させたくない場合は、「フロントエンドのカスタムツールバーを無効化する」のチェックボックスもクリックしてください。
そして、管理ツールバーの設定が終わったら、「すべての設定を保存」ボタンをクリックするのを忘れないでください。
ページを更新するか、管理サイドバーで別のページをクリックすると、カスタマイザーリンクが表示されます。
カスタム・ショートカットの個別リンクをツールバーにコードで追加する
WordPressツールバーにカスタム・ショートカットリンクを追加するもう一つの方法を紹介しよう。この方法は、WordPressにコード・スニペットをコピーすることに慣れている人向けです。
以下のコードをテーマのfunctions.phpファイル、サイト固有のプラグイン、またはコード・スニペット・プラグインにコピー&ペーストする必要があります。
1 2 3 4 5 6 7 8 9 10 11 12 13 14 | // add a link to the WP Toolbarfunction custom_toolbar_link($wp_admin_bar) { $args = array( 'id' => 'wpbeginner', 'title' => 'Search WPBeginner', 'href' => 'https://www.google.com:443/cse/publicurl?cx=014650714884974928014:oga60h37xim', 'meta' => array( 'class' => 'wpbeginner', 'title' => 'Search WPBeginner Tutorials' ) ); $wp_admin_bar->add_node($args);}add_action('admin_bar_menu', 'custom_toolbar_link', 999); |
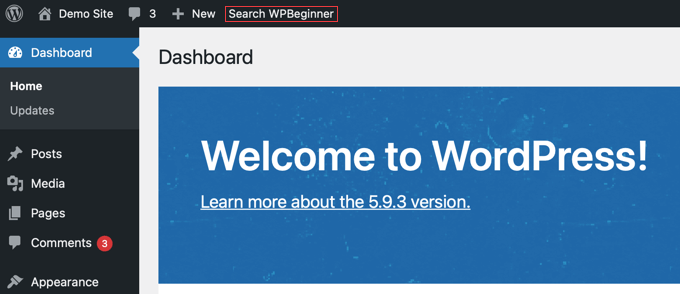
このサンプルコードは、WPBeginnerのWordPressチュートリアルを検索するGoogleカスタム検索エンジンへのリンクを追加します。配列に記述された引数でadd_node関数を使用します。
id、title、href、メタ情報の各項目をカスタムリンク用の値に置き換える必要があります。
WPCodeを使ってWordPressにこのコードを追加することをお勧めします。テーマのfunctions.phpファイルを編集することなく、カスタマイザーのコードを簡単に追加できる最高のコードスニペットプラグインです。そのため、サイトを壊す心配はありません。
開始するには、無料のWPCodeプラグインをインストールし、有効化する必要があります。詳しい手順は、WordPressプラグインのインストール方法をご覧ください。
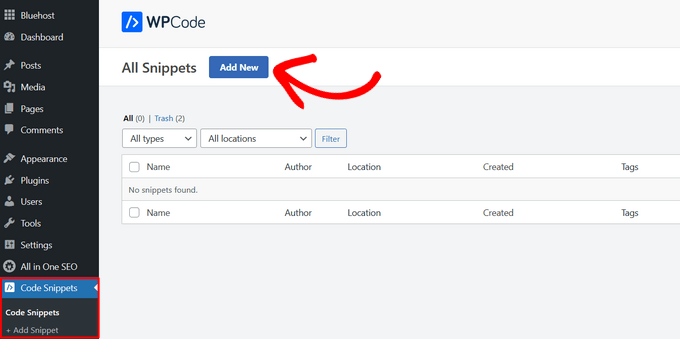
プラグインを有効化すると、WordPressダッシュボードに「Code Snippets」という新しいメニュー項目が追加されます。それをクリックすると、サイトに保存してあるすべてのカスタム・コード・スニペットのリストが表示されます。プラグインをインストールしたばかりなので、リストは空です。
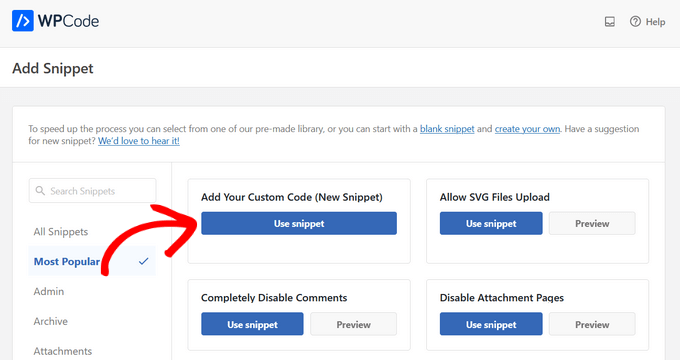
ここから「新規追加」ボタンをクリックして、最初のコード・スニペットを追加する。
次に、「カスタムコードを追加(新規スニペット)」設定に移動し、その下にある「スニペットを使用」ボタンをクリックします。
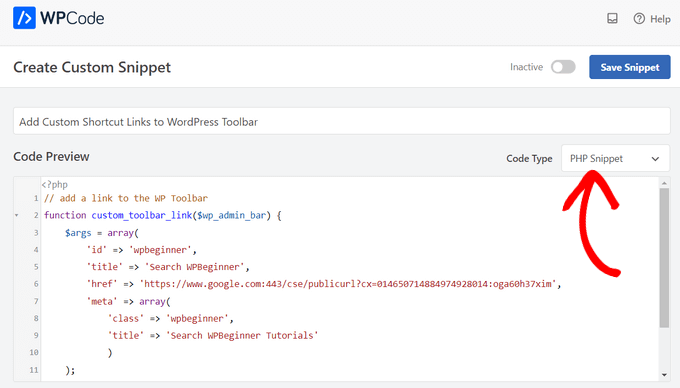
カスタマイザー作成」ページでは、まずスニペットのタイトルを追加します。これは、スニペットが何のためのものかを覚えておくのに役立つものであれば何でもかまいません。
次に、上記のコードを「コードプレビュー」ボックスに貼り付け、ドロップダウンメニューからコードタイプとして「PHPスニペット」を選択します。
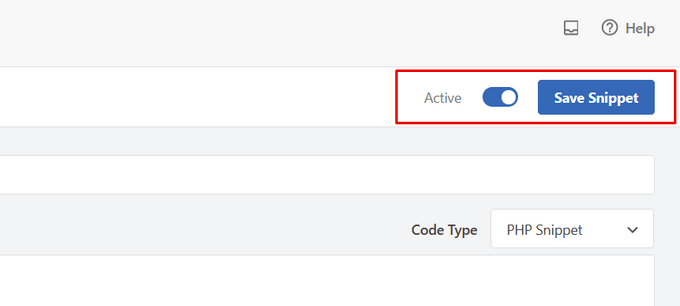
その後、スイッチを’Inactive’から’Active’に切り替え、’Save Snippet’ボタンをクリックする。
カスタムショートカットリンクのグループをコードでツールバーに追加する
前回は、コードを使ってツールバーにカスタムリンクを追加する方法を紹介した。しかし、独自のショートカットを使ったカスタムメニューを作りたい場合はどうすればいいでしょうか?
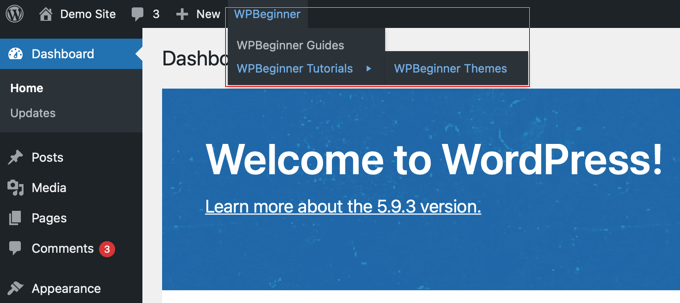
そのためには、1つの親項目の下に複数のショートカットをグループ化することができます。ユーザーが親リンクにマウスオーバーすると、親リンクの下の子ノードが外観表示されます。
WordPressツールバーにカスタムリンクのグループを追加する方法の例です。前の方法と同様に、このコード・スニペットをテーマのfunctions.phpファイル、サイト固有のプラグイン、またはWPCodeのようなコード・スニペット・プラグインにコピー&ペーストしてください。
1 2 3 4 5 6 7 8 9 10 11 12 13 14 15 16 17 18 19 20 21 22 23 24 25 26 27 28 29 30 31 32 33 34 35 36 37 38 39 40 41 42 43 44 45 46 47 48 49 50 51 52 53 54 55 56 57 58 59 60 61 62 | /** add a group of links under a parent link*/ // Add a parent shortcut link function custom_toolbar_link($wp_admin_bar) { $args = array( 'id' => 'wpbeginner', 'title' => 'WPBeginner', 'href' => 'https://www.wpbeginner.com', 'meta' => array( 'class' => 'wpbeginner', 'title' => 'Visit WPBeginner' ) ); $wp_admin_bar->add_node($args); // Add the first child link $args = array( 'id' => 'wpbeginner-guides', 'title' => 'WPBeginner Guides', 'href' => 'https://www.wpbeginner.com/category/beginners-guide/', 'parent' => 'wpbeginner', 'meta' => array( 'class' => 'wpbeginner-guides', 'title' => 'Visit WordPress Beginner Guides' ) ); $wp_admin_bar->add_node($args); // Add another child link$args = array( 'id' => 'wpbeginner-tutorials', 'title' => 'WPBeginner Tutorials', 'href' => 'https://www.wpbeginner.com/category/wp-tutorials/', 'parent' => 'wpbeginner', 'meta' => array( 'class' => 'wpbeginner-tutorials', 'title' => 'Visit WPBeginner Tutorials' ) ); $wp_admin_bar->add_node($args); // Add a child link to the child link $args = array( 'id' => 'wpbeginner-themes', 'title' => 'WPBeginner Themes', 'href' => 'https://www.wpbeginner.com/category/wp-themes/', 'parent' => 'wpbeginner-tutorials', 'meta' => array( 'class' => 'wpbeginner-themes', 'title' => 'Visit WordPress Themes Tutorials on WPBeginner' ) ); $wp_admin_bar->add_node($args); } add_action('admin_bar_menu', 'custom_toolbar_link', 999); |
このコード例では、まずカスタム・ショートカット・リンクを追加しました。次に、2つ目のカスタム・リンクを追加し、最初のリンクの子リンクにしました。引数'parent' => 'wPBeginner' を追加して、親リンクIDを追加しました。
これを繰り返して、同じ親の下に別のリンクを追加した。また、カスタムリンクメニューのサブ項目にサブ項目を追加する方法を紹介するために、子リンクを親リンクとして使用しました。
このチュートリアルで、WordPressの管理ツールバーにカスタムショートカットリンクを追加する方法を学んでいただけたでしょうか。WordPressで自動ワークフローを作成する方法や、サイトを成長させる最高のSEOプラグインとツールのリストもご覧ください。
If you liked this article, then please subscribe to our YouTube Channel for WordPress video tutorials. You can also find us on Twitter and Facebook.


Rick Rottman
Thanks for posting this!
I’ve always wanted a direct link in the admin bar to my Simple CSS screen. Thanks to this tutorial, I have one.
WPBeginner Support
Glad to hear our guide was helpful!
Admin
Edward Bonthrone
Hi all..
This is all working great for PC view – but the custom toolbar item icons/menus disappear when viewing on mobile with responsive theme.
I have seen this question asked many times but no examples of code I can insert as a test that works on both PC and mobile view?
Anyone give me a menu snippet that will stay visible on mobile phone?
Thanks
WPBeginner Support
Your CSS would be hiding it for your mobile view, if you would like this to appear on mobile you would need to add the following CSS for our examples.
#wpadminbar li#wp-admin-bar-wpbeginner {

    display: block;

}
For your own shortcut links, you would change the -wpbeginner to the ID of your widget, as an example: -yourid
Admin
dan
Why this code is not work for mobile view?
WPBeginner Support
You may want to try disabling your other plugins to ensure there isn’t a plugin that is overriding the default bar on mobile.
Admin
Tayyab Roy
Thanks.
WPBeginner Support
You’re welcome
Admin
Mohammad Kashif
Hi
How can i add tool bar user menu in theme navigation?
And why i don’t receive email notification when i got reply? While i select (Replies to my comments).
Thanks
WPBeginner Support
Hi Kashif,
We are not sure which toolbar user menu you want to add. Please see our guide on how to add navigation menus in WordPress may be that would help.
Admin
Court
This works great, my question is, how do you add a second parent menu item to this code?
Small Details
I don’t know if this is recommended but I was looking for a ‘new window’ solution (see Yassin’s comment). It didn’t work by itself but works fine when combined with ‘meta’:
add_action( ‘admin_bar_menu’, ‘toolbar_link_to_mypage’, 999 );
function toolbar_link_to_mypage( $wp_admin_bar ) {
$args = array(
‘id’ => ‘my_page’,
‘title’ => ‘PRODUCT MANAGEMENT’,
‘href’ => ‘http://www.mexample.com’,
‘meta’ => array( ‘class’ => ‘my-toolbar-page’, ‘target’ => ‘_blank’ )
);
$wp_admin_bar->add_node( $args );
}
Mel
Thanks!! This helped me out a ton!
Frederic
Thanks! Very useful!
Yassin
Great tip
How can we make these custom links open in new tab ?
I try to add ‘target’ => ‘_blank’ but didn’t work
Henry E.
To add a ‘target’ => ‘_blank’ you have to add it to the ‘meta’ => array()
Gary Cook
This is awesome. Thanks. Although, I have added several custom menus and I want to center them all in a group using CSS, if possible? Please.
Marc
Is it possible to add a icon?
Rosendo Cuyasen
Cool! I think this is a cool feature for WordPress if you’re going to use this toolbar above your web pages. Thanks for sharing.
adolf witzeling
I was looking for something like this. Thanks for sharing this awesome tip.