著者の専門知識を紹介することで、読者との信頼関係を築くことができます。読者にチームを紹介し、資格を強調し、ソーシャルメディアとのつながりを提供する専用のバイオボックスで、著者の情報を投稿に表示できます。
著者のバイオボックスは、あなたのウェブサイトのE-E-A-T(経験、専門知識、権威性、信頼性)シグナルを強化し、SEOを大幅に改善できることがわかりました。
WordPressのテーマによっては、ビルトインで著者プロフィール機能を提供しているものもありますが、そうでないものもあります。プラグインやカスタムコードを使えば、WordPressサイトに著者情報ボックスを簡単に追加することができます。
この投稿では、Google E-E-A-Tシグナルを高める投稿者プロフィールと、WordPressブログに投稿者情報ボックスを簡単に追加する方法をご紹介します。

Google E-E-A-Tを高める投稿者バイオの書き方
WordPressコンテンツの背後にいる実際の人物を示すことは、読者からの信頼性を高め、サイトの権威を強化するのに役立ちます。
それは、GoogleのE-E-A-Tガイドラインが、信頼できる情報源を選ぶ際に、専門知識、経験、権威性、信頼性を重視しているからです。そして、このコンテンツを検索結果の上位にランク付けするのです。

E-E-A-Tの各要素に貢献する投稿者経歴の書き方を紹介しよう:
専門知識
投稿者の経歴を見れば、その分野におけるトレーニングや資格など、テーマに対する深い理解を示すことができる。
本当に〜してもよいですか?関連する学位、資格、またはその分野での知識や資格を示す専門的な所属先を記載しましょう。
また、投稿者の専門性を示す、あるいは証明するような受賞歴や表彰歴についても簡単に触れておく。
経験
バイオグラフィーでは、投稿者の重要な業績や権限グループなど、よく書くトピックに関する実体験を要約することができます。その目的は、選んだトピックについて権威あるコンテンツを書くために、その経験がどのように備わったかを描くことです:
- 具体的な年数を用いて投稿者の経験をアピールする。
- 単に業種を挙げるのではなく、その分野でスキルアップした具体的な経験エリアを挙げましょう。
- 専門知識をどのように身につけたかを示す関連する職務経験、プロジェクト、ボランティア活動について簡潔に述べること。
権威性
バイオグラフィーでは、受賞歴や掲載誌など、投稿者がその分野の専門家から認められていることを強調することができます。
彼らが寄稿した出版物、評判の高いサイトに書いたゲスト投稿、参加した講演会などがあれば言及する。これは、ニッチな分野での地位を示すものです。
また、業界団体やコミュニティへの参加についても簡単に触れておきましょう。これは、彼らがその分野で積極的に活動していることを示すものです。
信頼性
バイオグラフィーがあれば、誰がコンテンツを書いているのかが一目瞭然です。いくつかヒントを挙げましょう:
- 投稿者の経歴では、プロフェッショナルで情報豊富な文体を保つこと。
- 投稿者のコンテンツ、洞察、視点が読者にどのような利益をもたらすかを簡潔に説明する。
- 彼らが実在の人物であることを証明するために、彼らが視聴者と関わっているソーシャルメディアのプロフィールへのリンクを含めることを検討する。
トップヒント略歴は情報量は多いが簡潔で、3~5文が理想的。本当に〜してもよいですか?最後に、個人的なタッチを加え、経歴を視覚的に魅力的なものにするために、プロフェッショナルな顔写真を掲載する。
このWPBeginnerのオーサーバイオをGoogle E-E-A-Tに最適化したことに注目してください:

あなたのサイトに使える投稿者プロフィール・テンプレートはこちら:
[Name] is a [Job Title/Area of Expertise] with over [Number] years of experience in [Industry]. [He/She/They] has a strong background in [specific areas of experience] gained through [relevant work experience, projects, or volunteer work]. [He/She/They] holds a [Degree] in [Field of Study] from [University Name] and is a certified [Certification] professional. [He/She/They] has [briefly mention achievements or publications]. [Name] is passionate about [area of interest] and enjoys helping readers by [explain how your content benefits them]. |
投稿者の経歴を書いたら、WordPressサイトに表示する必要があります。
WordPressで投稿者の経歴を表示する
デフォルト設定では、ほとんどのWordPressテーマはブログ投稿に投稿者名を表示するが、それ以外の情報は表示しない。
サイトの「About」ページで投稿者を紹介することはできるが、すべての読者がそのページを訪れるとは限らない。
投稿者が書いた各ブログ投稿に投稿者情報ボックスを表示することをお勧めします。これにより、複数著者のWordPressサイトにおいて、各投稿の背後にいる人物について読者に詳しく知ってもらうことができます。
また、新しいライターを惹きつけ、あなたのサイトにコンテンツを送信してもらうための素晴らしい方法でもある。
WordPressで投稿者プロフィールやインフォメーションボックスを追加する方法をいくつか見てみましょう。以下のクイックリンクから、使いたい方法にジャンプしてください:
- Adding Author Info Box Using Your WordPress Theme Settings
- Adding Author Info Box in WordPress Using a Free WordPress Plugin
- Display Author Info Box in WordPress Sidebar Widget Area
- Adding Author Info Box by Adding Code to WordPress
- Adding Author Info Box in WordPress With AIOSEO's Author SEO (Recommended)
- Displaying Author Info Box With a WordPress Page Builder
1.WordPressテーマ設定を使って投稿者情報ボックスを追加する
最高のWordPressテーマの中には、各投稿記事の下に自動的に表示される投稿者情報ボックスが付属しているものもある。
まず、現在使用しているテーマに投稿者情報ボックスがビルトインされているかどうかを確認します。
これを行うには、WordPress管理画面のユーザー ” すべてのユーザーに移動するだけです。
次に、変更したいユーザープロフィールにマウスオーバーし、「編集」リンクをクリックします。
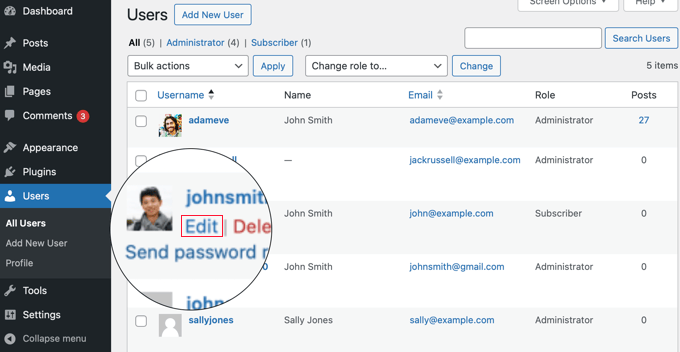
プロフィール編集画面になります。
投稿者の経歴を追加するには、ページを下にスクロールして「経歴情報」セクションに移動します。このフィールドにHTMLを使用して、投稿者のソーシャルメディア・プロフィールへのリンクを手動で追加することもできます。
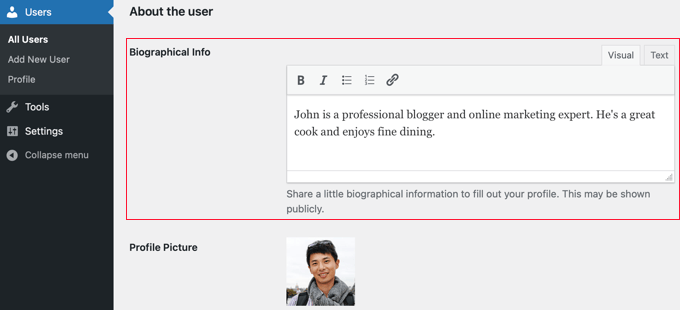
投稿者のプロフィール写真は、Gravatarサービスから自動的に取得されます。投稿者がすでにアカウントを設定している場合は、自動的に表示されます。
完了したら、ページ下部の「プロフィールを更新」ボタンをクリックして変更を保存してください。
これで、その投稿者が書いたサイト上の投稿を表示することができ、投稿者の経歴欄が表示されます。

2.WordPressの無料プラグインを使って投稿者情報ボックスを追加する
もしあなたのテーマが投稿者プロフィールボックスを表示する設定を持っていないか、どのように表示されるかをカスタマイズしたいのであれば、この方法が適している。
これを行うには、Simple Author Boxプラグインを使用します。カスタマイズ可能な投稿者プロフィールボックスをサイトにシンプルに追加できる、WordPress用の最高の投稿者プロフィールボックスプラグインのひとつだ。
注:コンテンツの前後に著者欄を表示したり、ゲストや共著者を含むサイトリンクの追加、ソーシャルアイコンのスタイル追加などの追加機能を提供するプロバージョンもあります。
最初に行う必要があるのは、プラグインのインストールと有効化です。詳しくは、初心者向けWordPressプラグインのインストール方法をご覧ください。
有効化した後、外観 ” Simple Author Boxでプラグインの設定を行う必要があります。
ここでは、投稿者の写真の表示、色、タイポグラフィ、グラビアスタイルなどを選択できます。
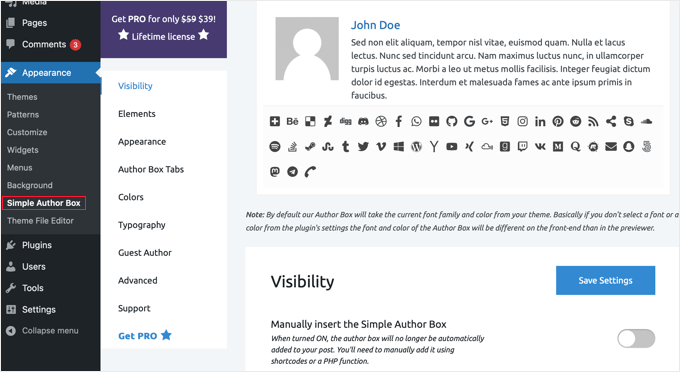
設定が完了したら、必ず「Save Settings」ボタンをクリックして変更を保存してください。
次に、Users ” All Usersにアクセスし、経歴を追加したいユーザーの下にある’Edit’リンクをクリックする必要があります。

これで、ユーザーのプロフィールに経歴を追加することができます。
ユーザーについて」セクションまでスクロールダウンし、「経歴情報」フィールドに経歴を貼り付けるだけです。

このフィールドでHTMLを使用し、手動でリンクを追加したり、基本的なHTMLフォーマットオプションを使用することもできます。
次に、ページ下部の「ソーシャルメディアリンク(シンプル投稿者ボックス)」セクションを探す。
ここでは、投稿者のソーシャルメディア・プロフィールのリンクを追加できます。プラグインは、URLを入力したソーシャルネットワークのアイコンのみを表示します。
ドロップダウンメニューから追加したいソーシャルメディアのプロフィールを選択し、正しいURLを追加する必要があります。
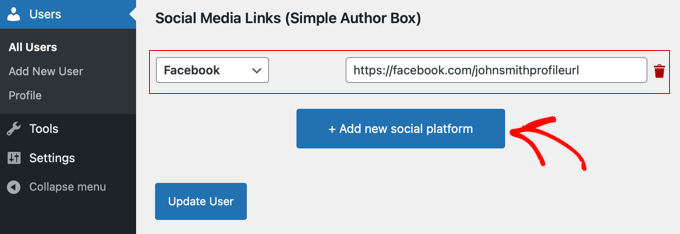
新しいソーシャルプラットフォームを追加 “ボタンをクリックして、ソーシャルリンクを追加することができます。
作業が終了したら、必ず「プロフィールの更新」ボタンをクリックしてユーザープロフィールの変更を保存してください。
これで、そのユーザーが書いた投稿にアクセスし、投稿者情報ボックスの動作を見ることができる。

3.WordPressサイドバーウィジェットエリアに投稿者情報ボックスを表示する
投稿者の情報を投稿の下ではなく、サイドバーやウィジェットエリアに表示したいですか?サイドバーウィジェットに投稿者情報ボックスを表示することができます。
この方法では、前の方法で使用したSimple Author Boxプラグインをインストールして有効化する必要があります。詳しくは、WordPressプラグインのインストール方法のステップバイステップガイドをご覧ください。
ヒント: Simple Author Boxプラグインは、WordPressブロックエディターとフルサイトエディターで、クラシックテーマ用のウィジェットとブロックテーマ用のブロックを提供します。
このチュートリアルでは、クラシックテーマのウィジェットエリアにシンプル投稿者ブロックウィジェットをすばやく追加する方法を紹介します。
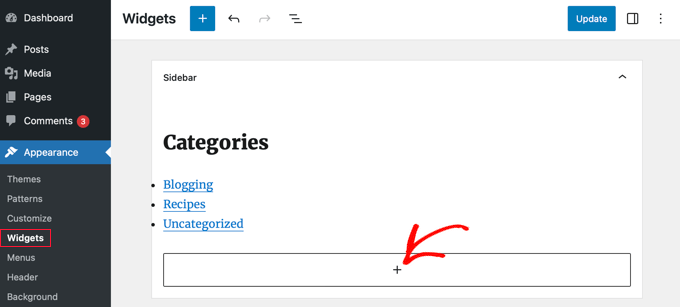
有効化したら、WordPressダッシュボードの外観 ” ウィジェットにアクセスする必要があります。
次に、「サイドバー」ウィジェットエリアの「+」追加ブロックアイコンをクリックします。
注:ウィジェットメニューオプションが表示されない場合、あなたのサイトはブロックテーマを使用しています。詳しくはWordPressフルサイトエディターの使い方のチュートリアルをご覧ください。

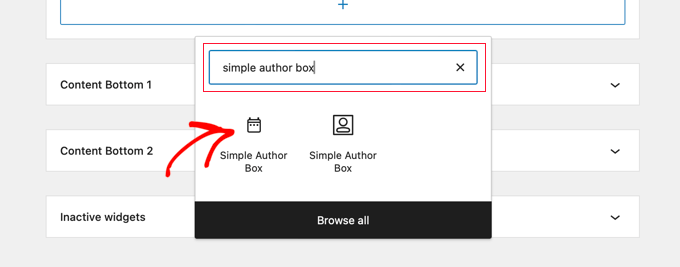
その後、「Simple Author Box」を検索する必要があります。2つのアイコンが表示されます:Simple Author Boxウィジェットとブロックです。
次に、最初のアイコンをクリックして、シンプル投稿者ブロックウィジェットを選択します。
ウィジェットには、表示方法をカスタマイズするためのオプションが多数用意されています。
Choose author/user」ドロップダウンメニューから「Autodetect」オプションが選択されていることを確認することが重要です。これは初期設定のオプションで、投稿者の経歴が自動的に表示されるようにします。
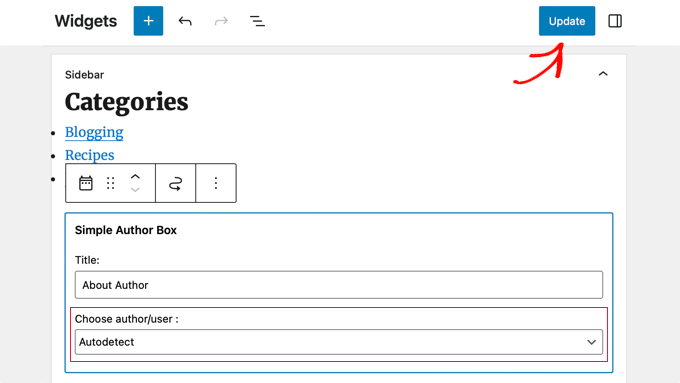
次に、画面上部の「更新」ボタンをクリックして、ウィジェット設定を保存します。
投稿者プロフィールウィジェットの動作を確認するために、あなたのサイトを訪問することができます。

このプラグインは、WordPressのプロフィールからユーザー情報を取得します。上記で紹介したように、あなたや投稿者はプロフィールを編集して経歴情報を入力する必要があります。
ユーザープロフィールの編集について詳しくは、WordPressブログに新規ユーザーと投稿者を追加する方法をご覧ください。
4.WordPressにコードを追加して投稿者情報ボックスを追加する
WordPressで投稿者ボックス情報を追加するもう一つの方法は、テーマのfunctions.phpファイルにコードを追加することです。
しかし、上級ユーザーでない限り、functions.phpファイル自体を編集することはお勧めしません。なぜなら、わずかなミスでもサイトを壊してしまう可能性があるからです。
代わりに、WordPressのための最高のコードスニペットプラグインであるWPCodeを使用することができます。テーマのfunctions.phpファイルを編集することなく、WordPressにカスタマイザーのコードを安全かつ簡単に追加することができます。
また、WPCodeには393以上のコードスニペットがあらかじめ用意されており、「投稿後の投稿者紹介」スニペットなど、クリック数回でサイトに追加することができます。
開始するには、無料のWPCodeプラグインをインストールし、有効化する必要があります。WordPressプラグインのインストール方法については、こちらのチュートリアルをご覧ください。
注:WPCodeの無料版には、WordPressでコードを追加するために必要なすべてがあります。しかし、AIスニペット生成、スケジュールスニペット、コードリビジョンなど、より高度な機能が必要な場合は、WPCode Proにアップグレードすることができます。
有効化したら、WordPressダッシュボードからCode Snippets ” Libraryページにアクセスしてください。
ここから、サイトに追加できるさまざまなスニペットをすべて見ることができます。
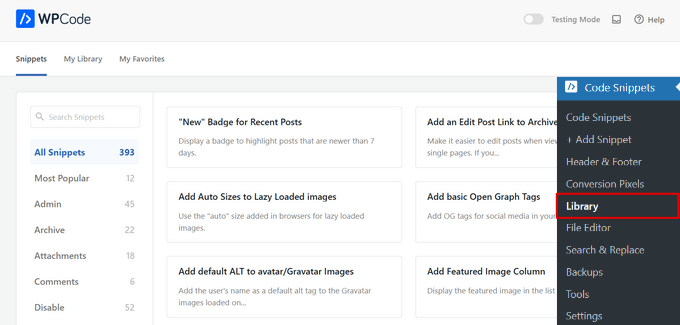
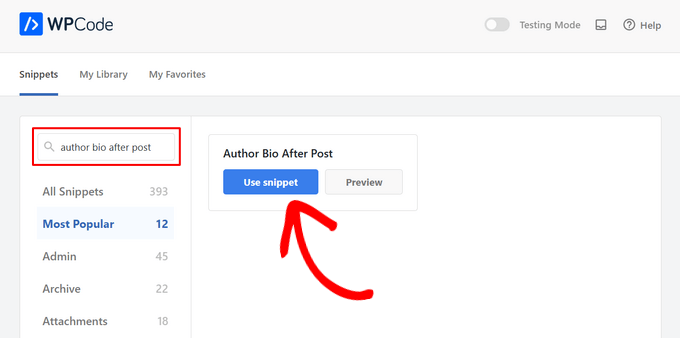
そして、「投稿後の投稿者プロフィール」のスニペットを検索する。
スニペットを見つけたら、マウスオーバーして「Use snippet」ボタンをクリックします。
その後、WPCodeは自動的にコードを追加するだけでなく、適切な挿入方法を選択します。
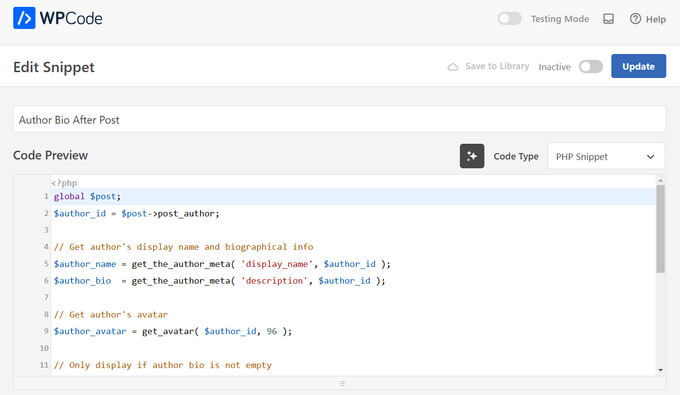
あとは、スイッチを「非活性化」から「有効化」に切り替え、「更新」ボタンを押すだけだ。

これで完了だ。これで、あなたのサイトにアクセスすると、WordPressブログ投稿の最後に新しい投稿者情報ボックスが表示されます。
テストサイトではこんな感じだった:

アドバンス・コード・メソッド
上級ユーザーであれば、このコードをコピー&ペーストして自分のfunctions.phpファイルに貼り付けることができます。
1 2 3 4 5 6 7 8 9 10 11 12 13 14 15 16 17 18 19 20 21 22 23 24 25 26 27 28 29 30 31 32 33 34 35 36 37 38 39 40 41 42 43 44 45 46 47 48 49 50 51 52 53 54 55 56 | function wpb_author_info_box( $content ) { global $post; // Detect if it is a single post with a post authorif ( is_single() && isset( $post->post_author ) ) { // Get author's display name$display_name = get_the_author_meta( 'display_name', $post->post_author ); // If display name is not available then use nickname as display nameif ( empty( $display_name ) )$display_name = get_the_author_meta( 'nickname', $post->post_author ); // Get author's biographical information or description$user_description = get_the_author_meta( 'user_description', $post->post_author ); // Get author's website URL$user_website = get_the_author_meta('url', $post->post_author); // Get link to the author archive page$user_posts = get_author_posts_url( get_the_author_meta( 'ID' , $post->post_author)); if ( ! empty( $display_name ) ) $author_details = '<p class="author_name">About ' . $display_name . '</p>'; if ( ! empty( $user_description ) )// Author avatar and bio $author_details .= '<p class="author_details">' . get_avatar( get_the_author_meta('user_email') , 90 ) . nl2br( $user_description ). '</p>'; $author_details .= '<p class="author_links"><a href="'. $user_posts .'">View all posts by ' . $display_name . '</a>'; // Check if author has a website in their profileif ( ! empty( $user_website ) ) { // Display author website link$author_details .= ' | <a href="' . $user_website .'" target="_blank" rel="nofollow">Website</a></p>'; } else {// if there is no author website then just close the paragraph$author_details .= '</p>';} // Pass all this info to post content$content = $content . '<footer class="author_bio_section" >' . $author_details . '</footer>';}return $content;} // Add our function to the post content filteradd_action( 'the_content', 'wpb_author_info_box' ); // Allow HTML in author bio sectionremove_filter('pre_user_description', 'wp_filter_kses'); |
このコードは単に投稿者の情報を取得し、WordPressの投稿の下に表示します。
そして、この投稿者情報ボックスをWordPressのテーマに一致するように、見栄えの良いスタイルにする必要があります。CSSがわからない場合は、WordPressサイトにカスタマイザーを簡単に追加する方法をご覧ください。
まず、WordPress管理画面の外観 ” カスタマイズに移動します。
WordPressテーマのカスタマイザーパネルが表示されます。Additional CSS」タブをクリックする必要がある。
テーマカスタマイザーが見つからない場合は、WordPressで見つからないテーマカスタマイザーを修正する方法のチュートリアルをご覧ください。
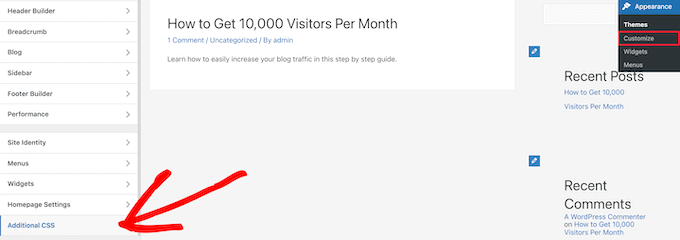
これにより、カスタマイザーコードをWordPressテーマに直接追加し、変更をライブで確認することができます。
以下は、CSSのサンプルコードです:
1 2 3 4 5 6 7 8 9 10 11 12 13 14 15 16 17 | .author_bio_section{background-color: #F5F5F5;padding: 15px;border: 1px solid #ccc;} .author_name{font-size:16px;font-weight: bold;} .author_details img {border: 1px solid #D8D8D8;border-radius: 50%;float: left;margin: 0 10px 10px 0;} |
次に、コードを「Additional CSS」ボックスに直接追加する。
その後、’公開する’ボタンをクリックして、変更内容を公開します。
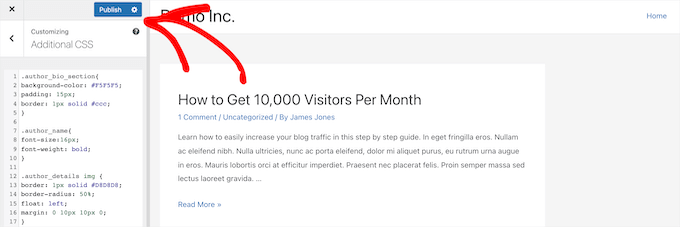
私たちのテーマでは、投稿者欄はこんな感じでした:

5.AIOSEOのAuthor SEOアドオンでWordPressに投稿者情報ボックスを追加する
All In One SEO(AIOSEO)は、300万人以上のユーザーを持つ、市場で最高のWordPress SEOプラグインです。また、WordPressの投稿日やページに詳細な投稿者情報ボックスを追加するために使用することもできます。
この方法は、AIOSEOの強力な投稿者SEOアドオンを使用し、他の方法よりもSEOを向上させる可能性があります。
始めるには、All In One SEOプラグインをインストールして有効化する必要があります。ヘルプが必要な場合は、WordPressプラグインのインストール方法のチュートリアルを参照してください。
注: All In One SEOには、使用できる無料版があります。しかし、投稿者SEOの機能を利用するには、AIOSEO Proプランが必要です。
プラグインを有効化し、設定したら、WordPressダッシュボードからユーザー ” すべてのユーザーに移動します。
次に、投稿者名またはその下の「編集」リンクをクリックします。
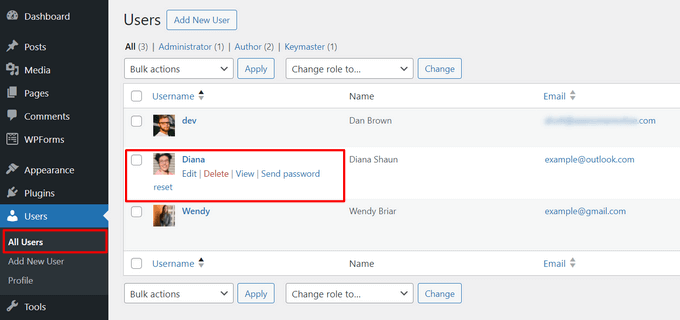
投稿者の「ユーザー編集」ページが開きます。
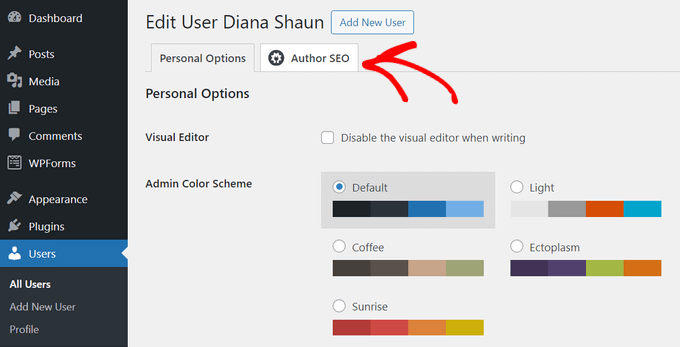
このページで、「投稿者SEO」タブをクリックする必要があります。
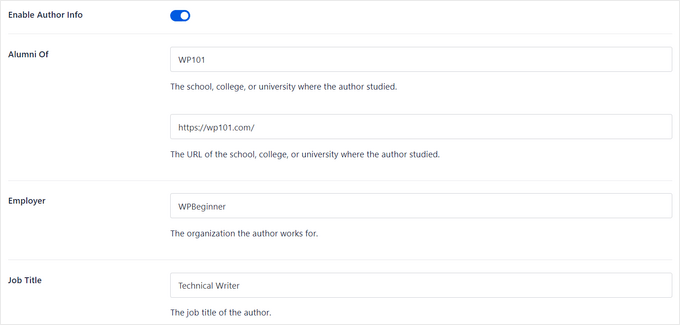
投稿者SEOセクションから、学歴、勤務先、役職などの情報を追加することができます。
この情報はE-E-A-Tシグナルの正しい検証に役立つ。
トピックカテゴリーを追加することもできる。
これらの投稿者は、検索エンジンや読者に著者の専門エリアをアピールすることができる。

注:これらのトピックカテゴリーは、まずAll In One SEOの検索外観“高度な設定 “投稿者エクスペリエンストピックの設定パネルで入力する必要があります。
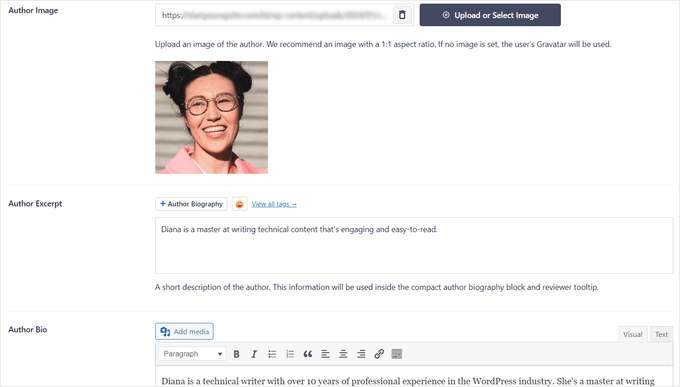
次に、スクロールダウンして投稿者画像、投稿者抜粋、投稿者略歴を追加することができます。
投稿者情報ボックスにソーシャルプロフィールを表示することもできます。
Facebook、Instagram、Twitter、YouTubeなどのプロフィールURLを入力するだけ。
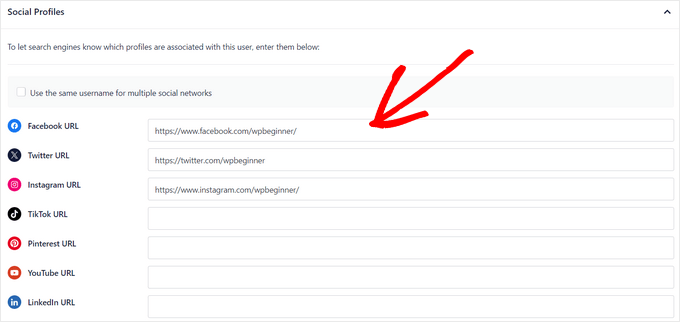
また、「Append Author Bio to Posts(投稿者にバイオグラフィーを追加する)」の設定もあり、有効化と無効化を切り替えることができる。
この設定が有効化されている場合、All In One SEOは自動的に投稿の下部にコンパクトな著者経歴を表示します。

AIOSEOのauthor bioブロックを使って投稿の下にコンパクトまたは完全な投稿者の経歴を手動で追加したい場合は、この設定を無効化することができます。詳しくは、投稿日:著者ブロックを追加するガイドをご覧ください。
このチュートリアルでは、投稿に著者の経歴を自動的に添付する設定を有効化したままにしておきます。
投稿者情報の入力が終わったら、忘れずに「ユーザー更新」ボタンをクリックして、変更内容を保存してください。
これで、WordPressの投稿にアクセスして、新しい投稿者情報ボックスの動作を確認することができます。

ボーナス:WordPressページビルダーで投稿者情報ボックスを表示する
完全カスタマイザーのWordPressテーマを作成し、サイト上の任意の場所に投稿者情報ボックスを簡単に表示したい場合は、SeedProdを使用することをお勧めします。
SeedProdはWordPressのための最高のドラッグアンドドロップページビルダーです。WordPressのカスタムテーマやページレイアウトを簡単に作成でき、コーディングは必須ではありません。
ワンクリックでインポートできる320以上のテーマとページテンプレートが付属しています。テーマテンプレートには、ホームページ、個別ページ、個別投稿、ブログアーカイブ、お問い合わせページなど、サイトのあらゆる部分が含まれています。
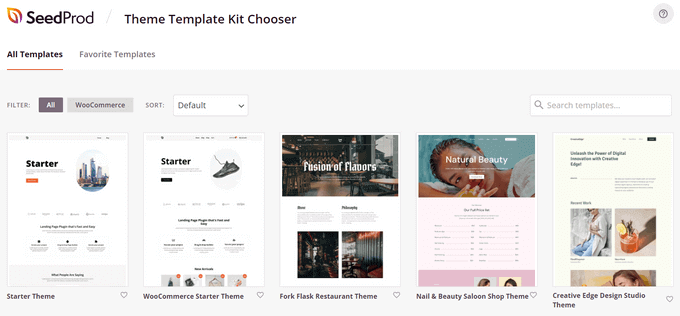
ビジュアルテーマビルダーを使ってテーマを自由にカスタマイズできます。
SeedProdは、どんなページにもドラッグ&ドロップできる「投稿者ボックス」ブロックを含む90以上の既製ブロックを提供することで、それを簡単にします。
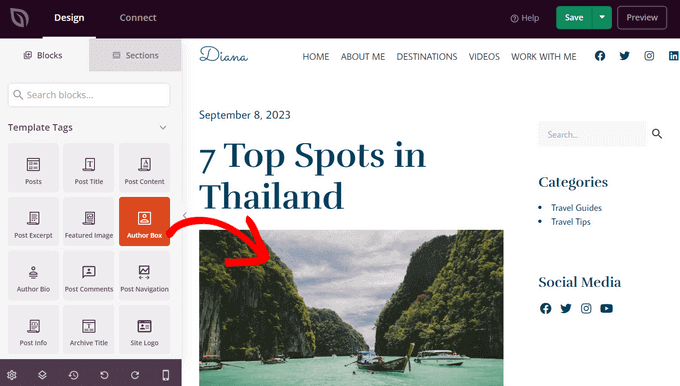
投稿者ボックスブロックをページに追加したら、クリックするだけで詳細を編集できます。
タイポグラフィ、フォントサイズ、配置、背景色、枠線の変更、プロフィール写真の有効化・無効化などが可能です。
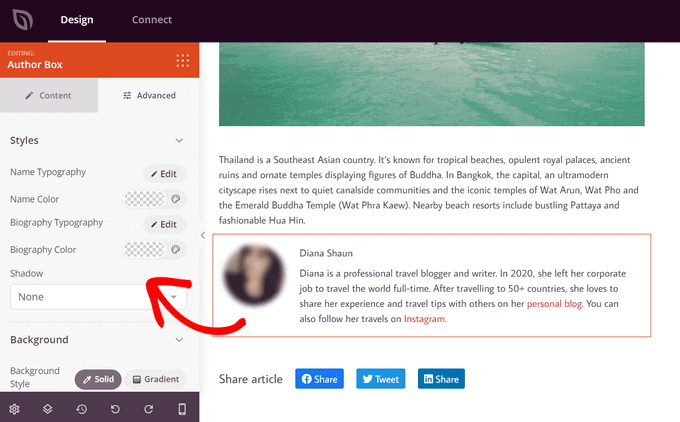
カスタマイザーが完了したら、新しいSeedProdテーマを有効化するだけです。
これを行うには、ページ上部の「SeedProdテーマを有効化」トグルをオンに動かします。

おめでとうございます、あなたのテーマに投稿者情報ボックスが追加されました。
これで、WordPressサイトにアクセスして、カスタム投稿者情報ボックスを見ることができます。

詳しくは、SeedProdでカスタムWordPressテーマを作成する方法のチュートリアルをご覧ください。
よくある質問Google E-E-A-Tについてよくある質問
さて、投稿者プロフィールとWordPressサイトへの追加方法について説明したところで、Google E-E-A-Tに関するよくある質問にお答えしましょう。
Google E-E-A-Tとは?
E-E-A-Tとは、Experience(経験)、Expertise(専門知識)、Authoritativeness(権威性)、Trustworthiness(信頼性)の頭文字をとったもの。Googleがウェブコンテンツの品質と信頼性を評価するために使用するフレームワークです。
ページがE-E-A-Tを示せば示すほど、信頼できる情報源とみなされ、検索結果で上位に表示される可能性が高くなる。
E-E-A-Tの「経験」要素は2022年に導入された。それ以前はE-A-Tと呼ばれていた。
なぜGoogleは今、エクスペリエンスを重視するのか?
この更新は、特定のコンテンツに対する直接的な知識と経験の重要性を強調している。Googleは、ユーザーがそのトピックに関する実践的な経験を持つ人々によって書かれた情報を見つけられるようにしたいと考えている。
良いE-E-A-Tを持つためにはどれくらいの経験が必要ですか?
必ずしも長年の経験は必要ない。そうでない場合は、専門性、権威性、信頼性といった他の側面に重点を置いてください。
サイトが新規の場合は?
E-E-A-Tの構築には時間がかかる。価値あるコンテンツを作成し、投稿者の関連する経験を紹介し、信頼できる情報源としてのサイトを確立することに集中すべきです。そうすることで、Googleや読者からの信頼を得ることができます。
E-E-A-Tのスコアを確実に上げる方法はありますか?
いいえ、魔法の公式はありません。E-E-A-Tはサイトのコンテンツや目的によって異なります。
しかし、有益なコンテンツを作成し、経験を示し、オーディエンスとの信頼を築くことで、軌道に乗り続けることができる。
WordPressの投稿に投稿者情報ボックスを追加する方法について、この投稿がお役に立てば幸いです。また、Google E-E-A-Tについての詳しい説明や、WordPressのマルチオーサーブログを効率的に管理するためのベストプラグインのエキスパートピックもご覧ください。
If you liked this article, then please subscribe to our YouTube Channel for WordPress video tutorials. You can also find us on Twitter and Facebook.


Dennis Muthomi
thank you for this incredibly helpful guide!!!
my WordPress theme had a basic author bio box, but it doesn’t allow me to include links to the author’s social media profiles.
I was about to hire a developer to add that feature but I have tried out Author Info Box as you have highlighted and it has fixed this issue.
You saved me some bucks there…haha!
WPBeginner Support
Glad we could help!
Admin
Michael
Simple and perfect, thank yo!
WPBeginner Support
You’re welcome
Admin
Jiří Vaněk
Thanks for providing the complete php code. In Elementor, I solve it with a widget, but outside of Elementor, I would very much like to use a ready-made solution from you.
Gleni
This only works for posts. I usually post everything from pages, not posts. How can I get this sorted?
WPBeginner Support
We don’t have a specific method we would recommend for pages at the moment but we will look into the possibilities in the future.
Admin
Bojan
Please, replace this code with this if you want to show only on blog posts:
// Detect if it is a single post with a post author
if ( is_single() && isset( $post->post_author ) ) {
with:
// Detect if it is a single post with a post author
if ( is_singular(‘post’) && isset( $post->post_author ) ) {
WPBeginner Support
Thanks for sharing this for those looking for that customization
Admin
Mark Beese
I would like to add something like the option of related stories to the author box, but show a random selection of others posts/stories from that author. Is that possible?
WPBeginner Support
For something like that, we would recommend taking a look at our guide below for showing related posts by the same author:
https://www.wpbeginner.com/wp-tutorials/how-to-display-related-posts-by-same-author-in-wordpress/
Admin
Ramon
This is excellent, works out of the box.
Keep in mind that you might want to add a “title” attribute to a href links ..
WPBeginner Support
Thanks for sharing your recommendation.
Admin
Kelly
I came here for your opinion because my SEO teacher (paid class) says that even though my website/URL is my name, Google needs to know who wrote the posts. I write them (with the exception of guest writers from time to time). You said, “For a single-author WordPress blog, you can just add an about me page.” Do you mean just have an about me page on your blog? Or link to the about me page within the author box at the end of posts?
WPBeginner Support
That would be a personal preference decision but having an about page publicly visible was what we recommended. It is not required in every article.
Admin
Rozard
I added the code in Theme function.php. It’s working better than a plugin. I just need little bit help if that is possible. My website is not in English, which is right to left. I added a css code that start paragraph from right to left, now the problem is that most of the author bios are in English, is there way to modify the alignment of bios to make left to right?
I really appreciate your help. Thank you
WPBeginner Support
You would need to add in the CSS for the author box:
direction: ltr;
Admin
Jerry
I have an author info box that shows at the end of every blog post. I want it to be shown on my About me static page as well apart from the blog post. How can I enable this?
WPBeginner Support
It would depend on what is adding the author box, if your theme is adding it you would want to reach out to your theme’s support for having it appear on a page.
Admin
usef
Hi. I used the method 4. It worked like a charm. Thank you for sharing this.
WPBeginner Support
You’re welcome, glad you found our guide helpful
Admin
Lauren Colquhoun
Hello
Could you please tell me how to only display the author bio box for certain categories? Thank you
WPBeginner Support
If you are using the widget method you can conditionally display the widget using the method from our guide here: https://www.wpbeginner.com/plugins/how-to-show-or-hide-widgets-on-specific-wordpress-pages/
Admin
Gustavo Razzetti
Hi I used the plugin and now it’s showing two bios–the one generated by the plugin and the one created by WordPress (which looks uglier and I don’t want to use). How I avoid having two bios?.
WPBeginner Support
If your theme included its own author bio, you would need to reach out to the theme’s support for how to remove it
Admin
Prajyot Kumbharjuvekar
Looks like the Guerrilla’s Author Box plugin is no longer available… Do you can you suggest any alternatives? thank you
WPBeginner Support
While we don’t have a recommended plugin at the moment, we will certainly look to update this article with an alternative
Admin
Louis Chaussé
Hi,
I have a problem with method #3
I added the php code to the functions.php file and the css to additonal css section in WP
Everything is working except that the bio is displaying twice on the page…
Once at the proper place at the bottom of the post, and it is also displaying at the top of the page (before header)
Any thoughts?
Warwick Levey
Is there anyway to disable to author box for profiles which don’t have any info in the author bio?
We use a custom field to add authorship to guest posts, and we don’t have a bio for most of our guests, and the blank box at the bottom of the page is z bit of an eyesore for these posts.
Thanks in advance for any help
Elizabeth Thompson
Does this mean I have to give them user access????
This doesn’t make sense for me? THey’re random people?
Thanks
re: Each author on your site will need to add their biographical information and links to their user profiles. They can do this by logging in to their WordPress account on your website and then click on the Profile link from the WordPress admin menu.
WPBeginner Support
Hi Elizabeth,
Random people should not have access to your WordPress site. Please see our beginner’s guide about WordPress user roles and permissions.
Admin
Morteza
Hi to all!
How to add EDD vendor name in EDD receipt?
I add this to my downloads page by adding:
echo get_the_author_meta( ‘name_of_store’, $post->post_author );
and
echo get_the_author_meta( ‘display_name’, $post->post_author );
,
It seems in this case I need to hook this, BUT HOW?
thanks
Mick
Thanks for this which is what I was looking for. Although now I see it with the bio in 2 places, what I would like is that the bio at the end of each post different to the bio down the side.
Is this possible or do I have to remove Meks and replace it with some other plugin?
Thanks
Wilson Lee
Hey,
This was just what I was looking for. I think I will stick with installing a plug-in though.
Coding makes my head hurt.
Thanks for the great wordpress content!
Wilson
Matt Stephens
hahaha! I thought exactly the same thing while reading through the post. Why go through the stress of coding, when there’s a plugin to get the job done?
Manjit Kumar
It’s great and so much helpful…
ingresos pasivos
Hi, I was wondering how I can add a margin higher than my box using the code that you left us.
My box shows very close to the letters of my post, I hope your answer.
A big greeting.
Vishal Rana
very helpful thanks a lot
Hina Ilyas
I have added the Guerrilla’s author box, but author details still don’t show on my posts. I can only see these three lines:
Author: Hina Ilyas
Filed Under: Weekly Rundown
Tags:
i don’t understand what is the issue!
Magnus
If I use method 3, it only shows the author info box when viewing a post.
The post itself doesn´t show at all.
Any suggestions?
Thank you in advance.
Kingsford
Please how can I add the author box to specific categories only?
Pls help.
Andy W.
You may have found the answer for this already (it’s kind of disappointing someone makes this posts and doesn’t respond to the questions), but I used this to display the box on only certain categories.
If you want to display the author box only on single posts that are assigned to any category, change:
// Detect if it is a single post with a post author
if ( is_single() && isset( $post->post_author ) ) {
to
// Detect if it is a single post with a post author
if ( is_single() && isset( $post->post_author ) && has_category() ) {
If you want to display the box ONLY in a certain category, then change the above to:
// Detect if it is a single post with a post author
if ( is_single() && isset( $post->post_author ) && in_category(‘X’) ) {
Change “X” to the category ID.
To include more than one category, simply replay “X” with an array() of category IDs:
// Detect if it is a single post with a post author
if ( is_single() && isset( $post->post_author ) && in_category( array(‘X’, ‘X’) ) ) {
Joseph
Hi andy can you help me, i-followed the method #3, how can i hide it to my wocommerce product page description here’s the site
Joseph
i just solved it, i used this code of yours:
// Detect if it is a single post with a post author
if ( is_single() && isset( $post->post_author ) && has_category() ) {
thanks for this
Shraddha Kapoor
Hi. I am facing a problem while adding hyperlink in the author bio. I tried add hyper link using anchor text at edumovlive.com but failed. Can anyone help me to get hyperlink in author bio.
Gabrielle
Hi, i added custom admin column: thumbnail to all users table
, how can i print each user gravatar, by user id, inside this column?
I added sucessfully featured image column inside all post table,
that links each image to each post via edit link, is there a way to add gravatar column in all users that links to edit user?
Anis Chity
How can I add links to my posts within the author box?
Nishat
Thanks for the post, great help. Is it possible to make the author box interactive? Like the bottom of this page?
I would like something similar to the ‘as well as’ feature but I know nothing about CSS.
Agus Tamanuri
Nice Post ..
Thanks for Your Article,
gagan
I added author box using method 3 but it showing author box above sharing icons how to move this down near comment section??
Annie
Do I need add links to social media profiles to the author, any idea?
Amir
For method #3 which is really the simplest and the fastest (involves some php coding skills) I added a break tag on the line where it shows picture and text as follows. Because it looks odd when only the first line of the bio shows up next to the picture and the rest of the bio separately.
$author_details .= ” . get_avatar( get_the_author_meta(‘user_email’) , 90 ) . ” . nl2br( $user_description ). ”;
Deyo
The hard coding worked perfectly with a little style tweaking, many thanks!
under the // Get author’s biographical information or description is the some kind of way to control the word or character count without having to edit the user bio itself? Maybe similar to controlling the excerpt length on a post page in functions?
King
I dont know how to add codes via my functions.php i might get an error. Any plugin to add codes into functions.php?
Wajiha Rizvi
You have to add it after the closing php tag that looks like this ( ?> ) in you child theme’s functions.php file.
Lorraine Reguly
Hi. I have three sites. For some reason, my author box automatically shows up on one of them. I had to install the Guerilla plugin to get it to show up on the others.
Why would one site show it and not the other two???
Shafi Khan
Hey There, Great article. The video attached to the post is not for instructions on “how to install a plugin” as written above it.
It it is a mistake, please correct it
sonja
Hi there, having trouble with the picture for the author box. I’ve moved the author widget to the sidebar for it to appear and it has along with the text but scratching my head on what to do to get the picture to show up also. I’m using a WordPress theme. Thanks for all your help!
Christopher Simmons
Heya… dealing with this today. Theme has a nice author box, but missing the socials at bottom.
Love your roll your own example, which we’re messing with “right now” — any chance you might expand on the example to include pulling in the “if socials” from the user meta, below the author’s website link ?
TIA ! Thanks for another great article
(12 year WP user — so not just for beginners! )
Peter Brown
Did you ever figure this out Christopher? I’m having the same issue with my theme.
Natanael David
Hi, thanks for this! I’m having a lot of help from you guys! For this and other functions.
One question: How can I set the max lenght in the Author description. Also, can I use a custom text for the box description in the single page and a full description in the Author page?
moon
Hi,
Thanks for your helpful information.
I have a problem, but I don’t know how to describe it. I added a picture into article, and set it style=”float: right; margin-left: 20px;”
It can show the web page well upon browsed on desktop computer, left hand side is content, and right hand side show picture.
but it cannot show the web page well upon browsed on mobile phone, please refer below URL:
Is it possible to show text first, and the picture under the text not around the picture?
If so, how?
Please try to help me out.
Thanks in advance.
Best regards,
Mario
Hi guys,
Do you know a way of inserting the author’s widget next to the post entry, but not in a sidebar? just as here:
thanks!
WPBeginner Support
You may want to add a widget area right next to the content.
Admin