
WordPressでアニメーションの背景を追加するのは複雑だと思っていませんか?そうではありません。
私たちも以前はそう思っていたが、いろいろ試してみた結果、実はそれほど悪くないことがわかった。
私たちは、サイトにアクセスした瞬間に訪問者を驚かせることがいかに重要かを知っています。アニメーションの背景は、コンテンツを圧迫することなく、印象的な第一印象を与えるWordPressのデザイン要素として最適です。
しかし、読み込み時間の遅さ、複雑なコーディング、高価なプラグインを心配されている方もご安心ください。サイトのパフォーマンスを損なうことなく、魅力的なアニメーション背景を作成できる軽量JavaScriptライブラリ、particle.jsを使ったシンプルな解決策を発見しました。
このガイドでは、プラグインでもコードでも、WordPressサイトに美しいパーティクルアニメーションを追加する方法をご紹介します。あなたのサイトを目立たせましょう!

なぜWordPressにアニメーションの背景を追加するのか?
サイトの背景をカスタマイザーすることは、最初は重要でないように思えるかもしれません。しかし、長年WordPressとウェブデザインの世界に携わってきた私たちは、考え抜かれたデザインのアニメーション背景を持つサイトは、訪問者を長く惹きつける傾向があることに気づきました。
アニメーションの背景は、あなたのサイトの視覚的な魅力を高め、よりインタラクティブで訪問者の目を引くようにすることができます。WordPressサイトが高品質で革新的なデザインであるという印象を与えます。
また、多くのサイトが特別な日を祝うためにアニメーション効果を使用している。
例えば、eコマースショップがホリデーシーズンの華やかな雰囲気を演出するために、ウェブページに雪の結晶やクリスマスツリーの落下のアニメーションを追加しているのを見かけるかもしれない。

また、プリローダーの背景アニメーションを使用しているサイトもある。
これにより、訪問者はサイトが読み込まれているという感覚を得ることができ、ウェブページの要素が表示されるまで辛抱強く待つことができるようになります。詳しくは、プリローダーの背景アニメーションの追加に関する投稿をご覧ください。
このガイドでは、particle.jsを使ってアニメーションの背景を追加する方法を紹介します。particle.jsとは何か知りたい方は、次のセクションに進んでください。
particle.js とは?
particle.jsは、小さなグラフィカルなアニメーション要素であるパーティクルを使って、魅力的な視覚効果を作成できるJavaScriptライブラリです。
パーティクルは、サイズ、色、形、動きをカスタマイズできます。また、マウスの動きやクリックなど、ユーザーのインタラクションに反応し、サイトにエンゲージメントのレイヤーを追加します。
particle.js がどのようなものかお分かりいただけたと思いますので、WordPress で背景をアニメーションさせるためにどのように使用できるかを見てみましょう。初心者の方には2つの方法がありますので、以下のクイックリンクからナビゲーションしてください:
WordPressサイト制作でお困りですか? あなたのサイトの可能性を無駄にしないでください。WPBeginnerプロサービスのエキスパートが、あなたのサイトを再設計し、パフォーマンスを最適化し、コンバージョンの高いコンテンツを生成します。
方法1:ページビルダーでアニメーションの背景を追加する方法(コードなし)
最初の方法は、市場で最高のWordPressページビルダープラグインであるSeedProdを使用することです。 ビルトインで高度にカスタマイズ可能なパーティクル背景機能を提供する。
すでに用意されているパーティクルアニメーションから1つを選ぶか、カスタマイザーで追加することができます。また、パーティクルの数、アニメーションの動き、マウスオーバー効果などを好みに合わせて変更することも可能です。
SeedProdの詳細については、SeedProdの詳細レビューをご覧ください。カスタマイズオプション、テンプレートやブロックの選択、サードパーティとの統合など、すべてを網羅しています。

このガイドでは、SeedProdのプレミアム版を使用します。プレミアム版ではパーティクルバックグラウンド機能が使用可能だからです。
SeedProdを使用するには、まずプラグインをインストールして有効化する必要があります。詳しくは、WordPressプラグインのインストールに関する初心者ガイドをご覧ください。
その後、ライセンスキーをプラグインにコピー&ペーストするだけです。WordPressダッシュボードに移動し、SeedProd ” 設定、 、適切なフィールドにライセンスキーを挿入します。そして、’Verify Key’をクリックします。

WordPressでパーティクルの背景を追加する前に、まずテーマをカスタマイズしたい場合は、SeedProdでカスタムテーマを簡単に作成する方法のガイドに従ってください。
次に、パーティクルの背景を挿入したいページのドラッグ&ドロップ・ビルダーを開く必要があります。SeedProdでテーマを作成した場合は、すでにWordPressにいくつかのページが追加されているはずです。
次に、Pages ” All Pagesに 行き、ホームページやアバウトページなどのページにカーソルをオーバーするだけです。そして、「SeedProdで編集」ボタンを選択します。

このオプションがあなたの方で設定されなくても、心配しないでください。
代わりに’Edit’ボタンをクリックし、ブロックエディターで’Edit with SeedProd’ボタンをクリックします。

これでSeedProdのページビルダーの中にいるはずです。
WordPressでパーティクルの背景を追加したいページセクションにマウスオーバーして選択するだけです。セクションの上部に紫色の枠線とツールバーが表示されれば、選択したことがわかります。

セクションをクリックすると、左側にセクションのサイドバーが表示されます。
あとはすべて、「高度な」タブに切り替えて、「パーティクルの背景を有効化」の設定を切り替えるだけです。

設定できるパーティクルの背景設定はいくつかあります。
一つはスタイルで、ポリゴン、スペース、スノー、雪の結晶、クリスマス、ハロウィーン、カスタマイザーのアニメーションエフェクトの中から好きなものを選ぶことができます。
カスタムパーティクル背景アニメーションの追加については、投稿の後半で詳しく説明します。

また、アニメーションの不透明度をコントロールする「不透明度(Opacity)」や、パーティクルが向かう方向を設定する「流れ方向(Flow Direction)」もあります。
パーティクルのスタイルによっては、色をカスタマイズすることもできる。
ただし、クリスマスとハロウィンについては、パーティクルが画像であるため、色の設定はない。

Colorの下には「高度な設定」があります。これを有効にすると、パーティクルの数、パーティクルのサイズ、移動速度、マウスオーバー効果の有効化をカスタマイズできます。
最後の機能では、マウスの向きに応じてパーティクルが動きます。ページビルダーエリアでWordPressサイトを表示している場合や、セクション内のコンテンツがそのセクションのスペース全体を占めている場合は、この機能は動作しませんのでご注意ください。

それですべてだ。
WordPressのパーティクル背景のカスタマイザーが完了したら、右上の「保存」ボタンをクリックして変更を公開します。また、「プレビュー」ボタンを選択すると、パーティクルの背景がどのように見えるかを確認できます。

サイトにカスタムパーティクル背景を作成する
利用可能なアニメーションエフェクトがあなたのニーズに合わない場合は、カスタマイザーを作成することもできます。パーティクル背景の設定で「カスタム」スタイルを選択します。
その後、「こちらのリンクにアクセスし、パーティクルに必要な属性を選択してください」という行のリンクをクリックする。
このリンクは、パーティクル・アニメーション用のJavascriptライブラリを提供するVincent Garreau氏のサイトへのリンクです。

このサイトでは、パーティクルのデザイン、インタラクティブ性、背景色をカスタマイザーすることができます。
パーティクル」設定では、パーティクルの数、色、形、大きさ、不透明度、パーティクルをつなぐ線、動きを調整できる。

その下にあるのが『双方向性』だ。
ここで、パーティクルの上にマウスオーバーしたり、パーティクルをクリックしたときのパーティクルの挙動を調整できます。

最後に、「ページ背景(css)」です。ここでは、パーティクルアニメーションの背景色を変更し、そのサイズ、位置、繰り返しを変更することができます。
必要であれば、カスタムの背景画像URLをアップロードすることもできる。

完了したら、下部にある「現在の設定(json)をダウンロード」ボタンをクリックします。
これでパーティクル背景のJSONコードファイルがダウンロードされるので、テキストエディターアプリを使って開いてください。テキストエディターウィンドウを開いたまま、次のステップに進んでください。

さて、SeedProdページビルダーに戻りましょう。
高度な設定の「Particle Background」メニューにもう一度ナビゲーションします。そして、JSONコードをコピー&ペーストして、適切なテキストボックスに入れます。
これでプレビューセクションにパーティクルの背景が表示されるはずです。

プレビュー」をクリックしてフロントエンドでパーティクルの背景がどのように見えるかを確認し、「保存」をクリックして変更を確定します。
パーティクルの背景がどのように見えるかの例です:

方法2:コードでアニメーションの背景を追加する方法(無料)
ページビルダーを使用してアニメーションの背景を挿入するのが面倒な場合は、コードを使用して追加することもできます。コーディングの専門家でなくても心配しないでください。WPCodeを使用して、このプロセスを安全かつ簡単にします。
このチュートリアルでは、WPCodeの無料版またはプレミアム版のどちらかを使用することができます。無料版でも全く問題なく動作しますが、プレミアム版にはAIコードジェネレータやテストモードなどの便利な機能が含まれています。
より詳細な情報が必要な場合は、WPCodeのレビューをお読みください。
まず、WordPressの管理画面にプラグインをインストールします。
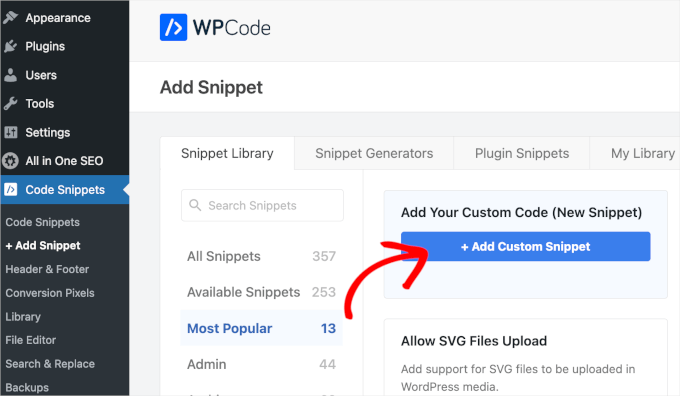
有効化した後、ダッシュボードのCode Snippets ” + Add Snippetに向かい、’Add Your Custom Code (New Snippet)’をクリックし、’+ Add Custom Snippet’ボタンをクリックします。
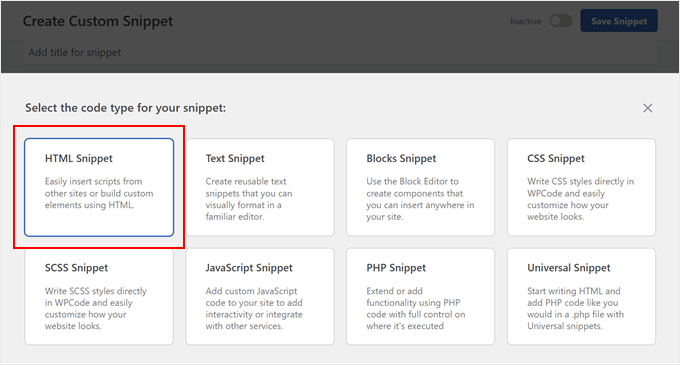
ここで、スニペットの種類を選択する必要があります。
HTML、JavaScript、CSSの組み合わせで作業するので、オプションから「HTML Snippet」を選ぶことができる。
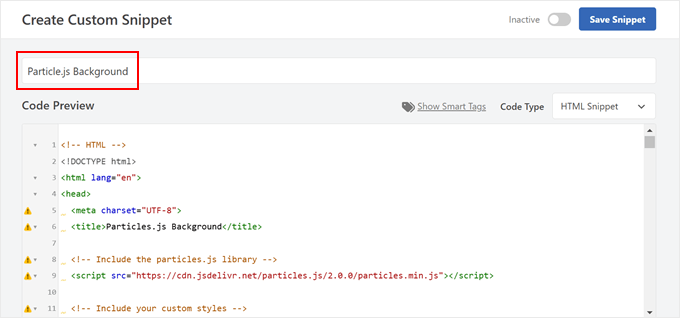
さて、スニペットに覚えやすい名前をつけよう。
Particle.js Background」のようなシンプルなものでも構わない。
それでは、以下のコードを貼り付けてください。
このコードは、実は最初の方法で紹介したのと同じヴィンセント・ガローのサイトから転用したものだが、コードだけでさらにカスタマイズする方法を紹介しよう:
1 2 3 4 5 6 7 8 9 10 11 12 13 14 15 16 17 18 19 20 21 22 23 24 25 26 27 28 29 30 31 32 33 34 35 36 37 38 39 40 41 42 43 44 45 46 47 48 49 50 51 52 53 54 55 56 57 58 59 60 61 62 63 64 65 66 67 68 69 70 71 72 73 74 75 76 77 78 79 80 81 82 83 84 85 86 87 88 89 90 91 92 93 94 95 96 97 98 99 100 101 102 103 104 105 106 107 108 109 110 111 112 113 114 115 116 117 118 119 120 121 122 123 124 125 126 127 128 129 130 131 132 133 134 135 136 137 138 139 140 141 142 143 144 145 146 147 148 149 150 151 152 153 154 155 156 157 158 159 160 161 162 163 164 165 166 167 168 169 170 171 172 173 174 175 176 177 178 179 180 181 182 183 184 185 186 187 188 189 190 191 192 193 194 | <!-- HTML --><!DOCTYPE html><html lang="en"><head> <meta charset="UTF-8"> <title>Particles.js Background</title> <!-- Include the particles.js library --> <script src="https://cdn.jsdelivr.net/particles.js/2.0.0/particles.min.js"></script> <!-- Include your custom styles --> <style> /* Reset styles */ body { margin: 0; font: normal 75% Arial, Helvetica, sans-serif; } canvas { display: block; vertical-align: bottom; } /* Particles.js container */ #particles-js { position: fixed; top: 0; width: 100%; height: 100%; /* Background color; change this to any valid CSS color value */ background-color: #b61924; /* <-- Customize background color here */ /* Optional background image; add the URL inside the quotes */ background-image: url(""); /* <-- Add background image URL here */ background-repeat: no-repeat; background-size: cover; background-position: 50% 50%; z-index: -1; /* Ensure the particles are behind other content */ } /* Optional stats styles */ .count-particles { background: #000022; position: absolute; top: 48px; left: 0; width: 80px; color: #13E8E9; font-size: 0.8em; text-align: left; text-indent: 4px; line-height: 14px; padding-bottom: 2px; font-family: Helvetica, Arial, sans-serif; font-weight: bold; border-radius: 0 0 3px 3px; -webkit-user-select: none; margin-top: 5px; margin-left: 5px; } .js-count-particles { font-size: 1.1em; } </style></head><body> <!-- Particles.js container --> <div id="particles-js"></div> <!-- Optional Stats Display --> <div class="count-particles"> <span class="js-count-particles">--</span> particles </div> <!-- Initialize particles.js --> <script> /* Customize the particles.js parameters below */ particlesJS("particles-js", { "particles": { "number": { "value": 80, /* <-- Number of particles; adjust this value */ "density": { "enable": true, "value_area": 800 /* <-- Particle density area */ } }, "color": { "value": "#ffffff" /* <-- Particle color; change to any valid CSS color */ }, "shape": { "type": "circle", /* <-- Particle shape: "circle", "edge", "triangle", etc. */ "stroke": { "width": 0, "color": "#000000" /* <-- Stroke color of particles */ }, "polygon": { "nb_sides": 5 /* <-- Number of sides for polygon shape */ }, "image": { "src": "img/github.svg", /* <-- URL of custom image for particles */ "width": 100, "height": 100 } }, "opacity": { "value": 0.5, /* <-- Opacity of particles */ "random": false, /* <-- Whether opacity is random */ "anim": { "enable": false, "speed": 1, "opacity_min": 0.1, "sync": false } }, "size": { "value": 3, /* <-- Size of particles; adjust to change particle size */ "random": true, /* <-- Whether particle size is random */ "anim": { "enable": false, "speed": 40, "size_min": 0.1, "sync": false } }, "line_linked": { "enable": true, /* <-- Enable lines between particles */ "distance": 150, /* <-- Maximum distance for linking particles */ "color": "#ffffff", /* <-- Color of the lines */ "opacity": 0.4, /* <-- Opacity of the lines */ "width": 1 /* <-- Width of the lines */ }, "move": { "enable": true, /* <-- Enable particle movement */ "speed": 6, /* <-- Speed of particle movement */ "direction": "none", /* <-- Direction of movement */ "random": false, /* <-- Randomize movement direction */ "straight": false, /* <-- Move in straight lines */ "out_mode": "out", /* <-- Action when particles go out of canvas */ "bounce": false, /* <-- Enable particles to bounce off edges */ "attract": { "enable": false, /* <-- Attract particles toward mouse */ "rotateX": 600, "rotateY": 1200 } } }, "interactivity": { "detect_on": "canvas", /* <-- Interaction events occur on "canvas" or "window" */ "events": { "onhover": { "enable": true, /* <-- Enable interaction on hover */ "mode": "repulse" /* <-- Interaction mode on hover: "grab", "bubble", "repulse" */ }, "onclick": { "enable": true, /* <-- Enable interaction on click */ "mode": "push" /* <-- Interaction mode on click: "push", "remove", "bubble", "repulse" */ }, "resize": true /* <-- Enable reactivity to window resize */ }, "modes": { "grab": { "distance": 400, /* <-- Distance for grab mode */ "line_linked": { "opacity": 1 } }, "bubble": { "distance": 400, /* <-- Distance for bubble mode */ "size": 40, /* <-- Size of particles in bubble mode */ "duration": 2, /* <-- Duration of bubble effect */ "opacity": 8, /* <-- Opacity of particles in bubble mode */ "speed": 3 /* <-- Speed of bubble effect */ }, "repulse": { "distance": 200, /* <-- Distance for repulse mode */ "duration": 0.4 /* <-- Duration of repulse effect */ }, "push": { "particles_nb": 4 /* <-- Number of particles added on click */ }, "remove": { "particles_nb": 2 /* <-- Number of particles removed on click */ } } }, "retina_detect": true /* <-- Enable retina display support */ }); /* Optional: Variables for stats.js (if used) */ var count_particles, stats, update; </script></body></html> |
このコードはかなり長いので、カスタマイズできる部分を見てみよう。
背景色を変更するには、#particles-jsの background-colorプロパティを変更します。b61924を、赤の#FF0000や rgb(255,0,0)、あるいはredのような色名など、正しいCSSカラー値で置き換えてください。
1 | background-color: #b61924; /* <-- Customize background color here */ |
背景画像を追加するには、url("")内に画像のURLを追加してbackground-imageプロパティを設定します。
背景画像のパスまたはURLが正しいことを確認してください。
1 | background-image: url("path/to/your/image.jpg"); /* <-- Add background image URL here */ |
パーティクルの数を変更するには、"number "の下にある"value "を調整する。
値を大きくするとパーティクルが増え、小さくすると数が減る。
1 2 3 4 | "number": { "value": 80, /* <-- Number of particles; adjust this value */ // ...} |
パーティクルのサイズを変更するには、"size "の下にある"value "を変更します。
数値が大きいほど粒子径は大きくなり、逆もまた真なりである。
1 2 3 4 5 | "size": { "value": 3, /* <-- Size of particles; adjust to change particle size */ "random": true, /* <-- Set to false for uniform size */ // ...} |
パーティクルの色を変更するには、"color "の"value "をCSSの正しい色の値で置き換えてください。
1 2 3 | "color": { "value": "#ffffff" /* <-- Particle color; change to any valid CSS color */}, |
パーティクルの形状を変更するには、"shape "の下にある"type "を変更します。
円」、「辺」、「三角形」、「多角形」、あるいは「星」などの図形を使うことができる。
1 2 3 4 | "shape": { "type": "circle", /* <-- Particle shape: "circle", "edge", "triangle", etc. */ // ...}, |
パーティクル間のラインのプロパティを変更するには、"line_linked "のプロパティを調整します。
例えば、"有効化": trueを "有効化": falseに変更すると、パーティクルを結ぶ線が表示されなくなる。
1 2 3 4 | "line_linked": { "enable": true, /* <-- Enable lines between particles */ // ...}, |
線の色、不透明度、幅も変更できる。
1 2 3 4 5 6 | "line_linked": { "color": "#ffffff", /* <-- Line color */ "opacity": 0.4, /* <-- Line opacity */ "width": 1, /* <-- Line width */ // ...}, |
有効化した後でも、いつでもコードを変更することができるので、後で変更が必要になっても心配しないでください。
コードをお好みにカスタマイズしたら、次はアニメーションの背景を表示する場所とタイミングを設定します。
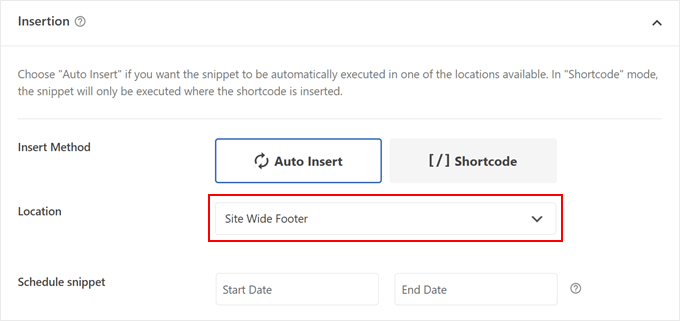
WPCodeスニペットのインサーターセクションまでスクロールダウンしてください。挿入方法として「Auto Insert」を選択し、場所として「Site Wide Footer」を選択してください。
WPCodeはまた、無料版とプレミアム版の両方で利用可能な条件付きロジックと呼ばれる強力な機能を提供しています。この機能により、サイト上のアニメーション背景の外観を正確にコントロールすることができます。
この機能を使用するには、「Smart Conditional Logic」セクションを探し、「Enable Logic」をオンに切り替えます。背景を表示する特定の条件を設定するオプションが表示されます。
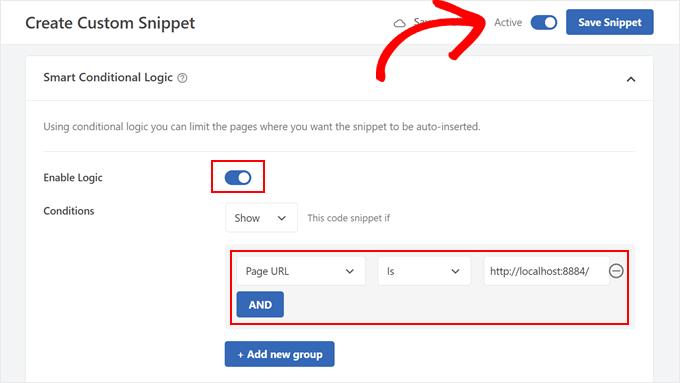
例えば、アニメーションの背景をホームページにのみ表示させたい場合は、条件ドロップダウンから「ページURL」を選択し、「Is」を選んでホームページのURLを入力します。
複数のコンディショングループを追加するには、「+ Add new group」ボタンをクリックします。
最後のステップは、スニペットを有効化することです。ページ上部の’Inactive’トグルを探してクリックし、’Active’に変更します。変更を保存するために「Save Snippet」をクリックするのを忘れないでください。
これですべてです!モバイルまたはデスクトップでサイトにアクセスし、新しいアニメーション背景をご覧ください。テストサイトではこんな感じです:
アニメーションの背景はサイトを遅くする?
アニメーションの背景は、適切でなければサイトの表示速度を低下させます。しかし、これを避ける方法があります。
パーティクル背景の場合、パーティクルの数と移動速度はページの読み込み速度に影響します。パーティクルの数が多ければ多いほど、また動きが速ければ速いほど、処理能力が必要になり、読み込みが遅くなる可能性があります。
この問題を解決するには、パーティクルの密度や速度の設定を変えてみて、サイトに最適な設定を見つけるとよいでしょう。この過程で、WordPressのスピードテストを実行して効果を確認することができます。
また、アニメーションの背景は、最も重要なページにのみ使用するのがよいでしょう。どこにでも使う必要はありませんし、飽きてしまうかもしれません。
最後に、あなたのサイトをパーティクルの背景で高速に保つためには、サイト速度のベストプラクティスに従うようにしてください。さらに詳しくは、WordPressの高速化に関する究極のガイドをご覧ください。
この投稿が、WordPressでパーティクルの背景をアニメーションさせる方法を学ぶのにお役に立てば幸いです。WordPressでサイトデザインのフィードバックを得る方法や、WordPressテーマビルダーのエキスパートが選ぶベストテーマもぜひご覧ください。
If you liked this article, then please subscribe to our YouTube Channel for WordPress video tutorials. You can also find us on Twitter and Facebook.

 in 2024")


Carlos Rangel
Nice article. I wonder if is possible to achieve this effect using some code like vanilla JavaScript and maybe some CSS styles. This as become my favorite WordPress blog
WPBeginner Support
While possible, it would require coding knowledge and would not be a beginner task which is why we do not currently recommend it.
Admin