50ドル以上のご注文で送料無料!」。このシンプルなメッセージを加えるだけで、売上は大幅にアップする。
様々な方法をテストした結果、OptinMonsterがWooCommerceストアにこの機能を追加する最も迅速かつ信頼性の高い方法を提供することがわかりました。
コーディングの知識がなくても、プロフェッショナルな出荷バーを簡単に作成できるのが特徴です。
本日は、WooCommerceで送料無料バーを作成する手順を順を追って説明します。
なぜWooCommerceの送料無料バーを表示するのか?
送料は、お買い物カゴを放棄される理由の上位を占める。多くのオンラインショップは、送料を無料にすることでこれに対処している。
送料無料キャンペーンをカスタマイザーに知らせることは、オンラインショップの売上をアップさせる素晴らしい方法です。
送料無料バナーの例です。ユーザーがスクロールダウンしても画面の上部に表示される、目立つサイト要素です:
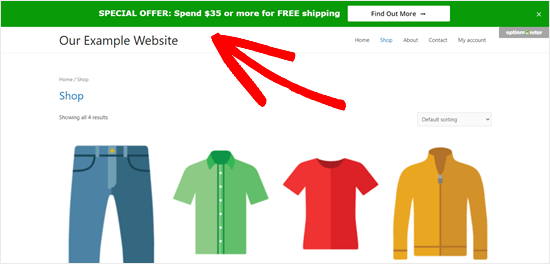
ご覧のように、上記の店舗例では、送料を無料にするためにユーザーに一定額の買い物を促している。これは、お買い物カゴの注文金額と全体的な販売量を増やすのに最適です。
高度なクーポンプラグインを使用するか、オンラインストアで配送方法を設定するだけで、WooCommerceの無料配送を提供することができます。
どのような方法で送料無料を有効化するにしても、サイト上で送料無料を適切に強調することが重要であり、送料無料バーの出番となります。
発送バーを作成するために、OptinMonsterを使用します。OptinMonsterは、WordPressのための最高のリードジェネレータ・ソフトウェアであり、コンバージョン最適化プラグインです。
また、WPBeginnerとパートナーサイトでマーケティングキャンペーンを実施するために使用しているものでもあります。詳しくはOptinMonsterのレビューをご覧ください。
以下はその手順である:
ステップ1:OptinMonsterアカウントのセットアップ
まず、OptinMonsterのサイトにアクセスし、アカウントにサインアップする必要があります。
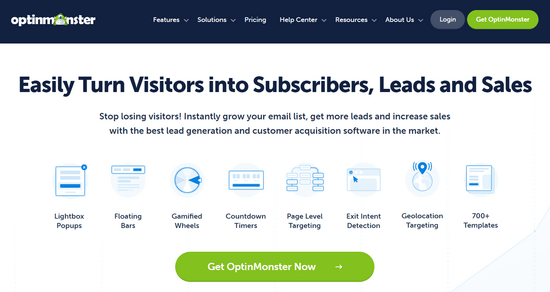
OptinMonsterにサインアップしたら、次のステップはWordPress用の無料のOptinMonsterプラグインをインストールして有効化することです。WordPressプラグインのインストール方法については、ステップバイステップガイドをご覧ください。
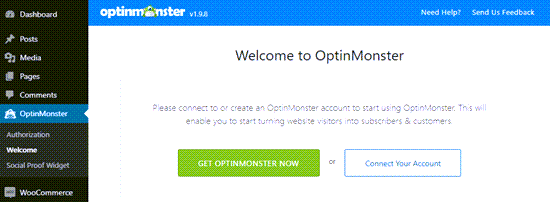
このプラグインは、WordPressサイトにOptinMonsterアプリを接続します。有効化した後、WordPressダッシュボードのOptinMonsterメニューをクリックします。次に、’アカウントを接続’ボタンをクリックし、WordPressとOptinMonsterアカウントを接続します。
ステップ2:WooCommerce送料無料バーを作成する
これで、WooCommerceの送料無料を提供するフローティングバーを作成できます。
まず、WordPressダッシュボードのOptinMonsterページに行き、右上の「新規追加」ボタンをクリックするか、「最初のキャンペーンを作成」ボタンをクリックします。
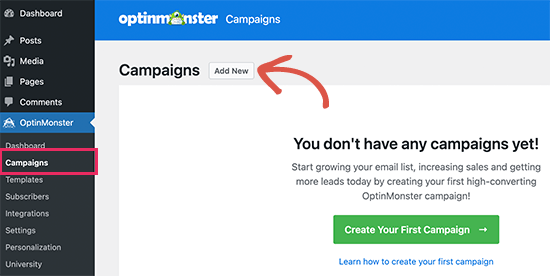
新しいポップアップウィンドウが開き、テンプレートまたはプレイブックを選択できます。
OptinMonsterはあなたのキャンペーンのための美しいテンプレートを提供します。あなたのニーズに合わせてカスタマイズすることができます。一方、成功したブランドからインスパイアされたすぐに使えるキャンペーンも提供しています。
このチュートリアルでは、「テンプレート」オプションを選択します。
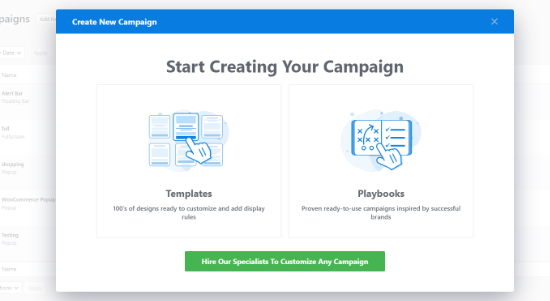
OptinMonsterキャンペーンビルダーに移動します。
ここで、キャンペーンタイプとして「フローティングバー」を選択する必要があります。
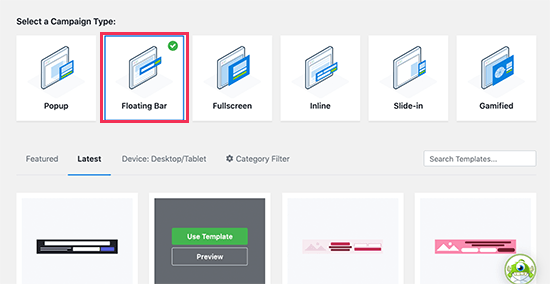
次に、下にスクロールしてキャンペーンテンプレートを選択します。OptinMonsterにはプロフェッショナルなテンプレートが豊富に揃っています。テンプレートにマウスカーソルを合わせ、「テンプレートを使用」ボタンをクリックします。
OptinMonsterはキャンペーンの名前を尋ねます。ここでは好きな名前を使うことができます。
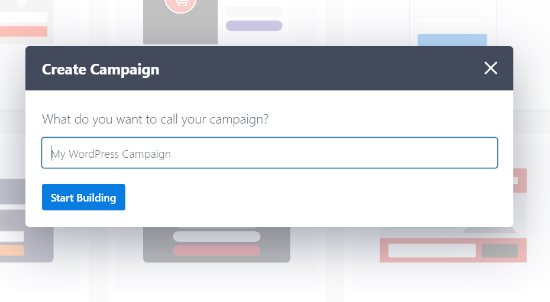
準備ができたら、「ビルド開始」ボタンをクリックします。
OptinMonsterビルダーのインターフェースが表示され、テンプレートに追加できるさまざまなブロックがあります。
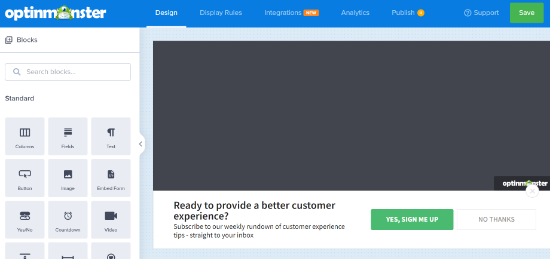
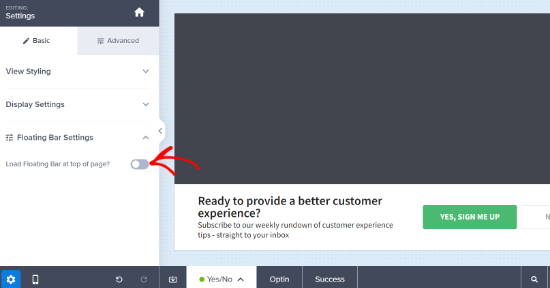
初期設定では、フローティング・バーは画面の一番下に固定表示されます。画面の上部に表示させたい場合は、簡単に変更できます。
フローティング・バーを選択し、左側のメニューから「フローティング・バーの設定」をクリックするだけです。そして、’Load Floating Bar at Top of Page?’オプションをオンにしてください。
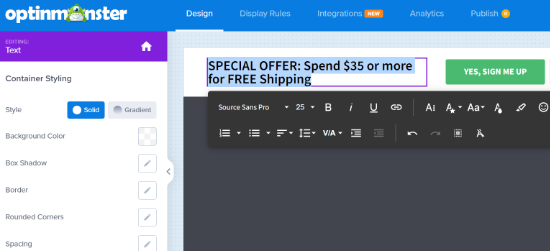
バーのテキストを変更するには、バーをクリックするだけです。
必要に応じてテキストをカスタマイザーできます。フォントのスタイル、色、フォントサイズなども変更できます。キャンペーンのプレビューは自動的に更新され、本番でどのように見えるかを表示します。
送料無料を適用するには、最低注文金額を目立つように表示することをお勧めします(例えば、「50ドル以上のご注文で送料無料!」など)。
この明確なメッセージングにより、カスタマイザーは送料無料にするためにさらに項目を追加する気になり、平均注文金額を効果的に高めることができます。
ここでは、テキストとフォントを変更しました。フォントサイズも少し大きくしています:
送料無料バーのボタンも変更できます。
ボタンをクリックするだけで、左側のパネルに設定が開きます。そこでボタンのテキストを変更できます。
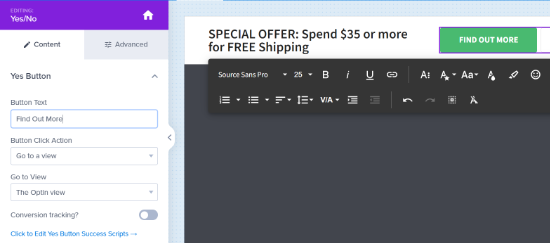
WordPressサイトの送料無料に関するページにカスタマイザーを誘導するには、正しいリダイレクトURLを入力します。
送料無料バーに別の色を使いたい場合も簡単です。まず、左側のメニューから「詳細設定」タブをクリックし、ボタンの背景色を変更します。
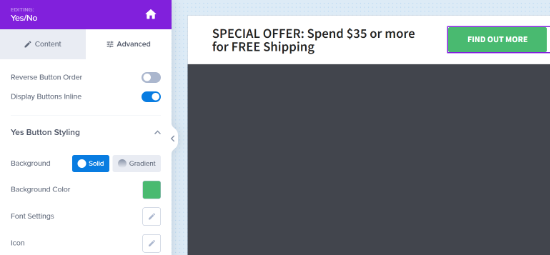
ステップ3:送料無料バーを表示するルールを調整する
次に、サイト上の送料無料バーを表示するユーザーをコントロールする表示ルールを選択する必要があります。
画面上部の「表示ルール」タブをクリックするだけです。
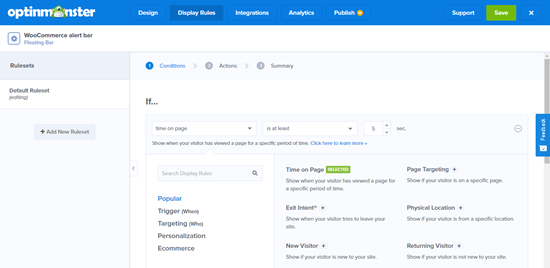
初期設定では、OptinMonsterは、ユーザーがサイトのいずれかのページに5秒間滞在した後にフローティングバーを表示します。
送料無料バーを即座にロードさせたい場合もあるでしょう。その場合は、このルールを削除してください。右側のマイナスアイコンをクリックしてください:
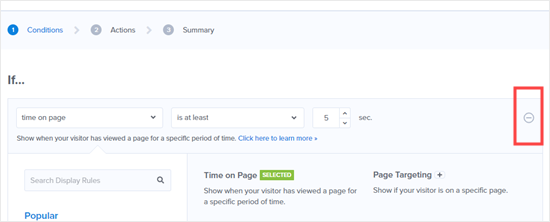
これで、「現在のURLパスは任意のページである」というルールが残るはずだ。
さらに、さまざまな表示ルールを選択することもできます。例えば、特定の地域からのユーザーや、特定の商品ページにアクセスしたユーザーに、送料無料バーを表示させることができます。
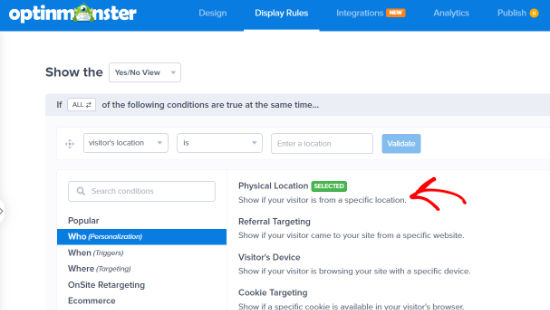
最後のステップは、あなたのサイトでキャンペーンを公開することです。画面上部の「公開する」タブをクリックします。
キャンペーン作成中は、初期設定で一時停止されます。下書きから公開に切り替えることができます。
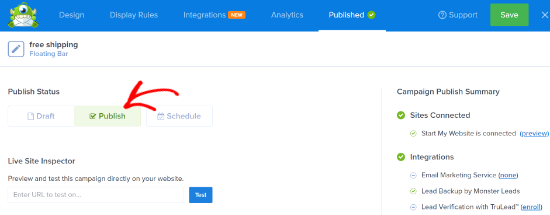
完了したら、「保存」ボタンをクリックし、キャンペーンビルダーを閉じます。
次に、送料無料アラートバーのキャンペーン出力設定が表示されます。ステータス]が[公開する]になっていることを確認するか、ドロップダウンメニューをクリックして[保留中]から[公開]に変更します。
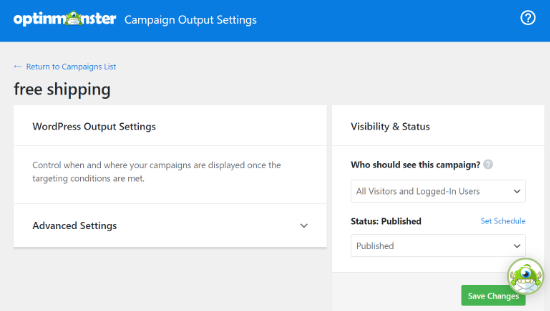
完了したら「変更を保存」ボタンをクリックするのをお忘れなく。
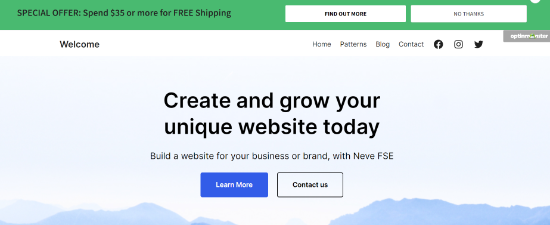
これで、あなたのサイトにアクセスして、送料無料バーをライブで見ることができます。
これは、私たちのデモショッピングサイトでのアラートバーの見え方のプレビューです。
この投稿がWooCommerceで送料無料バーを追加する方法を学ぶのにお役に立てば幸いです。また、あなたのオンラインストアに最適なWooCommerceプラグインのリストや、WooCommerceでクーポンを予約して時間を節約する方法についてのチュートリアルもご覧ください。
If you liked this article, then please subscribe to our YouTube Channel for WordPress video tutorials. You can also find us on Twitter and Facebook.


Have a question or suggestion? Please leave a comment to start the discussion.