メインナビゲーションメニューにボタンを追加すると、サイトのアクション喚起を際立たせ、最も重要なページへのトラフィックを増やすことができます。また、すべてのページや投稿に同じボタンを簡単に追加する方法でもあります。
パートナーブランドの1つであるWPFormsが、WordPressヘッダーに「WPFormsを入手」ボタンを直接追加した方法を見てきました。このシンプルな追加により、コンバージョンが増加し、売上が向上しました。
ボタンを目立つ場所に配置することで、WPFormsは訪問者が行動を起こしやすくなり、エンゲージメントの向上とリードの増加につながりました。
この記事では、WordPressのヘッダーメニューにボタンを簡単に追加する方法を紹介します。
WordPressヘッダーメニューにボタンを追加する理由
WordPressのナビゲーションメニューは、通常プレーンテキストのリンクであり、すべてが同じように見え、何も目立ちません。
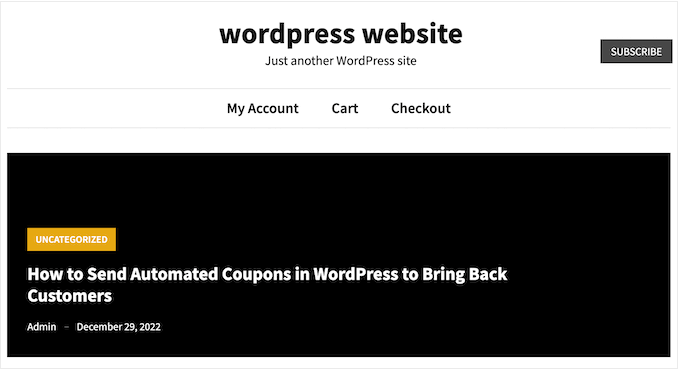
ただし、リンクによっては他のリンクよりも重要度が高い場合があります。たとえば、オンライン注文フォームやWordPressメンバーシップサイトの登録ページへのリンクを追加したい場合があります。
デフォルトでは、これらの重要なリンクはヘッダーメニューの他のリンクと同じように見えます。
これらのリンクをボタンに変えることで、より目を引くものにすることができます。これにより、より多くのクリックとコンバージョンを獲得できます。
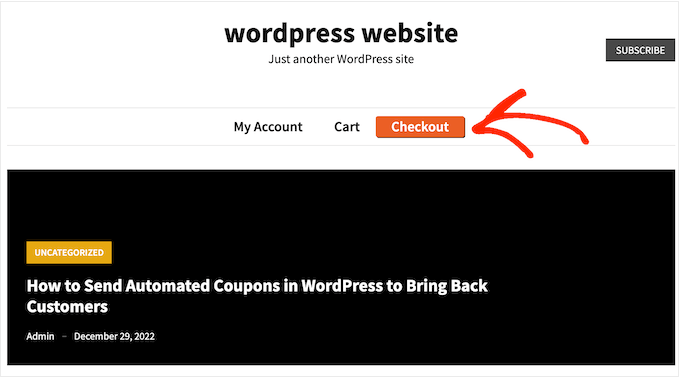
デフォルトでは、WordPressの投稿やページにボタンを追加できますが、ナビゲーションメニューには追加できません。
それでは、WordPressヘッダーメニューにボタンを追加する方法を見てみましょう。
WordPressヘッダーメニューにボタンを追加する
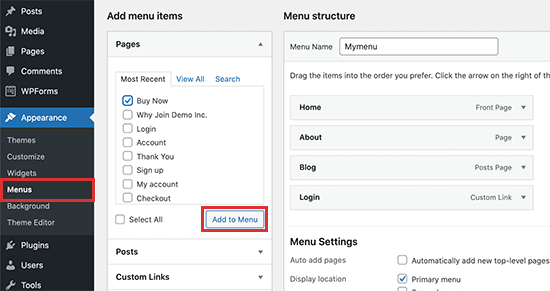
まず、ボタンにしたいリンクを追加する必要があります。
WordPressダッシュボードの 外観 » メニュー ページに移動し、ナビゲーションメニューにリンクを追加してください。詳細な手順については、WordPressでナビゲーションメニューを追加する方法のガイドをご覧ください。
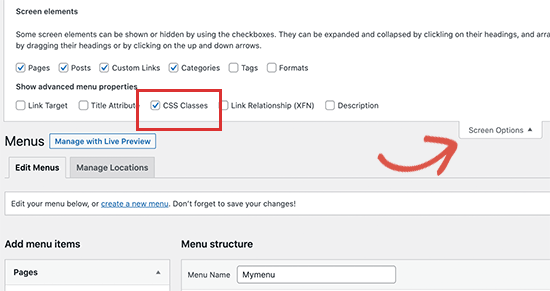
その後、「画面オプション」ボタンをクリックして展開する必要があります。
これにより、多くの新しいオプションが表示されるパネルが表示されます。「CSSクラス」の横にあるチェックボックスをオンにするだけです。
次に、ボタンにしたいメニュー項目をクリックして展開します。
クラス名を入力できる新しいCSSクラスオプションに気づくでしょう。CSSクラスは好きなように呼び出すことができますが、このガイドではmenu-buttonを使用します。
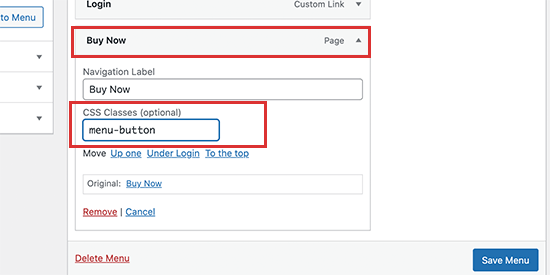
名前を入力したら、「メニューを保存」ボタンをクリックして変更を保存します。
カスタムCSSクラスをメニュー項目に追加しました。 カスタムCSSコードを使用して見た目を変更できます。このコードは、WordPressの組み込みカスタマイザー経由で追加するか、コードスニペットプラグインを使用できます。
WPCodeを使用してWordPressヘッダーメニューにボタンを追加する(推奨)
WordPressにカスタムコードを追加する最良の方法は、WPCodeを使用することです。これは、カスタムCSS、PHP、HTMLなどを追加できる最高のコードスニペットプラグインです。
テーマファイルを直接編集しないため、一般的なWordPressのエラーの多くを回避できます。また、カスタムコードを失うことなく、テーマを更新したり、まったく異なるテーマに切り替えたりすることもできます。
いつでもボタンを削除したい場合は、ワンクリックで無効にできます。
まず、無料のWPCodeプラグインをインストールして有効化する必要があります。詳細については、WordPressプラグインのインストール方法に関するステップバイステップガイドをご覧ください。
プラグインがアクティブになったら、WordPressダッシュボードから**Code Snippets » + Add Snippet**ページにアクセスします。
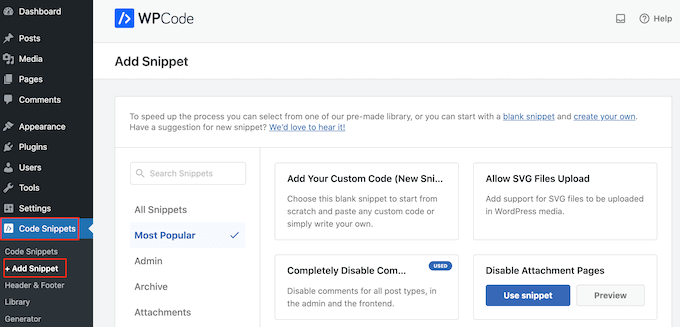
ここでは、サイトに追加できる既製のWPCodeスニペットがすべて表示されます。これには、コメントを完全に無効にする、通常WordPressでサポートされていないファイルタイプをアップロードする、添付ページを無効にするなどのスニペットが含まれています。
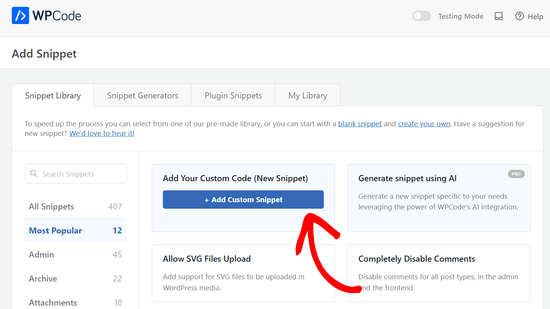
次に、「カスタムコードを追加(新規スニペット)」オプションにマウスカーソルを合わせ、「+カスタムスニペットを追加」ボタンが表示されたらクリックします。
次に、画面に表示されるオプションのリストから、コードの種類として「CSSスニペット」を選択する必要があります。
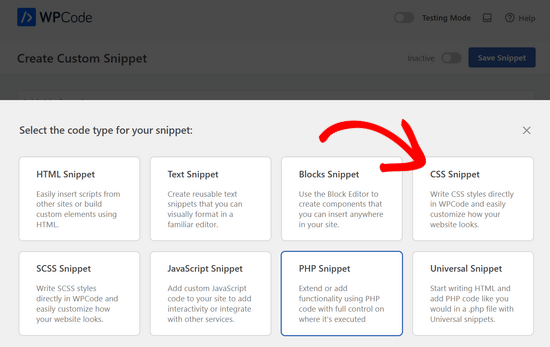
次の画面で、コードスニペットのタイトルを入力する必要があります。
名前は参照用なので、好きなものを自由に使用できます。
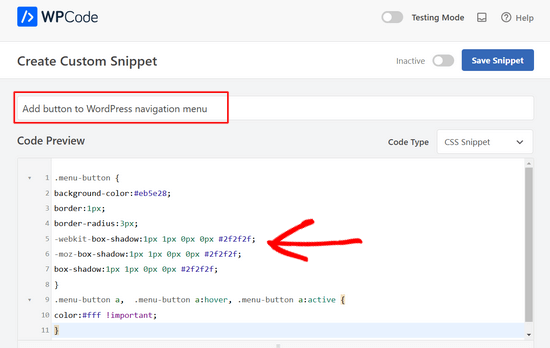
これで、「コードプレビュー」ボックスにCSSコードスニペットを貼り付ける準備ができました。
.menu-button {
background-color:#eb5e28;
border:1px;
border-radius:3px;
-webkit-box-shadow:1px 1px 0px 0px #2f2f2f;
-moz-box-shadow:1px 1px 0px 0px #2f2f2f;
box-shadow:1px 1px 0px 0px #2f2f2f;
}
.menu-button a,  .menu-button a:hover, .menu-button a:active {
color:#fff !important;
}
上記のコードスニペットを追加する際は、menu-button をご自身のCSSクラス名に置き換えてください。
上記のコードスニペットは、次の画像で見られるように、影の効果を持つオレンジ色のボタンを作成します。
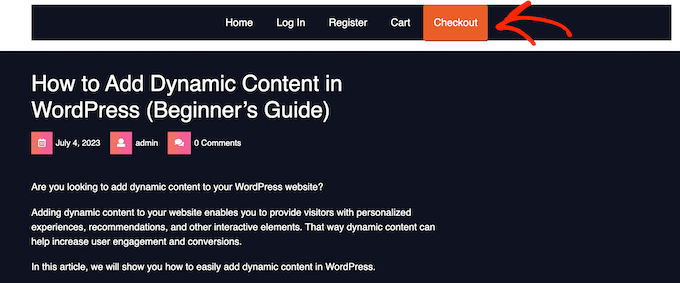
CSSスニペットを自由に操作して、さまざまな効果を作成してみてください。たとえば、背景色を変更したり、リンクテキストの色を変更したり、境界線を追加したりできます。
別の色を使用したい場合は、その色の16進数コードを知る必要があります。どのコードを使用すればよいかわからない場合は、Color Hexのようなリソースを使用できます。
コードに満足したら、「非アクティブ」トグルをクリックして「アクティブ」に変更し、「スニペットを保存」ボタンをクリックしてください。
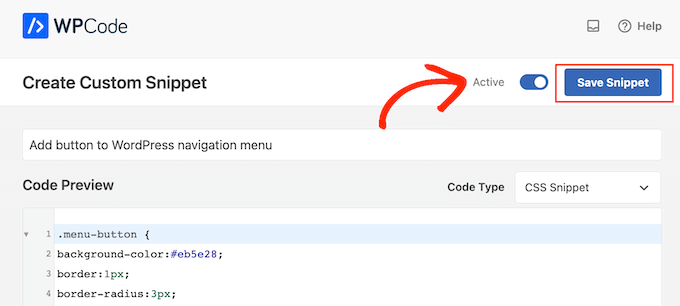
これで、WordPressウェブサイトにアクセスすると、新しいヘッダーメニューボタンが機能しているのがわかります。
カスタマイザーを使用してWordPressヘッダーメニューにボタンを追加する
プラグインを使用したくない場合は、組み込みのカスタマイザーを使用してコードを追加できます。
単純に外観 » カスタマイズに移動すると、右側にサイトのプレビューが表示され、左側の列に多くのテーマ設定が表示されます。
まず、「追加CSS」オプションをクリックします。
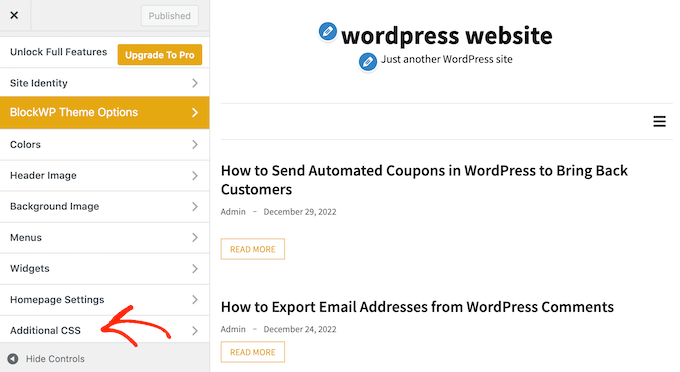
カスタムCSSコードを追加できるボックスが表示されます。
上記のコードスニペットを開始点として使用できます。
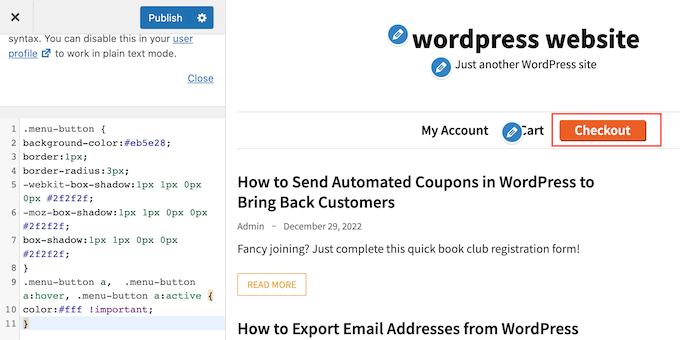
ボタンの外観に満足したら、「公開」をクリックして変更を反映させます。
動画チュートリアル
視覚的な学習者の方は、WordPressのヘッダーメニューにボタンを追加する方法に関するビデオチュートリアルをご覧ください。
WordPressヘッダーにクリックで電話できるボタンを追加する
中小企業のサイトをお持ちの場合、ナビゲーションメニューにクリック・トゥ・コールボタンを追加することも検討できます。これにより、訪問者があなたに連絡しやすくなり、サイトをよりSEOフレンドリーにすることで検索エンジンのランキングを向上させることもできます。
このボタンを追加するには、WordPressダッシュボードの外観 » メニューページにアクセスし、右側の「カスタムリンク」タブを展開します。
ここで、VOIP電話番号をURLに追加し、ラベルを追加します。その後、「メニューに追加」ボタンをクリックします。
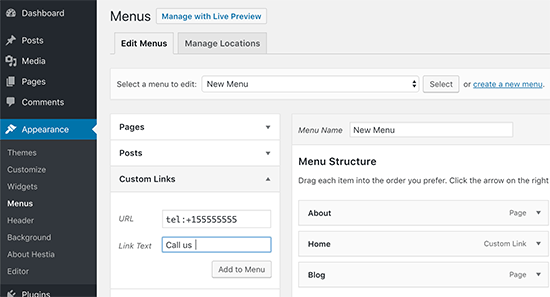
クリックして電話をかけるボタンがナビゲーションリンクのリストに追加されたら、「メニューを保存」ボタンをクリックして設定を保存することを忘れないでください。
詳細な手順については、WordPressでクリックして電話をかけるボタンを追加する方法に関するチュートリアルをご覧ください。
この記事が、WordPressヘッダーメニューにボタンを追加する方法を学ぶのに役立ったことを願っています。また、WordPressでスティッキーフローティングナビゲーションメニューを作成する方法に関するガイドや、WordPressでメニューに条件付きロジックを追加する方法のチュートリアルも参照してください。
この記事が気に入ったら、WordPressのビデオチュートリアルについては、YouTubeチャンネルを購読してください。 TwitterやFacebookでもフォローできます。


イジー・ヴァネック
よくできました!通常はプラグインで解決しようとしていましたが、WordPressがネイティブで対応できるとは知りませんでした。この方法が一部のプラグインよりもシンプルであることは認めざるを得ません。ヘッダーの連絡先情報をボタンで強調したかったのですが、うまくいきました。チュートリアルをありがとうございます!
アリ・ハイダー・ハイダー・スルタン
こんにちは!どうもありがとうございます!
また、このボタンを携帯電話で表示することは可能ですか?他のメニューのように、メニューをクリックしたときに表示されますが、このボタンはそのまま残りますか?そのようなウェブサイトを見ましたが、確信がありません。WPオーシャンを使用しています。
WPBeginnerサポート
テーマがモバイルデバイスで別のメニューを使用していない限り、表示されるはずです。以下のガイドを使用して、モバイル版がどのように見えるかを確認できます!
https://www.wpbeginner.com/beginners-guide/how-to-preview-the-mobile-layout-of-your-site/
管理者
Nicole Hassell
これは役立ち、ボタンを作成しましたが、カスタムリンクのリンクを上書きしてしまいます。それを止める方法について何かアイデアはありますか?
WPBeginnerサポート
CSSはメニュー項目のリンクに一切触れるべきではありません。リンクがメニュー設定で変更されていないこと、またリンクを変更する可能性のあるプラグインがないことを確認することをお勧めします。
管理者
セルジオ
この役立つガイドをありがとうございます!
CSSでボタンをカスタマイズすると、背景がヘッダー全体の高さを占めます。これをテキストに合うように(余分な背景を削除して)調整するにはどうすればよいですか?
どうもありがとう
WPBeginnerサポート
それにはテーマの編集が必要になります。編集する内容は、使用している特定のテーマによって異なります。
管理者
Bonny C.
なんて時間節約になるんでしょう!本当に助かります!!
WPBeginnerサポート
どういたしまして、ガイドがお役に立てて嬉しいです!
管理者
ソーヤー・スミス
こんにちは。CSSをメニューに実装したところ、いくつかのトラブルシューティングを経て素晴らしい結果になりました。しかし、カーソルをボタンに合わせると、カーソルがホバーしているときにテキストを覆う広い白い長方形が表示されます。これを修正して、ホバー中にこのようなことが起こらないようにするにはどうすればよいですか?よろしくお願いします。
WPBeginnerサポート
おそらく、お使いのテーマのデフォルトのホバーカラーが原因です。当社の記事のCSSを使用している場合は、以下のようなCSSコードを追加すると良いでしょう。
.menu-button:hover { background-color:#eb5e28; }
管理者
Nicole
これはとても参考になります、ありがとうございます!サブメニュー(ボタンからドロップダウンするメニュー)のテキストの色だけを変更する方法を教えていただけますか? ありがとうございます!
WPBeginnerサポート
各テーマは異なるため、テーマのサポートに確認することをお勧めします。そうでなければ、下のインスペクト要素のガイドを使用して、テキストの色を変更するためのサブメニューを選択する方法を確認できます。
https://www.wpbeginner.com/wp-tutorials/basics-of-inspect-element-with-your-wordpress-site/
管理者
Megan
これらの手順をすべて実行しても、ボタンがまったく表示されません。何も起こりません。何か原因が考えられますか?ここから正確なコードをコピー&ペーストしました!
WPBeginnerサポート
お使いのテーマによっては、このコードを上書きするCSSがある場合があります。テーマのサポートに確認すれば、支援を受けられるはずです。
管理者
Gabriela
ボタンのサイズを変更するにはどうすればよいですか?テキストとインラインで表示されるのですが
jj
大変助かりました、ありがとうございます!
CSSでボタンを別の外部サイトにリンクさせることは可能でしょうか?
Dorothy
本当に感謝しています!長い間、どうすればよいかわかりませんでした。これを参考に、問題なくナビゲーションにボタンを作成できました。ありがとうございます!!
ステファニー
このチュートリアル、本当にありがとうございました!私は技術的な人間ではないので、最初はうまくいきませんでした。プライマリナビゲーションメニューにいたのですが、セカンダリに移動して手順を実行したところ、うまくいきました!サイトにちょっとした輝きが加わりました!
WPBeginnerサポート
Glad our guide was able to help
管理者