
WordPressのコンテンツを整理するのは、カテゴリーやタグを使えば簡単です。しかし、長年WordPressサイトを構築する中で、初期設定のカテゴリーやタグだけでは完璧なコンテンツ構造を作るには必ずしも十分ではないことを学びました。
そこでカスタムタクソノミーの出番です。カスタムタクソノミーを使えば、コンテンツを分類したりグループ化したりする独自の方法を作ることができます。
私たちはレシピの材料から不動産物件まで、あらゆるものを整理するのに使ってきました。投稿や商品、その他のコンテンツをどのように分類するか、驚くほどコントロールと柔軟性があります。
このガイドでは、プラグインを使用する場合でも、手動で行う場合でも、WordPressでカスタムタクソノミーを作成する方法を説明します。

WordPressのタクソノミーとは?
WordPressのタクソノミーは、投稿のグループやカスタムの投稿タイプを整理する方法です。
WordPressの初期設定では、カテゴリーとタグと呼ばれる2つのタクソノミーが用意されています。これらを使ってブログ投稿を整理することができます。
しかし、カスタム投稿タイプを使用している場合、カテゴリーやタグがすべてのコンテンツに適しているとは限りません。
例えば、「Books」というカスタム投稿タイプを作成し、「Topics」というカスタムタクソノミーを使って並べ替えることができる。そして、’アドベンチャー’、’ロマンス’、’ホラー’などのトピックキーワードを追加することができます。
これにより、あなたや読者は、トピックごとに本を簡単に並べ替えたり、フィルターをかけたりすることができる。
タクソノミーは階層化することもでき、「フィクション」や「ノンフィクション」のようなメイン・トピックや親トピックを持つことができます。そして、各カテゴリーの下にサブトピック(子トピック)を持つことができます。
たとえば、親カテゴリーの「フィクション」は、「アドベンチャー」、「ロマンス」、「ホラー」を子カテゴリーとして持つことができる。
カスタムタクソノミーが何であるか分かったところで、WordPressでカスタムタクソノミーを作成する方法を学びましょう。
カスタムタクソノミーの作成は強力ですが、カバーしなければならないことがたくさんあります。適切に設定するために、以下に簡単な目次を用意しました:
準備はいいかい?始めよう
プラグインでカスタム・タクソノミーを作成する(簡単な方法)
まず最初にカスタム投稿タイプUIプラグインをインストールして有効化します。詳しくはWordPressプラグインのインストール方法をご覧ください。
このチュートリアルでは、すでにカスタム投稿タイプを作成し、それを「Books」と呼んでいます。ですから、タクソノミーの作成を始める前にカスタム投稿タイプが作成されていることを確認してください。
次に、WordPressの管理エリアにあるCPT UI ” タクソノミーの追加/編集にアクセスして、最初のタクソノミーを作成しましょう。
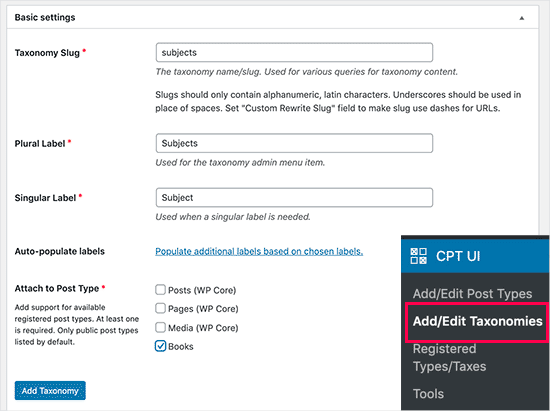
この画面では、以下のことを行う必要がある:
- タクソノミースラッグを作成する(これはURLに入ります)
- 複数形ラベルの作成
- 単数ラベルの作成
- ラベルの自動入力
最初のステップは、URLとWordPressの検索クエリーで使用するタクソノミーのスラッグを作成することです。スラッグはアルファベットと数字のみを含むことができ、自動的に小文字に変換されることに注意してください。
次に、カスタムタクソノミーの複数形と単数形の名前を入力します。
そこから、’Populate additional labels based on selected labels’ リンクをクリックするオプションがあります。これを実行すると、プラグインが残りのラベルフィールドを自動入力します。
ここで、「追加ラベル」セクションまでスクロールダウンすることができます。
このエリアでは、投稿タイプの説明を記入することができます。
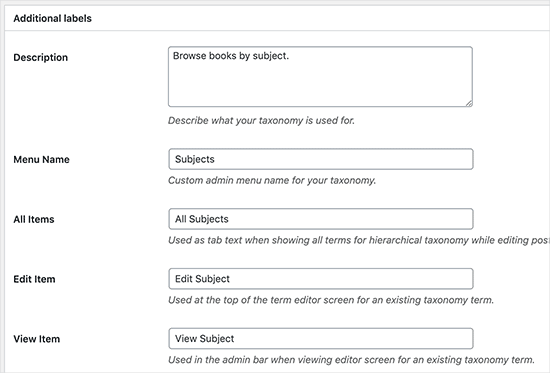
これらのラベルは、WordPressダッシュボードで特定のカスタムタクソノミーのコンテンツを編集・管理する際に使用されます。
次は設定オプションです。このエリアでは、作成したタクソノミーごとに異なる属性を設定することができます。各オプションには、それが何をするのかを詳しく説明する説明があります。
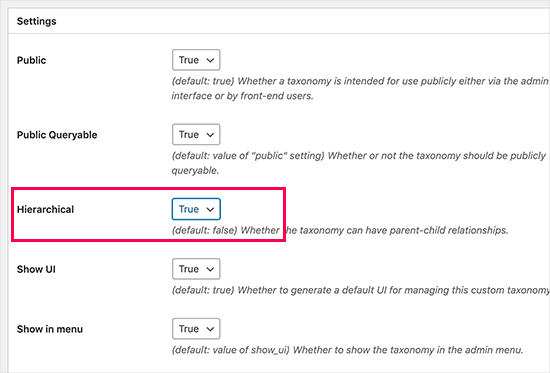
上のスクリーンショットでは、このタクソノミーを階層化することにしました。
つまり、タクソノミーの「主題」はサブ・トピックを持つことができる。例えば、「フィクション」という主題は、「ファンタジー」、「スリラー」、「ミステリー」などのサブトピックを持つことができます。
WordPressダッシュボードの画面のさらに下には他にもたくさんの設定がありますが、チュートリアルではそのままにしておいてください。
下部の「タクソノミーを追加」ボタンをクリックして、カスタマイザーを保存することができます。
その後、WordPressのコンテンツエディターでこのタクソノミーに関連付けられている投稿タイプを編集し、使用を開始することができます。
カスタムタクソノミーを手動で作成する(コード付き)
この方法では、WordPressサイトにコードを追加する必要があります。WordPressにコードを追加したことがない場合は、WordPressにコード・スニペットを簡単に追加する方法をご覧ください。
WordPressファイルを直接編集することはお勧めしません。小さなミスがサイト全体を壊してしまう可能性があるからです。そのため、最も簡単で安全なコードスニペットプラグインであるWPCodeを使用することをお勧めします。
まず、無料のWPCodeプラグインをインストールし、有効化する必要があります。詳しい手順については、WordPressプラグインのインストール方法のステップバイステップガイドをご覧ください。
1.階層的タクソノミーの作成
カテゴリーと同様に機能し、親と子のキーワードを持つことができる階層タクソノミーから始めましょう。
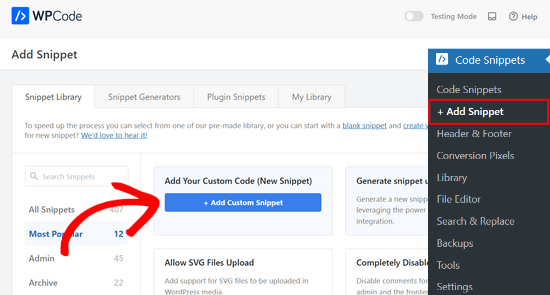
WPCodeをインストールして有効化したら、WordPressダッシュボードのCode Snippets ” + Add Snippetに移動します。
ここから、「カスタムコードの追加(新規スニペット)」にマウスオーバーし、「+カスタム・スニペットの追加」ボタンをクリックします。
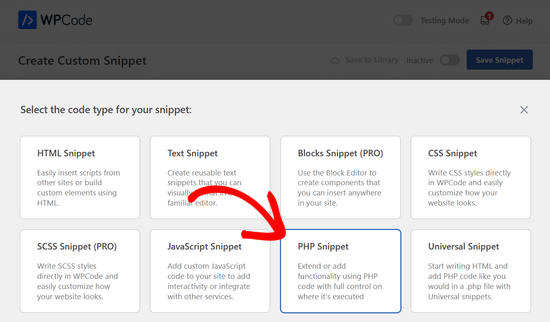
次に、画面に表示されるオプションリストからコードタイプを選択する必要があります。
このチュートリアルでは、「PHP Snippet」を選択します。
次に、「カスタマイザー作成」ページに移動します。
新しいコード・スニペットの名前を入力することから始めましょう。これは、そのコードが何のためのものかを覚えておくのに役立つものであれば何でもかまいません。
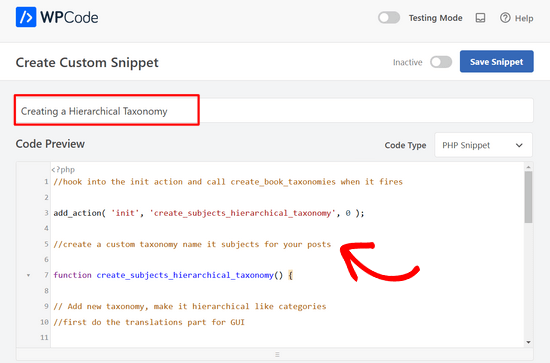
その後、以下のコードを「コード・プレビュー」エリアに貼り付けるだけです:
1 2 3 4 5 6 7 8 9 10 11 12 13 14 15 16 17 18 19 20 21 22 23 24 25 26 27 28 29 30 31 32 33 34 35 36 37 | //hook into the init action and call create_book_taxonomies when it fires add_action( 'init', 'create_subjects_hierarchical_taxonomy', 0 ); //create a custom taxonomy name it subjects for your posts function create_subjects_hierarchical_taxonomy() { // Add new taxonomy, make it hierarchical like categories//first do the translations part for GUI $labels = array( 'name' => _x( 'Subjects', 'taxonomy general name' ), 'singular_name' => _x( 'Subject', 'taxonomy singular name' ), 'search_items' => __( 'Search Subjects' ), 'all_items' => __( 'All Subjects' ), 'parent_item' => __( 'Parent Subject' ), 'parent_item_colon' => __( 'Parent Subject:' ), 'edit_item' => __( 'Edit Subject' ), 'update_item' => __( 'Update Subject' ), 'add_new_item' => __( 'Add New Subject' ), 'new_item_name' => __( 'New Subject Name' ), 'menu_name' => __( 'Subjects' ), ); // Now register the taxonomy register_taxonomy('subjects',array('books'), array( 'hierarchical' => true, 'labels' => $labels, 'show_ui' => true, 'show_in_rest' => true, 'show_admin_column' => true, 'query_var' => true, 'rewrite' => array( 'slug' => 'subject' ), )); } |
スニペット内のタクソノミー名とラベルを独自のタクソノミーラベルに置き換えることを忘れないでください。また、このタクソノミーはBooks投稿タイプに関連付けられていることに気づくでしょう。このタクソノミーを使用したい投稿タイプに変更する必要があります。
次に、下にスクロールして、インサーターボックスで「自動挿入」と「どこでも実行」が選択されていることを確認してください。

これで、ページの一番上までスクロールして戻り、スイッチを「非活性化」から「有効化」に切り替えることができる。
最後に、’Save Snippet’ボタンをクリックして、変更をライブに反映させる。

2.非階層タクソノミーの作成
タグのような階層的でないカスタム・タクソノミーを作成するには、WPCodeを使用し、上記と全く同じ手順を踏みます。
ただし、代わりにこのコードを使用する:
1 2 3 4 5 6 7 8 9 10 11 12 13 14 15 16 17 18 19 20 21 22 23 24 25 26 27 28 29 30 31 32 33 34 35 36 37 38 39 | //hook into the init action and call create_topics_nonhierarchical_taxonomy when it fires add_action( 'init', 'create_topics_nonhierarchical_taxonomy', 0 ); function create_topics_nonhierarchical_taxonomy() { // Labels part for the GUI $labels = array( 'name' => _x( 'Topics', 'taxonomy general name' ), 'singular_name' => _x( 'Topic', 'taxonomy singular name' ), 'search_items' => __( 'Search Topics' ), 'popular_items' => __( 'Popular Topics' ), 'all_items' => __( 'All Topics' ), 'parent_item' => null, 'parent_item_colon' => null, 'edit_item' => __( 'Edit Topic' ), 'update_item' => __( 'Update Topic' ), 'add_new_item' => __( 'Add New Topic' ), 'new_item_name' => __( 'New Topic Name' ), 'separate_items_with_commas' => __( 'Separate topics with commas' ), 'add_or_remove_items' => __( 'Add or remove topics' ), 'choose_from_most_used' => __( 'Choose from the most used topics' ), 'menu_name' => __( 'Topics' ), ); // Now register the non-hierarchical taxonomy like tag register_taxonomy('topics','books',array( 'hierarchical' => false, 'labels' => $labels, 'show_ui' => true, 'show_in_rest' => true, 'show_admin_column' => true, 'update_count_callback' => '_update_post_term_count', 'query_var' => true, 'rewrite' => array( 'slug' => 'topic' ), ));} |
2つのコードスニペットの違いに注目してください。register_taxonomy()関数の下では、hierarchical引数の値はカテゴリのようなタクソノミーの場合はtrueに、タグのようなタクソノミーの場合はfalseに設定されます。
また、非階層タクソノミーのラベル配列では、parent_itemと parent_item_colonの引数にnullを追加しています。これは、サブトピックを持つことができる親項目やタクソノミーを作成するためにUIに何も表示されないことを意味します。
本当に〜してもよいですか?コードを編集して、独自のカスタム・タクソノミー・ラベルを含めるようにしてください。
カスタム・タクソノミーの表示
カスタム・タクソノミーを作成し、いくつかのキーワードを追加しましたが、WordPressテーマはまだそれらを表示しません。
これらを表示するには、WordPressテーマまたは子テーマにコードを追加する必要があります。具体的には、キーワードを表示したいテンプレートファイルにこのコードを追加する必要があります。
このスニペットは、single.php、content.php、archive.php、index.phpなどのテーマファイルに手動で追加することができます。どのファイルを編集する必要があるかは、WordPressのテンプレート階層ガイドをご覧ください。
しかし、正しく行わないとサイトを壊してしまう可能性があるので、無料のWPCodeプラグインを使用することを再度お勧めします。
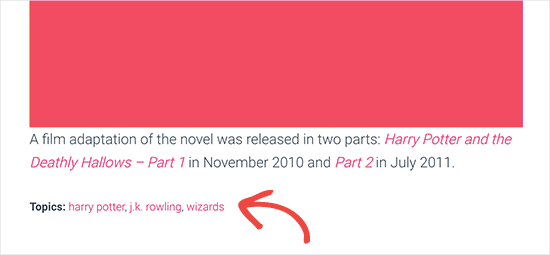
キーワードを表示したい場所に以下のコードを追加する必要があります:
1 | <?php the_terms( $post->ID, 'topics', 'Topics: ', ', ', ' ' ); ?> |
あとは、上記の手順でWPCodeにスニペットを貼り付けるだけです。
しかし、インサーターでは、’Location’の隣にあるドロップダウンをクリックし、投稿の前、投稿の後、あるいは段落の間など、タクソノミーを表示したい場所を選択したい。
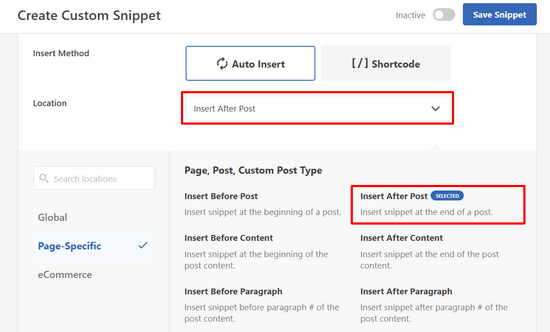
このチュートリアルでは、「投稿後に挿入」を選択します。
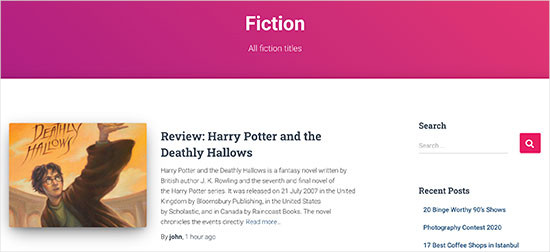
下の画像で、ライブサイトでの外観をご覧いただけます。
カスタム投稿にタクソノミーを追加する
カスタムタクソノミーの作成方法がわかったところで、例を使って実際に使ってみましょう。
タクソノミーを作成し、それを’ノンフィクション’と呼ぶことにする。Books’というカスタム投稿タイプがあるので、通常のブログ投稿を作成する方法と似ている。
WordPressダッシュボードで、Books ” Subjectsに移動し、キーワードまたは件名を追加することができます。
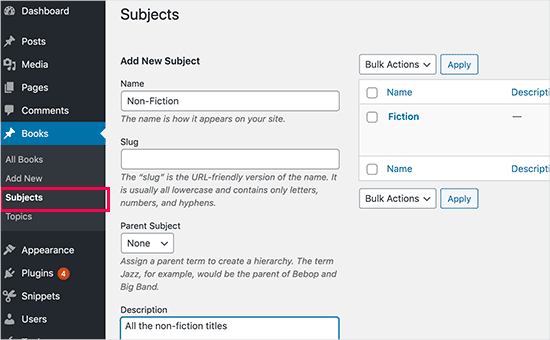
この画面では4つのエリアが表示される:
- 名称
- スラッグ
- 親
- 説明
名前の欄には、追加したいキーワードを記入する。スラッグの部分は省略して、この特定のキーワードの説明を記入することもできます。
最後に、「新規件名の追加」ボタンをクリックして、新しいタクソノミーを作成します。
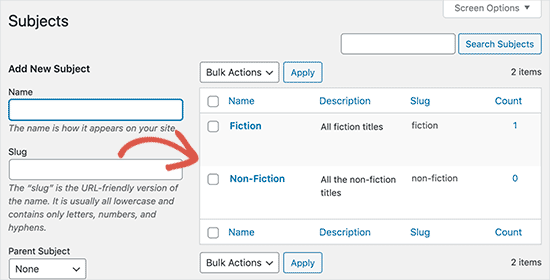
新しく追加したキーワードが右の列に表示されます。
これで、ブログ投稿で使える新しいキーワードができました。特定の投稿タイプでコンテンツを編集したり書いたりする際に、直接キーワードを追加することもできる。
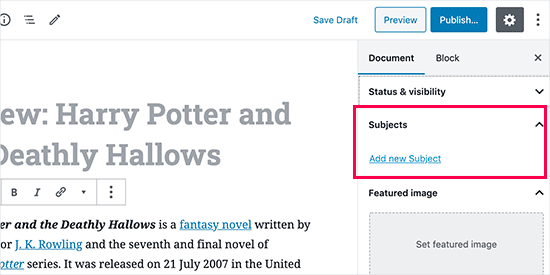
投稿を作成するには、Books ” Add Newをクリックするだけです。
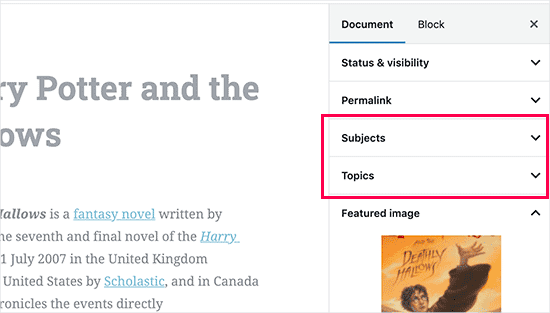
投稿エディターでは、右カラムに新しいキーワードを選択または作成するオプションがあります。
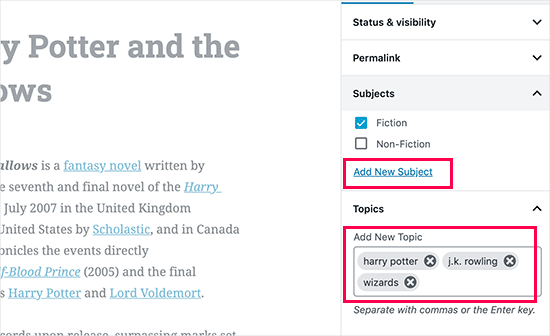
キーワードを追加したら、コンテンツを公開してください。
そのキーワードで投稿された投稿は、すべてそのURLであなたのサイトにアクセスできるようになります。例えば、「フィクション」というテーマで投稿された記事は、以下のURLで表示されます:
https://example.com/subject/fiction/
ナビゲーションメニューへのカスタマイザーの追加
カスタムタクソノミーを作成したので、サイトのナビゲーションメニューに表示させたいと思うかもしれません。
外観 ” メニューに移動し、画面の左側に表示されるカスタム・タクソノミー・タブの下に追加したいキーワードを選択します。
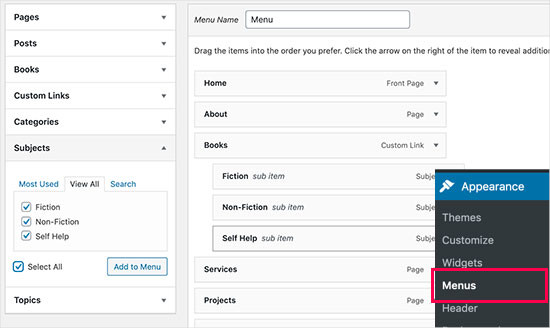
メニューの保存」ボタンをクリックして、設定を保存することを忘れないでください。
これで、あなたのサイトにアクセスして、実際にメニューを見ることができます。

詳しくは、WordPressでドロップダウンメニューを作成する方法のステップバイステップガイドを参照してください。
動画チュートリアル
カスタムタクソノミーの作成方法を動画でご覧になりたい方は、チュートリアルをご覧ください:
ボーナス:WordPressタクソノミーをさらに活用しよう
カスタマイソノミーでは、様々なことができます。例えば、サイドバーウィジェットに表示したり、キーワードごとに画像アイコンを追加したりできます。
また、 カスタム・タクソノミーに対応し、ユーザーが個々のキーワードを購読できるようにすることもできます。そうすれば、読者は自分にとって重要な特定のコンテンツに関する更新だけを受け取ることができます。
タクソノミーカスタムページのレイアウトをカスタマイズしたいのであれば、SeedProdをチェックしてみてください。これは、コーディングなしでカスタムレイアウトを作成できる最高のドラッグアンドドロップWordPressページビルダーとテーマビルダーです。

さらに詳しく知りたい方は、WordPressでカスタムページを作成する方法の投稿をご覧ください。
WordPressでカスタム・タクソノミーを作成する方法について、この投稿がお役に立てれば幸いです。WordPressでタクソノミーの画像(カテゴリーアイコン)を追加する方法や、WordPressのカテゴリーを適切に変更、移動、削除する方法についてのガイドもご覧ください。
If you liked this article, then please subscribe to our YouTube Channel for WordPress video tutorials. You can also find us on Twitter and Facebook.


 in 2024")
Jiří Vaněk
Thank you for the clear instructions. I would like to make my own taxonomy for tutorials on the site. This tutorial is great and clear, thanks.
WPBeginner Support
Glad it was helpful
Admin
Kira
Hello.
I don’t understand this part:
ID, ‘topics’, ‘Topics: ‘, ‘, ‘, ‘ ‘ ); ?>
I mean, should I paste exactly that part into my loop-single.php?
I’m using a taxonomy called “writer”
WPBeginner Support
It would depend on where you want to display the terms, normally it would be added to the single.php.
Admin
Wolfgang
Hi,
I used your article to create a CPT with a hierarchical and a non-hierarchical taxonomy attached to it. I created a few entries and it all seems to be working fine. Both taxonomies display fine in their respective archive pages. One thing I noticed though when I tried to add the taxonomies to the menu was that the non-hierarchical taxonomy was available in the “Add menu item” column but the hierarchical taxonomy was NOT.
Is that an expected behavior? If not what could be going wrong?
Thanks
WPBeginner Support
The most common issues you could check would be that you have published content in the taxonomy and you may want to test adding a different content type to test if it is an issue with the taxonomy or something else.
Admin
mb
what does this line do
‘menu_name’ => __( ‘Subjects’ ),
is this in order to add taxonomies to the menu
aditya
hii i try everything but i taxonomy not showing in product. please help me.
WPBeginner Support
You would want to check under your preferences to ensure it is not hidden for your user.
Admin
Gina Wilson
This tutorial and specifically the part of how to display the custom taxonomy was a lifesaver! I’m very much a beginner and this was very helpful in understanding where I went wrong in my coding.
Thank you!!!
WPBeginner Support
Glad our guide was helpful
Admin
fengquanli
this is very confident with the custom post ui, thanks very much ,it’s very useful for get them.
WPBeginner Support
Glad our guide was helpful
Admin
Bruno Oliveira
Awesome tutorial! i have one question. how do i use my new taxonomy slug as permalink like category (/%category%/%year%/%monthnum%/%day%/%postname%/)
I want something like /%custom_taxonomy%/%year%/%monthnum%/%day%/%postname%/
i keep getting 404 error
WPBeginner Support
That is not something WordPress would allow by default and would require some custom coding to set up.
Admin
vikas
i tried the plugin method , it sucessfully created a new category in custom post type but it is not showing on my posts like tags and other categoties. can you help me with that?
WPBeginner Support
You would want to reach out to the support for your specific theme for customizing the display to include your taxonomy.
Admin
Richard
I am creating a podcast network where I have multiple podcasts on a single site with episodes under each individual podcast. Would something like this work for that? I really don’t want to go the multi site route.
WPBeginner Support
You can certainly use this should you want or another option would be to create a custom post type depending on your preference.
Admin
Maria
Hello is possible add the custom taxonomies to a custom product type?
I create a custom product call drinks and i have several taxonomies like country, material and etc
I want when the user click in drinks then only apperas those taxonomies, is this posiible?
WPBeginner Support
You should be able to using the plugin method.
Admin
Parveen Kaushik
Hi,
Thanks for this article, I am getting 404 page after using this code, can you help me
WPBeginner Support
If you haven’t done so yet, resave your permalinks for the most common solution
Admin
Mike Smith
this code works great on my site for work. Can you tell me how to add the custom taxonomy into the site’s rss feed?
WPBeginner Support
It would depend on what you are looking for, for a starting point you would want to take a look at our article below:
https://www.wpbeginner.com/wp-tutorials/how-to-make-a-separate-rss-feed-for-each-custom-post-type-in-wordpress/
Admin
angela
thank you for taking the time to post this, this was the first site that actually explained this and it made sense, haha. im a happy camper now
WPBeginner Support
You’re welcome, glad our guide could help simplify the process
Admin
Jem
How to show custom taxonomy (checkbox list) in Post editor page like category and tag?
WPBeginner Support
It would depend on which method you used to create the custom taxonomy, if you’re using the plugin you would want to reach out to the plugin’s support to make sure they have show_in_rest set to true for seeing it in the block editor.
Admin
Jem
No, I am not using any plugin. I have just copy paste your snippet. Its create new taxonomy. But it is not display in post editor page like category, tags display on rightside panel.
Can you please guide me how can I show custom taxonomy in post editor page?
WPBeginner Support
In the register_taxonomy array, you would want to first try adding a new line with the code below:
‘show_in_rest’ => true,
Jim Gersetich
The first half of this post is completely useless. the Simple Taxonomy plugin doesn’t work with the current WordPress version, and it hasn’t been updated in four years.
Please try to find another plugin and change that section to go with the new one.
WPBeginner Support
Thank you for letting us know, we’ll certainly take a look at updating this article.
Admin