WordPressサイトにちょっとした調整を加えるだけで、隠れたスーパーパワーを手に入れたような気分になることがあります。functionsファイルに数行のコードを書くだけで、プラグインを追加することなくサイトの動作をカスタマイザーすることができます。
functions.phpファイルは、WordPressユーザーのツールキットの中で最も便利なツールのひとつです。カスタム機能を追加したり、不要なものを削除したり、ほんの少しのコードでサイトの動作を微調整することができます。
しかし、その前に重要なルールがひとつある。それは、サイトのバックアップを必ず取ることだ。ファンクションファイルの編集は、車のエンジンを調整するようなものです。より安全な方法をお望みなら、代わりにカスタム・コード・スニペット・プラグインを使うことをお勧めする。
このガイドでは、関数ファイルを使ってWordPressをカスタマイズするための25の便利なトリックを紹介します。さっそく始めましょう!
WordPressのFunctionsファイルとは?
functions.phpファイルはWordPressテーマの頭脳のようなものです。すべての無料およびプレミアムWordPressテーマに付属しており、開発者はカスタマイザーの機能を定義することができます。
テーマにビルトインされたミニプラグインと考えてください。カスタムコードスニペットを追加して、追加ウィジェットの追加からログインページの変更まで、サイトの動作を調整することができます。強力なツールだが、難点もある。
ファンクションファイルを直接編集するのはベストなアイデアではありません。テーマを更新すると、カスタムコードがすべて失われてしまいます。また、ミスをするとサイトが壊れてしまい、修正に追われることになります。
そのため、コード・スニペットを簡単かつリスクなく追加できる無料のプラグイン、WPCodeの使用を常に推奨している。
なぜWPCodeを好むのか?
- テーマやコアファイルに触れることなくカスタム・スニペットを保存できます。
- コードを必要な場所に自動的に配置してくれる。
- スニペットは区切りで保存されるので、いつでもオン・オフできる。
- エラーを引き起こすスニペットを無効化するフェイルセーフがビルトインされている。
追加ボーナスとして、WPCodeプラグインは、事前に設定されたスニペットの巨大なライブラリが含まれています。クリックするだけで有効化でき、コーディングは必須ではありません!
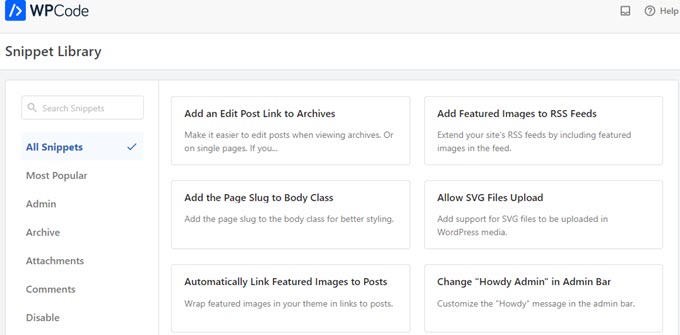
詳しくはWPCodeのレビューをご覧ください。
コードスニペットの最適な扱い方がわかったところで、WordPressサイトのカスタマイズに使える便利な関数を紹介しよう。
- How to Add These Code Snippets to Your Website
- Remove WordPress Version Number
- Add a Custom Dashboard Logo
- Change the Footer in WordPress Admin Panel
- Add Custom Dashboard Widgets in WordPress
- Change the Default Gravatar in WordPress
- Dynamic Copyright Date in WordPress Footer
- Randomly Change the Background Color in WordPress
- Update WordPress URLs
- Add Additional Image Sizes in WordPress
- Add New Navigation Menus to Your Theme
- Add Author Profile Fields
- Adding Widget-Ready Areas or Sidebars in WordPress Themes
- Manipulate the RSS Feed Footer
- Add Featured Images to RSS Feeds
- Hide Login Errors in WordPress
- Disable Login by Email in WordPress
- Disable Search Feature in WordPress
- Delay Posts in RSS Feed
- Change Read More Text for Excerpts in WordPress
- Disable RSS Feeds in WordPress
- Change Excerpt Length in WordPress
- Add an Admin User in WordPress
- Disable Language Switcher on Login Page
- Show the Total Number of Registered Users in WordPress
- Exclude Specific Categories From RSS Feed
- Disable URL Links in WordPress Comments
- Add Odd and Even CSS Classes to WordPress Posts
- Add Additional File Types to Be Uploaded in WordPress
- Change Sender Name in WordPress Emails
- Add an Author Info Box in WordPress Posts
- Disable XML-RPC in WordPress
- Automatically Link Featured Images to Posts
- Disable Block Editor in WordPress
- Disable Block Widgets in WordPress
- Display the Last Updated Date in WordPress
- Use Lowercase Filenames for Uploads
- Disable WordPress Admin Bar on Frontend
- Change Howdy Admin Text in Admin Area
- Disable Code Editing in Block Editor
- Disable Plugin / Theme File Editor
- Disable New User Notification Emails
- Disable Automatic Update Email Notifications
- Add a Link to Easily Duplicate a Post
- Remove Welcome Panel From the WordPress Admin Dashboard
- Add a Featured Image Column for Posts in WordPress Admin
- Block WordPress Admin Area for Everyone Except Administrators
コード・スニペットをサイトに追加する方法
始める前に、この投稿のコード・スニペットをWordPressのfunctionsファイルに追加する方法を見てみよう。
1.WPCodeを使ってカスタムコードを関数ファイルに追加する(推奨)
まず、WPCodeプラグインをインストールし、有効化する必要があります。詳しくは、WordPressプラグインのインストール方法のステップバイステップガイドをご覧ください。
有効化した後、コードスニペット ” + スニペットの追加ページに移動します。WPCodeのコードライブラリには、すでに多くの便利なカスタムコードスニペットが追加されています。
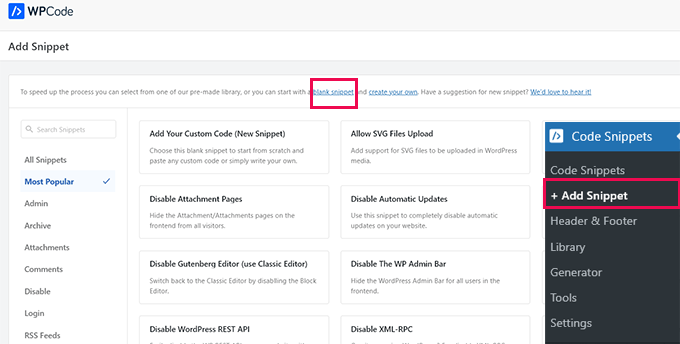
もしあなたのコード・スニペットがライブラリにあるスニペットと同じことをするのであれば、すでに追加されているものを試すことができる。
または、’blank snippet’ リンクをクリックして、カスタムコードスニペットの追加を続行します。
次の画面で、カスタムコードのタイトルを入力します。これは、このコード・スニペットが何をするものかを識別するのに役立つものであれば何でもかまいません。
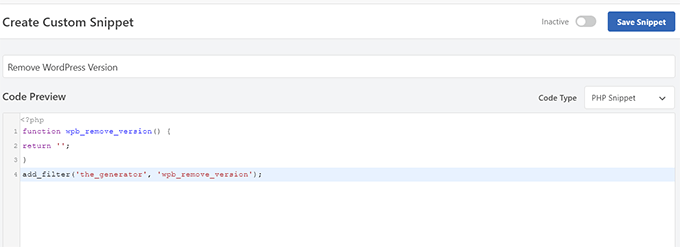
次に、「コードタイプ」を選択する必要があります。functions.phpファイルで動作するコードを追加する場合は、「PHPスニペット」を選択する必要があります。
その下の「コードプレビュー」ボックスにカスタムコードをコピー&ペーストしてください。
最後に、スニペットを「有効化」にして「スニペットを保存」ボタンをクリックします。
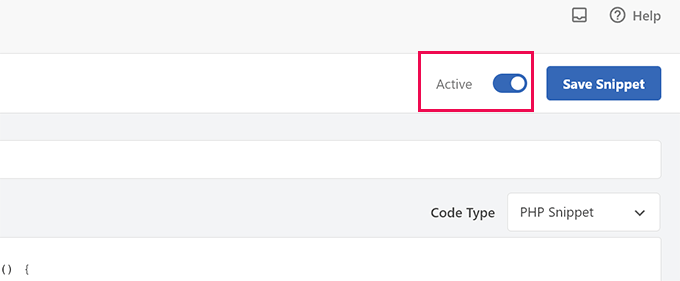
保存したスニペットは、functions.phpファイルに追加した場合と同じように実行されます。
スニペットは、必要なときに繰り返し追加することができます。また、スニペットを削除せずに無効化することもできます。
2.カスタムコードを関数ファイルに直接追加する
WPCodeの方法は、テーマの関数ファイルにコードを追加するよりも常に優れています。
しかし、ユーザーによっては、クライアントのカスタムWordPressテーマのためにコードを書いたり、単にfunctions.phpファイルにコードを追加することを好むかもしれません。
その場合、WordPressテーマのfunctions.phpファイルにコードを追加する方法があります。
まず、FTPクライアントを使用してWordPressサイトに接続します。接続したら、/wp-content/themes/your-wordpress-theme/フォルダーに移動します。
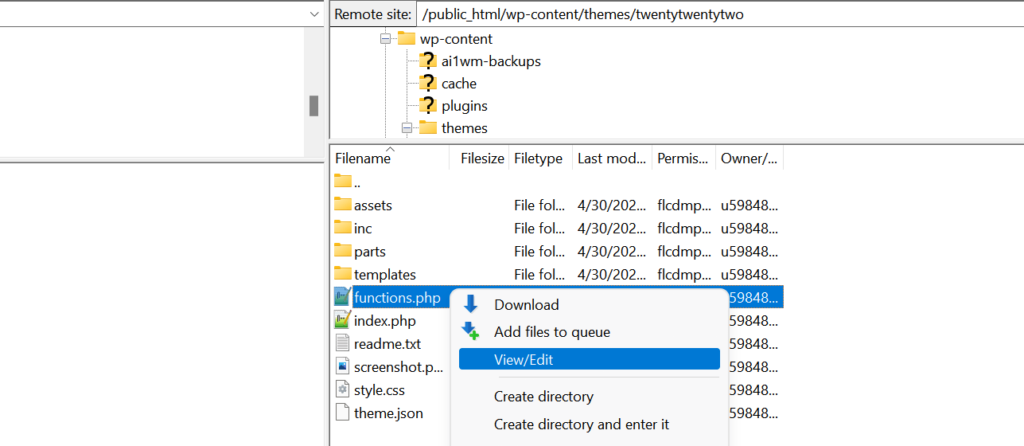
そこにfunctions.phpファイルがあります。右クリックして編集を選択するか、ファイルをコンピューターにダウンロードして編集してください。
メモ帳やテキストエディットのようなプレーンテキストエディターで編集できます。
次に、functions.phpファイルの一番下までスクロールダウンし、そこにコード・スニペットを貼り付けます。変更を保存し、更新したfunctions.phpファイルをテーマフォルダーにアップロードします。
これでWordPressサイトにアクセスし、カスタムコードの動作を確認することができます。
それでは、WordPressの関数ファイルに関する46の便利なトリックを見てみよう。
1.WordPressのバージョン番号を削除する
WordPressは常に最新バージョンを使用する必要があります。しかし、WordPressのバージョン番号をサイトから削除したい場合もあるでしょう。
このコード・スニペットを関数ファイルまたは新規WPCodeスニペットとして追加するだけです:
1 2 3 4 | function wpb_remove_version() {return '';}add_filter('the_generator', 'wpb_remove_version'); |
詳細な手順については、WordPressのバージョン番号を削除する正しい方法についてのガイドをご覧ください。
2.カスタムダッシュボードロゴの追加
WordPressの管理エリアにホワイトラベルを貼りたいですか?最初のステップは、カスタムダッシュボードロゴを追加することです。
まず、カスタムロゴをテーマのimagesフォルダーにcustom-logo.pngとしてアップロードする必要があります。カスタムロゴは、16×16ピクセルの1:1の比率(正方形の画像)である必要があります。
その後、このコードをテーマの関数ファイルまたは新しいWPCodeスニペットとして追加することができます:
1 2 3 4 5 6 7 8 9 10 11 12 13 14 15 16 | function wpb_custom_logo() {echo '<style type="text/css">#wpadminbar #wp-admin-bar-wp-logo > .ab-item .ab-icon:before {background-image: url(' . get_bloginfo('stylesheet_directory') . '/images/custom-logo.png) !important;background-position: 0 0;color:rgba(0, 0, 0, 0);}#wpadminbar #wp-admin-bar-wp-logo.hover > .ab-item .ab-icon {background-position: 0 0;}</style>';}//hook into the administrative header outputadd_action('wp_before_admin_bar_render', 'wpb_custom_logo'); |
詳しくは、WordPressでカスタムダッシュボードロゴを追加する方法をご覧ください。
3.WordPress管理画面でフッターを変更する
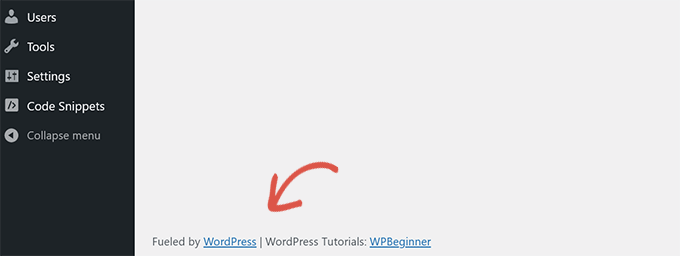
WordPress管理エリアのフッターには、「WordPressで作成していただきありがとうございます」というメッセージが表示されています。このコードを追加することで、好きなものに変更することができます:
1 2 3 4 5 6 7 | function remove_footer_admin () {echo 'Fueled by <a href="http://www.wordpress.org" target="_blank">WordPress</a> | WordPress Tutorials: <a href="https://www.wpbeginner.com" target="_blank">WPBeginner</a></p>';}add_filter('admin_footer_text', 'remove_footer_admin'); |
追加したいテキストやリンクは自由に変更してください。テストサイトではこんな感じです。
4.WordPressでカスタムダッシュボードウィジェットを追加する
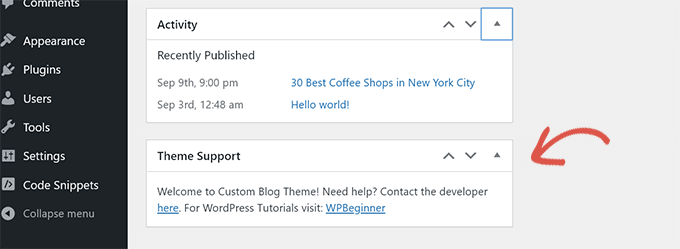
多くのプラグインやテーマがWordPressダッシュボードにウィジェットを追加しているのを見たことがあるだろう。以下のコードを貼り付ければ、自分でも追加することができる:
1 2 3 4 5 6 7 8 9 10 11 | add_action('wp_dashboard_setup', 'my_custom_dashboard_widgets');function my_custom_dashboard_widgets() {global $wp_meta_boxes;wp_add_dashboard_widget('custom_help_widget', 'Theme Support', 'custom_dashboard_help');}function custom_dashboard_help() {echo '<p>Welcome to Custom Blog Theme! Need help? Contact the developer <a href="mailto:yourusername@gmail.com">here</a>. For WordPress Tutorials visit: <a href="https://www.wpbeginner.com" target="_blank">WPBeginner</a></p>';} |
こんな感じだろう:
詳しくは、WordPressでカスタムダッシュボードウィジェットを追加する方法のチュートリアルをご覧ください。
5.WordPressで初期設定のGravatarを変更する。
ブログで初期設定の謎の男のアバターを見たことがありますか?それを簡単に自分のブランドのカスタムアバターに置き換えることができます。
初期設定のアバターとして使用したい画像をアップロードし、このコードを関数ファイルまたはWPCodeプラグインに追加するだけです:
1 2 3 4 5 6 | function wpb_custom_default_gravatar( $avatar_defaults ) { $myavatar = 'https://example.com/wp-content/uploads/2022/10/dummygravatar.png'; $avatar_defaults[$myavatar] = 'Default Gravatar'; return $avatar_defaults;}add_filter( 'avatar_defaults', 'wpb_custom_default_gravatar' ); |
これで、設定 ” ディスカッションのページに行き、初期設定のアバターを選択することができます。
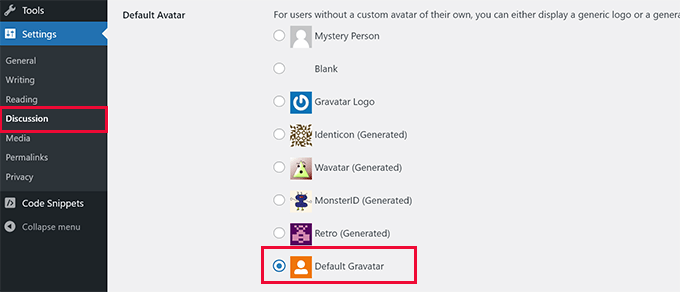
詳しい手順は、WordPressの初期設定グラバターを変更するガイドをご覧ください。
6.WordPressフッターの動的著作権日付
テーマのフッターテンプレートを編集することで、コピーライトの日付を追加することができます。しかし、あなたのサイトがいつ始まったかは表示されませんし、翌年に自動的に変更されることもありません。
このコードは、WordPressのフッターにダイナミックなコピーライトの日付を追加することができます:
1 2 3 4 5 6 7 8 9 10 11 12 13 14 15 16 17 18 19 20 21 | function wpb_copyright() {global $wpdb;$copyright_dates = $wpdb->get_results("SELECTYEAR(min(post_date_gmt)) AS firstdate,YEAR(max(post_date_gmt)) AS lastdateFROM$wpdb->postsWHEREpost_status = 'publish'");$output = '';if($copyright_dates) {$copyright = "© " . $copyright_dates[0]->firstdate;if($copyright_dates[0]->firstdate != $copyright_dates[0]->lastdate) {$copyright .= '-' . $copyright_dates[0]->lastdate;}$output = $copyright;}return $output;} |
この関数を追加した後、footer.phpファイルを開き、動的なコピーライトの日付を表示したい場所に以下のコードを追加する必要があります:
1 | <?php echo wpb_copyright(); ?> |
この関数は、あなたの最初の投稿の日付と最後の投稿の日付を探します。そして、この関数を呼び出した場所の年数を返します。
ヒント: WPCodeプラグインを使用している場合、2つのコード・スニペットを組み合わせることができます。その後、スニペット設定の「インサーター」セクションで「サイトワイドフッター」の場所を選択してください。これで、テーマのfooter.phpファイルを編集することなく、自動的にフッターに著作権表示日が表示されます。
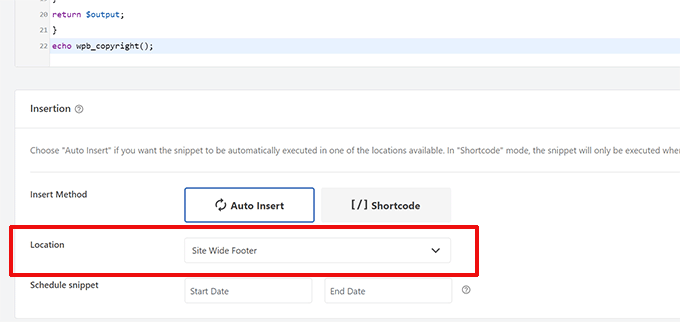
詳しくは、WordPressで著作権の動的な日付を追加する方法をご覧ください。
7.WordPressの背景色をランダムに変更する
WordPressブログの背景色を、訪問やページのリロードごとにランダムに変更したいですか?簡単にできる方法をご紹介します。
まず、このコードをテーマの関数ファイルかWPCodeプラグインに追加します:
1 2 3 4 5 6 7 | function wpb_bg() {$rand = array('0', '1', '2', '3', '4', '5', '6', '7', '8', '9', 'a', 'b', 'c', 'd', 'e', 'f');$color ='#'.$rand[rand(0,15)].$rand[rand(0,15)].$rand[rand(0,15)].$rand[rand(0,15)].$rand[rand(0,15)].$rand[rand(0,15)];echo $color; } |
次に、テーマのheader.phpファイルを編集する必要があります。<body>タグを見つけ、次の行に置き換える:
1 | <body <?php body_class(); ?> style="background-color:<?php wpb_bg();?>"> |
これで変更を保存し、サイトにアクセスしてこのコードの動作を確認することができます。

詳細と代替方法については、WordPressで背景色をランダムに変更するチュートリアルをご覧ください。
8.WordPressのURL更新
WordPressのログインページが更新され続けたり、管理エリアにアクセスできない場合は、WordPressのURLを更新する必要があります。
一つの方法は、wp-config.phpファイルを使用することです。しかし、そうすると、設定ページで正しいアドレスを設定することができません。WordPress URLとサイトURLフィールドはロックされ、編集できなくなります。
その代わりに、次のコードを関数ファイルに追加すれば解決する:
1 2 | update_option( 'siteurl', 'https://example.com' );update_option( 'home', 'https://example.com' ); |
example.comをあなたのドメイン名に置き換えることをお忘れなく。
ログイン中、WordPress管理エリアの「設定」ページでURLを設定できます。
その後、関数ファイルまたはWPCodeに追加したコードを削除してください。そうしないと、サイトにアクセスがあるたびにURLが更新され続けることになります。
9.WordPressで画像サイズを追加する
WordPressでは、画像をアップロードすると自動的に複数の画像サイズが生成されます。また、テーマで使用する画像サイズを追加作成することもできます。
このコードをテーマの関数ファイルまたはWPCodeスニペットとして追加するだけです:
1 2 3 | add_image_size( 'sidebar-thumb', 120, 120, true ); // Hard Crop Modeadd_image_size( 'homepage-thumb', 220, 180 ); // Soft Crop Modeadd_image_size( 'singlepost-thumb', 590, 9999 ); // Unlimited Height Mode |
このコードは、異なるサイズの3つの新しい画像サイズを作成します。あなたの必須条件を満たすために、自由にコードを調整してください。
このコードを使って、テーマ内の任意の場所に画像サイズを表示することができます:
1 | <?php the_post_thumbnail( 'homepage-thumb' ); ?> |
詳細な手順については、WordPressで追加画像サイズを作成するガイドを参照してください。
10.テーマに新規ナビゲーションメニューを追加する
WordPressでは、テーマ開発者がナビゲーションメニューを定義し、それを表示することができます。
このコードをテーマのfunctionsファイルに追加するか、新規WPCodeスニペットとして追加することで、テーマに新しいメニューの場所を定義することができます:
1 2 3 4 | function wpb_custom_new_menu() { register_nav_menu('my-custom-menu',__( 'My Custom Menu' ));}add_action( 'init', 'wpb_custom_new_menu' ); |
WordPressダッシュボードの外観 ” メニューを開き、 、テーマの場所オプションとして「マイカスタムメニュー」が表示されます。
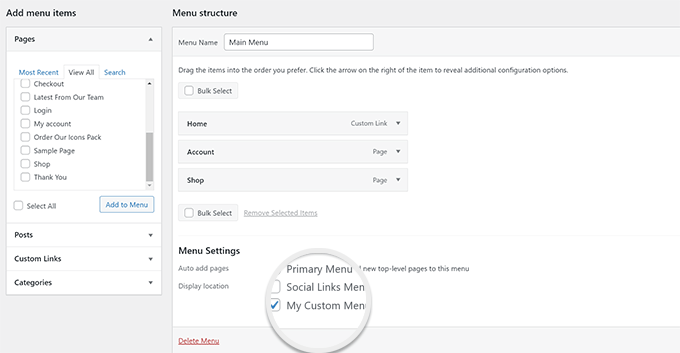
注: このコードはフルサイト編集機能を持つブロックテーマでも動作します。このコードを追加すると、外観のメニュー画面が有効化されます。
次に、ナビゲーション・メニューを表示したいテーマにこのコードを追加する必要がある:
1 2 3 4 5 | <?phpwp_nav_menu( array( 'theme_location' => 'my-custom-menu', 'container_class' => 'custom-menu-class' ) ); ?> |
詳細な手順については、WordPressテーマでカスタムナビゲーションメニューを追加する方法のガイドを参照してください。
11.投稿者プロフィールフィールドの追加
WordPressの投稿者プロフィールに追加フィールドを追加したいですか?このコードを関数ファイルに追加するか、新規WPCodeスニペットとして追加することで簡単にできます:
1 2 3 4 5 6 7 8 9 | function wpb_new_contactmethods( $contactmethods ) {// Add Twitter$contactmethods['twitter'] = 'Twitter';//add Facebook$contactmethods['facebook'] = 'Facebook';return $contactmethods;}add_filter('user_contactmethods','wpb_new_contactmethods',10,1); |
このコードは、WordPressのユーザープロフィールにTwitterとFacebookのフィールドを追加します。
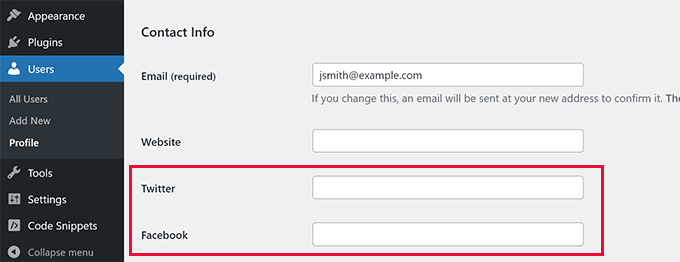
これで、投稿者テンプレートにこれらのフィールドを次のように表示できる:
1 | <?php echo get_the_author_meta('twitter') ?> |
WordPress登録でユーザープロフィール欄を追加するガイドもご参照ください。
12.WordPressテーマでウィジェット対応エリアやサイドバーを追加する
これは最もよく使われるコードスニペットのひとつで、WordPressテーマにウィジェット対応エリアやサイドバーを追加することは、すでに多くの開発者が知っています。しかし、知らない人のためにこのリストに載せる価値がある。
以下のコードをfunctions.phpファイルまたは新規WPCodeスニペットとして貼り付けてください:
1 2 3 4 5 6 7 8 9 10 11 12 13 14 15 16 | // Register Sidebarsfunction custom_sidebars() { $args = array( 'id' => 'custom_sidebar', 'name' => __( 'Custom Widget Area', 'text_domain' ), 'description' => __( 'A custom widget area', 'text_domain' ), 'before_title' => '<h3 class="widget-title">', 'after_title' => '</h3>', 'before_widget' => '<aside id="%1$s" class="widget %2$s">', 'after_widget' => '</aside>', ); register_sidebar( $args );}add_action( 'widgets_init', 'custom_sidebars' ); |
注: このコードは、フルサイト編集機能を持つブロックテーマでも動作します。このコードを追加すると、外観のウィジェット画面が有効化されます。
これで外観 ” ウィジェットページにアクセスし、新しいカスタムウィジェットエリアを見ることができます。
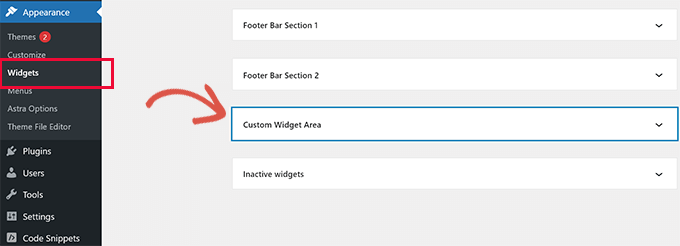
このサイドバーまたはウィジェット対応エリアをサイトに表示するには、表示したいテンプレートに以下のコードを追加する必要があります:
1 2 3 | <?php if ( !function_exists('dynamic_sidebar') || !dynamic_sidebar('custom_sidebar') ) : ?><!–Default sidebar info goes here–><?php endif; ?> |
詳しくは、WordPressで動的なウィジェット対応エリアとサイドバーを追加する方法のガイドをご覧ください。
13.RSSフィードのフッターを操作する
RSSフィードの各投稿の下に広告を追加しているブログを見たことがありますか?これは簡単な機能で実現できる。以下のコードを貼り付けるだけです:
1 2 3 4 5 6 7 8 | function wpbeginner_postrss($content) {if(is_feed()){$content = 'This post was written by Syed Balkhi '.$content.'Check out WPBeginner';}return $content;}add_filter('the_excerpt_rss', 'wpbeginner_postrss');add_filter('the_content', 'wpbeginner_postrss'); |
詳しくは、コンテンツを追加してRSSフィードを完全に操作する方法のガイドをご覧ください。
14.RSSフィードにアイキャッチ画像を追加する
投稿サムネイルやおすすめ投稿画像は、通常サイトデザイン内にしか表示されません。この機能をRSSフィードに拡張するには、以下のコードを使用します:
1 2 3 4 5 6 7 8 9 10 | function rss_post_thumbnail($content) {global $post;if(has_post_thumbnail($post->ID)) {$content = '<p>' . get_the_post_thumbnail($post->ID) .'</p>' . get_the_content();}return $content;}add_filter('the_excerpt_rss', 'rss_post_thumbnail');add_filter('the_content_feed', 'rss_post_thumbnail'); |
詳しくは、WordPressのRSSフィードに投稿サムネイルを追加する方法をご覧ください。
15.WordPressでログインエラーを非表示にする
ハッカーはログインエラーを利用して、間違ったユーザー名やパスワードを入力したかどうかを推測することができます。WordPressでログインエラーを非表示にすることで、ログインエリアとWordPressサイトをより安全にすることができます。
以下のコードをテーマの関数ファイルまたは新規WPCodeスニペットとして追加するだけです:
1 2 3 4 | function no_wordpress_errors(){ return 'Something is wrong!';}add_filter( 'login_errors', 'no_wordpress_errors' ); |
ユーザー名またはパスワードが正しく入力されなかった場合、一般的なメッセージが表示されるようになりました。
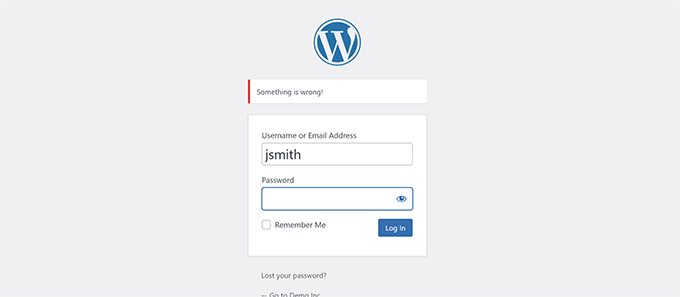
詳しくは、WordPressのエラーメッセージでログインヒントを無効化するチュートリアルをご覧ください。
16.WordPressでメールによるログインを無効化する
WordPressでは、ユーザーはユーザー名またはメールでログインすることができます。このコードを関数ファイルまたは新規WPCodeスニペットとして追加することで、WordPressでメールによるログインを簡単に無効化することができます:
1 | remove_filter( 'authenticate', 'wp_authenticate_email_password', 20 ); |
詳しくは、WordPressでメールによるログイン機能を無効化する方法をご覧ください。
17.WordPressの検索機能を無効化する
WordPressサイトの検索機能を無効化したい場合は、このコードを関数ファイルまたは新しいWPCodeスニペットに追加するだけです:
1 2 3 4 5 6 7 8 | function wpb_filter_query( $query, $error = true ) {if ( is_search() ) {$query->is_search = false;$query->query_vars[s] = false;$query->query[s] = false;if ( $error == true )$query->is_404 = true;}} |
このコードは単に検索クエリーを変更することで無効化し、検索結果の代わりに404エラーを返す。
詳しくは、WordPressの検索機能の無効化に関するチュートリアルをご覧ください。
プロからのアドバイス:WordPress検索をあきらめる代わりに、SearchWPを試してみることをお勧めします。あなたのサイトにパワフルでカスタマイズ可能な検索機能を追加できる、市場で最高のWordPress検索プラグインです。
18.カテゴリー: RSSフィードの投稿を遅らせる
文法エラーやスペルミスのある投稿を公開することもあります。
RSSフィード購読者に配信されます。WordPressブログにメール購読者がいる場合は、その購読者にも通知が届きます。
このコードをテーマのfunctionsファイルに追加するか、新規WPCodeスニペットとして追加するだけで、RSSフィードの投稿を遅らせることができます:
1 2 3 4 5 6 7 8 9 10 11 12 13 14 15 16 17 18 19 20 21 | function publish_later_on_feed($where) { global $wpdb; if ( is_feed() ) { // timestamp in WP-format $now = gmdate('Y-m-d H:i:s'); // value for wait; + device $wait = '10'; // integer // http://dev.mysql.com/doc/refman/5.0/en/date-and-time-functions.html#function_timestampdiff $device = 'MINUTE'; //MINUTE, HOUR, DAY, WEEK, MONTH, YEAR // add SQL-sytax to default $where $where .= " AND TIMESTAMPDIFF($device, $wpdb->posts.post_date_gmt, '$now') > $wait "; } return $where;}add_filter('posts_where', 'publish_later_on_feed'); |
このコードでは、$waitまたはdelayの時間として10分を使っています。これを自由に変更してください。
プラグインによる方法と詳細については、WordPressのRSSフィードに投稿が表示されるのを遅らせる方法の詳細ガイドをご覧ください。
19.WordPressで抜粋の続きを読むテキストを変更する
投稿の抜粋の後に表示されるテキストを変更したいですか?このコードをテーマの関数ファイルまたは新規WPCodeスニペットとして追加してください:
1 2 3 4 | function modify_read_more_link() { return '<a class="more-link" href="' . get_permalink() . '">Your Read More Link Text</a>';}add_filter( 'the_content_more_link', 'modify_read_more_link' ); |
20.WordPressでRSSフィードを無効化する
すべてのサイトにRSSフィードが必要なわけではありません。WordPressサイトでRSSフィードを無効化したい場合は、このコードをテーマのfunctionsファイルに追加するか、新規WPCodeスニペットとして追加してください:
1 2 3 4 5 6 | function new_excerpt_more($more) { global $post; return '<a class="moretag" href="'. get_permalink($post->ID) . '">Your Read More Link Text</a>';}add_filter('excerpt_more', 'new_excerpt_more'); |
プラグインによる方法については、WordPressでRSSフィードを無効化する方法をご覧ください。
21.WordPressで抜粋の長さを変更する
WordPressは抜粋の長さを55ワードに制限しています。変更する必要がある場合は、このコードを関数ファイルまたは新規WPCodeスニペットとして追加することができます:
1 2 3 4 | function new_excerpt_length($length) {return 100;}add_filter('excerpt_length', 'new_excerpt_length'); |
100を抜粋で表示したい単語数に変更するだけです。
別の方法として、WordPress抜粋のカスタマイズ方法(コーディング必須)をご覧ください。
22.WordPressで管理ユーザーを追加する
WordPressのパスワードとメールを忘れてしまった場合は、FTPクライアントを使用してテーマのfunctionsファイルにこのコードを追加することで、管理ユーザーを追加することができます:
1 2 3 4 5 6 7 8 9 10 | function wpb_admin_account(){$user = 'Username';$pass = 'Password';$email = 'email@domain.com';if ( !username_exists( $user ) && !email_exists( $email ) ) {$user_id = wp_create_user( $user, $pass, $email );$user = new WP_User( $user_id );$user->set_role( 'administrator' );} }add_action('init','wpb_admin_account'); |
ユーザー名、パスワード、メールの記入をお忘れなく。
重要WordPressサイトにログインしたら、関数ファイルからコードを削除することを忘れないでください。
このトピックについては、FTPを使ってWordPressに管理ユーザーを追加する方法のチュートリアルをご覧ください。
23.ログインページの言語切り替え無効化
多言語サイトを運営している場合、WordPressはログインページに言語セレクタを表示します。以下のコードをfunctions.phpファイルまたは新規WPCodeスニペットとして追加することで、簡単に無効化できます:
1 | add_filter( 'login_display_language_dropdown', '__return_false' ); |
24.WordPressの登録ユーザー数を表示する
WordPressサイトの登録ユーザー数を表示したいですか?このコードをテーマの関数ファイルまたは新規WPCodeスニペットとして追加するだけです:
1 2 3 4 5 6 7 | function wpb_user_count() {$usercount = count_users();$result = $usercount['total_users'];return $result;}// Creating a shortcode to display user countadd_shortcode('user_count', 'wpb_user_count'); |
このコードは、サイトの登録ユーザー数の合計を表示できるショートコードを作成します。
あとは、総ユーザー数を表示したい投稿やページにショートコード[user_count]を追加するだけです。
詳細とプラグインの方法については、WordPressで登録ユーザーの総数を表示する方法のチュートリアルをご覧ください。
25.RSSフィードから特定のカテゴリーを除外する
WordPressのRSSフィードから特定のカテゴリーを除外したいですか?このコードをテーマの関数ファイルまたは新規WPCodeスニペットとして追加することができます:
1 2 3 4 5 6 7 | function exclude_category($query) { if ( $query->is_feed ) { $query->set('cat', '-5, -2, -3'); }return $query;}add_filter('pre_get_posts', 'exclude_category'); |
26.WordPressのコメントでURLリンクを無効化する
初期設定では、WordPressはコメントする際にURLをクリック可能なリンクに変換します。
次のコードをfunctionsファイルに追加するか、新規WPCodeスニペットとして追加することで、これを止めることができます:
1 | remove_filter( 'comment_text', 'make_clickable', 9 ); |
詳しくは、WordPressのコメントで自動リンクを無効化する方法の投稿をご覧ください。
27.WordPressの投稿に奇数と偶数のCSSクラスを追加する
WordPressのテーマで、WordPressのコメントに奇数または偶数のクラスを使用しているのを見たことがあるかもしれません。これは、1つのコメントがどこで終わり、次のコメントが始まるかをユーザーが視覚化するのに役立ちます。
WordPressの投稿にも同じテクニックを使うことができる。見た目も美しく、ユーザーがコンテンツの多いページを素早くスキャンするのに役立ちます。
このコードをテーマの関数ファイルに追加するだけです:
1 2 3 4 5 6 7 8 9 | function oddeven_post_class ( $classes ) { global $current_class; $classes[] = $current_class; $current_class = ($current_class == 'odd') ? 'even' : 'odd'; return $classes;}add_filter ( 'post_class' , 'oddeven_post_class' );global $current_class;$current_class = 'odd'; |
このコードは、WordPressの投稿に奇数または偶数のクラスを追加するだけです。カスタムCSSを追加することで、投稿のスタイルを変えることができます。
以下はサンプルコードです:
1 2 3 4 5 6 | .even {background:#f0f8ff;}.odd { background:#f4f4fb;} |
最終的にはこのようになる:
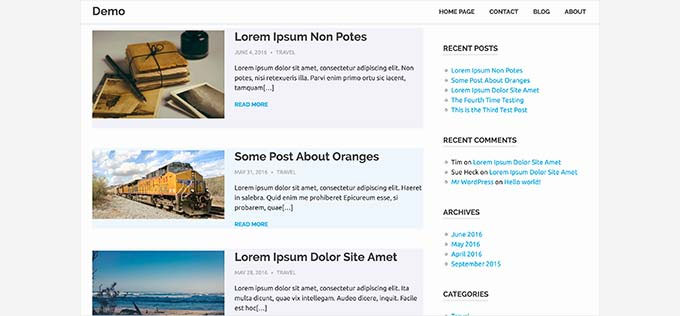
もっと詳しい説明が必要ですか?WordPressテーマで投稿に奇数/偶数クラスを追加する方法のチュートリアルをご覧ください。
28.WordPressでアップロードできるファイルタイプを追加する
WordPressの初期設定では、最も一般的に使用される限られた数のファイルタイプをアップロードすることができます。しかし、他のファイルタイプを許可するように拡張することができます。
このコードをテーマの関数ファイルに追加するだけです:
1 2 3 4 5 6 | function my_myme_types($mime_types){ $mime_types['svg'] = 'image/svg+xml'; //Adding svg extension $mime_types['psd'] = 'image/vnd.adobe.photoshop'; //Adding photoshop files return $mime_types;}add_filter('upload_mimes', 'my_myme_types', 1, 1); |
このコードを使えば、WordPressにSVGやPSDファイルをアップロードすることができます。
許可したいファイルタイプのMIMEタイプを見つけて、コードタイプで使用する必要がある。
このトピックについては、WordPressでアップロードできるファイルタイプを追加する方法のチュートリアルをご覧ください。
29.WordPressメールの送信者名を変更する
WordPressは初期設定で送信メールに存在しないメールアドレス(wordpress@yourdomain.com)を使用しています。
このメールアドレスはプロバイダーからスパムとして判定される可能性があります。
これを解決するには、WP Mail SMTPプラグインを使用するのが適切な方法です。
メール到達性の問題を解決し、WordPressのメール送信に実際のメールアドレスを選択できるようになります。
さらに詳しく知りたい方は、WordPressでメールが送信されない問題の解決方法をご覧ください。
一方、これを実際のメール・アドレスに素早く変更したい場合は、次のコードを関数ファイルまたは新しいWPCodeスニペットとして追加してください:
1 2 3 4 5 6 7 8 9 10 11 12 13 | // Function to change email addressfunction wpb_sender_email( $original_email_address ) { return 'tim.smith@example.com';} // Function to change sender namefunction wpb_sender_name( $original_email_from ) { return 'Tim Smith';} // Hooking up our functions to WordPress filters add_filter( 'wp_mail_from', 'wpb_sender_email' );add_filter( 'wp_mail_from_name', 'wpb_sender_name' ); |
メールアドレスと名前を自分の情報に置き換えることをお忘れなく。
この方法の問題点は、WordPressはまだメール送信にmail()関数を使用しており、そのようなメールはスパムになってしまう可能性が高いことです。
より良い方法については、WordPressの送信メールの送信者名を変更する方法のチュートリアルをご覧ください。
30.WordPress投稿に投稿者情報ボックスを追加する
複数投稿者のサイトを運営していて、投稿の最後に投稿者の経歴を表示したい場合は、この方法を試すことができる。
このコードを関数ファイルまたは新しいWPCodeスニペットとして追加することから始めてください:
1 2 3 4 5 6 7 8 9 10 11 12 13 14 15 16 17 18 19 20 21 22 23 24 25 26 27 28 29 30 31 32 33 34 35 36 37 38 39 40 41 42 43 44 45 46 47 48 49 50 51 52 53 54 55 56 57 58 59 | function wpb_author_info_box( $content ) {global $post;// Detect if it is a single post with a post authorif ( is_single() && isset( $post->post_author ) ) {// Get author's display name$display_name = get_the_author_meta( 'display_name', $post->post_author );// If display name is not available then use nickname as display nameif ( empty( $display_name ) )$display_name = get_the_author_meta( 'nickname', $post->post_author );// Get author's biographical information or description$user_description = get_the_author_meta( 'user_description', $post->post_author );// Get author's website URL$user_website = get_the_author_meta('url', $post->post_author);// Get link to the author archive page$user_posts = get_author_posts_url( get_the_author_meta( 'ID' , $post->post_author)); // Get User Gravatar$user_gravatar = get_avatar( get_the_author_meta( 'ID' , $post->post_author) , 90 );if ( ! empty( $display_name ) )$author_details = '<p class="author_name">About ' . $display_name . '</p>';if ( ! empty( $user_description ) )// Author avatar and bio will be displayed if author has filled in description. $author_details .= '<p class="author_details">' . $user_gravatar . nl2br( $user_description ). '</p>';$author_details .= '<p class="author_links"><a href="'. $user_posts .'">View all posts by ' . $display_name . '</a>'; // Check if author has a website in their profileif ( ! empty( $user_website ) ) {// Display author website link$author_details .= ' | <a href="' . $user_website .'" target="_blank" rel="nofollow noopener">Website</a></p>';} else {// if there is no author website then just close the paragraph$author_details .= '</p>';}// Pass all this info to post content$content = $content . '<footer class="author_bio_section" >' . $author_details . '</footer>';}return $content;}// Add our function to the post content filteradd_action( 'the_content', 'wpb_author_info_box' );// Allow HTML in author bio sectionremove_filter('pre_user_description', 'wp_filter_kses'); |
次に、見栄えを良くするためにカスタムCSSを追加する必要がある。
このサンプルCSSを出発点として使うことができる:
1 2 3 4 5 6 7 8 9 10 11 12 13 14 15 16 17 | .author_bio_section{background: none repeat scroll 0 0 #F5F5F5;padding: 15px;border: 1px solid #ccc;}.author_name{font-size:16px;font-weight: bold;}.author_details img {border: 1px solid #D8D8D8;border-radius: 50%;float: left;margin: 0 10px 10px 0;} |
投稿者欄はこのようになります:

プラグインを使った方法とより詳しい手順については、WordPress投稿に投稿者情報ボックスを追加する方法の投稿をご覧ください。
31.WordPressでXML-RPCを無効化する
XML-RPCは、サードパーティアプリがWordPressサイトとリモートで通信できるようにする方法です。これはセキュリティ上の問題を引き起こし、ハッカーに悪用される可能性があります。
WordPressでXML-RPCをオフにするには、以下のコードをfunctionsファイルまたは新規WPCodeスニペットとして追加してください:
1 | add_filter('xmlrpc_enabled', '__return_false'); |
詳しくはWordPressでXML-RPCを無効化する方法の投稿をご覧ください。
32.おすすめ投稿にアイキャッチ画像を自動リンク
WordPressテーマが自動的にアイキャッチ画像を記事全体にリンクしない場合は、この方法を試すことができる。
このコードをテーマの関数ファイルまたは新規WPCodeスニペットとして追加するだけです:
1 2 3 4 5 6 7 8 9 10 11 12 13 14 15 | function wpb_autolink_featured_images( $html, $post_id, $post_image_id ) {If (! is_singular()) { $html = '<a href="' . get_permalink( $post_id ) . '" title="' . esc_attr( get_the_title( $post_id ) ) . '">' . $html . '</a>';return $html;} else { return $html;}}add_filter( 'post_thumbnail_html', 'wpb_autolink_featured_images', 10, 3 ); |
WordPressでアイキャッチ画像を自動的に投稿にリンクさせる方法については、こちらの投稿をご覧ください。
33.WordPressでブロックエディターを無効化する
WordPressでは、コンテンツの作成やサイトの編集にモダンで直感的なエディターを使用しています。このエディターは、よく使われるコンテンツやレイアウト要素にブロックを使用するため、ブロックエディターと呼ばれています。
しかし、場合によっては古いクラシックエディターを使う必要があるかもしれません。
ブロックエディターを無効化する最も簡単な方法は、Classic Editorプラグインを使用することです。しかし、区切りのプラグインを使いたくない場合は、以下のコードを関数ファイルか新しいWPCodeスニペットとして追加してください:
1 2 | add_filter('gutenberg_can_edit_post', '__return_false', 5);add_filter('use_block_editor_for_post', '__return_false', 5); |
詳しくは、ブロックエディターを無効化してクラシックエディターを使う方法のチュートリアルをご覧ください。
34.WordPressでブロックウィジェットを無効化する
WordPressは、WordPress 5.8でクラシックウィジェットからブロックウィジェットに切り替えました。新しいブロックウィジェットは使いやすく、クラシックウィジェットよりもデザインコントロールができます。
しかし、クラシック・ウィジェットを使いたいユーザーもいるでしょう。その場合、テーマの関数ファイルまたは新規WPCodeスニペットで以下のコードを使用できます:
1 | add_filter( 'use_widgets_block_editor', '__return_false' ); |
詳しくは、ウィジェットブロックを無効化する(クラシックウィジェットを復元する)方法の投稿をご覧ください。
35.WordPressで最終更新日を表示する
訪問者がWordPressブログの投稿やページを表示すると、WordPressテーマは投稿が公開された日付を表示します。これは、ほとんどのブログや静的サイトでは問題ありません。
しかし、WordPressは古い投稿が定期的に更新されるサイトでも使われている。このような出版物では、投稿が最後に更新された日時を表示することが不可欠です。
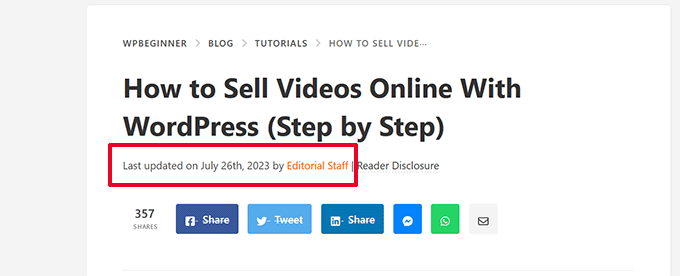
テーマの関数ファイルまたは新規WPCodeスニペットで以下のコードを使用して、最終更新日を表示できます:
1 2 3 4 5 6 7 8 9 10 11 12 13 14 15 16 17 18 19 20 | $u_time = get_the_time( 'U' );$u_modified_time = get_the_modified_time( 'U' );// Only display modified date if 24hrs have passed since the post was published.if ( $u_modified_time >= $u_time + 86400 ) { $updated_date = get_the_modified_time( 'F jS, Y' ); $updated_time = get_the_modified_time( 'h:i a' ); $updated = '<p class="last-updated">'; $updated .= sprintf( // Translators: Placeholders get replaced with the date and time when the post was modified. esc_html__( 'Last updated on %1$s at %2$s' ), $updated_date, $updated_time ); $updated .= '</p>'; echo wp_kses_post( $updated );} |
別の方法や詳細については、WordPressで最終更新日を表示する方法をご覧ください。
36.アップロードには小文字のファイル名を使用してください。
複数の投稿者がいるサイトを運営している場合、投稿者はファイル名を大文字または小文字にして画像をアップロードすることができます。
以下のコードを追加すると、ファイル名がすべて小文字になる:
1 | add_filter( 'sanitize_file_name', 'mb_strtolower' ); |
注意:このコードでは、既存のアップロードのファイル名は変更されません。別の方法については、WordPressで画像やメディアファイルの名前を変更する方法のチュートリアルを参照してください。
37.フロントエンドのWordPress管理バーを無効化する
WordPressの初期設定では、ログイン中のユーザーがサイトを表示すると、上部に管理バーが表示されます。
サイト管理者以外のすべてのユーザーに対して、管理バーを無効化することができます。以下のコードを関数ファイルまたは新規WPCodeスニペットとして追加してください:
1 2 | /* Disable WordPress Admin Bar for all users */add_filter( 'show_admin_bar', '__return_false' ); |
詳しくは、管理者以外のすべてのユーザーのWordPress管理バーを無効化する方法をご覧ください。
38.管理エリアのHowdy管理者テキストの変更
WordPressのダッシュボードに「Howdy Admin」という挨拶が表示されます。Admin」はログイン中のユーザー名に置き換えられます。
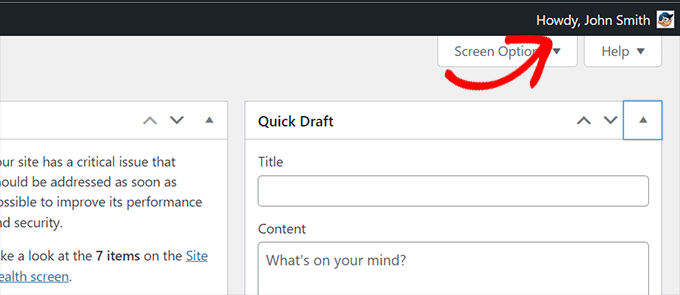
初期設定の挨拶は、以下のコードを関数ファイルまたは新規WPCodeスニペットとして追加することで、独自の挨拶に変更することができます:
1 2 3 4 5 6 7 8 9 10 11 12 13 14 15 | function wpcode_snippet_replace_howdy( $wp_admin_bar ) { // Edit the line below to set what you want the admin bar to display intead of "Howdy,". $new_howdy = 'Welcome,'; $my_account = $wp_admin_bar->get_node( 'my-account' ); $wp_admin_bar->add_node( array( 'id' => 'my-account', 'title' => str_replace( 'Howdy,', $new_howdy, $my_account->title ), ) );}add_filter( 'admin_bar_menu', 'wpcode_snippet_replace_howdy', 25 ); |
詳しくは、WordPressの「Howdy Admin」メッセージの変更に関する投稿をご覧ください。
39.ブロックエディターでのコード編集無効化
ブロックエディターでは、コードエディターに切り替えることができます。手動でHTMLコードを追加する必要がある場合に便利です。
しかし、この機能をサイト管理者に限定しておきたい場合もあるでしょう。
これを実現するには、次のコードを関数ファイルまたはWPCodeスニペットとして追加します:
1 2 3 4 5 6 | add_filter( 'block_editor_settings_all', function ( $settings ) { $settings['codeEditingEnabled'] = current_user_can( 'manage_options' ); return $settings;} ); |
40.プラグイン/テーマファイルエディターの無効化
WordPressにはプラグインファイルを編集できるエディターがビルトインされています。プラグイン ” プラグインファイルエディターのページで見ることができます。
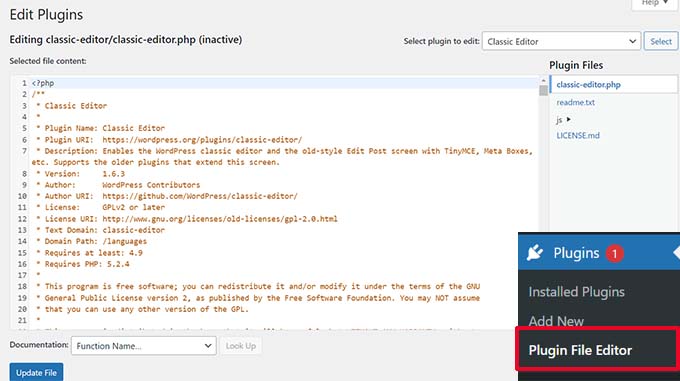
同様に、WordPressにはクラシックテーマ用のファイルエディターが外観 ” テーマファイルエディターにあります。
注:ブロックテーマを使用している場合、テーマファイルエディターは表示されません。
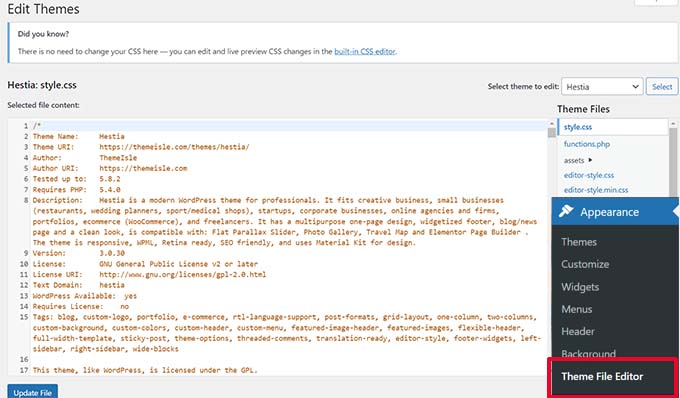
テーマやプラグインの変更にこれらのエディターを使用することはお勧めしません。コードのわずかなミスで、すべてのユーザーがサイトにアクセスできなくなる可能性があります。
プラグイン/テーマエディターを無効化するには、以下のコードを関数ファイルまたはWPCodeスニペットとして追加してください:
1 2 3 4 | // Disable the Plugin and Theme Editorif ( ! defined( 'DISALLOW_FILE_EDIT' ) ) { define( 'DISALLOW_FILE_EDIT', true );} |
詳しくはWordPressのプラグイン/テーマエディターを無効化する方法のチュートリアルをご覧ください。
41.新規ユーザー通知メールの無効化
初期設定では、WordPressは新規ユーザーがWordPressサイトに参加するとメール通知を送信します。
WordPressで会員制サイトを運営している場合や、ユーザー登録が必須の場合は、ユーザーがサイトに参加するたびに通知が届きます。
これらの通知をオフにするには、関数ファイルまたは新規WPCodeスニペットとして以下を追加します:
1 2 3 4 5 6 7 8 9 10 11 12 13 14 15 16 17 18 19 20 21 22 | function wpcode_send_new_user_notifications( $user_id, $notify = 'user' ) { if ( empty( $notify ) || 'admin' === $notify ) { return; } elseif ( 'both' === $notify ) { // Send new users the email but not the admin. $notify = 'user'; } wp_send_new_user_notifications( $user_id, $notify );}add_action( 'init', function () { // Disable default email notifications. remove_action( 'register_new_user', 'wp_send_new_user_notifications' ); remove_action( 'edit_user_created_user', 'wp_send_new_user_notifications' ); // Replace with custom function that only sends to user. add_action( 'register_new_user', 'wpcode_send_new_user_notifications' ); add_action( 'edit_user_created_user', 'wpcode_send_new_user_notifications', 10, 2 ); }); |
詳しくは、WordPressで新規ユーザーのメール通知を無効化する方法のチュートリアルをご覧ください。
42.自動更新メール通知の無効化
WordPressは、セキュリティアップデートやメンテナンスアップデートを自動的にインストールしたり、重大な脆弱性を持つプラグインを更新したりすることがあります。
更新のたびに自動更新メールを送信します。複数のWordPressサイトを管理している場合、このようなメールが何通も届くことがあります。
このコードをfunctionsファイルに追加するか、新規WPCodeスニペットとして追加することで、これらのメール通知をオフにすることができます:
1 2 3 4 5 6 7 8 | / Disable auto-update emails.add_filter( 'auto_core_update_send_email', '__return_false' );// Disable auto-update emails for plugins.add_filter( 'auto_plugin_update_send_email', '__return_false' );// Disable auto-update emails for themes.add_filter( 'auto_theme_update_send_email', '__return_false' ); |
さらに詳しく知りたい方は、WordPressの自動更新メールを無効化する方法の投稿をご覧ください。
43.リンクを追加して投稿を簡単にDuplicateする
公開する投稿に触れることなく、編集のために投稿のコンテンツをすべてコピーする簡単な方法を望んだことがありますか?
次のコード・スニペットは、投稿をすべてのコンテンツとともに簡単に複製するオプションを追加します:
1 2 3 4 5 6 7 8 9 10 11 12 13 14 15 16 17 18 19 20 21 22 23 24 25 26 27 28 29 30 31 32 33 34 35 36 37 38 39 40 41 42 43 44 45 46 47 48 49 50 51 52 53 54 55 56 57 58 59 60 61 62 63 64 65 66 67 68 69 70 71 72 73 74 75 76 77 78 79 80 81 82 83 84 85 86 87 88 89 90 91 92 93 94 95 96 97 98 99 100 101 102 103 104 105 106 107 108 109 110 111 112 113 114 115 116 117 | // Add duplicate button to post/page list of actions.add_filter( 'post_row_actions', 'wpcode_snippet_duplicate_post_link', 10, 2 );add_filter( 'page_row_actions', 'wpcode_snippet_duplicate_post_link', 10, 2 );// Let's make sure the function doesn't already exist.if ( ! function_exists( 'wpcode_snippet_duplicate_post_link' ) ) { /** * @param array $actions The actions added as links to the admin. * @param WP_Post $post The post object. * * @return array */ function wpcode_snippet_duplicate_post_link( $actions, $post ) { // Don't add action if the current user can't create posts of this post type. $post_type_object = get_post_type_object( $post->post_type ); if ( null === $post_type_object || ! current_user_can( $post_type_object->cap->create_posts ) ) { return $actions; } $url = wp_nonce_url( add_query_arg( array( 'action' => 'wpcode_snippet_duplicate_post', 'post_id' => $post->ID, ), 'admin.php' ), 'wpcode_duplicate_post_' . $post->ID, 'wpcode_duplicate_nonce' ); $actions['wpcode_duplicate'] = '<a href="' . $url . '" title="Duplicate item" rel="permalink">Duplicate</a>'; return $actions; }}/** * Handle the custom action when clicking the button we added above. */add_action( 'admin_action_wpcode_snippet_duplicate_post', function () { if ( empty( $_GET['post_id'] ) ) { wp_die( 'No post id set for the duplicate action.' ); } $post_id = absint( $_GET['post_id'] ); // Check the nonce specific to the post we are duplicating. if ( ! isset( $_GET['wpcode_duplicate_nonce'] ) || ! wp_verify_nonce( $_GET['wpcode_duplicate_nonce'], 'wpcode_duplicate_post_' . $post_id ) ) { // Display a message if the nonce is invalid, may it expired. wp_die( 'The link you followed has expired, please try again.' ); } // Load the post we want to duplicate. $post = get_post( $post_id ); // Create a new post data array from the post loaded. if ( $post ) { $current_user = wp_get_current_user(); $new_post = array( 'comment_status' => $post->comment_status, 'menu_order' => $post->menu_order, 'ping_status' => $post->ping_status, 'post_author' => $current_user->ID, 'post_content' => $post->post_content, 'post_excerpt' => $post->post_excerpt, 'post_name' => $post->post_name, 'post_parent' => $post->post_parent, 'post_password' => $post->post_password, 'post_status' => 'draft', 'post_title' => $post->post_title . ' (copy)',// Add "(copy)" to the title. 'post_type' => $post->post_type, 'to_ping' => $post->to_ping, ); // Create the new post $duplicate_id = wp_insert_post( $new_post ); // Copy the taxonomy terms. $taxonomies = get_object_taxonomies( get_post_type( $post ) ); if ( $taxonomies ) { foreach ( $taxonomies as $taxonomy ) { $post_terms = wp_get_object_terms( $post_id, $taxonomy, array( 'fields' => 'slugs' ) ); wp_set_object_terms( $duplicate_id, $post_terms, $taxonomy ); } } // Copy all the custom fields. $post_meta = get_post_meta( $post_id ); if ( $post_meta ) { foreach ( $post_meta as $meta_key => $meta_values ) { if ( '_wp_old_slug' === $meta_key ) { // skip old slug. continue; } foreach ( $meta_values as $meta_value ) { add_post_meta( $duplicate_id, $meta_key, $meta_value ); } } } // Redirect to edit the new post. wp_safe_redirect( add_query_arg( array( 'action' => 'edit', 'post' => $duplicate_id ), admin_url( 'post.php' ) ) ); exit; } else { wp_die( 'Error loading post for duplication, please try again.' ); }} ); |
コードを追加した後、投稿 ” すべての投稿画面に行き、投稿タイトルにマウスオーバーします。
オプション設定の下に新しく「Duplicator」リンクが追加されていることにお気づきでしょう。
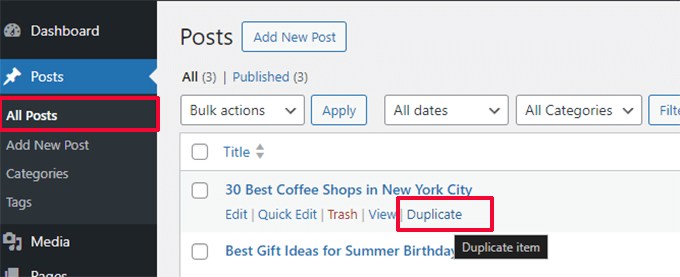
リンクをクリックすると、すべてのコンテンツを含む投稿のコピーが作成されます。その後、その下書きで作業することができます。
完了したら、公開した元の投稿に変更内容をコピー&ペーストし、コピーを削除することができます。
プラグインを使用する方法については、WordPressの投稿やページを複製する方法の投稿をご覧ください。
44.WordPress管理ダッシュボードからウェルカムパネルを削除する
ウェルカムパネルはWordPress管理画面のダッシュボードに表示されます。表示オプション」ボタンをクリックすることで、簡単に非表示にすることができます。
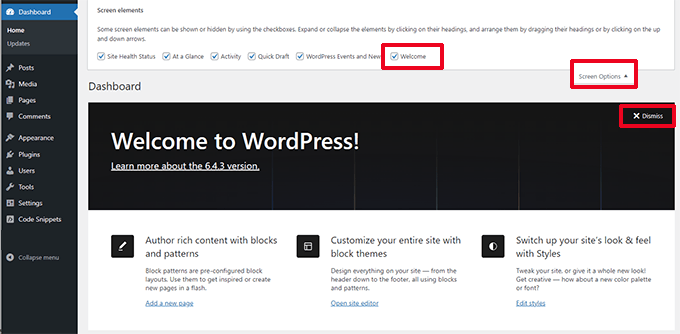
しかし、ユーザーによりクリーンなダッシュボードを体験してもらうためなら、非表示にすることもできる。
以下のコードを追加して、サイトのすべてのユーザーに対して無効化してください:
1 2 3 4 5 6 | add_action( 'admin_init', function () { remove_action( 'welcome_panel', 'wp_welcome_panel' ); }); |
45.WordPress管理画面で投稿におすすめ画像カラムを追加する
初期設定では、WordPressはサイトを表示しているとき、または投稿やページを編集したときにのみ、おすすめ投稿画像を表示します。
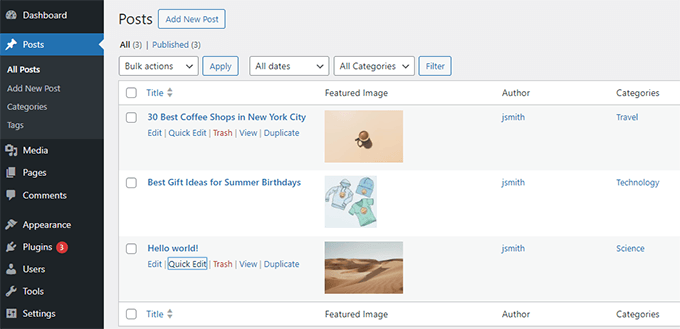
以下のコードは、投稿 ” すべての投稿画面に、アイキャッチ画像用の新しいカラムを追加します:
1 2 3 4 5 6 7 8 9 10 11 12 13 14 15 16 17 18 19 20 21 22 | add_filter( 'manage_posts_columns', function ( $columns ) { // You can change this to any other position by changing 'title' to the name of the column you want to put it after. $move_after = 'title'; $move_after_key = array_search( $move_after, array_keys( $columns ), true ); $first_columns = array_slice( $columns, 0, $move_after_key + 1 ); $last_columns = array_slice( $columns, $move_after_key + 1 ); return array_merge( $first_columns, array( 'featured_image' => __( 'Featured Image' ), ), $last_columns );} );add_action( 'manage_posts_custom_column', function ( $column ) { if ( 'featured_image' === $column ) { the_post_thumbnail( array( 300, 80 ) ); }} ); |
コードを追加した後の表示は以下のようになる。
46.管理者以外のWordPress管理エリアをブロックする
WordPressサイトによっては、ユーザーにアカウント登録が必要な場合があります。例えば、WordPressの会員制サイトやeコマースストアなどです。
そのようなプラグインのほとんどは、そのようなユーザーが管理エリアにアクセスできないようにします。しかし、そのようなプラグインを使っていない場合は、以下のコードを追加することで、管理者以外のすべてのユーザーが管理エリアにアクセスするのをブロックすることができます:
1 2 3 4 5 6 | add_action( 'admin_init', function() { if ( ! current_user_can( 'administrator' ) ) { wp_redirect( home_url() ); exit; }} ); |
他のユーザー権限を持つユーザーもアカウントにログインできますが、ログイン記録後はホームページにリダイレクトされます。
この投稿がWordPressのfunctions.phpファイルの新しい便利なトリックを学ぶのに役立てば幸いです。また、WordPressでコードを表示してスニペットを簡単に共有する方法や、専門家が選ぶMacとWindows用の最高のコードエディターもご覧ください。
If you liked this article, then please subscribe to our YouTube Channel for WordPress video tutorials. You can also find us on Twitter and Facebook.


Moinuddin Waheed
So much to accomplish with the help of functions.php
I think this is the core of the WordPress and if we do too much to it, we may lose many core functionalities.
having said this, using wpcode is a wise idea to insert anything for functionality without compromising the WordPress core.
I have a question though, if wpcode doesn’t insert it’s code in the main functions.php then how it works?
and if inserts it into the same, how updating wordpress doesn’t erase it?
WPBeginner Support
The code is stored in your database and the plugin hooks in the code in different ways depending on how you set it in the plugin.
Admin
Jiří Vaněk
I’ve noticed that on some websites, the top part of the browser changes color, specifically on mobile Chrome. Do you have any tested snippet that accomplishes this?
WPBeginner Support
We do have a guide for this, you can see our guide below:
https://www.wpbeginner.com/wp-tutorials/how-to-change-the-color-of-address-bar-in-mobile-browser-to-match-your-wordpress-site/
Admin
Jiří Vaněk
Thank you. I tried it on my own website and it works perfectly. Although only in Chrome, but it works.
Ralph
A lot of great ideas explained in novice friendly way. Thanks! I will try adding featured images to RSS feeds. It never worked before for some reason and now it will
WPBeginner Support
Glad to hear you found our tricks helpful
Admin
Ben
This is a pretty dangerous idea. Query strings exist for the purposes of cache busting, aka, making sure the end user has the latest version your js and css files.
Removing those is going to cause all sorts of issues for returning users down the line as their browser will assume nothing has changed and use their cached version rather than downloading the new one.
If for some reason you need to target a specific file and remove the query string (which I’ve had to do) you can use this code snippet:
// remove version from scripts and styles
function remove_version_scripts_styles($src) {
if (strpos($src, ‘yourfile.js’)) {
$src = remove_query_arg(‘ver’, $src);
}
return $src;
}
add_filter(‘script_loader_src’, ‘remove_version_scripts_styles’, 9999);
Gean Paulo Francois
Very useful article. I just saved this page offline so I can insert some of these with my websites. Anyway, should I add the codes to functions,php and not anywhere else?
WPBeginner Support
Correct, these codes are for your functions.php file.
Admin
Hussain Badusha
Nice compendium of some useful tricks and functions for wordpress. I added quite a new things to my wordpress knowledge after going through here.
I look forward even more from you if you wish to
WPBeginner Support
Glad you found our guide helpful
Admin
Satinder Satsangi
Oh WoW,
This is lifesaver most of the times, would like to know more about useful functions.
WPBeginner Support
Glad you found our guide helpful
Admin
vivek
Nice article,
Just have a doubt if I am supposed to add these codes in snippets plugin or somwhere in file? if its snippet plugin, it’s not working. Kindly put some light.
Thanks
WPBeginner Support
You would add these codes as a custom plugin or more commonly in your functions.php file
Admin
Beulah Wellington
Thank you for this tutorial. I learned a lot. I will be reading it again.
WPBeginner Support
You’re welcome, glad our guide can continue to help you
Admin
Ali Jahani
Hi
Thanks a lot of….
wpbeginner Is god team
WPBeginner Support
You’re welcome, glad you like our content
Admin
VISHAL CHOWDHRY
Superb Article.
Waiting for more of this
WPBeginner Support
Thank you, glad you liked our content
Admin
Miley Cyrus
Great Article it its really informative and innovative keep us posted with new updates. its was really valuable. thanks a lot.
WPBeginner Support
Glad our article could be helpful
Admin
John Dee
Almost NONE of these code snippets belong in your theme’s functions.php file. Only a few of them are related to the actual theme. Themes are for APPEARANCE. Create a PLUGIN for functionality. In any case, it would go in child theme’s functions.php file.
WPBeginner Support
Thank you for pointing this out, while we do mention site-specific plugins at the beginning of this article, we will be sure to look into making that statement clearer.
Admin
Suman Samanta
Nice information for a new bloggers. It is really helpful.
Richard Yzenbrandt
Thank you so much for making this resource available. WP for Beginners is the best goto site on the web!
alok patel
hey i am unable to add my post on specific page. when i write any blog post it shows in home page but i wanna also see in specific pages where i want to add. how i can out of from this problem. plz help me as soon as possible. if any video link thn plz share with reply. i m getting too much confused.
DONALD
I am creating a form to collect data from my users.
I have created the database from myphpAdmin
I have created the form.
I now created a new php.file in my child theme
I referenced it in the form too using action = “name.php”
Now i expect it to gather, peoples registration details.
But clicking on submit on the form, says, page cannot be found.
I dont know what i am not getting right.
Please help me
marvin N N
is there a plugin one can use to customise a theme’s default menu setting to suit your taste???
Sazzad Hossain
Thanks for this codes.
Shafiq Khan
Very useful post thanks.
A question – Because you’re updating the functions.php of a theme.
If you update the theme then you lose your tweaks.
Is there a way around this? Is it just a cause of using a Child theme?
Thanks
Lisa
Hi Shafiq,
Any changes you make to a parent theme will be overwritten when you update it. It is good practice to work with a child theme when making changes to a theme you didn’t build that is going to be updated so that you can keep the changes you made.
Jan
I use the plugin ‘My Custom Functions’ – it is simply adding all functions to the functions.php automatically – so no re-writing after every update needed
Jane Lawson
This is late, but you can also create a plugin for your site (e.g. “[Site name]’s custom plugin”). It does require a bit of expertise, however, since some functions clash with other plugins/the site theme.
Neil
Excellent post – thank you for the tips & tricks. They are all very helpful
Karakaplan
How to use these above with child theme functions file?
Minhaz
Nothing difference with parent or child theme’s functions.php
Joe
I’ve not done much with the functions file so it was good to see this article.
Thanks.
Jorge Rosa
Great snippets. Very handy and useful. Thank You!
sriganesh
this is best site for wordpress
WPBeginner Support
Thanks for the kind words
Admin
Bilal
will you tell me a most easy book for wordpress.
i am very new in this field .
thanks in advance
Al1
Another one :
// Remove query string from static files :
function remove_cssjs_ver( $src ) {
if( strpos( $src, ‘?ver=’ ) )
$src = remove_query_arg( ‘ver’, $src );
return $src;
}
add_filter( ‘style_loader_src’, ‘remove_cssjs_ver’, 10, 2 );
add_filter( ‘script_loader_src’, ‘remove_cssjs_ver’, 10, 2 );
siva
Great post, Could provide all wordpress function with example
shojib
This is the best blog for WordPress users.
Parveen
Great post!!!
I am a newbie and looking for such tricks.
Thanks.
Deepak Kanyan
Really a nice blog. i had learn lot of things from here thanks admin.
Andrew
I tried #16 to add the post featured thumbnail to m RSS feed but when I tested it in mailchimp (paused my campaign and previewed) it appears that it has changed from “summary” to “full text”? Is this expected behaviour? I want to leave the emails (rss driven) as summary, and simply add the thumbnail featured image at the top.
Thanks for any help, I can’t find this on google anywhere.
WPBeginner Support
You can try replacing get_the_content() with get_the_excerpt().
Admin
Em Cloney
re: removing rss feed for static pages — is it correct that the txt one would replace in that code is ‘url’ (with a page link, including ) and ‘homepage’ (if you’d like it to say something else, like ‘some other site’)?
Mohan Manohar
This is huge list and great help. would like to know the first part of twitter counter code is to be pasted in function.php or directly into texty widget of theme.
grafx
There is an easier way to remove WordPress Version Number…
remove_action(‘wp_head’, ‘wp_generator’);