見栄えの良いメニューは大きな違いを生むことができます。サイト全体の見た目を改善し、訪問者が探しているものを見つけやすくし、特定のページをクリックするように促すことさえできます。
WPBeginnerでは、メニューをスタイリングするためのさまざまなクリエイティブな方法を見てきました。また、長年にわたってナビゲーションメニューのスタイリングを何度も試してきました。そのため、さまざまな状況に最適なものを共有したいと思います。
この記事では、WordPressのナビゲーションメニューを5つの異なる方法でスタイル設定する方法を紹介します。
WordPressナビゲーションメニューをスタイル設定する理由
あなたのWordPressナビゲーションメニューは、訪問者を最も重要なページに導くウェブサイトのロードマップです。ほとんどのウェブサイトの上部に表示され、注目を集め、ユーザーがコンテンツをどのように探索するかに影響を与えるのに最適な場所です。
ナビゲーションメニューのスタイリングは、見た目を良くするだけではありません。ウェブサイトのユーザーエクスペリエンスを大幅に向上させ、ひいては検索エンジン最適化(SEO)を向上させることができます。
メニューのデザインが使いにくい場合、訪問者は探しているものを見つけるのに苦労し、不満を感じてサイトを離れる可能性があります。一方、明確で視覚的に魅力的なメニューは、さまざまなセクションへのクリックを促し、サイトでの滞在時間を長くすることができます。
その結果、サイトのページビューを増やし、直帰率を減らすことができます。
このガイドでは、WordPressテーマとあなたのスキルレベルに応じて、ナビゲーションメニューをスタイル設定するためのさまざまな方法を説明します。以下のクイックリンクを使用して、このチュートリアルをナビゲートし、あなたに最適な方法を見つけてください。
- 方法1:フルサイトエディター(ブロックテーマ)でナビゲーションメニューをカスタマイズする
- 方法2:テーマカスタマイザーでナビゲーションメニューをカスタマイズする(クラシックテーマ)
- 方法3:ページビルダープラグインでナビゲーションメニューをカスタマイズする(推奨)
- 方法4:ビジュアルCSSエディターでナビゲーションメニューをカスタマイズする(よりカスタマイズ可能)
- Method 5: Customize Your Navigation Menu With Code (Advanced)
方法1:フルサイトエディター(ブロックテーマ)でナビゲーションメニューをカスタマイズする
ブロックテーマを使用しており、フルサイトエディターを使用してサイトのナビゲーションメニューをスタイル設定したい場合は、この方法が最適です。
まず、WordPressダッシュボードに移動し、外観 »エディターに移動します。
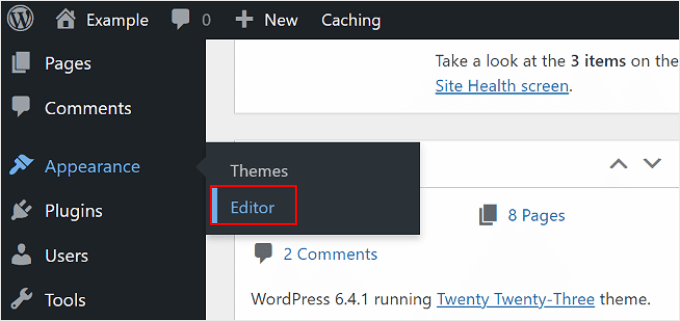
ここで、ブロックテーマのさまざまな部分をカスタマイズするオプションが表示されます。
「ナビゲーション」をクリックしてください。
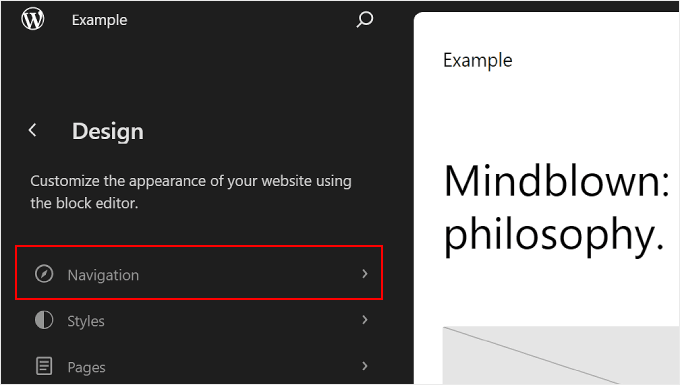
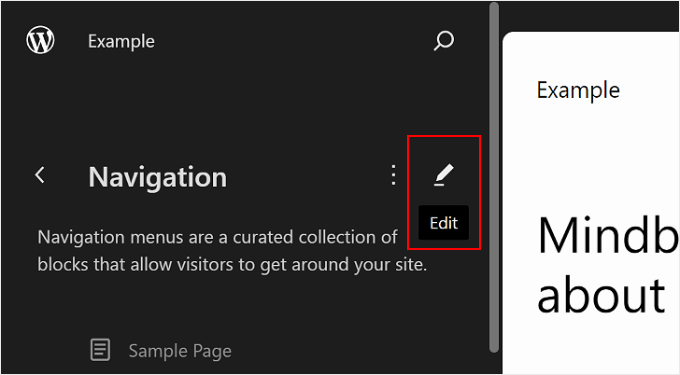
次のページで、鉛筆の「編集」アイコンをクリックします。
これにより、ナビゲーションブロックを編集できるブロックエディターが開きます。
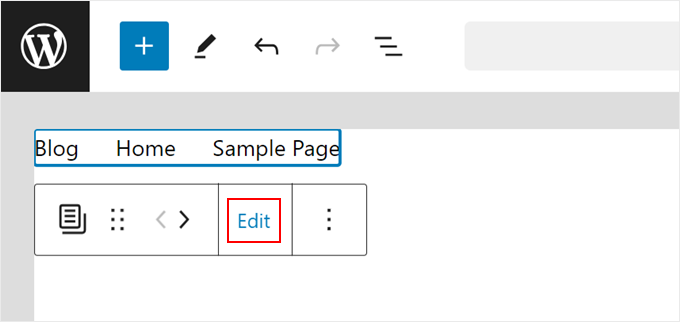
ブロックエディターに入ったら、WordPressウェブサイトのページをナビゲーションメニュー項目として表示する「ページリスト」ブロックをクリックします。
次に、「編集」をクリックします。
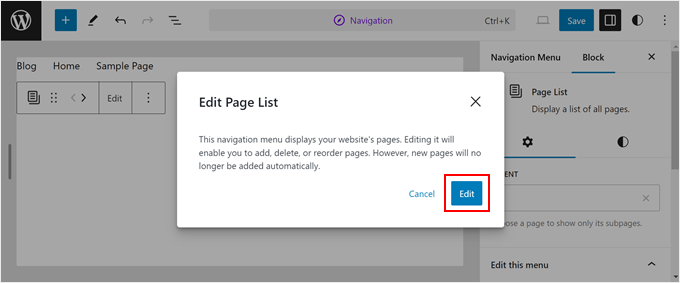
ポップアップウィンドウが表示され、ページリストブロックを編集できるようになったことが通知されます。ブロックのメニュー項目を編集、削除、並べ替え、追加できます。
「編集」をクリックして続行します。
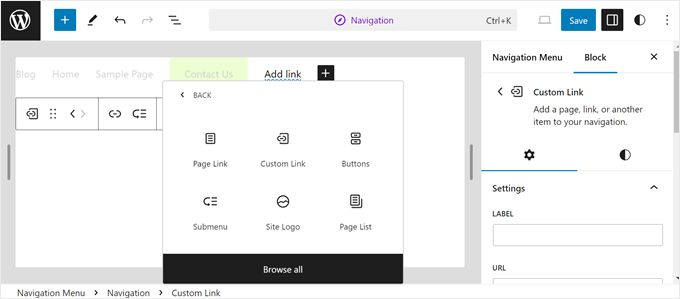
ナビゲーションメニューのブロックエディターは、ページや投稿を編集するときと同じように機能します。カスタムリンク、行動喚起ボタン、検索フォーム、サイトロゴなど、他のメニュー要素を自由に追加できます。
フルサイトエディターでのメニュー管理についてさらに詳しく知りたい場合は、フルサイト編集ガイドのナビゲーションメニューの編集方法のセクションをご覧ください。このセクションでは、サブメニューの作成についても説明しています。
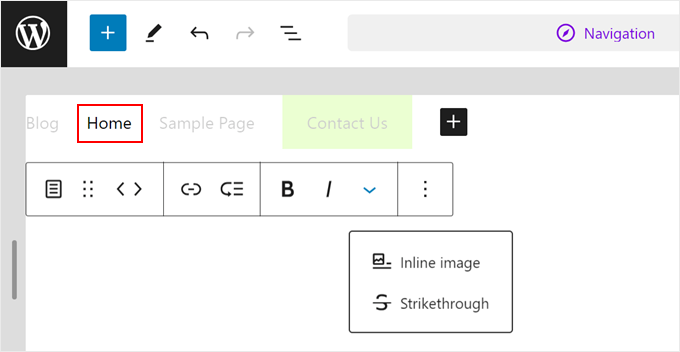
さて、スタイリングに移りましょう。ブロックをクリックして開始してください。
ブロックによっては、ツールバーにカスタマイズオプションが用意されている場合があります。たとえば、ページリンクを選択した場合、必要に応じて太字、斜体、取り消し線、並べ替えを行うことができます。
これらのツールを使用して、他のメニュー項目から単一のメニュー項目を強調表示できます。
右側の設定パネルで、「ブロック」タブに切り替え、その下の「スタイル」タブに移動します。
ここでは、ブロックの色、タイポグラフィ、寸法、境界線、影をカスタマイズできます。
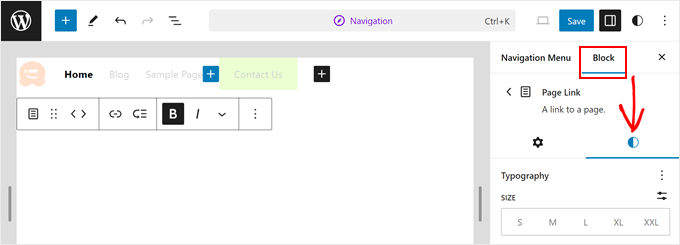
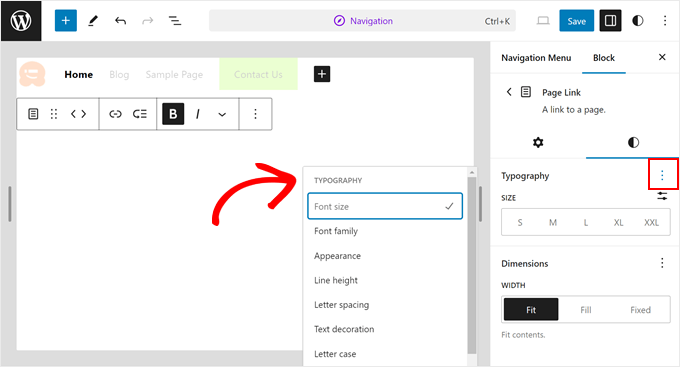
ブロックにはデフォルトのスタイル設定がある傾向があります。たとえば、ページリンクを編集している場合、「フォントサイズ」や「幅」などのオプションしか表示されない場合があります。
しかし、心配しないでください。これらのオプションの隣にある3点メニューをクリックするだけで、フォントファミリーや文字間隔の変更など、より多くのカスタマイズが可能になります。
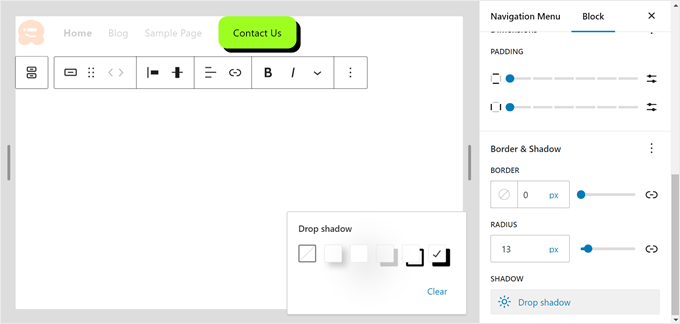
同様に、ナビゲーションメニューにボタンブロックがある場合、それをクリックすると、スタイル、テキスト、背景色、タイポグラフィ、寸法、境界線、さらには影をカスタマイズするオプションが表示されます。
詳細については、コールトゥアクションボタンを追加する方法に関するガイドをご覧ください。
ナビゲーションメニューの 背景色 を変更したい場合は、テーマのヘッダーテンプレートを編集する必要があります。
開くには、上部にある「ナビゲーション」と表示されているコマンド検索フィールドをクリックします。次に、「ヘッダー」と入力してEnterキーを押します。

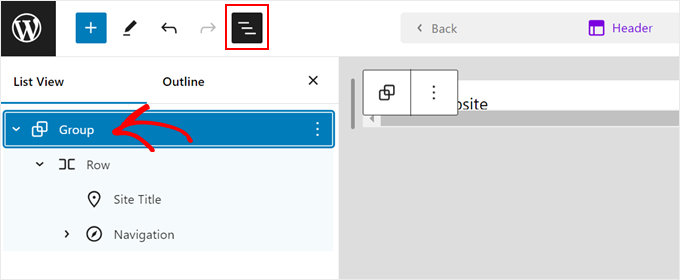
次に、リストビューを開き、グループを選択します。
このグループは、ヘッダーのサイトタイトルとナビゲーションメニューで構成されます。
次に、ブロック設定サイドバーの「スタイル」タブを開き、カラーセクションの「背景」をクリックします。
その後、ヘッダーテンプレートの背景色を選択するだけです。
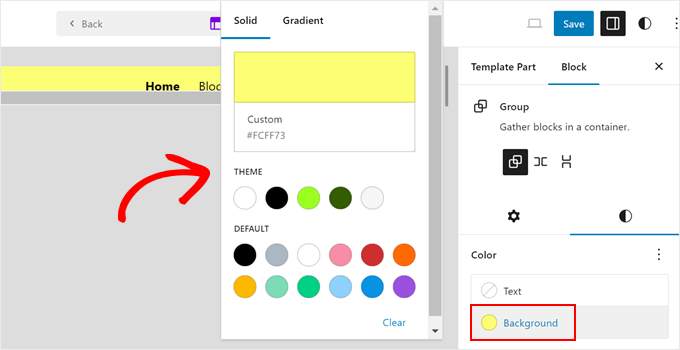
ナビゲーションメニューのスタイルに満足したら、[保存] ボタンをクリックするだけで、新しいメニューとヘッダーが WordPress ブログ またはサイトで公開されます。
デモサイトでのナビゲーションメニューは次のようになります。
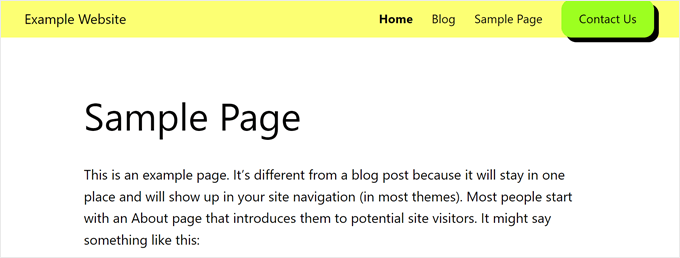
スタイルの選択肢は、特定のテーマ全体のスタイリングオプションによって異なることを覚えておいてください。
テーマのグローバルスタイルをカスタマイズしたい場合は、右上にある「スタイル」ボタンをクリックする必要があります。
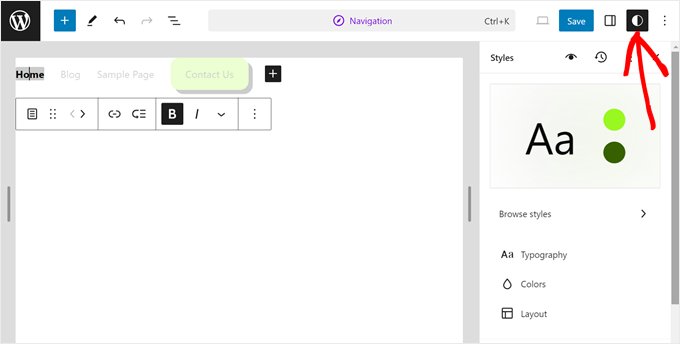
ここから、ウェブサイト全体のタイポグラフィ、色、レイアウトを変更できます。
注意: ここで行った変更は、ナビゲーションメニューだけでなく、テーマの他の部分にも影響することに注意してください。
詳細については、フルサイト編集ガイドのウェブサイトのグローバルスタイルを変更する方法のセクションをご覧ください。
方法2:テーマカスタマイザーでナビゲーションメニューをカスタマイズする(クラシックテーマ)
この方法は、組み込みのテーマカスタマイザーを使用してナビゲーションメニューをスタイル設定したいクラシック WordPress テーマを使用しているユーザー向けです。
前の方法と同様に、メニュー項目自体を管理するのではなく、メニューの外観のスタイル設定に焦点を当てます。
クラシックテーマでメニューを作成および管理する方法については、WordPressでナビゲーションメニューを追加する方法に関するガイドをご覧ください。カスタムメニューでメニューを作成し、異なるメニューロケーションに割り当て、ウィジェットとしてメニューを追加する方法について説明しています。
テーマカスタマイザーを使用するには、WordPressダッシュボードに移動し、外観 » カスタマイズに移動します。次に、アクティブなテーマの横にある「カスタマイズ」ボタンをクリックします。
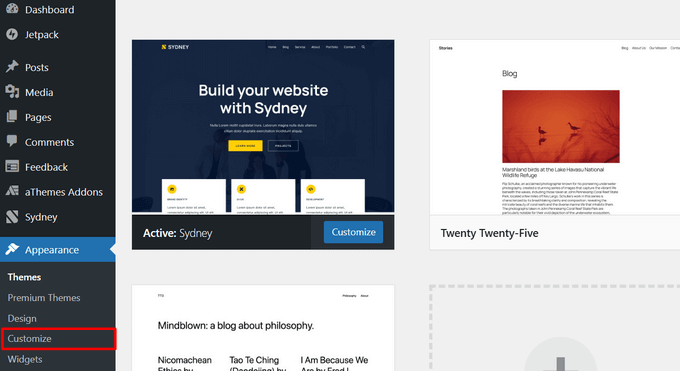
ここでは、テーマのさまざまな側面をカスタマイズするためのオプションが表示されます。これは使用しているテーマによって異なります。ほとんどの場合、WordPressテーマには「メニュー」オプションがありますが、サードパーティの開発者が他の設定を追加することもあります。
例えば、Sydneyテーマには、メニューカスタマイズ用の専用ヘッダービルダーがあります。テーマのドキュメントを参照して、特別なメニュー設定が追加されているか確認してください。
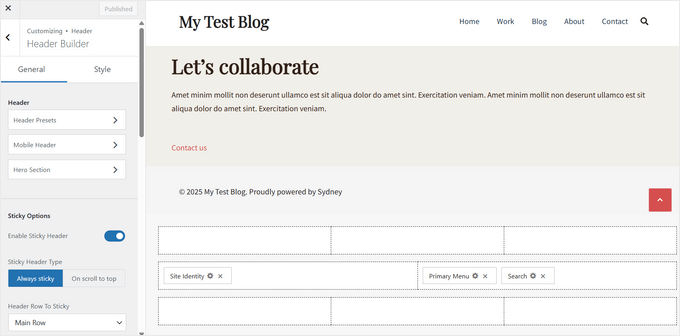
テーマにそのようなカスタマイズオプションがない場合でも、心配しないでください。カスタムCSSを使用してメニューを簡単にスタイル設定できます。
まず、「メニュー」セクションをクリックします。
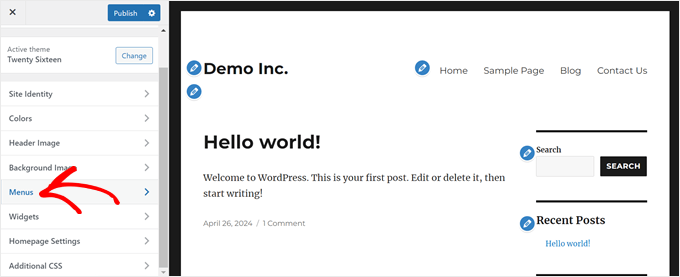
次のページで、歯車アイコンの「設定」をクリックし、「CSSクラス」を選択します。
これにより、各メニュー項目に一意のCSSクラスを割り当てることができ、後で個別にスタイル設定できるようになります。
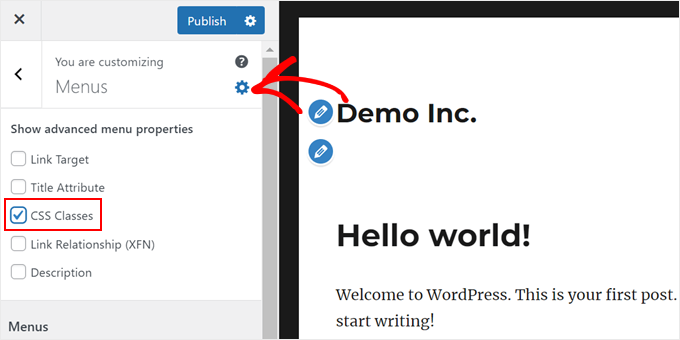
次に、パネルを下にスクロールします。
次に、プライマリメニューを開きます。
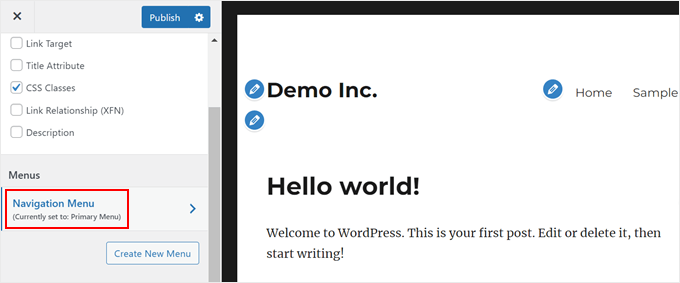
次に、変更したいメニュー項目を見つけてクリックして展開します。
カスタムCSSクラスを追加する新しいオプションが表示されます。以下の例では、お問い合わせページにCSSクラスcontact-usを追加しています。
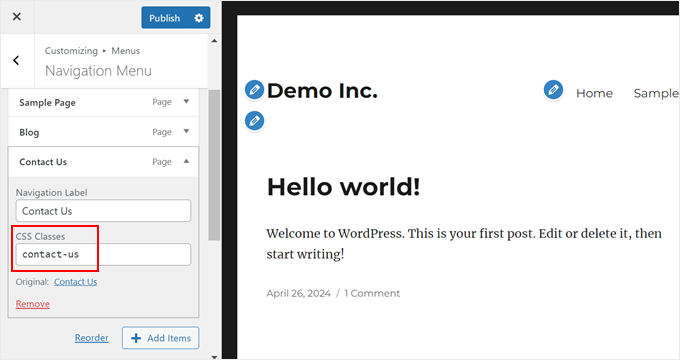
メニュー項目にCSSクラスを割り当てたら、テーマカスタマイザーのメインメニューに戻ります。
次に、「追加CSS」をクリックします。
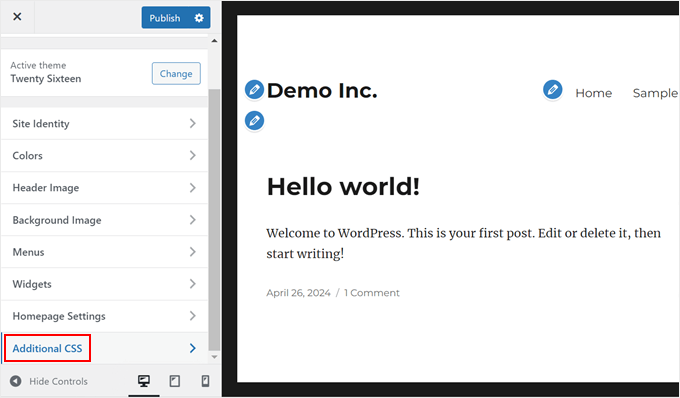
ここで、ナビゲーションメニューをスタイル設定するためのカスタムCSSコードを追加できます。
いくつかの例を見てみましょう。CSS クラスや 16 進数のカラーコードは自由に編集してください。
メニュー項目の背景色を変更する
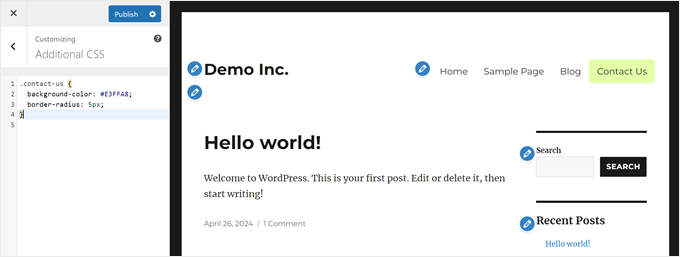
以下のコードスニペットは、CSSクラスcontact-usを持つメニュー項目の背景色を緑色(#E3FFA8)に変更し、角丸(border-radius: 5px)を追加します。
.contact-us {
  background-color: #E3FFA8;
  border-radius: 5px;
}
デフォルトのメニューリンクの色を変更する
このコードスニペットは、プライマリメニューリスト(#primary-menu-li a)内のすべてのメニューリンクの色を赤(#ff0000)に変更します:
.primary-menu li a {
    color: #ff0000;
}
テーマのプライマリメニューのCSSクラスは、私たちのものとは異なる場合があることに注意してください。

テーマのCSSクラスのプライマリメニューを確認するには、ナビゲーションメニュー領域のインスペクトツールを使用できます。
次に、「menu」または「navigation-menu」というHTMLコードを探します。その隣にそれを定義するCSSクラスがあるはずです。

メニュー項目にホバーエフェクトを追加する
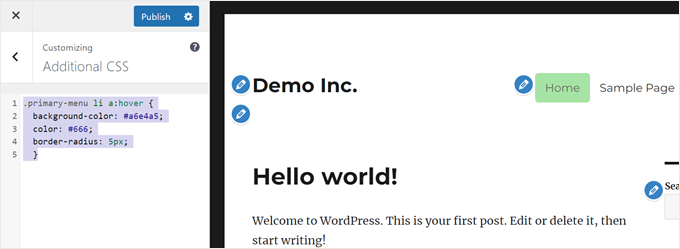
このコードスニペットは、プライマリメニューリスト(#primary-menu li)内のすべてのメニュー項目を対象とし、ホバー効果を追加します。
.primary-menu li a:hover {
  background-color: #a6e4a5;
	color: #666;
	border-radius: 5px;
	}
メニュー項目にユーザーがカーソルを合わせると、背景色が薄い緑色 (#a6e4a5) に、テキストの色が濃い灰色 (#666) に変わり、角丸 (border-radius: 5px) が追加されます。
WordPressで透明なナビゲーションメニューを作成する
このCSSコードスニペットは、ナビゲーションメニューを透明にすることができます。
#site-navigation {
background-color:transparent;
}
このエフェクトを使用すると、背景画像とブレンドされ、ウェブサイトにクリーンでモダンな雰囲気を与えます。

さらなるインスピレーションを得るために、以下のガイドをご覧ください。
これらはあくまで開始のためのいくつかの例です。これらの同じ方法を使用したいが、追加のCSSセクションが見つからない場合は、テーマカスタマイザーが見つからない問題を修正する方法に関するガイドをご覧ください。
方法3:ページビルダープラグインでナビゲーションメニューをカスタマイズする(推奨)
この方法は、ナビゲーションメニューの外観をより細かく制御したいが、初心者向けの使いやすいエクスペリエンスを好む人に最適です。ウェブサイトの構築の初期段階にあり、まだ公開していない場合にも最適なオプションです。
ページビルダープラグインを使用すると、コードを書かずにドラッグアンドドロップ機能を使用してウェブサイトのレイアウトを視覚的にデザインできます。これは初心者にとって理想的です。
このセクションでは、ページビルダープラグインとしてSeedProdを使用します。SeedProdは使いやすいインターフェースを提供し、ナビゲーションメニューを際立たせるための追加ブロックと機能が含まれています。
注意:ここではSeedProd Proを使用します。テーマビルダー機能はProバージョンでのみ利用可能です。ただし、SeedProdがどのようなものかを知るために、無料版を自由に試してみてください。
ステップ1:SeedProdのインストールと有効化
まず、WordPressウェブサイトにSeedProdプラグインをインストールして有効化します。詳細については、WordPressプラグインのインストール方法のガイドをご覧ください。
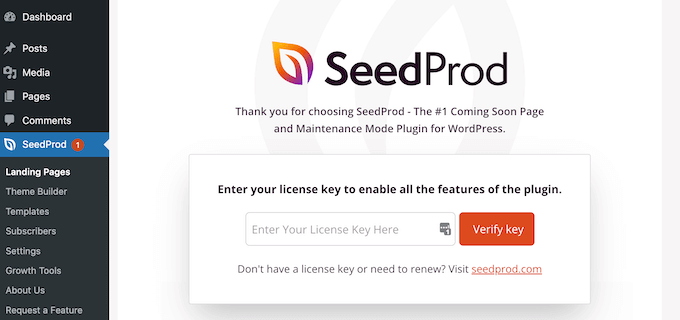
有効化したら、WordPressダッシュボードからSeedProd »設定に移動します。次に、SeedProdライセンスキーを入力し、「キーを確認」ボタンをクリックします。
ステップ2:SeedProdテーマテンプレートキットを選択する
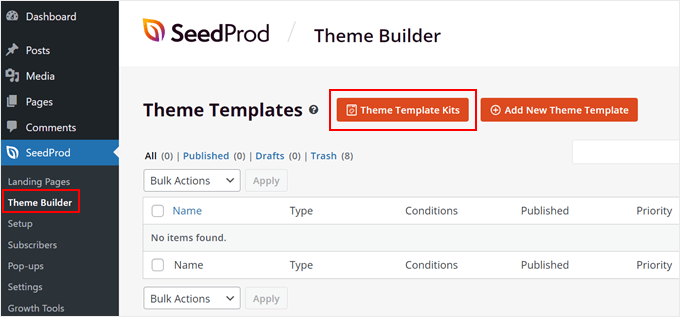
さて、SeedProd » Theme Builder に移動します。ここで、カスタムWordPressテーマをゼロから作成できます。
「テーマテンプレートキット」ボタンをクリックすると、デザイン済みのテンプレートギャラリーが表示されます。
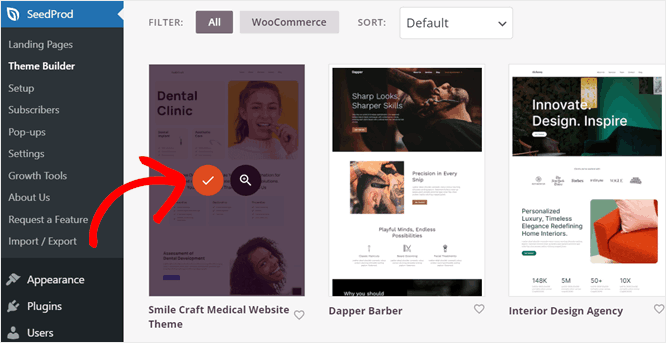
このチュートリアルでは、Smile Craft Medical Website Theme を使用します。ただし、ビジネスに適したテンプレートを自由に選択してください。
これらのテーマテンプレートキットは、虫眼鏡アイコンをクリックしてプレビューすることで、ウェブサイトのスタイルに合うものを確認できます。
気に入ったテーマテンプレートを見つけたら、オレンジ色のチェックマークアイコンをクリックしてテンプレートパーツをインポートします。
SeedProdは、ヘッダー、フッター、ホームページなどの必須のウェブサイトセクションを作成します。これらはすべてドラッグアンドドロップビルダーを使用して視覚的に編集できます。
ステップ3:メニューデザインのカスタマイズ
テーマテンプレートがインストールされたら、テーマビルダーページに戻ります。
SeedProdのテーマテンプレートでは、ナビゲーションメニューはヘッダーテンプレート部分にあります。
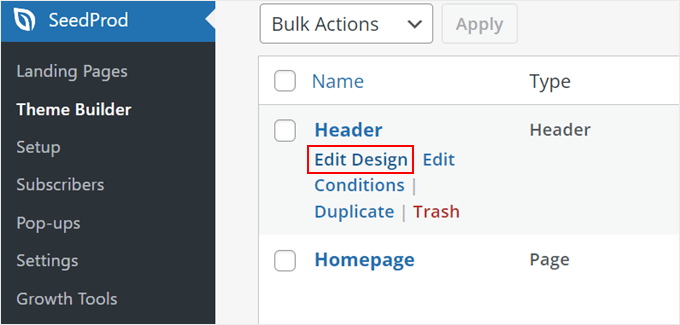
ヘッダーテンプレートを編集するには、マウスカーソルを合わせて「デザインを編集」リンクをクリックするだけです。これにより、テンプレートがドラッグアンドドロップエディターで開きます。
これで、テーマに応じて、ナビゲーションメニューブロック(ナビゲーションメニューです)とその他のブロックで構成されるヘッダーセクションが表示されます。
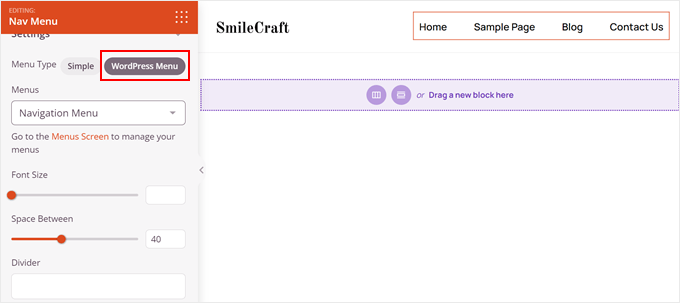
メニューを編集するには、ナビゲーションメニューブロックをクリックします。すると、左側のサイドバーにブロック設定のリストが表示されます。
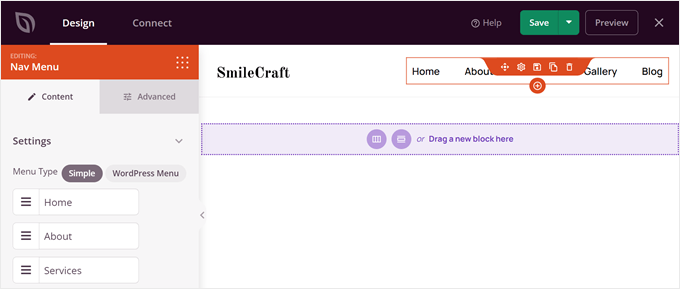
デフォルトでは、SeedProdは「シンプル」メニューを使用して、使用するテーマテンプレートに基づいてメニューを作成します。ただし、「WordPressメニュー」オプションを選択して、標準のWordPressメニューエディター(外観 » メニュー)で既に作成した既存のメニューを使用することもできます。
両者の違いを詳しく見ていきましょう。シンプルな方法では、ページビルダーインターフェース内で直接リンクを追加、編集、削除できます。
新しいメニュー項目を作成するには、「+新しい項目を追加」ボタンをクリックします。
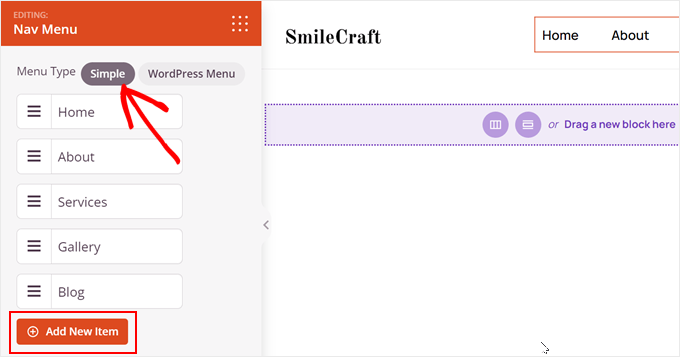
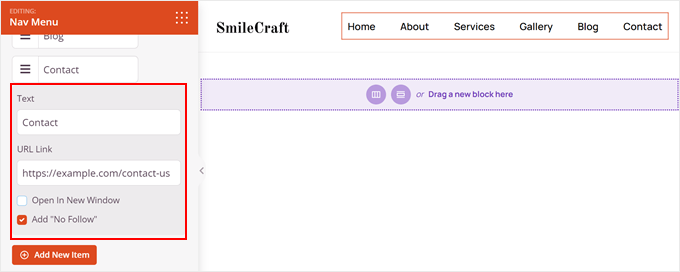
ここで、テキストラベルとリンクURLを入力できます。
次に、新しいウィンドウでリンクを開くを選択し、必要であればnofollow属性を追加します。以下のようにします。
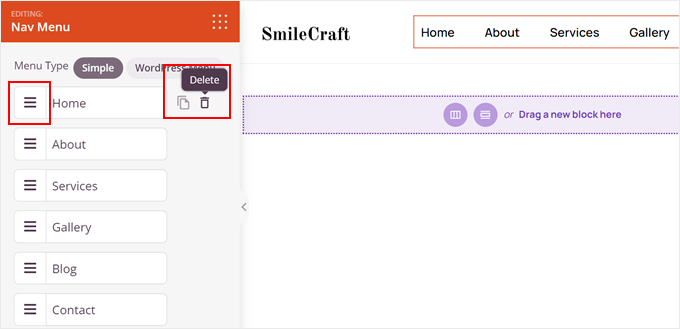
メニュー項目は、項目横の3本線のボタンをクリックして上下にドラッグすることで並べ替えることもできます。
メニュー項目を削除するには、その項目にカーソルを合わせ、横にあるゴミ箱アイコンをクリックするだけです。
このオプションの欠点は、ドロップダウンメニューを作成できないことです。だからこそ「シンプル」と呼ばれているのです。
一方、「WordPressメニュー」オプションでは、SeedProdエディターから直接メニュー項目を管理することはできません。メニューエディターで行う必要があります。
幸いなことに、既存のメニューがドロップダウンメニューであれば、この方法で表示できます。
どの方法を選択しても、フォントサイズやメニュー項目の間の間隔をカスタマイズしたり、テキスト区切りを追加したり、配置を調整したりできます。
「詳細設定」タブには、さらに多くのカスタマイズオプションがあります。
リストのレイアウトを横から縦に変更したり、タイポグラフィを調整したり、テキストやホバーの色を変更したり、テキストシャドウを追加したりすることもできます。
![SeedProd の [高度] タブに切り替える SeedProd の [高度] タブに切り替える](https://www.wpbeginner.com/wp-content/uploads/2017/11/nav-menu-advanced-min.png)
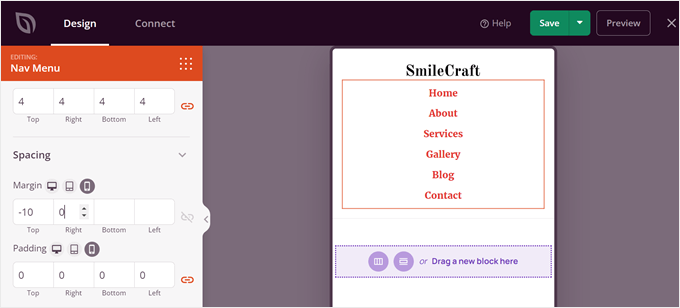
下にスクロールすると、デスクトップ、タブレット、モバイルデバイスのパディングとマージンを制御できます。
このように、メニューはどのような画面サイズでも簡単にナビゲートできます。
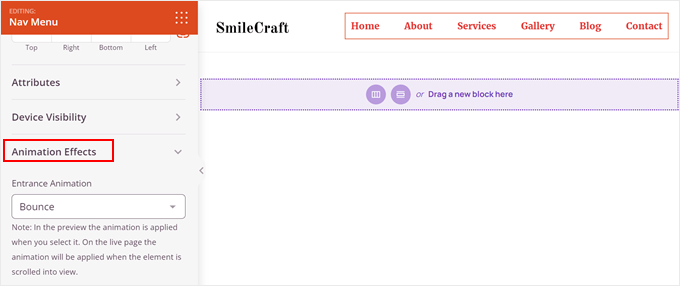
メニューを目立たせたいですか?
SeedProd を使用すると、アニメーションを追加して、より魅力的なユーザーエクスペリエンスを実現できます。詳細については、WordPress で CSS アニメーションを追加する方法に関するステップバイステップガイドをお読みください。
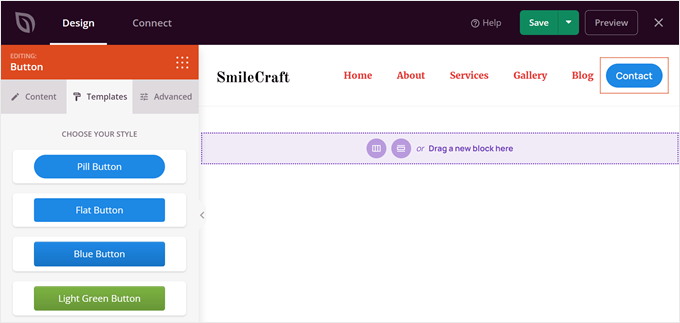
ナビゲーションバーに新しいコールトゥアクションボタンを追加したい場合は、SeedProdのボタンブロックを使用できます。
左側のサイドバーにあるブロックファインダーを開き、左側のサイドバーにあるボタンブロックを見つけます。
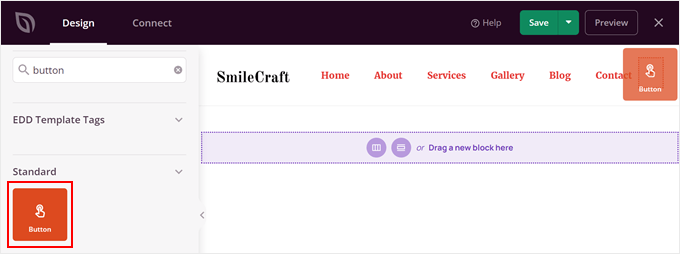
次に、ブロックをヘッダーのどこにでもドラッグします。
完了したら、ボタンのコールトゥアクション、リンク、スタイル、その他の設定をカスタマイズするだけです。
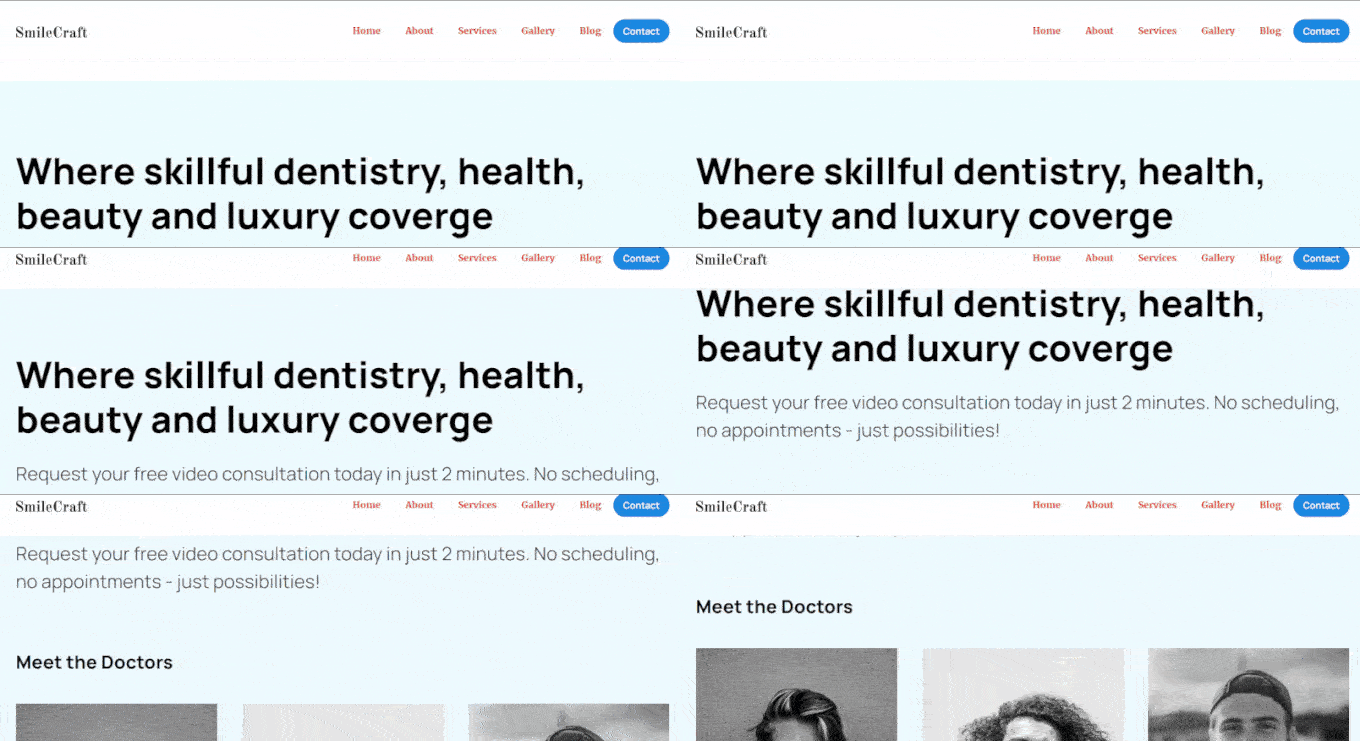
ユーザーが下にスクロールしてもページの上部に固定されるスティッキーメニューを作成することもできます。これにより、別のページに移動したいときに毎回上に移動する必要がなくなります。
これを行うには、セクションにカーソルを合わせると紫色の線が表示されるので、歯車の「設定」アイコンをクリックします。

次に、「詳細設定」タブに切り替えます。
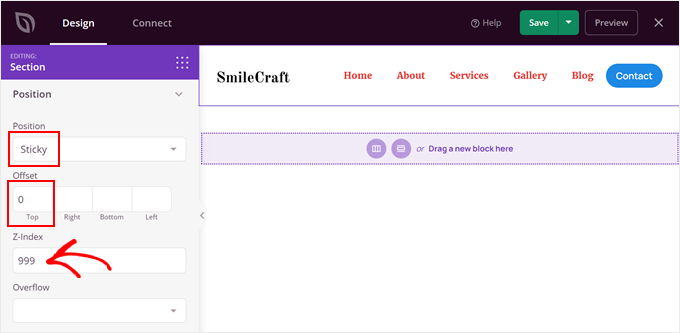
次に、「位置」メニューまで下にスクロールします。
![SeedProd の詳細メニューで [Position] タブを選択 SeedProd の詳細メニューで [Position] タブを選択](https://www.wpbeginner.com/wp-content/uploads/2017/11/seedprod-position-min.png)
ここで、「固定」を選択します。
その後、上部オフセットにゼロを、z-index に高い数値(999 など)を追加します。これにより、ヘッダーが常にページの上に表示されるようになります。
カスタマイズしたナビゲーションメニューに満足したら、「保存」ボタンをクリックします。
ステップ4:カスタムWordPressテーマを公開する
この段階で、新しいカスタムWordPressテーマを使用する準備が整いました。有効化するには、「テーマビルダー」ページに戻り、「SeedProdテーマを有効化」ボタンをオンにしてください。

あとは、ウェブサイトを表示して、新しいカスタムナビゲーションメニューを確認するだけです。
デモサイトでのナビゲーションメニューは次のようになります。
方法4:ビジュアルCSSエディターでナビゲーションメニューをカスタマイズする(よりカスタマイズ可能)
この方法は、WordPressの組み込み機能よりも多くのカスタマイズオプションを提供しますが、ページビルダープラグインを使用するほど柔軟ではありません。とはいえ、テーマを完全に置き換えることなくナビゲーションメニューのデザインを少し変更したい場合には、優れたソリューションです。
この方法は、スタイリングオプションが不足しているクラシックテーマを使用しているが、方法2のCSS編集に慣れていない人にとっても良い代替手段です。
ここでは、プレミアムWordPressビジュアルCSSエディタープラグインであるCSS Heroの使用方法を説明します。これにより、コードを書かずにウェブサイトを視覚的にデザインできます。HTMLやCSSの知識は必要ありません。
注意: CSS Heroのレビューをチェックして、その機能について詳しく学んでください。WPBeginnerユーザーは、CSS Heroを当社の限定クーポンコードで最大34%割引で購入することもできます。
まず、WordPressにCSS Heroプラグインをインストールしてください。WordPressプラグインのインストール方法に関するガイドをこちらで参照して、詳細をご確認ください。
CSS Hero プラグインを有効にすると、WordPress 管理ツールバーに「CSS Hero」という新しいボタンが表示されます。このボタンをクリックすると、ビジュアルエディターが起動します。
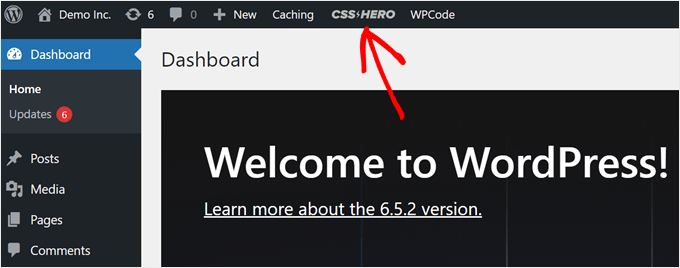
CSS HeroはWYSIWYGインターフェースを使用しています。ボタンをクリックすると、画面の左側にCSS Heroペインとともにウェブサイトが開きます。
ナビゲーションメニューを編集するには、マウスをメニューの上に移動します。CSS Heroが境界線でメニューをハイライト表示します。ハイライトされた領域をクリックすると、メニューのカスタマイズを開始できます。
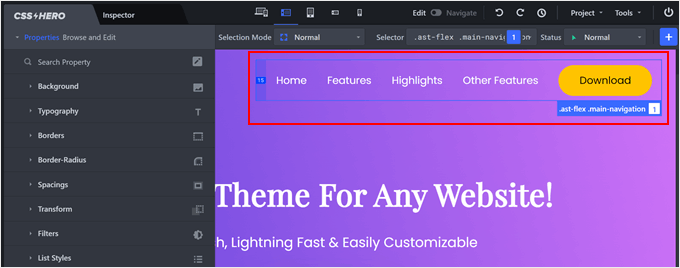
CSS Hero を使用すると、背景、タイポグラフィ、境界線、間隔、リスト、さらには追加効果など、ナビゲーションメニューコンテナのさまざまな側面を編集できます。
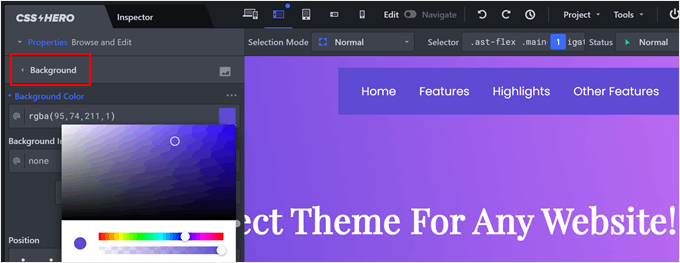
例えば、メニューの背景色を変更したいとします。「背景」をクリックすると、新しい色、グラデーション、または画像を選択できる使いやすいインターフェイスが開きます。
変更を加えると、右側のウェブサイトプレビューにリアルタイムで反映されます。
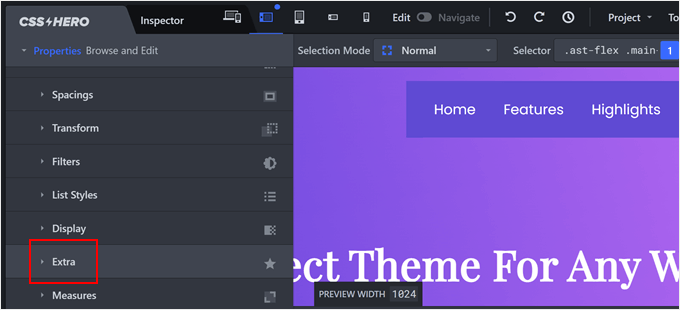
または、メニュー項目にボックスシャドウを追加して、より目を引くようにすることもできます。
これを行うには、「Extra」タブに移動します。
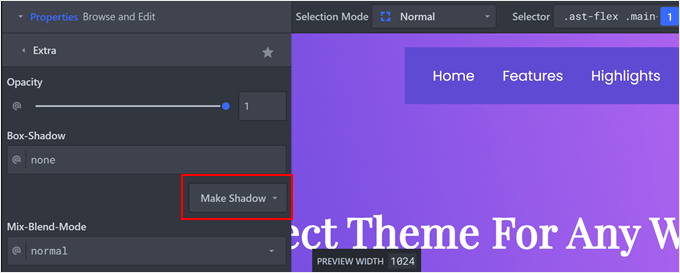
次に、「影を作成」をクリックします。
ここで、影の設定を編集できます。
これで、影の見た目を自由に調整できるようになりました。
シャドウの向き、ぼかしと広がり、位置を自由にドラッグできます。
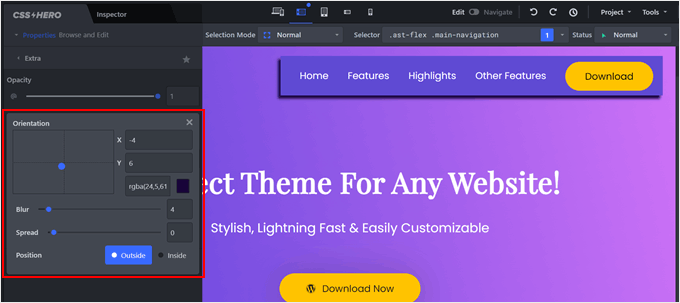
CSS Heroのインターフェースを使えば、サイトに最適なものを見つけるために自由に実験しながら、好きなように変更できます。
プロのヒント:メソッド2の手順に従って個々のメニュー項目にCSSクラスを追加した場合、CSS Heroを使用してそれらの特定のメニュー項目をターゲットにしてカスタマイズし、ナビゲーションメニューの外観をさらに細かく制御することもできます。
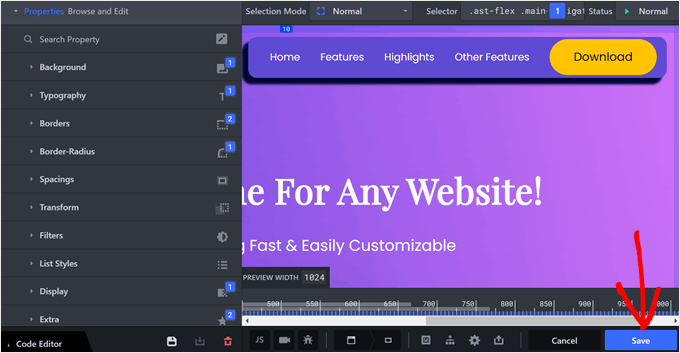
カスタマイズしたメニューに満足したら、「保存」ボタンをクリックして変更を保存してください。
CSS Heroでできることについて詳しくは、これらのガイドをお読みください。
方法 5: コードでナビゲーションメニューをカスタマイズする (上級者向け)
この方法は、コードに慣れているユーザーにより適しています。また、テーマにデフォルトでメニューが含まれていない場合にカスタムメニューを作成することもできます。
カスタムコードスニペットの追加は、functions.phpやheader.phpのようなテーマファイルを編集するため、最初は daunting に思えるかもしれません。しかし、それを容易にする方法があります。
WPCodeというプラグインの使用をお勧めします。これにより、コアファイルを変更することなく、カスタムコードをWordPressサイトに追加するための安全で使いやすい方法が提供されます。
WordPress テーマにカスタムナビゲーションメニューを追加する方法に関するガイドでは、WPCode を使用してメニューを作成する手順を説明しています。
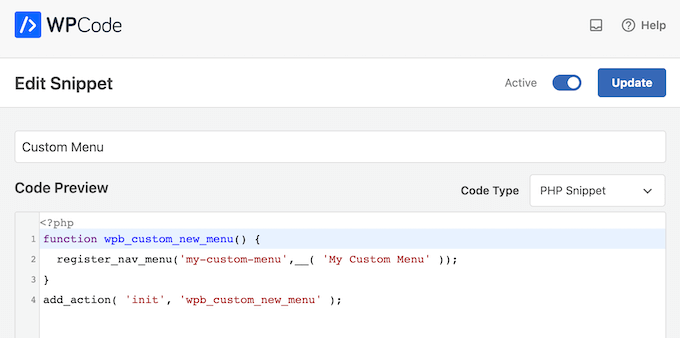
メニューを作成したら、これらのチュートリアルを探索できます。
- WordPressでナビゲーションメニューに画像アイコンを追加する方法
- WordPressヘッダーメニューにボタンを追加する方法
- WordPressでスティッキーなフローティングナビゲーションメニューを作成する方法
それぞれにWPCodeを使用してメニューをカスタマイズする方法が含まれています。
WordPress ナビゲーションメニューをカスタマイズするための究極ガイド
WordPressナビゲーションメニューの基本的なスタイリング方法を理解したところで、メニューをさらにレベルアップさせるためのガイドをいくつかご紹介します。
- WordPressサイトにメガメニューを追加する方法。 メガメニューを使用すると、サブカテゴリを含めることができ、広範なウェブサイトコンテンツを整理するためのユーザーフレンドリーな方法を提供します。
- モバイル対応のレスポンシブWordPressメニューの作成方法。このガイドでは、さまざまな画面サイズに適応するレスポンシブメニューの作成方法を説明します。
- WordPressにフルスクリーンレスポンシブメニューを追加する方法。 このチュートリアルでは、アクティブ化されたときに画面全体に広がるフルスクリーンメニューを実装する方法を学び、大胆なナビゲーションエクスペリエンスを提供します。
- WordPressテーマにスライドパネルメニューを追加する方法。 スライドパネルメニューは、ユーザーがスワイプするかボタンをクリックして表示するまでメインナビゲーションを隠す、省スペースなソリューションです。
- WordPressで縦型ナビゲーションメニューを作成する方法 縦型ナビゲーションメニューは、サイドバーやウェブサイトのその他の縦長のスペースに多数のメニュー項目を表示するのに役立ちます。
- WordPress メニューにソーシャルメディアアイコンを追加する方法。 ナビゲーションメニューにソーシャルメディアアイコンを直接統合して、訪問者があなたとつながりやすくします。
- WordPressで折りたたみ可能なサイドバーメニューを作成する方法。 ページが多いですか?サイドバーに折りたたみ可能なメニューを追加して、ユーザーがウェブサイトをナビゲートしやすくします。
この記事が、WordPressのナビゲーションメニューのスタイリング方法を学ぶのに役立ったことを願っています。また、WordPressサイトデザインの重要な要素に関する究極のガイドや、WordPressでカスタムページを作成する初心者向けガイドもチェックしてみてください。
この記事が気に入ったら、WordPressのビデオチュートリアルについては、YouTubeチャンネルを購読してください。 TwitterやFacebookでもフォローできます。


シドニー・ピアソン
「メニュー」オプションが「外観」メニューオプションの下から消えてしまいました。メニューとそのオプションのコンテナCSSを確認する別の方法はありますか?
ありがとうございます!
WPBeginnerサポート
ブロックテーマを使用しており、外観メニューがない場合は、要素を検証(Inspect element)を使用してCSSコンテナ情報を確認できます。要素を検証(Inspect Element)の使用方法については、以下のガイドをご覧ください。
https://www.wpbeginner.com/wp-tutorials/basics-of-inspect-element-with-your-wordpress-site/
管理者
Kristyna
こんにちは、アドバイスをお願いします。
CSSを追加して、メニュー項目の1つを異なる色にすることに成功しました。しかし、下にスクロールすると、固定ナビゲーションのプライマリメニューも一緒にスクロールし、その項目の変更された色が元の色に戻ってしまいます。スクロールダウンしても、その項目の新しい色を維持するにはどうすればよいですか?
ありがとうございます!
WPBeginnerサポート
スクロールダウンすると、テーマがメニューを変更する場合があります。インスペクト要素を使用すると、スクロールダウン中にメニュー項目を選択してCSSを追加できるはずです。インスペクト要素の使用方法に関するガイドを以下に示します。
https://www.wpbeginner.com/wp-tutorials/basics-of-inspect-element-with-your-wordpress-site/
管理者
Venkat Vavilala
こんにちは、
メニューのフォントサイズを大きくしたいのですが、どうすればいいですか?
デフォルトの場合は、どのようにカスタマイズできますか?
メニューのフォントサイズを大きくする簡単な方法を教えてください
WPBeginnerサポート
この記事のどの方法を使用するかによって異なります。たとえば、CSSメソッドを使用する場合、メソッド2の例と同様に要素を検査し、フォントサイズを変更します。
管理者
ブディ・サントソ
Hello Admin.
How the Orange ribbon navigation menu in this site was made?
Thanks
WPBeginnerサポート
To understand that you would want to take a look at our guide on using inspect element here: https://www.wpbeginner.com/wp-tutorials/basics-of-inspect-element-with-your-wordpress-site/
管理者
maria
このサイトのメニューはどうやって作ったのですか?
テーマファイルを編集する必要がありましたか?
ありがとうございます
WPBeginnerサポート
Our theme was one we custom created
管理者
トリッシュ
WooCommerceサイトのショップページに、水平方向に、販売されているすべての製品カテゴリを持つメニューを作成したいのですが。どうすればできますか?事前にご協力いただきありがとうございます。
WPBeginnerサポート
テーマにその場所にメニューがある場合、次を使用して通常のメニューを設定できます。
https://www.wpbeginner.com/beginners-guide/how-to-add-navigation-menu-in-wordpress-beginners-guide/
次に、条件付きロジックを使用して、この記事で説明している方法でショップページにのみ表示させることができます: https://www.wpbeginner.com/plugins/how-to-add-conditional-logic-to-menus-in-wordpress/
管理者
Kushal Sonwane
大変な作業でしたが、この記事を読んだ後では、ナビゲーションメニューのカスタマイズはとても簡単になりました。
ありがとうございます。
WPBeginnerサポート
You’re welcome
管理者
リサ
私はこれをやるのが初めてで、WPでOceanwpというテーマを使ってサイトを作成しています。メニューからCCSをクリックして、あなたが提案した通りにしました。ドロップダウンメニューの矢印を削除しようとしていますが、何を試しても削除できません。
事前にご協力に感謝いたします。
WPBeginnerサポート
こんにちは、Lisaさん。
テーマ作成者に問い合わせてみてください。彼らが手助けしてくれるはずです。
管理者
Anirudhya
どのようなテーマを使用していますか?WordPressブログを始めたばかりで、教育目的でシンプルなレイアウトのブログが欲しいのですが。
WPBeginnerサポート
アニルディヤさん、
WPBeginner専用に作成されたカスタムテーマを使用しています。
管理者
Bobby
こんにちは、HTMLコードではどうですか?
ネストされたメニューにヘッダーを追加したいのですが、どこにどのように配置すればよいかわかりません。
Daniela
こんにちは、
セールスページ用に作成したメニューの外観のみを変更したいです。高さを変更し、ロゴを追加したいです。
私はプロではないので、メニューに何か変更がないかいくつか試しましたが、何も変わりませんでした。試したことは以下の通りです。
#Salespage-menu { background:#2194af; height:40px; }
道順を教えていただけますか?
ご尽力いただき、誠にありがとうございます!
ユージーン
皆さん、こんにちは。
ナビゲーションメニューに問題があり、助けていただけると大変助かります。プライマリメニュー自体は見た目も完璧なのですが、問題はドロップダウンするサブメニューで、親メニューとの間に約100pxほどの大きな隙間があることです。
サブメニューにカーソルを合わせようとすると、表示から消えてしまいます。
親メニューのすぐ下に移動させて、開いたままクリック可能にしようと、考えられることはすべて試しましたが、今のところ失敗しています。
これは、Point Themeで使用されているカスタムCSSです:
#logo { margin: 0; } .site-branding { padding: 0; }
.post-info { display: none; }
#navigation ul li a { min-height: 22px; padding: 5px 10px 5px 10px; }
.post-date { display: none; }
感謝と敬具。
WPBeginnerサポート
ユージンさん、
この問題の原因は特定できていません。テーマのCSSとレイアウト、および使用されているクラスによって異なります。このカスタムCSSを試すことができます:
.primary-navigation li ul { margin:0px; padding:0px; }1-click Use in WordPress
管理者
ユージーン
残念ながら、それも効果がありませんでした…
試してくれてありがとう。新しいテーマが必要なようです。
よろしくお願いいたします。
Amirul Farhan
こんにちは。
テーマが独自のメニューデザインを持っている場合でも、プラグインは機能しますか?
ありがとうございます
Rida
ブートストラップを使用したい場合は、ヘッダー.phpに簡単な1行コードで独自のCSSクラスを追加するだけです。
‘primary’, ‘container’ => ‘div’, ‘container_class’ => ‘collapse navbar-collapse’, ‘menu_class’ => ‘nav navbar-nav pull-right’, ‘menu_id’ => ‘primary-menu’ ) ); ?>
Dhany
イェイ…またプラグインですね。プラグインの使い方をたくさん共有してくれますね。WordPress の使い方はあまり…素晴らしい仕事です。
WPBeginnerサポート
Dhanyさん、こんにちは。
フィードバックありがとうございます。WPBeginnerでは、ターゲットオーディエンスは主に初心者レベルのユーザーです。彼らのほとんどはCSS、HTML、PHPなどに慣れていません。プラグインを使用すると、ウェブサイトを壊すことなく、より簡単に作業を進めることができます。
管理者
アンドリュー
Dude…it says ‘beginner’ in the URL.
さらに…途中で手動オプションが配置されていました。
Malin
こんにちは!Baskervilleテーマを使用したサイトのメニューで、絶望的に助けが必要です。最新のアップデートでメニューが完全にめちゃくちゃになりました!助けてください!
Malin
Raymond
これは、WordPressでブートストラップテーマのスタイルを機能させる方法を理解しようとしていたときに、非常に役立ちました。ありがとうございます
Samseen
素晴らしい投稿ですね。
しかし、リスト内の特定の項目をどのようにターゲットにできますか?現在、回避策を実行しましたが、その特定のメニュー項目をターゲットにしたいと考えています。
例えば、特定のメニュー項目の背景色を別の色にしたいとします。これはどのように行えますか?
マルコ
Chrome、Firefox の要素検証ツール。
ベンジャミン
皆さん、こんにちは。コーディング初心者です。本当に助けが必要です。WordPressサイトがあり、サイトのテーマはBaskervilleです。このテーマはメニューを1つしかサポートしていません。好奇心旺盛なページにナビゲーションメニューを作成しようとしています。もしコードがあれば、どこに配置すればよいですか?返信いただけると大変助かります。ありがとうございます。
Arsh Dznr
WordPressでCSSメニューを使用していますが、メニューのドロップダウンが表示されません。助けてください。
ありがとう
umanga
function.php にスクリプトを正しく追加しましたか?
Andika Amri
こんにちは、wpbeginnerさん、素晴らしいチュートリアルです!
vantage テーマを使用しています。メニューの 1 つにカスタムクラス「.menu-about」を既に追加しましたが、stylesheet.css でスタイル設定しても全く適用されません。何か提案はありますか?
ありがとう!
shaon
Twenty Twelve テーマを使用しています。メニューの色はすでに変更済みです。しかし、ヘッダーのナビゲーションメニューの位置を移動させることができません。ヘッダーのベースラインから下部にスペースが空きすぎています。ヘッダーの下部にぴったりつけたいです。
ニベディタ
こんにちは、
WordPressのCodexを使用してヘッダーにメインメニュー、フッターにフッターメニューを作成しました。現在、私の2つのメニューはページ上で縦に並んでいます。横並びのメニューにするにはどうコードすればよいですか?
至急、助けてください!
TIA
WPBeginnerサポート
そのためにはCSSを使用する必要があります。デフォルトのテーマのコードを調べてください。最も良い例は、twenty thirteenまたはtwenty twelveのテーマです。
管理者
ジュディ
これらのクラスが実際に何を修正しているのか、インフォグラフィックがあればどんなに良いか。例えば:
.current-page-ancestor
.current-menu-parent
.current_menu_parent
.current-page-parent
.current_page_parent
.current-menu-ancestor
そして、.current-menu-parentと.current_menu_parentのように、ダッシュとアンダースコアの違いは何ですか?
あなたに説明してくれたら、一つ作ってあげるよ!
ありがとう…
Tarmizi Achmad
情報ありがとうございます…
Yogesh Kumar
非常に重要なことをお伺いしたいのですが。
あなたのウェブサイトのナビゲーションバーの上にある、リンク「Blog」の上にカーソルを移動すると8つのリンクが表示されるバーのようなものです。私のサイトも同じスタイルで表示されていますが、カーソルを合わせると8つのリンクが横並びで、つまり4つずつ表示されるようにしたいです……。どうか、これは非常に必要としています……できるだけ早く返信してください……
編集スタッフ
通常、メニューは順序なしリスト (ul) で構成されます。サブナビゲーションやドロップダウンがある場合、それらはリスト要素内に独自の順序なしリストとして配置されます。したがって、変更する可能性のある CSS クラスの例は次のようになります。
ul.menu li ul{width: 220px;}
ul.menu li li{float: left; width: 100px;}
これにより、各セカンドレベルのリストアイテムに正確な幅が設定され、左にフロートされます。
管理者
Jim
素晴らしい記事です、ありがとうございます。
そのCSSクラス機能については知りませんでした。少なくとも今は知っています。
本当に私の役に立ちます。
ありがとう。
Nilamkumar Patel
This is very helpful. Prior to this, I had understanding that we can’t add custom classes in wordpress from admin and I always used to do it in functions.php, but this is awsome. These people are rockers. And many thanks to Sayed for this helpful post
wiseroner
great tutorial!! but how do i do something as simple as change the font size? what do i enter in to change the font size? thank you!
wpbeginner
@wiseroner CSSファイル内のメインメニュークラスにfont-sizeを追加するだけではいけません。
wpbeginner
@mriulian 上記のチュートリアルをご覧ください…現在のページのクラスはすでに定義されています…
ヘッダーコードで、メニューコンテナIDとコンテナクラスを定義する必要があります…記事の指示に従えば、機能します。
mriulian
より明確にするために、これが私のコードです。
// 関数ページ内
if (function_exists(‘register_nav_menus’)) { register_nav_menus( array( ‘mainNav’ ) ); }
// ヘッダーページにて
‘main_nav_menu’)); ?>
// cssファイル内
.current{ background-color: #0188AA; color: #fff; text-decoration: none; }
このクラスをナビゲーションに適用するにはどうすればよいですか?(静的なHTMLページでは非常に簡単ですが、WordPressではかなり複雑なようです)。
事前に感謝いたします
mriulian
これを試しましたが、うまくいきませんでした。functionsページでメニューを登録し、それをヘッダーページからメインナビゲーションとして呼び出しました。現在、スタイルシートに現在のページに適用するための.currentクラスがありますが、その方法が明確ではありません。 何か提案をいただけますか?
wpbeginner
WordPressのナビゲーションメニューの仕組みにより、現在のページがどれであるかを自動的に認識します。
iirimina
スクリーンオプションパネルでのCSSクラスについて言及していただきありがとうございます。私のナビゲーションの問題は、特定のページにアクセスしたときに各メニュー項目に特定の背景色が付くようにナビゲーションメニューをスタイル設定する方法です。スタイルシートに.current_page_item{}のようなクラスを作成すると述べていますが、これをheader.phpに適用するにはどうすればよいですか?
Rick
メニュー名にアイコンを追加する方法について、さらに詳しい情報をどこで入手できますか?ここで概説されている多くのことを行うための、本当に良い CSS ガイドは何ですか?
ありがとう
編集スタッフ
CSS-Tricksは良いフォーラムですが、CSSを学ぶにはCSS for Beginnerの本を見るのが良いでしょう。なぜなら、あなたがやっていることは背景画像を追加するだけだからです。
管理者
Francisco
Hello. I absolutely loved this post and found it very useful, particularly the option to set individual CSS classes, so many thanks for this information.
What I was wondering is if it would be possible to dynamically assign CSS classes from the php wp_nav_menu function call to certain types of elements, for instance, to parent menu items only. That way, you wouldn’t have to manually add that class in the Menu Screen every time a new type element (in the example, a new parent item) is created.
Any thoughts on that would be greatly appreciated,
編集スタッフ
はい、それにはMenu Classパラメータを使用します。
管理者
Francisco
私もそう思っていました。確認していただき、そして返信していただきありがとうございます。
では!
Jayesh
良い記事です。
wp_nav_menu()の出力方法を変更したいです。
wp_nav_menu()が生成するHTMLが好きではありません。
メニュー用の素敵なHTMLを持っています。
そのため、wp_nav_menu()が生成するHTML構造を変更したいと思いました。
これは可能ですか?
至急ご連絡ください。
編集スタッフ
独自のdivなどを追加することはできますが、常にリスト出力になります。どのようにでもスタイル設定できます。
管理者
chunky
Thank you! Now I can stop pulling my hair out! Bookmarked this and will tell others!
Kalid
こんにちは、チュートリアルありがとうございます。あなたのテーマで使用されているナビゲーションメニューを持てるように、私をガイドしていただけると嬉しいです。あなたのもののようなドロップダウンメニューが欲しいです。よろしくお願いします!
編集スタッフ
WordPressのデフォルトのナビゲーションメニューでは、ドロップダウンメニューを作成できます。メイン項目から少し右にドラッグするだけで可能です。Genesisのようなフレームワークを使用している場合は、すでにFancy Drop downオプションが利用可能なので、それを選択するだけです。または、SuperFishのようなjQueryテクニックを使用して行うこともできます。将来的にはチュートリアルを追加するかもしれません。
管理者
チューバ
とても良い記事でした。WordPressプロジェクトの助けになりました。ありがとうございます!
GrimCris
素晴らしい記事です。WordPressメニューのCSSクラスについては知りませんでした。本当にありがとうございます!
キース・デイビス
皆さん、WordPressのことをよく知っていますね。
これは簡単なチュートリアルではありませんが、よく説明されており、私の理解を深めるのに役立ちました。
他の皆さんに教育してくれてありがとう。
Rick
おい!すごい!CSSオプションでメニューを操作できるなんて知らなかったよ!最高!
Adam W. Warner
素晴らしい記事で、非常に有益でした!メニューの画面オプションについても知りませんでした。
Eli
最初のphp wp_nav_menuコードをどこに配置すべきか分かりません。functionsファイルやheaderなどでしょうか?
Tony
CSSクラスメニュー項目については知りませんでした!教えてくれてありがとう。
編集スタッフ
You are welcome
管理者
スティーブ・マイズナー
私もです!まさに必要としていたものでした。皆さん、そしてWordPress開発チームに神のご加護がありますように!
Pieter
Respect for pointing out the css styles! I always used the css attribute to style a list item, but these styles are definitely more handy. You just earned yourself another feed subscriber!
Regards from Belgium.
編集スタッフ
お役に立てて嬉しいです、Pieter。
管理者