あなたのサイトのWordPressコメントフォームのスタイルを変更したいですか?WPBeginnerでは、ユーザーのエンゲージメントを高めるさまざまな方法を何年もかけて試してきましたが、見栄えがよく、ユーザーフレンドリーなコメントフォームが大きな違いをもたらすことがわかりました。
コメントは、サイト上でユーザーとのエンゲージメントを築く上で重要な権限を持つグループです。ユーザーがコメントを残しやすく、視覚的に魅力的なものにすることで、サイト上でのディスカッションや交流を促進することができます。
この投稿では、WordPressのコメントフォームを簡単にスタイリングして、サイトのエンゲージメントを高める方法を紹介します。
始める前に
WordPressテーマはサイトの外観をコントロールします。各WordPressテーマには、テンプレートファイル、関数ファイル、JavaScripts、スタイルシートを含むいくつかのファイルが付属しています。
スタイルシートには、WordPressテーマで使用するすべての要素のCSSルールが含まれています。テーマのスタイルルールを上書きするために、独自のカスタムCSSを追加することができます。
まだやったことがない場合は、初心者向けのWordPressでカスタムCSSを追加する方法の投稿をご覧ください。
CSSの外観とは別に、WordPressのコメントフォームの初期設定を変更するために関数を追加する必要があるかもしれません。この作業を行ったことがない場合は、WordPressでコードをコピー&ペーストする方法の投稿をご覧ください。
ということで、WordPressのコメントフォームのスタイルを見てみましょう。
これはかなり包括的なガイドであるため、ナビゲーションしやすいようにコンテンツの目次を作成した:
- Styling WordPress Comment Form Using SeedProd Theme Builder
- Change WordPress Comments with Default CSS Classes
- Adding Social Login to WordPress Comments
- Adding Comment Policy Text in WordPress Comment Form
- Move Comment Text Field to Bottom
- Remove Website (URL) Field from WordPress Comment Form
- Add a Subscribe to Comments Checkbox in WordPress
- Add Custom Fields to WordPress Comment Form
SeedProdテーマビルダーを使ったWordPressコメントフォームのスタイリング
この方法は、市場で最高のWordPressページとテーマビルダープラグインであるSeedProdが必須です。
コーディング経験のない初心者におすすめだ。しかし、この方法の欠点は、既存のWordPressテーマをカスタムテーマに置き換えてしまうことです。
まず、SeedProdプラグインをインストールして有効化する必要があります。詳しくは、WordPressプラグインのインストール方法のステップバイステップガイドをご覧ください。
注:テーマビルダー機能にアクセスするには、少なくともPROプランが必要です。
有効化した後、カスタムWordPressテーマ用のテンプレートを作成する必要があります。SeedProdでは、ビルトインテーマの1つを使用して、これらのテンプレートを簡単に生成することができます。
詳しい手順については、コーディングなしでカスタマイザーWordPressテーマを作成する方法のチュートリアルをご覧ください。
テーマテンプレートを生成したら、個別投稿テンプレートの下にある「デザインを編集」リンクをクリックする必要があります。
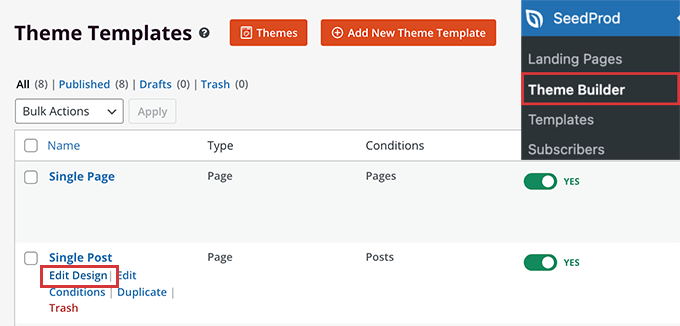
これでSeedProdテーマビルダーのインターフェースに個別投稿プレビューが読み込まれます。プレビューの下部にコメントフォームのブロックがあることに気づくでしょう。
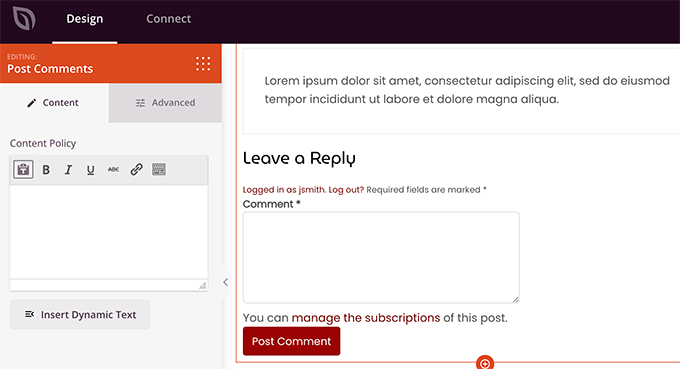
コメントフォームをクリックすると、左のパネルにプロパティが表示されます。
また、「詳細設定」タブに切り替えると、CSSコードを記述することなくコメントフォームのスタイルを編集することができます。
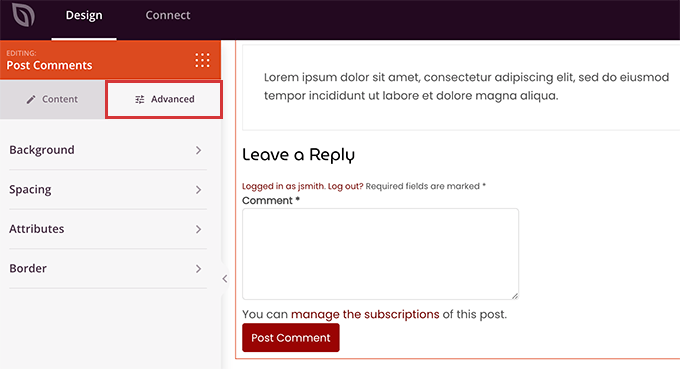
変更が完了したら、「保存」ボタンをクリックして公開することをお忘れなく。
SeedProdを使えば、コードを書かずにサイト上のあらゆる要素のスタイルを超簡単に変更できます。
しかし、これはテーマビルダーであり、すでに気に入ったWordPressテーマを使っているかもしれない。その場合、以下のヒントはWordPressでコメントフォームのスタイルを手動で変更するのに役立ちます。
WordPressでコメントフォームのスタイルを変更する
ほとんどのWordPressテーマにはcomments.phpというテンプレートがあります。このファイルは、ブログ投稿日にコメントやコメントフォームを表示するために使用されます。WordPressのコメントフォームは、次の関数を使用して生成されます:<?php comment_form(); ?>.
初期設定では、3つのテキストフィールド(名前、メール、サイト)、コメントするテキストエリアフィールド、GDPR遵守のためのチェックボックス、送信ボタンを備えたコメントフォームが生成されます。
初期設定のCSSクラスを調整するだけで、これらのフィールドを簡単に変更することができます。以下は WordPress が各コメントフォームに追加する初期設定の CSS クラスのリストです。
1 2 3 4 5 6 7 8 9 10 11 12 13 14 15 16 17 18 | #respond { }#reply-title { }#cancel-comment-reply-link { }#commentform { }#author { }#email { }#url { }#comment#submit.comment-notes { }.required { }.comment-form-author { }.comment-form-email { }.comment-form-url { }.comment-form-comment { }.comment-form-cookies-consent { }.form-allowed-tags { }.form-submit |
これらのCSSクラスを調整するだけで、WordPressのコメントフォームのルック&フィールを完全に変更することができます。
では、いくつかの点を変更してみましょう。
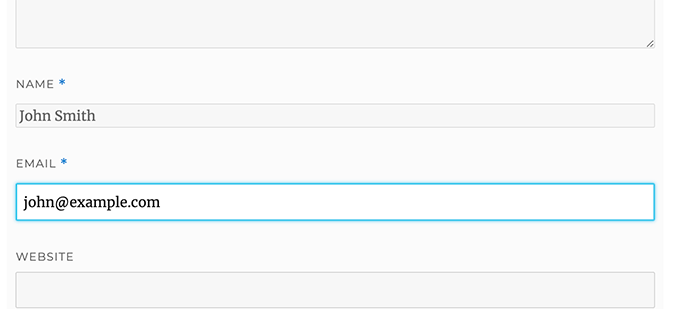
まず、有効化したフォームフィールドをハイライトすることから始めます。現在アクティブなフィールドをハイライトすることで、特別なニーズを持つ人々にとってフォームがより有効化され、また、小さな端末でもコメントフォームが見やすくなります。
1 2 3 4 5 6 7 8 9 10 11 12 13 14 15 16 17 18 19 20 21 22 23 24 25 26 | #respond {background: #fbfbfb;padding:0 10px 0 10px;}/* Highlight active form field */#respond input[type=text], textarea { -webkit-transition: all 0.30s ease-in-out; -moz-transition: all 0.30s ease-in-out; -ms-transition: all 0.30s ease-in-out; -o-transition: all 0.30s ease-in-out; outline: none; padding: 3px 0px 3px 3px; margin: 5px 1px 3px 0px; border: 1px solid #DDDDDD;}#respond input[type=text]:focus,input[type=email]:focus,input[type=url]:focus,textarea:focus {box-shadow: 0 0 5px rgba(81, 203, 238, 1);margin: 5px 1px 3px 0px;border: 2px solid rgba(81, 203, 238, 1);} |
これが変更後のWordPress Twenty Sixteenテーマでのフォームの様子です:
これらのクラスを使うと、入力ボックス内のテキストの外観を変更することができます。さっそく、投稿者名とURLフィールドのテキストスタイルを変更してみましょう。
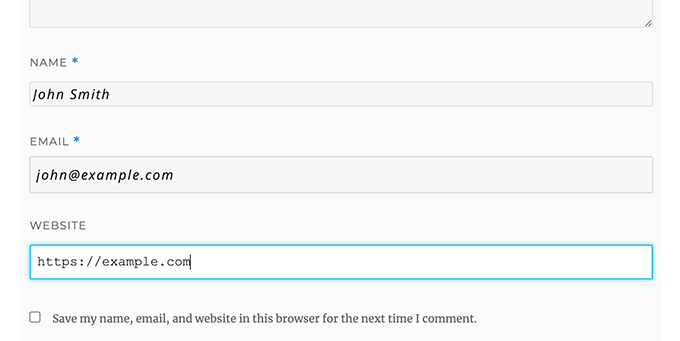
1 2 3 4 5 6 7 8 9 10 11 | #author, #email {font-family: "Open Sans", "Droid Sans", Arial;font-style:italic;color:#1d1d1d;letter-spacing:.1em;} #url {color: #1d1d1d;font-family: "Luicida Console", "Courier New", "Courier", monospace;} |
下のスクリーンショットをよく見ると、名前とメールのフィールドのフォントがサイトのURLと異なっている。
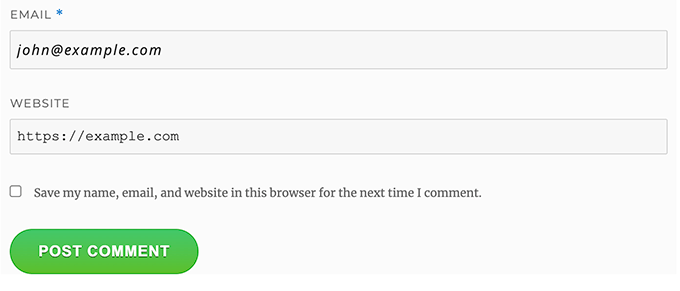
WordPressのコメントフォーム送信ボタンのスタイルを変更することもできます。初期設定の送信ボタンを使う代わりに、CSS3のグラデーションとボックスシャドウを付けてみましょう。
1 2 3 4 5 6 7 8 9 10 11 12 13 14 15 16 17 18 19 20 21 22 23 24 25 26 27 28 29 30 31 32 33 34 | #submit {background:-moz-linear-gradient(top, #44c767 5%, #5cbf2a 100%);background:-webkit-linear-gradient(top, #44c767 5%, #5cbf2a 100%);background:-o-linear-gradient(top, #44c767 5%, #5cbf2a 100%);background:-ms-linear-gradient(top, #44c767 5%, #5cbf2a 100%);background:linear-gradient(to bottom, #44c767 5%, #5cbf2a 100%);background-color:#44c767;-moz-border-radius:28px;-webkit-border-radius:28px;border-radius:28px;border:1px solid #18ab29;display:inline-block;cursor:pointer;color:#ffffff;font-family:Arial;font-size:17px;padding:16px 31px;text-decoration:none;text-shadow:0px 1px 0px #2f6627;} #submit:hover {background:-webkit-gradient(linear, left top, left bottom, color-stop(0.05, #5cbf2a), color-stop(1, #44c767));background:-moz-linear-gradient(top, #5cbf2a 5%, #44c767 100%);background:-webkit-linear-gradient(top, #5cbf2a 5%, #44c767 100%);background:-o-linear-gradient(top, #5cbf2a 5%, #44c767 100%);background:-ms-linear-gradient(top, #5cbf2a 5%, #44c767 100%);background:linear-gradient(to bottom, #5cbf2a 5%, #44c767 100%);background-color:#5cbf2a;}#submit:active {position:relative;top:1px;} |
WordPressのコメントフォームを次のレベルに引き上げる
基本的すぎると思うかもしれない。まあ、みんながついていけるように、まずはそこから始めなければならない。
しかし、フォームフィールドを並べ替えたり、ソーシャルログイン、コメント購読、コメントガイドライン、クイックタグなどを追加することで、WordPressのコメントフォームを次のレベルに引き上げることができます。
WordPressのコメントにソーシャルログインを追加する
WordPressのコメントにソーシャルログインを追加するところから始めよう。
最初に必要なことは、Super Socializerプラグインをインストールして有効化することです。詳しくは、WordPressプラグインのインストール方法のステップバイステップガイドをご覧ください。
有効化した後、Super Socializer ” Social Loginにアクセスし、’Enable Social Login’というボックスにチェックを入れる必要があります。

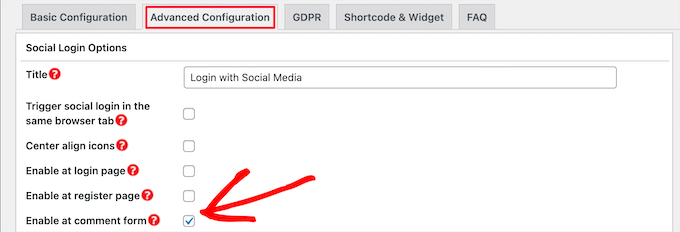
ソーシャルログインオプションパネルが表示されます。まず、「詳細設定」タブをクリックします。
そして、「コメントフォームで有効化」ボックスにチェックが入っていることを確認してください。
次に、「基本設定」タブをクリックします。ここでは、’ソーシャルネットワークを選択’セクションのボックスにチェックを入れて、追加するソーシャルネットワークを選択することができます。

この下で、プラグインはソーシャル・プラットフォームと接続するためにAPIキーを必須にします。クエスチョンマーク」のアイコンをクリックすると、各プラットフォームのAPIキーの取得方法が表示されます。

完了したら、「変更を保存」ボタンをクリックしてソーシャルログイン設定を保存します。
あなたのサイトにアクセスすると、コメントフォームの上にソーシャルログインボタンが表示されます。

コメントフォームの前後にコメントポリシーのテキストを追加する
私たちはすべてのユーザーを愛していますし、私たちのサイトにコメントを残してくださることに本当に感謝しています。しかし、健全なディスカッション環境を作るためには、コメントをモデレートすることが重要です。
完全な透明性を確保するため、コメントポリシーのページを作りましたが、このリンクをフッターに貼るだけではダメです。
私たちは、コメントを残すすべてのユーザーにとって、コメントポリシーを目立たせ、見えるようにしたいと考えました。そのため、WordPressのコメントフォームにコメントポリシーを追加することにしました。
コメントポリシーページを追加したい場合、まず最初にWordPressページを作成し、コメントポリシーを定義する必要があります(私たちのものを盗んで、あなたのニーズに合うように変更することができます)。
その後、テーマのfunctions.phpファイルまたはコード・スニペット・プラグインに以下のコードを追加します。
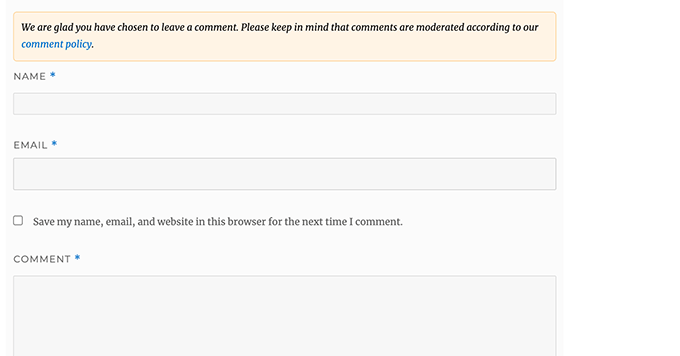
1 2 3 4 5 6 | function wpbeginner_comment_text_before($arg) { $arg['comment_notes_before'] .= '<p class="comment-policy"">We are glad you have chosen to leave a comment. Please keep in mind that comments are moderated according to our <a href="http://www.example.com/comment-policy-page/">comment policy</a>.</p>'; return $arg;}add_filter('comment_form_defaults', 'wpbeginner_comment_text_before'); |
上記のコードは、ノートの前にある初期設定のコメントフォームをこのテキストに置き換えます。また、CSSを使用して通知をハイライトできるように、コードにCSSクラスを追加しました。以下は使用したCSSのサンプルです:
1 2 3 4 5 6 7 8 9 | p.comment-policy { border: 1px solid #ffd499; background-color: #fff4e5; border-radius: 5px; padding: 10px; margin: 10px 0px 10px 0px; font-size: small; font-style: italic;} |
私たちのテストサイトではこのように見えた:
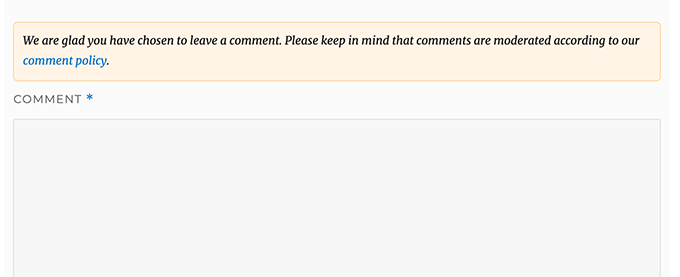
コメントするテキストエリアの後にリンクを表示したい場合は、以下のコードを使用する。
1 2 3 4 5 6 | function wpbeginner_comment_text_after($arg) { $arg['comment_notes_after'] .= '<p class="comment-policy"">We are glad you have chosen to leave a comment. Please keep in mind that comments are moderated according to our <a href="http://www.example.com/comment-policy-page/">comment policy</a>.</p>'; return $arg;}add_filter('comment_form_defaults', 'wpbeginner_comment_text_after'); |
example.comではなく、あなたのコメントポリシーページに飛ぶように、URLを適宜変更することをお忘れなく。
コメントするテキストフィールドを下に移動する
初期設定では、WordPressのコメントフォームはコメントテキストエリアを最初に表示し、次に名前、メール、サイトのフィールドを表示します。この変更はWordPress 4.4で導入されました。
それ以前は、WordPressサイトは名前、メール、ウェブサイトのフィールドを最初に表示し、次にコメントするテキストボックスを表示していました。WPBeginnerでは、ユーザーがこの順番でコメントフォームを表示することに慣れていると感じたため、古いフィールドの順番を使用しています。
その場合は、テーマのfunctions.phpファイルまたはコード・スニペット・プラグインに次のコードを追加するだけです。
1 2 3 4 5 6 7 8 | function wpb_move_comment_field_to_bottom( $fields ) {$comment_field = $fields['comment'];unset( $fields['comment'] );$fields['comment'] = $comment_field;return $fields;}add_filter( 'comment_form_fields', 'wpb_move_comment_field_to_bottom'); |
WPCodeのようなコードスニペットプラグインを使用してWordPressにコードを追加することをお勧めします。これにより、functions.phpファイルを編集することなく簡単にカスタマイザーのコードを追加することができるため、サイトを壊す心配がありません。
開始するには、無料のWPCodeプラグインをインストールし、有効化する必要があります。手順については、WordPressプラグインのインストール方法をご覧ください。
有効化したら、WordPressダッシュボードからCode Snippets ” + Add Snippetにアクセスします。
そこから、’カスタムコードを追加(新規スニペット)’オプションを見つけ、その下の’スニペットを使用’ボタンをクリックします。

次に、ページの一番上にスニペットのタイトルを追加します。これは、何のコードかを覚えておくのに役立つものであれば何でもかまいません。
次に、上記のコードを「コードプレビュー」ボックスに貼り付け、右側のドロップダウンリストからコードタイプとして「PHPスニペット」を選択します。
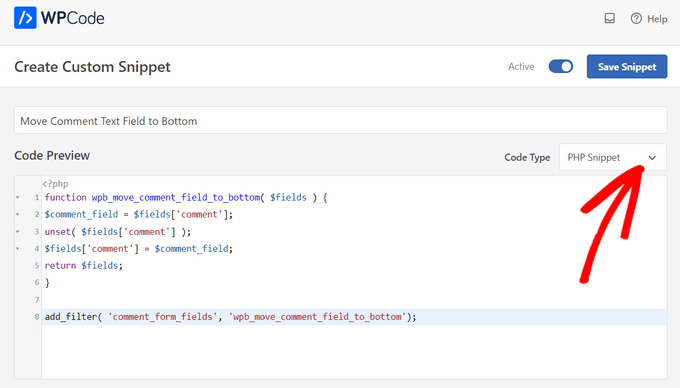
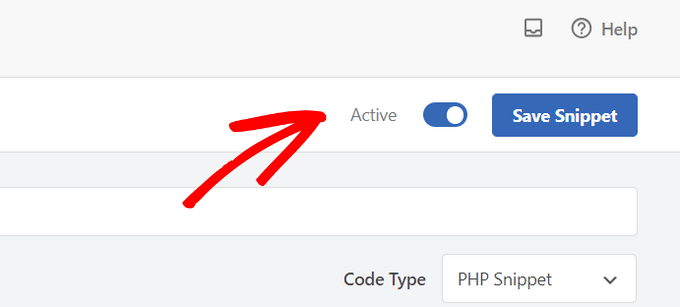
その後、スイッチを’Inactive’から’Active’に切り替え、’Save Snippet’ボタンをクリックするだけです。
このコードは、単にコメントするテキスト・エリア・フィールドを一番下に移動させるだけである。
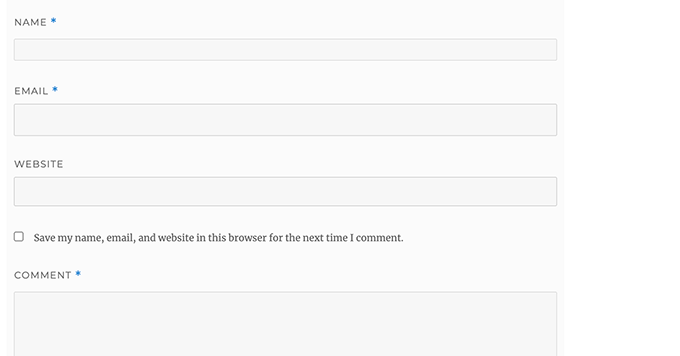
WordPressのコメントフォームからサイト(URL)フィールドを削除する
コメントフォームのサイトフィールドは多くのスパマーを引きつけています。このフィールドを削除してもスパマーを止めることはできませんし、スパムコメントを減らすこともできませんが、誤って悪い作者のサイトリンクを含むコメントを承認してしまうことを防ぐことができます。
また、コメントフォームからフィールドを減らすことができ、より簡単でユーザーフレンドリーになります。このトピックについては、WordPressのコメントフォームからサイトのURLフィールドを削除する投稿をご覧ください。
コメントフォームからURLフィールドを削除するには、以下のコードをfunctions.phpファイルまたはコードスニペットプラグインに追加するだけです。
1 2 3 4 5 | function wpbeginner_remove_comment_url($arg) { $arg['url'] = ''; return $arg;}add_filter('comment_form_default_fields', 'wpbeginner_remove_comment_url'); |
前節と同じ手順で、WPCodeプラグインを使ってWordPressにこのコードを安全に追加することができます。
WordPressにコメント購読チェックボックスを追加する
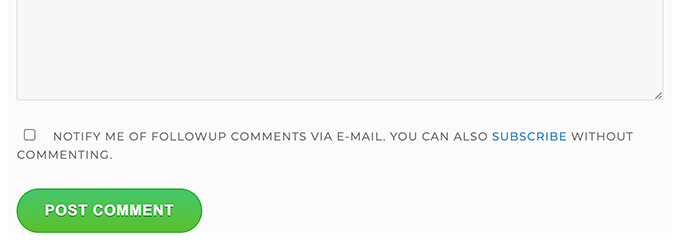
ユーザーがあなたのサイトにコメントを残したとき、誰かがそのコメントに返信したかどうかを確認するために、そのスレッドをフォローしたいと思うかもしれません。コメントを購読するチェックボックスを追加することで、投稿に新しいコメントが表示されるたびに、ユーザーは即座に通知を受け取ることが有効化されます。
このチェックボックスを追加するには、まずSubscribe to Comments Reloadedプラグインをインストールして有効化します。有効化したら、StCR ” コメントフォームページにアクセスしてプラグインの設定を行う必要があります。
詳しい手順については、WordPressでユーザーがコメントを購読できるようにする方法の投稿をご覧ください。
WordPressのコメントフォームに追加フィールドを追加する
WordPressのコメントフォームに追加フィールドを追加したいですか?例えば、ユーザーがTwitterのハンドルネームを追加できるオプション設定などでしょうか?
WordPress Comments Fieldsプラグインをインストールして有効化するだけです。有効化したら、「Comments Fields」ページに移動し、「Comment Fields」タブに切り替えます。
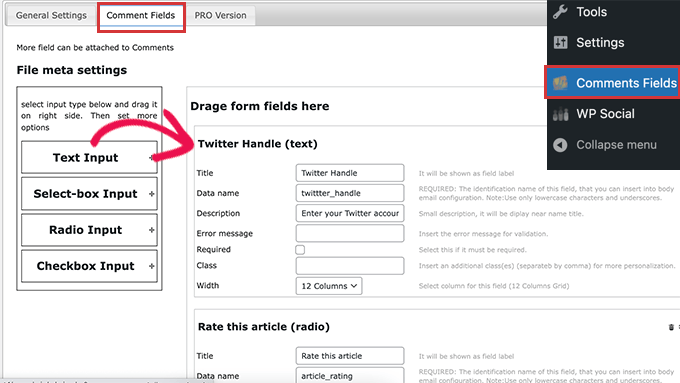
カスタムフィールドをドラッグ&ドロップし、タイトル、説明、データ名を付けるだけです。
フィールドの追加が完了したら、忘れずに「変更をすべて保存」ボタンをクリックしてください。
コメントフォームを表示し、カスタムフィールドのアクションを確認できるようになりました。
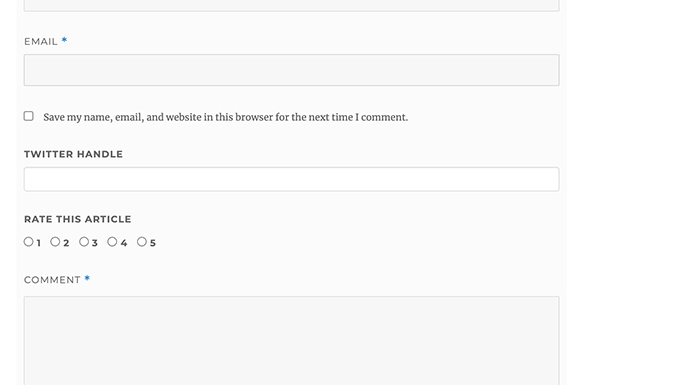
カスタムフィールドはコメントモデレーションとコメントコンテンツの下に表示されます。
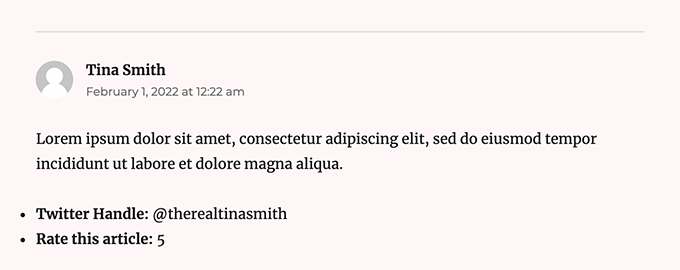
詳しくは、WordPressのコメントフォームにカスタムフィールドを追加する方法のチュートリアルをご覧ください。
この投稿が、WordPressのコメントフォームをユーザーにとってより楽しいものにする方法を学ぶのにお役に立てば幸いです。また、WordPressブログ投稿日に多くのコメントをもらうためのヒントや、WordPressに最適なソーシャルメディアプラグインのエキスパートピックもご覧ください。
If you liked this article, then please subscribe to our YouTube Channel for WordPress video tutorials. You can also find us on Twitter and Facebook.


Dayo Olobayo
Thanks for taking out the time to put this article together. I used the code snippet for removing the website url but I noticed it doesn’t working well here. Reason why I said that is because it only worked on 2 post but other posts on my website still has the URL box in the comment section.
Am I the one not getting it right please? Also, do I need to replace the “wpbeginner” in the code to my domain name?
WPBeginner Support
You may want to check with your theme to see if they have something in their styling that could be overriding the standard styling. You do not need to remove wpbeginner from the code for it to work.
Admin
Jiří Vaněk
Thanks for the tutorial using Seed Prod. I am currently using WP Discuz and I am quite happy with it. However, for smaller sites this form is much more elegant with Seed Prod. The instructions are quite long but I will try it on my test site where I have Seed Prod installed. Thanks for a great and really detailed tutorial.
Moinuddin Waheed
I have seen many different comments section on websites and wondered why do they differed on appearance although all are using the same wordpress comments.
having a good looking comments section is necessary for making good user experience while commenting.
I have a query regarding disqus platform for wordpress comments which I have used for two years.
is it good idea to continue to use it or is there a better alternative?
also just curious to know what does wpbeginner uses for comments?
WPBeginner Support
You can find our opinion on disqus in our article below. For our comments we are currently using the built-in WordPress comment system.
https://www.wpbeginner.com/wp-tutorials/how-to-disable-disqus-on-custom-post-types-in-wordpress/
Admin
Jiří Vaněk
In my opinion, WP Discuz is a great plugin. I’ve been using it on my blog for almost two years now, and I must say, without any issues so far. So if you’re using it too, I wouldn’t necessarily change this plugin. The developers and support team work great. However, it probably also depends on the type and size of the website, as this plugin is quite large and complex.
Vera Kofyan
Thank you for a great tutorial.
One thing did not work for me: moving the text area to bottom. I added the script in Code snippets, but nothing changed. Has anything changed since you wrote that?
Thank you,
Vera
WPBeginner Support
The snippet should still work correctly, the theme you are using may have added styling to the comment form that could be changing some things, if you check with the support for your specific theme they can help check and confirm this.
Admin
Arischvaran Puvanesvaran
Thank you for sharing
WPBeginner Support
You’re welcome, we hope you found our guide helpful!
Admin
Ali Kaleem
This Blog Is very imformative.
WPBeginner Support
Glad you found our site helpful!
Admin
Asutosh sahoo
really full of knowledge. please keep updating. thanks..
WPBeginner Support
Glad you found our guide helpful!
Admin
saikul
good tutorial . i like this
WPBeginner Support
Thank you, glad you liked it!
Admin
Samyak sharma
Thanks, This is very good article.
WPBeginner Support
Glad you found it helpful
Admin
Vincent Nyagaka
Thank you for guiding us on how to style WordPress form. However I have tried to use almost all the codes, on how to remove the URL field from the comment form but unfortunately, none is working code. Kindly can you give me another code to use
WPBeginner Support
If none of our recommendations were able to assist, we would recommend reaching out to the support for your specific theme and they should be able to assist with targeting their specific target for your comments.
Admin
amr
Hi
How can I delete the url from the author name and date?
Thanks
WPBeginner Support
IF you mean from your comments then you would want to take a look at our article below:
https://www.wpbeginner.com/plugins/how-to-remove-website-url-field-from-wordpress-comment-form/
Admin
lal
good tutorial, loved it
WPBeginner Support
Glad you liked our tutorial
Admin
Adam Rees
Thanks, it helped me a lot in customizing the comment section.
WPBeginner Support
You’re welcome
Admin
fred
Hi, nice tutorial ! but i have a problem to find the location of the right .php to modify the post comments, i’m using oceanwp theme with elementor pro, when i go to the functions.php or comments.php i can’t find any of the command lines, i’v tryed to add your code and nothing happens. so i guess it’s somewhere else but where ?
WPBeginner Support
If you are using a page builder you would need to reach out to that page builder’s support for how to edit the comment form and what tools are available.
Admin
Muhammad Shahzad
how to show to comment box to the top of all comments and after post.
WPBeginner Support
If your theme is not set up that way you would sadly need to modify the theme’s code to do that. As each theme’s code can be very different we do not have a specific guide on how to do that yet.
Admin
HieuBui
Thank you very much
WPBeginner Support
You’re welcome
Admin