WordPressブログのオーナーとして、私たちはブログ記事のメタデータを表示することがいかに重要であるかを知っています。公開日、著者名、カテゴリー、タグなど、ブログ記事に関する重要な情報が表示されます。
時には、このメタデータをカスタマイズしたり、より詳細な情報を追加したりして、オーディエンスにさらなる価値を提供したいと思うかもしれません。最終更新日や閲覧時間など、投稿のメタデータを調整することで、WordPressブログのユーザーエクスペリエンスを向上させることができます。
この記事では、WordPressの投稿に投稿メタデータを簡単に表示する方法を紹介します。ビルトインのテーマオプションを使う方法から、より高度なカスタマイズまで、いくつかの方法を取り上げますので、あなたのニーズやスキルレベルに合った方法を選んでください。

なぜWordPressサイトでブログ投稿のメタ情報を編集・表示するのか?
ブログ投稿のメタ情報とは、実際のコンテンツの一部ではない投稿に関する情報です。公開日や投稿者名、WordPressのカテゴリーやタグなどが含まれます。
このメタ情報は、WordPressのテーマによって、さまざまな場所に表示されます。
WordPressのメタ情報は、どのような外観であっても、訪問者があなたのコンテンツについてさらに詳しく知るのに役立ちます。また、他の興味深い投稿を発見するのにも役立ちます。例えば、同じ投稿者が書いた他のブログを探すことができる。
このように、投稿メタ情報はユーザー体験を向上させ、ページビューを増やすこともできる。ただ、投稿メタ情報を表示させすぎると、サイトがごちゃごちゃしてわかりにくくなるので注意が必要です。
WordPressの初期設定では、ブログ投稿の公開日、投稿者名、カテゴリーなど、いくつかの投稿メタ情報がすでに表示されています。しかし、時には追加情報を表示したいこともあるでしょう。
それでは、WordPressテーマで投稿メタ情報を表示する方法を見ていきましょう。以下のクイックリンクから、使いたい方法にジャンプしてください:
方法1:WordPressテーマカスタマイザーを使用する(クラシックテーマ)
クラシックWordPressテーマの中には、コードを書かずに投稿メタ情報をカスタマイズできるものもある。
あなたのテーマがそうであるかどうかを確認するには、外観“ カスタマイズを開き、WordPressテーマカスタマイザーを開きます。
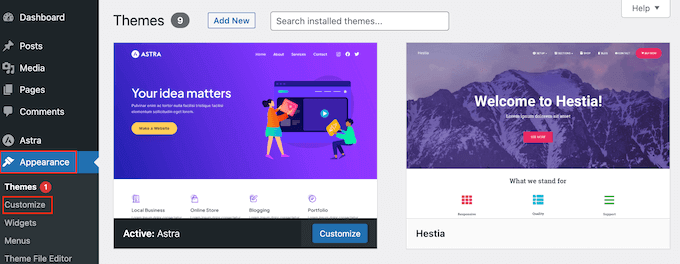
これで、ブログページをカスタマイズできる設定を探すことができます。これらは通常、「ブログ」、「ブログ設定」、「投稿」などのラベルがついています。
例えば、Astra WordPressテーマを使用している場合、左側のメニューから「Blog」を選択するだけです。
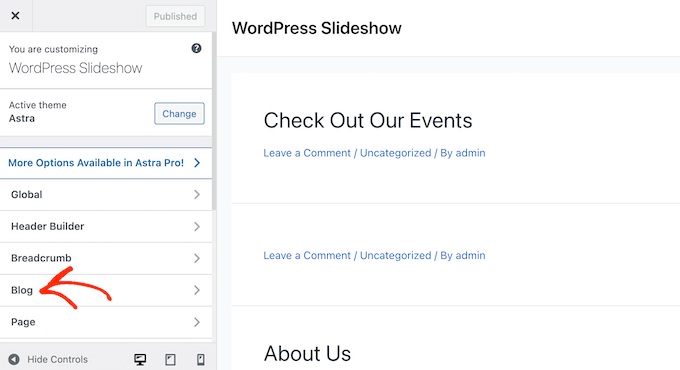
その後、「ブログ/アーカイブ」をクリックする。
メタ情報」セクションまでスクロールするだけで、追加・削除できるすべてのデータを見ることができる。
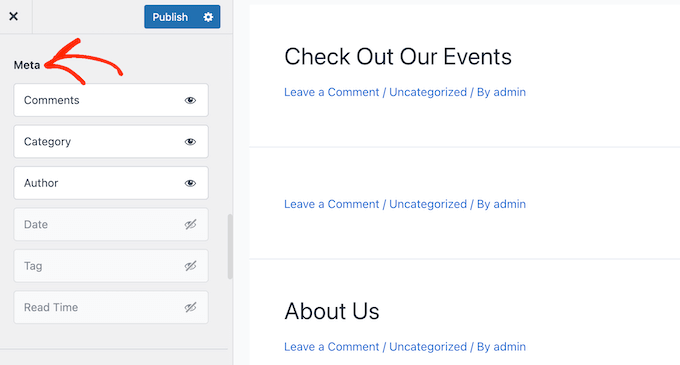
サイトにメタ情報を追加するには、目のような「表示」アイコンをクリックするだけ。
メタ情報を削除するには、もう一度アイコンをクリックする。
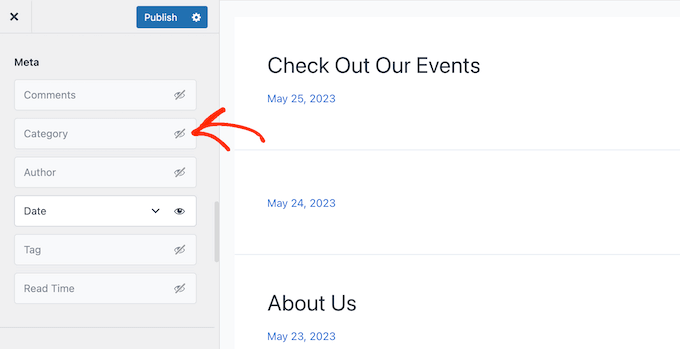
また、WordPressがこのメタ情報を訪問者に表示する順番を、ドラッグ&ドロップで変更することもできます。
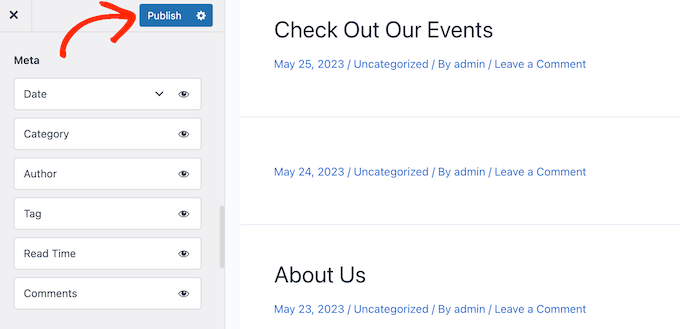
テーマカスタマイザーで変更を加えると、ライブプレビューが自動的に更新されるため、さまざまな設定を試して、WordPress サイトに最適な設定を確認できます。
メタ情報の見栄えに満足したら、「公開する」をクリックして変更を反映させることをお忘れなく。
WordPressのカスタマイザーに投稿メタ情報の設定がない場合でも、コードを書かずにこの情報を追加する方法があるかもしれません。
それを念頭に置いて、テーマのドキュメンテーションを見ることをお勧めします。テーマの開発者に助けを求めることもできます。
WordPressのサポートを正しく依頼し、サポートを受ける方法については、こちらのガイドをご覧ください。
方法2:フルサイトエディターを使う(ブロックテーマ)
Hestia Proのようなブロックベースのテーマを使っている場合、投稿メタブロックを使ってWordPressサイトに投稿のメタ情報を表示することができます。
始めるには、WordPressダッシュボードの外観“ エディターと進んでください。
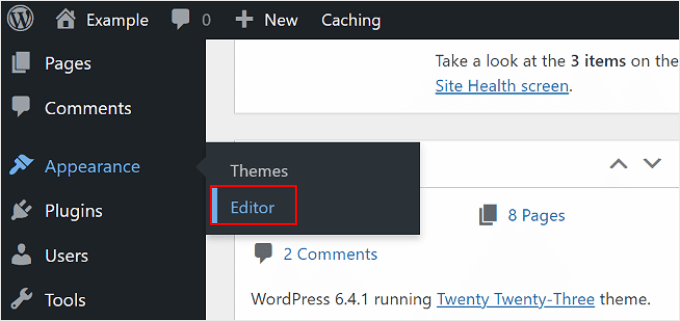
初期設定では、フルサイトエディターはテーマのホームテンプレートを表示します。
WordPressのブログ投稿にメタ情報を追加するには、左メニューの「テンプレート」をクリックしてください。
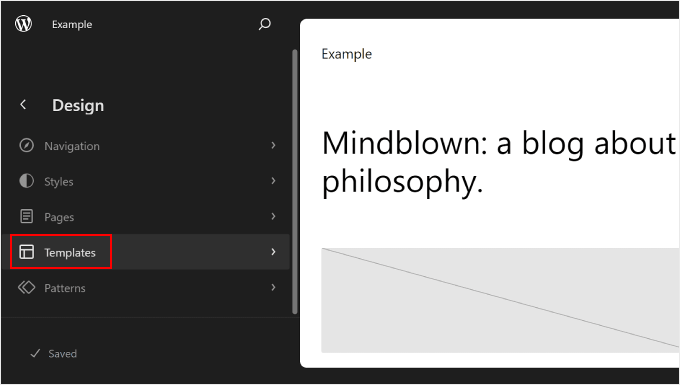
エディターにはWordPressテーマを構成するすべてのテンプレートのリストが表示されます。
ブログ記事のレイアウトをコントロールするSingle Postsテンプレートをクリックするだけです。
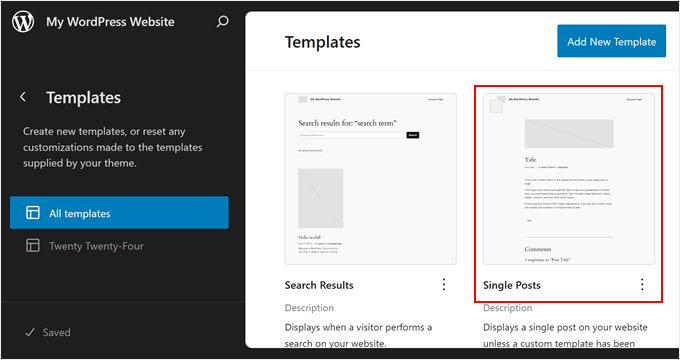
通常、Single PostsテンプレートにはすでにPost Metaブロックがあるはずなので、それをお好みで編集します。
しかし、そうでない場合は、左上の青い「+」アイコンをクリックする必要がある。表示される検索バーに「投稿メタ情報」と入力する。
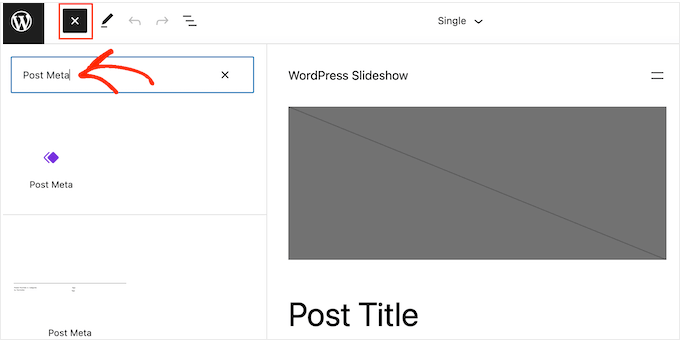
適切なブロックが外観に表示されたら、ブログのレイアウトにドラッグ&ドロップします。
初期設定では、このブロックは投稿のカテゴリー、投稿者名、タグを表示します。
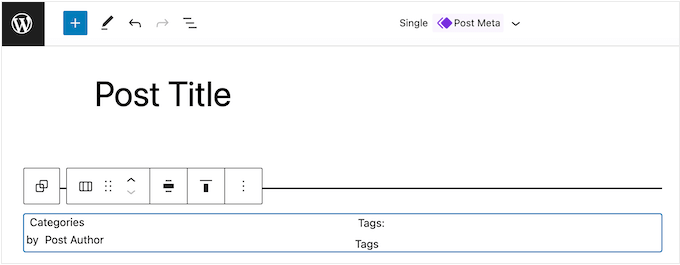
このメタ情報を編集したい場合もあるでしょう。例えば、タグを削除したり、WordPressがメタ情報の前に表示する静的テキストを変更したりすることができます。
以下の画像は、初期設定の投稿メタ情報がWordPressブログ上でどのように表示されるかの例です。
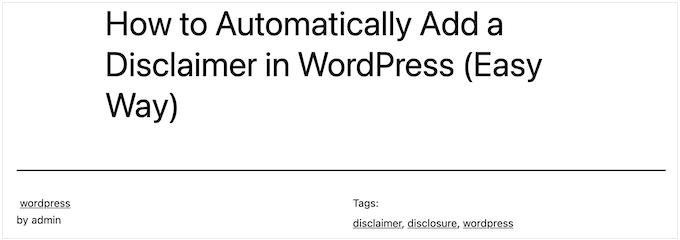
このブロックを変更するには、フルサイトエディターでクリックして選択するだけです。その後、投稿メタ情報ブロック内の任意のブロックをクリックし、変更することができます。
WordPressがメタ情報の前に表示する静的テキストを編集するのか、それともWordPressが実際の値に置き換える動的テキストを編集するのか、注意してください。
例えば、以下の画像では、投稿者セクションに静的テキストを追加しています。

しかし、「投稿者」のダイナミック・テキストは変更していない。
以下の画像では、WordPressブログでどのように表示されるかを見ることができる。

また、投稿メタブロックにさらにメタ情報を追加したい場合もあるでしょう。
例えば、フルサイトエディターには投稿日や投稿者経歴などのブロックがあり、ドラッグ&ドロップで簡単に投稿メタ情報に追加することができます。選択できるオプションはたくさんあるので、時間をかけてじっくりと検討することができます。
青い「+」ボタンをクリックして、使いたいブロックを見つけてください。それを投稿メタ情報ブロックにドラッグ&ドロップします。
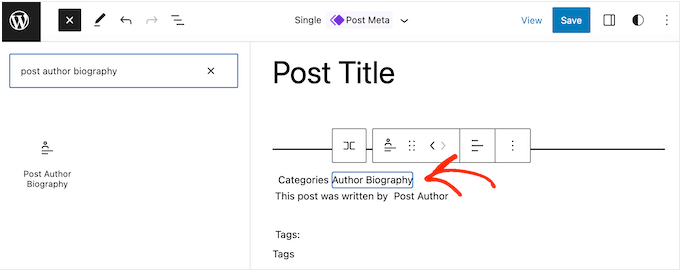
投稿メタ情報ブロックにさらにブロックを追加する場合は、レイアウトを変更する必要があるかもしれません。
これを行うには、投稿日: ブロックをクリックし、「ブロック」タブを選択するだけです。
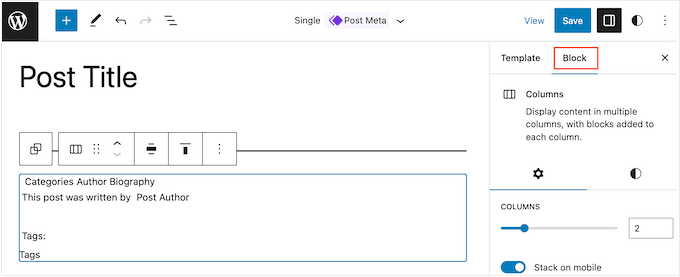
これらの設定を使用して、コンテンツを美しいレイアウトに配置することができます。例えば、カラム数を変更したり、マージンやパディングを追加したりすることができる。
個別テンプレートの見た目に満足したら、「保存」ボタンをクリックしてください。
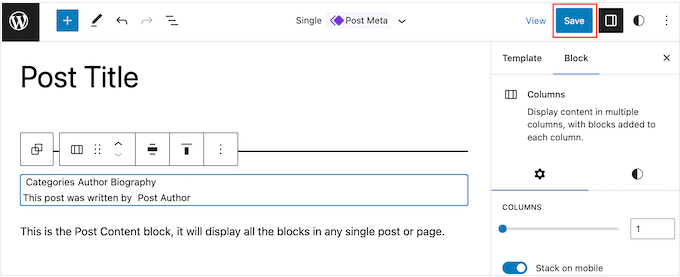
さて、あなたのサイトにアクセスすると、投稿メタ情報が実際に表示されているのがわかるだろう。
プロのヒント 個別投稿ページを次のレベルに引き上げたいですか?このステップバイステップガイドに従って、WordPressでカスタム個別投稿テンプレートを作成する方法を学びましょう。
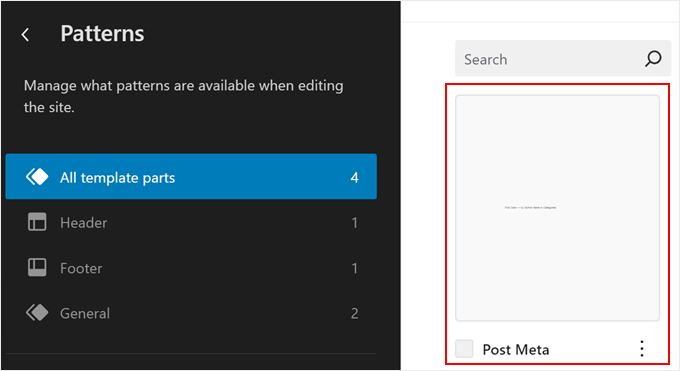
ブログ記事のメタを直接カスタマイズしたい場合は、フルサイトエディターのメインメニューから「パターン」を選択します。

ここで、「すべてのテンプレート」オプションをクリックします。
その後、「Post Meta」を選択して編集する。
方法3:カスタムWordPressテーマを作成する(フルカスタマイズ可能)
もう一つのオプションは、WordPressのカスタムテーマを作成することです。これはより高度な方法で、サイトにまったく別のテーマを使いたい場合におすすめです。
とはいえ、投稿メタ情報がサイト上のどこに表示されるかを完全にコントロールすることができる。
以前は、カスタマイザーのWordPressテーマを作るには、複雑なWordPressチュートリアルに従ってコードを書く必要がありました。しかし、SeedProdを使えば、コードを一行も書かずに独自のテーマを作成できるようになりました。
SeedProdは最高のドラッグ&ドロップWordPressページビルダーで、テーマビルダーも付属しています。これにより、シンプルなドラッグ&ドロップエディターを使って独自のテーマをデザインすることができます。
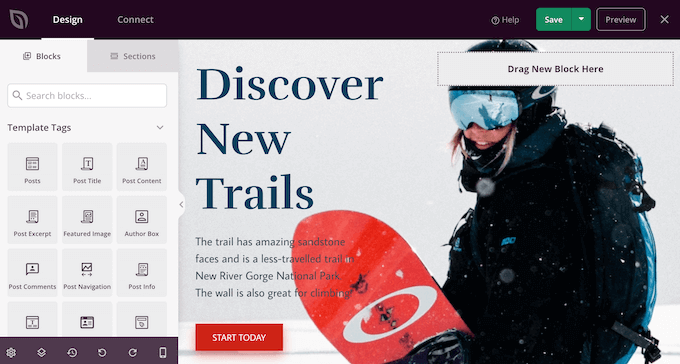
ステップバイステップの手順については、カスタムWordPressテーマの作成方法(コードなし)をご覧ください。
その後、WordPressサイトのどの部分にも投稿メタ情報を追加することができます。SeedProdの左側のメニューから「投稿情報」ブロックを見つけてください。
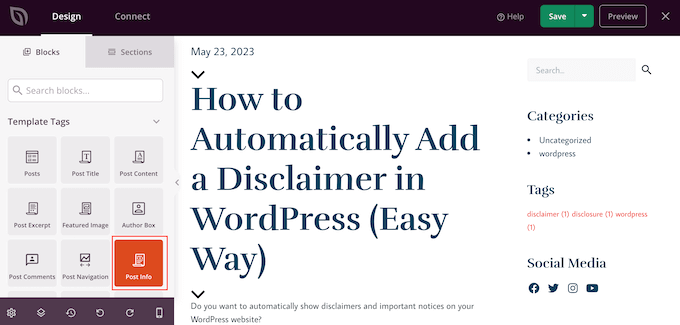
次に、ブロックをページレイアウトにドラッグ&ドロップします。
その後、投稿情報ブロックをクリックして選択します。初期設定では、このブロックには投稿者、日付、時間、コメントするメタ情報が表示されます。
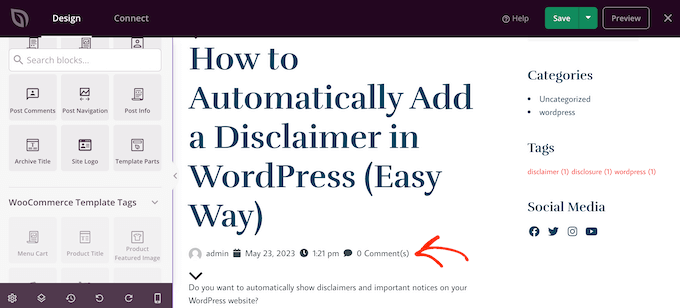
ただし、更新日、更新キーワード、用語のメタ情報を表示することもできる。
ブロックにさらに情報を追加するには、先に進んで「項目を追加」をクリックするだけだ。
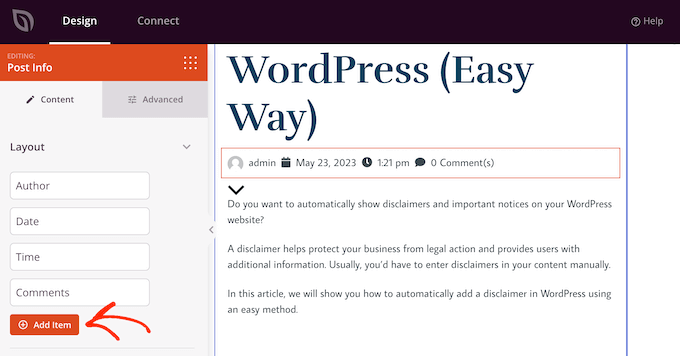
これは新しいプレースホルダー項目を追加します。
では、項目をクリックして、すべての設定を確認してください。
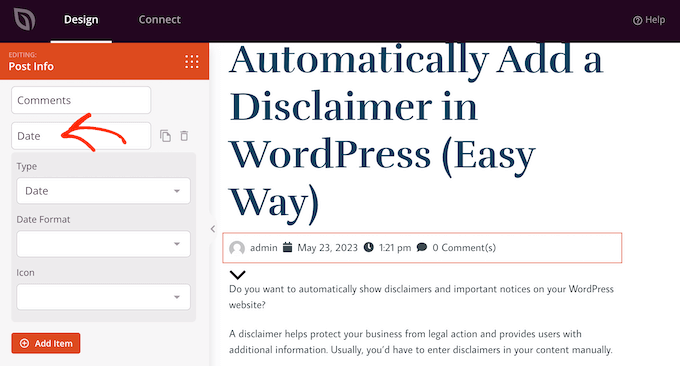
ここで、「タイプ」ドロップダウンを開き、表示したいメタ情報のタイプを選択する。
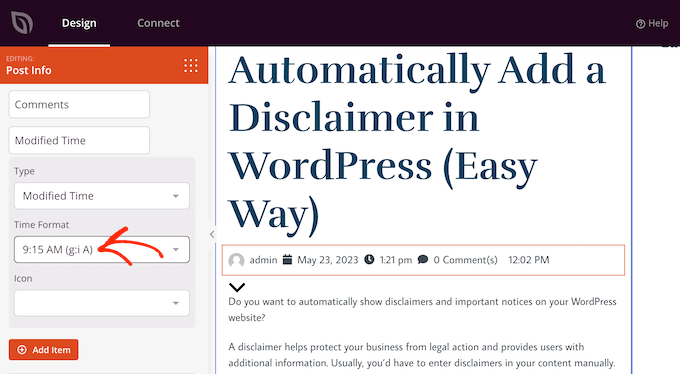
選択したオプションに応じて、いくつかの追加設定にアクセスできます。例えば、’Modified Time’を選択した場合、時間フォーマットを選択することができます。
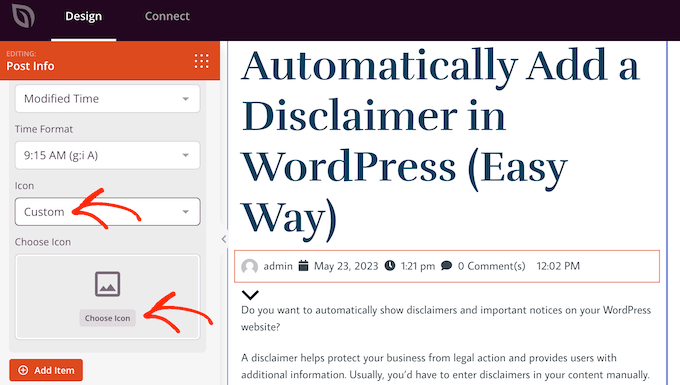
SeedProdがメタ情報項目に使用するアイコンを変更することもできます。アイコン」ドロップダウンを開き、「カスタム」を選択するだけです。
次に、『アイコンを選択』をクリックします。
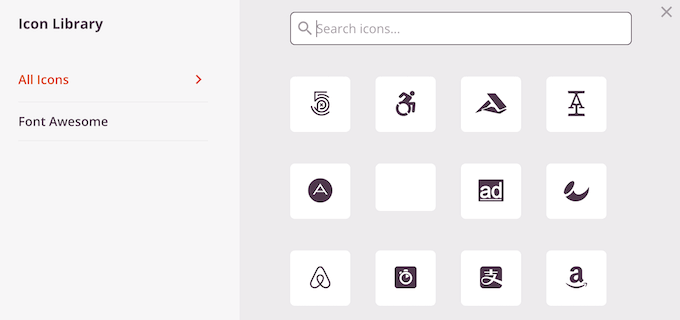
アイコン・ライブラリが表示され、数百のアイコンから選択できます。検索バーを使って特定のアイコンを探したり、リスト全体をブラウズすることができます。
使いたい画像を見つけたら、マウスオーバーして「プラス」ボタンをクリックするだけで、ページに追加できます。
代わりにメタ情報を削除しますか?
そして、マウスオーバーしてゴミ箱内のアイコンが現れたらクリックするだけです。
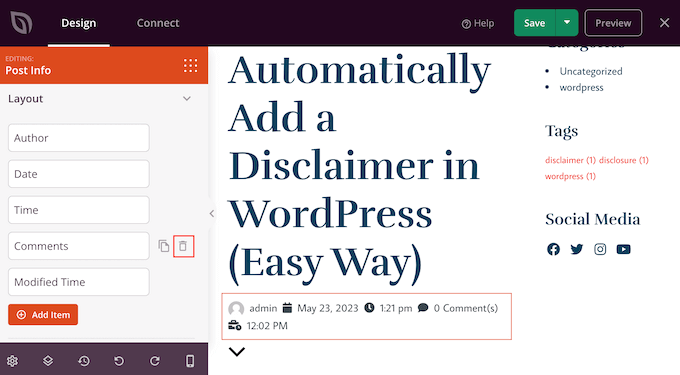
最後に、メタ情報の項目の順番はドラッグ&ドロップで変更できる。
投稿情報ボックスの設定に満足したら、「高度な設定」タブを選択して、投稿情報ボックスの外観を変更することができます。
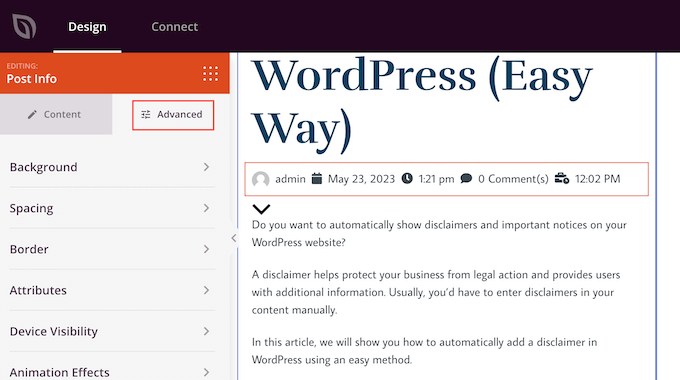
ここでは、スペーシングを変更したり、枠線を追加したり、CSSアニメーション効果を追加することもできる。
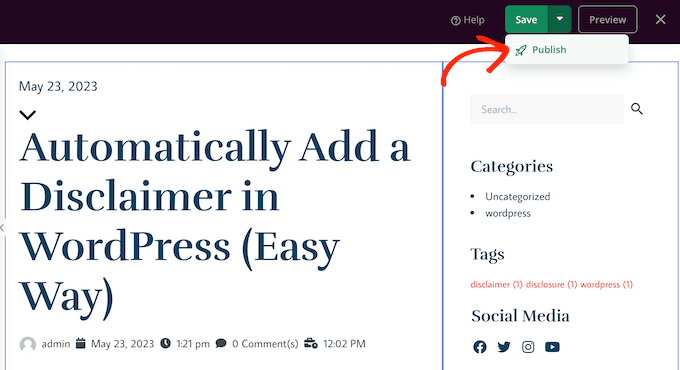
ページの見栄えに満足したら、「保存」ボタンをクリックし、「公開する」を選択して公開します。
専門家のアドバイス WordPressサイトに合わせた完全カスタマイザーのテーマをご希望ですか?WordPressサイトデザインサービスをチェックして、私たちの専門家にあなたの正確なニーズに合わせて作られた美しいテーマを構築させてください。
方法4:高度なカスタムフィールドを使う(フルカスタマイズ可能)
追加のメタ情報を表示するためだけにカスタムテーマを作成するのはやりすぎだと感じるかもしれません。その場合、カスタムフィールドやカスタムメタボックスを代わりに使うことができる。
どちらのオプションも、WordPressのブロックエディターに独自のフィールドを追加することができ、それを使って様々なタイプのメタ情報を挿入することができます。
詳しくは、以下のガイドをご覧ください:
方法5:WordPressテーマファイルにコードを追加する(上級者向け)
最後に、カスタムコードを使用してWordPressでブログ投稿メタ情報を追加することができます。この方法は、WordPressテーマカスタマイザー、フルサイトエディター、SeedProdが提供する投稿メタ情報オプションがあなたのニーズを満たさない場合に推奨されます。
あなたが初心者なら、コードを使用することは、あなたのウェブサイトを壊す可能性があるため、威圧的に見えるかもしれません。そのため、サイト内にカスタム・コード・スニペットを挿入するための最も簡単で安全なプラグインであるWPCodeを使用することをお勧めします。
WPCodeを使えば、WordPressのコアファイルに直接触れることなく、WordPressにコードを追加することができます。この方法で、WordPressサイトにエラーを引き起こすことはありません。
投稿メタ情報として使用できるカスタム・コード・スニペット付きの投稿はすでにいくつかあります。以下のガイドから始めることができます:
- カテゴリー:WordPressで投稿の最終更新日を表示する方法
- 各ブログ投稿にアフィリエイト情報開示を自動的に追加する方法
- WordPress投稿から投稿者名を削除する方法
- WordPressの投稿に記事の推定閲覧時間を表示する方法
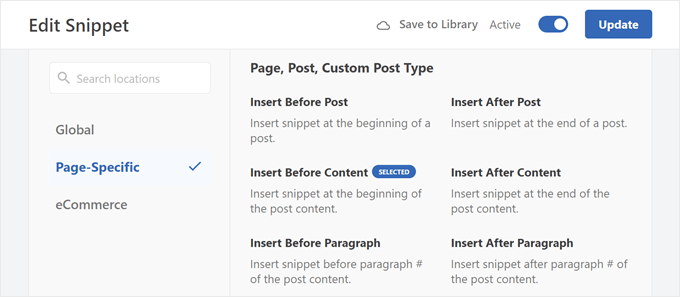
注意点としては、すべてのブログ投稿に表示されるように、コードを実行する場所を適切に選択する必要があるということだ。
投稿メタ情報の場合は、Insert Before Post(投稿の前に挿入)、Insert After Post(投稿の後に挿入)、Insert Before Content(コンテンツの前に挿入)、Insert After Content(コンテンツの後に挿入)のいずれかを選択する。
WordPressテーマでブログ記事のメタデータを表示する方法について、この記事がお役に立てれば幸いです。また、WordPress でメタディスクリプションとキーワードを追加する方法についてのガイドと、WordPress のエキスパートが選ぶ必携プラグインもご覧ください。
If you liked this article, then please subscribe to our YouTube Channel for WordPress video tutorials. You can also find us on Twitter and Facebook.


Jiří Vaněk
I left the metadata basic, but according to your instructions in different article, I added the date of the last modification of the posts using a snippet. In addition, I modified it so that it is displayed only for articles and not for pages. I found it important to add the latest revision of the article, because if a reader sees an article that was published, for example, two years ago, he may consider it outdated and the content irrelevant. That’s why I added this metadata to make it clear at first glance that the article is being added to and edited over time to be valid for its time. I find this information really important.
Ralph
As an autor of personal blog i ditched all of that info. Everybody knows only 1 person post on that website and i think this just waste the space on screen and first glance is very important for stay or nay decision. I only left the post original date (or when edited) as i often write about specific stuff and want readers to know if it is up to date or not.
WPBeginner Support
That is certainly an option for that type of site but there are many different types of sites out there
Admin
Ahmed Omar
I am using the first metod, it is easy and convenient for me
Thank you for the detailed post
WPBeginner Support
You’re welcome, glad our guide was helpful!
Admin
Serah
I’m using code snippets and none of it work. I get the following error message “syntax error, unexpected ‘<', expecting end of file"
WPBeginner Support
You may want to try adding above the code snippet you are trying to use the closing tag:
?>
Admin
zunairah
Hey, great article. I want to display only one category on my blog. Let’s say if I have a post that comes under three categories, I want to display only one category out of three as metadata on a single post. How can I achieve it?
WPBeginner Support
In those cases, it would normally be better to restructure your categories so the post would only be in one and use tags for organization
Admin
Thom
Thanks a lot for this article! I have one question. Is it possible to hide Tags: and This post was filed under: in case no tags or categories are set?
WPBeginner Support
It would depend on how your specific theme has added it and you would normally add a conditional statement. If you check with the support for your theme they may be able to assist.
Admin
Arif Wali
Hello,
Wpbeginners helped me alot during my whole career. Thank You for all. I have a question that is there any role of published date and authors name in SEO? can it effect ranking ? I have a php website and I have published many posts but it doesn’t contain any author name or date. should I add these to my site ?
WPBeginner Support
The published date can sometimes be a ranking factor but your author’s name shouldn’t be a ranking factor. For SEO you would want to take a look at our article here: https://www.wpbeginner.com/wordpress-seo/
Admin
Clayton
Great article! Thank you
WPBeginner Support
You’re welcome
Admin
Jen
Thanks for the info! So I’m trying to add a date to my posts. I saw your code but where is that added?
Thank you!
WPBeginner Support
It would depend on where you want to have the information displayed for where to add the code. If you reach out to the support for your current theme they should be able to point you to the right direction
Admin
simpson
Hello, i have news aggregator site how to add on homepage after every post source name and time when is published post (example google | before 45 minutes
Liudmyla Shapovalova
Hello, I have added an author name using the code provided in the article, but the link goes to the home page and not to the all articles written by this author. Please advise, thank you in advance, Liudmyla