ウェブサイトのトップナビゲーションメニューには、通常、すべての重要なページへのリンクがあります。このメニューを粘着性のあるものにすると、ユーザーがページをスクロールしても画面上に表示されたままにすることができます。そうすれば、いつでも手の届くところにメニューが表示されます。
これにより、ナビゲーションがよりアクセスしやすくなり、ユーザーは一番上までスクロールバックすることなく、サイトのさまざまなセクションに素早くジャンプできるようになります。スティッキーメニューを使用することで、エンゲージメントを高め、ウェブサイト全体のユーザビリティを向上させることができると私たちは考えています。
この投稿では、WordPressサイトに先頭固定表示のナビゲーションメニューを簡単に追加する方法をご紹介します。
先頭固定表示ナビゲーションメニューとは?
スティッキーまたはフローティングナビゲーションメニューは、ユーザーがスクロールダウンすると画面の先頭に「固定表示」されるため、画面上にすべて表示されます。
通常、WordPressのトップナビゲーションメニューには、サイトの最も重要なコンテンツへのリンクが含まれています。このメニューを先頭固定表示にすることで、訪問者はスクロールすることなく、いつでもそれらのリンクをクリックすることができます。

オンラインストアを運営している場合、トップナビゲーションメニューには通常、チェックアウトページやカートなど、コンバージョンを目的としたページへのリンクがあります。トップメニューを粘着性のあるものにすることで、カート放棄率を減らし、より多くの売上を得ることができます。
それでは、WordPressテーマやWooCommerceストアで、先頭固定表示のナビゲーション・メニューを簡単に作成する方法を見ていきましょう。以下のクイックリンクから、使いたい方法にジャンプしてください:
方法1:テーマ設定を使って先頭固定表示メニューを追加する(簡単)
最高のWordPressテーマの中には、先頭固定表示ナビゲーションメニューをビルトインでサポートしているものがあります。とはいえ、WordPressのダッシュボードでテーマ ” カスタマイズに行き、「メニュー」と書かれた設定を探して、テーマの設定をチェックする価値はある。
お使いのテーマが先頭固定表示に対応しているかどうか本当に〜してもよいですか?その場合は、テーマのドキュメンテーションを確認するか、開発者に問い合わせてください。詳しくは、WordPressのサポートを正しく依頼し、サポートを受ける方法をご覧ください。
もしあなたのテーマが先頭固定表示にビルトインされていない場合は、以下の他の方法を使う必要がある。
方法2:プラグインを使って先頭固定表示ナビゲーションメニューを追加する(推奨)
WordPressで先頭固定表示ナビゲーションメニューを追加する最も簡単な方法は、Sticky Menu & Sticky Headerプラグインを使うことです。このプラグインを使えば、メニューを含め、どんなものでも先頭固定表示にすることができます。
まず、プラグインをインストールして有効化する必要があります。WordPressプラグインのインストール方法については、ビギナーズガイドをご覧ください。
有効化したら、Settings(設定) ” Sticky Menu(先頭固定表示)(または何でもいい!)にアクセスしてください。
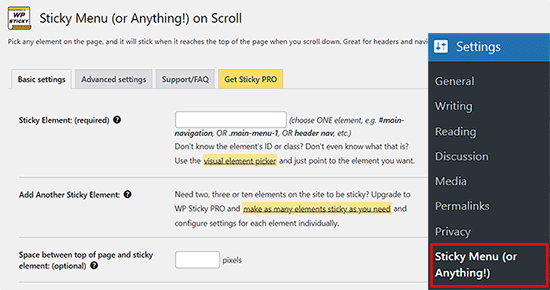
まず始めに、ブラウザーのinspectツールを使って、先頭に固定表示させたいナビゲーション・メニューのCSSIDを取得する必要があります。
ウェブサイトにアクセスし、ナビゲーションメニューにマウスオーバーするだけです。次に右クリックし、ブラウザのメニューから「検査」を選択します。
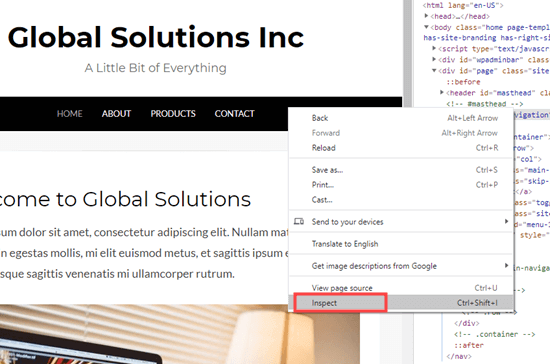
ブラウザー内に新しいパネルが開き、ナビゲーションメニューのソースコードを見ることができます。
メニューまたはサイトのヘッダーに関連するコードの行を見つける必要があります。それは次のようになります:
1 | <nav id="site-navigation" class="main-navigation" role="navigation"> |
コードを見つけるのに苦労している場合は、「Inspect(検査)」パネルにあるさまざまな行にマウスオーバーしてください。正しいコードが見つかると、次の画像のように、ブラウザがナビゲーション・メニューをハイライトします。
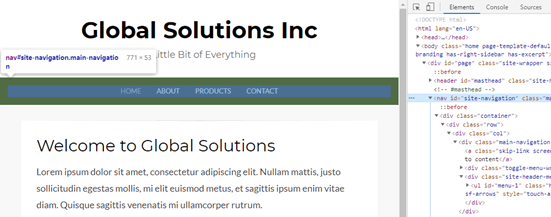
この場合、ナビゲーション・メニューのCSS IDはsite-navigationです。
この情報を入手したら、WordPressダッシュボードに戻り、「Sticky Element (必須)」フィールドに追加します。
また、先頭にハッシュ文字(#)を追加する必要があるので、サイトナビゲーションは #site-navigationになります。
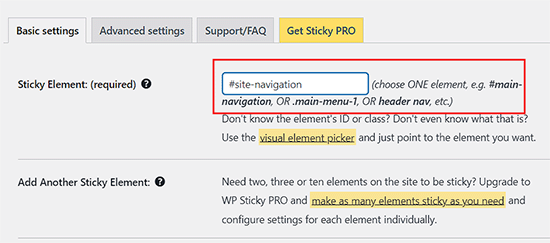
その後、ページ下部の「変更を保存」ボタンをクリックし、変更内容を保存します。
これで、WordPressのウェブサイトにアクセスしてスクロールしても、メニューが一番上に表示されたままになるはずだ。

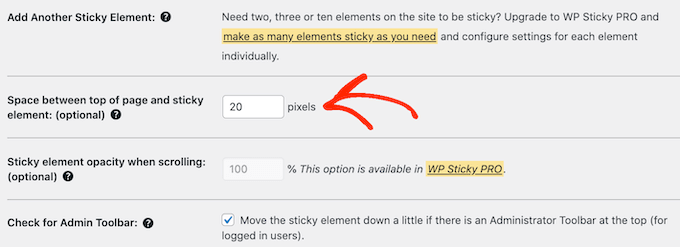
時には、非表示にしたくないコンテンツに先頭固定メニューが重なることがあります。
その場合は、「ページ上部と付箋要素の間のスペース」フィールドに数字を入力して、画面上部と付箋ナビゲーションメニューの間のスペースを定義する必要があります。
先頭固定表示メニューは、モバイル端末のような画面の小さい端末では問題を引き起こす可能性があります。その点を考慮し、デスクトップからWordPressサイトのモバイル版をチェックすることをお勧めします。
メニューの見た目に満足できない場合は、次のフィールドを見つけることによって、モバイルユーザーのためにメニューを「固定解除」することができます:「Do not stick element when screen is smaller than.
ここで「780px」と入力する。

このほかにもいくつかの設定がありますが、先頭固定表示ナビゲーションを作成するのに必要な設定はすべてこれだけです。
ナビゲーションメニューの設定に満足したら、「変更を保存」をクリックして設定を保存します。
方法3:コードを使って先頭固定表示ナビゲーションメニューを追加する
CSSを使って先頭固定表示ナビゲーションメニューを作ることもできます。
WordPressにカスタムコードを追加する最良の方法は、WPCodeを使用することです。WPCodeは、カスタムCSS、PHP、HTMLなどを追加できる最高のコードスニペットプラグインです。
テーマファイルを直接編集するわけではないので、WordPressでよくあるエラーを避けることができます。また、カスタムコードを失うことなく、テーマの更新や全く別のテーマへの変更も可能です。
また、先頭固定表示のオン・オフを個別クリックで切り替えることもできる。
まず、無料のWPCodeプラグインをインストールし、有効化する必要があります。 詳しくは、WordPressプラグインのインストール方法のステップバイステップガイドをご覧ください。
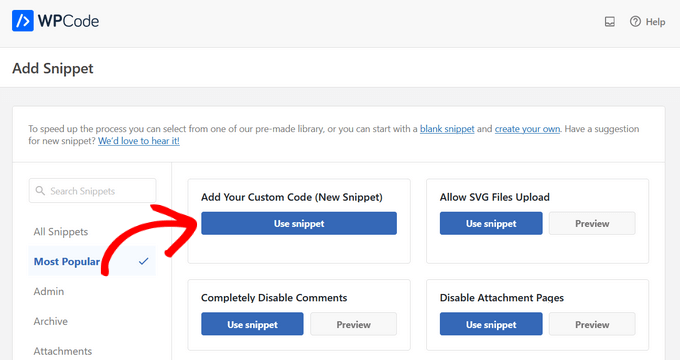
プラグインが有効化されたら、Code Snippets ” + Add Snippetページに移動し、あなたのサイトに追加できるすべての既製のWPCodeスニペットを見ることができます。
これらには、コメントを完全に無効化するスニペット、WordPressが通常サポートしていないファイルタイプのアップロード、添付ファイルページの無効化などが含まれます。
ここで、「カスタムコードの追加(新規スニペット)」にマウスオーバーし、表示されたら「スニペットを使用」ボタンをクリックするだけです。
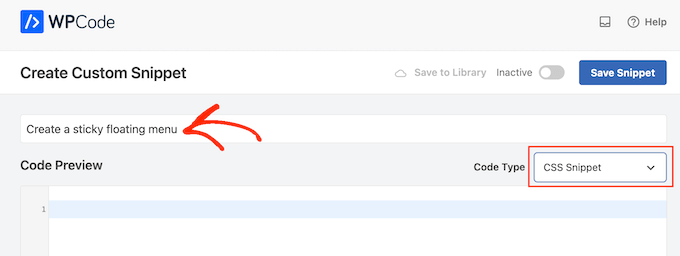
次の画面では、コード・スニペットのタイトルを入力する必要がある。これは単なる参考用なので、好きなものを使ってください。
次に、「コードタイプ」のドロップダウンを開き、「CSSスニペット」を選択する。
これで、WPCodeコードエディターに以下のスニペットを追加する:
1 2 3 4 5 6 7 8 9 10 11 12 13 | #site-navigation { background:#00000; height:60px; z-index:170; margin:0 auto; border-bottom:1px solid #dadada; width:100%; position:fixed; top:0; left:0; right:0; text-align: center;} |
これで黒い背景のナビゲーション・メニューが作成されます。backgroundの隣にある16進コードを変更することで、好きな色を使うことができます。
例えば、background:#を使えば、メニューの背景は白になります。どの16進コードを使えばよいか本当に〜してもよいですか?
また、#site-navigationをナビゲーション・メニューのCSS IDに置き換える必要があります。このコードを見つけるには、上で説明したのと同じ手順に従ってください。
コードに満足したら、’Inactive’トグルをクリックして’Active’に変更し、’Save Snippet’ボタンをクリックします。
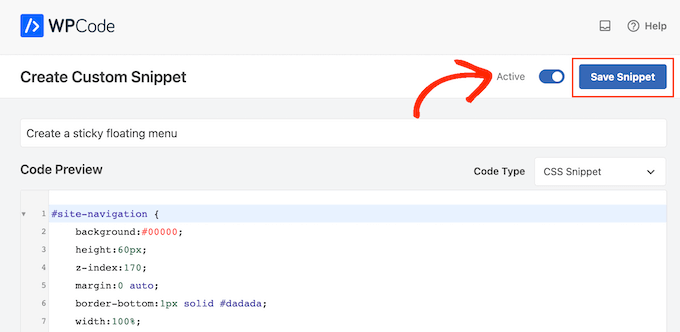
これで、WordPressのブログやウェブサイトにアクセスすると、スティッキーなフローティングナビゲーションメニューが表示されます。
テーマによっては、ナビゲーションメニューがサイトヘッダーの上ではなく、下に表示されることがあります。この場合、先頭固定表示ナビゲーションメニューがサイトタイトルやヘッダーに近すぎたり、重なって表示されることがあります。

このような場合は、カスタムCSSスニペットに以下を追加してください:
1 2 3 | .site-branding {margin-top:60px !important;} |
サイトブランディングをヘッダーエリアのCSSクラスで置き換えるだけです。この情報を得るには、ブラウザーの「Inspect」ツールを使い、方法2で説明したのと同じ手順を踏むだけです。
ボーナス:WordPressの投稿を先頭固定表示にする
WordPressでブログを運営しているのであれば、ブログ記事の一部をスティッキーにするのは良いアイデアだ。これらは、あなたのサイトの最も重要なコンテンツを含む柱となる記事であったり、ユーザーに交流してもらいたいお知らせやプレゼントの記事であったりします。
選択した投稿に付箋を付けると、新しいコンテンツを公開しても、その投稿はブログページの先頭に残り、付箋の下に表示されます。
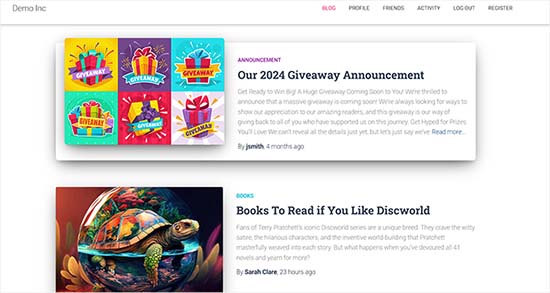
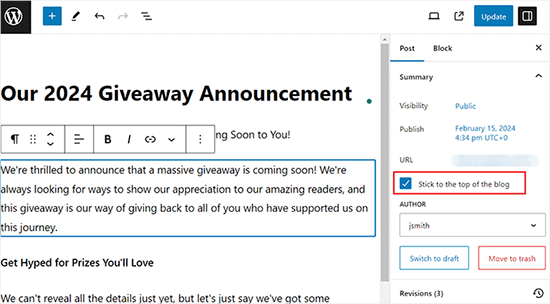
コンテンツエディターでブログ投稿を開けば、簡単に先頭に固定表示させることができます。ブロックパネルの’Summary’タブを展開し、’Stick to the top of the blog’オプションをチェックしてください。
その後、上部にある「更新」または「公開」ボタンをクリックして、設定を保存します。これで、WordPressサイトに先頭固定表示ブログ投稿が作成できました。
詳しくは、WordPressで先頭固定表示をする方法のチュートリアルをご覧ください。
この記事が、あなたのWordPressサイトにスティッキーなフローティングナビゲーションメニューを追加するのにお役に立てば幸いです。また、WordPressテーマでスライドパネルメニューを追加する方法についての初心者向けガイドや、WordPressメニューにソーシャルメディアアイコンを追加するチュートリアルもご覧ください。
If you liked this article, then please subscribe to our YouTube Channel for WordPress video tutorials. You can also find us on Twitter and Facebook.


Dennis Muthomi
is there a way to make sticky menu only apply to certain posts/pages? Like for examlpe, having it non-sticky on my blog’s homepage but sticky everywhere else on the website?
WPBeginner Support
If your theme does not offer that option then we would recommend the plugin for a simple method to have that conditional display
Admin
Mrteesurez
Well crafted, I am happy to see the plugin you shared here “sticky menu or (anything) on scroll”. That’s means it can be used to make sticky any elements apart from menu.
Initially I used raw code for it, thanks for share this easy method.
Jiří Vaněk
Thanks for the tutorial. I’ve always been looking for usually a template that can basically do this. According to this guide, I no longer have to.
WPBeginner Support
Glad we could help open up your theme options
Admin
Paul
Where do i leave the 5 Stars…..thank-you very much!!
WPBeginner Support
Glad our guide was helpful
Admin
Jess
Thank you so so much for this helpful post!!! So clear and easy to follow.
WPBeginner Support
Glad our guide was helpful
Admin
Ivaylo
Great practical tutorail. I did Method 2 and it worked instantly, however when I open the website on mobile, the buttons from the menu have vanished. Anyone knows why or how to solve it?
Cheers!
WPBeginner Support
If you haven’t done so already, we would recommend checking with the support for your specific theme to see if it could be a conflict with your theme’s CSS
Admin
Serena Richardson
Hello,
How do you create a sticky floating menu down the right hand side of a page rather than at the top, so it moves down as you scroll down.
Thanks!
Serena
WPBeginner Support
That would be adding a sticky widget which we have a recommendation in our article below:
https://www.wpbeginner.com/plugins/how-to-create-a-sticky-floating-sidebar-widget-in-wordpress/
Admin
Tom Browne
Worked instantly. Thank you
WPBeginner Support
You’re welcome
Admin
simran
level of perfection and the way of present the information …thanks you..
WPBeginner Support
Glad our guide was helpful
Admin
Theo
Where do I find out the id of my navbar?
Can’t find it.
WPBeginner Support
To do that you would use inspect element. We have a guide on how to properly use inspect element below:
https://www.wpbeginner.com/wp-tutorials/basics-of-inspect-element-with-your-wordpress-site
Admin
Natasha T
A lifesaver, can’t thank you enough.
WPBeginner Support
You’re welcome
Admin
Tam
Hello!
Thanks for your help! It worked like magic :D.
I learn a little CSS and tried to make my nav sticky from a free theme (GeneratePress) but didn’t work. (I tried “position: sticky;” in CSS), but thank your code that helped me to fix it
WPBeginner Support
Glad our article was helpful
Admin
alexandre
Just what I was looking for! Great plugin.Thank’s
WPBeginner Support
You’re welcome, glad you found our recommendation helpful
Admin
Guy Bailey
Many thanks for your help – just a small q; the background of my menu is transparent when scrolling down. Any quick fixes of tricks to add a solid colour behind it (white in our case)?
WPBeginner Support
It would depend on how your menu is set up but you can use inspect element to find the object that you can set the background-color property to: https://www.wpbeginner.com/wp-tutorials/basics-of-inspect-element-with-your-wordpress-site/
Admin
Manish
Thank You. When Wpbeginner writes a blog post on a topic, it is bound to be helpful.
WPBeginner Support
Glad our content has been helpful
Admin
Everest
Thanks so much.
You made my day.
WPBeginner Support
You’re welcome, glad we could help
Admin
Tony Chung
The CSS code worked and I did have to add a margin to the header so the whole title would display. My menu bar stretches across the top but the menu buttons start at the left and stop in the middle. How do I move the buttons to be centered on the page?
WPBeginner Support
That would vary from theme to theme the specifics, but you would normally need to modify the CSS. You can test changes using inspect element: https://www.wpbeginner.com/wp-tutorials/basics-of-inspect-element-with-your-wordpress-site/
Admin
Chinedu
Wow, This works perfectly.
Thank you
WPBeginner Support
Glad our solution worked for you
Admin
Gillian Davies
I have a list of books in a table. I have imported the images of their front covers into Media, now I want to have the images pop up as a viewer scrolls down the list. Similar to a row hover, but how do I do this in a table created in table maker?
Raul
How can i make this fixed navigation menu scrollable?
So i used it for a sidebar but when the sidebar it is too long it doesn’t fit on the screen and i cant scroll it down.
Rushikesh Thawale
Hello,
How did you write the code LIKE A CODE in this post? I mean how to show HTML codes like this in a post?
Thanks.
Tara
You’ve probably found out by now, but for those searching, how to show your code on your post use the html character for the opening bracket on the html tags < ; without the space.
WPBeginner Support
That is one method but for this, we’re using the second method in our article here: https://www.wpbeginner.com/wp-tutorials/how-to-easily-display-code-on-your-wordpress-site/
Admin
Cesar
Great post! your CSS code works for me
dani
Alain
Very usefull !
thank you.
amin
Also you can “z-index: 999xxxx” for logo or any element that you want put it on navbar
Sujith Reghu
I want to know how to add a sticky menu inside a WordPress post or page. Like for a long post, the headings and sub-headings of the post itself to be presented in the sticky menu so that a reader can easily navigate from one section in the post to another. Thanks…
Zac
thanks for the tutorial!
what i need is a little different, i need a ‘mini-menu’ to appear when you hover on the menu … so it doesn’t show until you hover .. like a drop down
if you could make this tutorial i would appreciate it.
amin
you can use a mega-menu plugin or uber menu plugin, but you can make it without plugin, by css or jquery, like bootstrap3 menu