最初と最後のメニュー項目がユニークなスタイルになっているサイトを見たことがあるだろうか?それは偶然ではなく、巧妙なCSSが働いているのです。このテクニックは、お問い合わせページや特別オファーなど、重要なリンクを強調することができます。
多くの読者が、メニュー項目にカスタマイザーを追加してみましたが、メニューを並べ替えると、スタイリングが崩れてしまうことに気づきました。最初’と’最後’としてタグ付けされた項目は、もはやそれらの位置になく、メニューは一貫性のない外観を残します。
そこでこのガイドでは、メニュー項目を後でシャッフルしても、先頭に固定表示する.firstクラスと.lastクラスを追加する方法を紹介します。クラシックテーマ用のフィルターと、ブロックテーマを含むすべてのテーマ用のCSSセレクタです。
なぜ最初と最後のナビゲーション項目でスタイルを変えるのか?
ナビゲーションメニューの最初と最後の項目にカスタマイザーを追加する必要がある場合があります。これにより、サイトのお問い合わせフォームやお買い物カゴページへのリンクなど、重要なリンクを目立たせることができます。
この場合、最初と最後のメニュー項目にカスタムCSSクラスを追加するだけでよい。しかし、メニューの順序を変更すると、カスタマイザーが完全に壊れてしまう可能性があります。
そのため、フィルターの使用をお勧めします。
このガイドでは、ナビゲーション・メニューの最初と最後の項目にスタイルを設定する方法を説明します。以下のクイックリンクから、お好きな方法にジャンプしてください:
プロのアドバイス サイト上のメニュー項目をハイライトしたいですか?詳しくはWordPressでメニュー項目をハイライトする方法をご覧ください。
方法1:フィルターを使用して最初と最後のクラスを追加する(推奨)
注: この方法はクラシックWordPressテーマでのみ機能します。ブロックテーマを使用している場合は、方法2に進んでください。
ナビゲーション・メニュー項目をスタイリングする最も簡単な方法は、テーマにフィルターを追加することです。
WordPressのチュートリアルには、テーマのfunctions.phpファイルに追加するコードスニペットがよく掲載されています。
最大の問題は、カスタムコードスニペットに小さなミスがあっただけでも、WordPressサイトが壊れてアクセスできなくなることだ。言うまでもなく、WordPressテーマを更新すれば、カスタマイザーはすべて失われてしまう。
そこでWPCodeの 出番だ。
この無料プラグインを使えば、サイトを危険にさらすことなく、WordPressにカスタムCSS、PHP、HTMLなどを簡単に追加できる。
最初に行う必要があるのは、無料のWPCodeプラグインをインストールして有効化することです。詳しくは、WordPressプラグインのインストール方法のステップバイステップガイドをご覧ください。
有効化したら、Code Snippets ” Add Snippetにアクセスしてください。
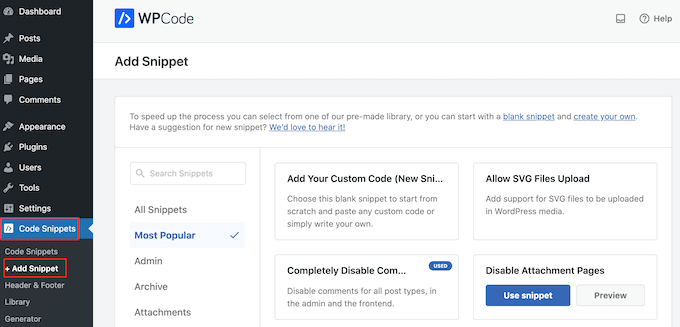
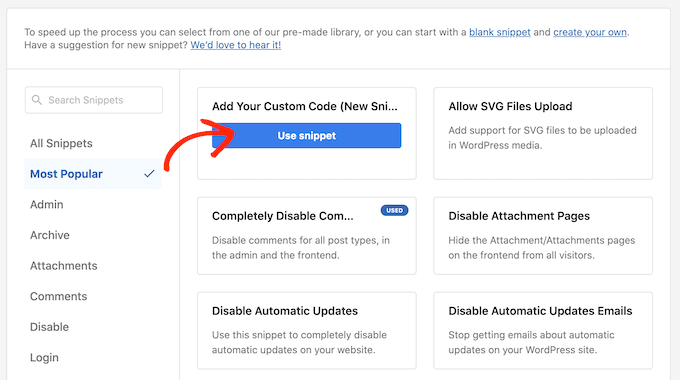
ここで、「カスタムコードを追加」にマウスオーバーするだけです。
表示されたら、『スニペットを使用する』をクリックする。
はじめに、カスタムコードスニペットのタイトルを入力します。これは、WordPressダッシュボードでスニペットを識別するのに役立つものであれば何でも構いません。
その後、「コードタイプ」のドロップダウンを開き、「PHPスニペット」を選択する。
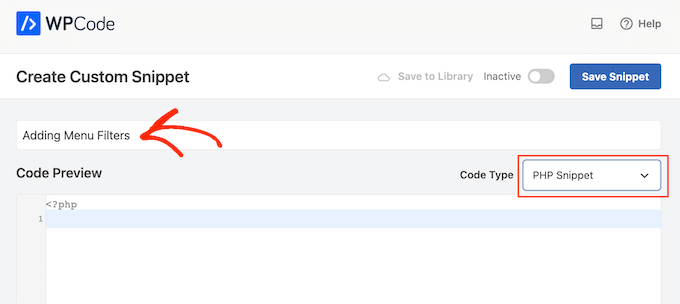
そして、次のPHPをコードボックスに追加する:
1 2 3 4 5 6 | function wpb_first_and_last_menu_class($items) { $items[1]->classes[] = 'first'; $items[count($items)]->classes[] = 'last'; return $items;}add_filter('wp_nav_menu_objects', 'wpb_first_and_last_menu_class'); |
その後、画面を一番上までスクロールし、「Inactive」トグルをクリックして「Active」に変更すれば準備完了です。
最後に「Save Snippet」をクリックして、PHPスニペットをライブにする。
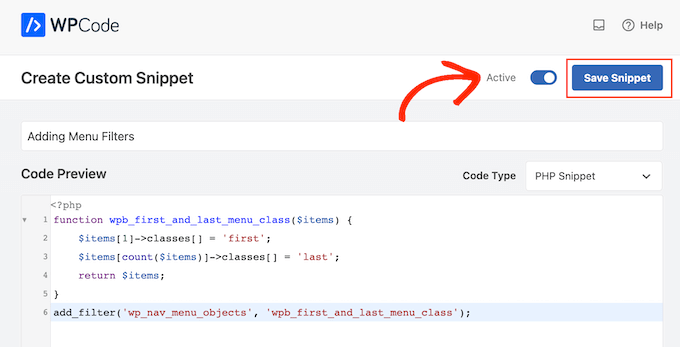
これにより、最初と最後のメニュー項目に .first と .last CSS クラスが作成されます。これらのクラスを使用して、カスタムナビゲーションメニューのこれらの項目に独自のスタイルを適用することができます。
そのためには、WordPressサイトに2つ目のスニペットを追加する必要があります。まず、上記と同じ手順でカスタマイザーを新規作成します。
その後、カスタム・コード・スニペットのタイトルを入力する。
次に、「コードタイプ」のドロップダウンを開くが、今回は「CSSスニペット」を選択する。
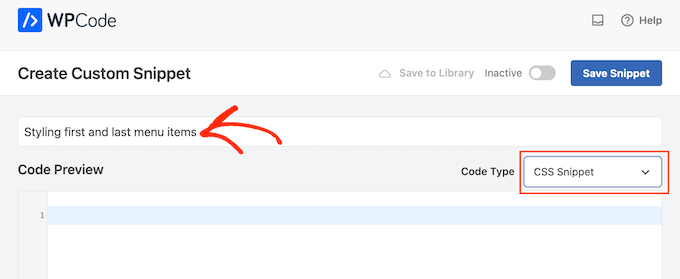
このガイドでは、以下のCSSフォーマットをコードボックスに追加することで、最初と最後のメニュー項目を太字にするだけです:
1 2 3 | .first a {font-weight: bold;}.last a {font-weight: bold;} |
それが終わったら、「Inactive」トグルをクリックして「Active」に変更する。
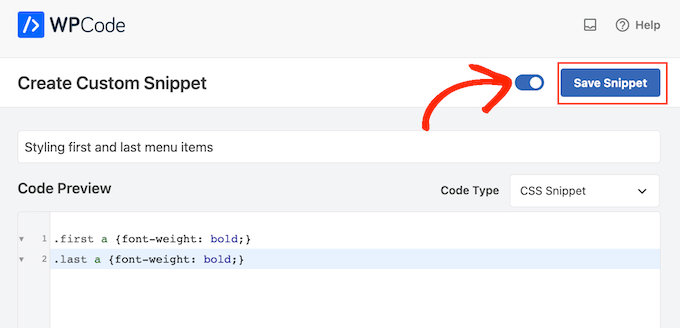
最後に「Save Snippet」をクリックして、CSSスニペットをライブにする。
今、あなたのサイトにアクセスすると、新しくスタイリングされたメニューが表示されます。

方法2: CSSセレクタを使用して最初と最後の項目をスタイリングする (すべてのテーマで動作)
コード・スニペット・プラグインを使いたくない場合は、CSSセレクタを使って最初と最後のメニュー項目をスタイルすることができます。ただし、この方法はInternet Explorerなどの一部の古いブラウザーでは動作しない場合があります。
このことを念頭に置いて、WordPressサイトをさまざまなブラウザーでテストすることをお勧めします。
この方法に従うには、テーマのスタイルシートまたはWordPressテーマ・カスタマイザーの「追加CSS」セクションにコードを追加する必要があります。
まだカスタムCSSを使用したことがない場合は、WordPressサイトに簡単にカスタムCSSを追加する方法をご覧ください。
最初のステップは、テーマのstyle.cssファイルを編集するか、外観 ” カスタマイザーから「追加CSS」をクリックします。
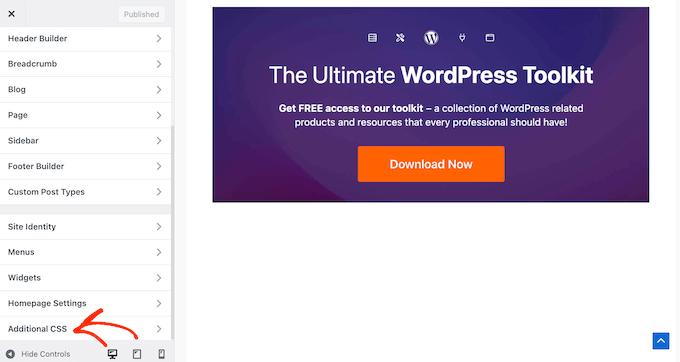
その後、以下のコード・スニペットをサイトに追加してください:
1 2 | ul#yourmenuid > li:first-child { }ul#yourmenuid > li:last-child { } |
yourmenuid’をナビゲーションメニューのIDに置き換える必要があることに注意してください。
セレクタ’first-child’と’last-child’は、ナビゲーション・メニューの最初と最後の項目である親の最初と最後の子を選択する。
例えば、WordPressブログの最初と最後のナビゲーション・メニュー項目を太字にするために、このコードを使用した:
1 2 3 4 5 6 | ul#primary-menu-list > li:first-child a { font-weight: bold;}ul#primary-menu-list > li:last-child a { font-weight: bold;} |
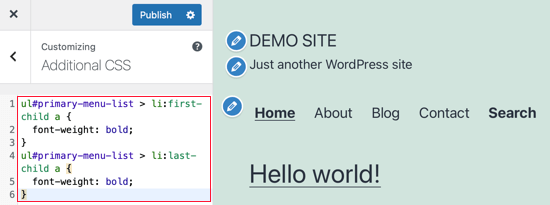
WordPressのブロックテーマを使用している場合、WordPressの管理画面にはテーマカスタマイザーがありません。テーマカスタマイザーにアクセスするには、ブラウザーでこのURLを入力する必要があります:
1 | https://yourdomainname.com/wp-admin/customize.php |
ドメインは必ずあなたのサイトのドメイン名に置き換えてください。
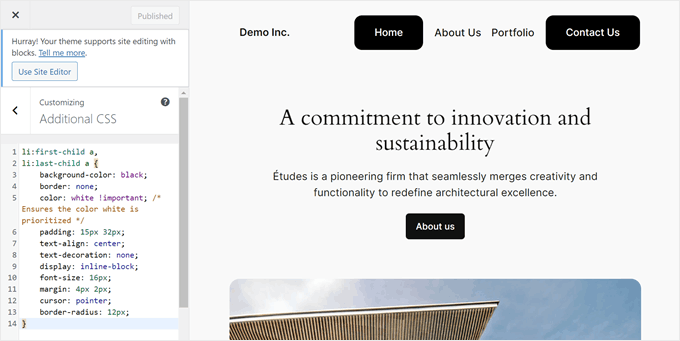
その後、先ほどと同じように「Additional CSS」タブを開き、以下のコードをインサーターで挿入する。メニューIDを追加する必要がないので、コードが少し違って見えることに注意してください。
1 2 3 4 5 6 7 8 9 10 11 12 13 14 | li:first-child a,li:last-child a { background-color: black; border: none; color: white !important; /* Ensures the color white is prioritized */ padding: 15px 32px; text-align: center; text-decoration: none; display: inline-block; font-size: 16px; margin: 4px 2px; cursor: pointer; border-radius: 12px;} |
コードは自由にカスタマイズしてください。下の例では、最初と最後のリンクをボタンにしています。
こんな感じだ:
このチュートリアルで、WordPressのナビゲーションメニューに.firstクラスと.lastクラスを追加する方法を学んでいただけたら幸いです。WordPressで縦型ナビゲーションメニューを作成する方法の投稿や、WordPressサイトでドロップダウンメニューを作成するための初心者向けガイドもご覧ください。
If you liked this article, then please subscribe to our YouTube Channel for WordPress video tutorials. You can also find us on Twitter and Facebook.


Ahmed Mahdi
i’ve changed the code slightly to work with child menus too:
function wpb_first_and_last_menu_class($items) {
foreach($items as $k => $v){
$parent[$v->menu_item_parent][] = $v;
}
foreach($parent as $k => $v){
$v[0]->classes[] = ‘first’;
$v[count($v)-1]->classes[] = ‘last’;
}
return $items;
}
add_filter(‘wp_nav_menu_objects’, ‘wpb_first_and_last_menu_class’);
Trevor Simonton
exactly what i needed. thank you!
Georgios Panagiotakopoulos
Thanks! This works great!
Munkhbayar
Thanks for code. Works for me.
mad_doc
Thank you for idea & help!
Charles
Thanks for this nice code…
What about child menu first and last item?
It applied only for parent manu.
Do you have any idea about child last item?
jordi
Anyone have any tip about use add_filter(”); for wp_nav_menu using STARKERS? JS and CSS are fine to do that, it is just frustrating to don’t be able to fix it from the back…
can’t make it works
thanks to share anyway!!
Jake
This does not work reliably if you have nested menus.
Editorial Staff
Hmm, will look into a fix for this.
Admin
Olivier
It works when the menu item is the last, or the last child of a last menu item.
It does not work when the menu item is a last child of a menu item that is not the last.
Olivier
Together with some other additions to functions.php that i’ve tried, this code fails to tag a menu item as first or last menu item when they are in a submenu. A fix for this would be great!
Elliott Richmond
Nice! Would usually use CSS but this is a good tip
Mattia
Great! This is particularly interesting because I have to class more than 2 menu items…
Now I got it!
Thanks
karen
Thanks for this! Forgive me if I missed it – but – is there an example of the menu to see the difference in the nav created by this class? Thank you again!
Editorial Staff
The site we designed for our client is not live yet. But the main reason was that we wanted to have a border left to the first menu item. All other items had border right element with a specific padding and margin. We used the last class to remove the margin right and the border right because there was no need for it. It was hitting the wrap container. Hope you can visualize it.
Admin
Ivo Minchev
I’ve tried this at the site http://aurorachalet-switzerland.com/ and I cannot see the effect. I’m using the “Twenty Eleven” theme for this site. Where is the problem?
Ivo Minchev
Pobably because of the #yourmenuid tag. I tried some ID’s but none of them worked.
Editorial Staff
This should work as long as you specify the correct id tags.
Admin
Editorial Staff
Don’t think that you are using the wp_nav_menu. From the looks of it, it seems that your site is using the fall_back menu by listing all pages. Can you confirm that you have gone into Appearance > Menu and created a menu there. Then specified that menu as a primary location??
Admin