WPBeginnerでは、ユーザーエクスペリエンスを向上させ、ブランディングを強化し、コンバージョンを促進するために、数え切れないほどの読者がWordPressサイトをカスタマイズするお手伝いをしてきました。そして、ナビゲーションメニューを適切に作成することで、エンゲージメントを高め、サイトを長く利用してもらうことができることを実感してきました。
問題は、WordPressテーマはすべてナビゲーションメニューを表示できる場所が決まっているため、これを変更するのが厄介だということだ。テーマファイルを修正するのは繊細な作業なので、初心者の場合は特にそうだ。
ブロックテーマを使用している場合、フルサイトエディターでこれを行うことができます。しかし、私たちの経験では、すべてのタイプのテーマで機能する、より良いオプションがあります。
例えば、高度なカスタマイザーが必要であれば、SeedProdのような強力なページビルダーを使うことができます。また、カスタマイザーをシンプルに使いたいのであれば、WPCodeが断然おすすめです。
この投稿では、WordPressテーマの任意のエリアにカスタムナビゲーションメニューを追加する方法を紹介します。あなたのニーズに合ったチュートリアルを選択できるように、3つの異なるオプション設定について説明します。
なぜWordPressテーマでカスタムナビゲーションメニューを追加するのですか?
ナビゲーションメニューは、サイトの重要なエリアを指すリンクのリストです。訪問者が興味深いコンテンツを見つけやすくすることで、WordPressのページビューを増やし、直帰率を下げることができます。
メニューの正確な位置はWordPressテーマによって異なります。ほとんどのテーマにはいくつかのオプションがあるので、異なるメニューを作成し、異なる場所に表示することができます。
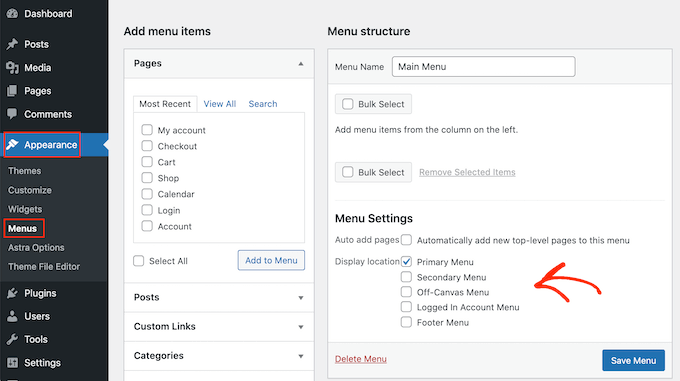
現在のWordPressテーマでメニューを表示できる場所を確認するには、外観 ” メニューに移動し、「表示場所」セクションを見てください。
以下の画像は、Astra WordPressテーマでサポートされている場所を示しています。
テーマで「表示場所」としてリストされていないエリアにメニューを表示したい場合があります。
それでは、WordPressテーマのどのエリアにもカスタムナビゲーションメニューを追加する方法を見ていきましょう。以下のクイックリンクからお好きな方法にジャンプしてください:
方法1:フルサイトエディターを使う(ブロックベースのテーマのみ)
ThemeIsle Hestia Proのようなブロックテーマを使っている場合、フルサイト編集(FSE)とブロックエディターを使ってカスタムナビゲーションメニューを追加することができます。
詳しくはWordPressフルサイト編集テーマの投稿をご覧ください。
この方法はすべてのテーマで使えるわけではないし、メニューのすべての部分をカスタマイズできるわけでもない。WordPressテーマに完全にカスタムメニューを追加したい場合は、代わりにページビルダープラグインを使用することをお勧めする。
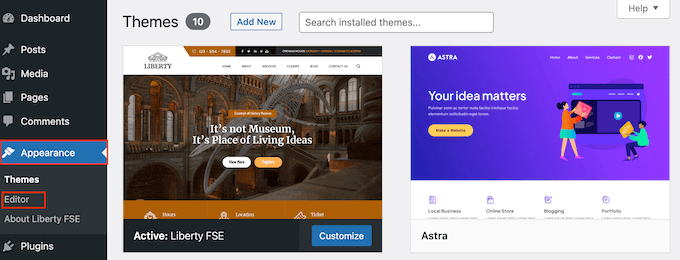
ブロックベースのテーマを使っている場合は、外観“エディターへ。
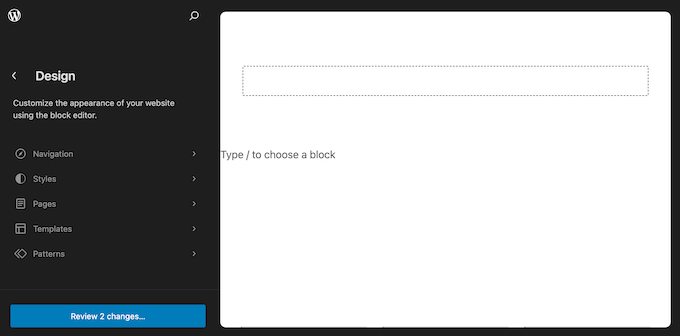
デフォルト設定では、フルサイトエディターにはテーマのホームテンプレートが表示されますが、どのエリアにもナビゲーションメニューを追加することができます。
利用可能なオプションをすべて見るには、「テンプレート」、「パターン」、「ページ」のいずれかを選択すればよい。
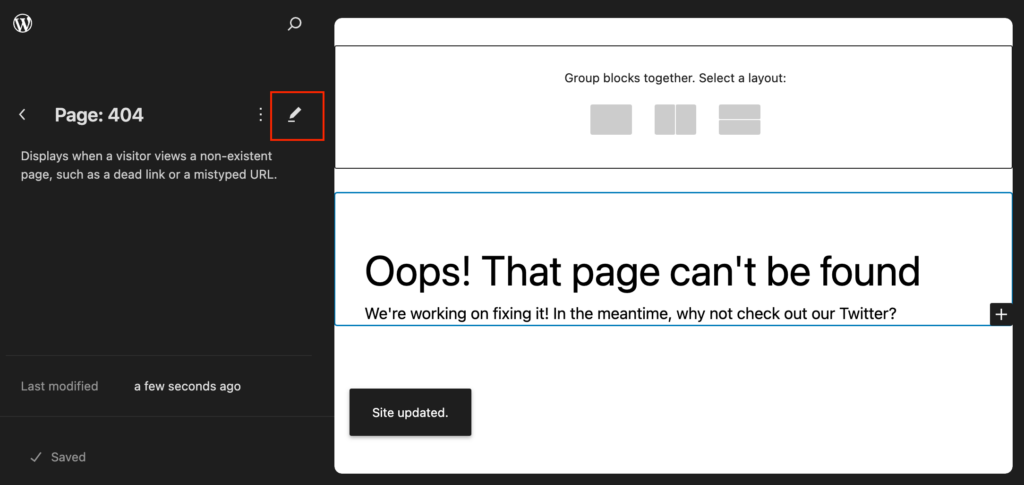
カスタムナビゲーションメニューを追加したいテンプレート、テンプレートパーツ、ページをクリックしてください。
WordPressにデザインのプレビューが表示されます。このテンプレートを編集するには、小さな鉛筆のアイコンをクリックしてください。
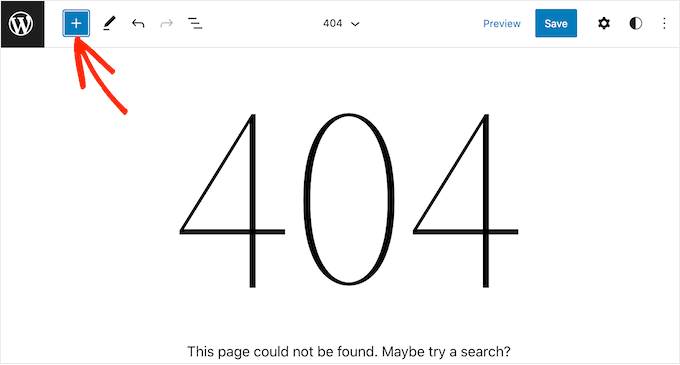
次のステップは、メニューを表示したいエリアにナビゲーションブロックを追加することです。
左上の青い「+」ボタンをクリックする。
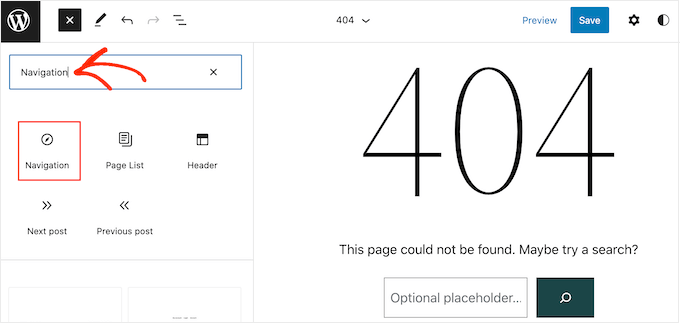
では、検索バーに「ナビゲーション」と入力してください。
ナビゲーション」ブロックが外観に表示されたら、レイアウトにドラッグ&ドロップするだけです。
次に、ナビゲーションブロックをクリックして選択します。
表示したいメニューがすでに作成されている場合は、ナビゲーションブロックをクリックして選択します。右側のメニューで、「メニュー」の隣にある3点アイコンをクリックします。
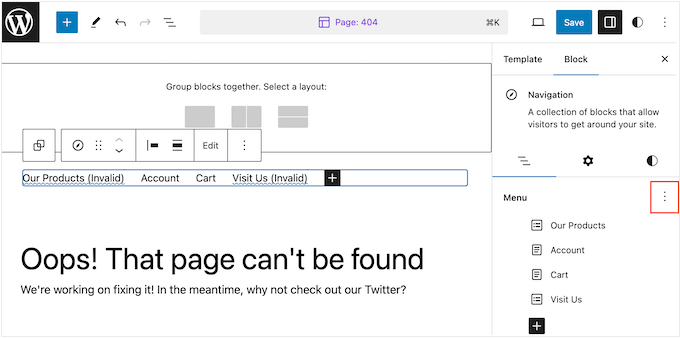
ドロップダウンメニューからメニューを選択することができます。
もう一つのオプションは、ページ、投稿、カスタムリンクなどを追加して、フルサイトエディター内でメニューを構築することです。新規メニューに項目を追加するには、’+’アイコンをクリックするだけです。
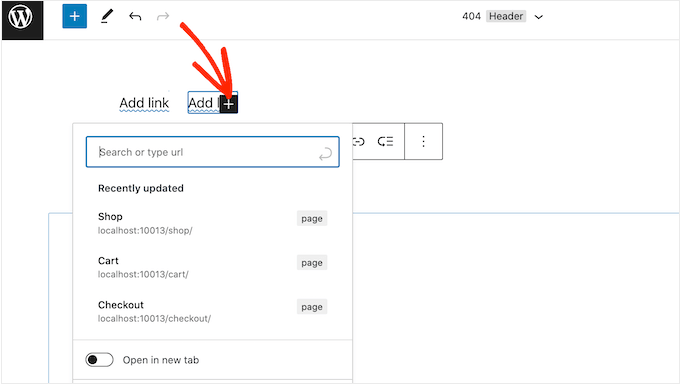
このポップアップを開き、任意の投稿やページを追加し、これらのリンクを新しいタブで開くかどうかを決定します。
WordPressのメニューに検索バーを追加したり、ソーシャルメディアのアイコンを追加したりすることもできます。ポップアップで、メニューに追加したいブロックをタイプし、適切なオプションが表示されたら選択するだけです。
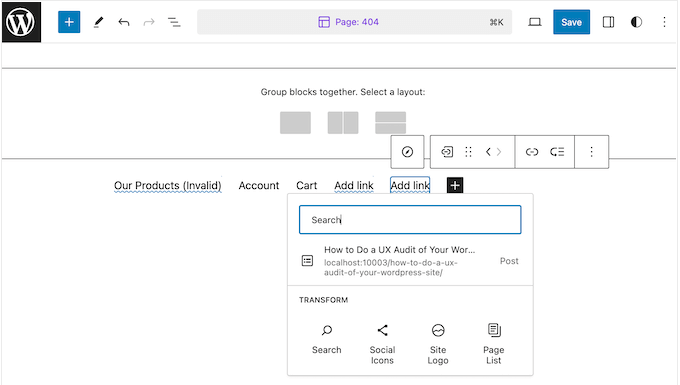
その後、ミニツールバーと右側メニューの設定を使用して、このブロックを設定することができます。メニューに項目を追加するには、この手順を繰り返すだけです。
メニューの見た目に満足したら、「保存」ボタンをクリックするだけです。
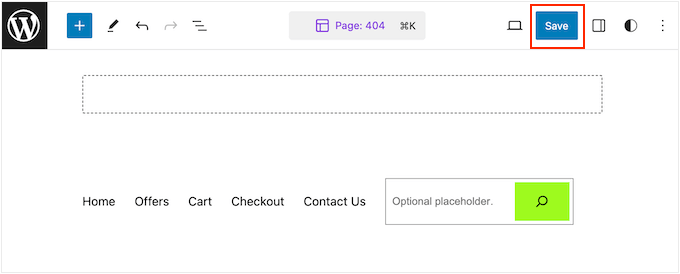
あなたのサイトは新しいテンプレートを使用するようになり、訪問者はカスタムナビゲーションメニューを操作できるようになります。
方法2:ページビルダー・プラグインを使う(すべてのテーマで使える)
フルサイトエディターでは、ブロックベースのテーマにメニューを追加することができる。しかし、高度で完全にカスタマイズ可能なメニューをWordPressテーマに追加したい場合は、ページビルダープラグインが必要です。
SeedProdは、あなたのナビゲーションメニューのすべての部分をカスタマイズすることができ、市場で最高のWordPressページビルダープラグインです。
私たちは、このツールを使ってカスタムナビゲーションメニューやランディングページなどを構築した豊富な経験があります。詳細については、SeedProdのレビューをご覧ください。
ページに関しては、SeedProdには350以上のプロがデザインしたテンプレートが用意されています。テンプレートを選択した後、SeedProdの既製のナビゲーションメニューブロックを使用してサイトにカスタマイザーナビゲーションメニューを追加することができます。
まず、SeedProdプラグインをインストールして有効化する必要があります。詳しくは、WordPressプラグインのインストール方法のステップバイステップガイドをご覧ください。
注:コードを書かずにカスタマイザーナビゲーションメニューを作成できるSeedProdの無料版もあります。しかし、このガイドでは、SeedProd Proを使用します。SeedProd Proには、ナビゲーションメニューブロックに加えて、追加のテンプレートと高度な機能があります。
プラグインを有効化した後、SeedProdはライセンスキーを要求します。

この情報は、SeedProdサイトのアカウントで確認できます。キーを入力した後、「Verify Key」ボタンをクリックしてください。
それができたら、SeedProd ” ランディングページに行き、’新規ランディングページを追加’ボタンをクリックします。
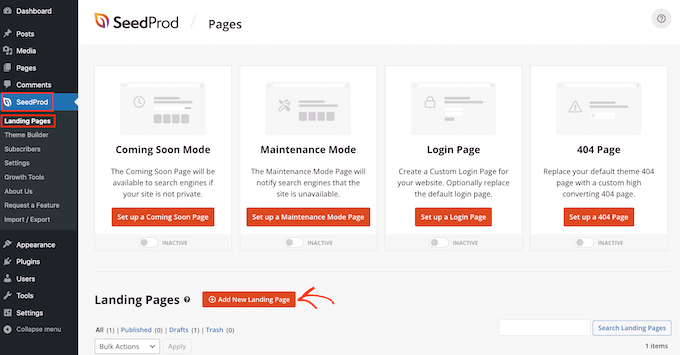
カスタムページのテンプレートを選択できます。
適切なデザインを見つけるために、SeedProdのテンプレートはすべて、近日公開キャンペーンやリードスクイーズキャンペーンなど、さまざまなキャンペーンタイプに分類されています。SeedProdのテンプレートを使って404ページを改善することもできます。
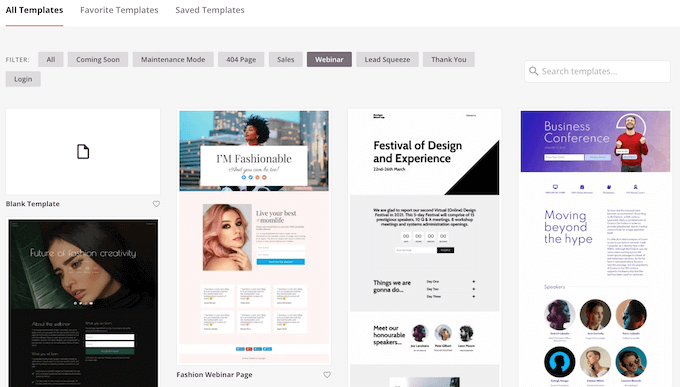
デザインを詳しく見るには、テンプレートの上にマウスオーバーし、虫眼鏡アイコンをクリックするだけです。
使いたいデザインが見つかったら、「Choose This Template」をクリックする。

すべての画像に「ブラックフライデー販売ページ」テンプレートを使用していますが、お好きなテンプレートをお使いください。
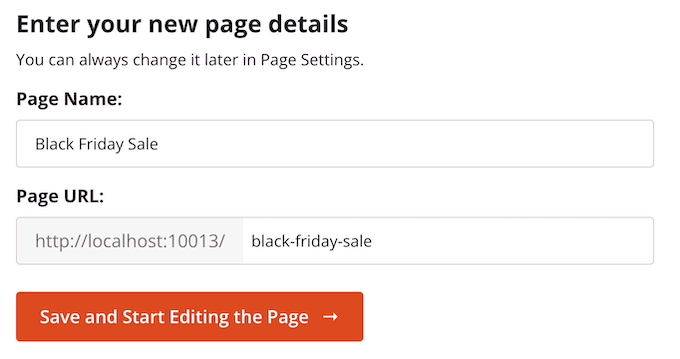
テンプレートを選択したら、カスタムページの名前を入力します。SeedProdはページのタイトルに基づいて自動的にURLを作成しますが、このURLは好きなものに変更することができます。
例えば、検索エンジンがページの内容を理解しやすくするために、関連キーワードを追加することもできます。これはWordPressのSEOを改善し、検索エンジンがあなたのようなコンテンツを探している人にページを表示するのに役立ちます。
これらの情報を入力したら、「保存してページの編集を開始する」ボタンをクリックします。
ほとんどのテンプレートはすでにいくつかのブロックを含んでおり、これらはすべてSeedProdページレイアウトのコアコンポーネントです。
ブロックをカスタマイズするには、ページエディターでクリックして選択するだけです。
左側のツールバーには、そのブロックのすべての設定が表示されます。例えば、下の画像では「見出し」ブロック内のテキストを変更しています。
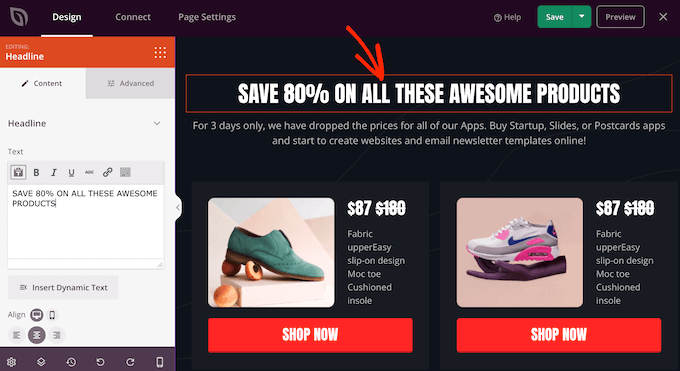
左側のメニューにある設定を使って、テキストの書式設定、配置の変更、リンクの追加などができます。
高度な」タブを選択すると、さらに多くの設定にアクセスできるようになります。例えば、ボックスシャドウや CSSアニメーションを追加して、ブロックを本当に目立たせることができます。
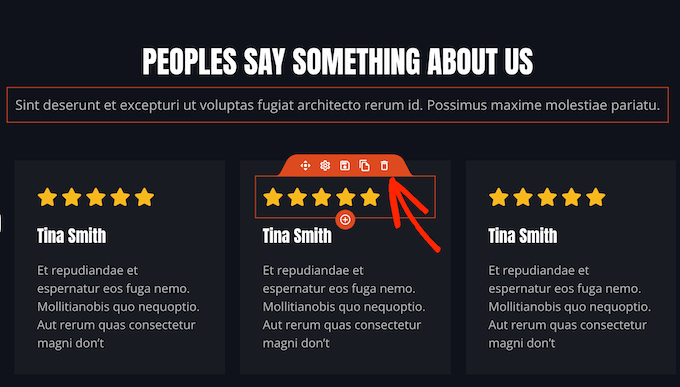
デザインに新しいブロックを追加するには、左側のメニューからブロックを探し、ページ上にドラッグするだけです。ブロックを削除したい場合は、クリックしてブロックを選択し、ゴミ箱内のアイコンを使用します。
カスタマイザーナビゲーションメニューを作りたいので、「Nav Menu」ブロックをページにドラッグする。
これにより、初期設定の「About」項目が個別設定されたナビゲーションメニューが作成されます。
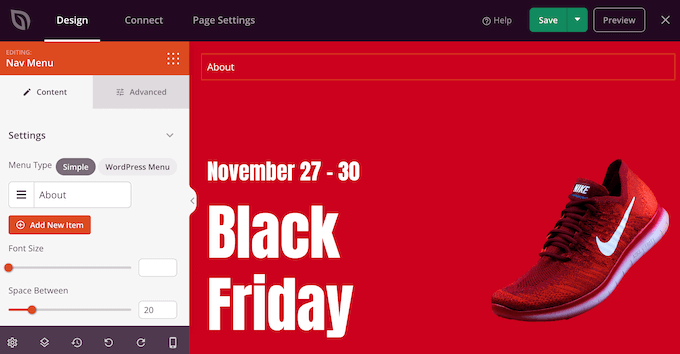
SeedProdエディター内で新しいメニューを作成するか、WordPressダッシュボードですでに作成したメニューを選択することができます。
以前作成したメニューを表示するには、「WordPressメニュー」ボタンをクリックしてください。メニュー’ドロップダウンを開き、リストから任意の設定を選択することができます。
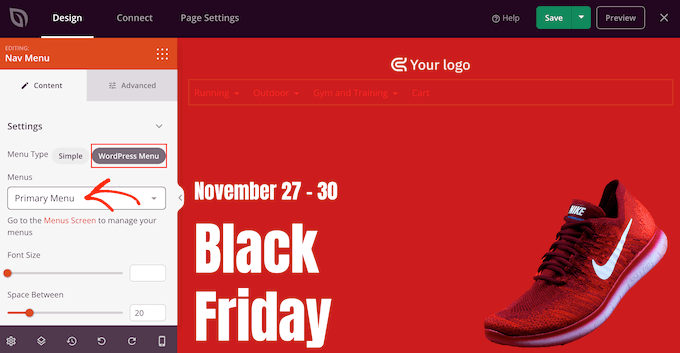
その後、左側のメニューにある設定を使って、フォントサイズや文字揃えなどを変更できる。
SeedProdの中に新しいメニューを作りたい場合は、’Simple’ボタンを選択してください。
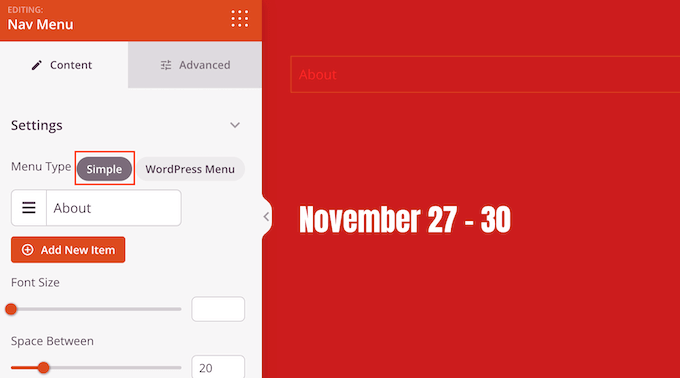
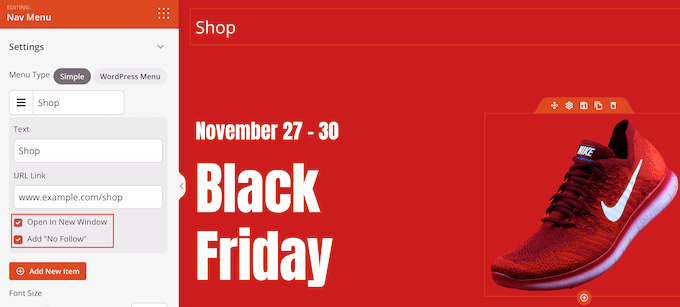
次に、SeedProdが初期設定として作成する「About」項目をクリックして展開します。
テキストを変更したり、メニュー項目がリンクするURLを追加したりできるコントロールが開きます。
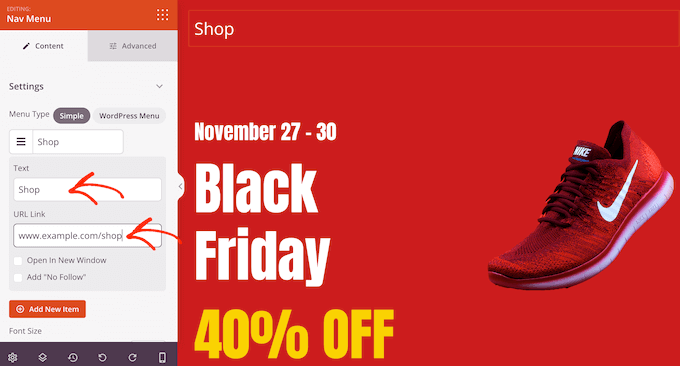
初期設定では、リンクは「dofollow」になり、同じブラウザーウィンドウで開きます。これらの設定は、「URLリンク」セクションのチェックボックスを使って変更できます。
以下の画像では、新しいウィンドウで開く「nofollow」リンクを作成しています。このトピックについては、nofollowリンクの初心者ガイドをご覧ください。
メニューに項目を追加するには、「新規項目を追加」ボタンをクリックします。
その後、上記と同じプロセスを踏むことで、各項目をカスタマイズすることができる。
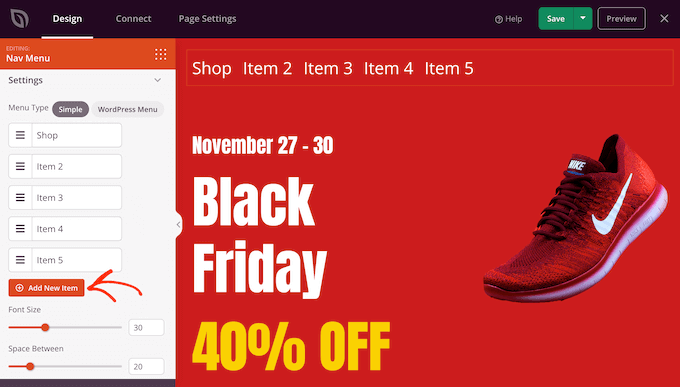
左側のメニューには、フォントサイズやテキストの配置を変更する設定もある。
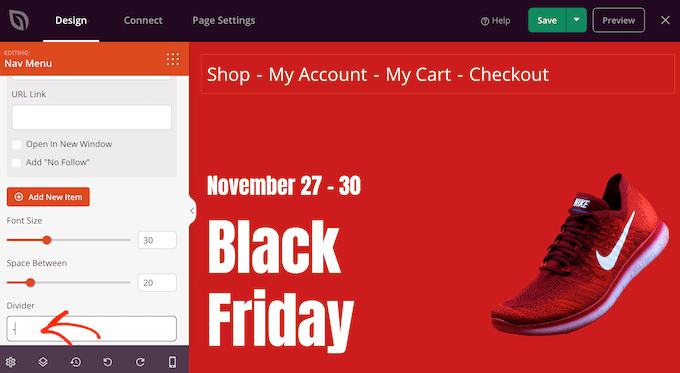
メニューの各項目の間に表示される区切りも作成できる。
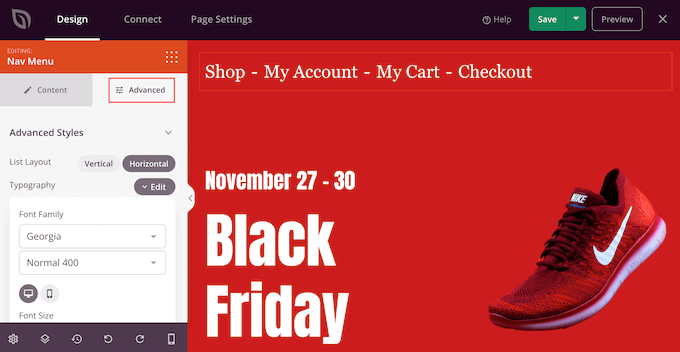
その後、’Advanced’タブに切り替えてください。ここでは、メニューの色、間隔、タイポグラフィ、その他の高度なオプションを変更することができます。
変更を加えると、ライブプレビューが自動的に更新されるので、さまざまな設定を試して、あなたのデザインに何が似合うかを確認できます。
初期設定では、SeedProdはモバイル端末とデスクトップ端末で同じメニューを表示します。しかし、一般的にモバイル端末はデスクトップコンピューターに比べて画面が非常に小さいです。
その点を考慮すると、モバイル端末で表示するメニューを区切った方がいいかもしれません。例えば、モバイルユーザーが横にスクロールする必要がないように、縦長のレイアウトにするとよいでしょう。また、スマートフォンやタブレット端末では、表示するリンクを少なくするのもよいでしょう。
モバイル対応メニューを作成するには、上記と同じ手順に従ってメニューをデザインするだけです。次に、’詳細設定’タブを選択し、’端末の表示’セクションをクリックして展開します。
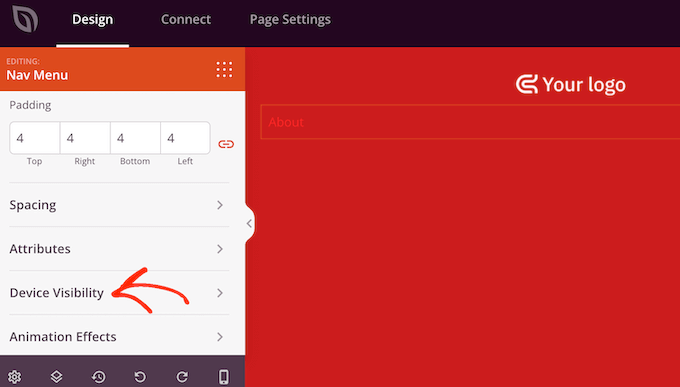
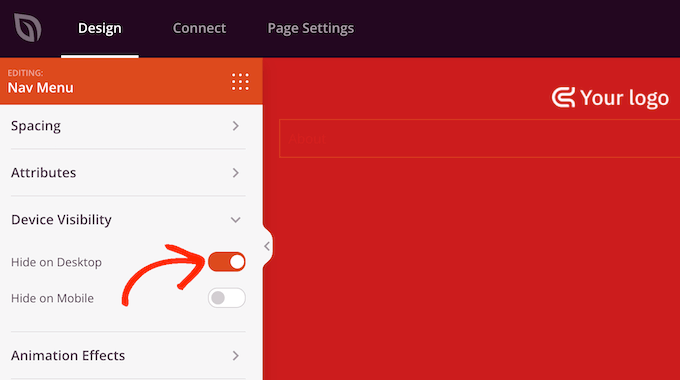
デスクトップに非表示」スライダーの切り替えができるようになりました。
現在、SeedProdはこのメニューをモバイルユーザーにのみ表示します。
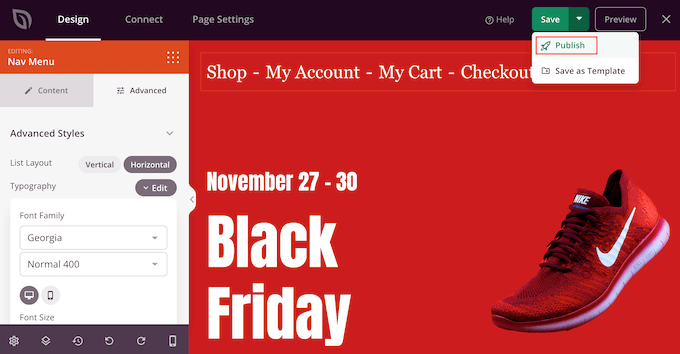
カスタムメニューの見た目に満足したら、公開しましょう。
保存」の隣にあるドロップダウン矢印をクリックし、「公開する」を選択するだけです。
これで、WordPressブログにアクセスすると、カスタムナビゲーションメニューが表示されます。
方法3:WordPressでコードを使用してカスタムナビゲーションメニューを作成する(上級者向け)
ページビルダープラグインをセットアップしたくない場合は、コードを使ってカスタマイザーナビゲーションメニューを追加することができます。テーマのfunctions.phpファイルにカスタムコードスニペットを追加する方法を説明したガイドがよく見つかるだろう。
しかし、この方法はお勧めしません。コードにちょっとしたミスがあっただけでも、WordPressでよくあるエラーを引き起こしたり、サイトが完全に壊れてしまったりする可能性があるからです。また、WordPressテーマを更新すると、カスタムコードも失われてしまいます。
そのため、WPCodeの使用をお勧めします。WordPressのコアファイルを編集することなく、WordPressにカスタムコードを追加する最も簡単で安全な方法です。
注:あなたのWordPressサイトを安全にカスタマイズするためにWPCodeを使用することができるさまざまな方法が大量にあります。コードスニペットライブラリがビルトインされており、PHP、JavaScript、CSS、HTMLなど、WordPressで最も重要な言語をすべてサポートしています。プラグインの詳細については、WPCodeのレビューをご覧ください。
最初に行う必要があるのは、無料のWPCodeプラグインをインストールして有効化することです。詳しくは、WordPressプラグインのインストール方法のステップバイステップガイドをご覧ください。
有効化したら、WordPressダッシュボードのCode Snippets “ Add Snippetにアクセスしてください。
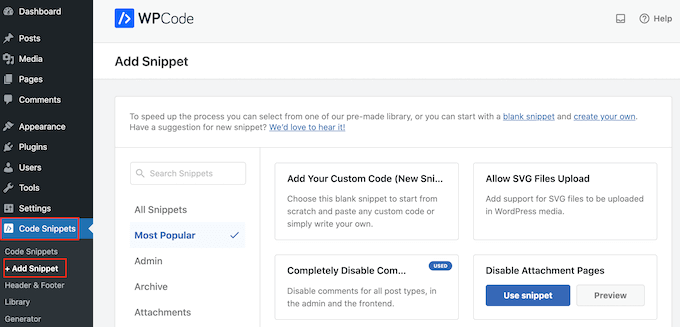
コメントを完全に無効化するスニペットや、WordPressが通常サポートしていないファイルタイプのアップロード、添付ファイルの無効化など、サイトに追加できるスニペットがすべて表示されます。
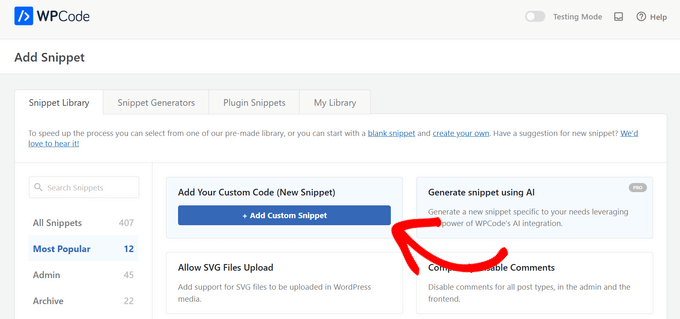
独自のスニペットを作成するには、「カスタムコードの追加(新規スニペット)」にマウスオーバーし、「+カスタム・スニペットの追加」ボタンをクリックします。
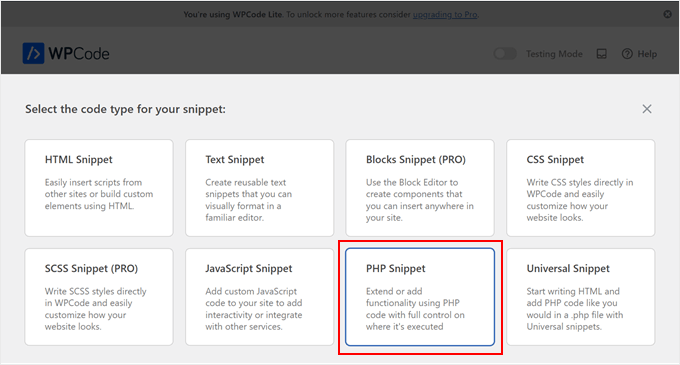
次に、画面に表示されるオプションの一覧からコードタイプを選択する必要があります。このチュートリアルでは、コードタイプとして「PHP Snippet」を選択します。
カスタムスニペットの作成ページに移動します。
はじめに、カスタムコードスニペットのタイトルを入力します。これは、WordPressダッシュボードでスニペットを識別するのに役立つものであれば何でもかまいません。
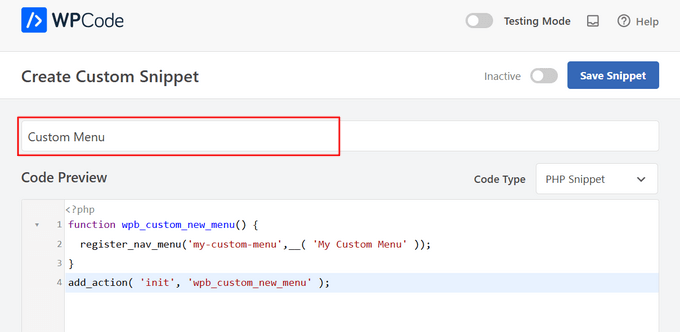
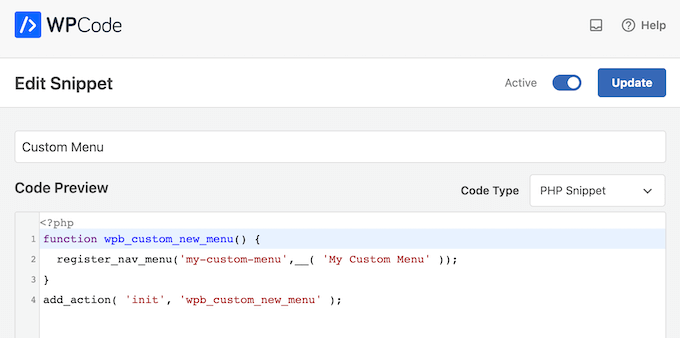
それができたら、以下のスニペットをコードエディターに貼り付けるだけだ:
1 2 3 4 | function wpb_custom_new_menu() { register_nav_menu('my-custom-menu',__( 'My Custom Menu' ));}add_action( 'init', 'wpb_custom_new_menu' ); |
これであなたのテーマに「マイカスタムメニュー」という新しいメニューの場所が追加されます。別の名前を使うには、コードスニペットを調整するだけです。
テーマに複数のカスタマイザーナビゲーションメニューを追加したい場合は、コードスニペットに1行追加するだけです。
例えば、ここでは「マイカスタムメニュー」と「エクストラメニュー:」という2つの新規メニューをテーマに追加しています。
1 2 3 4 5 6 7 8 9 | function wpb_custom_new_menu() { register_nav_menus( array( 'my-custom-menu' => __( 'My Custom Menu' ), 'extra-menu' => __( 'Extra Menu' ) ) );}add_action( 'init', 'wpb_custom_new_menu' ); |
その後、「インサーター」オプションまでスクロールします。すでに選択されていない場合は、「自動挿入」を選択し、WPCodeがサイト全体にスニペットを追加します。
次に、『場所』のドロップダウンを開き、『どこでも実行』をクリックする。
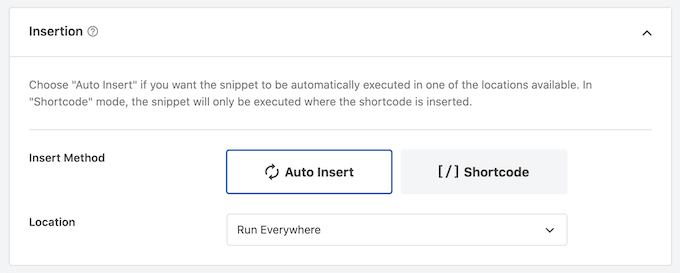
画面を一番上までスクロールし、「Inactive」トグルをクリックして「Active」に切り替えます。
最後に、「保存」をクリックして、このスニペットをライブにする。
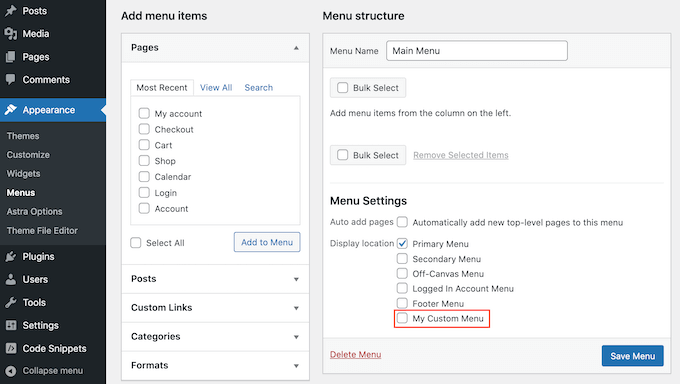
その後、外観 ” メニューを開き、「表示場所」エリアを見てください。
これで新しい「マイカスタムメニュー」オプションが表示されるはずです。
これで、新しい場所にメニュー項目を追加することができます。詳しくは、初心者のためのナビゲーションメニューの追加方法のステップバイステップガイドをご覧ください。
メニューに満足したら、次のステップはWordPressテーマに追加することです。
ほとんどのサイトでは、ヘッダーセクションの直下にナビゲーションメニューが表示されています。つまり、メニューはサイトのロゴやタイトルと並んで、訪問者が最初に目にするもののひとつなのです。
テーマのテンプレートファイルにコードを追加することで、カスタムナビゲーションメニューを任意の場所に追加することができます。
WordPressのダッシュボードで、外観 ” テーマファイルエディターに進みます。
右側のメニューで、メニューを追加したいテンプレートを選択します。例えば、カスタムナビゲーションメニューをサイトのヘッダーに表示したい場合は、通常header.phpファイルを選択します。
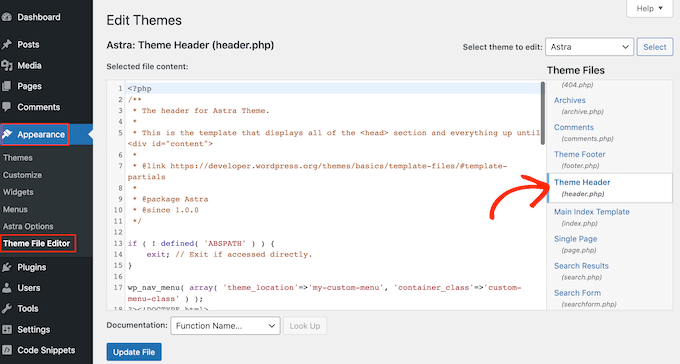
適切なテンプレートファイルの見つけ方については、WordPressテーマで編集するファイルの見つけ方をご覧ください。
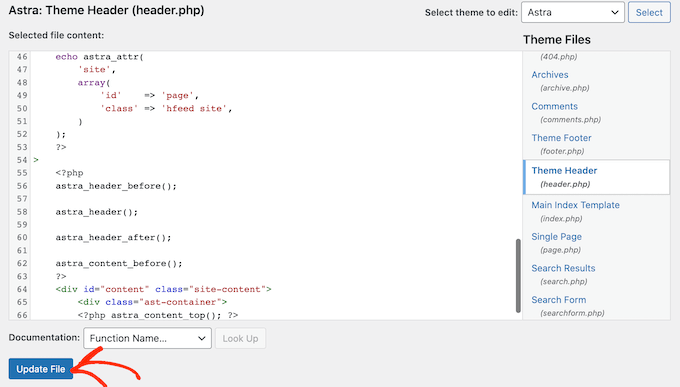
ファイルを選択した後、wp_nav_menu関数を追加し、カスタムメニューの名前を指定する必要があります。
例えば、以下のコードスニペットでは、テーマのヘッダーに「マイカスタムメニュー」を追加しています:
1 | wp_nav_menu( array( 'theme_location'=>'my-custom-menu', 'container_class'=>'custom-menu-class' ) ); |
コードを追加したら、「ファイルを更新」ボタンをクリックして変更を保存します。
さて、あなたのサイトにアクセスすると、カスタムメニューが表示されます。
初期設定では、メニューは箇条書きリストとして表示されます。
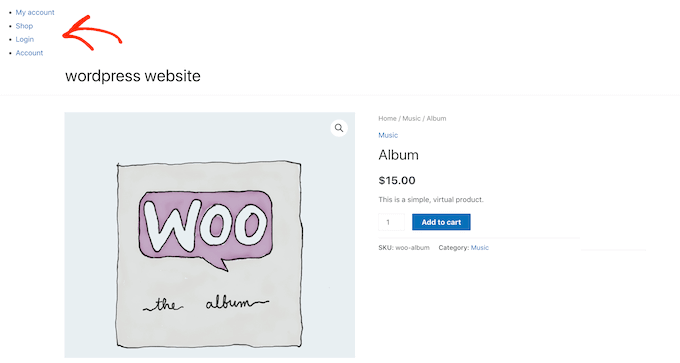
カスタムCSSコードをサイトに追加することで、カスタムナビゲーションメニューをWordPressテーマや企業ブランディングに一致するようにスタイル設定することができます。
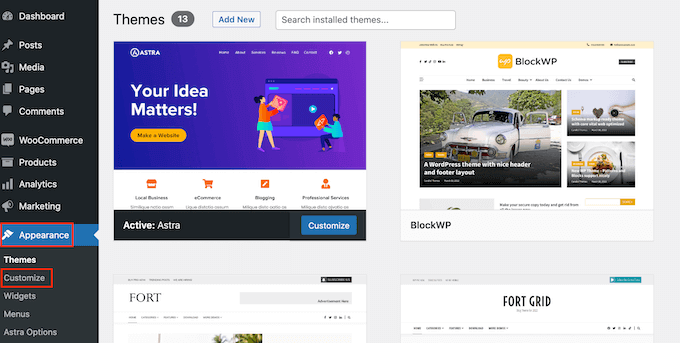
これを行うには、外観 ” カスタマイザーに進みます。
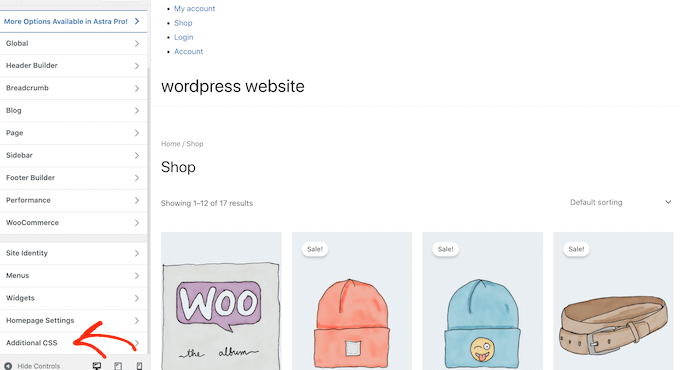
WordPressのテーマカスタマイザーで、「Additional CSS」をクリックします。
小さなコードエディターが開き、CSSを入力することができます。
テーマのテンプレートに追加したCSSクラスを使って、メニューのスタイルを設定できます。私たちの例では、これは.custom_menu_classです。
以下のコードでは、余白とパディングを追加し、テキストの色を黒に設定し、メニュー項目を水平レイアウトにしている:
1 2 3 4 5 6 7 8 9 10 11 12 13 14 15 16 | div.custom-menu-class ul { margin:20px 0px 20px 0px; list-style-type: none; list-style: none; list-style-image: none; text-align:right; display:inline-block;}div.custom-menu-class li { padding: 0px 20px 0px 0px; display: inline-block;} div.custom-menu-class a { color:#000;} |
WordPressカスタマイザーは自動的に更新されます。
これでメニューが新しいスタイルでどのように見えるかが表示されます。
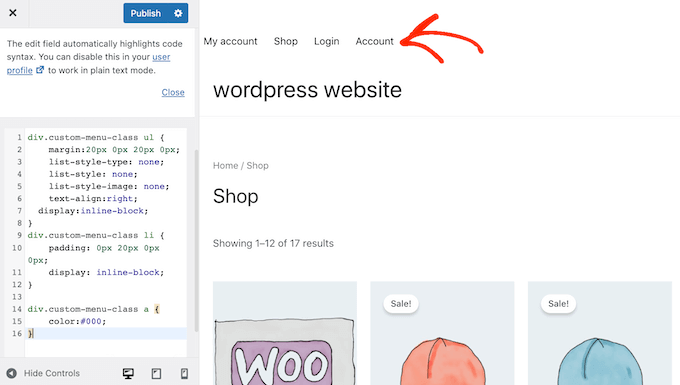
メニューの見た目に問題がなければ、「公開する」をクリックして変更を反映させます。
詳しくは、WordPressナビゲーションメニューのスタイリング方法をご覧ください。
エキスパートガイドWordPressのナビゲーションメニューをもっと活用しよう
WordPressでは、便利で魅力的なメニューをすべて作成することができます。ここでは、ナビゲーションメニューをさらに活用するためのエキスパートガイドをご紹介します:
- WordPressでナビゲーションメニューにイメージアイコンを追加する方法
- WordPressでメニューに条件ロジックを追加する方法(ステップバイステップ)
- WordPressテーマにメニュー説明を追加する方法
- WordPressでフルスクリーンレスポンシブメニューを追加する方法
- WordPressサイトにメガメニューを追加する方法(ステップバイステップ)
WordPressでカスタマイザーナビゲーションメニューを追加する方法をご紹介しました。WordPressのヘッダーメニューにボタンを追加する方法や、WordPressでメニュー項目をハイライトする方法についてのガイドもご覧ください。
If you liked this article, then please subscribe to our YouTube Channel for WordPress video tutorials. You can also find us on Twitter and Facebook.


Jiří Vaněk
I always wanted to avoid the plugin first for things like this. That’s why I always appreciate it when you also offer the option of using WP Code and snippets. I always try them on a test site first and this one works great. I then save your snippets in my own code store, which I can always return to if necessary. Thanks.
WPBeginner Support
Glad to hear you found our code snippets helpful!
Admin
Mike
Thanks for show the code, I have an issue, my new new always shows same content as main menu after I applied:
wp_nav_menu( array( ‘theme_location’=>’too-right-menu’, ‘container_class’=>’top-right-class’ ) );
Please help.
WPBeginner Support
You may be using the same name as a different menu that your theme has active. If you have not done so already, please try a different location name.
Admin
Shubham Kumar
How can create that menu sticky, I use the first method ie. to paste the code in theme’s header.php, now I would like to sticky that element if the user scrolls to from that menu location.
Amit Singh
I created two menus. One in left of logo and other in right. Now I want to add sub menu. I m just dragging menus under parent but it’s not working. Do you have any article explain how we can add custom submenu
WPBeginner Support
Not at the moment but we will certainly take that into consideration for future articles.
Admin
Mohit
Keep doing the great work
WPBeginner Support
Glad you continue to enjoy our content
Admin
Saurabh
my menu is not display in header. it display below the page title
WPBeginner Support
You may need to modify where the code is inserted in the template but if you reach out to your current theme’s support they should be able to let you know where the header is added in their theme.
Admin
ian
hello
why can’t i see the menus page of my website?
the layout of the tutorials look absolutely nothing like my screen
thanks
WPBeginner Support
Is your site a WordPress.com site? https://www.wpbeginner.com/beginners-guide/self-hosted-wordpress-org-vs-free-wordpress-com-infograph/
Admin
krishna
hello
i want to add my own html for header
how can i do that ?
Mukeshwar Singh
Hey, I am using Magazine Pro and There is no option of Custom Menu in Widgets Area!! I Used your code to create a Custom Menu but I need help because there is no option of Custom Menu in the Widget area because of Which I cannot Drag and drop that into the footer area… Please help me
Elle
Hey! I completed the tutorial and I’ve been able to add the menu to my desired location on my site. I’ve styled it and everything. PROBLEM: The menu appears on page refresh for a moment I can even click it! However, it quickly disappears behind my header. It’s not clickable after it disappears. My brain’s exploding trying to figure this one out!!
Furqan
Hi
First I create the add menu with a name my custom menu and its perfectly fine and proper fetch and then I changed its name to footer menu after changed its name custom navigation not fetch what the reason
Himanshu
Just one ques : what should I do with the existing navbar of WordPress . How to delete it.
karima
Hi, Friend of mine has a problem, well several, she has the horizontal header nav bar but also a vertical one next to it which is obscuring the page content , it appears when you start to scroll on the home page but is fixed on all the content pages.. can someone look please and advise, also there is an error notice we can´t find how to get rid of, any help please appreciated.
sudhakar
how to remove default slider any theme and how to add our new slider model in homepage
Imran
I have a custom header built for wordpress when had menu items hardcoded, How can i use the wordpress menu in the header instead of the hardcoded menu ?
cheryl
I am fairly new to wordpress however I would like to edit a custom menu that we have created as something appears wrong within the menu.
How do i do this?
Manu
Excellent tutorial! This was exactly what I needed right now. Within 5 minutes I was able to set up a footer menu in a theme that by default didn’t have any. Thank you so much
Munna Hossain
Helpful article. I am a WordPress user and this tips will help me to add custom navigation menus. Thanks for sharing.
Daniel Keith
Hi there,
Great tutorial. How can I apply CSS to this custom menu?
Though this is a great way to add multiple menus but without proper CSS the website look odd.
Zaheer Abbas
I m creating my word press theme but menu and widget is not showing in admin panel ???
is it built in features in word press or i have to create menus and widgets with code plz guide
Tabitha
How can I make my drop down menu into columns? My current drop down is too long.
Aakash Salunke
I’m little bit advanced user. My theme supports only one menu. But I want to add one more menu. I have made it but how can I add?
WPBeginner Support
First you will need to register the menu location, then you will need to edit your theme files to display your navigation menu.
Admin
bobit
its worked, thanks for the great post
Aijaz Ansari
Awsome, tutorial, it really helps a novice like me.
thanks
Victoria
Thanks for the article!!! I created my new menu.
I have a problem though.
My website has a fixed width, and when I resize the window everything stays in place, exept for the new menu. Min-width is not an option because it’s not exactly the behavior I want.
How can I make it behave the same way as the rest of the contents of the page?
Thanks!
Joey
THANKS! I was looking a long time for this, never thought it was so simple.
Cory
i have a crazy old theme that didnt support WP 3.0+ menus. This tutorial was so easy. Took me 3 minutes to bring it a little more up to date. thanks so much.
Jacques Goudreau
Thanks for the tip! Great tut!
Emma
Where do you even go to make these changes? I can’t see any of those options under the Theme or Theme Options tabs.
I use the Buenos Theme, but can’t find on the Buenos theme page does it support these changes? I want to put in an Archive menu with a list of all the recipes on my blog… should be easy but proving impossible
Editorial Staff
Most themes do support this. Look at Appearance > Menus. This article is for theme designers who want to add this feature in their themes to allow users to add menus from the backend.
Admin
Zoe
I’ve been trying to add a custom class to a singular custom url (to change the color of just one url) in the Top Nav Menus section, but it just adds my class as an extension of the existing class in the output source code and nothing happens.
Here’s my css code and the source code that is output on my site:
.myCustomClass { color: #FFFF00; }
A one-off colored link
Any suggestions on how to get this to work?
Editorial Staff
Yes add it like color: #ffff00 !important; in that class. This should do the trick.
Admin
Jeremy Johnson
I was able to implement these modifications and the custom menu works. However, the css in my chosen theme doesn’t seem to support sub-menus. The submenu item is always visible, mousing over the parent item does nothing, and the parent menu item is as wide as the wider child item which pushes the other menu items farther to the right than they should be. Any suggestions on making the sub-menu act dynamically? I’m fairly new to CSS.
Editorial Staff
The best place to start would be to take the default Twenty Eleven theme. Use the navigation CSS from there, and start modifying.
Admin
Cedric
Still looking for a solution for this.
shaunling
This is just great!
digitfox
Yeah! its a nice tutorial for me! I am very new to WP! Thanks
PauloNeves
I need help.
Follow all steps, but in Apparance Panel the option menu not enable.
When select other theme working.
How do enable option menu?
Thanks.
Paulo Neves
wpbeginner
@PauloNeves You have to add this line in your theme’s functions.php file: add_theme_support( ‘menus’ );
Brad
Thanks for this! Worked awesomely for me and helped my client a lot! – aptdesign
eeebasic
That is very helpful me although wordprees 3.3 version released few days ago.
citydan
I have followed the instructions and this post and the post here (https://www.wpbeginner.com/wp-tutorials/adding-a-second-menu-to-the-twenty-ten-theme/), and figured out how to get my CSS to make the menu appear correctly, but the child items (sub menu items) are not appearing. I have them set up correctly in the menus editor, but on the site they do not show. They are not hidden by CSS because they are not there in the source code of the page.
Any ideas why my menu sub-items are not showing?
GourabMalla
Hi,
I have added the custom menu in top navigation but want to know how can I active the “Current Page Class”.
I’m using WordPress 3.2
Thanks
Gourab
DanFlynnDesign
Thank you! Love how this is all dynamic so the client can edit if needed, plus able to state which is the current page and apply hover effect! EXACTLY what I was looking for!
asharperrazor
I have tried this many times. I have an old wordpress theme. So old I’m not even sure what version of wrodpress it was written for. Anyway, I can get the functions part to work. I can save the correct menu. I can put the code into other parts of my website, say the footer, although it displays as a hierarchy list and not horizontally.
Won’t display in the top nav menu. Do I need a new theme or is it possible to edit my current theme to allow the new menu function?
Thanks in advance. The website is http://www.asharperrazor.com
JamesGeorge
I implemented this with NO problems-thank you! I took the “nav menu” code and put it in the div where my client’s theme was calling the list of pages. I basically replaced it with your code from above and uploaded it, and the css kept it in the same style. It looks great and functions perfectly. AWESOME!
ÁlvaroBenavides
I really need help implementing the CSS of the classes, so please notify when u finish!
Bec
Great post – thank you!
I have implemented as above and my menu items are showing on site only problem is that each page is empty?!
any ideas?
Editorial Staff
Sounds like a PHP error. Please validate your PHP to make sure there is no error.
Admin
Joseph McCullough
Quick and dirty – the way I like my code snippets. Thanks a bunch.
Paul
I have created custom navigation menus a couple of times. What is weird is that after I create and save them, they appear for a while and then the navigation bar returns to 2 tabs only as if the settings are automatically overwritten. On sites with the same template were I never created a custom bar they display correctly.
Any ideas?
Editorial Staff
Nope, no clue why it is doing that.
Admin
Narendra Choudhary
You can define custom classes to each navigation, and then add image in the background. You can even use CSS (text-indent) property to get rid of the Menu text if you want.
Reply
Ram
I have a question on nav menu,
is there any way to add the image to the list of navigation menus..
Thanks,
Ram
Editorial Staff
You can define custom classes to each navigation, and then add image in the background. You can even use CSS (text-indent) property to get rid of the Menu text if you want.
Admin
Ram
thanks for your response but i need more clearly that custom menu image for the wordpress.
Im using wp_list_categories(‘exclude=4,7&title_li=’); to show the navigational menu so is it any possibility to add the different images to the different menu button. Im trying the CSS but it never works for me
Thanks,
Ram
Editorial Staff
Yes it is possible to add different images with the custom menu. The one you are using is not the menu that we are talking about in this article.
Julie @ Inspired to Write
Can you add code to make it look more presentable (fonts, buttons, size, etc)? If so, can you give me an example and where to put this code? Thanks!
Editorial Staff
That is a CSS related question. You will have to add the font size in the appropriate classes in the CSS file. We will be doing a writeup on the CSS styles soon.
Admin
Chris
Question about the menu handling.
I have a menu that is right aligned, so the menu items show up in reverse order.
Is there a way to sort the menu_order in REVERSE?
so: sort_column’ => ‘menu_order’ would have something added to reverse the order.
Thanks!
Editorial Staff
Just because they are right aligned, shouldn’t make it appear in reverse order. To fix that, you need to change your CSS rather than reversing the hook. Make a container div that is aligned right, and then make the list tags float left.
Admin
Julie
Have followed instructions but after creating menus and adding appropriate categories to use, I can’t see them in my nav bar – any ideas what I have done wrong?
Editorial Staff
Have you pasted the codes in your header.php or wherever that menu should appear?
Admin