特定のWordPressメニューにカスタムアイテムを追加したいですか?
WordPressメニューは、ほとんどのウェブサイトの上部に表示されるナビゲーションメニューです。場合によっては、ナビゲーションメニューに通常のリンク以外のカスタム項目を表示したいことがあります。
この記事では、特定のWordPressメニューにカスタム項目を簡単に追加する方法を紹介します。
WordPressのメニューにカスタム項目を追加する理由
WordPressのメニューは、通常ウェブサイトの上部に表示されるナビゲーションリンクです。モバイルデバイスでは、メニューアイコンをタップすると表示されることがよくあります。
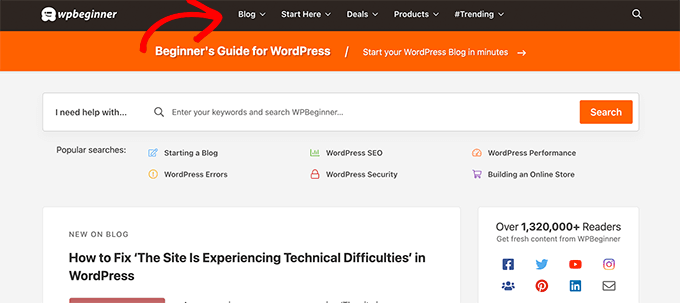
通常のWordPressウェブサイトのレイアウトで目立つ場所なので、プレーンなリンク以外のカスタムアイテムをメニューに配置して活用するのは賢明です。
例えば、WPBeginnerで行っているように検索フォームを表示したいユーザーもいるかもしれません。会員制ウェブサイトではログインとログアウトのリンクを表示したいかもしれませんし、メニューにアイコンや画像を追加したいかもしれません。
デフォルトでは、ナビゲーションメニューはプレーンテキストリンクを表示するように設計されています。ただし、カスタムアイテムをWordPressメニューに配置することは still できます。
とはいえ、WordPressのナビゲーションメニュー全体を維持したまま、特定のメニューにカスタム項目を追加する方法を見ていきましょう。
WordPressの特定のナビゲーションメニューにカスタムアイテムを追加する
WordPressでカスタム項目をナビゲーションメニューに追加するには、いくつかの方法があります。追加しようとしているカスタム項目の種類によって異なります。
最も一般的な例をいくつかご紹介します。一部にはプラグインを使用する必要がありますが、その他にはコードの追加が必要になります。
特定のセクションにスキップしたい場合は、この目次を使用できます。
- WordPressメニューに検索ポップアップを追加する
- メニューにアイコンや画像を追加する
- メニューにログイン/ログアウトリンクを追加する
- WordPressメニューにカスタムテキストを追加する
- メニューに現在の日付を追加する
- メニューにユーザー名を表示する
- ページごとに異なるメニューを表示する
さあ、始めましょう。
1. WordPressメニューに検索ポップアップを追加する
通常、デフォルトの検索ウィジェットまたはブロックを使用して、WordPressのサイドバーに検索フォームを追加できます。ただし、デフォルトではナビゲーションメニューに検索を追加する方法はありません。
いくつかのWordPressテーマには、メインメニューエリアに検索ボックスを追加するオプションがあります。しかし、お使いのテーマにない場合は、以下の方法を使用できます。
このためには、 SearchWP Modal Search Form プラグインをインストールして有効化する必要があります。詳細については、WordPress プラグインのインストール方法に関するステップバイステップガイドをご覧ください。
このプラグインは、市場で最高のWordPress検索プラグインであるSearchWPのアドオンです。
このアドオンは無料であり、デフォルトの WordPress 検索でも機能します。ただし、WordPress 検索を改善したい場合は、SearchWP と一緒に使用することをお勧めします。
アドオンをインストールしたら、外観 » メニューページにアクセスしてください。「メニュー項目を追加」列の下にある「SearchWPモーダル検索フォーム」タブをクリックして展開します。
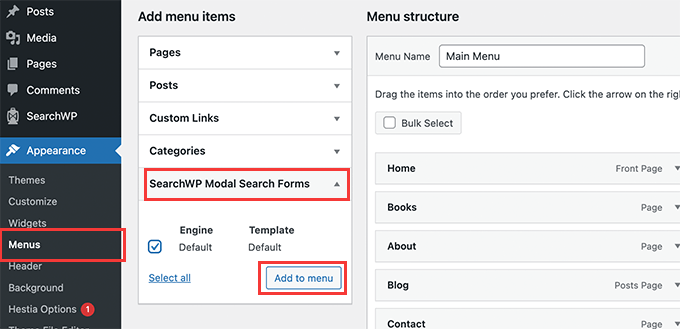
検索エンジンを選択してから、「メニューに追加」ボタンをクリックします。
プラグインは検索をナビゲーションメニューに追加します。メニュー項目の下にある「モーダル検索フォーム」をクリックして展開し、ラベルを「検索」または好きな他のものに変更します。
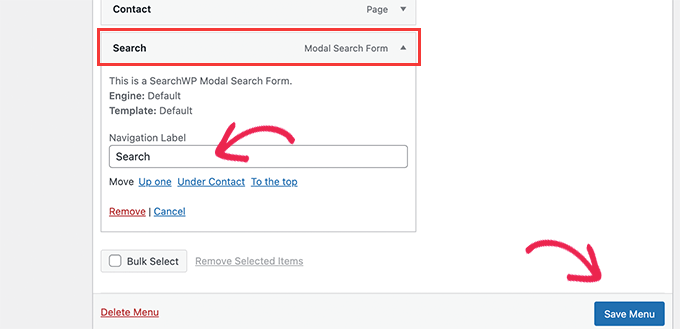
変更を保存するには、必ずメニューを保存ボタンをクリックしてください。
これで、ウェブサイトにアクセスすると、検索がナビゲーションメニューに追加されているのがわかります。それをクリックすると、検索フォームがライトボックスポップアップで開きます。

詳細については、WordPress メニューに検索ボタンを追加する方法に関するガイドをご覧ください。
2.特定のメニューにアイコンとカスタム画像を追加する
ユーザーが特定のメニューに追加したいもう1つの一般的なカスタムアイテムは、画像またはアイコンです。
そのためには、Menu Image Iconプラグインをインストールして有効にする必要があります。詳細については、WordPressプラグインのインストール方法に関するステップバイステップガイドをご覧ください。
有効化したら、外観 » メニュー ページに移動し、アイコンまたは画像を表示したいメニュー項目にマウスカーソルを合わせます。
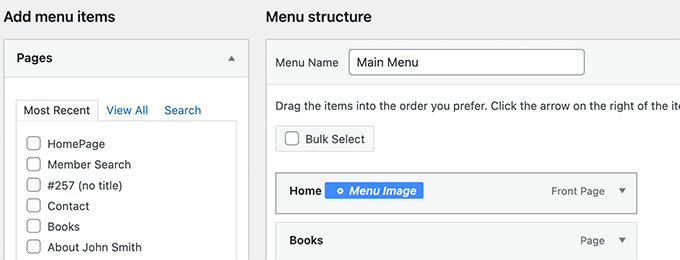
続行するには、青いメニュー画像ボタンをクリックしてください。
これによりポップアップが表示されます。ここから、そのメニュー項目に表示する画像またはアイコンを選択できます。
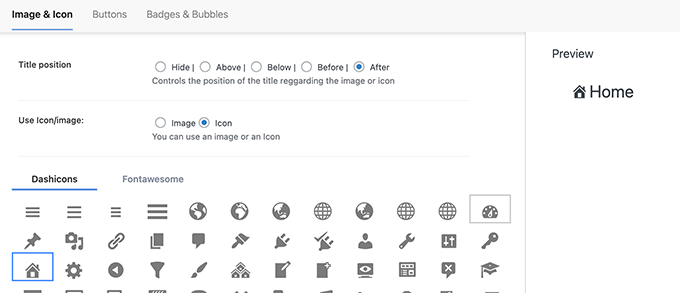
メニュー項目に対する画像またはアイコンの位置を選択することもできます。たとえば、以下の例のようにメニュー項目の直前にアイコンを表示したり、メニュータイトルを非表示にしてアイコンのみを表示したりすることもできます。
設定を保存するには、必ず「変更を保存」ボタンをクリックしてください。他のメニュー項目にアイコンや画像を追加する必要がある場合は、この手順を繰り返してください。
その後、ウェブサイトにアクセスして、特定のメニュー項目にカスタム画像またはアイコンが表示されていることを確認できます。

より詳細な手順については、WordPressメニューに画像アイコンを追加する方法に関するチュートリアルをご覧ください。WordPressメニューに画像を追加する方法。
3. WordPressの特定のメニューにログイン/ログアウトリンクを追加する
WordPressメンバーシッププラグインを使用している場合、またはオンラインストアを実行している場合は、ユーザーがアカウントに簡単にログインできるようにしたい場合があります。
デフォルトでは、WordPressにはナビゲーションメニューにログインとログアウトのリンクを簡単に表示する方法がありません。
プラグインを使用するか、コードスニペットを使用して追加する方法を説明します。
1. プラグインを使用してログイン/ログアウトリンクをメニューに追加する
この方法はより簡単で、すべてのユーザーにおすすめです。
まず、Login or Logout Menu Item プラグインをインストールして有効化する必要があります。その後、外観 » メニューページにアクセスし、ログイン/ログアウトタブをクリックして展開します。
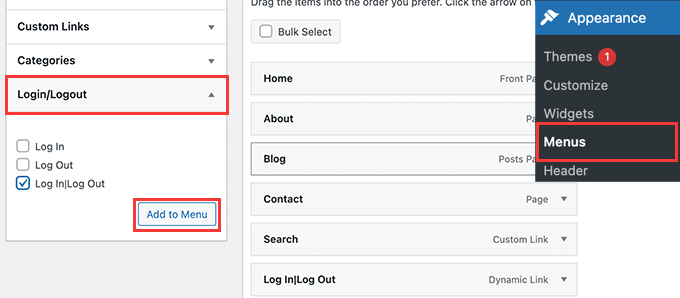
ここから、「ログイン|ログアウト」項目を選択し、「メニューに追加」ボタンをクリックします。
変更を保存するには、必ずメニューを保存ボタンをクリックしてください。これで、ウェブサイトにアクセスして、カスタムログインログアウトリンクが機能していることを確認できます。

リンクは、ユーザーのログイン状態に応じて、動的にログインまたはログアウトに変わります。
WordPressメニューにログインおよびログアウトリンクを追加する方法に関するチュートリアルで詳細をご覧ください。
2.カスタムコードを使用してログイン/ログアウトリンクを追加する
この方法では、WordPressウェブサイトにコードを追加する必要があります。以前にこれを実行したことがない場合は、WordPressにカスタムコードを簡単に追加する方法に関するガイドをご覧ください。
まず、WordPressテーマが特定のナビゲーションメニューの場所に使用している名前を見つける必要があります。
これを見つける最も簡単な方法は、外観 » メニュー ページにアクセスし、メニューロケーションエリアにマウスカーソルを合わせることです。
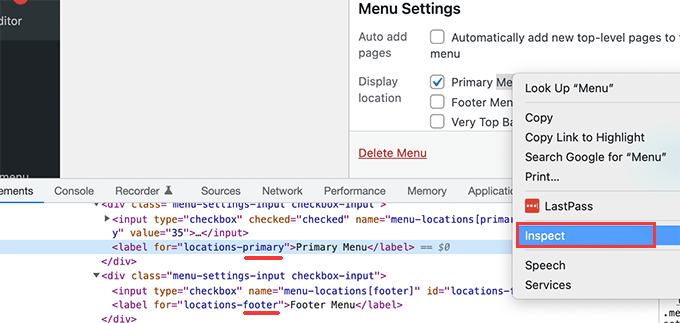
右クリックして「要素を検証」ツールを選択すると、ソースコードの下に場所名が表示されます。たとえば、私たちのデモテーマでは、primary、footer、top-bar-menuを使用しています。
ログイン/ログアウトリンクを表示したいターゲットロケーションに使用されている名前をメモしてください。
次に、以下のコードをテーマのfunctions.phpファイルまたはサイト固有のプラグインに追加する必要があります。
add_filter( 'wp_nav_menu_items', 'add_loginout_link', 10, 2 );
function add_loginout_link( $items, $args ) {
    if (is_user_logged_in() && $args->theme_location == 'primary') {
        $items .= '<li><a href="'. wp_logout_url() .'">Log Out</a></li>';
    }
    elseif (!is_user_logged_in() && $args->theme_location == 'primary') {
        $items .= '<li><a href="'. site_url('wp-login.php') .'">Log In</a></li>';
    }
    return $items;
}
その後、ウェブサイトにアクセスすると、ナビゲーションメニューにログインまたはログアウトのリンクが表示されます。

このダイナミックリンクは、ユーザーのログイン状態に基づいて自動的にログインまたはログアウトに切り替わります。
4. WordPressナビゲーションメニューにカスタムテキストを追加する
ナビゲーションメニューにリンクではなくテキストだけを追加したい場合はどうなりますか?
その方法は2つあります。
1. 特定のメニューにカスタムテキストを追加する(簡単な方法)
外観 » メニュー ページに移動し、URL を # 記号、表示したいテキストをリンクテキストとしてカスタムリンクを追加するだけです。
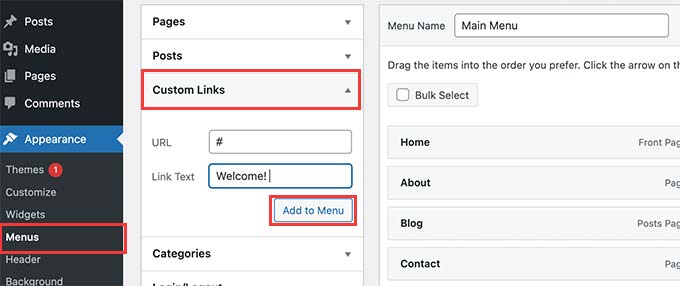
続行するには、「メニューに追加」ボタンをクリックしてください。
WordPress は、カスタムテキストを左側のメニュー項目として追加します。次に、それを展開して # 記号を削除します。
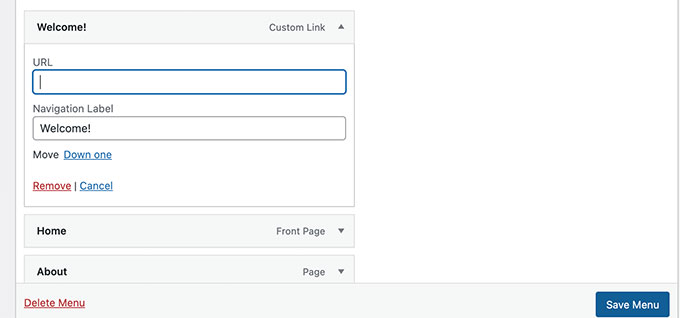
保存メニューボタンをクリックして、ウェブサイトをプレビューすることを忘れないでください。カスタムテキストがナビゲーションメニューに表示されることに気づくでしょう。
それでもリンクですが、クリックしてもユーザーは何もしません。

2. コードを使用してナビゲーションメニューにカスタムテキストを追加する
この方法では、ウェブサイトにコードスニペットを追加します。まず、上記のログイン/ログアウトリンクセクションで説明されているように、テーマの場所の名前を見つける必要があります。
その後、次のコードをテーマのfunctions.phpファイルまたはサイト固有のプラグインに追加する必要があります。
add_filter( 'wp_nav_menu_items', 'your_custom_menu_item', 10, 2 );
function your_custom_menu_item ( $items, $args ) {
    if ( $args->theme_location == 'primary') {
        $items .= '<li><a title="">Custom Text</a></li>';
    }
    return $items;
}
「カスタムテキスト」と表示されている部分を、ご自身のテキストに置き換えるだけです。
変更を保存し、ウェブサイトにアクセスして、ナビゲーションメニューの末尾にカスタムテキストが追加されたことを確認できるようになりました。
プログラムで特定のWordPressメニューに動的な要素を追加したい場合、このコード方法は役立つかもしれません。
5. WordPressメニューに現在の日付を追加する
WordPressのナビゲーションメニュー内に現在の日付を表示したいですか?頻繁に更新されるブログやニュースサイトを運営している場合に役立つトリックです。
次のコードをテーマのfunctions.phpファイルまたはサイト固有のプラグインに追加するだけです。
add_filter('wp_nav_menu_items','add_todaysdate_in_menu', 10, 2);
function add_todaysdate_in_menu( $items, $args ) {
    if( $args->theme_location == 'primary')  {

        $todaysdate = date('l jS F Y');
        $items .=  '<li><a>' . $todaysdate .  '</a></li>';

    }
    return $items;
}
「primary」をメニューの場所で置き換えるのを忘れないでください。
これで、ウェブサイトにアクセスして、WordPressメニューに現在の日付が表示されていることを確認できます。

日付の形式を好みに合わせて変更することもできます。WordPress で日付と時刻の形式を変更する方法については、チュートリアルをご覧ください。WordPress で日付と時刻の形式を変更する方法。
6. WordPressメニューにユーザー名を表示する
ナビゲーションメニューに、もう少しパーソナライズを追加したいですか?ナビゲーションメニューで、ログイン中のユーザーを名前で挨拶することができます。
まず、次のコードをテーマのfunctions.phpファイルまたはサイト固有のプラグインに追加する必要があります。
add_filter( 'wp_nav_menu_objects', 'username_in_menu_items' );
function username_in_menu_items( $menu_items ) {
    foreach ( $menu_items as $menu_item ) {
        if ( strpos($menu_item->title, '#profile_name#') !== false) {
			 if ( is_user_logged_in() )     {
				$current_user = wp_get_current_user();
				 $user_public_name = $current_user->display_name;
                $menu_item->title =  str_replace("#profile_name#",  " Hey, ". $user_public_name, $menu_item->title . "!");
			 } else {
			 $menu_item->title =  str_replace("#profile_name#",  " Welcome!", $menu_item->title . "!");
			 }
        }
    }

    return $menu_items;
}
このコードは、リンクテキストとして#profile_name#を持つメニュー項目を追加したかどうかを最初にチェックします。その後、そのメニュー項目をログインユーザーの名前またはログインしていないユーザー向けの一般的な挨拶に置き換えます。
次に、「外観」→「メニュー」ページに移動し、リンクテキストとして#profile_name#を使用したカスタムリンクを新規追加する必要があります。
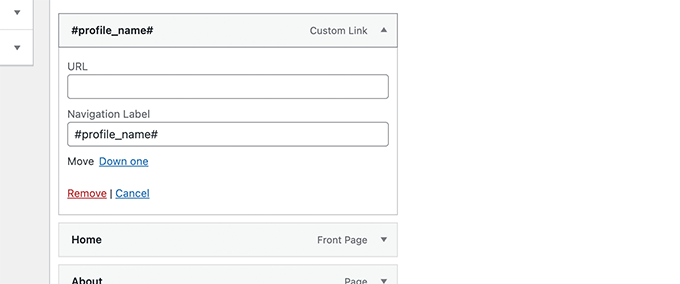
変更を保存するには、必ず「メニューを保存」ボタンをクリックしてください。その後、ウェブサイトにアクセスして、WordPressメニューにログインしているユーザー名を表示できます。

7. WordPressで条件付きメニューを動的に表示する
これまで、さまざまな種類のカスタム項目を特定のWordPressメニューに追加する方法を示してきました。ただし、ユーザーに動的に異なるメニュー項目を表示する必要がある場合があります。
例えば、ログインしているユーザーにのみメニューを表示したい場合があります。別のシナリオは、ユーザーが表示しているページに基づいてメニューを変更したい場合です。
この方法では、複数のメニューを作成し、特定の条件が一致した場合にのみそれらを表示することができます。
まず、Conditional Menus プラグインをインストールして有効化する必要があります。詳細については、WordPress プラグインのインストール方法のステップバイステップガイドをご覧ください。
有効化したら、外観 » メニュー ページにアクセスする必要があります。ここから、表示したい新しいメニューを作成する必要があります。たとえば、この例ではログインユーザーのみの新しいメニューを作成しました。
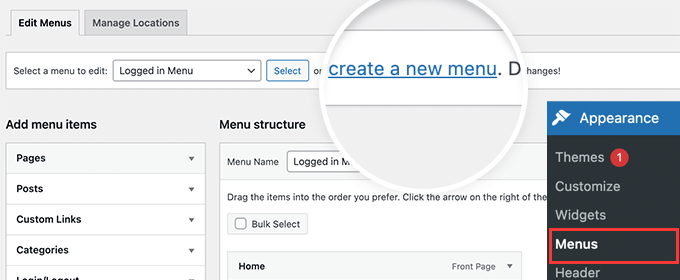
メニューを作成したら、[場所の管理]タブに切り替えます。
ここから、メニューの場所の横にある「条件付きメニュー」リンクをクリックする必要があります。
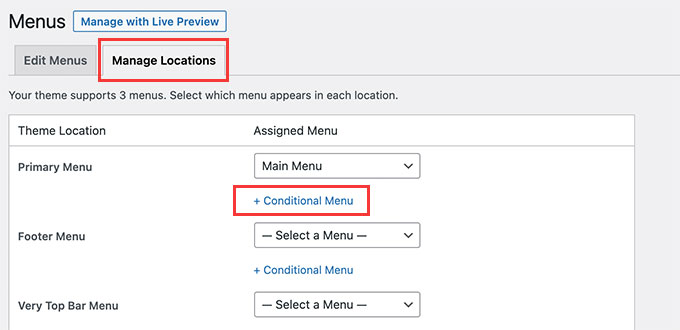
その後、ドロップダウンメニューから先ほど作成したメニューを選択する必要があります。
次に、「+ 条件」ボタンをクリックして続行します。

ポップアップウィンドウが表示されます。
ここから、このメニューを表示するために満たす必要がある条件を選択できます。
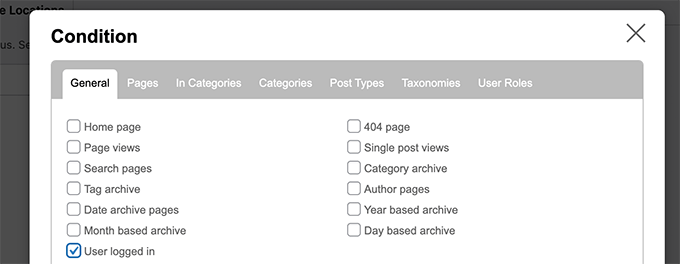
このプラグインは、選択できる条件を多数提供しています。たとえば、特定のページ、カテゴリ、投稿タイプ、タクソノミーなどに基づいてメニューを表示できます。
ユーザーのロールやログイン状態に基づいて、異なるメニューを表示することもできます。例えば、会員制ウェブサイトでは、既存の会員に異なるメニューを表示できます。
この記事が、特定の WordPress メニューにカスタムアイテムを追加する方法を学ぶのに役立ったことを願っています。また、最適な Web デザインソフトウェアの選び方ガイド、または中小企業向けの最適なライブチャットソフトウェアの専門家による比較もご覧ください。
この記事が気に入ったら、WordPressのビデオチュートリアルについては、YouTubeチャンネルを購読してください。 TwitterやFacebookでもフォローできます。


イジー・ヴァネック
検索の実装が好きです。従来の空のフィールドの代わりにポップアップウィンドウがあります。これは良い解決策のように見えます。また、ログインユーザーの日付とパーソナライゼーションにも興味がありました。インスピレーションをありがとうございます。
reza
とても親切で簡単です
ありがとうございます ありがとうございます ありがとうございます
WPBeginnerサポート
Glad our guide was helpful
管理者
デニス
こんにちは、
そのコードをありがとうございます。メニューの順番を変更する方法はありますか?例えば、ログイン/ログアウトボタンをメニューの一番最初にしたいのですが。あくまで例ですが。
よろしく、
Denis
WPBeginnerサポート
現時点では、このコードでは、追加項目がメニュー項目に対してどこに配置されるかを並べ替える簡単な方法はありません。
管理者
ベン・ショート
デニスにはもう遅すぎると思いますが、もし誰かがメニューアイテムをリストの最後にではなく、最初に表示したい場合は、この目的で使用したコードの例を以下に示します。
add_filter( ‘wp_nav_menu_items’, ‘your_custom_menu_item’, 10, 2 );
function your_custom_menu_item ( $items, $args ) {
if (is_single() && $args->theme_location == ‘primary’) {
$oldItems = $items;
$items = ‘ここに表示したい内容’; // ここに表示したい内容を記述します
$items .= $oldItems;
}
return $items;
}
Karen
メニューバーのエントリを特定の時間に表示させ、別の項目を期限切れにさせる方法はありますか?
WPBeginnerサポート
特に推奨する、時間に基づいた条件付き表示機能は、他に指示がない限り、当社にはありません。
管理者
Mary
functions.php でフッターの li アイテムにセカンダリメニューを追加するにはどうすればよいですか…?
Saurabh Saneja
こんにちは、
メニュー項目のリストの先頭に検索フォームを追加するにはどうすればよいですか?
ありがとう、
Saurabh
PS: big fan of your tuts
イゴール
これは素晴らしいです。しかし、メニューの中にメニューを追加することは可能でしょうか?
プライマリメニューに言語メニューを追加したいのです。
ページには言語メニューが表示されますが、希望する場所には表示されません。
の代わりに
Annemarie
これ、ありがとうございます!プロジェクトでまさに必要としていたものです。
タスネーム
検索ボックスのコードを使用しましたが、完璧に機能しました。
Anuj
素晴らしい記事です。大変助かりました。
Garratt
このコードはまだ機能しますか?基本的な関数でテキストのみを使用しても、メニューに何も表示されません。特別な種類のメニューは使用していません。'X'と子テーマのみです。
Garratt
やっぱり、すみません、今読みました:「明らかに、さらに進む前に、テーマでカスタムメニューが有効になっている必要があります。」
Garratt
OK、メニューがカスタムで、条件を削除するまでいじっていたのですが、問題はまだ発生していました。(IF) それを削除すると、ホームページを含むすべてのページに表示されました。
`add_filter( ‘wp_nav_menu_items’, ‘your_custom_menu_item’, 10, 2 );
function your_custom_menu_item ( $items, $args ) {
$items .= ‘Show whatever’;
return $items;
}
sahar
うまくいきましたが、レスポンシブが壊れてしまいました…コードを削除する必要がありました
Gerson
このメニュー項目を最初の位置に追加するにはどうすればよいですか?
Gwen
すごい、ありがとうございます。何時間も節約できました。
ディリップ
コードの10,2は何のために使われますか?
WPBeginnerサポート
10 は、特定のアクションに関連付けられた関数が実行される順序を指定します。数値が小さいほど早く実行され、同じ優先度の関数は、アクションに追加された順序で実行されます。
2は、関数が受け入れる引数の数です。
管理者
Pat
これはとても便利で、まさに私が求めていたものでした!共有していただき、本当にありがとうございます。
Matt
ログインリンクが表示されず、ログアウトリンクのみが表示されます。何が原因でしょうか?
Ritchie Pettauer
これは素晴らしい、要点を押さえたチュートリアルです。メニューの1つに今日の日付(「ヘッドライン | DATE」)を持つ項目を追加したいです。
I didn’t expect the first posting I found to solve my problem thx guys.
ビル・グラム=リーファー
機能しますが、(笑)私の状況では、プライマリヘッダーに「検索」を追加したいのですが、あたかもチェックされた別の項目のように表示させたいのです。
appearance/menus/add-to-menu
私が見たものはすべて、まったく新しい…何ですか、div…(?)を作成しています。
ヘッダーに新しい行が追加され、プライマリナビゲーション編集ウィンドウの ABOUT などの項目と同じ行にフォームが配置されるのではなく、ヘッダーに新しい行が追加されます。
AND ナビゲーションバーに割り当てられた CSS を取得します。
ジョサローン・ワーズワース
投稿はとても参考になりました。しかし、もしフッターにログインとログアウトのリンクを条件付きで追加したい場合はどうなりますか?
Hugo Callens
関連質問: 特定のユーザーロールに基づいてメニュー項目を追加する方法は?
「Student」というカスタムユーザーロールがあり、ユーザーが「Student」ロールを持っている場合にのみメニューに項目を追加したいのですが?
Monilal
うまくいきますが、現在のメニュー項目が選択されません
james
特定のサブメニューに、トップのulではなく追加する方法はありますか?
Jonathan
同じことを知りたいです。特定のサブメニューに追加する方法を知っている人はいますか?
Gerrit
このハウツー記事、ありがとうございます!
正直、関数がどのように呼び出されているのか理解できません。
特に、関数をどのような引数で呼び出すか、つまり、$items および $args としてどのような WordPress 変数を渡すかについての言及が欠けています。
wp-beginner向けに詳しく説明していただけますか?
ありがとうございます、
Gerrit
サミュエル
サブメニューに追加したい場合はどうすればいいですか?
lokitoki
WordPressのメニュー項目1つだけにHTMLタグを追加するにはどうすればよいですか?
これから:
お問い合わせ
これに:
お問い合わせ
全てのメニュー項目ではなく、1つのメニュー項目だけであるべきです。
amit
オプションはwp管理パネルで利用可能です
lokitoki
hm、WordPressのメニューアイテムのタグを編集する方法について何かアイデアはありますか?
これから:
お問い合わせ
これに:
お問い合わせ
全てのメニュー項目ではなく、1つのメニュー項目だけであるべきです。
gonzela2006
こんにちは、
以下のクラス active と current-menu-item、および ID menu-item-id を追加するにはどうすればよいですか?
Lại Đình Cường
特定の位置に新しいカスタムメニューを追加するにはどうすればよいですか?
ギレルモ
メニューのホームの左側に小さな画像を配置したいのですが、どうすれば配置できますか?
助けてください
Pierre Laflamme
あなたの例では、プライマリメニュー(theme_location == ‘primary’)に項目を追加しています。
ウィジェットエリアの特定のメニューに項目を追加するにはどうすればよいですか? theme_location はどこで取得できますか?
WPBeginnerサポート
テーマの場所は通常テーマによって定義されます。テーマのfunctions.phpファイルまたはメニューが表示されるテンプレートを確認してください。
管理者
Brad Trivers
特定のメニュー(テーマの場所ではなく)を対象にしたい場合は、$args->theme_location == 'primary' の代わりに $args->menu->slug == 'the_menu_slug' を使用してください。
Xúlio Zé
とても役に立ちます!
ブラッドさん、本当にありがとうございます
^-^
ピーター・ラロー
ブラッドさん、こんにちは。 「the_menu_slug」の値が何であるかを知る方法を教えていただけますか? よろしくお願いします。 ピーター
razvan
こんにちは!チュートリアルを使って、メニューバーの上に重なるようにロゴとして画像を設定しました。すべてうまくいっていますが、この特定のメニューにはホバーオプションがあり、色が白になります…そのため、ロゴにマウスをホバーすると、リンクもホバーされ、ページの見た目が損なわれます。
私のコードは以下の通りです。
if( $args->theme_location == ‘primary’ ) return ““.$items;
ページ上の a href を非表示にして、リンク付きの画像のみを表示するにはどうすればよいですか?
事前に感謝いたします
キャシー
こんにちは、あなたのコードは私が探しているものに近いと思いますが、私がやりたいことを実現するためにカスタマイズする方法を理解しようとしています!
やりたいことは、著者名のドロップダウンリストを持つメニュー項目を作成することです。それを達成する方法について何かアイデアはありますか?
本当にありがとうございます!
エリック・ミヤンス
こんにちは、キャシー!
数日間この作業をしていましたが、ついに動作しました。
こちらをご覧ください: http://wordpress.org/support/topic/creating-a-dropdown-in-menu-that-lists-authors/page/2?replies=45#post-5103035
また、テーマがBootstrapベースであるため、追加のクラスや属性を追加していることも考慮してください。それらすべてが必要ないかもしれません。
乾杯!
Eric
sachi
すごい、これらのコードを探していました
ブラッド
ありがとうございます、大変参考になりました。
しかし、好奇心から、この貴重なフィルターフック「‘wp_nav_menu_items」が見つかりません。WPコアファイルのどこで呼び出されているのでしょうか?
どうもありがとうございます!!
WPBeginnerサポート
wp-includes/nav-menu.phpにありますが、コアファイルを変更することは推奨されません。これはフィルターであり、テーマの
functions.phpファイルまたはサイト固有のプラグインで呼び出すことができます。管理者
Lavinia
This isn’t work for me
アンドール・ナジ
最初のメニュー項目の前に配置するにはどうすればよいですか?それ以外は素晴らしいチュートリアルです!
敬具、
Andor Nagy
編集スタッフ
検索バーの戻り例を使用して、項目を末尾に移動しますか?
管理者
キャメロン・ジョーンズ
add_filter( ‘wp_nav_menu_items’, ‘your_custom_menu_item’, 10, 2 );
function your_custom_menu_item ( $items, $args ) {
$custom = ‘Show whatever’;
$items = $custom.$items;
return $items;
}
Murugu
私の無知をお許しください。どのPHPファイルを編集すればよいですか?
編集スタッフ
これは functions.php ファイルに入れることになります。
管理者
Murugu
テーマの functions.php に以下を追加しましたが、期待どおりに検索ボックスが表示されません。何か提案はありますか?
add_filter(‘wp_nav_menu_items’,’add_search_box_to_menu’, 10, 2);
function add_search_box_to_menu( $items, $args ) {
if( $args->theme_location == ‘header_extras_inner’ )
return $items.””;
}
return $items; }
エリオット・ウォール
この議論に遅れて参加して申し訳ありません
検索フォームの部分を試しましたが、うまくいきました。ありがとうございます!ただし、スタイリングに問題があります。なぜかプレースホルダーテキストがグレーのままです。スタイルのカスケードを確認し、多くのことを試しましたが、背景色などは変更できますが、テキストを黒くすることはできません。そのため、メニューのデザインの一貫性が損なわれています。もしよろしければ、私のサイトはhttp://elliottwall.comです。よろしくお願いします。
編集スタッフ
プレースホルダーテキストの場合、次のようなことを行う必要があります。
::-webkit-input-placeholder { color: red; } :-moz-placeholder { /* Firefox 18- */ color: red; } ::-moz-placeholder { /* Firefox 19+ */ color: red; } :-ms-input-placeholder { color: red; }1-click Use in WordPress
管理者
エリオット・ウォール
これは完璧に機能しました。改めてありがとうございます!
サム
最初のアイテムの前にカスタムリンクを追加することはできますか?最後にではなく?
ザファール・アリ
はい、最後に連結するのではなく、まず連結してください。
$items = “MENU ITEM ” . $items;
piomat
beer!
SAcha
こんにちは、
とても興味深いです!
カスタムリンクを追加しましたが、メニュー内の特定の場所に配置することは可能ですか?例えば「最初のメニュー項目の後」のような。
ありがとう
編集スタッフ
それが可能かどうかはわかりません。
管理者