EUのGDPR法では、ユーザーデータを保存する前に明示的な同意が必要であり、WordPressのコメント欄も例外ではありません。
多くのWordPressユーザーから、コメント欄をGDPRに対応させたいという問い合わせが寄せられています。ありがたいことに、私たちは数多くのWordPressサイトにGDPRに準拠したコメントシステムを導入してきました。
この投稿では、WordPressサイトにGDPRコメントプライバシーオプトインチェックボックスを追加する方法をご紹介します。
WordPressでコメントする際にプライバシーチェックボックスを追加する理由
一般データ保護規則(GDPR)は、EU市民が個人データをよりコントロールできるようにすることを目的としている。
この法律が導入されると、多くの組織がデータプライバシーに取り組む方法が変わりました。このトピックの詳細については、WordPressとGDPRコンプライアンスに関する究極のガイドをご覧ください。
GDPRに準拠しなければ、罰金や懲役刑が科される可能性さえあります。だからこそ、コメントフォームを含め、サイトをGDPRに準拠させることが重要なのです。
コメントフォームでは、訪問者の名前、メールアドレス、オプションでサイトのURLなどの個人情報を収集します。WordPressはまた、これらの情報をブラウザーCookieに保存し、将来コメントした人の情報を自動的に入力できるようにします。
初期設定では、WordPressのコメントフォームにコメントプライバシーオプトインチェックボックスが表示されます。
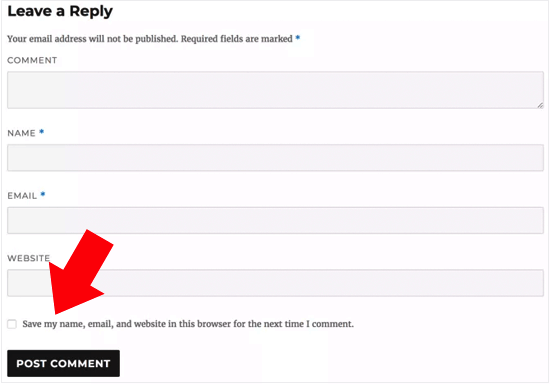
ただし、サイトにこのチェックボックスが表示されない場合は、WordPressテーマによって無効化されている可能性があります。
関連投稿 WordPressでGDPRに準拠したお問い合わせフォームを作成する方法
WordPressでコメントプライバシーチェックボックスを有効化する方法
独自のコメントプライバシーボックスを作成する前に、お使いのテーマにすでにこの機能がビルトインされているかどうかを確認することをお勧めします。
まず、テーマとWordPressコアの両方が最新であることをダッシュボード ” 更新で確認しましょう。
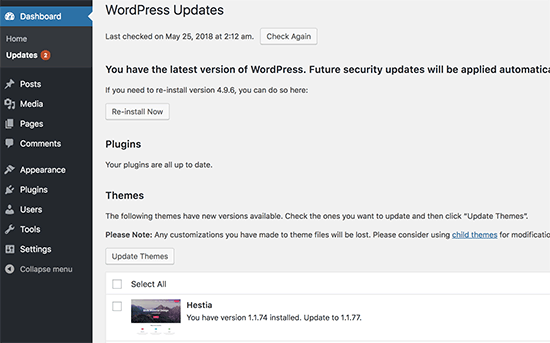
更新が可能であれば、インストーラをインストールしてください。ヘルプが必要な場合は、WordPress を安全に更新する方法をご覧ください。
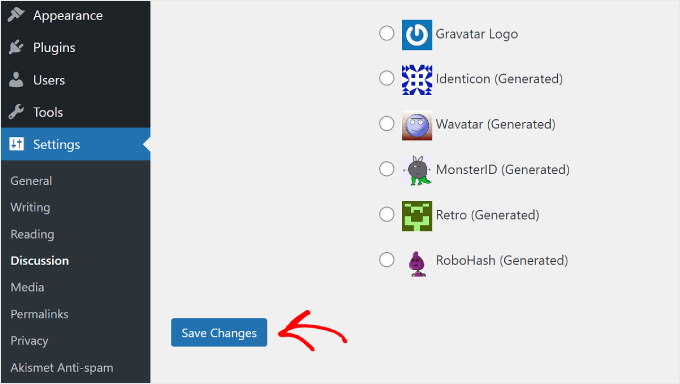
その後、Settings ” Discussionに行き、’Other comment settings’までスクロールしてください。ここで、’Show comments cookie opt-in checkbox…’の隣にあるボックスにチェックを入れてください。

あとは「変更を保存」をクリックするだけで、設定が保存されます。
これで、WordPressサイトを訪問して、これらの変更によってCookieの同意チェックボックスが追加されたかどうかを確認できます。
もし最新版にアップデートしているにもかかわらず、コメントプライバシーチェックボックスが表示されない場合は、お使いのテーマがWordPress初期設定のコメントフォームを上書きしていることを意味します。
このことを念頭に置いて、テーマの開発者にサポートチケットを開いてこの問題を解決するよう依頼することをお勧めします。アドバイスについては、WordPressサポートへの適切な依頼方法についてのガイドをご覧ください。
もう一つのオプションは、WordPressテーマにコメントプライバシーチェックボックスを追加することです。これにはいくつかの方法がありますので、以下のクイックリンクからお好きな方法をお選びください:
方法1:Thrive Commentsのコメントフォームを使う(推奨)
コメントプライバシーチェックボックスを追加する最も簡単な方法は、現在のコメントフォームをThrive Commentsのものに置き換えることです。
Thrive CommentsはWordPressのコメントプラグインで、コメントのエンゲージメントを高めるための機能がすべて揃っています。カスタマイズ可能なコメントフォームの他に、このプラグインには以下の機能があります:
この方法が最も簡単な理由は、テーマファイルのコードをいじってチェックボックスを追加する必要がないからです。プラグインをインストールし、GDPR機能を有効化するだけですべて完了です。
とはいえ、このプラグインには無料版がないので、投資のように感じるかもしれません。ThriveThemesのレビューでThrive Commentsについてさらに詳しく知ることができます。
最初のステップはThrive Commentsをインストールすることです。これを行うには、Thrive Themesのサイトに行き、有料プランを取得することができます。

次に、ログインしてアカウント・ダッシュボードに移動します。
このページで、「Thrive Product Managerプラグインをダウンロードしてインストールする」をクリックします。
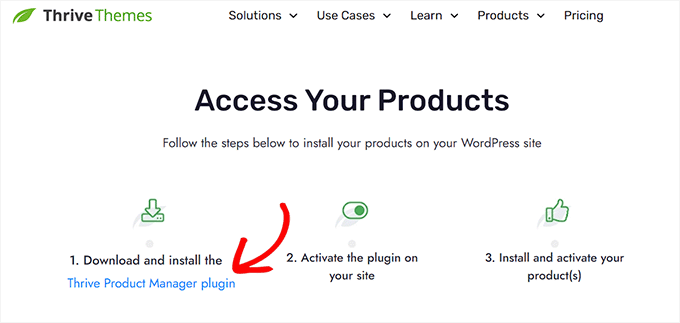
あとは、WordPressサイトにThrive Product Managerプラグインをインストールするだけです。詳しくは、WordPressプラグインのインストール方法をご覧ください。
次に、WordPressの管理エリアからProduct Managerページに移動し、’Log into my account’をクリックします。
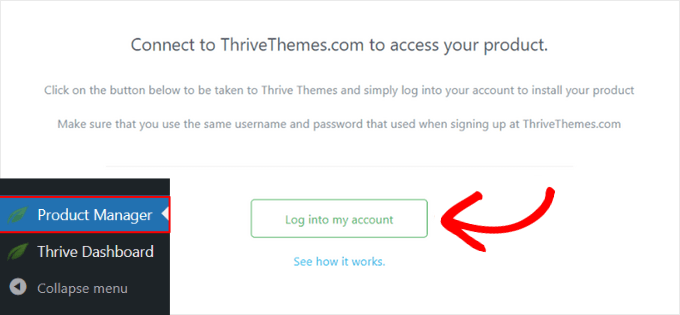
現在、Thrive Product Managerダッシュボードにいます。
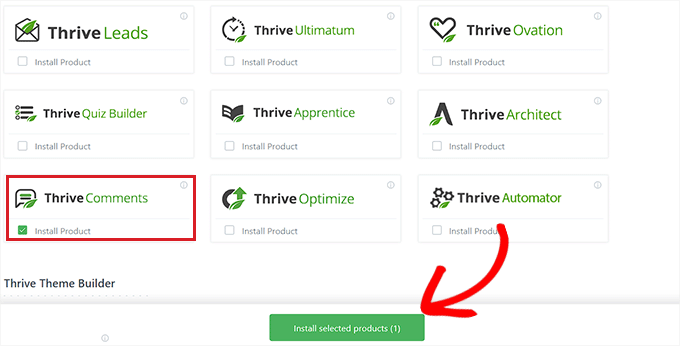
この段階で、Thrive Commentsを選択します。そして、「選択した製品をインストール」ボタンをクリックします。
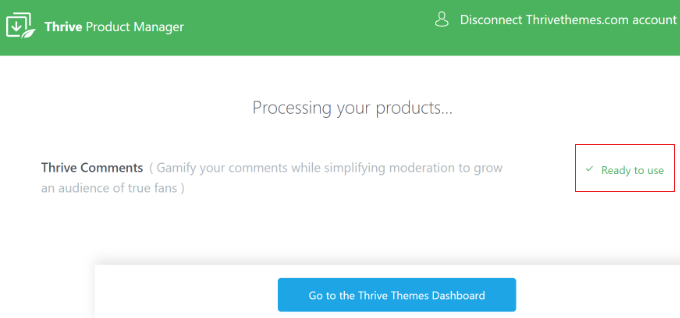
インストーラが完了すると、『使用準備が整いました』というメッセージが表示されます。
一番下の「Thrive Themesダッシュボードへ」ボタンをクリックするだけです。
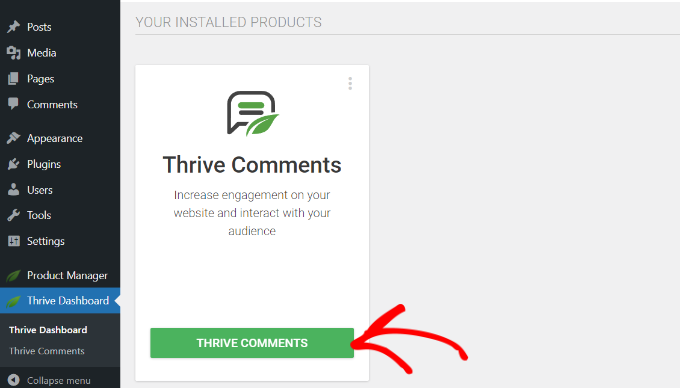
インストールしたプラグインがすべて表示されます。
Thrive Comments’ボタンをクリックしてプラグインの使用を開始します。
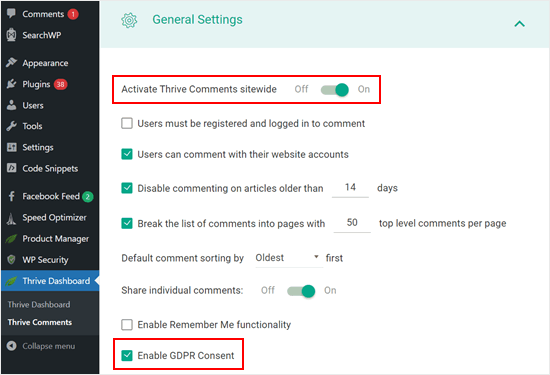
次のページで「一般設定」メニューを開きます。
次に、サイト全体のThrive Commentsセクションを有効化し、「GDPR同意を有効化する」というチェックボックスをオフにします。
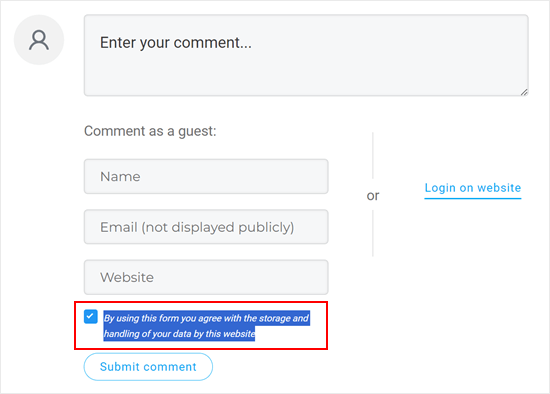
これでコメント欄をプレビューすることができる。
ご覧の通り、初期設定のコメントフォームは置き換えられ、「このフォームを使用することで、このサイトがあなたのデータを保存し、取り扱うことに同意する」という同意チェックボックスが設けられました。
以上です。また、コメント欄をさらに充実させるために、Thrive Commentsの他の設定も自由に弄ってみてください。
例えば、WordPressのコメントを購読者に許可し、コメントへの返信を通知することができます。
この1つのチェックボックスを追加するためだけに有料のコメントプラグインを使うのはやりすぎだと思われるかもしれません。
その場合は、次の2つの方法を試してみることをお勧めします。どちらもカスタマイザーによるコーディングが必要ですが、コーディングの経験がなくてもプライバシーチェックボックスを追加できるよう、手順を説明します。
注: 以下のチュートリアルを行う前に、予期せぬエラーに備えてサイトをバックアップしておくことを強くお勧めします。Duplicatorのようなバックアッププラグインを使用することができます。
方法2:WordPressテーマにGDPRチェックボックスをコードで追加する
この方法はほとんどのWordPressテーマで使えるはずです。また、テーマのフォームスタイルやレイアウトもそのまま維持できます。
まず、FileZillaなどのFTPクライアントを使用してWordPressサイトに接続するか、WordPressホスティングのcPanelのファイルマネージャを使用する必要があります。SiteGround をご利用の場合は、サイトツールダッシュボードのファイルマネージャーを使用できます。
初めてFTPを使用する場合は、FTPを使用してサイトに接続する方法についての完全なガイドを参照してください。
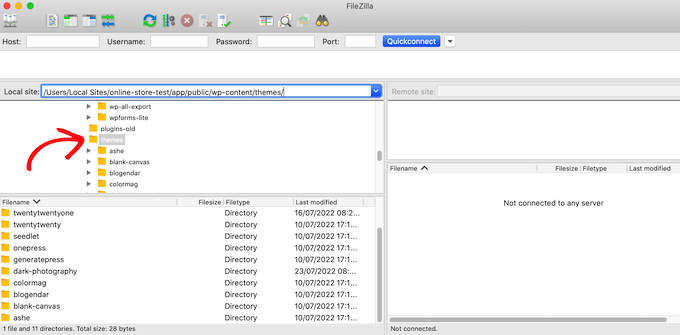
接続が完了したら、/wp-content/themes/に移動し、現在のWordPressテーマのフォルダーを開く必要があります。
WordPress初期設定のコメントフォームを上書きするコードを見つける必要があります。通常、テーマフォルダーのcomments.phpまたはfunctions.phpファイルにあります。
これらのファイルを開いたら、comment_form_default_fieldsフィルターがあるコードを探してください。テーマはこのフィルターを使ってWordPressの初期設定のコメントフォームを上書きします。
すべてのコメントフォームフィールド用の行があります。テーマごとに異なりますが、以下にお探しのコードの例を示します:
1 2 3 4 5 6 7 8 9 10 11 12 13 14 15 16 17 18 19 20 21 22 23 24 25 26 27 28 29 | $comments_args = array( // change the title of send button 'label_submit'=> esc_html(__('Post Comments','themename')), // change the title of the reply section 'title_reply'=> esc_html(__('Leave a Comment','themename')), // redefine your own textarea (the comment body) 'comment_field' => ' <div class="form-group"><div class="input-field"><textarea class="materialize-textarea" type="text" rows="10" id="textarea1" name="comment" aria-required="true"></textarea></div></div>', 'fields' => apply_filters( 'comment_form_default_fields', array( 'author' =>'' . '<div><div class="input-field">' . '<input class="validate" id="name" name="author" placeholder="'. esc_attr(__('Name','themename')) .'" type="text" value="' . esc_attr( $commenter['comment_author'] ) . '" size="30"' . $aria_req . ' /></div></div>', 'email' =>'' . '<div><div class="input-field">' . '<input class="validate" id="email" name="email" placeholder="'. esc_attr(__('Email','themename')) .'" type="email" value="' . esc_attr( $commenter['comment_author_email'] ) . '" size="30"' . $aria_req . ' /></div></div>', 'url' =>'' . '<div class="form-group">'. '<div><div class="input-field"><input class="validate" placeholder="'. esc_attr(__('Website','themename')) .'" id="url" name="url" type="text" value="' . esc_attr( $commenter['comment_author_url'] ) . '" size="30" /></div></div>', ) ), ); comment_form($comments_args); ?> |
このコードでは、comment_form_default_fieldsフィルターが投稿者、メール、URLフィールドを変更するために使われていることがわかります。
各フィールドは以下のフォーマットで表示される:
1 2 | 'fieldname' => 'HTML code to display the field','anotherfield' => 'HTML code to display the field', |
ここで、コメントするプライバシーオプトインチェックボックスフィールドを、コードブロックの最後、comment_form($comments_args); ?>行の前に追加します。
このようなコードになりますが、コピー&ペーストしてください:
1 2 3 4 5 6 7 8 9 10 11 12 13 14 15 16 17 18 19 20 21 22 23 24 25 26 27 28 29 30 31 32 33 34 | $comments_args = array( // change the title of send button 'label_submit'=> esc_html(__('Post Comments','themename')), // change the title of the reply section 'title_reply'=> esc_html(__('Leave a Comment','themename')), // redefine your own textarea (the comment body) 'comment_field' => ' <div class="form-group"><div class="input-field"><textarea class="materialize-textarea" type="text" rows="10" id="textarea1" name="comment" aria-required="true"></textarea></div></div>', 'fields' => apply_filters( 'comment_form_default_fields', array( 'author' =>'' . '<div><div class="input-field">' . '<input class="validate" id="name" name="author" placeholder="'. esc_attr(__('Name','themename')) .'" type="text" value="' . esc_attr( $commenter['comment_author'] ) . '" size="30"' . $aria_req . ' /></div></div>', 'email' =>'' . '<div><div class="input-field">' . '<input class="validate" id="email" name="email" placeholder="'. esc_attr(__('Email','themename')) .'" type="email" value="' . esc_attr( $commenter['comment_author_email'] ) . '" size="30"' . $aria_req . ' /></div></div>', 'url' =>'' . '<div class="form-group">'. '<div><div class="input-field"><input class="validate" placeholder="'. esc_attr(__('Website','themename')) .'" id="url" name="url" type="text" value="' . esc_attr( $commenter['comment_author_url'] ) . '" size="30" /></div></div>', // Now we will add our new privacy checkbox opt-in 'cookies' => '<p class="comment-form-cookies-consent"><input id="wp-comment-cookies-consent" name="wp-comment-cookies-consent" type="checkbox" value="yes"' . $consent . ' />' . '<label for="wp-comment-cookies-consent">' . __( 'Save my name, email, and website in this browser for the next time I comment.' ) . '</label></p>', ) ), ); comment_form($comments_args); ?> |
この変更を行った後、ファイルを保存してWordPressホスティングサービスアカウントにアップロードしてください。
作業が完了したら、WordPressブログにアクセスして、変更を確認することができます。
方法 3:テーマのコメントフォームをWordPress初期設定に置き換える
この方法は、テーマのコメントフォームをWordPressの初期設定のコメントフォームに置き換えるだけです。
この方法はコメントフォームの見た目を変えてしまう可能性があるので、フォームのスタイルやレイアウトを維持したい場合には最適な方法ではありません。しかし、この変更を行った後は、カスタム CSS を使ってコメントフォームをいつでもスタイル設定することができます。
前の方法と同様に、最初のステップはFTPを使ってサーバーに接続するか、ホスティングサービスのファイルマネージャーを開くことです。
その後、comments.phpファイルを開き、comment_form()関数の行を探します。あなたのテーマには、テーマのカスタムコメントフォームを読み込むために使用する引数、関数、またはテンプレートが定義されています。comment_formの行は以下のようになります:
1 | <?php comment_form( custom_comment_form_function() ); ?> |
これを以下の行に置き換える必要がある:
1 | <?php comment_form(); ?> |
そうしたら、変更を保存してください。
あなたのサイトにアクセスすると、初期設定のWordPressコメントフォームとコメントプライバシーオプトインチェックボックスが表示されます。
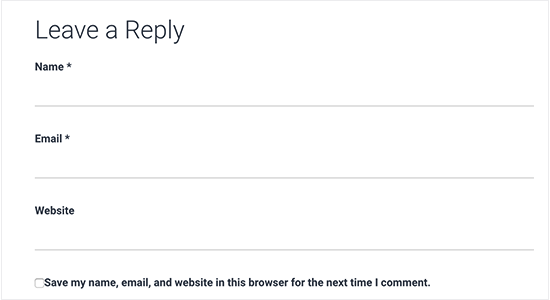
ボーナスのヒント:MonsterInsightsとWPConsentでGDPRコンプライアンスを改善する
コメントプライバシーオプトインチェックボックスを有効化することは、サイトをGDPRに準拠させる一つの方法です。その他のデータを収集し、サイトがGDPRに準拠していることを確認したい場合は、MonsterInsightsのインストールをお勧めします。
MonsterInsightsは、あなたのサイトをGoogleアナリティクスに簡単に接続できるプラグインです。それだけでなく、トラッキングをGDPRに準拠させるEU Complianceアドオンもあります。
これにより、MonsterInsightsは、ユーザーがあなたのサイトに到着したときにそれを行うのではなく、ユーザーの行動を追跡するためにユーザーの同意を待ちます。
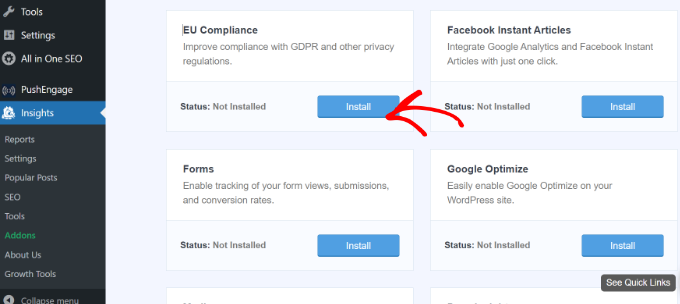
MonsterInsightsの詳細については、MonsterInsightsのレビューをお読みください。
GDPRコンプライアンスに欠かせないもう一つのツールは、サイト全体のCookie同意管理を行うWPConsentです。これは、市場で最高のWordPress GDPRコンプライアンスプラグインの一つです。
このプラグインは、WordPressインストール全体を自動的にスキャンし、サードパーティのスクリプト、WordPressのコア機能、プラグインからのCookieを検出します。
検出されると、カスタマイザー同意ポップアップを自動的に作成し、明示的な権限が付与されるまで、これらのスクリプトによるユーザー活動のトラッキングを防ぐことができます。

MonsterInsightsとWPConsentの両方をコメントプライバシーチェックボックスと一緒に使用することで、あなたとユーザーの両方を保護する包括的なGDPRコンプライアンスシステムが構築されます。
この投稿が、WordPressでGDPRコメントプライバシーオプトインチェックボックスを追加する方法を学ぶのにお役に立てば幸いです。また、WordPressのコメントをモデレートするための初心者向けガイドや、ユーザーがWordPressの不適切なコメントを報告できるようにする方法についての投稿もご覧ください。
If you liked this article, then please subscribe to our YouTube Channel for WordPress video tutorials. You can also find us on Twitter and Facebook.


Jiří Vaněk
I live in the Czech Republic, which is subject to the GDPR law and it is a rather complex and comprehensive law. As far as websites are concerned, we now have to be really very careful about how we handle the data that the user sends to the website. These guides are great because they help people better prepare their website for this law and not forget anything. Thanks for the guide, you really have to be very careful about GDPR and these guides are a great help.
Kris
What I just don’t understand or maybe I am missing something, is how to put the Privacy Policy checkbox as in what you have on your comments. Something like, “by using this form you agree to us collecting and storing data as per our privacy policy. Nobody seems to have this information – just the usual comment checkbox which is straight forward to do.
WPBeginner Support
If I understand what you’re looking to do, you can change the text by editing the text on line 29 in our code above that currently has ‘Save my name, email, and website in this browser for the next time I comment.’ when replacing, ensure you keep the single quotes.
Admin
Stephen Ho
Thank!
mike carpenter
Got this working and checked that the cookie was being created as expected, but when I browse away from the blog page and then return to it, I expected the form values to be pre-populated with the values stored in the cookie, but this doesn’t happen and the fields are left blank! I think I assumed that the line $commenter = wp_get_current_commenter(); and subsequent lines esc_attr( $commenter[‘comment_author_url’] ) etc. would retrieve the stored field values from the cookie. Have I missed something, or am I msundersatding the way the checkbox is supposed to work?
Sefket
Do you have one for contact forms?
WPBeginner Support
Hi Sefket,
Please see our article on how to create GDPR compliant forms in WordPress.
Admin
Tara
I normally find great info on your site, but I have to speak up and say in this case, this is not accurate to be ready for GDPR, you need get consent to save their data for the comment/email/name/ip etc in your website database, whether or not they choose to save their details in a cookie for faster commenting at a later time.
I used css to hide this checkmark and installed a GDPR plugin, unfortunately now that plugin is not prompting people that they have to checkmark to leave their comment, so now we are losing comments. What’s also frustrating is that it appears for all users with no option to show only for EU. Another frustration is that with hiding the wordpress added checkmark, now the users do not see “your comment is awaiting moderation”.
parijatak ayurveda
Thanks for the sharing of information.
Mirko
What if I don’t want the commenters to store a cookie with their personal data at all? Is there a way to deactivate the whole process and to hide this cookie consent for good?
Uphoria
What if the code is there in my theme already? It’s still not showing up, but it has each of the fields there.
Peter
Thx for the guide,
but everything described doesn’t seem to be possible, if it’s a wordpress.com page (free/no plan).
There is no updating and there is nothing in the settings to add an opt-in check box or any other specific code. The only thing in the settings, that implies a possibility to achieve GDPR-compliance is to add a short info, that data will be provided to and stored at automaticc with a link to their privacy disclaimer. Furthermore, plug-ins and access via ftp can not be used.
—
Any suggestions on how to include an opt-in check box for users who only use the free wordpress.com solution?
Or is it not even needed due to the fact that user access to the web space is only possible via the rather limited wordpress configuration page – or due to any other means?
WPBeginner Support
Hi Peter,
Please reach out to WordPress.com support, they will be able to help you better.
Admin
Bryan
Hello, I was able to add this in my theme and it works, but there is one problem. I check consent box. Next time, my name and email are filled in, but I have to check consent box again. In default WP theme, if I check remember name, email fields box once, next time it comes checked by default. Is there problem with my theme or this code can be improved?
Jim
Hey there! Great instruction! I am trying to get some sites GDPR compliant as well.
I was wondering about Genesis websites, I couldn’t find this code in either comments.php OR functions.php so I first tried loading the code from Method 1 in via Simple Hooks after the comment form then I used the code you gave to Mateja in my functions.php. Both gave me a checkbox but… is it supposed to do anything else? Is there somewhere that I can see whether a commenter has checked this box? Thanks in advance for any help.
Jim
Elisa
Unfortunately I cannot apply any of the mentioned solutions as none of the CSS can be found. Contacted the comoany I got my theme from, hope they can help.
Alexander
Hi,
I was not helped by Method 1 and Method 2.
I could not find the code I needed to edit.
I’m using the “publisher” (themeforest) template.
Can you tell me how to configure the “publisher” template?
Thank you
WPBeginner Support
Hi Alexander,
Unfortunately, it is not possible for us to come up with a solution for each theme as they use different methods. It would be best to contact your theme developer for support.
Admin
Samantha
I also got the “Undefined variable: consent” message when I tried to do this, although the checkbox appeared along with the message.
Vicdayo
What if I’m using facebook comment system on my blog?
Mateja
Hi, I disabled the Jetpack comment form and now I can see the checkbox. All good. BUT, I don’t like how the text looks like….save my name, address and so on…..I would like to insert my own text with a link to the privacy policy,,,,,….is that possible? and how I do that? Thank you
WPBeginner Support
Hi Mateja,
You can try this code in your theme’s functions.php file. You’ll be able to change the label text for the consent checkbox.
functionwpb_comments_privacy($arg) {$arg['cookies'] ='<p class="comment-form-cookies-consent"><input id="wp-comment-cookies-consent" name="wp-comment-cookies-consent" type="checkbox" value="yes"'.$consent.' />'.'<label for="wp-comment-cookies-consent">'. __('Save my name, email, and website in this browser for the next time I comment.') .'</label></p>';return$arg;}add_filter('comment_form_default_fields','wpb_comments_privacy');1-click Use in WordPress
Admin
Inayatali
Thank you so much.
WPBeginner Support
You’re welcome
Kamran Khan
Thank you sir. I have applied the 1st method. Its working but after inserting the code some of the code elements also shown with the checkbox and message which I manually removed. Is it OK? Now its working fine but the checkbox is showing above the message and not inline. How I can inline both the checkbox and the message.
WPBeginner Support
Hi Kamran,
No, there is probably something missing in the code. Most likely a quote or a php start or end tag. Carefully review the code to make sure that all quotes are closed and code is properly formatted.
For styling you will need to use custom CSS to adjust the field.
Admin
Carey
Ok, I am ignorant about adding code. I am using the K2 theme, which does not seem to have the updated comments form. I installed Code Snippets, but I don’t understand – does it just know where to put the snippet? I looked at the comments code in the theme files, but it doesn’t look anything like your example here. In fact it has 189 lines of code for comments. Do I just add your “new privacy checkbox optin” code to snippets and click activate and it inserts it in the correct place? So confused…
WPBeginner Support
Hi Carey,
If you find editing theme files difficult, then ask your theme author to release an update.
Admin
Brian Sanderson
Hi! I do not have the above code in your article, as is, but i do have the following code in the comments.php file. The code includes the 4 fields;
Could you please advise how my code could be edited? Thanks in advance.
WPBeginner Support
Hi Brian,
It depends on rest of the code in your theme. Unfortunately, we cannot cover all the possible ways in which a theme may display a comment form. You will need to reach out to your theme author for support.
Admin
Mark Corder
Thanks for this – I know it was quick work on your part too!
Thomas
I tried using this and got the following notice in place of the checkbox:
Undefined variable: consent
So you didn’t define it? How do I do that?
Mark Corder
Huh… It’s working for me. I just need to get the checkbox and label lined-up to match the rest of my form…
Thomas
Just so everyone knows I opened up comments-template.php file from the wp-includes folder and found this:
$consent = empty( $commenter[‘comment_author_email’] ) ? ” : ‘ checked=”checked”‘;
Adding this to the above defines the consent and in doing so will remove the notice if you have debug turned on.
You have to add it before the $comments_args = array. This all depends on how you have your template configured.
Hope it helps.