ウェブサイトの著者について話しましょう。彼らは単なるページ上の名前ではありません。彼らは専門家であり、ストーリーテラーであり、あなたのブランドの背後にある声です。
経験と専門知識を紹介することで、読者とのより強い繋がりを築き、ウェブサイトの検索ランキングを向上させることもできます。
問題は、多くの WordPress テーマが基本的な著者情報ページしか提供しておらず、少し退屈に見える可能性があることです。これは機会損失です。
影響を与える、より魅力的で情報量の多い著者のプロフィールページを作成する方法について、よく質問を受けます。
この記事では、WordPressでカスタム作成者プロフィールページを作成し、ウェブサイト訪問者に強い印象を与える方法を紹介します。作成者のプロフィールを輝かせましょう!
WordPressサイトにカスタム著者プロフィールページを追加する理由
WordPressサイトにカスタム著者プロフィールページを追加することは、ブログをよりパーソナルにする簡単な方法です。読者が誰がコンテンツを書いたかを知ると、信頼が築かれます。
プロフィールページでは、著者の写真、短い経歴、ソーシャルメディアリンク、およびすべての投稿のリストなど、著者に関する詳細を共有するスペースが提供されます。
この方法は、サイトに複数のライターがいる場合に非常に役立ちます。各著者は独自のページを持つことができ、サイトがプロフェッショナルで整理された印象になります。
また、読者がお気に入りの著者からの他の記事を見つけやすくします。これにより、訪問者がサイトに長く滞在し、エンゲージメントを高めることができます。
カスタム著者ページは SEO にも適しています。これらは 内部リンク を改善し、検索エンジンがサイトをより良く理解するのに役立ちます。
ユニークなプロフィールを作成し、リンクを含めると、これらのページは検索結果に表示されることもあり、サイトへのトラフィックが増加します。
要するに、カスタム著者プロフィールページは、サイトをより良く見せ、読者があなたのコンテンツを信頼するのを助け、著者にふさわしいクレジットを与えます。
とはいえ、WordPressでカスタム著者プロフィールページを簡単に作成する方法を見ていきましょう。3つの方法を説明します。
興味のあるセクションにジャンプするには、以下のリンクを使用してください。
- 方法1:SeedProdでWordPressのカスタム著者プロフィールページを作成する(推奨)
- 方法 2: WP User Manager を使用して WordPress にカスタム著者プロフィールページを追加する
- 方法3:テーマでカスタム著者プロフィールページを手動で作成する
- カスタム著者プロフィールに関するよくある質問
方法1:SeedProdでWordPressのカスタム著者プロフィールページを作成する(推奨)
WordPressでカスタム著者プロフィールページを作成する最良の方法は、SeedProdプラグインを使用することです。
これはWordPress向けの最高のドラッグ&ドロップページビルダーであり、ウェブサイトのすべてのライターのためにカスタムWordPressテーマやページレイアウト、美しい著者ページを簡単に作成できます。
私たちはSeedProdをデモ環境で個人的にテストしましたが、私たちの経験に基づくと、インターフェースは非常に使いやすいです。私たちは、それが際立っている理由を強調した、詳細なレビューも公開しました。
事前に作成されたテーマのライブラリが付属しており、ページにすぐにプロフェッショナルな外観を与えることができます。さらに、ページブロックを使用して、画像、ソーシャルプロフィール、最新の投稿などで著者プロフィールページを完全にカスタマイズできます。
開始するには、SeedProd プラグインをインストールして有効にする必要があります。手順については、WordPress プラグインのインストール方法のチュートリアルをご覧ください。
注意: SeedProd の無料版もあります。ただし、カスタム著者ページテンプレートを使用するには、Pro バージョンが必要です。
プラグインを有効化したら、WordPressダッシュボードからSeedProd » Theme Builderに移動し、「Theme Templates Kit」ボタンをクリックします。
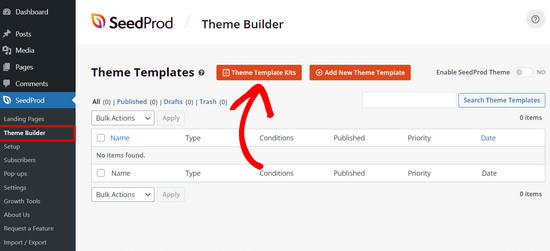
ここで、SeedProdの既製のウェブサイトキットのライブラリに移動します。
ウェブサイトのテーマを選択するには、好きなデザインにマウスカーソルを合わせ、チェックマークアイコンをクリックするだけです。
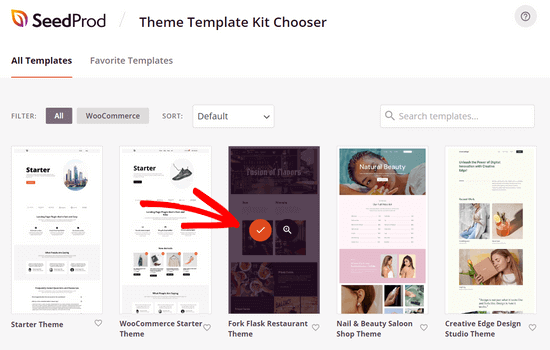
選択が完了すると、SeedProd はウェブサイトキットをインポートし、テーマビルダーダッシュボードにテンプレートパーツのリストが表示されます。
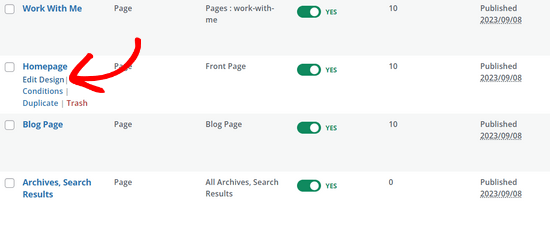
ウェブサイトの設定に必要なすべてのテンプレートパーツ(ホームページ、ブログページ、お問い合わせページなど)を入手できます。
テンプレートの「デザインを編集」リンクをクリックすると、ドラッグ&ドロップテーマビルダーを使用してカスタマイズできます。
手順については、カスタム WordPress テーマの作成方法に関するガイドをご覧ください。
カスタム著者ページテンプレートの作成
ウェブサイトのテーマのカスタマイズが完了したら、カスタム作成者プロフィールページを作成する時間です。
これを行うには、SeedProd » Theme Builderに移動し、「新しいテーマテンプレートを追加」ボタンをクリックします。
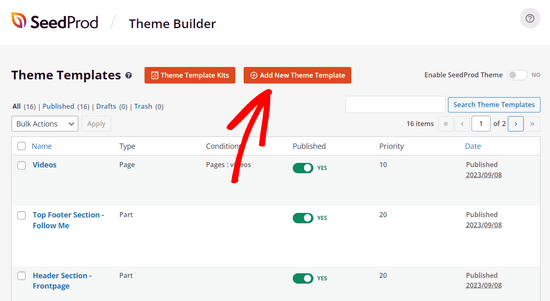
これにより、新しいテーマテンプレートポップアップが開きます。
次に、「タイプ」ドロップダウンメニューで「著者ページ」オプションを選択します。
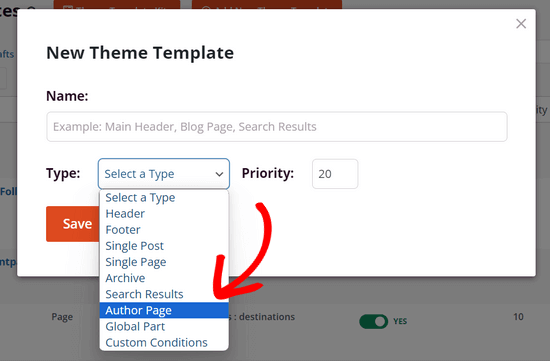
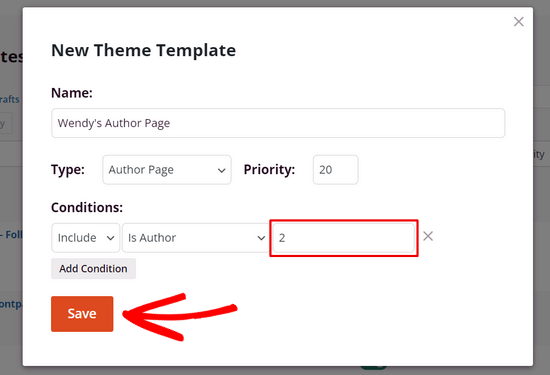
すべてのライターに同じ著者ページレイアウトを使用したい場合は、「条件」セクションの下に表示される空白フィールドを無視できます。
ただし、各ライターにユニークな作成者ページを作成したい場合は、このフィールドに特定の作成者のユーザーIDを入力する必要があります。たとえば、ユーザーIDが2の場合は、空のフィールドに入力します。
WordPressでユーザーIDを見つける方法については、こちらのガイドをご覧ください。WordPressでユーザーIDを見つける。
次に、「保存」ボタンをクリックして続行します。
著者プロフィールページのカスタマイズ
作成者ページテンプレートのセットアップが完了したら、その下にある「デザインの編集」リンクをクリックしてカスタマイズを開始できます。
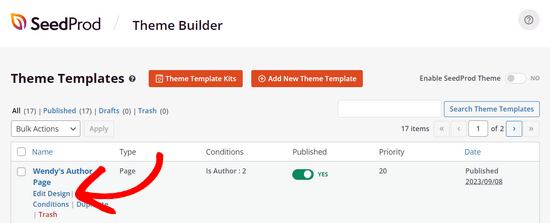
これにより、テンプレートが SeedProd のページビルダーで開きます。
左側には、ページに追加できるブロックとセクションが表示されます。右側には、まだコンテンツを追加していないため、空白のページのプレビューが表示されます。
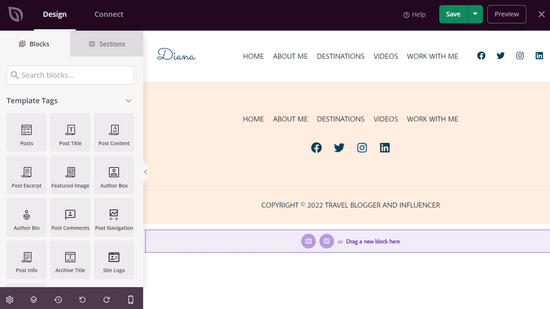
これでコンテンツの追加を開始できます。
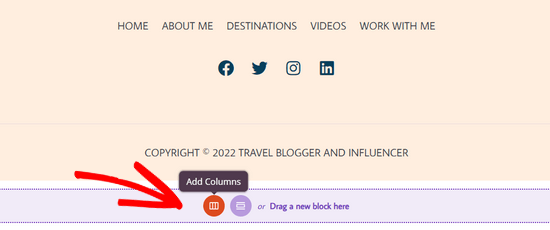
「列の追加」アイコンをクリックして、ページレイアウトを設定します。
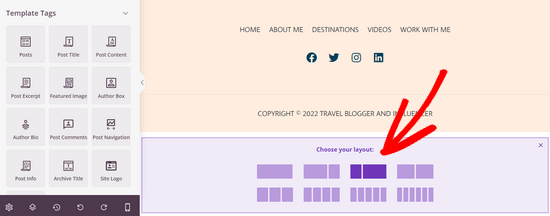
次に、さまざまなコラムレイアウトが表示されます。
作成したいコラムレイアウトの種類を著者のページに選択してください。
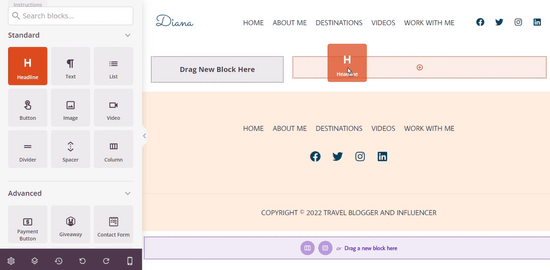
これで、SeedProdの既製のブロックをページに追加できます。
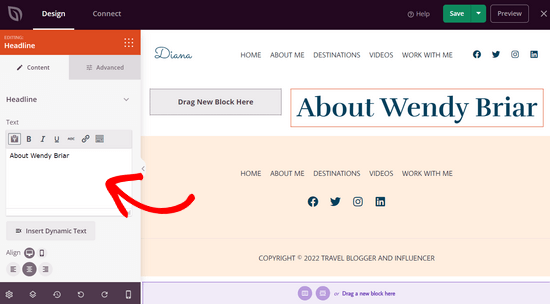
例えば、'見出し'ブロックをページにドラッグして、著者の見出しを追加できます。
見出しをカスタマイズするには、クリックするだけです。
これにより、著者名を入力したり、サイズや配置などを調整したりできるパネルが開きます。
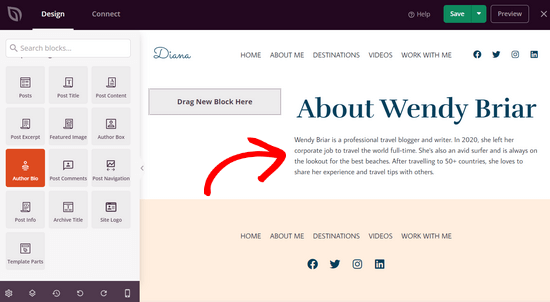
次に、「著者紹介」ブロックをページにドラッグして、著者に関する情報を表示できます。
このブロックは、著者のWordPressユーザープロフィールからコンテンツを自動的に取得します。
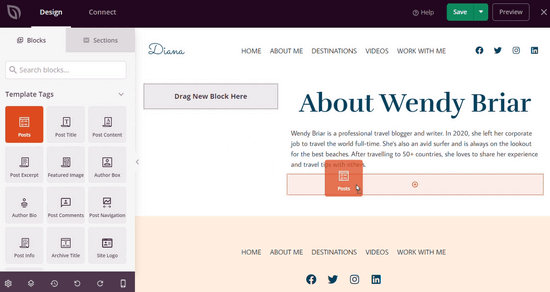
これで、著者の最近の記事を表示できます。
「投稿」ブロックをページにドラッグするだけです。
「投稿」ブロックを追加した後、それをクリックして「クエリタイプ」を「カスタム」に設定します。
次に、「クエリ作成者」トグルを有効にし、ドロップダウンリストから特定の作成者を選択します。
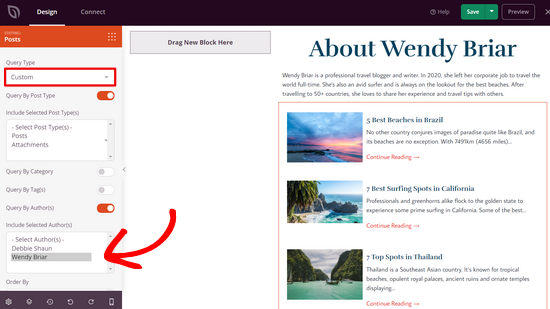
これで、著者ページにはその著者からの投稿のみが表示されます。
著者ページはさらにカスタマイズを続けることができます。例えば、「テキスト」や「画像」ブロックを追加して、著者に関する追加情報を含めることができます。また、「ソーシャルプロフィール」やソーシャル共有、「レビュー」などのブロックを追加することもできます。
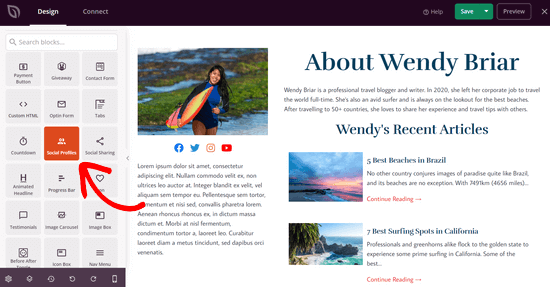
著者のページの見た目に満足したら、画面上部にある「保存」ボタンをクリックしてページビルダーを終了します。
カスタム著者プロフィールページの公開
著者ページをサイトで公開するには、カスタムSeedProdテーマを有効にする必要があります。
これは、SeedProd » Theme Builderに移動することで実行できます。そこから、「SeedProdテーマを有効にする」トグルを見つけて、「はい」の位置に切り替えます。
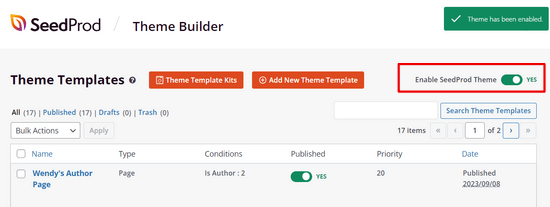
SeedProdはカスタムWordPressテーマを発行します。
新しい著者プロフィールページが機能しているか、サイトにアクセスして確認できます。

方法 2: WP User Manager でカスタム著者プロフィールページを WordPress に追加する
この方法は設定が簡単ですが、SeedProdほど多くのデザインやカスタマイズオプションを提供していません。
まず最初に行う必要があるのは、WP User Managerプラグインをインストールして有効化することです。詳細については、WordPressプラグインのインストール方法に関するステップバイステップガイドをご覧ください。
有効化後、プラグイン設定を構成するには、ユーザー » 設定ページにアクセスする必要があります。
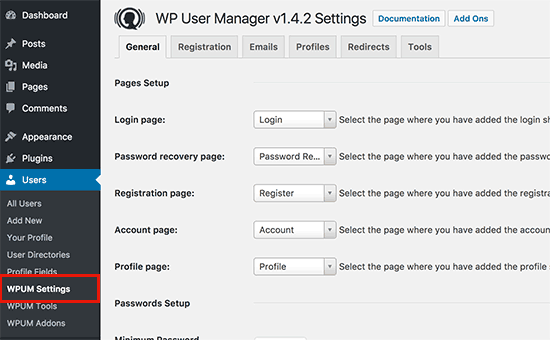
このプラグインは、カスタムログイン、カスタムユーザー登録、パスワード忘れ、アカウント、プロフィールページとして使用するさまざまなページを自動的に作成します。
WP User Manager は、著者プロフィールページにさまざまなオプションを提供します。それらを慎重に確認し、使用したくない機能はオフにする必要があります。
次に、ユーザープロファイル設定を行うには、「プロファイル」タブをクリックする必要があります。
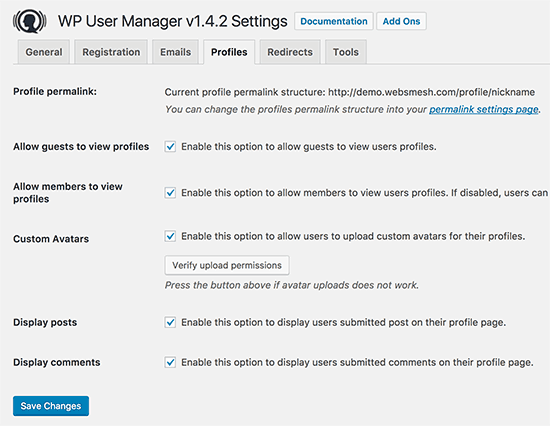
ここで、ゲスト向けのプロフィールページオプションを有効にできます。これは、誰でもユーザープロフィールを表示できることを意味します。また、メンバーがお互いのプロフィールを表示できるようにすることもできます。このオプションのチェックを外すと、ユーザーは自分のプロフィールページのみを表示できるようになります。
ユーザーがカスタムプロフィール写真をアップロードできるようにし、プロフィールページに最近の記事やコメントを表示することもできます。
設定を保存するには、「変更を保存」ボタンをクリックしてください。
次に、著者プロフィールページの SEOフレンドリーなURL またはパーマリンクを選択する必要があります。これは、設定 » パーマリンク ページにアクセスし、「ユーザープロフィールのパーマリンクベース」セクションまでスクロールすることで行えます。
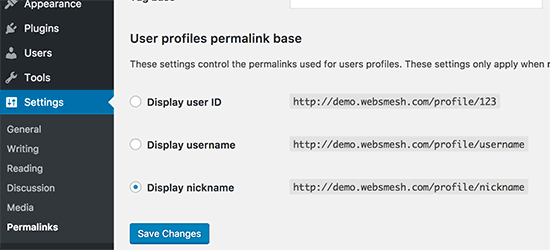
このプラグインを使用すると、URLでユーザーID、ユーザー名、またはニックネームを使用できます。ニックネームとユーザー名の両方とも、ユーザーIDよりもSEOに優しいオプションです。どちらか一方を選択してクリックし、次に[変更の保存]ボタンをクリックしてパーマリンク設定を保存します。
カスタム著者プロフィールページはほぼ準備ができました。次に、ユーザーが WordPress ウェブサイト で自分のプロフィールページを簡単に見つけられるようにする必要があります。
外観 » ウィジェット ページに移動し、ログインフォームウィジェットをサイドバーに追加します。
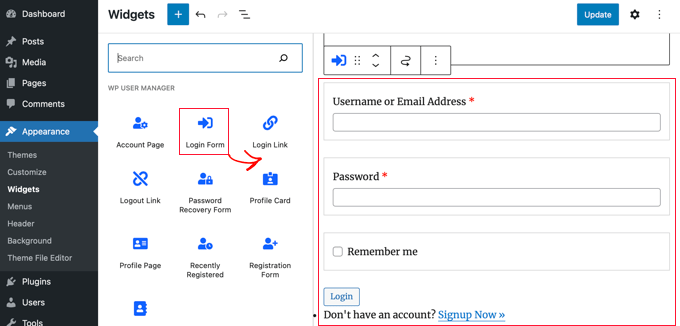
これで、ウェブサイトにアクセスして、著者プロフィールページが機能していることを確認できます。
ログイン中のユーザーは、サイドバーウィジェットにあなた自身の口座情報が表示されます。ユーザー名をクリックすると、あなたの著者プロフィールページに移動します。
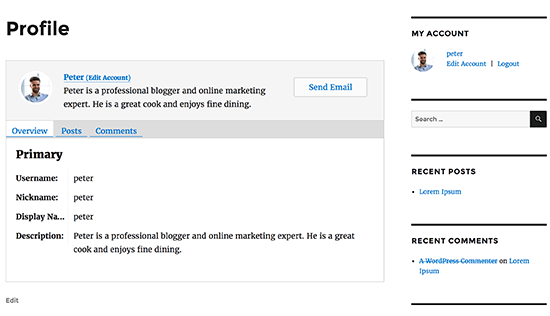
サイドバーウィジェットには、ログアウトしているユーザーにログインフォームが表示されます。ウェブサイトでのユーザー登録を許可している場合、フォームにはサインアップへのリンクも含まれます。
このプラグインは、ウェブサイト上の著者のリンクも変更し、デフォルトの著者のアーカイブページではなく、著者プロフィールページを指すようになります。
著者プロフィールページの表示を変更する
色や境界線を変更したいだけであれば、カスタムCSSを追加することでそれが可能です。
ただし、レイアウトや要素の順序を変更したい場合は、プラグインのテンプレートファイルを編集する必要があります。WP User Managerはカスタムテンプレートをサポートしているため、現在のテーマ内にプラグインが使用する独自のテンプレートを作成できます。
まず、FTPクライアントを使用してウェブサイトに接続し、/wp-content/plugins/wp-user-manager/templates/フォルダに移動する必要があります。そこにあるすべてのファイルをコンピューターにダウンロードしてください。
次に、現在のテーマフォルダに移動し、その中に「wpum」という名前の新しいフォルダを作成する必要があります。次に、以前ダウンロードしたファイルをwpumフォルダにアップロードします。
これで、これらのファイルを編集して、必要に応じてプロフィールページの表示をカスタマイズできます。
方法3:テーマでカスタム著者のプロフィールページを手動で作成する(コード)
この方法では、WordPressのテーマまたは子テーマファイルを編集する必要があります。以前にこのような作業をしたことがない場合は、WordPressでコードをコピー&ペーストする方法に関するガイドをご覧ください。
まず、FTPクライアントを使用してウェブサイトに接続し、/wp-content/themes/your-current-theme/ フォルダに移動する必要があります。
現在のテーマフォルダ内に、author.php ファイルを作成する必要があります。その後、archive.php ファイルの内容をコピーして、新しい author.php テンプレートに貼り付けます。
テーマにすでにauthor.phpファイルがある場合は、それも編集できます。
ここでの目標は、著者のプロフィール情報を取得し、それを表示することです。どこから編集を開始するかを決定する必要があります。通常、get_header(); と get_sidebar() の行の間にあるものはすべて編集できます。
<?php
// Set the Current Author Variable $curauth
$curauth = (isset($_GET['author_name'])) ? get_user_by('slug', $author_name) : get_userdata(intval($author));
?>

<div class="author-profile-card">
    <h2>About: <?php echo $curauth->nickname; ?></h2>
    <div class="author-photo">
    <?php echo get_avatar( $curauth->user_email , '90 '); ?>
    </div>
    <p><strong>Website:</strong> <a href="<?php echo $curauth->user_url; ?>"><?php echo $curauth->user_url; ?></a><br />
    <strong>Bio:</strong> <?php echo $curauth->user_description; ?></p>
</div>

<h2>Posts by <?php echo $curauth->nickname; ?>:</h2>

         <?php if ( have_posts() ) : while ( have_posts() ) : the_post(); ?>
<h3>
<a href="<?php the_permalink() ?>" rel="bookmark" title="Permanent Link: <?php the_title(); ?>">
<?php the_title(); ?></a>
</h3>
<p class="posted-on">Posted on: <?php the_time('d M Y'); ?></p>

<?php the_excerpt(); ?>

<?php endwhile;

// Previous/next page navigation.
the_posts_pagination();

else: ?>
<p><?php _e('No posts by this author.'); ?></p>

<?php endif; ?>
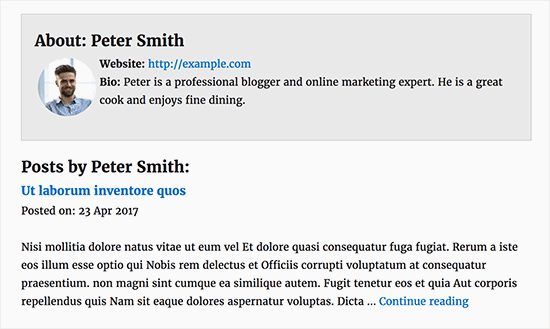
このコードは、単にページの上部に著者プロフィールカードを追加し、その後、著者による最近の投稿を表示します。
このコードは必要に応じて自由にカスタマイズできます。ウェブサイトに追加のユーザープロフィールフィールドを追加したり、作成者のTwitterやFacebookのプロフィールリンクを表示したり、投稿のアイキャッチ画像を表示したりすることができます。
著者プロフィールカードに適切な外観を与えるためのサンプルCSSです。これをテーマのカスタムCSSとして追加するか、コードスニペットプラグイン(例:WPCode)を使用できます。
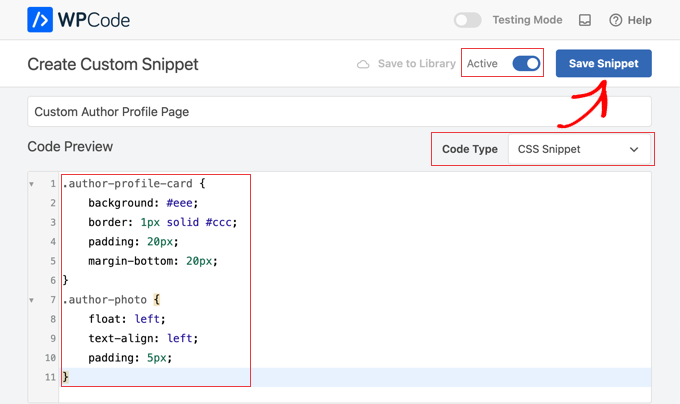
コードをテーマカラーに合わせてカスタマイズすることもできます。
.author-profile-card {
    background: #eee;
    border: 1px solid #ccc;
    padding: 20px;
    margin-bottom: 20px;
}
.author-photo {
    float: left;
    text-align: left;
    padding: 5px;
}
これで、カスタム著者のプロフィールページが機能しているか、ウェブサイトを訪問して確認できます。
デモウェブサイトではこのように表示されました。
カスタム著者プロフィールに関するよくある質問
著者プロフィールの追加に関して、読者からよく寄せられる質問をいくつかご紹介します。
カスタム著者ページを追加すると、サイトのSEOに影響しますか?
カスタム作成者ページを追加することは、正しく行えばSEOに良い影響を与える可能性があります。カスタム作成者ページは、内部リンクを改善し、検索エンジンにコンテキストを追加できます。
最適化するには:
- 一般的なテキストの代わりにユニークな著者紹介を追加する
- 著者のソーシャルメディアへのリンクを含めます(E-E-A-Tに役立ちます)。
- AIOSEOのようなSEOプラグインを使用して、作成者アーカイブのメタタイトルと説明をカスタマイズします。
各著者ページがユニークで、投稿リスト以上の価値を提供するようにすることで、重複コンテンツを回避します。
著者ボックスと著者プロフィールページの違いは何ですか?
著者ボックスは、通常、ブログ記事の最後に表示される小さなセクションです。ライターの簡単な紹介を提供し、多くの場合、名前、短いプロフィール、そしてプロフィール写真が含まれます。
その目的は、読者がページを離れることなく、誰が記事を書いたかのスナップショットを提供することです。
一方、著者プロフィールページは、著者のための専用ページです。
通常、完全な経歴、プロフィール写真、ソーシャルメディアリンク、および公開された投稿の完全なリストなど、より詳細な情報が含まれます。カスタム著者ページによっては、最近のコメント、個人のウェブサイトへのリンク、または作品のポートフォリオなどの追加の詳細が表示される場合もあります。
このようなページは、読者が著者とより深くつながるのに役立ち、特に複数著者のブログに便利です。
著者のプロフィールページをモバイルフレンドリーにするにはどうすればよいですか?
訪問者の多くがスマートフォンやタブレットを使用しているため、著者プロフィールページをモバイルフレンドリーにすることは不可欠です。プラグインを使用している場合は、完全にレスポンシブなものを選んでください。
ほとんどの最新プラグインは小さな画面に自動的に適応しますが、それでも複数のデバイスでレイアウトをテストする必要があります。
著者ページをカスタマイズする場合は、これらのヒントを念頭に置いてください。
- レスポンシブテーマを使用する
- 画像、テキスト、コンテナが小さい画面で適切にスケーリングされることを確認してください。
- 品質を損なうことなく、より高速な読み込みのために画像を最適化します。
- 固定幅の要素は避けてください
- さまざまな画面サイズでテストする
モバイルフレンドリーな著者ページはユーザーエクスペリエンスを向上させ、SEOランキングに良い影響を与える可能性があります。
この記事が、WordPressサイトにカスタム著者プロフィールページを追加する方法を学ぶのに役立ったことを願っています。初心者向けの究極のWordPress SEOガイドや、チェックすべき優れたWordPressウェブサイトの例もご覧ください。
この記事が気に入ったら、WordPressのビデオチュートリアルについては、YouTubeチャンネルを購読してください。 TwitterやFacebookでもフォローできます。


デニス・ムトミ
このチュートリアルをありがとうございます!
SeedProdの方法はとても使いやすく、カスタマイズオプションも豊富で気に入りました。
マルチアザーブログのマネージャーとして、ユーザーIDを使用して各アザーに個別のページを作成するというヒントが気に入りました。
これは、私たちのアザーページをよりプロフェッショナルに見えるように作り直すためのインスピレーションとなりました。素晴らしい仕事です!
Benky
著者ページに電話番号フィールドを追加する方法を知っていますか?
WPBeginnerサポート
プラグインを使用している場合は、カスタムフィールドを追加するためのプラグインの方法を使用する必要があります。
管理者
Subodh Gupta
著者アーカイブURLにユーザー名が表示されています。
管理者とすべての著者の表示名またはニックネームを表示するように簡単に変更するにはどうすればよいですか?
WPBeginnerサポート
この記事の方法を使用している場合は、[設定] > [パーマリンク] で更新できるはずです。
管理者
Ben Osborne
WordPressダッシュボードで著者ページを編集可能にしたいのですが、可能でしょうか?
WPBeginnerサポート
方法が見つかった場合は、この記事を更新することを検討します。
管理者
Ben Osborne
これは推奨できるものではないかもしれませんが…しかし、高度なカスタムフィールドを使用して、ユーザー編集画面に直接WYSIWYGエディターを作成し、そのカスタムフィールドをカスタマイズされたauthor.phpで呼び出しました。かなりうまく機能しています。
Nomi
wpbeginnerは最高です。常に最良の解決策を見つけ出します。SERPでwpbeginnerを見ると、すぐにクリックします。
WPBeginnerサポート
Thank you, glad you like our content
管理者
ルーニ・ハダッド
こんにちは、ウェブサイトのメニューエリアのトップにログインページを追加しようとしていますが、追加してもウェブサイトに表示されません。これを修正する方法はありますか。
Annapurna Agrawal
皆さん、こんにちは。
これで本当に困っています。著者テンプレートが機能しません。つまり、著者アーカイブページで 404 エラーが発生しています。
作者のnice_nameにスペースがありません。競合を確認するためにすべてのプラグインを無効にしました。これに対する解決策は見つかりませんでした。助けていただけますか?
WPBeginnerサポート
こんにちは、Annapurnaさん。
パーマリンク構造を更新してみてください。単に 設定 » パーマリンク にアクセスし、何も変更せずに変更を保存ボタンをクリックしてください。
管理者
取得
WordPressの求人サイトで、各会社の詳細を永続的に掲載するにはどうすればよいですか?毎回求人詳細とキーワードを追加したくありません。
Sharif Mustajib
私のウェブサイトには、Eメールで記事を送ってくるライターがいます。彼らがプロフィールを作成しない場合、どのようにして彼らのプロフィールを追加できますか?お願いします。
いいえ
もう使用しない場合、著者プロフィールページを削除するにはどうすればよいですか?
William
このチュートリアルをありがとうございます。しかし、私のテーマにはauthor.phpまたはarchive.phpが見つかりません。Customizr Proを使用しています。何かアイデアがあれば、大歓迎です。デモ画像のルックスが大好きです!
WPBeginnerサポート
ウィリアム様
author.php ファイルがない場合は、作成できます。archive.php がない場合は、テーマ内の index.php、category.php、またはその他のアーカイブテンプレートの内容をコピーできます。テーマのサポートに連絡すれば、より詳しいガイダンスを得られるでしょう。
管理者
Ifeanyi
こんにちは
登録ページにラジオボタンフィールドを追加する方法はありますか?
WPBeginnerサポート
こんにちは、
WPFormsを使用してカスタム登録フォームを作成することで、これを行うことができます。
管理者
Adel
著者のページに子ページを作成する方法を必死に探しています。
メニューバーやタブでカテゴリを個別に表示したいのですが…
よろしくお願いします。
Gatera
この記事をありがとうございます。メソッド2を使用しました。
作成者のバイオの下に、現在の作成者のWooCommerce製品を表示したいのですが。これを達成する方法を知っていますか?
ありがとう、
ムハンマド・イブラヒム
初心者である私にとって、本当に役立つ記事でした。ビデオチュートリアルがあれば、さらに詳しく知ることができるでしょう。しかし、それでもカスタム著者プロフィールページの設定方法を知るには十分です。
WordPressについて何かを学ぶ必要があるときは、いつもこのサイトを訪れています。
このような素晴らしいWordPressリソースサイトを作成してくださったSyed Balkhiさん、本当にありがとうございます。