WordPressは、ほとんどのテーマでさまざまな要素に独自のCSSクラスを追加します。これらの初期設定は、サイトのさまざまな部分を自動的にスタイル設定するのに役立ちます。
初期設定のCSSクラスを知っておくと、とても便利です。ゼロから始めることなく、サイトの外観を簡単にカスタマイズできるようになります。
例えば、サイトにCSSを使い始めてから、ブログのコンテンツを際立たせるためのスタイル設定がとても簡単になった。
この投稿では、WordPressで初期設定されているCSSクラスのチートシートを紹介します。また、より多くのCSSクラスを見つける方法や、必要なときに独自のクラスを追加する方法も紹介します。
WordPressが生成する初期設定のCSSについて学ぶ理由とは?
WordPressは自動的に初期設定のCSSクラスを生成し、WordPressサイトのさまざまな要素に追加します。
テーマ開発者は、コンテンツエリア、サイドバー、ウィジェット、ナビゲーションメニューなど、WordPressサイトの共通エリアをスタイリングするために、これらの初期設定のCSSクラスを弄ることができます。
そのため、WordPressのテーマ開発を学んでいる場合や、単に自分のサイトの子テーマを作成しようとしている場合に、これらのCSSクラスを知っていると便利です。
また、独自のテーマを作成することなく、カスタムCSSを追加することで、WordPressテーマの特定の要素をすばやくスタイル設定することができます。
注:テーマのスタイルを変更したり、カスタマイザーを作成するためにCSSを学ぶ必要はありません。コードを学びたくない場合は、SeedProdのようなドラッグ&ドロップビルダーを使うことができます。これについては投稿の後半で詳しく説明します。
以下のセクションでは、WordPressが生成する初期設定のCSSクラスを紹介します。この投稿で扱うすべての概要を簡単に説明します:
それでは早速、WordPressサイトを思い通りに仕上げる方法をご紹介しましょう!
初期設定のボディ・クラス・スタイル
HTMLでは、<body>タグはあらゆるウェブページのレイアウト構造をコンテナとしており、WordPressのテーマデザインにおいて非常に重要です。
WordPressはbodyタグにいくつかのCSSクラスを追加します。テーマデザイナーは、これらのクラスを使用して、ボディコンテナを効果的にスタイル設定することができます。
1 2 3 4 5 6 7 8 9 10 11 12 13 14 15 16 17 18 19 20 21 22 23 24 25 26 27 28 29 30 31 32 33 34 35 36 37 38 39 40 41 42 43 44 45 46 47 48 49 50 51 52 53 54 55 56 57 58 59 60 61 62 63 64 65 66 67 68 69 70 71 72 73 74 75 76 77 78 79 80 81 82 83 84 85 86 87 88 89 90 91 92 93 94 95 | // Added when a website is using a right-to-left language e.g. Arabic, Hebrew .rtl {}// Added when home page is being displayed.home {}// Added when blog page is being displayed.blog {}// Added when an Archive page is being displayed.archive {}// Added when a date based archive is displayed.date {}// Added on search pages.search {}// Added when pagination is enabled.paged {}// Added when an attachment page is displayed.attachment {}// Added when a 404 error page is displayed.error404 {}// Added when a single post is dispayed includes post ID.single postid-(id) {}// Added when a single attachment is displayed. Includes attachment ID.attachmentid-(id) {}// Added when a single attachment is displayed. Includes attachment mime-type.attachment-(mime-type) {}// Added when an author page is displayed.author {}// Added when an author page is displayed. Includes author name. .author-(user_nicename) {}// Added when a category page is displayed.category {}//Added when a category page is displayed. Includes category slug..category-(slug) {}// Added when a tag page is displayed. .tag {}// Added when a tag page is displayed. Includes tag slug..tag-(slug) {}// Added when a parent page is displayed. .page-parent {}// Added when a child page is displayed. Includes parent page ID. .page-child parent-pageid-(id) {}// Added when a page is displayed using page template. Includes page template file name. .page-template page-template-(template file name) {}// Added when search results are displayed. .search-results {}// Added when search returns no results. .search-no-results {}// Added when a logged in user is detected. .logged-in {}// Added when a paginated page is displayed. Includes page number. .paged-(page number) {}// Added when a paginated single item is displayed. Includes page number. .single-paged-(page number) {}// Added when a paged page type is displayed. Includes page number. .page-paged-(page number) {}// Added when a paged category page is displayed. Includes page number. .category-paged-(page number) {}// Added when a paged tag page is displayed. Includes page number. .tag-paged-(page number) {}//Added when a paged date based archive page is displayed. Includes page number. .date-paged-(page number) {}// Added when a paged author page is displayed. Includes page number. .author-paged-(page number) {}// Added when a paaged search page is displayed. Includes page number. .search-paged-(page number) {} |
ご覧のように、これらのクラスには、CSSスタイルでターゲットにできるさまざまな条件が含まれています。
例えば、「ニュース」カテゴリーページの背景色を変えたい場合、以下のカスタムCSSを追加します。
1 2 3 | .category-news { background-color:#f7f7f7; } |
専門家のヒントWordPressでCSSやコードスニペットを追加する簡単な方法が必要ですか?無料のWPCodeプラグインをお試しください。
初期設定投稿スタイルクラス
body要素と同様に、WordPressは投稿要素にもダイナミッククラスを追加します。
この要素は通常、テーマテンプレートの<article>タグです。しかし、WordPressのテーマによっては、他のタグである可能性もあります。投稿CSSクラスは、post_class()テンプレートタグを追加することで、テーマに表示されます。
1 | <article id="post-<?php the_ID(); ?>" <?php post_class(); ?>> |
以下は、post_class()関数によって生成される最も一般的なCSSクラスのリストです:
1 2 3 4 5 6 7 8 9 10 11 12 13 14 15 16 17 18 19 20 21 22 23 24 25 26 27 28 29 30 31 32 | // Adds a class with ID for single items.post-(ID) {}// Generic post claass added for single blog posts. .post {}// Generic page class added when a single page is displayed. .page {}// Generic attachment class added to attachment pages..attachment {}// Adds a post type class e.g. type-post.type(post-type){}// Adds a class for post format if theme supports posts formats. E.g. format-standard .format-(post-format){}// Added when an item has a featured image.has-post-thumbnail{}// Added when a sticky post is displayed.sticky {}// Generic class to display an entry.hentry {}// Classes with categories assigned to a post. E.g. category-news category-movies.category-(slug) {}// Classes with tags assigned to a post. e.g. tag-photofriday tag-tgif.tag-(slug) {} |
投稿クラスを使用すると、さまざまな条件に一致するブログ投稿やページをスタイル設定できます。例えば、以下のカスタムCSSを使用して、特定のカテゴリーに分類されたブログ投稿を異なるスタイルにすることができます:
1 2 3 | .category-news { background-color:#EFEFEF; } |
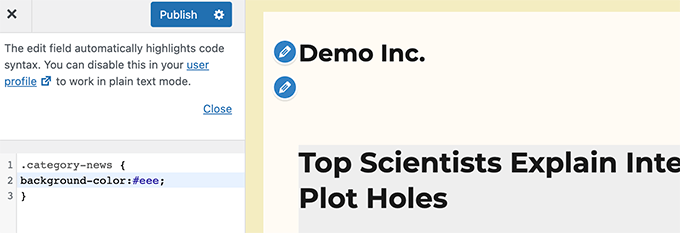
WordPressダッシュボードにCSSエディターが表示されない場合は、WordPressテーマカスタマイザーが表示されないのを修正する方法についてのチュートリアルに従ってください。
初期設定ナビゲーションメニュークラス
WordPressはナビゲーションメニューにもCSSクラスを追加します。ナビゲーションメニューに追加される初期設定は以下の通りです。
1 2 3 4 5 6 7 8 9 10 11 12 13 14 15 16 17 18 19 20 | // Class for Current Page.current_page_item{}// Class for Current Category.current-cat{} // Class for any other current Menu Item.current-menu-item{} // Class for a taxonomies.menu-item-type-(taxonomy){}// class to distinguish post types. .menu-item-type-(post_type){}// Class for any custom item that you added.menu-item-type-custom{} // Class for the Home Link.menu-item-home{} |
WordPressテーマはまた、ナビゲーションメニューの各位置にCSSクラスを追加します。
例えば、あなたのテーマがプライマリ・メニュー・クラスをヘッダー・エリア内のメニュー・ロケーションに割り当てたとしよう。
1 2 3 4 5 6 7 8 9 10 11 12 13 14 15 16 17 18 19 20 21 22 23 | // container class#header .primary-menu{} // container class first unordered list#header .primary-menu ul {} //unordered list within an unordered list#header .primary-menu ul ul {} // each navigation item#header .primary-menu li {} // each navigation item anchor#header .primary-menu li a {} // unordered list if there is drop down items#header .primary-menu li ul {} // each drop down navigation item#header .primary-menu li li {} // each drap down navigation item anchor#header .primary-menu li li a {} |
詳しくはWordPressのナビゲーションメニューの作り方をご覧ください。
初期設定のWordPressウィジェットクラス
ウィジェットは、WordPressテーマでコンテンツ以外のブロックを表示する簡単な方法です。通常、ウィジェット専用のエリアやサイドバーに表示されます。
WordPressは、レガシーウィジェットに以下のクラスを追加します。
1 2 3 4 5 6 7 8 9 10 11 12 13 14 15 16 17 18 19 20 21 22 23 24 25 26 27 28 29 30 31 32 33 34 35 36 37 38 39 40 41 42 43 44 45 46 47 48 49 50 51 52 53 54 55 56 57 58 59 60 61 62 63 64 65 66 67 68 69 70 71 72 73 74 75 76 77 | .widget {} #searchform {}.widget_search {}.screen-reader-text {} .widget_meta {}.widget_meta ul {}.widget_meta ul li {}.widget_meta ul li a {} .widget_links {}.widget_links ul {}.widget_links ul li {}.widget_links ul li a {} .widget_archive {}.widget_archive ul {}.widget_archive ul li {} .widget_archive ul li a {}.widget_archive select {}.widget_archive option {} .widget_pages {}.widget_pages ul {}.widget_pages ul li {}.widget_pages ul li a {} .widget_links {}.widget_links li:after {}.widget_links li:before {}.widget_tag_cloud {}.widget_tag_cloud a {}.widget_tag_cloud a:after {}.widget_tag_cloud a:before {} .widget_calendar {}#calendar_wrap {}#calendar_wrap th {}#calendar_wrap td {}#wp-calendar tr td {}#wp-calendar caption {}#wp-calendar a {}#wp-calendar #today {}#wp-calendar #prev {}#wp-calendar #next {}#wp-calendar #next a {}#wp-calendar #prev a {} .widget_categories {}.widget_categories ul {}.widget_categories ul li {} .widget_categories ul ul.children {}.widget_categories a {}.widget_categories select{}.widget_categories select#cat {}.widget_categories select.postform {}.widget_categories option {}.widget_categories .level-0 {}.widget_categories .level-1 {}.widget_categories .level-2 {}.widget_categories .level-3 {} .recentcomments {}#recentcomments {}#recentcomments li {}#recentcomments li a {}.widget_recent_comments {} .widget_recent_entries {}.widget_recent_entries ul {}.widget_recent_entries ul li {}.widget_recent_entries ul li a {} .textwidget {}.widget_text {}.textwidget p {} |
しかし、WordPressがブロックベースのウィジェットエリアに移行するにつれて、ウィジェットエリアにさまざまなブロックを追加できるようになり、それぞれのブロックが動的にCSSクラスを生成します。
これらのCSSクラスを見つける方法は、この投稿の後半で紹介する。
コメントフォームの初期設定クラス
コメントは多くのWordPressサイトのエンゲージメントのハブです。コメントをスタイリングすることで、ユーザーによりクリーンで魅力的な体験を提供することができます。
WordPressでは、テーマ開発者がコメントするエリアのスタイルを設定しやすくするために、以下の初期設定CSSクラスを追加しています。
1 2 3 4 5 6 7 8 9 10 11 12 13 14 15 16 17 18 19 20 21 22 23 24 25 26 27 28 29 30 31 32 33 34 35 36 37 38 39 40 41 42 43 44 45 46 47 48 49 50 51 52 53 54 55 56 57 58 59 60 61 62 63 64 65 66 67 68 69 | /*Comment Output*/ .commentlist .reply {}.commentlist .reply a {} .commentlist .alt {}.commentlist .odd {}.commentlist .even {}.commentlist .thread-alt {}.commentlist .thread-odd {}.commentlist .thread-even {}.commentlist li ul.children .alt {}.commentlist li ul.children .odd {}.commentlist li ul.children .even {} .commentlist .vcard {}.commentlist .vcard cite.fn {}.commentlist .vcard span.says {}.commentlist .vcard img.photo {}.commentlist .vcard img.avatar {}.commentlist .vcard cite.fn a.url {} .commentlist .comment-meta {} .commentlist .comment-meta a {}.commentlist .commentmetadata {}.commentlist .commentmetadata a {} .commentlist .parent {}.commentlist .comment {}.commentlist .children {}.commentlist .pingback {}.commentlist .bypostauthor {}.commentlist .comment-author {}.commentlist .comment-author-admin {} .commentlist {}.commentlist li {}.commentlist li p {}.commentlist li ul {}.commentlist li ul.children li {}.commentlist li ul.children li.alt {}.commentlist li ul.children li.byuser {}.commentlist li ul.children li.comment {}.commentlist li ul.children li.depth-{id} {}.commentlist li ul.children li.bypostauthor {}.commentlist li ul.children li.comment-author-admin {} #cancel-comment-reply {}#cancel-comment-reply a {} /*Comment Form */ #respond { } #reply-title { } #cancel-comment-reply-link { }#commentform { } #author { } #email { } #url { } #comment #submit.comment-notes { } .required { }.comment-form-author { }.comment-form-email { } .comment-form-url { }.comment-form-comment { } .form-allowed-tags { } .form-submit |
詳しくは、WordPressでコメントをスタイルする方法をご覧ください。
WordPressブロッククラスを探す
WordPressのブロックエディターは、ブロック用のCSSクラスを動的に生成します。
これらのCSSクラスを見つけるには、まず投稿やページに特定のブロックを追加する必要があります。次に、「プレビュー」ボタンをクリックして、ブロックの動作を確認します。
プレビュー・タブで、追加したブロックにマウスを移動し、右クリックしてInspectツールを選択します。
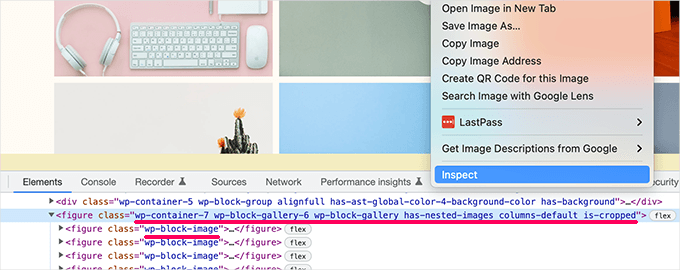
開発者コンソールでは、ブロックが生成したHTMLと、ブロックが追加したCSSクラスが表示されます。
上のスクリーンショットでは、ギャラリーブロックのCSSクラスを見ています。これらのCSSクラスを使用して、WordPressテーマのギャラリーブロックをスタイル設定することができます。
WordPressにカスタムCSSクラスを追加する
さて、初期設定のWordPress CSSクラスは非常に包括的です。しかし、その目的は主にテーマ開発者に標準化されたフレームワークを提供することです。
あなたのサイトでは、初期設定のCSSクラスが利用できないエリアにカスタマイザーを追加する必要があるかもしれません。
同様に、テーマ全体に影響を与えることなく、特定の投稿やページに小さな変更を加えたい場合もあるでしょう。
幸いなことに、WordPressはさまざまなエリアにCSSクラスを追加する簡単な方法をいくつかプロバイダーしています。ここではいくつかの方法を紹介します:
ブロックエディター内でブロックにカスタムCSSクラスを追加する
カスタムCSSクラスを特定の投稿やページに素早く追加したい場合、ブロックエディターを使うのが最も簡単な方法です。
投稿またはページを編集し、カスタムCSSクラスを追加したいブロックを選択するだけです。ブロック設定の下にある「高度な設定」パネルをクリックし、CSSクラスの名前を追加します。
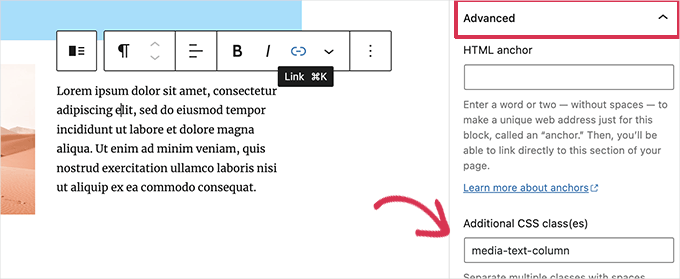
更新」ボタンをクリックして変更を保存することをお忘れなく。
このクラスを使って、特定の投稿やページの特定のブロックにのみ影響するカスタムCSSコードを追加することができます。
WordPressのナビゲーションメニューで
WordPressのナビゲーション・メニュー項目にカスタムCSSを追加することもできる。メニュー項目をボタンに変換したい場合、この方法が便利だ。
外観 ” メニューのページで画面右上の「表示オプション」ボタンをクリックするだけです。
ここから、’CSS Classes’オプションの隣にあるボックスにチェックを入れます。
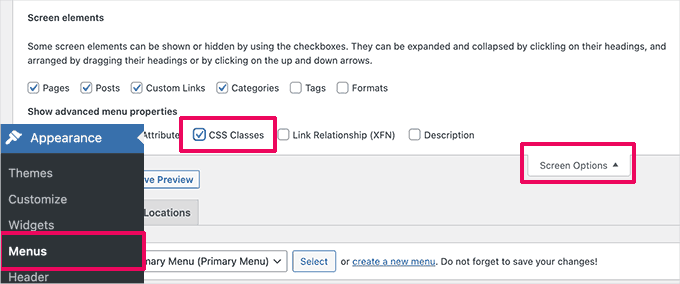
次に、下にスクロールして、カスタムCSSクラスを追加したいメニュー項目を展開しよう。
すると、CSSクラスというフィールドがあることに気づくだろう。ここにカスタマイザーのCSSクラスを追加してください。
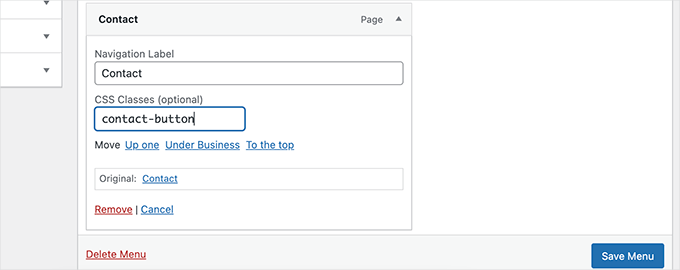
メニューの保存」ボタンをクリックし、変更を保存することを忘れないでください。
このカスタムCSSクラスを使って、特定のメニュー項目を別のスタイルにすることができます。
ボーナス:CSSコードを書かずにWordPressテーマを簡単にデザインする
カスタムCSSでWordPressテーマをスタイリングすることを学ぶことは、非常に有用なスキルです。しかし、ユーザーによっては、CSSコードを書かずにWordPressテーマをデザインするソリューションが欲しいだけかもしれません。
そのためには、SeedProdが必要です。これは、コードを書くことなく簡単にカスタマイザーテーマを作成できる、市場で最高のWordPressページビルダーツールです。
SeedProdには、すぐに使えるテーマが用意されています。
必要であれば、ゼロからテーマを作ることもできる。
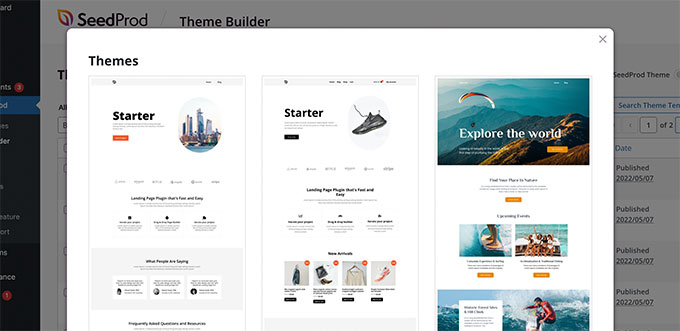
テンプレートを選んだら、ドラッグ&ドロップの直感的なエディターを使ってカスタムテーマを編集する準備はすべて整いました。
デザインにブロックをドロップするだけで、自分だけのレイアウトが作れます。
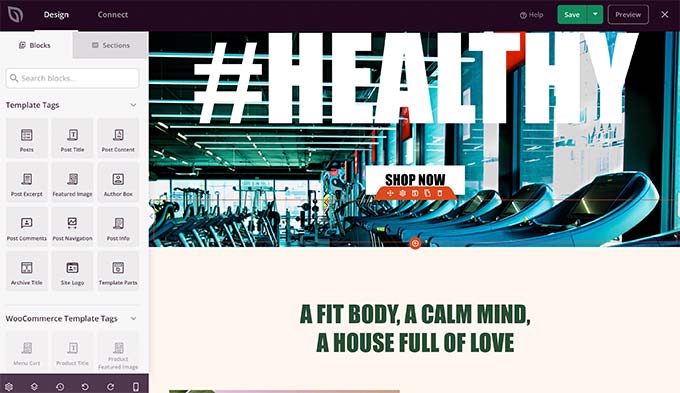
また、どの項目もポイント&クリックで簡単に変更できます。さらに、独自の色、背景、フォントなどを使用することもできます。
詳しくは、コードを書かずに簡単にカスタムWordPressテーマを作成する方法についてのステップバイステップのチュートリアルをご覧ください。
WordPressサイトのリニューアルにお困りですか?WPBeginnerはWordPressサイトデザインサービスでお手伝いします!美しくデザインされた、魅力的でユーザーフレンドリーなサイトに生まれ変わらせましょう。WordPressサイトデザインサービスを今すぐご予約ください!
この投稿がWordPressが生成する初期設定のCSSチートシートを見つけるのに役立てば幸いです。次に、WordPress で CSS や JavaScript ファイルを最小化する方法や、WordPress で未使用の CSS を削除する方法についてのガイドもご覧ください。
If you liked this article, then please subscribe to our YouTube Channel for WordPress video tutorials. You can also find us on Twitter and Facebook.


Rodrigo Vieira Eufrasio da Silva
You are to be congratulated for this wonderful content. I would only recommend updating this article, and letting us know which classes are generated by guttenberg and the latest version of WordPress because this post is out of date. But it helped me a lot.
Hugs to you all.
WPBeginner Support
Thank you for letting us know, we’ll be sure to take a look
Admin
Alison Westall
Is there a CSS class for changing the padding of an element? Thanks!
WPBeginner Support
Once you find the object you want to add padding to, you would use:
padding, padding-top, padding-right, padding-bottom, padding-left
depending on what type of padding you want added
Admin
Matt Cauley
Thanks for the info. I just bookmarked page even though its a few years old!
WPBeginner Support
Thank you, while the article is older, it should still be useful
Admin
MS Shohan
Awesome work bro. Thanks for making a list of all the default WP classes
Hannah Steele
Hello, I am really struggling to format the automatically generated events page.
Please help me?
Arunjith RS
Realy useful..Tank you.
Shai
Can you (if not already elsewhere) list the admin dashboard and admin widgets classes.
it look like the admin is using a loader (wp-admin/load-styles.php) to include it CSS but that CSS is compress and hard to read. it will be nice to see a list of the items in use. for example if you want to create your own widget with tabs ; I inspected the CSS and can see large list of the class .nav-tab related CSS.
.
Ari Susanto
and the “entry-content” itself!
Ari Susanto
I want to add this one:
“status-publish”
luroch
A question: when creating a bootstrap theme from underscores, should I keep the classes and ids that come with this framework, just adding the Bootstrap ones, or can I use only Bootstrap classes and Ids?
Ari Susanto
How did you found them? Is there an automated way like using php function, may be?
Stephen Clark
Fantastic post and highly informative. Curious if you could append this post with similar details about the WP footer. I have been struggling with styling and formatting the footer with the theme I’m using, and with some other sites I’ve built.
Would also be helpful to have a downloadable CSS stylesheet file containing all of these styles. Thanks!
Kevin Pryce
When I inspect element only my wordpress theme, I do not see these styles, especially the ones applied to the body class. Do you have to put them into the template?
Joel Bladt
Nice compilation of all the standard WordPress classes. Was that really all classes that are added automatically by WordPress? If classes are obsolete and disappeared, or new ones have come to this, I look forward to updating the list.
– German Blogger and translated with Google Translator.
WPBeginner Support
It is up to date to the best of our knowledge, if you find any class obsolete, please let us know.
Admin
loreto
time saver! now let me mess those styles
Amba Junior
Very useful tutorial. Just like the Genesis visual hook guide, this summarizes Genesis real well
MalcolmOwen
Do you know what would be useful? A printable PDF version of this guide…
Pete
http://www.printfriendly.com/print/v2?url=http%3A%2F%2Fwww.wpbeginner.com%2Fwp-themes%2Fdefault-wordpress-generated-css-cheat-sheet-for-beginners%2F#
Adriane
Thank you Pete!
wpbeginner
@smashingmag Thank you for retweeting our article really appreciate the love.
favstar50
@smashingmag Congrats on your 50★ tweet! http://t.co/r78Ao3Sm
bobHankin
@photoassassin No I hadn’t. That’s sweet! Handy too!
eugenebicyclist
Just learning to work with WP and this is really handy. Thank you.