
WPBeginnerでは、WordPressを自分のものにしたいユーザーから多くの質問を受けます。最も多いリクエストのひとつは初期設定のWordPressロゴをカスタムのダッシュボードロゴに変更したい。
WordPressのロゴをカスタマイザーに置き換えることで、管理エリアをブランディングし、サイトをユニークなものにすることができます。
あなた自身がサイトを管理している場合でも、ユーザーのチームがいる場合でも、カスタマイザーのダッシュボードロゴはサイトをよりプロフェッショナルな雰囲気にするいいアクセントになります。
この投稿では、WordPressでブランディングのためにカスタムのダッシュボードロゴを追加する方法を紹介します。

カスタムダッシュボードロゴとは何か、なぜ追加するのか?
カスタムダッシュボードロゴは、WordPress管理ダッシュボードに独自のカスタムロゴやブランディングで外観を表示します。
些細なことのように思えるかもしれませんが、サイトのブランドにとって重要な要素であり、いくつかの理由から重要なのです:
- ブランディング:ブランドアイデンティティを強化し、WordPressの管理エリアがあなたのビジネスの一部のように感じられるようにします。
- プロフェッショナリズム:カスタムのダッシュボードロゴは、WordPressサイトをよりプロフェッショナルで洗練された印象にします。
- ホワイトラベル: クライアントのためにウェブサイトを構築したり、マルチサイトネットワークを運営している場合、カスタムダッシュボードロゴを使用してWordPress管理エリアをホワイトラベル化することができます。つまり、WordPressのブランディングを完全に削除し、独自のブランディングに置き換えることで、クライアントにカスタマイザー体験を提供することができます。
オンラインショップ、中小企業、ブログなど、ダッシュボードロゴのカスタマイザーは、バックエンドエクスペリエンスをパーソナライズし、社内のブランドアイデンティティを確立するために重要です。
以下のセクションでは、WordPressでダッシュボードのカスタムロゴを追加する2つの異なる方法と、ダッシュボードからWordPressロゴを削除する方法を紹介します。
準備はいいかい?始めよう
方法1:プラグインを使ってWordPressにカスタム・ダッシュボード・ロゴを追加する
この方法は超簡単で、ほとんどの初心者にお勧めできる。
まず最初にWhite Label CMSプラグインをインストールし有効化します。WordPressプラグインのインストール方法については、ステップバイステップガイドをご覧ください。
有効化した後、WordPressダッシュボードから設定 ” White Label CMSにアクセスする必要があります。
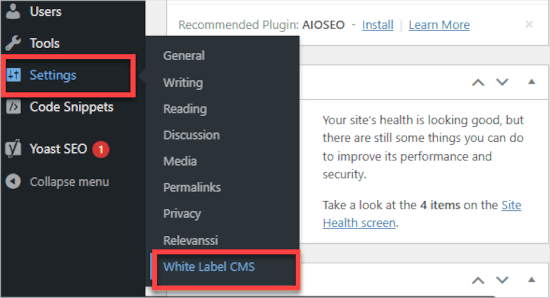
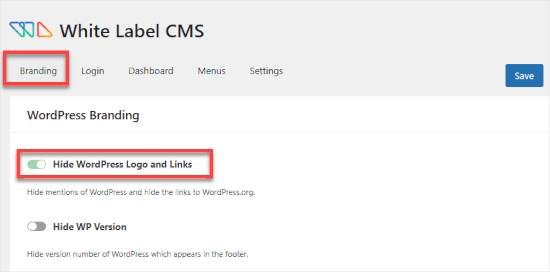
そして、「ブランディング」タブにいることを確認しましょう。
ここからスイッチを左から右に切り替えると、「WordPressのロゴとリンクを非表示」になります。
次に、「ダッシュボード」タブを開きます。
ダッシュボードアイコン」の下にカスタムロゴをアップロードします。アップロード」リンクをクリックするだけで、プロセスが開始されます。
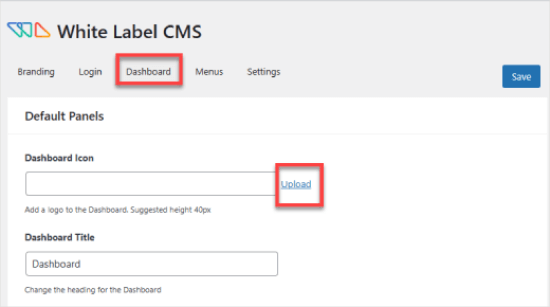
カスタマイザーロゴのサイズは40×40ピクセルでお願いします。そうでないと、トリミングされたり引き伸ばされたりして、おかしな感じになります。
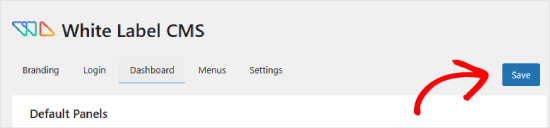
右上の「保存」ボタンをクリックして変更を保存することをお忘れなく。
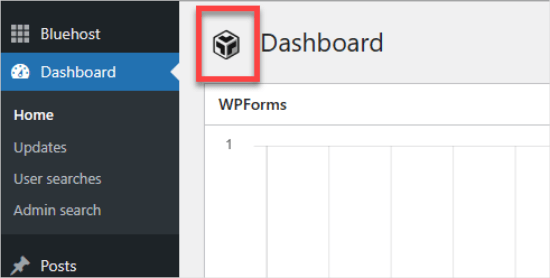
さて、WordPressの管理エリアに戻り、「ダッシュボード」パネルを開いてみよう。
このパネルに新しいカスタムロゴが表示されます。こんな感じです:
カスタムダッシュボードロゴ以外にも、White Label CMSプラグインはWordPressインストールをリブランディングする他の機能も提供しています。
詳しくは、WordPress管理ダッシュボードをホワイトラベル化する方法をご覧ください。
方法2:WordPressでカスタム・ダッシュボードのロゴを手動で追加する
この方法は、WordPressにコード・スニペットを貼り付けることに慣れているユーザー向けです。WordPressにカスタムコードを追加する最も簡単で安全な方法は、WPCodeのようなプラグインを使用することです。

WordPressサイトにショートコードを追加する方法を教えるほとんどのチュートリアルでは、テーマのfunctions.phpファイルにコードを追加するように書かれています。うまくいくこともありますが、うまくいかないこともたくさんあります。
コードや追加方法に小さなミスがあっただけでも、WordPressサイトが壊れてアクセスできなくなる可能性があります。そのため、上級ユーザーにのみお勧めします。
上級ユーザーにとっても、WPCodeは最も安全な方法である。
まずは、無料のWPCodeプラグインをインストールして有効化してください。より詳しい手順については、WordPressプラグインのインストール方法をご覧ください。
次に、カスタムロゴをcustom-logo.pngファイルとしてコンピューターに保存しましょう。サイズは40×40pxでお願いします。
カスタムロゴの準備ができたら、FTPを使って /wp-content/themes/your-theme/imagesフォルダにアップロードします。あなたのテーマにフォルダーがない場合は、作成する必要があります。
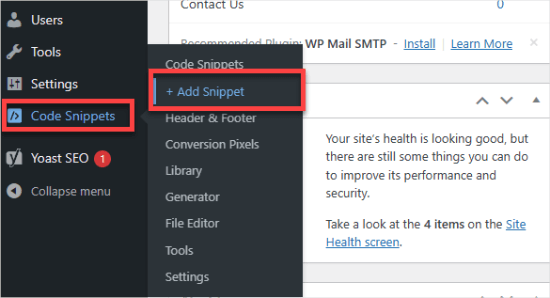
そこから、Code Snippets “ +Add Snippetに向かうことができる。
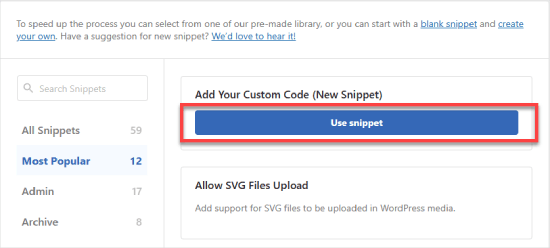
WPCodeライブラリに移動すると、数十のコード・スニペットから選ぶことができる。
ここで、「カスタムコードを追加」を選択し、「スニペットを使用」ボタンをクリックします。
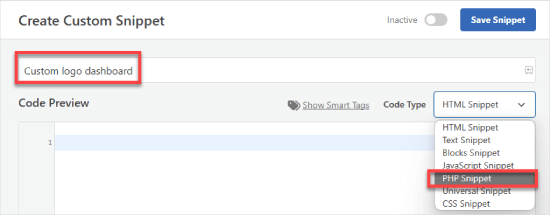
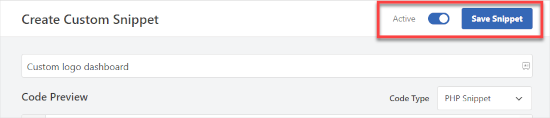
エディターで、スニペットにタイトルを付けます。例えば「カスタム・ロゴ・ダッシュボード」です。
次に、「コードタイプ」を「PHPスニペット」に設定する必要がある。
その後、このコードを「コード・プレビュー」ボックスに追加するだけだ:
1 2 3 4 5 6 7 8 9 10 11 12 13 14 15 16 17 | function wpb_custom_logo() {echo '<style type="text/css">#wpadminbar #wp-admin-bar-wp-logo > .ab-item .ab-icon:before {background-image: url(' . get_bloginfo('stylesheet_directory') . '/images/custom-logo.png) !important;background-position: 0 0;color:rgba(0, 0, 0, 0);}#wpadminbar #wp-admin-bar-wp-logo.hover > .ab-item .ab-icon {background-position: 0 0;}</style>';}//hook into the administrative header outputadd_action('wp_before_admin_bar_render', 'wpb_custom_logo'); |
こんな感じだ:

次に進む前に、すべてのテキストと書式が上とまったく同じであることを確認しましょう。
すでにすべてがうまくいっているようであれば、「挿入方法」までスクロールダウンし、「自動挿入」を選択することができる。
カスタムロゴがダッシュボードに表示されるようにするには、「場所」ドロップダウンメニューを展開し、「管理者のみ」を選択します。
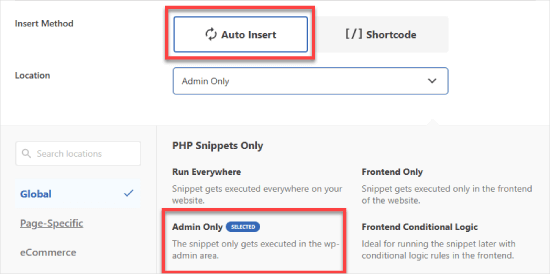
最後に、スイッチを「無効」から「有効」に切り替え、「保存」ボタンをクリックする。
このコードは、WordPressの管理バーにカスタムロゴを表示するために必要なCSSを追加するだけです。
代替案管理ダッシュボードからWordPressロゴを削除する
WordPressのロゴをカスタムロゴに置き換えることなく、管理ダッシュボードから完全に削除したい場合は、この方法をお勧めします。
前にも述べたように、WPCodeは最高のコードスニペットプラグインであり、WordPressにカスタマイザーコードを簡単に追加できる。
さらに、WordPressの管理バーロゴを削除するためのものを含む、1,500以上の既製のコードスニペットのライブラリが付属しており、コーディングの経験がなくても、あなたのサイトを素早くカスタマイズするために使用することができます。
開始するには、無料のWPCodeプラグインをインストールし、有効化する必要があります。ヘルプが必要な場合は、WordPressプラグインのインストール方法のチュートリアルに従ってください。
有効化したら、WordPressの管理ダッシュボードからCode Snippets ” Libraryに移動します。
そこから、「Remove the WordPress Logo From the Admin Bar(管理バーからWordPressロゴを削除する)」スニペットを検索できます。見つけたら、マウスオーバーして「Use snippet」ボタンをクリックします。
WPCodeが自動的にコードを追加します。
また、適切なインサーターメソッドを選択し、タグを追加することで、サイトで使用しているコードを追跡できるようになります。
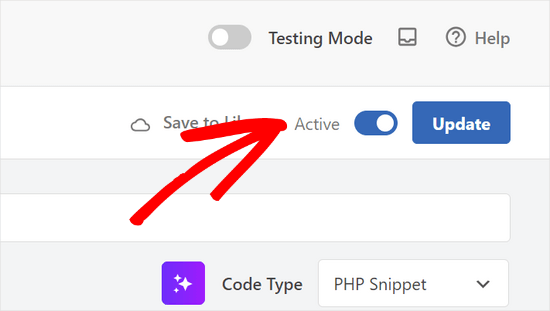
さて、いよいよコード・スニペットを有効化しよう。
ページ上部のスイッチを「非活性化」から「有効化」に切り替え、「更新」ボタンを押すだけだ。
これで、管理ダッシュボードからWordPressのロゴが削除されました。
この投稿がWordPressでカスタムダッシュボードロゴを追加する方法を学ぶのにお役に立てば幸いです。次に、Adminimize を使って WordPress から不要な項目を非表示にする方法や、WordPress の管理エリアを改善するためのプラグインとヒントのエキスパートピックもご覧ください。
If you liked this article, then please subscribe to our YouTube Channel for WordPress video tutorials. You can also find us on Twitter and Facebook.


 in 2024")

Dennis Muthomi
this is why I love WordPress opens source nature,the freedom to change/customize it to my liking
I really appreciated the clear step-by-step instructions for both the plugin method and manual code. I’ll go with the plugin method…it seems easier
Great post!
Dwight
Thank you! This worked.
WPBeginner Support
Glad our recommendation worked for you!
Admin
Justin
Does this code also apply to plugins?
WPBeginner Support
If you wanted to override a plugin’s logo then you would want to reach out to the support for that specific plugin and they may have an option.
Admin
Hanif
thank you very much, it works very well
WPBeginner Support
Glad our article was helpful
Admin
mazhar
i change the wordpress custom logo with the help of white label CMS plugin but i dont know how to find this code to your theme’s functions.php file or a site-specific plugin. where it is please help me
thank you
Bjornen
Where is the file located?
I mean, the logo itself must be a png (transparent picture) of the WP-logo, placed somewhere in WP.
So, would it not be better to just switch that with another file with the same name?
james
Nope, the icon is part of the WordPress custom font face, it is added to with CSS content
chad
This does’nt wok for me. I made the 16×16 png and put it in my themes images folder and pasted the function to my functions.php file.
Sanjeev Beekeeper
change the file path to your image path.
David Cornish
A great article information with some great tips sharing that I will be implementing on my own website as well as clients.