最新のWordPressの傑作を「公開」したばかりです。次に、プラットフォームからプラットフォームへと飛び移り、手動でコンテンツを共有するという、おなじみの作業が待っています。疲れますよね?
私たちも経験があります――複数のソーシャルアカウントを管理し、どこに何を投稿するかを覚えようとし、時には完全に忘れてしまうことも。読者の方々から、毎日何時間もかけずにソーシャルメディアの共有を簡単にする方法をよく尋ねられます。まさにそのために、私たちはBufferのようなツールを愛用しています。
Buffer は、複数のプラットフォームにわたるソーシャルメディア投稿を1つのダッシュボードからスケジュールおよび管理できる人気のフリーミアムツールです。WordPressと統合すると、新しい投稿が自動的にソーシャルアカウントに共有されます。
このガイドでは、Bufferを使用してWordPressの投稿をソーシャルメディアにスケジュールする方法を説明します。

WordPress投稿をソーシャルメディアにスケジュールする理由
ソーシャルメディアは、WPBeginnerを含む多くのウェブサイトにとって重要なトラフィックソースです。
WordPressにソーシャル共有ボタンを追加することで、訪問者がコンテンツを共有しやすくなります。
しかし、ソーシャルメディアプラットフォームでは、積極的に関与する必要があります。その方法の1つは、ソーシャルメディアアカウントに定期的に更新を投稿することです。
1日に複数回投稿し、各ソーシャルプラットフォームに時間を費やすのは時間がかかることがあります。
その作業の一部を自動化およびスケジュール設定して、ビジネスの成長に集中できるようになるとしたら、素晴らしいと思いませんか?
これがBufferの機能です。ソーシャルメディアの投稿をスケジュールしたり、WordPressからブログ投稿を自動的にソーシャルメディアで共有するようにスケジュールしたりできます。
Bufferとは?
Bufferは、さまざまなソーシャルネットワークに投稿できるウェブベースのアプリです。
Bufferは、より賢く情報を共有する方法です。Facebook、X/Twitter、LinkedInを1つのBufferアカウントに統合できます。

単一のダッシュボードを使用して、すべてのネットワークにコンテンツを共有できます。また、分析、投稿の簡単なスケジュール設定、URL短縮も提供しています。
チームメンバーを追加することもできます。これは、ソーシャルメディア活動を分担するのに役立ちます。
というわけで、Bufferを使ってWordPressの投稿をソーシャルメディアプロフィールにスケジュールし、自動投稿する方法を見ていきましょう。
Bufferを使ってWordPressの投稿をソーシャルメディアにスケジュールする方法
ステップ1:Bufferアカウントの設定
まず、Bufferのホームページにアクセスし、右上にある「今すぐ開始」ボタンをクリックします。
次に、Bufferのオンボーディングウィザードに従います。「オーディエンスを増やす」セクションの「チャンネルを接続」をクリックして開始します。
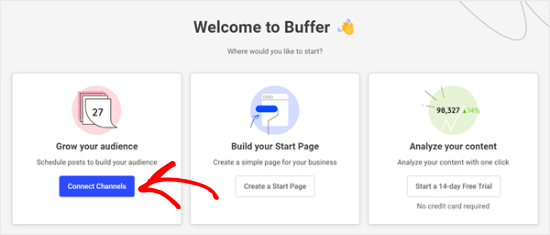
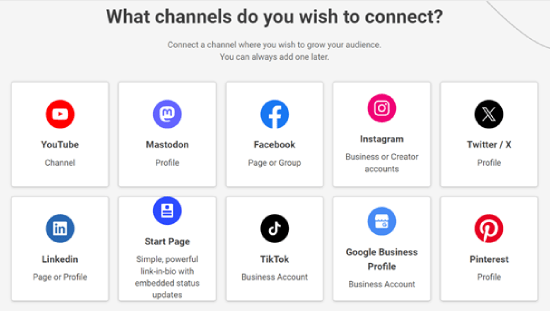
完了すると、Bufferに接続できるソーシャルメディアチャンネルオプションが表示されます。
この例では、Facebookを使用します。
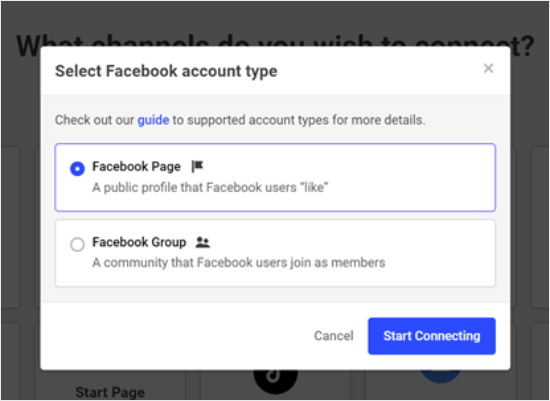
次に、Bufferに接続するFacebookアカウントの種類を選択します。デモンストレーションのためにFacebookページオプションを選択しました。
完了したら、「接続を開始」をクリックするだけです。
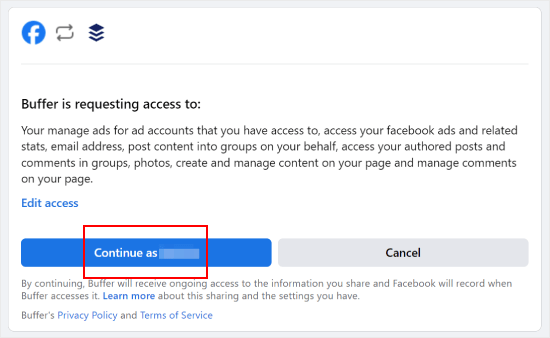
次のステップは、BufferがFacebookアカウントにアクセスできるようにすることです。
続行するには、「…として続行」をクリックしてください。
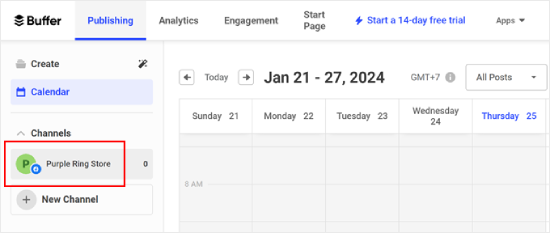
完了すると、Bufferダッシュボードに表示されます。
ここでは、以前Bufferに接続したFacebookページを選択するだけです。以下を参照してください。
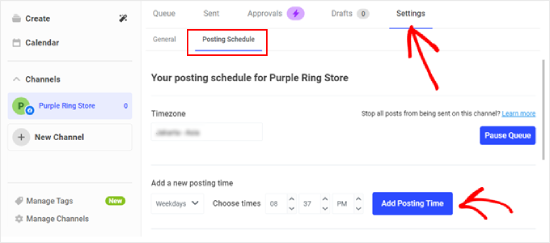
次に、Bufferダッシュボードでソーシャルアカウントに投稿する特定の時間を設定したことを確認する必要があります。
「設定」タブに切り替え、「投稿スケジュール」をクリックするだけです。ここから投稿時間を設定できます。好きなだけ追加できます。
それが完了したら、「投稿時間の追加」をクリックするだけです。
ステップ2:WP to BufferでWordPressをBufferに接続する
Bufferアカウントを作成したら、次にWordPressウェブサイトに接続します。
そのためには、サイトに WP to Buffer プラグインをインストールして有効化する必要があります。詳細については、WordPressプラグインのインストール方法に関する究極のガイドをご覧ください。
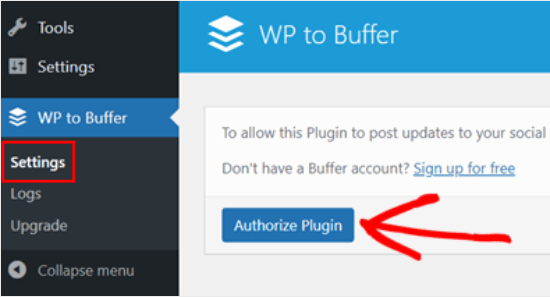
プラグインを有効にした後、WP to Buffer » 設定に移動し、「プラグインを承認」ボタンをクリックします。
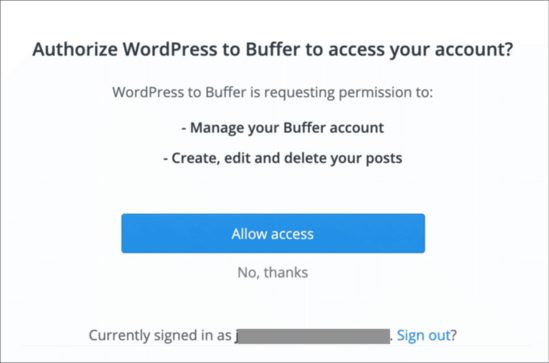
次に、この画面が表示されるはずです。
「アクセスを許可」ボタンをクリックすると、WordPressサイトがBufferアカウントに接続されます。
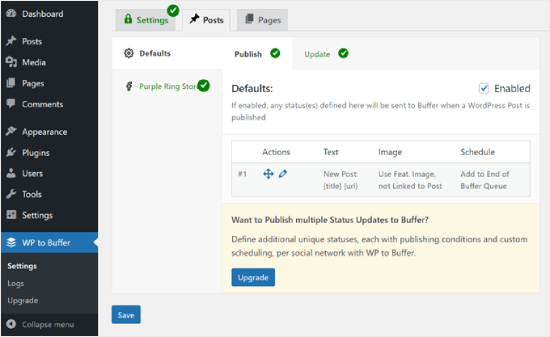
BufferアカウントがWordPress管理画面に接続されたので、WP to Bufferプラグインのオプションがそこに表示されます。
プラグインページは次のようになります。
ステップ3:投稿スケジュールをテストするためにブログ記事を公開する
WordPressの投稿が公開されたときに自動的にBufferに共有するには、WP to Buffer » 設定に移動し、「投稿」タブに移動する必要があります。
次に、Bufferに追加したソーシャルメディアチャンネルタブに切り替えます。この場合、先ほど追加したFacebookページになります。
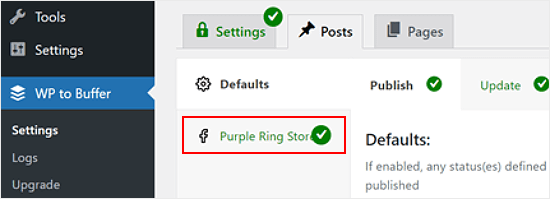
その後、「アカウントを有効にする」ボックスをオンにします。
次に、「保存」をクリックします。
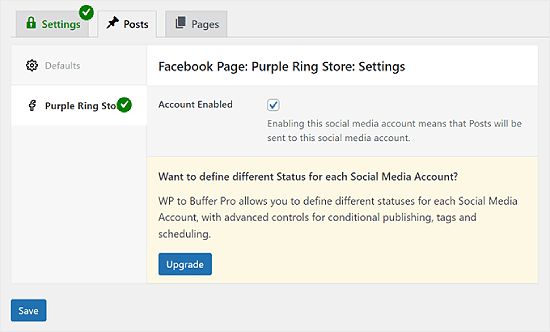
これで、WordPressブログに新しい投稿を公開するたびに、設定したスケジュールに基づいてBufferが自動的に公開します。
このテストは、ウェブサイトのローカルバージョンまたはステージングサイトでテストできます。これにより、テスト投稿を誤ってライブのWordPressブログに公開してしまうことを防ぐことができます。
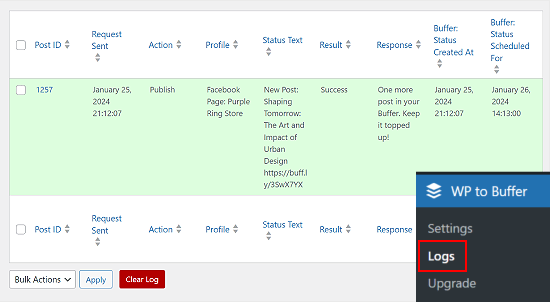
WordPress投稿が公開されたら、WP to Buffer » Logsに移動できます。将来公開される予定の投稿がキューに入っていることが確認できるはずです。
動画チュートリアル
文章での説明がお好みでない場合は、代わりに動画チュートリアルをご覧ください。
WordPressソーシャルメディア戦略を自動化するその他の方法
WordPress投稿の自動公開とスケジュール設定に加えて、WordPressソーシャルメディアの自動化を次のレベルに引き上げる方法はたくさんあります。初心者向けのこれらのスマートなソーシャルメディアガイドをご覧ください。
- 古いWordPressブログ投稿を自動的に共有する方法(ステップバイステップ) – 古い投稿をソーシャルメディアで自動的に再共有することで、エバーグリーンコンテンツを循環させ続けます。
- WordPressからInstagramへ自動投稿する方法 – WordPressコンテンツを自動的に共有することで、Instagram戦略を効率化する方法を学びましょう。
- WordPressからFacebookへ自動投稿する方法 – 手動での労力をかけずに、最新のWordPress投稿でFacebookページをアクティブに保つ方法を見つけましょう。
- WordPressで新しい投稿を自動的にツイートする方法 – 新しい投稿の自動ツイートを設定して、Twitterのフォロワーが常に最新のコンテンツを見られるようにします。
- WordPressに新しいInstagram写真を自動投稿する方法 – InstagramのコンテンツをWordPressサイトに自動的に表示し、一貫したオンラインプレゼンスを作成します。
- YouTube動画からWordPress投稿を自動作成する方法 – YouTube動画をWordPress投稿に自動変換して、コンテンツ作成プロセスを効率化しましょう。
この記事が、Bufferを使用してWordPress投稿をソーシャルメディアにスケジュールする方法を学ぶのに役立ったことを願っています。また、WordPressでカスタムInstagram写真フィードを作成する方法に関するガイドや、WordPressのベストソーシャルメディアプラグインの専門家のおすすめもご覧ください。
この記事が気に入ったら、WordPressのビデオチュートリアルについては、YouTubeチャンネルを購読してください。 TwitterやFacebookでもフォローできます。


デニス・ムトミ
ありがとうございます。
私の経験から一つ付け加えるなら、WordPressのカテゴリと一致するコンテンツカテゴリをBufferで作成すると役立ちます。
こうすることで、よりターゲットを絞ったスケジュール設定ができ、ソーシャルチャネル全体でバランスの取れたコンテンツミックスを維持できます。
Yadian
これを変更できますか?: 「Buffer が公開」
これを次のように: 「site_name が公開」
WPBeginnerサポート
残念ながら現時点ではできません。これはBuffer自体ではなく、ソーシャルメディアプラットフォームによって設定された制限です。
管理者
Tayo
Bufferは、blogspotブログから記事を自動公開できますか?
WPBeginnerサポート
Tayoさん、こんにちは。
それができるかどうかはわかりません。IFTTTと組み合わせて使用してみてください。うまくいくかもしれません。
管理者
Dave
何らかの理由で、管理画面で投稿やページを読み込もうとすると、BufferプラグインがGoogle Chromeを完全に停止させてしまいます。他の誰かがこのような経験をしましたか?
Davide Corizzo
Hey guys, thanks for writing this interesting article!
あなたがやったように、ブログ記事の公開を自動化したいと思っていて、成功しました。
WP to Bufferプラグインで問題が発生しました… Facebook Open GraphおよびTwitter Cards機能を使用して記事のURLを手動でコピー&ペーストした場合と同じ結果を得たいのですが。
現在、プラグインは非常に基本的な {title} {url} #{category} に加えて記事の画像のみを公開します。これを修正して、同じ結果を得るにはどうすればよいですか?
ご清聴ありがとうございました。
乾杯、
Davide
Sach
WordPress内で投稿をスケジュールした場合、WordPress内で投稿するようにスケジュールされたときに、Bufferにも送信されるようにスケジュールされますか?ありがとうございます。
WPBeginnerサポート
はい。
管理者
マイク
皆さん、こんにちは。Bufferの投稿やIFTTT、Pocketの更新を直接WordPressのブログページ(ホームページではなく)に投稿することは可能でしょうか?つまり、WP→Bufferではなく、その逆で、BufferやIFTTT、Pocket経由でWPサイトのブログページに自動投稿されるようにしたいのです。
これは、ウェブ上の重要な記事を私のウェブサイトに投稿し、その後、すでに設定されているGet Responseフィードに投稿するのに非常に役立ちます。
どんな助けでも大歓迎です!
Thanks
マイク
Cristian O. Balan
Facebookページ(プロフィールページではなく)でも機能しますか?
デビッド・パパス
ユースケースは何ですか?WordPress内で投稿をスケジュールして直接さまざまなソーシャルメディアサイトに公開できる場合、どのような状況でこのサービスは役立ちますか?
編集スタッフ
Bufferを使用すると、ツイートの間隔を空けることができます。サイトへのリンクをツイートするだけなら、Bufferは必要ありません。WordPress以外での一般的な共有にも優れています。
管理者
François
チュートリアルありがとうございます。バッファーアカウントを設定するためにすべての手順に従いました。
バッファーがGoogle+をサポートしていないのは残念ですが、何か解決策をご存知でしたら教えていただけますか?
お返事お待ちしております!
編集スタッフ
Google+にはそのためのAPIがないため、現時点では解決策はわかっていません。
管理者
Abdul Rahim
非常に良い投稿です。WordPressにはすでにスケジュール投稿オプションがありますが、BufferAppは投稿の公開やソーシャルネットワークへの自動共有のためのより多くのオプションを提供します。
このアプリは気に入っています
Gurjit Singh Khehra
WordPressユーザー向けの優れたサービスですね。Bloggerユーザー向けの同様のサービスをご存知ですか?大変助かります。
よろしくお願いします。
編集スタッフ
Bufferはサードパーティのサービスであり、Bloggerでも利用できます。IFTTTとBufferを組み合わせて使用するには、追加のハードルを越える必要があります。
管理者