資金調達に関しては、多くの人が計画、投資家への売り込み、潜在的な拒絶に直面することに多くの時間を費やしています。その一方で、KickstarterやIndiegogoのようなクラウドファンディングプラットフォームに目を向け、プロセスを容易にする人もいます。
しかし、もっと簡単な方法があり、これらのサードパーティプラットフォームに依存する必要はありません。
WordPressを使用すると、独自のクラウドファンディングキャンペーンを管理できます。自分で管理することで、より多くのコントロールと手数料の削減が可能になります。さらに、WordPressプラグインの助けを借りれば、思っているよりも簡単です。
この記事では、WordPressサイトで簡単にクラウドファンディングを設定する方法をご紹介します。
クラウドファンディングとは何か、そしてなぜそれを行うのか?
クラウドファンディングとは、人々がプロジェクト、慈善団体、または個人的なニーズのためにお金を集める方法です。
起業家は、投資家に株式を譲渡することなく、クラウドファンディングを利用してスタートアップ資金を調達することがよくあります。会社の持ち分を得る代わりに、寄付者はリワードを受け取ります。
これらのリワードは、シャツやステッカーから、実際に販売している商品まで、何でも構いません。寄付額が大きいほど、より魅力的なリワードが得られます。
今や、クラウドファンディングはビジネスだけのものではありません。個人や非営利団体も、医療費、災害支援、地域プロジェクトなど、関心のある原因のために資金を調達するためにそれを使用できます。
ほとんどの人は、KickstarterやIndiegogoのようなサイトを使ってクラウドファンディングを行っています。しかし、これらのサイトにはいくつかの欠点があります。
例えば、Kickstarterは調達した金額の5%に加えて処理手数料を徴収します。そして、目標を達成できなかった場合、お金は一切受け取れません。
そのため、WordPress ウェブサイトを使用する方が良い選択肢です。キャンペーンに対する完全な制御と柔軟性が得られます。
それでは、WordPressでクラウドファンディングを使ってどのように資金を調達できるか見ていきましょう。
WordPressでクラウドファンディングを開始する方法
クラウドファンディングを開始する最も簡単な方法は、WordPressプラグインを使用することです。多くの 寄付および資金調達プラグイン は、投資家からオンライン決済を収集し、プロジェクトのクラウドファンディングを行うのに役立ちます。
このガイドでは、WordPressでクラウドファンディングを開始するために使用できる2つのプラグインを紹介します。特定のメソッドに興味がある場合は、次のリンクをクリックして記事の該当箇所にスキップできます。
準備はいいですか?始めましょう。
方法1:Charitableを使用してクラウドファンディングで資金を調達する
Charitableは、トップクラスのWordPressクラウドファンディングプラグインの1つです。10,000以上の非営利団体がCharitableを使用して、クラウドファンディングや寄付を通じて資金を調達しています。
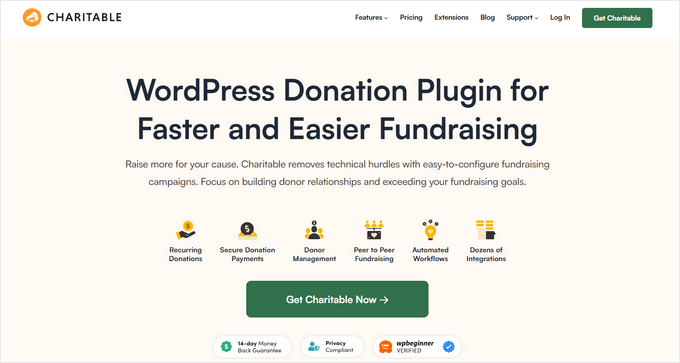
このプラグインは、クラウドファンディングキャンペーンを迅速に開始するのに役立つ多数の拡張機能と機能を提供します。たとえば、WordPressでピアツーピアの資金調達を設定し、口コミマーケティングを使用して資金を調達できます。
このチュートリアルでは、ピアツーピアの資金調達のための「アンバサダー」拡張機能と追加の決済ゲートウェイが含まれているため、 Charitable Proを使用します。それでは、アカウントを作成しましょう。
完了したら、コアのCharitableプラグインをインストールして有効化できます。ヘルプが必要な場合は、WordPressプラグインのインストール方法に関するガイドを参照してください。
有効化すると、WordPressダッシュボードにCharitableのウェルカム画面が表示されます。管理パネルからCharitable » 設定 » 一般に移動できます。
ここから、「ライセンス」セクションが表示されます。ライセンスキーを入力して、「キーの検証」ボタンをクリックするだけです。
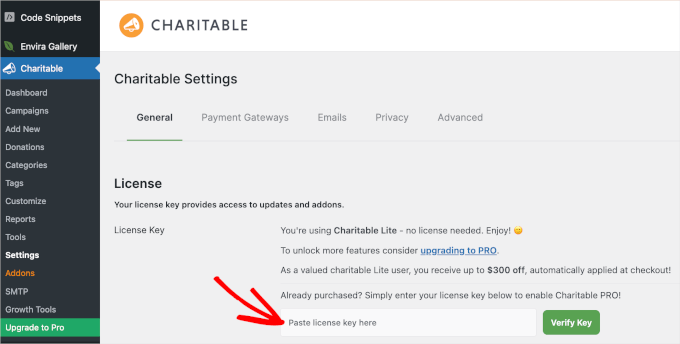
キーは Charitable アカウントで見つけることができます。
その後、「支払いゲートウェイ」タブに移動できます。お好みの支払い方法を使用するには、「ゲートウェイを有効にする」ボタンをクリックしてください。
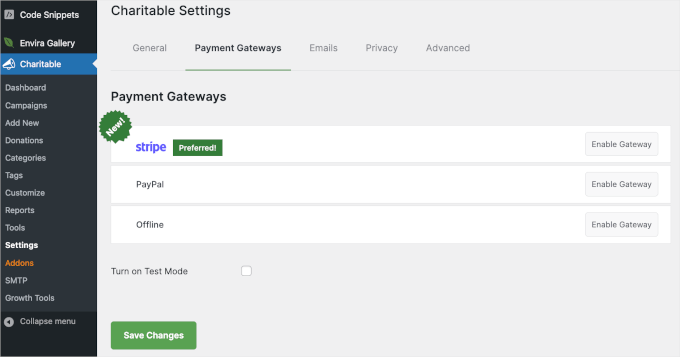
Charitableで推奨されている支払いゲートウェイは、Stripe、PayPal、およびオフライン決済です。
ただし、Mollie、Paystack、Braintree、Authorize.netなどの他の支払い方法を追加することもできます。
支払いオプションを有効にすると、決済ゲートウェイの詳細を入力できるページにリダイレクトされます。
例として、決済ゲートウェイとしてPayPalを設定します。
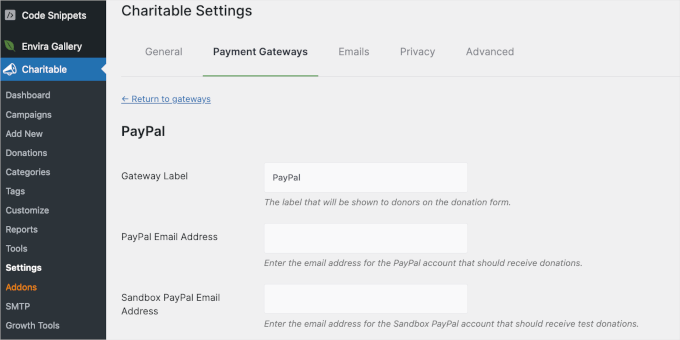
PayPalゲートウェイの設定では、PayPalのメールアドレスとAPI認証情報を入力する必要があります。認証情報は、PayPalビジネスプロフィールにログインすることで確認できます。
完了したら、ページ下部にある「変更を保存」ボタンをクリックすることを忘れないでください。
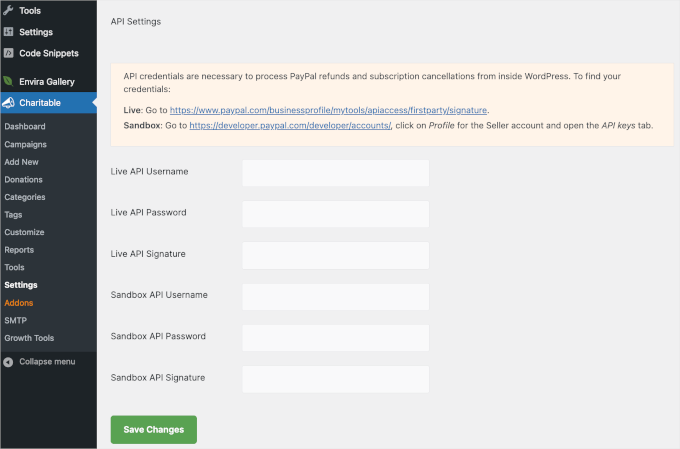
次のステップは、Charitableで資金調達キャンペーンを作成することです。
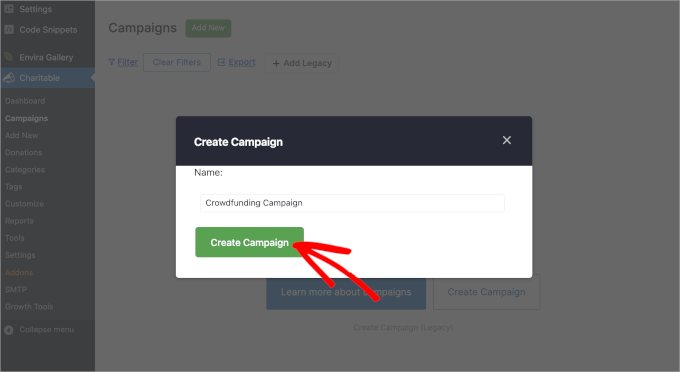
WordPressダッシュボードからCharitable » キャンペーン » 追加に移動するだけです。次に、表示されるポップアップにキャンペーンの名前を入力できます。
名前が決まったら、「キャンペーンを作成」ボタンをクリックしてください。
次のステップは、テンプレートを選択することです。
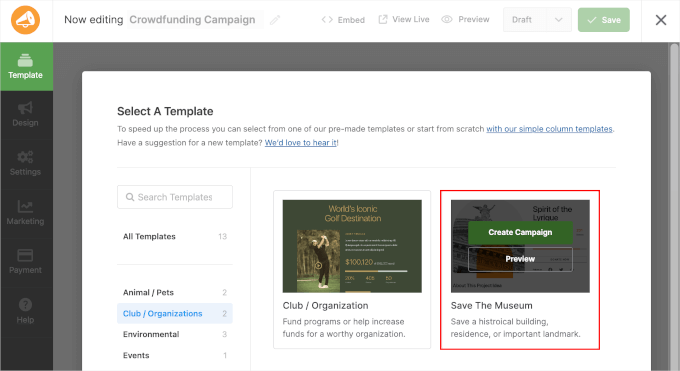
Charitable は、キャンペーン構築プロセスを効率化するために、10 以上の既製のテンプレートを提供しています。「環境」「イベント」「医療」などのカテゴリを探索して、あなたの目的に最適なテンプレートを見つけることができます。
このチュートリアルでは、「クラブ/組織」カテゴリから「Save The Museum」テンプレートを選択します。
テンプレートを使用するには、テンプレートにカーソルを合わせて「キャンペーンを作成」ボタンをクリックするだけです。
Charitable はキャンペーンビルダーに移動します。このエリアでは、左側の要素を右側のパネルにドラッグアンドドロップできます。
ライブプレビューで要素をクリックして、既存の要素をカスタマイズすることもできます。すると、その要素のカスタマイズオプションが左側のパネルに表示されます。
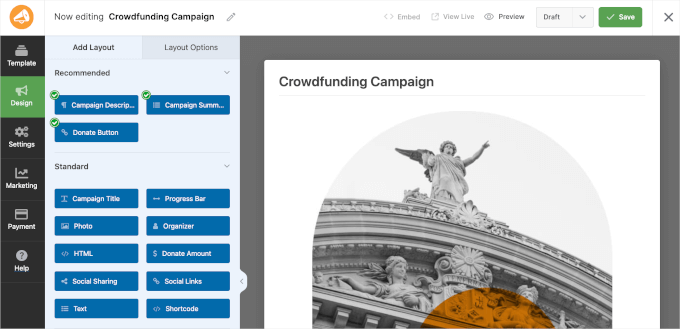
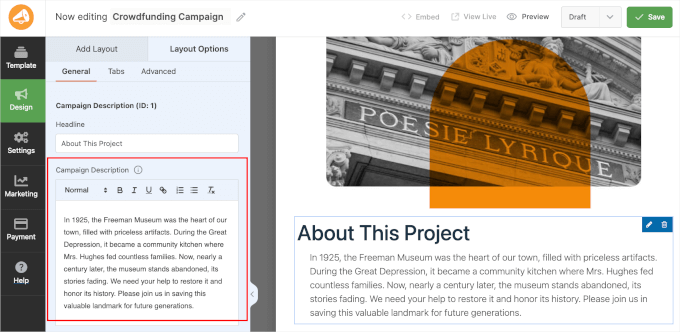
例えば、ここではキャンペーンの説明を意図に合うように変更しました。
「プロジェクトについて」要素をクリックし、左側のパネルで「キャンペーン説明」フィールドのテキストを編集するだけです。
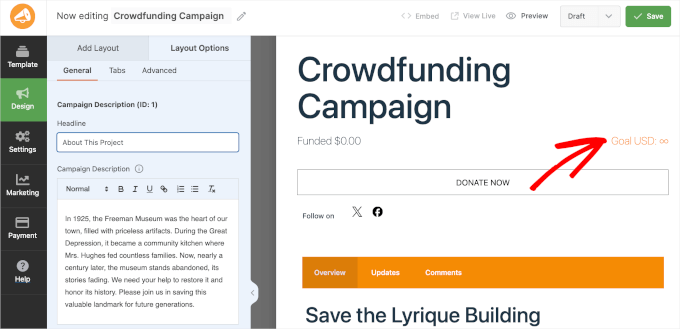
ライブプレビューを下にスクロールすると、受け取った寄付と寄付目標の両方を表示するプログレスバーが表示されます。
デフォルトでは、Charitableはクラウドファンディングキャンペーンに無限アイコンを表示します。
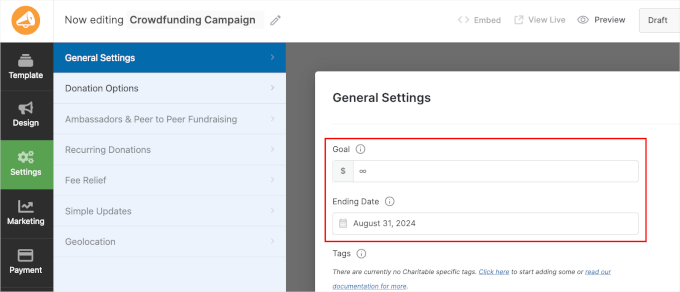
次に、「設定」セクションに移動します。
「一般」では、キャンペーンの目標と終了日を設定できます。目標金額が決まっていない場合は、「目標」フィールドを空白のままにしておくことができます。ただし、緊急性を高めるために有効期限を設定しておくと良いでしょう。
次に、「寄付オプション」セクションも確認したいところです。
ここでは、説明付きのカスタマイズ可能な4つの事前作成済み提案が表示されます。
キャンペーンに推奨寄付金額を追加したい場合は、「推奨金額を追加」ボタンをクリックして金額を入力するだけです。
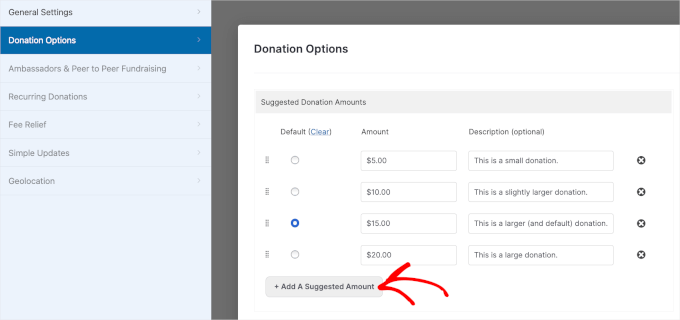
完了したら、「保存」をクリックして進捗を保存することを忘れないでください。
次に、「下書き」ドロップダウンを展開し、「公開」を選択してウェブサイトでライブにします。
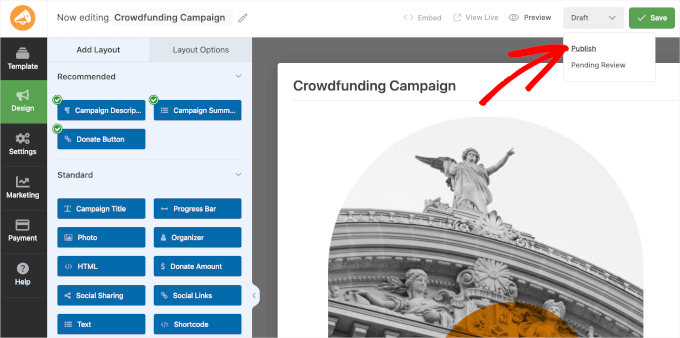
これで、最初のCharitableクラウドファンディングキャンペーンが正常に作成され、公開されました!
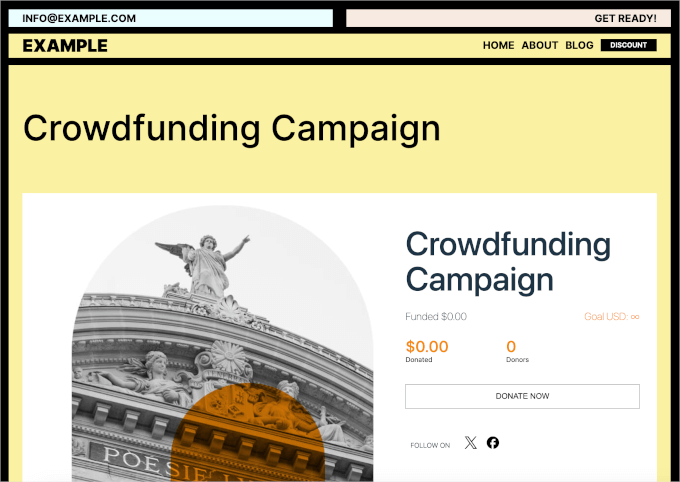
さて、あなたのウェブサイトにアクセスして、クラウドファンディングキャンペーンが実際に動作しているのを確認できます。以下のような表示になります。
WP Charitableでピアツーピアの資金調達を設定する
WP Charitable では、WordPress でピアツーピアの募金活動を設定することもできます。これにより、チームメンバーや個人が独自のキャンペーンを作成し、全体のクラウドファンディング目標の達成を支援できます。
これを行うには、ウェブサイトに「Ambassadors」拡張機能をインストールして有効にする必要があります。
それでは、WordPress管理エリアからCharitable » アドオンに移動しましょう。次に、「Charitable Ambassadors Addon」ボックスの「アドオンをインストール」ボタンをクリックします。
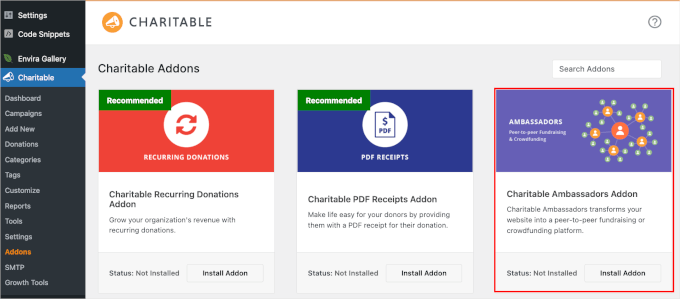
有効化後、Charitable » Settings に移動し、「Ambassadors」タブに切り替えることができます。
ここから、「既存のキャンペーンの募金活動」ボックスをチェックしましょう。
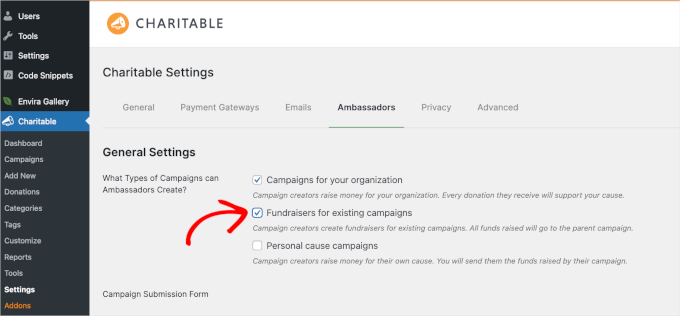
ページを下にスクロールすると、ユーザーが送信前にアカウント登録を必要としないようにするオプションも見つかります。完了したら変更を保存することを忘れないでください。
次に、ブロックエディターを使用して募金ページを作成します。これは、人々が独自のピアツーピア募金キャンペーンを開始したいときにリダイレクトされるページです。
WordPressダッシュボードから、投稿 » 新規追加に移動するだけです。次に、「+」ボタンをクリックして、ショートコードブロックを検索します。
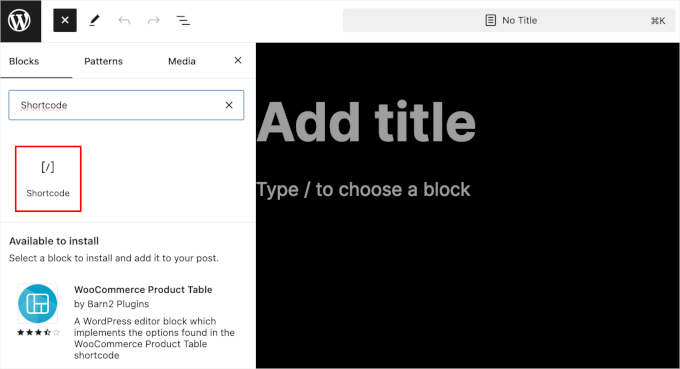
見つけたら、それをページに追加し、次のショートコードをコピー&ペーストできます。
[charitable_submit_campaign]
ページエディタでは以下のようになります。
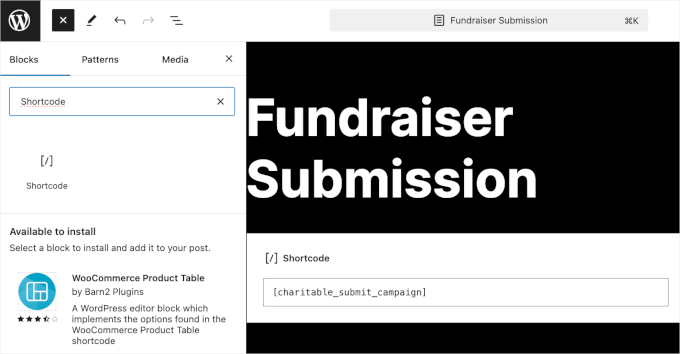
設定を保存するには、「公開」ボタンをクリックすることを忘れないでください。
次に、**Charitable » 設定**に移動し、「ページ」セクションまでスクロールします。
「キャンペーン投稿ページ」ドロップダウンフィールドで、利用可能なページリストから「募金活動投稿」を選択します。
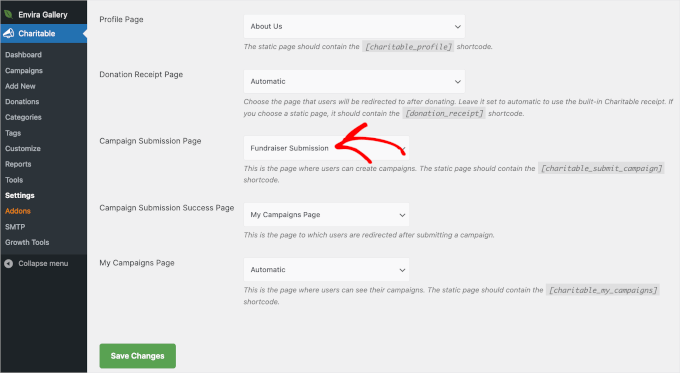
再度、「変更を保存」ボタンをクリックすることを忘れないでください。
その後、Charitableで既存のキャンペーンを編集したり、新しいキャンペーンを追加したりできます。
単純に、WordPressダッシュボードからCharitable » Campaignsに移動し、「Builderで編集」または「新規追加」をクリックします。このチュートリアルでは、作成したばかりのクラウドファンディングキャンペーンを使用します。
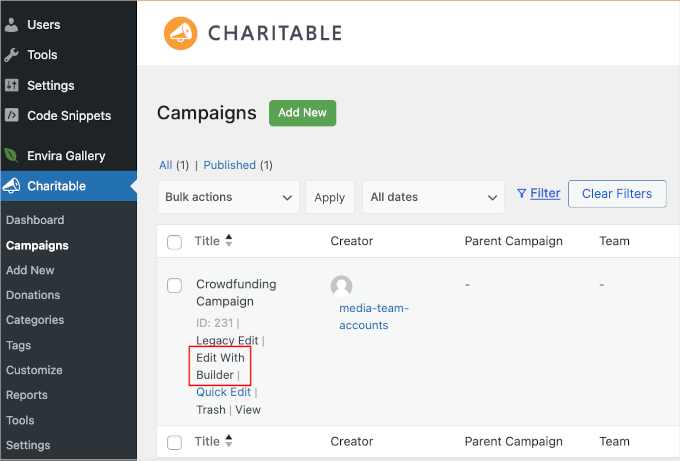
これにより、Charitable のビルダーインターフェイスに移動します。ここから、[設定] に移動し、「アンバサダーとピアツーピア募金活動」セクションをクリックします。
「ピアツーピア・ファンディング」セクションで、「このキャンペーンでピアツーピア・ファンディングを許可する」オプションをオンにしたいはずです。
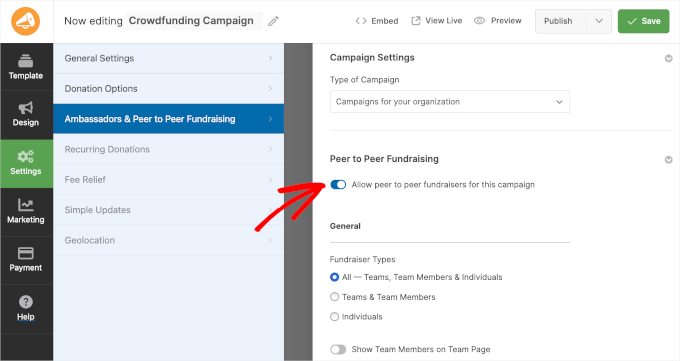
ピアツーピア募金活動の下に、さまざまな設定が表示されるはずです。募金活動に参加できるユーザーを選択したり、募金活動のフィールドをカスタマイズしたり、目標を設定したり、写真を追加したりできます。
完了したら、「保存」ボタンをクリックするだけです。
さて、資金調達ボタンを追加するために「デザイン」セクションに戻りましょう。ここから、「ショートコード」フィールドをライブプレビューにドラッグします。
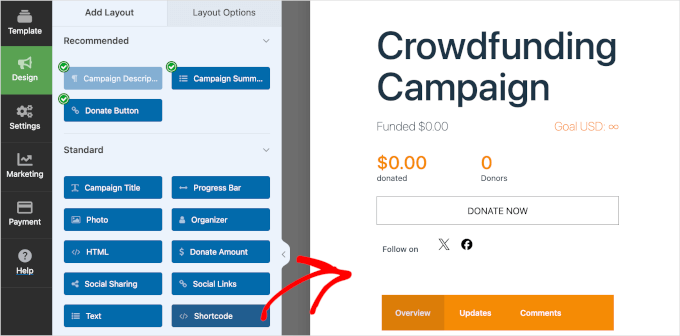
フィールドの設定で、フィールドの見出しを作成できます。たとえば、私たちの場合、見出しは「あなたの募金活動を作成する」です。
次に、「ショートコード」フィールドに[charitable_fundraise_button]を追加します。
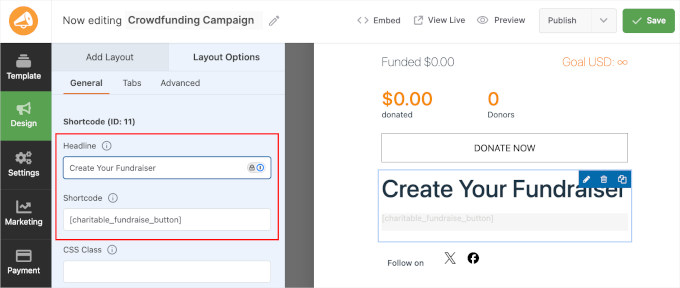
それが完了したら、「保存」をクリックしてください。
キャンペーンに募金オプションが表示されるはずです。ユーザーが募金ボタンをクリックすると、作成したい募金の種類を選択できます。
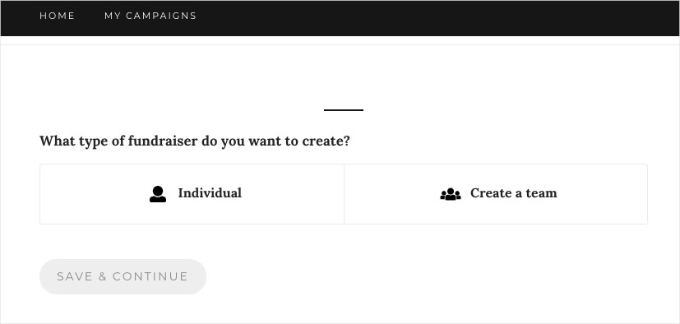
その後、ユーザーは単にファンドレイザーに関する詳細を入力し、メールアドレスを確認するだけで済みます。それが完了すると、あなたのクラウドファンディングプロジェクトのためにお金を調達するのに役立ちます。
詳細については、WordPress でピアツーピアの募金活動を設定する方法に関するガイドをご覧ください。
方法2:WPFormsを使用してクラウドファンディングフォームを作成する
WordPressでクラウドファンディングを通じて資金を調達するもう一つの方法は、WPFormsを使用することです。これはWordPress向けの最高のフォームプラグインであり、非常に使いやすいです。
WPFormsを使用すると、ドラッグアンドドロップフォームビルダーを使用して、コードを編集せずに数分で任意の種類のフォームを作成できます。また、PayPalやStripeなどの支払いサービスともシームレスに統合されており、投資家からオンラインで支払いを受け取ることができます。
このチュートリアルでは、WPForms Pro バージョンを使用します。これは、非営利団体向けのクラウドファンディングフォームテンプレートと支払いゲートウェイ統合が含まれているためです。ただし、無料で試せる WPForms Lite バージョンもあります。
まず、ウェブサイトにWPFormsプラグインをインストールして有効化しましょう。ヘルプが必要な場合は、WordPressプラグインのインストール方法に関するガイドをご覧ください。
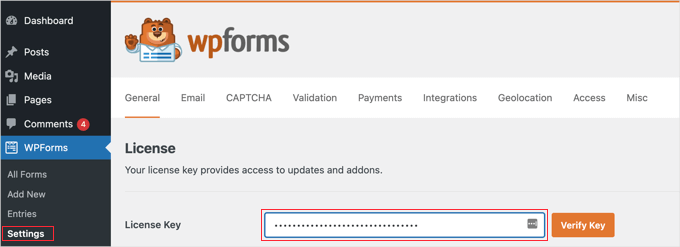
インストール後、WordPress ダッシュボードから WPForms » 設定 に移動し、ライセンスキーを入力できます。ライセンスキーはアカウントで簡単に見つけることができます。
その後、クラウドファンディングを通じて資金を調達するために、さまざまな支払いサービスを統合する必要があります。WPFormsは、Stripe、PayPal、Square、Authorize.netなどの支払いプロバイダーをサポートしています。
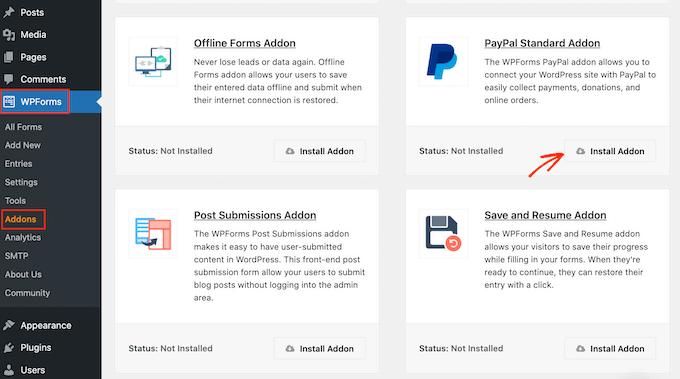
WordPress管理画面からWPForms » Addonsに移動し、希望する決済アドオンの「アドオンをインストール」ボタンをクリックするだけです。
アドオンがアクティブになったら、WordPressウェブサイト用のクラウドファンディングフォームを作成できます。
まず、WordPressダッシュボードからWPForms » Add Newに移動できます。これにより、WPFormsのドラッグアンドドロップフォームビルダーが起動します。
「設定」セクションで、最初の画面にフォームの名前を入力します。この名前は参照用ですので、好きなものを自由に使用できます。
次のステップは、左側のメニューから「非営利団体クラウドファンディングフォーム」テンプレートを検索することです。次に、フォームテンプレートにカーソルを合わせ、「テンプレートを使用」ボタンをクリックします。
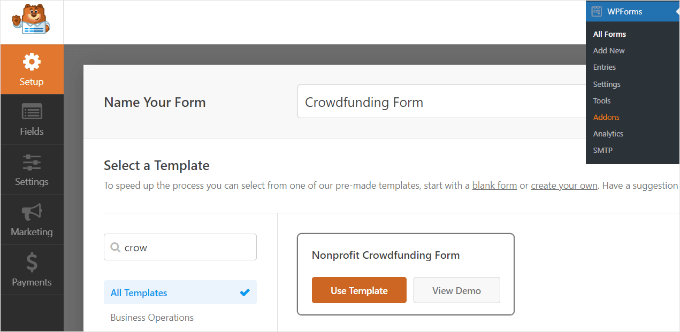
ここから、ドラッグアンドドロップフォームビルダーを使用してテンプレートをカスタマイズします。
WPFormsにはすでにテンプレートにフォームフィールドが追加されています。ただし、左側のメニューからドラッグするか、既存のフィールドを並べ替えることで、さらにフィールドを追加できます。
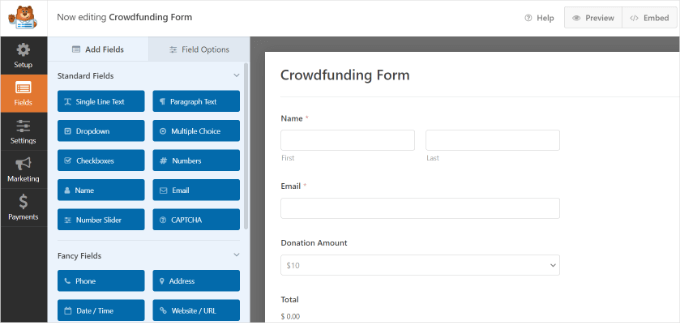
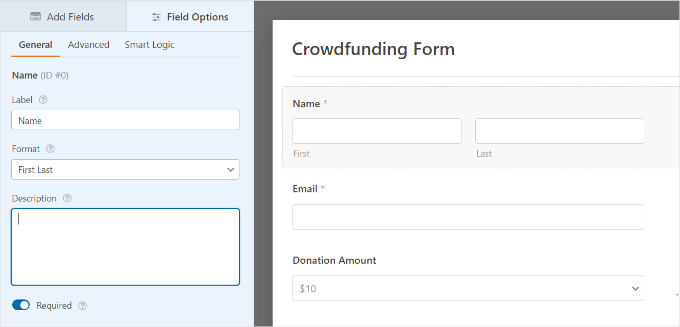
各個別のフォームフィールドをさらにカスタマイズすることもできます。
フォームフィールドを選択するだけで、左側のメニューにさらに多くのオプションが表示されます。たとえば、フィールドのラベルやフォーマットを変更したり、必須フィールドにしたりすることができます。
次に、WPFormsのフォームビルダーの「支払い」タブに移動できます。
このセクションでは、クラウドファンディングフォームに接続したい支払いゲートウェイを選択します。
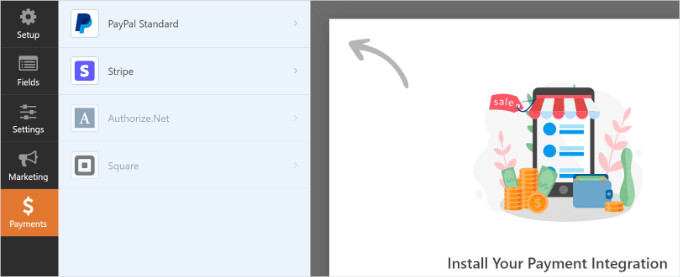
このチュートリアルでは、PayPalを選択します。したがって、設定で「PayPal Standard paymentsを有効にする」ボックスをチェックします。
次に、PayPalのメールアドレスを提供し、「支払いタイプ」ドロップダウンメニューから「寄付」を選択できます。
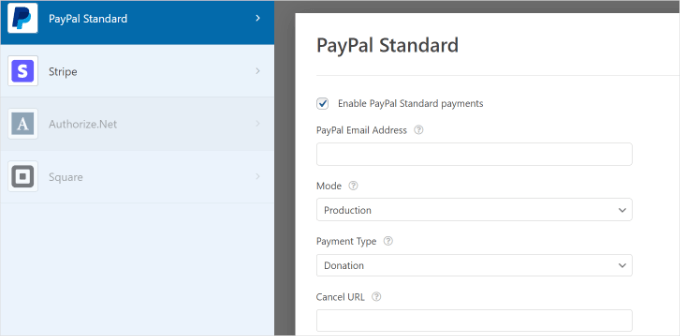
その下には、「キャンセルURL」を入力するためのオプションがさらに表示されます。これは、ユーザーがチェックアウトプロセスをキャンセルした場合に、ユーザーとのつながりを維持するための素晴らしい機会です。
配送先住所のオプションをカスタマイズしたり、購入者に支払い時のメモを含めるように依頼したりすることもできます。
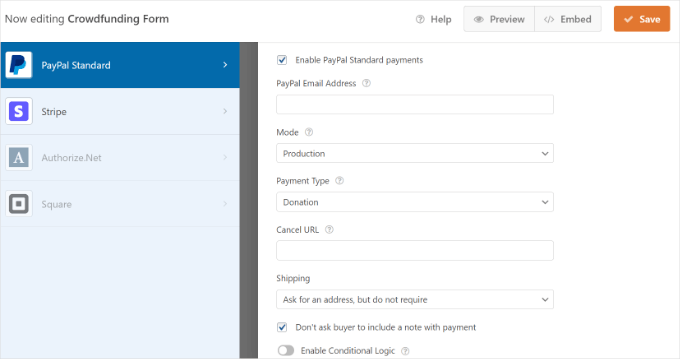
カスタマイズが完了したら、一番上にある「保存」ボタンをクリックするのを忘れないでください。
次のステップは、フォーム送信通知を設定することです。これを行うには、フォームビルダーの「設定」タブに移動し、「通知」をクリックします。
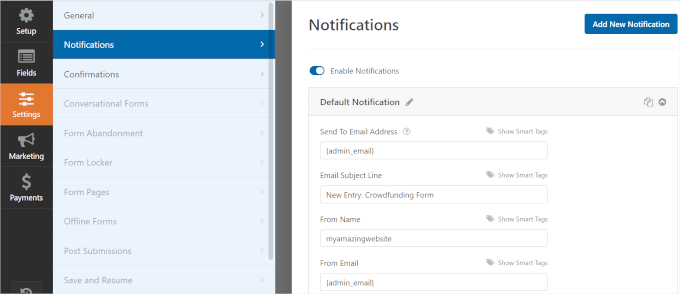
ここで、サイト管理者に送信されるメール通知設定をカスタマイズできます。たとえば、通知が送信されるメールを変更したり、メールの件名やメッセージを編集したりできます。
次に、「確認」セクションに進むことができます。
ここで、寄付者がプロジェクトへの資金提供の確認を受け取れるようにすることができます。誰かがクラウドファンディングフォームを送信したときにメッセージを表示するか、ユーザーをサイト上の別のページまたはURLに誘導することができます。
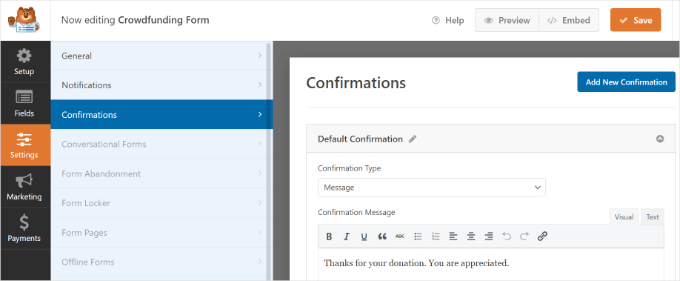
完了したら、上部にある「保存」ボタンをクリックすることを忘れないでください。
これで、クラウドファンディングフォームをWordPressブログに追加する準備ができました。
フォームビルダーの上部にある「埋め込み」ボタンをクリックするだけで、既存のページを選択するか、フォーム用の新しいページを作成するかを選択できます。

このチュートリアルでは、「新しいページを作成」オプションを選択しましょう。
次に新しいページの名前を付け、「Let’s Go!」ボタンをクリックできます。
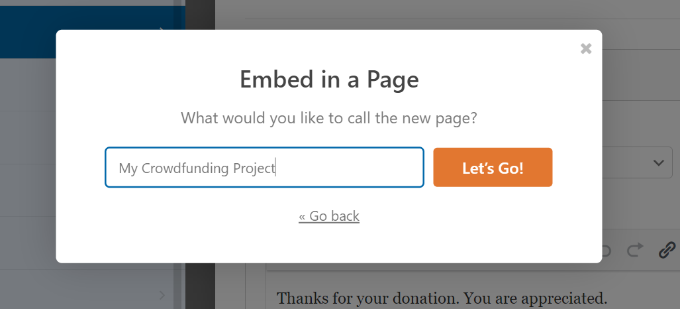
WPFormsは、作成したばかりの新しいページにクラウドファンディングフォームを自動的に埋め込みます。
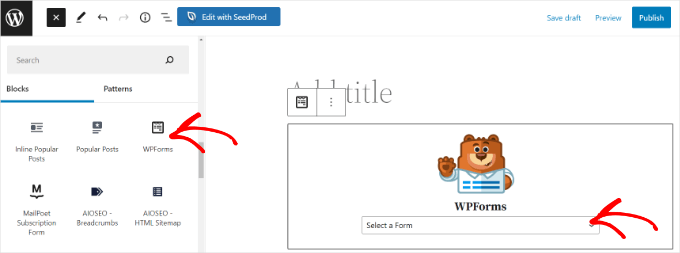
または、WordPressコンテンツエディターにWPFormsブロックを追加し、ドロップダウンメニューからフォームを選択することもできます。
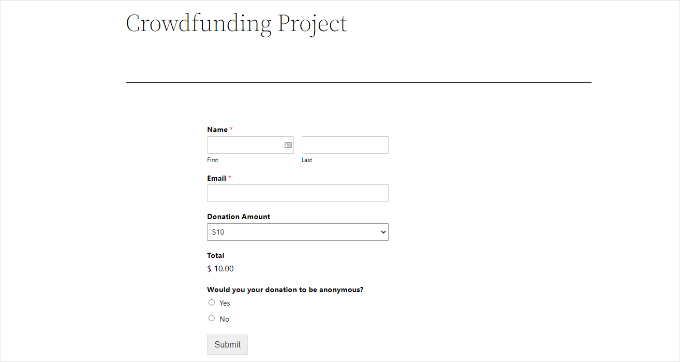
クラウドファンディングフォームを確認して、新しいページでどのように表示されるかを確認することをお勧めします。それでは、「プレビュー」ボタンをクリックしてください。
すべてに満足したら、「公開」ボタンをクリックして、ウェブサイトにアクセスしてフォームが機能していることを確認できます。
専門家のアドバイス: 寄付フォームを作成したいですか?WordPressを使用すると、非営利団体のウェブサイトにカスタム寄付フォームを簡単に設定できます。始めるには、非営利団体向けの寄付フォームの作成方法に関する記事をご覧ください。
この記事が、WordPressでクラウドファンディングを使って資金調達する方法を学ぶのに役立ったことを願っています。また、WordPressで継続的な支払いを受け取る方法に関するガイドや、非営利団体向けの最高のWordPressプラグインの専門家による選び方もご覧ください。
この記事が気に入ったら、WordPressのビデオチュートリアルについては、YouTubeチャンネルを購読してください。 TwitterやFacebookでもフォローできます。


デニス・ムトミ
このガイド、大好きです!WordPressのクラウドファンディングを始めたばかりの頃にまさに必要としていたものです。先日、ある非営利団体がKickstarterからWordPressに移行するのをCharitableプラグインを使って手伝いました。結果は驚くべきものでした!手数料が約8%節約でき、寄付額は17%増加しました。一番良かったのは、寄付プロセスに関するあらゆることをカスタマイズできたことです。
特に効果的だった機能の一つは、ピアツーピアのファンドレイジングツールです。ボランティアが独自のキャンペーンページを作成できたので、非常に役立ちました。最初にすべてを設定したときにこの記事があれば、プロセス全体がもっとスムーズに進んだのにと思います!
イジー・ヴァネック
あるプロジェクトで、少年用の車椅子資金を調達する必要があるという依頼を受けました。さまざまなオプションとシステムソリューションを調査した後、最終的にあなたが言及したCharitableプラグインを推奨しました。このプラグインを使用してウェブサイトは正常に完成し、現在その目的を果たしており、非常によく機能しています。厳密にはクラウドファンディングではありませんが、このようなプロジェクトには最適なプラグインです。
WPBeginnerサポート
Glad to hear the plugin was able to help you with setting up a site like that
管理者
Prince
素晴らしい仕事とアドバイスです。
WordPressテーマを使用してウェブサイトを構築しています。
このサイトを構築する目的は、世界中の人々が私たちのサイトを通じて資金を調達するのを支援することです。
Crowdfundingプラグインを当社のサイトに導入することで、個人、グループ、組織が当社のサイトでアカウントを作成し、その目的のために資金を調達することが可能になります。
Z.N. Singer
私たちの会社ではセルフホスト型のクラウドファンディングプラットフォームを検討しており、WordPressの側面に関する大きな懸念はセキュリティです。私たちの何人かはWordPressはハッキングされやすく、すべてのお金を失い、責任を負うことになるだろうと考えています。しかし、これを裏付けるような恐ろしい話を見つけることができません。これが問題になる理由、またはならない理由を教えていただけますか?
WPBeginnerサポート
WordPressは世界で最も人気のあるコンテンツ管理プラットフォームです。これは、世界中の何百万人もの人々がそれを使用していることを意味します。これらのユーザーの多くは、パスワード、バックアップ、ファイル権限についてあまり注意を払っておらず、WordPressソフトウェアやプラグイン、テーマを更新し続けていないことさえあります。これにより、あらゆるハッカー志望者にとって、悪用される可能性のある多数のウェブサイトが提供されます。WordPressが安全でないからではなく、安全でないサイトを見つける確率が比較的高いからです。一方で、WordPressは多くのフォーチュン500企業によって成功裏に使用されています。
管理者
HCCanada
現在のWordPress 3.8.1にIgnitionDeckをインストールしました。
まず、デザインが不親切で、左側に2つのコントロールパネル、上に1つ、下に1つに分かれています。どちらのコントロールパネルも、支払い方法を設定するオプションを一切提供していません。
さらに、デフォルトのウィジェットがサイドバーには幅が広すぎます!
これは、純粋に機能しないデモであり、支払い方法を追加するために IgnitionDeck にアップグレード料金を支払う必要があるように意図されていると推測します。
ウィジェットは私のサイトに合わないので、いずれにしても使用しません。
その時間の無駄なプラグインは今すぐ削除します。
良い一日を。
アダム・ハリソン
非常に役立ちました。実際、Ignition deckのウェブサイトよりも私にとっては役立ちました!
Hans
これまでのところ、最高のモジュールです!そしてサポートも素晴らしいです!アドオンの1つの動作方法に小さな問題がありましたが、ネイサンが協力して1時間以内に解決してくれました。素晴らしい仕事です、皆さん!ここにファンがいます!
スーザン・マクヒュー
両方使用してください。個別のソーシャルメディアIDを通じて両方を宣伝してください。
Donald Goodearl
このように入ってくる寄付金すべてに対する税務上の影響はどうなりますか?私のビジネス、私のサイト、savehislife.comは501c3ではありません。この問題に取り組んだ人はいますか?私はLLCとして登録しています。
ありがとう、
Don
Nathan Hangen
皆さん、IgnitionDeckを使用することの長所と短所についての素晴らしい記事をありがとうございます。開始のヒントも、IgnitionDeckの新規ユーザーにとって非常に役立ちます。
あなたの評価は的確です。私たちは人々があらゆる方法で資金を調達することを奨励しています。最も成功しているお客様の中には、Kickstarterと自身のウェブサイト(IgnitionDeckを使用)で同時に資金を調達している方もいます。
Donald Goodearl
まず、あなたの記事はすべて保存していることをお伝えしたいと思います。確かに、私が受け取る大量のオファーの中で最高です。素晴らしい仕事です!
クラウドファンディングキャンペーンを展開する前に、組織は非営利団体(例:501c3)である必要がありますか?私は、前立腺がん(PCa)に直面している男性や家族を支援するために http://www.savehislife.com を運営しています。ニュースを読んだことがあるかもしれませんが、501c3および4の申請に関して多くの騒ぎがあります。
ご協力ありがとうございました。敬具、ドン
編集スタッフ
いいえ。クラウドファンディングはあらゆる種類の組織に使用できます。非営利でも営利でも構いません。
管理者
Darryl
http://startacure.com で Start A Cure を開始することは、Ignition Deck を使用したがん研究のクラウドファンディングサイトです。これは、がんサバイバーの非営利団体である Malecare Cancer Support のために私が構築したものです。Ignition Deck のサポートは素晴らしいです。労力に見合う価値がありますが、サイトの構築はクラウドファンディングの仕事のごく一部に過ぎないことを誰もが知っておくべきです。クラウドファンディングサイトを成功させるには、サイトのマーケティングが仕事の 99% です。
編集スタッフ
教えてくれてありがとう、ダリル。
管理者
Bill
興味深いですね!このプラグインについては知りませんでした。特にチャリティイベントの支援に役立つかもしれません。
一方、両方のKickstartとプラグインを使用して、すべての基盤をカバーするのはどうでしょうか?
編集スタッフ
それは可能ですが、問題はプロモーションになります。どちらに誘導したいですか?
管理者
DAvutor
このクラウドファンディングの可能性があることを知りませんでした。すでにプラグインをチェックしましたが、素晴らしいようです。
投稿ありがとうございます。